Drupal 5 Views Recipes
94 recipes to develop custom content displays for your
Drupal web site
Marjorie Roswell
Copyright © 2009 Packt Publishing
All rights reserved. No part of this book may be reproduced, stored in a retrieval system, or transmitted in any form or by any means, without the prior written permission of the publisher, except in the case of brief quotations embedded in critical articles or reviews.
Every effort has been made in the preparation of this book to ensure the accuracy of the information presented. However, the information contained in this book is sold without warranty, either express or implied. Neither the author, Packt Publishing, nor its dealers or distributors will be held liable for any damages caused or alleged to be caused directly or indirectly by this book.
Packt Publishing has endeavored to provide trademark information about all the companies and products mentioned in this book by the appropriate use of capitals. However, Packt Publishing cannot guarantee the accuracy of this information.
First published: May 2009
Production Reference: 1200509
Published by Packt Publishing Ltd. 32 Lincoln Road
Olton
Birmingham, B27 6PA, UK.
ISBN 978-1-847196-96-5
www.packtpub.com
Credits
Author
Marjorie Roswellie Roswelle Roswell
Reviewers Dave Myburgh Aaron Stewart Acquisition Editor
David Barnes Development Editor
Ved Prakash Jha Technical Editors
Bhupali Khule Hithesh Uchil
Indexer
Monica Ajmera
Production Editorial Manager
Abhijeet Deobhakta
Editorial Team Leader Akshara Aware
Project Team Leader Lata Basantani
Project Coordinator Leena Purkait Proofreader
Jeff Orloff
Production Coordinator Aparna Bhagat
About the Author
Marjorie Roswell
has been building web sites that serve the community for more than a decade.She developed a GIS system for assisting citizen callers to the Baltimore Office of Recycling, and has taught professional classes in desktop publishing, AutoCAD, and Drupal. She has served non-profit clients at Community IT Innovators, and now designs web sites and maps with Roswell Infographics.
At Connecticut College, Marjorie received the Betty Flanders Thomson Prize for Excellence in Botany. She combines her love of plants and Drupal to create http://BaltimoreUrbanAg.org for the Baltimore Urban Agriculture Task Force.
Acknowledgement
I have lots of people to happily and gratefully thank.
Thanks to my parents, Arthur and Betty Roswell, for always expressing interest in something I'm not sure they ever learned to pronounce.
Thanks to Bob Roswell, my computer scientist brother. He gave me my first real job at ComputerLand back in 1985, and set me up with my Linux web server about a decade later.
Thanks to Barbara Roswell, my sister-in-law, and a professor of writing, for thoughtful and helpful ideas.
Thanks to my sister, Judy Roswell Weinstein and her wonderful family who managed to get me out on a glacier when I thought I should be writing during vacation. Her oldest son, Ari (AriX, at http://drupal.org/user/214187) was a Drupal GHOP participant, and his family usability study yielded a few installation patches in Drupal 6.
Thanks to Earl Miles (merlinofchaos, at http://drupal.org/user/26979) for writing the amazing Views module, and to Daniel F. Kudwien (sun, at http://drupal.org/user/54136), for co-maintaining Views 5.x.
Thanks to the awesome world Drupal community. (As I write this, the newest members of drupal.org come from Uganda, Belgium, United States, India, Hungary, Ireland, and Finland.) The book appendices list the maintainers of hundreds of Views-enabled modules.
Thanks to my nearest Drupal neighbor, mathematician Emil Volcheck (http://groups.drupal.org/user/33466), for kindly testing out the Node Reference recipes.
lightbox2, and carousel recipes. (Photo sources are detailed in the book downloads in Chapter 6, Recipe 59)
Thanks to Curtis Clark for creating the terrific Pie Charts for Maps font.
Thanks to Rob Ellis and James Harris, of MySafeWork.com, for the site screenshot and their good work.
Thanks to Joe Sances for permission to use his poster, Unarmed Truth, in a screenshot.
Thanks to Peter Montague for free reign to share content from http://rachel. org. Dr. Montague introduced me to the Precautionary Principle, and compelling information on health and the environment.
Thanks to Stephanie Pakrul, for permission to adapt one of her beautiful Top Notch Themes (http://topnotchthemes.com).
Thanks to Leena Purkait, Project Coordinator, for keeping track of innumerable chapters, rewrites, worksheets, and appendices, and for always including smiley faces when inviting me to submit chapters on time.
Thanks to Ved Prakash Jha, Development Editor, for reading and thoughtfully responding to every single one of my emails!
Thanks to David Barnes, Senior Acquisition Editor for liking my book idea enough to send a contract.
Thanks to Reviewer Dave Myburgh, (ncrn8, at http://drupal.org/user/51467) whose eagle eye has greatly improved this book, and whose positive remarks in the document margins warmed the heart of the author.
Thanks to my Technical Editors, Hithesh Uchil and Bhupali Khule, who have made this a better book.
Kudos to the Friendly Coffeehouse community, the Baltimore Urban Agriculture Task Force, and Baltimore EarthSave. Every one of them does such important work and play that each merited a Drupal website.
Thanks to many friends: Leah Ulansey, Naomi Bernstein, Matthew Clark, Joanne Stato, Jonathan Rudie, and Mark Edwards, who contributed the lovely music for the podcasting recipe.
Thanks to Wordsmith Joe for words and support.
About the Reviewer
Dave
has been involved with computers since before the web existed. He studied as a molecular biologist, but discovered that he liked working with computers more than bacteria. He had his own computer business in South Africa (where he grew up) doing technical support and sales. He even created a few static web sites for clients during that time.He went back to science for a few years when he first came to Canada, and then got sucked into the world of Drupal when a friend wanted a site for a local historical society. Since then he has once again started his own company that now builds websites exclusively in Drupal (he doesn't do static anymore). There is no lack of work in the Drupal world and he now balances his time between work and family. He has also reviewed several Drupal books including Drupal 5 Themes, Drupal 6 Themes.
Table of Contents
Preface
1
Chapter 1: Introduction to Views
7
Recipe 1: Installing the Views module 7
Finding or creating the <DRUPALROOT>/sites/all/modules directory 8
Downloading and uncompressing the module 8
Enabling the module 10
Recipe notes 11
Recipe 2: Views-related URLs on your site 13
Recipe notes 13
Recipe 3: Creating a "Swim Groups" Page View 14
Creating a new Content type (Swim Group), and adding content 14
Creating a View 17
Selecting Filters 19
Recipe notes 22
Recipe 4: Adding a Header to your View 23
Recipe notes 24
Recipe 5: Adding a View to a Menu 25
Recipe notes 27
Recipe 6: Creating a Block of Swim Groups 27
Recipe notes 29
Recipe 7: Creating an "Admin" Role and setting Access Permissions 30
Installing the Admin Role module 30
Adding an Admin Role 31
Configuring the Admin Role module 31
Creating a User for the Admin Role 32
Recipe notes 32
Recipe 8: Installing Firefox and Firebug 32
Installing Firefox 32
Installing Firebug 32
Recipe notes 35
Recipe 9: Revealing the full extent of Views 35
Running the jQuery command 37
Recipe notes 37
Recipe 10: Preparing Views Worksheets 38
Recipe notes 38
Summary 40
Chapter 2: Working with Default Views
41
Recipe 11: Adding "Recent Comments" to your site 43
Overriding the View 45
Configuring the Block 45
Configuring the Date Field 47
Recipe notes 47
Recipe 12: The frontpage View 49
Enabling the Views RSS module 50
Looking at the Frontpage View, and Overriding it 50
Basic Information fieldset 51
Page fieldset 51
Fields fieldset 51
Feed Selector Argument 51
Filters fieldset 52
Sort Criteria fieldset 53
Enabling the frontpage View to show on the front page 54
Removing duplicate search engine results 55
Recipe notes 55
Recipe 13: Read More link 56
Recipe notes 57
Recipe 14: All-time Popular, and Recent Popular Pages 57
Enabling Statistics 58
Overriding the Default Views 58
The Menu Options 59
Recipe notes 62
Recipe 15: All-time Popular, and Recent popular Blocks—removing
the hit count 63
Adding the blocks to a region 63
Removing the hits from the popular_alltime block 64
Recipe notes 65
Another alternative 66
User-submitted snippets 66
Recipe 16: Taxonomy View 67
Recipe notes 70
Recipe 17: Fixing the case of the missing Taxonomy term 72
Recipe notes 74
Recipe 18: Empty Text, with PHP 74
Generating a list of Regional categories 76
Recipe notes 77
Recipe 19: Getting to know the Tracker 78
Recipe 20: Making the Tracker Sortable 82
Recipe notes 83
Recipe 21: Integrating the Tracker View with the Tracker module 84
Recipe notes 85
Recipe 22: Reviewing Default Views code 85
Recipe notes 88
Recipe 23: Creating a Default View 90
The ".info" file 90
Default Views function in a ".inc" file 90 Including the Default View in a ".module" file. 92
Recipe notes 93
Summary 94
Chapter 3: CCK and Views
95
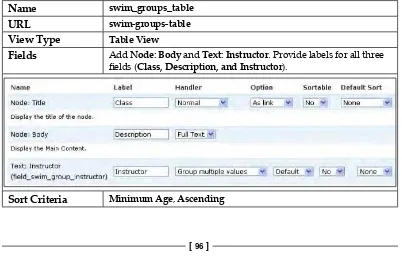
Recipe 24: Addressing the Views Body Field issue 95
Demonstrating the Body Field issue 96
Copying the Body Field, and modifying the View 98
Recipe notes 99
Recipe 25: Creating Website snapshots 100
Installing modules 100
Creating a Content Type 100
Adding the Link Field 101
Create a Website Snapshots View 101
Recipe notes 103
Recipe 26: Creating a Blogroll 105
Modifying the Link Field 106
Creating a new view based on website_snapshots 106
Recipe notes 107
Recipe 27: Displaying Guitar Chords 108
Recipe notes 109
Recipe 28: Using the Viewfield module 110
Installing modules 110
Views, Taxonomy, and Content setup 110
Associating the View with a Content item 112
Recipe notes 113
Recipe 29: Using the Node Reference module 115
Enabling the modules 115
Creating the Media Hit and Press Release Content types 115
Adding Press Releases 116
Creating drop-down Press Release View 117
Modifying and populating the Media Hit Content type 117
Recipe notes 118
Recipe 30: Relating Content types with Reverse Node Reference 118
Recipe notes 120
Recipe 31:Embedding a View in a Theme template 121
Recipe 32: Displaying mini-pie charts 126 Setting up the Pie Chart Content type and View 127
Install and configure sIFR 130
Recipe notes 132
Summary 133
Chapter 4: Dates and Calendars
135
Recipe 33: Understanding Date formats 135
Recipe notes 140
Recipe 34: Block of upcoming workshops 140
Recipe notes 143
Recipe 35: Exposed Filters 144
Recipe notes 145
Recipe 36: Views Date Range Filter module 145
Recipe notes 146
Recipe 37: Exposed Filter settings 146
Recipe notes 148
Recipe 38: Summary Views 148
Recipe notes 151
Recipe 39: Date Browser 151
Recipe notes 153
Recipe 40: Timeline 153
Recipe notes 156
Recipe 41: Views Popup 157
Recipe notes 159
Recipe 42: Creating a Calendar 159
Installation and configuration 160
View setup 160
Installing Calendar Blocks 162
Recipe notes 163
Recipe 43: iCal feeds 164
Import Calendar items 165
Export Calendar items 166
Recipe notes 167
Recipe 44: Upgrade Date and Calendar modules 168
Backing up the Database 168
Upgrading Calendar and Date 170
Recipe notes 174
Summary 174
Chapter 5: Views and Tools for Administrators
175
Recipe 45: Administration menu 175
Recipe notes 177
Recipe 46: ModuleInfo 177
Recipe notes 178
Recipe 47: Views UI permissions 178
Recipe 48: Views UI Sort 181
Recipe notes 183
Recipe 49: Editablefields 183
Recipe notes 184
Recipe 50: Views Bulk Operations—Content administration 184
Recipe notes 188
Recipe 51: Views Bulk Operations—Taxonomy assignment 189
Recipe notes 194
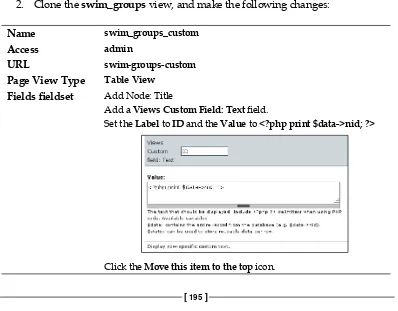
Recipe 52: Views Custom Field 195
Recipe notes 196
Recipe 53: Cron setup 196
Example 1: Setting up Cron using cPanel 197
Example 2: Setting up Cron on a Linux box 199
Example 3: Using the Poormanscron module 200
Recipe notes 200
Recipe 54: Formatting Views queries 201
Recipe notes 203
Summary 204
Chapter 6: Views Galore
205
Recipe 55: Views Fusion 205
Patch the Node Reference module 206
Views setup 206
Views Fusion installation and configuration 207
Recipe notes 209
Recipe 56: Views Fast Search 209
Setup 209
Using the Default View 209
Using an Alternative Imported View 210
Replacing the Search block 211
Recipe notes 212
Recipe 57: YouTube Video Bar 212
Recipe notes 214
Recipe 58: Views Bonus Pack Export 215
Recipe notes 217
Recipe 59: Photo Gallery 218
Set up the Photo Content type 218
Configure ImageCache 219
Add Photos 221
View setup 221
Recipe notes 222
Recipe 60: Gallery with Lightbox2 and jQuery Update 223
Installing jQuery Update 223
Installing Lightbox2 223
Recipe notes 224
Recipe 61: Google Maps 225
Create and populate the Content types 226
View setup 228
Recipe notes 230
Recipe 62: Proximity Search 232
Recipe notes 238
Recipe 63: Views Calculations 239
Recipe 64: Podcasting 242
Setup 242
Adding content 243
View setup 245
Recipe notes 247
Recipe 65: Using the Flag module for Bookmarks 249
Default Bookmarks View 249
Recipe 66: Using the Flag module for various use cases 250
Viewing a List of inappropriate comments 253
Creating a view for Fact-Checkers 253
View of RSVPs 254
Recipe notes 256
Recipe 67: Explore more Views, Galore 257
Views Checkboxes 257
Phoneblogz 258
Default Views 258
Summary 259
Chapter 7: Theming and Layout
261
Recipe 68: Themeable functions reference 262
Recipe notes 263
Recipe 69: Displaying Themeable function names in Source Code 263
Recipe notes 264
Recipe 70: Using Panels with SimpleFeed 265
Setup 265
Creating Feed Content 266
Create Views 267
Enabling specific Views for Panels 268
Panels setup 268
Placing Panels on the Front Page 272
Recipe notes 272
Recipe 71: Tweaking output with hook_link_alter 273
Recipe notes 275
Recipe 72: Debugging 276
Recipe notes 278
Recipe 73: Node-feed-item.tpl.php 279
Recipe notes 280
Recipe 74: Format the Pager with CSS-only modifications 280
Recipe notes 282
Recipe notes 284 Recipe 76: Understanding how Theme functions are called 285
Recipe notes 286
Recipe 77: Override theme_views_view 288
Recipe notes 290
Recipe 78: Total Item count 290
Recipe notes 291
Recipe 79: Views Theme Wizard 292
Recipe notes 296
Recipe 80: Date badge 298
Recipe notes 301
Recipe 81: Grouped View 302
Recipe notes 303
Recipe 82: Body classes 304
Recipe notes 305
Recipe 83: Carousel View 306
Recipe notes 308
Recipe 84: Views Dashboard—code approach 309
Recipe notes 311
Recipe 85: Views Dashboard—module approach 311
Recipe notes 313
Recipe 86: Great Online Theming resources 313
Summary 315
Chapter 8: Navigating the Online Drupal Community
317
Recipe 87: Creating an issue Page Bookmark 317
Recipe notes 318
Recipe 88: Searching the Views issue queue 319
Basic Search 319
Advanced Search 319
Recipe notes 320
Recipe 89: Posting an issue 321
Posting a New issue 321
Responding to an existing issue 322
Recipe notes 323
Recipe 90: Applying a Patch 323
Recipe notes 325
Recipe 91: Creating a Patch 326
Recipe notes 327
Recipe 92: Installing a Search plugin for the Contributions API 328
Recipe notes 329
Recipe 93: Using IRC—real-time technical support 330
Recipe notes 331
Recipe 94: Exploring Resources 332
Appendix A: Default Views in Drupal 5 Modules
335
Appendix B: Formatters
343
Appendix C: Style Plugins
355
Appendix D: Views Hooks for Coders
361
Appendix E: Modules Included in Recipe Ingredients
363
Appendix F: Additional Resources and Modules Mentioned
in Recipes
369
Appendix G: Selected Noteworthy Patches to Views
373
Preface
The Views module is a powerful and flexible tool for displaying content on a Drupal site. Views came on the Drupal scene in 2005. Developed primarily by an awesome coder named Earl Miles with much input from other Drupalers, it has revolutionized the Drupal website developer experience.
This book offers step-by-step Views recipes for use by Drupal administrators and themers. We will be cooking up an extensive smorgasbord. We'll create lists, tables, calendars, charts, maps, proximity searches, fused views, views bulk operations, and so on, while introducing a wide array of techniques and companion modules along the way. Most of the recipes require no programming, but some contain useful code snippets.
This book covers Views for Drupal 5.x. (Views 2 will be the primary subject of a separate book.)
Why release a book on a Drupal 5 module, when Drupal 6 has already been released? It's simple: Many web site developers use Drupal 5!
What this book covers
Chapter 1 introduces the Views module along with a Views Worksheet that will serve
as a guide throughout the rest of the book. We create a basic view of Swim Groups.
In Chapter 2 we look at the six default views that come with the Views module. We learn which modules must be enabled for these views to appear and we get to know the feed selector and Term arguments. We end the chapter by creating a module with a default view of Swim Groups.
In Chapter 3 we incorporate CCK fields into views such as a Blog Roll, Guitar Chord
Display, and a Block of Media Hits Associated with Press Releases. We share a variety of ways to associate views with related content, including Viewfield and Node Reference modules and building views from within a template.
In Chapter 4 we focus on date fields, calendars, upcoming events, and the timeline
module. This chapter rounds out coverage of all of the Views User Interface fieldsets, including Exposed Filters.
In Chapter 5 we examine ten tools to ease the work of site administrators, including Views Bulk Operations, Editable Fields, ModuleInfo, and setting up cron.
In Chapter 6 we explore some rarely-covered but powerful modules, including: Views Fusion, Views Fast Search, Views Bonus Pack Export, and Google Maps Tools, We also create a YouTube Video Bar, detail the steps to install jQuery Update with a Lightbox2 Gallery, and examine how to use the Flag module for a variety of applications.
Chapter 7 is the theming chapter and a bit more code-rich than the others. We create a
directory of available theme functions. We look closely at Views theme functions and override them when necessary. We cover some debugging strategies. We use CSS to create date badges and to control carousel formatting. Finally, we incorporate views into panels and tabs.
In Chapter 8 we focus on navigating the online Drupal community. We learn how to
search the Views issue queue, and how to apply and create patches. We cover some Dos and don'ts for Drupal chat on IRC and create a few helpful browser buttons and search plug-ins to facilitate finding information online.
Appendix A lists all the default views available for Drupal 5
Appendix B gives a comprehensive list of Drupal 5 field formatters by module
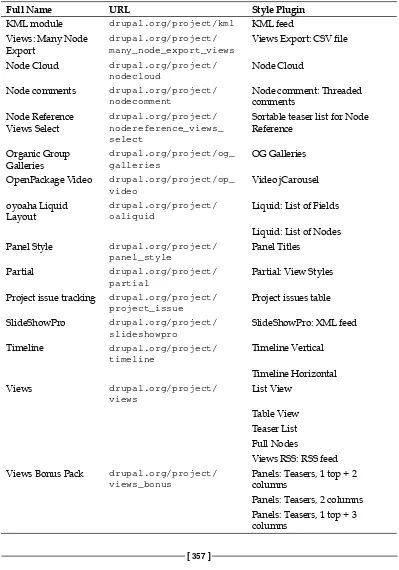
Appendix C gives a Comprehensive list of Drupal 5 style plug-ins by module
Appendix E lists the modules included in recipe ingredients
Appendix F lists the additional resources and modules
Appendix G lists the selected noteworthy patches to views, sorted by topic
What you need for this book
For most of the recipes, you'll need a Drupal 5 web site along with administrative access to the server and the site. (The Packt book, Building Powerful and Robust websites with Drupal 5 offers a comprehensive chapter on installation.) You may also want to use a printer or copy machine to prepare copies of the Views Worksheet.
Who this book is for
This book is primarily written for Drupal site builders, administrators, and themers who want to develop custom content displays using Views. It can be used by anyone who has developed or inherited a Drupal 5 site.
Some knowledge of HTML and CSS is required. PHP basics will be handy for some of the recipes.
How you read this book is your choice. Some readers will start from Recipe 1, working all the way through to the Appendix, to gain as much information as possible. Others will head straight for the most-needed recipe, turning back only to complete prerequisite steps. However you approach it, cook up a storm!
Conventions
In this book, you will find a number of styles of text that distinguish between different kinds of information. Here are some examples of these styles, and an explanation of their meaning.
Code words in text are shown as follows: "The last argument of that command was views.module."
A block of code will be set as follows:
if ($field['fullname'] == 'node_counter.totalcount') { $item .= ' <span class="popular-content-count">
(' . views_theme_field('views_handle_field', $field['queryname'], $fields, $field,
Any command-line input or output is written as follows:
cd <DRUPALROOT>/sites/all/modules/cck
New terms and important words are shown in bold. Words that you see on the
screen, in menus or dialog boxes for example, appear in our text like this: "Enable the core Search module and the Views Fast Search module".
Warnings or important notes appear in a box like this.
Tips and tricks appear like this.
Reader feedback
Feedback from our readers is always welcome. Let us know what you think about this book—what you liked or may have disliked. Reader feedback is important for us to develop titles that you really get the most out of.
To send us general feedback, simply drop an email to [email protected], and mention the book title in the subject of your message.
If there is a book that you need and would like to see us publish, please send us a note in the SUGGEST A TITLE form on www.packtpub.com or email [email protected].
If there is a topic that you have expertise in and you are interested in either writing or contributing to a book, see our author guide on www.packtpub.com/authors.
Customer support
Now that you are the proud owner of a Packt book, we have a number of things to help you to get the most from your purchase.
Downloading the example code for the book
Visit http://www.packtpub.com/files/code/6965_Code.zip to directly download the example code.Errata
Although we have taken every care to ensure the accuracy of our contents, mistakes do happen. If you find a mistake in one of our books—maybe a mistake in text or code—we would be grateful if you would report this to us. By doing so, you can save other readers from frustration and help us to improve subsequent versions of this book. If you find any errata, please report them by visiting http://www.packtpub. com/support, selecting your book, clicking on the let us know link, and entering the details of your errata. Once your errata are verified, your submission will be accepted and the errata added to any list of existing errata. Any existing errata can be viewed by selecting your title from http://www.packtpub.com/support.
Piracy
Piracy of copyright material on the Internet is an ongoing problem across all media. At Packt, we take the protection of our copyright and licenses very seriously. If you come across any illegal copies of our works in any form on the Internet, please provide us with the location address or web site name immediately so that we can pursue a remedy.
Please contact us at [email protected] with a link to the suspected pirated material.
We appreciate your help in protecting our authors, and our ability to bring you valuable content.
Questions
Introduction to Views
In this chapter, we'll create both a page and a block using the Views module. We'll
install Views, and introduce the Basic Info, Page, Block, Fields, and Filters fieldsets.
We'll have a chance to further observe every available Views UI fieldset in Recipe 9. The Views Worksheet in Recipe 10 summarizes the whole interface, and will help you track your learning throughout the book. While most chapters lend themselves to a pick-and-choose approach, I encourage you to complete each recipe in this chapter.
Let's Begin!
Recipe 1: Installing the Views module
Ingredients*
Drupal 5: http://drupal.org Host login access
Views: http://drupal.org/project/views Views UI: contained within the Views module
*These ingredients are prerequisite for all of the recipes that follow,
and will not be listed in subsequent ingredient lists.
Finding or creating the <DRUPALROOT>/sites/all/
modules directory
1. Log in to your web server. You will need to know your host name, login name, and password.
2. Locate the Drupal root directory on your server (a common directory location is /home/your_account/public_html).
3. If this is the first contributed module in a brand new Drupal installation, you will need to create the modules subdirectory.
From your Drupal root directory, type the following to change into the <DRUPALROOT>/sites/all directory:
cd sites/all
Make a new modules directory:
mkdir modules
While you're there, you may as well create the theme directory, if it is not there already. We will use this directory in Chapter 7,
Techniques for Theming Views
mkdir themes
Now change to the modules directory:
cd modules
Downloading and uncompressing the module
4. Open the browser of your choice.Most of the screenshots in this book use the Firefox browser—a popular choice for many developers. Recipe 8 covers Firefox installation.
Go to http://drupal.org/project/views, and read the page. There are several different versions of Views available for download. We are looking for the Download link marked Recommended for 5.x.
°
°
°
5. Download the module from the Views project web page. Here is one way to do that:
Right-click in Firefox on Download.
Select Copy Link Location (in Internet Explorer, this link will be called Copy Shortcut). You now have text similar to the following in your clipboard:
http://ftp.drupal.org/files/projects/views-5.x-1.6.tar.gz A file with the .tar.gz extension is affectionately known as a "tarball", reflecting the days when files were backed up onto tape archives. Switch to your Drupal server window. Be sure you are still in your <DRUPALROOT>/sites/all/modules directory.
Type:
wget <Paste><Enter>
In many shell environments, you can use the right mouse
button to paste text from the clipboard. In Windows, you
can use Ctrl+V.
The result on your screen, after pasting the download link, will be:
wget http://ftp.drupal.org/files/projects/views-5.x-1.6.tar.gz
After pressing Enter, the download begins. You are provided with a status report of the percent complete as shown in the following screenshot:
° °
°
°
6. Uncompress the module to the <DRUPALROOT>/sites/all/modules/views directory. Enter:
tar xvf views-5.x-1.5.tar.gz
Depending on your system setup, you may need syntax such as this:
tar -zxvf views-5.x-1.5.tar.gz
You may also use an alternative uncompression tool, such as 7-Zip or
WinRAR. WinRAR offers a graphical interface in Windows, but is also
available with a command line interface for Mac and Linux systems. The output of the tar xvf views-5.x-1.5.tar.gz command is seen in the following screenshot:
Enabling the module
7. Return to your browser window. Go to the Module page at: http://YOURSITE.com/admin/build/modules.
If you are not already logged into your Drupal site as an administrator, you will need to do so. Scroll down to the Viewsfieldset and enable the Views
8. Click on the Save configuration button.
Congratulations! You will now see a message (similar to the screenshot that follows), signaling the successful installation of our module.
Recipe notes
UI is an abbreviation for "User Interface". The Views UI module offers a point-and-click approach for selecting content and output types, controlling view sort order, and so on. The Views UI can even generate a views programming code for you, as we'll see in Chapter 2. If the Views UI module were not enabled, you could still see the existing views and create new views through code. However, the Views UI
module is quite helpful: even "Ninja" Drupal programmers will typically enable it.
Command line tips
These shortcuts will assist you in your Drupal development (your host environment may, or may not, have all of these shortcuts enabled).
Press Ctrl+U in the command line to clear everything to the left of the cursor. For instance, if you paste something, and then realize the wrong text was in the clipboard, it may be easier to clear the whole line than to press backspace many times.
Press Ctrl+K on the command line to clear everything to the right of the cursor.
Press the up arrow to re-use a previous command line. You may also search your command history with Ctrl+R.
Type !$ on the command line to reuse the last argument of the previous command line. For example:
more views_ui.module views.module
lets you page through the text of both modules. The last argument of that command was views.module. If your next command is:
less !$
this will print as:
less views.module
(This tip is difficult to find with a search engine. A Google search for !$ yields nothing.) Quit both the more and less commands by typing:
Q
Use "man" pages. Man is shorthand for the manual.
man less
reveals that
Less is a program similar to more but which allows backward movement in the file
as well as forward movement.
Type cd to go to your home directory.
To return to the previous directory you were in, type:
cd
-If you are not sure where you are in your directory structure, type:
pwd
This is the "print working directory" command, which provides the full path to your current directory. This is especially useful if your prompt is not set up to already display the full path.
Use the Tab key for command line completion. In step 6 of the recipe above, you could type:
tar xvf v<tab>
If there is only one file that begins with v in the directory, the Tab key will conveniently complete the full name of the zipped .tar file:
tar xvf views-5.x-1.5.tar.gz
If you already had the votingapi module installed, for instance, you would need to enter:
tar xvf vo<tab>
to distinguish voting from views.
Recipe 2: Views-related URLs on your site
Ingredients
Administrative access to a Drupal web site and a printer
This is a quick tour of Views-related URLs on your site. Make yourself at home. Feel free to click around and generally become familiar with the Views interface.
1. Administer Views: http://YOURSITE.com/admin/build/views 2. Add a View: http://YOURSITE.com/admin/build/views/add
(This is where we'll be spending much of our time in this book.) 3. Import a View: http://YOURSITE.com/admin/build/views/import 4. Views Tools: http://YOURSITE.com/admin/build/views/tools 5. Views Help: http://YOURSITE.com/admin/help/views
6. Views UI Help:http://YOURSITE.com/admin/help/views_ui
(While you are on this page, go ahead and print it. This is an easy page to miss, but quite informative.)
7. Views Permissions: http://YOURSITE.com/admin/user/ access#module-views
(We will interact with this page in Recipe 7.)
8. Enable Views modules: http://YOURSITE.com/admin/build/modules
Recipe notes
If your site does not have the Clean URLs option Enabled, you will need to add ?q= before the URL parameters in the URL. For instance:
http://YOURSITE.com/admin/build/views becomes:
Recipe 3: Creating a "Swim Groups"
Page View
Ingredients
Administrative access to a Drupal website
You may think of the Views UI as a series of questions. Here are some sample questions to consider:
What do I want to name this view? What do I want to display?
Who should be able to view this content? In what format should the content appear?
Do I want the content to appear in a page, or in a block (or both)? How many items to display?
Is there any particular order (By date? Alphabetically?) We will first need to create the content for our view.
Creating a new Content type (Swim Group), and
adding content
1. Go to Administer | Content management | Content Types. Select Add content type (http://YOURSITE.com/admin/content/types/add).
If you have the ContentConstructionKit (CCK) module installed, you will see more than two tab options, but as seen in the following screenshot, we simply have the Drupal 5 core, plus the Views modules that we have installed. •
2. Enter Name, Type, and Description.
3. Keep the Submission form fieldset at default settings.
4. In the Workflow fieldset, uncheck Promoted to front page and set the
5. Save your new content type. You will see a list of your Content types, and a message that your new content type has been added.
Creating a View
7. Go to Administer | Site Building | Views (http://YOURSITE.com/admin/ build/views), and select Add.
8. In the Basic Information fieldset, enter the following: Name:swim_group
Description:List of swim groups
9. Sections of the main Views UI form are contained in HTML fieldsets. Click on Page to open that fieldset if it is not already expanded. Note that when
a fieldset is closed, a triangle icon points to the fieldset name (as seen in the following image); when the fieldset is expanded, the triangle icon points down. This is a subtle clue (available in most themes) to help you navigate the page.
10. Enter the following values in their respective fields:
Provide Page View URL: swim-groups
° °
ViewType: Full Nodes Title: Swim Groups
Use Pager NodesperPage: 20
In this section, we are essentially creating a new URL on the site, and displaying full content items (nodes). We are specifying that up to 20 items will be displayed on the page, and if we have more, we will have the option to see additional items on subsequent pages.
Selecting Filters
The following figure offers a visual representation of Views filtering. We see the multiple content types available on the site symbolized on the left (for instance, Page, Story, Swim Group). The filter allows only one content type to be displayed. In our case, we just want the Swim Group.
11. Open the Filters fieldset. If you printed the Views UI Help, as suggested in Recipe 2, now is a good time to review the Filters options. There are
many filter options available. We will select just two from the Add Filter
drop-down list, Node: Type, and Node: Published. These are by far the two
most commonly used filters. Select Node: Type from the drop-down, and click on Add Filter.
Select the Value as Swim Group and leave the Is One Of option of Operator, as shown in the following screenshot:
12. Return to the Add Filter dropdown, and add the Node: Published filter. (As
you add filters in Views, you may find that the interface hops back to the top of the page. If this happens, dutifully scroll back down to the Filters fieldset.)
By default, when you add this filter, Node: Published Equals Yes. Leave the default as-is.
If this filter is not added, the view will display items that are marked unpublished. This is an easy filter to forget, but
13. You will now see a variety of Ops buttons. Note the Delete button. With
a little imagination, you can see it looks like a trash can. Also, if you move the mouse over the button, the popup text, Delete this item appears. The
delete button does not delete content from the site, it simply removes the filter. For instance, if you delete the Node: Published filter, the view would
contain both published and unpublished content. The up and down buttons will prove most useful in the Sort and Field fieldsets, which we cover in
Chapter 2. In Chapter 4, we will also cover exposed filters.
14. Click on Save. When you first create a view, you are brought back to the
"Views" List page. If you Edit your view from the view itself, you will be brought back to the view itself after editing it. Notice that the full URL of your view is http://YOURSITE.com/swim-groups. The message,
View successfully saved, appears only the first time you view this. As an
administrator, you will also see the Edit, Clone, and Export tabs. Those tabs
Recipe notes
It is worth highlighting some subtle distinctions in naming conventions.
Name: This is the unique identifier for a view. Hyphens are not allowed:
use an underscore to separate multiple words.
Compare the Name fields for adding content and adding a view. When creating a content type in Drupal 5 (Step 2, above), the first item on the page is the human-readableName, while the machine-readable type appears second. The Views interface (Step 8) breaks this convention; the first item on the page is the machine-readable Name.
Example:
Machine-readable:swim_groups
Human-readable:Swim Groups
It is not a big problem if you misname a view (by including spaces, for instance). All of your careful settings will remain intact, and Drupal will simply issue the message: Viewname must be alphanumeric or underscores only, when you attempt to save your view. Edit the Name, and scroll back down to the bottom of the page to Save the Views form again. You are not required to use lower case in your Views Name, but it is a common and oft-preferred practice.
It is acceptable for a machine-readable view name to be the same as the machine-readable content type. More typically, however, the content type will be singular, and the Views name plural. In our case, the content type is
swim_group, and the view name is swim_groups.
URL: If you would like to use more than one word in a URL, use hyphens to separate them. This enables Google (and possibly to other search engines as well) to index them as separate words. Many developers use underscores, but hyphens have the edge when it comes to search engine optimization.
Example:
View Name: swim_groups
View URL: swim-groups
You may include slashes in the URL field. For instance: groups/swim.
Title: The title displays at the top of each page in the view. You may use
some HTML markup such as <em>, <i>, and <b> to highlight phrases in the title. You may use a line break in a title <br />. You may also use HTML entities, such as → A helpful list of entity codes can be found at: http://www.w3schools.com/tags/ref_entities.asp. For the most part, however, formatting of the full title is handled in your theme (thus, you will not specify fonts or other styles on the Views page).
•
•
Examples:
<em>Swim</em> Groups
Swim Groups: <br />Tadpoles, and Guppies, and Wrigglers, Oh My!
Voilà: Learn to swim at any age
Compare Views Titles with Node Titles. HTML markup is allowed in View
Titles, but not in Node Titles.
Recipe 4: Adding a Header to your View
Ingredients
Completed Recipe 3
You can easily add custom text or graphics above or below your view content, using the Header and Footer fieldsets. We will add a brief description at the top of the Swim Groups page.
1. Go to http://YOURSITE.com/admin/build/views. Your swim_groups
view is now included in the list of views. 2. Click on swim-groups in the URL column.
3. Open the Page fieldset, and then open the Header fieldset contained within it.
Enter the following header text:
Swimming is a great sport which exercises the whole body. Swim lessons are available for all ages and ability levels. Note: A parent or guardian must accompany children under 5 when in the water.
4. Open the Input format fieldset contained within the Header fieldset. Note
5. Scroll down to the bottom of the Edit view page, and click on Save. 6. Enjoy the view.
Recipe notes
The Header fieldset (along with the Footer and EmptyText fieldsets) each
contain Input format fieldsets. Input format filters will modify the display of text that has been entered by users (Input format filters are not connected
to the filters fieldset that we described in Recipe 3). When a user enters text or code into a Drupal site, the text is saved in the database exactly as typed. Next time we view the text, however, it may not look exactly the same—some text and tags may not appear. To modify the list of allowed tags, visit the Site
Configuration | Input Formats page, at: http://YOURSITE.com/admin/ settings/filters.
The most common reason for using these filters is to protect your site from malicious users, or even from users who don't intend to be malicious but who exhibit bad form. The Input format ensures that scripts will not be run, and that badly formed HTML will not break your site's layout.
Filtered HTML is the name of one of the default Input formats.
A terrific article by Robert Douglass offers helpful information on input filters at: http://www.lullabot.com/articles/drupal_input_formats_ and_filters.
•
•
Recipe 5: Adding a View to a Menu
Ingredients
Completed Recipe 3 or 4
1. Edit the Swim Groups view, at: http://YOURSITE.com/admin/build/ views/swim_groups/edit.
2. Open the Menu fieldset, found within the Page fieldset. Check the Provide Menu option, and add a Menu Title.
3. By default, the menu item appears in the Navigation menu. We don't want it
4. Go to Administer | Site Building | Menus. (http://YOURSITE.com/admin/build/menus).
5. Use your browser to do a Find (usually Ctrl+F) for the word Swim. The first
result will likely be in the actual sidebar menu item (if the Navigation menu has been placed in a region on the page). The second find will be the Swim Group content type listing in the menu configuration. The third one, finally,
is the menu listing for the Swim Groups view. Click on the Edit link. 6. The Path is already filled in, based on our settings from the Views UI
(Step 2). Enter a Title, and change the Parent item to Primary Links. If you wish the menu items to appear in alphabetical order, you may leave the
Weight for all items at 0. In our example, we'll set the weight to a negative number, ensuring that it appears early among the primary links.
Recipe notes
Newly created swim groups are automatically added to the Swim Groups view, and its associated menu item.
Recipe 6: Creating a Block of
Swim Groups
Ingredients
Completed Recipe 3 or 4
In Recipe 3, we created a page view, which is accessed via a URL. In this recipe, we are going to edit that view, adding a Block based on the same content. A view may provide both a Block and a Page view at the same time.
Page Blocks
Blocks are placed inside regions made available by your theme. Sample regions that are common across most themes include the left sidebar, right sidebar, content top, and content bottom. A given block can appear on every page of the site, or just on pages that you designate. In the following steps you will create a Block for the
Swim Groups view.
1. Go to Administer | Site Building | Views
http://YOURSITE.com/admin/build/views. 2. Select the Edit link next to the swim_groups view.
3. Open the Block fieldset, if it is not already open, and enter the following: ProvideBlock
View Type: List View Title: Swim Groups
Nodesperblock: 10 [More] Link?
4. Open the Fields fieldset, and add the Node:Title field. You may leave the
various options at their default settings.
5. Go to the Blocks page via Administer | Site Building | Blocks: http://YOURSITE.com/admin/build/block.
Place the swim_groups block in the right sidebar (see the image below). Click on the Save blocks button at the bottom of the page.
6. View your Block on any page of the site. The Block configuration page itself
provides special formatting to inform administrators about various regions, so you may wish to view your block from a different page. For instance, click on the site logo, to go to the home page.
Recipe notes
Recipe 7: Creating an "Admin" Role and
setting Access Permissions
Ingredients
Admin Role module: http://drupal.org/project/adminrole
When you first installed Drupal, the first user you created was, naturally, user #1, also known as the "super-administrator". If others users need administrative access to the site (to administer Views, for instance), it is a good practice to create a distinct admin role. The Admin Role module will save you the trouble of having to manually set permissions each time you install a new module. All new permissions will automatically be enabled for the admin role.
Installing the Admin Role module
1. Go to http://drupal.org/project/adminrole. 2. Download the Drupal 5 Admin Role module to:<DRUPALROOT>/sites/all/modules
(Select the "tarball" marked Recommended for Drupal 5.) 3. Unzip the module.
Adding an Admin Role
5. Go to the Roles page at Administer | User Management | Roles (http://YOURSITE.com/admin/user/roles) and add an admin role.
Configuring the Admin Role module
6. Go to the User management | Admin Role page at(http://YOURSITE.com/admin/user/adminrole) and select your newly created admin role from the drop-down list.
7. Go to the User Management | Access Control page, and note that the admin
Creating a User for the Admin Role
8. Go to Administer | User Management | Users and select Add user. 9. On the User account page for your new user, add a Username, E-mail
address, and Password, and be sure to check the admin role.
Recipe notes
You will receive an Admin Permissions Set message at the top of the module page each time you enable a new module (some modules do not actually create new permissions, but you will receive this status message, nevertheless).
Recipe 8: Installing Firefox and Firebug
Ingredients
Firefox: http://www.mozilla.com/firefox Firebug: http://getfirebug.com/
The rest of the recipes in this chapter are devoted to enabling you to see the full scope of the Views interface. This recipe is a prerequisite for Recipe 9, Revealing the full extent of Views. Firefox and Firebug are also useful in any web developer's toolkit.
Installing Firefox
Bring up your current browser, and go to http://www.mozilla.com/firefox. Click on the Free Download button. Follow the detailed directions for installing Firefox here:
http://support.mozilla.com/en-US/kb/Installing+Firefox.
Installing Firebug
1. From Firefox, you can install Firebug by visiting Tools | Add-ons.
2. Go to the Get Add-ons tab, and click on Browse All Add-ons.
This will bring you to the Firefox Add-ons page.
4. Click on Install Now.
5. Restart Firefox to make the Firebug add-on available to the browser.
Recipe notes
Firefox Add-ons are also called "extensions". Many web developers say that if they could only install one Firefox extension, it would be Firebug. Consider spending some time at getfirebug.com to learn more about its features. For more in-depth discussion, join the Firebug discussion group at http://groups.google.com/group/firebug.
Recipe 9: Revealing the full extent
of Views
Ingredients
Completed Recipe 8 Recipe 8
One reason that Views can feel a little bit mysterious, is that so much of it is concealed at first.
This recipe exposes all of the options on the main View's Edit screen by expanding all of the collapsed fieldsets on the page. This will save you the time it would take to manually open the nearly two-dozen fieldsets. The recipe uses a single line of jQuery. Please do not feel that you have to understand everything all at once when you see the full extent of Views! That's what the rest of this book is for. There is value, however, in the full array of options that will be available to you. A summary of the full screen can be found in Recipe 7. Note that fieldsets are nested within other
The list of all the fieldsets in the View's Edit screen is as follows:
Ensure that Firefox and Firebug are installed
(See Recipe 8)
1. Go to admin/build/views/swim_groups/edit. If you have not yet created a view, go to admin/build/views, and click on Add.
2. Click on the firebug icon in the Firefox status bar, or press F12 (on Apple laptops, it may be necessary to hold down "Fn" while pressing F12). If you get a message regarding the need to enable Firebug for the site, go ahead and do that. Firebug opens at the bottom of the browser.
3. Click on the Console tab in Firebug. An understated JavaScript (and jQuery)
command line appears in the lower left, after the >>> prompt. You may notice the blinking cursor.
Running the jQuery command
4. In the command line area, enter the following jQuery command. Make sure to include the dollar sign character.
$('fieldset').removeClass('collapsed')
5. The full scope of the views Add or Edit interface appears in the browser. Take some time to explore the page.
Recipe notes
How does this recipe work? If the jQuery command above were to be read as
English, it would say: "Find all of the fieldsets on the page, and remove the collapsed CSS class from all of them". The effect is to open all the fieldsets (JavaScript must be enabled for this to work).
Let's elucidate this further:
The HTML fieldset tag in most Drupal themes (including the default Garland theme) looks like this, when collapsed: <fieldset class="collapsible collapsed">
An expanded tag looks like this in HTML: <fieldset class="collapsible"> •
•
The jQuery code removes all of the "collapsed" classes from the Views page. Thus, all the fieldsets are open, revealing their full contents.
Most of the time, you will not want to interact with Views in this expanded way, but it certainly is helpful, sometimes. It's nice to know that Firebug CSS edits are temporary. The next time you view the page, the fieldsets will refresh with their default open or closed appearance. Press F5 in Firefox to refresh the page you are on.
This jQuery fieldset expansion command does not function if you have already manually closed a fieldset with your mouse.
Recipe 10: Preparing Views Worksheets
Ingredients
The Views Worksheet in this chapter
Copy machine
Pen or highlight markers
On the following page is worksheet that lists each element on the View's Add or Edit
form. This worksheet will serve as your guide as you learn the features of Views.
1. You have permission to photocopy the Views Worksheet. Start with a dozen copies or so. You may choose to copy more or less depending on whether you think this resource suits your learning style.
2. Edit the Swim Groups view that you created in Recipe 3
http://YOURSITE.com/admin/build/views/swim_groups/edit. 3. On a worksheet copy, mark each element used by the view (use a pen, or
highlight markers according to your preference).
Recipe notes
The worksheet divides elements into four categories: Text, Checkboxes, Dropdowns, and Radio Buttons.
Some text boxes expect numeric characters, as noted in parentheses. Checkboxes can be considered as a yes or no question. For instance: Provide Page View is the Views shorthand for "Do you want to provide a page view?" Some of the drop-down boxes allow you to select more than one element. Radio buttons are mutually exclusive.
• •
Default Menu Tab: Tab Weight (Numeric) Default Menu Tab: Parent Menu Item Title
Title
Nodes per Block (Numeric) Header
Footer Empty Text
Title
Option (may also be drop-down) Wildcard Wildcard Sub
Argument Handling Code : Argument Code
Filters View Type Provide Menu
Provide Menu as Tab Default Menu Tab: Make Default Menu Tab
Default Menu Tab: Parent Menu Item Type
Bolck Provide Bock
[More] Link?
Header: Use Page Header Footer: Use Page Footer Empty Text: Use Page Empty
Fields
Option (may also be text) Add Argument
Nodes per Page (Numeric) Header
Menu(This is a fields et nested inside the Page fields et)
Views WorksheetMake copies to track your learning progress. View Name:___________
Header: Inputformat Footer: Inputformat Empty Text Inputformat Access Roles
Value (may also be dropdown) Option
Operator
Value (may also be text) Add Filter
Option (may also be drop-down)
Summary
In Chapter 1, we installed Views, took a whirlwind tour of associated URLs, and then created our first view: a list of Swim Groups. We edited the page view to add
Working with Default Views
Right out of the box, the Drupal Views module provides six pre-made "default" views that you can rapidly incorporate into your site. While serving your site, the default views can also serve as a valuable learning resource, providing keys to understanding a number of advanced Views features. Using default views as examples we will have the chance in this chapter to introduce all but one of the primary Views fieldsets.
With only core Drupal and Views installed, you will initially see just four default views. There are displayed at the bottom of the page at http://YOURSITE.com/ admin/build/views.
Default views are created in code (by contrast, most views reside in the views tables in the Drupal database). Any contributed module may create one or more default views. Appendix A contains a list of close to 200 default views from sixty contributed Drupal 5 modules.
For the default views that come with Views module, the code is found in the following directory:
<DRUPALROOT>/sites/all/modules/views/modules
The following table provides information about the six default views packaged with the Views module. The table shows which file created the view, and which fieldsets are utilized. For comparison, we'll also show which fieldsets were implemented in the two views we created in Chapter 1.
Basic Info Page Menu* Block Fields Arguments Filters Exposed Filters Sort comments_recent (Recipes 12 and 13)
ü
ü
ü
ü
ü
popular_alltime
views_statistics.inc (Recipes 14 and 15)
ü
ü
ü
ü
ü
ü
popular_recent
views_statistics.inc (Recipes 14 and 15)
ü
ü
ü
ü
ü
ü
taxonomy_term
views_taxonomy.inc (Recipes 16, 17, and 18)
Basic Info Page Menu* Block Fields Arguments Filters Exposed Filters Sort swim_groups
(Recipes 3 and 4)
ü
ü
ü
swim_groups
(Recipe 6)
ü
ü
ü
ü
ü
*The Menu fieldset is nested inside of the Page fieldset
Recipe 11: Adding "Recent Comments"
to your site
The comments_recent default view creates a block of recent comments. We will
use the standard Blocks administration page—which by now is likely familiar to you—to place the block into a page region. Yet there are some prerequisites and quirks that are worth getting to know:
The comments_recent default view is available only if the comments module is enabled (in a standard Drupal installation the comments module is enabled by default).
Even if the comments module is enabled, a default block view appears in the Blocks Administration page only if the default view is enabled. (The
comments_recent view is enabled by default. Click on Enable in the
Actions column to change a Disabled default view Status to Enabled.) •
I recommend that you override default views before using them. Simply click on Add to start an override. You may modify view settings, or even leave the existing settings intact before scrolling to the bottom to click on Save. When
you override a default view, the status changes to Overridden and a new view appears in the top of the admin/build/views page, under Existing Views. This view is stored in the database.
Administer Views
Existing Views
Default Views
The block would actually show up perfectly well if you did not choose to override the default. However, in order to make any modifications to a default view through the Views UI interface, you will need to perform this override. Also, occasionally, some theming functions will only work properly with an overridden view.
When you visit admin/build/blocks you will actually see twoRecent comments blocks. This confuses many people, but the reason is simple:
two different modules create separate blocks by the same name.
Recent comments block created by the Comment module
Source Code:
modules/comment/comment.module
Recent comments block created by the Views module
Source Code:
sites/all/modules/views/modules/ views_comment.inc
•
Armed with this information, we are now ready for our recipe:
Ingredients
Ensure that the prerequisites described above are met.
(The comments module is enabled, and the view is enabled.)
Overriding the View
1. Go to http://YOURSITE.com/admin/build/views. Override the
comments_recent view by selecting Add. Scroll down to the bottom of http://YOURSITE.com/admin/build/views/add/comments_recent, and Save the view.
Configuring the Block
Lower-case block names generally appear below capitalized ones, so look near the bottom of the list of blocks if you do not see two Recent comments blocks next to each other.
3. With your mouse still hovering over configure, check the status bar in your browser. If it reads:
http://YOURSITE.com/admin/build/block/configure/views/ comments_recent
then you have identified the default view block. If it says:
http://YOURSITE.com/admin/build/block/configure/comment/0 you've got the view defined by the comment module.
4. Place the block in the region of your choice. Common choices are
left sidebar, right sidebar, and content bottom. Click on the Save Blocks button.
5. Scroll up the page to find the block in your new region's section. Click on
Configure to change the title. If you enter nothing in the block title, the default block title will be used; the view uses a lower-case "c" in the title. If you prefer proper case (Recent Comments)you could enter that here (alternatively, you can change the title on the views edit page). As usual, you may also use the block configuration page to specify visibility by user, role, and page. Save the block.
Configuring the Date Field
6. Return to admin/build/views, and select Edit.
7. In Chapter 1, Recipe 7, we set permissions for the admin role to access all views. However, we did not provide these permissions for anonymous and authenticated users. Be sure to add access for these roles when you edit the view. Use the Access checkboxes in the Basic Information fieldset.
8. Visit the Fields fieldset, and change the Handler for Comment: Created time, from As Short Date to As Time Ago.
Recipe notes
The guidance in Step 7 to enable appropriate roles applies to all the Views recipes throughout the book.
We will review more Date formatting options in Chapters 4 and 7.
A user prepared a Comment: Distinct filter patch, which you may find to be
helpful. It can be found at: http://drupal.org/node/219499. •
The default comments_recent, and frontpage views are implemented beautifully at www.MySafeWork.com. Thanks to Rob Ellis and and James
Harris from the charitable foundation "Our Youth at Work" for permission to display this screenshot from their site.
Recipe 12: The frontpage View
Ingredients Views RSS module
Thefrontpage view serves two basic functions. It presents key content on the site's home page, and also enables the home page content to be syndicated with a Really SimpleSyndication (RSS) feed.
The default frontpage view includes content marked for the front page, keeping items marked Sticky at the top. It is common to modify this default, particularly to filter for selected content types.
Give some thought to which content types you wish to include on your home page. In the MySafeWork.com screenshot, for instance, only Blog entries appear in the
frontpage view, while Videos and other blocks are placed around the site's edges. Another site could set up Events and News to stream to the front page, keeping other content items, such as Forums and Slideshows, available only through the navigation menu.
The frontpage view introduces five views features. We'll highlight two (both noted
with a magnifying glass) with some detail before beginning the recipe.
Page Fieldset
View Type: Teaser List
Breadcrumb trail should not include "Home"
Arguments
Node: Feed Selector
Filters
Node: Front Page Equals Yes
Sort:
Node:Sticky
• •
•
•