by Andy Rathbone
Windows
®
XP
FOR
DUMmIES
‰Windows
®
XP
FOR
DUMmIES
‰by Andy Rathbone
Windows
®
XP
FOR
DUMmIES
‰Copyright © 2004 by Wiley Publishing, Inc., Indianapolis, Indiana Published by Wiley Publishing, Inc., Indianapolis, Indiana Published simultaneously in Canada
No part of this publication may be reproduced, stored in a retrieval system or transmitted in any form or by any means, electronic, mechanical, photocopying, recording, scanning or otherwise, except as permitted under Sections 107 or 108 of the 1976 United States Copyright Act, without either the prior written permis-sion of the Publisher, or authorization through payment of the appropriate per-copy fee to the Copyright Clearance Center, 222 Rosewood Drive, Danvers, MA 01923, (978) 750-8400, fax (978) 646-8600. Requests to the Publisher for permission should be addressed to the Legal Department, Wiley Publishing, Inc., 10475 Crosspoint Blvd., Indianapolis, IN 46256, (317) 572-3447, fax (317) 572-4355, e-mail: [email protected].
Trademarks:Wiley, the Wiley Publishing logo, For Dummies, the Dummies Man logo, A Reference for the Rest of Us!, The Dummies Way, Dummies Daily, The Fun and Easy Way, Dummies.com, and related trade dress are trademarks or registered trademarks of John Wiley & Sons, Inc. and/or its affiliates in the United States and other countries, and may not be used without written permission. Microsoft is a registered trademark of Microsoft Corporation. All other trademarks are the property of their respective owners. Wiley Publishing, Inc., is not associated with any product or vendor mentioned in this book.
LIMIT OF LIABILITY/DISCLAIMER OF WARRANTY: THE PUBLISHER AND THE AUTHOR MAKE NO REP-RESENTATIONS OR WARRANTIES WITH RESPECT TO THE ACCURACY OR COMPLETENESS OF THE CONTENTS OF THIS WORK AND SPECIFICALLY DISCLAIM ALL WARRANTIES, INCLUDING WITHOUT LIMITATION WARRANTIES OF FITNESS FOR A PARTICULAR PURPOSE. NO WARRANTY MAY BE CRE-ATED OR EXTENDED BY SALES OR PROMOTIONAL MATERIALS. THE ADVICE AND STRATEGIES CON-TAINED HEREIN MAY NOT BE SUITABLE FOR EVERY SITUATION. THIS WORK IS SOLD WITH THE UNDERSTANDING THAT THE PUBLISHER IS NOT ENGAGED IN RENDERING LEGAL, ACCOUNTING, OR OTHER PROFESSIONAL SERVICES. IF PROFESSIONAL ASSISTANCE IS REQUIRED, THE SERVICES OF A COMPETENT PROFESSIONAL PERSON SHOULD BE SOUGHT. NEITHER THE PUBLISHER NOR THE AUTHOR SHALL BE LIABLE FOR DAMAGES ARISING HEREFROM. THE FACT THAT AN ORGANIZATION OR WEBSITE IS REFERRED TO IN THIS WORK AS A CITATION AND/OR A POTENTIAL SOURCE OF FUR-THER INFORMATION DOES NOT MEAN THAT THE AUTHOR OR THE PUBLISHER ENDORSES THE INFORMATION THE ORGANIZATION OR WEBSITE MAY PROVIDE OR RECOMMENDATIONS IT MAY MAKE. FURTHER, READERS SHOULD BE AWARE THAT INTERNET WEBSITES LISTED IN THIS WORK MAY HAVE CHANGED OR DISAPPEARED BETWEEN WHEN THIS WORK WAS WRITTEN AND WHEN IT IS READ.
For general information on our other products and services or to obtain technical support, please contact our Customer Care Department within the U.S. at 800-762-2974, outside the U.S. at 317-572-3993, or fax 317-572-4002.
Wiley also publishes its books in a variety of electronic formats. Some content that appears in print may not be available in electronic books.
Library of Congress Control Number: 2004107902 ISBN: 0-7645-7326-8
Manufactured in the United States of America 10 9 8 7 6 5 4 3 2 1
About the Author
Andy Rathbonestarted geeking around with computers in 1985 when he bought a 26-pound portable CP/M Kaypro 2X. Like other budding nerds, he soon began playing with null-modem adapters, dialing up computer bulletin boards, and working part-time at Radio Shack.
When not playing computer games, he served as editor of the Daily Aztec
newspaper at San Diego State University. Armed with a comparative literature degree, he began writing features for magazines and local newspapers.
He eventually combined his interests in words and computers, and sold articles to a local computer magazine. During the next few years, he started ghostwriting computer books for more-famous computer authors, as well as writing several hundred articles about computers for various techie publications.
In 1992, Andy and DOS For Dummiesauthor/legend Dan Gookin teamed up to write PCs For Dummies. Andy subsequently wrote the award-winning Windows For Dummiesseries, Upgrading & Fixing PCs For Dummies, TiVo For Dummies,
and many other For Dummiesbooks.
Today, he has more than 15 million copies of his books in print, which have been translated into more than 30 languages.
Dedication
To my wife, parents, sister, and cat.
Author’s Acknowledgments
Acquisitions, Editorial, and Media Development
Project Editor:Rebecca Huehls
Senior Acquisitions Editor:Steve Hayes
Senior Copy Editor:Kim Darosett
Technical Editor:Lee Musick
Editorial Manager:Leah Cameron
Media Development Manager:Laura VanWinkle
Media Development Supervisor:
Richard Graves
Editorial Assistant:Amanda Foxworth
Cartoons:Rich Tennant, www.the5thwave.com
Composition
Senior Project Coordinator: Nancee Reeves
Layout and Graphics:Lauren Goddard, Denny Hager, Joyce Haughey,
Barry Offringa, Jacque Roth, Heather Ryan
Proofreaders:John Greenough, Brian H. Walls
Indexer:TECHBOOKS Production Services
Publishing and Editorial for Technology Dummies
Richard Swadley,Vice President and Executive Group Publisher
Andy Cummings,Vice President and Publisher
Mary Bednarek,Executive Acquisitions Director
Mary C. Corder,Editorial Director
Publishing for Consumer Dummies
Diane Graves Steele,Vice President and Publisher
Joyce Pepple,Acquisitions Director
Composition Services
Gerry Fahey,Vice President of Production Services
Contents at a Glance
Introduction ...1
Part I: Windows XP Stuff Everybody
Thinks You Already Know...7
Chapter 1: What Is Windows XP? ...9
Chapter 2: The Desktop, Start Menu, and Other Windows XP Mysteries ...15
Chapter 3: Basic Windows Mechanics...41
Chapter 4: Flipping Through Files, Folders, Floppies, and CDs...61
Part II: Working with Programs and Files ...83
Chapter 5: Playing with Programs and Documents ...85
Chapter 6: I Can’t Find It! ...107
Chapter 7: Printing, Faxing, and Scanning...115
Part III: Getting Things Done on the Internet ...139
Chapter 8: Cruising the Web ...141
Chapter 9: Sending Mail and Instant Messages ...163
Chapter 10: Safe Computing...185
Part IV: Customizing and Upgrading Windows XP ...203
Chapter 11: Customizing Windows XP with the Control Panel ...205
Chapter 12: Keeping Windows from Breaking ...229
Chapter 13: Sharing One Computer with Several People...243
Chapter 14: Connecting Two or More Computers with a Network ...255
Part V: Music, Movies, Memories (And Photos, Too) ...273
Chapter 15: Playing and Copying Music in Media Player...275
Chapter 16: Fiddling with Photos and Movies ...295
Part VI: Help! ...321
Chapter 17: The Case of the Broken Window ...323
Chapter 18: Strange Messages: What You Did Does Not Compute ...333
Chapter 19: Moving from an Old Computer to a New One...347
Chapter 23: Ten Things to Look Forward to in the Next Version of Windows ...379
Table of Contents
Introduction...1
About This Book...1
How to Use This Book...2
And What about You? ...3
How This Book Is Organized ...3
Part I: Windows XP Stuff Everybody Thinks You Already Know ...4
Part II: Working with Programs and Files ...4
Part III: Getting Things Done on the Internet ...4
Part IV: Customizing and Upgrading Windows XP ...4
Part V: Music, Movies, Memories (And Photos, Too) ...5
Part VI: Help! ...5
Part VII: The Part of Tens...5
Icons Used in This Book ...6
Where to Go from Here...6
Part I: Windows XP Stuff Everybody
Thinks You Already Know ...7
Chapter 1: What Is Windows XP? . . . .9
What Is Windows and Why Are You Using It?...9
Windows XP’s Luggage: Service Packs ...11
What service pack version is on my computer? ...12
What’s in Service Pack 2? ...13
Installing Service Pack 2 ...13
Chapter 2: The Desktop, Start Menu, and
Other Windows XP Mysteries . . . .15
Being Welcomed to the World of Windows XP ...16
Fiddling around with user accounts ...17
Keeping your account private with a password...18
The Desktop ...20
Cleaning up a messy desktop...21
Jazzing up the desktop’s background ...23
Dumpster diving in the Recycle Bin ...24
The Start Button’s Reason to Live...25
The Start menu’s prime real estate ...27
Starting a program from the Start menu...28
Shrinking windows to the taskbar and retrieving them ...33
Clicking the taskbar’s sensitive areas ...33
Customizing the taskbar...34
The taskbar’s crazy toolbars...35
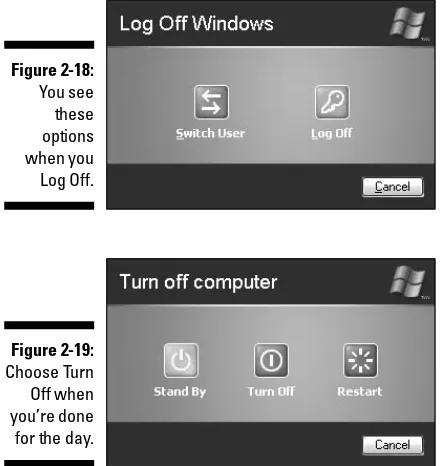
Logging Off from Windows ...38
Chapter 3: Basic Windows Mechanics . . . .41
Dissecting a Typical Window ...41
Tugging on a window’s title bar...43
Barking out orders with the menu bar...43
Playing with a window’s Standard Buttons toolbar ...45
Moving inside a window with its scroll bar...46
Quick shortcuts with the Windows XP task pane ...47
Boring borders ...49
Filling Out Bothersome Dialog Boxes ...50
Poking the correct command button ...50
Choosing between option buttons ...51
Typing into text boxes ...52
Choosing options from list boxes...52
Drop-down list boxes ...53
Check boxes ...54
Sliding controls ...55
Maneuvering Windows around the Desktop...56
Moving a window to the top of the pile ...57
Moving a window from here to there ...57
Making a window fill the whole screen...57
Making a window bigger or smaller ...58
Placing two windows next to each other...58
Making windows open to the same darn size ...59
Chapter 4: Flipping Through Files, Folders, Floppies, and CDs . . . .61
Browsing My Computer’s File Cabinets...62
Getting the Lowdown on Folders ...63
Peering into Your Drives and Folders ...65
Seeing the files on a disk drive ...65
Seeing what’s inside folders ...66
Creating a New Folder...67
Renaming a File or Folder...69
Selecting Bunches of Files or Folders ...70
Getting Rid of a File or Folder ...70
Copying or Moving Files and Folders ...72
Seeing More Information about Files and Folders ...73
What’s That Windows Explorer Thing? ...76
Writing to CDs and DVDs...77
Buying the right kind of blank CDs and DVDs for burning...78
Copying things from or to a CD ...79
Part II: Working with Programs and Files...83
Chapter 5: Playing with Programs and Documents . . . .85
Starting a Program ...85
Opening a Document ...87
Saving a Document...88
Choosing Which Program Opens a File ...90
The wrong program loads my file!...90
No program will open my file! ...92
Taking the Lazy Way with a Shortcut...94
The Absolutely Essential Guide to Cutting, Copying, and Pasting ...95
The quick ’n’ dirty guide to cut ’n’ paste...96
Selecting things to cut or copy ...96
Cutting or copying your selected goods ...97
Pasting information to another place ...100
Windows XP’s Free Programs! ...100
Writing letters with WordPad...101
Jotting down notes with Notepad ...102
Finding symbols like © with Character Map ...103
Drawing and editing photos with Paint ...105
Chapter 6: I Can’t Find It! . . . .107
Finding Lost Windows on the Desktop ...107
Finding Lost Files, Folders, Music, Photos, Videos, People, or Computers ...109
Finding any lost files or folders ...110
Finding lost pictures, music, or video...113
Finding lost documents ...113
Finding computers or people...114
Chapter 7: Printing, Faxing, and Scanning . . . .115
Printing Your Masterwork ...115
Adjusting how your work fits on the page ...116
Adjusting your printer’s settings...119
Canceling a print job ...120
Printing a Web page...121
Installing new fonts ...122
Troubleshooting your printer ...125
Sending and Receiving Faxes in Windows XP...126
Installing Windows XP’s fax program...127
Setting up your computerized fax machine ...128
Sending a fax directly from a program...129
Sending faxes of scanned files ...131
Receiving a fax ...132
Scanning a Photo, Letter, Receipt, or Clothing Stain ...132
Scanning with the Scanning and Camera Wizard ...133
Choosing the right scanning resolution ...136
Dealing with scans that look awful...137
Chapter 8: Cruising the Web . . . .141
What Is the Internet?...142
What’s an ISP and Why Do I Need One? ...143
Setting Up Internet Explorer the First Time...144
How Do I Navigate the Web with Microsoft Internet Explorer?...148
How do I move from Web page to Web page? ...148
Making Internet Explorer open to your favorite site ...151
How can I revisit my favorite places? ...152
How do I find things on the Internet?...152
The Web Page Says It Needs a Weird Plug-In Thing! ...154
Saving Information from the Internet ...155
Saving a Web page ...155
Saving text ...157
Saving a picture ...157
Downloading a program ...158
It Doesn’t Work! ...160
The Pages Won’t All Fit on My Screen!...161
Chapter 9: Sending Mail and Instant Messages . . . .163
Using Outlook Express...163
Setting up your e-mail account ...166
Composing and sending an e-mail...168
Reading a received e-mail...170
Finding lost mail ...174
Using an Address Book ...174
Getting rid of all your spam...176
Bugging Friends with Windows Messenger ...177
Getting started with a .NET Passport ...178
Signing on to Messenger and adding friends ...179
Sending and receiving an instant message...181
Chapter 10: Safe Computing . . . .185
Assessing Your Safety in XP’s Security Center ...185
Changing the firewall settings...188
Automating Windows Update ...189
Avoiding viruses ...190
Staying Safe on the Internet ...191
Avoiding evil add-ons and hijackers in Internet Explorer ...191
Stopping pop-up ads ...196
Buying from secure Web sites...197
Maintaining Your Privacy in Windows XP ...198
Removing previously typed words from online drop-down lists ...199
Part IV: Customizing and Upgrading Windows XP...203
Chapter 11: Customizing Windows XP with the Control Panel . . . . .205
Finding the Right Switch in the Control Panel...206
Changing Windows’ Appearance and Themes ...207
Changing the computer’s theme...208
Changing the desktop background ...210
Choosing a screen saver...211
Changing the screen resolution ...212
Changing Network and Internet Connections...213
Adding or Removing Programs...214
Changing or removing programs ...215
Adding new programs ...216
Add/remove parts of Windows XP ...217
Set program access and defaults...218
Adjusting Windows XP’s Sounds ...218
Adjusting the system volume...219
Changing the sound scheme ...220
Changing the speaker settings...220
Performance and Maintenance...220
Adding Printers and Other Hardware ...221
Viewing installed printers or fax printers ...221
Adding a printer...222
Adding new hardware ...223
Installing or adjusting other items ...224
Fiddling with User Accounts...226
Setting the Date, Time, Language, and Regional Options ...226
Accessibility Options ...227
Security Center ...228
Icons to Avoid ...228
Chapter 12: Keeping Windows from Breaking . . . .229
Creating a Restore Point...230
Tuning Up Windows XP with Built-In Maintenance Tools ...231
Finding technical information about your computer ...232
Adjusting visual effects to speed up your computer ...234
Freeing up space on your hard disk ...235
Backing up your data ...236
Rearranging items on your hard disk to make programs run faster (defragmenting) ...239
Fiddling with Drivers...240
Cleaning Your Computer ...241
Cleaning your mouse...241
Cleaning your monitor ...242
Cleaning your keyboard...242
Understanding User Accounts...244
Setting Up or Changing User Accounts ...246
Switching Quickly between Users ...248
Changing a User Account’s Picture ...250
Setting Up Passwords and Security ...251
Chapter 14: Connecting Two or More Computers
with a Network . . . .255
Understanding a Network’s Parts...256
Setting Up a Small Network...258
Buying parts for a network...259
Installing a network ...260
Running Windows’ Network Setup Wizard...262
Setting Up a Wireless Connection ...265
Troubleshooting a Network ...267
Sharing and Accessing Your Computer’s Files and Folders...268
Sharing a Printer on the Network...270
Part V: Music, Movies, Memories (And Photos, Too)...273
Chapter 15: Playing and Copying Music in Media Player . . . .275
Stocking Media Player’s Library...276
Understanding Media Player’s Controls...278
Playing CDs ...279
Playing DVDs...281
Playing Videos and TV Shows...283
Playing Music Files (MP3s and WMAs)...284
Playing Internet Radio Stations ...285
Creating, Saving, and Editing Playlists...285
Copying CDs to Your Hard Disk ...287
Duplicating Music CDs...289
Copying Songs to Your Portable Player...290
Buying Music and Movies from Online Stores...291
Chapter 16: Fiddling with Photos and Movies . . . .295
Using Your Computer as a Digital Shoebox ...296
Dumping the camera’s photos into your computer...296
Viewing photos in the My Pictures folder ...300
Copying your digital photos to a CD ...306
E-mailing photos ...307
Cropping photos with Paint ...308
Creating, Editing, and Viewing Digital Movies ...310
Step one: Importing pictures from your video camera...312
Step two: Editing your movie ...316
Step three: Saving your edited movie ...319
Part VI: Help! ...321
Chapter 17: The Case of the Broken Window . . . .323
My New Computer Keeps Getting Shut Down! ...323
Restoring Calm with System Restore...324
My Mouse Doesn’t Work Right ...326
My Double-Clicks Are Now Single Clicks! ...327
Making and Using a Password Reset Disk ...327
Creating a password reset disk...327
Using a password reset disk to enter a user account ...328
Making Older Programs Run under Windows XP...329
It Says I Need to Be an Administrator!...330
I’m Stuck in Menu Land ...330
All My Desktop Icons Vanished ...331
My Computer Is Frozen Up Solid...331
The Printer Isn’t Working Right ...332
Chapter 18: Strange Messages: What You Did
Does Not Compute . . . .333
Access Is Denied...333
Allow This Page to Install ActiveX Controls ...334
AutoComplete ...335
Click Here to Activate Now ...335
Did You Notice the Information Bar? ...336
Do You Want to Run This File?...336
Error Renaming File or Folder ...337
Found New Hardware...337
Language Pack Installation...338
Hiding Your Inactive Notification Icons...338
If You Remove This File, You Will No Longer Be Able to Run This Program...339
New Fax Received...339
New Programs Installed...340
New Updates Are Ready to Install...340
The Publisher Could Not Be Verified ...341
There Are Unused Icons on Your Desktop ...342
To Help Protect Your Computer, Windows Firewall Has Blocked This Program . . . ...342
Windows Cannot Open This File ...344
You Have Files Waiting to Be Written to the CD ...344
Chapter 19: Moving from an Old Computer to a New One . . . .347
Using the File and Settings Transfer Wizard ...348
Choosing things to move from your old computer...349
Moving things to the new computer ...354
My New Computer Won’t Open My Old Computer’s Files! ...356
Disposing of the Old Computer ...357
Chapter 20: Help on the Windows XP Help System . . . .359
Get Me Some Help, and Fast!...359
Press F1 ...360
Right-click on the confusing part ...360
Sending in Windows XP’s troubleshooting robots ...361
Consulting a Program’s Built-In Computer Guru...363
Using the Windows Help and Support Center ...365
Part VII: The Part of Tens...367
Chapter 21: Ten Aggravating Things about Windows XP
(And How to Fix Them) . . . .369
Windows Makes Me Log On All the Time! ...369
Turning Down (Or Up) the Volume ...370
The Taskbar Keeps Disappearing!...371
My Bar Full of Buttons Just Fell Off!...371
Keeping Track of Open Windows ...372
Lining Up Two Windows on the Screen ...372
It Won’t Let Me Do Something Unless I’m an Administrator!...373
My Folders List the Wrong Task Panes! ...373
What Version of Windows Do I Have?...374
My Print Screen Key Doesn’t Work ...374
Chapter 22: Ten Things to Remember about Windows XP . . . .375
When in Doubt, Right-Click ...375
Create Restore Points ...376
Make Windows Update Automatic ...376
Show the Quick Launch Toolbar ...376
Add Your Favorite Goodies to the Quick Launch Toolbar ...376
Use the Show Desktop Icon...377
Add Your Own User Account Picture...377 Share Files with Other User Accounts ...378 Make Windows Open to the Size You Want...378 Lock Your PC before Leaving ...378
Chapter 23: Ten Things to Look Forward
to in the Next Version of Windows . . . .379
It Won’t Run Well on Older Computers ...379 Longhorn Looks Much Prettier ...379 New Improved Digital Photo Viewer...380 Improved Security...380 Improved Filing System ...380 Longhorn Supports DVD Burning ...380Appendix A: Upgrading to Windows XP...381
Index...387
Introduction
W
elcome to the second edition of Windows XP For Dummies,the world’s best-selling book about Windows XP! I’ve expanded the book to explain all the recent patches, tweaks, fixes, and frustrations that Microsoft has added to Windows XP.This book’s popularity probably boils down to this simple fact: Some people want to be Windows whizzes. They love interacting with dialog boxes. Some randomly press keys in the hope of discovering hidden, undocumented fea-tures. A few memorize long strings of computer commands while washing their hair.
And you? Well, you’re no dummy, that’s for sure. But when it comes to Windows and computers, the fascination just isn’t there. You want to get your work done, stop, and move on to something more important. You have no intention of changing, and there’s nothing wrong with that.
That’s where this book comes in handy. Instead of making you a whiz at Windows, it merely dishes out chunks of useful computing information when you need them. Instead of becoming a Windows XP expert, you’ll know just enough to get by quickly, cleanly, and with a minimum of pain so that you can move on to the pleasant things in life.
About This Book
Don’t try to read this book in one sitting; there’s no need. Instead, treat this book like a dictionary or an encyclopedia. Turn to the page with the informa-tion you need and say, “Ah, so that’s what they’re talking about.” Then put down the book and move on.
cussed in plain English:
⻬Keeping your computer safe and secure
⻬Finding, starting, and closing programs
⻬Locating the file you saved or downloaded yesterday
⻬Setting up a computer for the whole family to use
⻬Copying information to and from a CD
⻬Working with your digital camera’s photos
⻬Scanning and printing your work
⻬Fixing Windows XP when it’s misbehaving
There’s nothing to memorize and nothing to learn. Just turn to the right page, read the brief explanation, and get back to work. Unlike other books, this one enables you to bypass the technical hoopla and still get your work done.
How to Use This Book
Something in Windows XP will eventually leave you scratching your head. No other program brings so many buttons, bars, and babble to the screen. When something in Windows XP has you stumped, use this book as a reference. Look for the troublesome topic in this book’s table of contents or index. The table of contents lists chapter and section titles and page numbers. The index lists topics and page numbers. Page through the table of contents or index to the spot that deals with that particular bit of computer obscurity, read only what you have to, close the book, and apply what you’ve read.
If you’re feeling spunky and want to learn something, read a little further. You can find a few completely voluntary extra details or some cross-references to check out. There’s no pressure, though. You won’t be forced to learn anything that you don’t want to or that you simply don’t have time for.
If you have to type something into the computer, you’ll see easy-to-follow bold text like this:
Type Media Playerin the Search box.
3
Introduction
Whenever I describe a message or information that you see on-screen or a cryptic Web address, I present it this way:
www.vw.com
This book doesn’t wimp out by saying, “For further information, consult your manual.” Windows XP doesn’t even come with a manual. You won’t find information about running specific Windows software packages, such as Microsoft Office. Windows XP is complicated enough on its own! Luckily, other For Dummiesbooks mercifully explain most popular software packages. Don’t feel abandoned, though. This book covers Windows in plenty of detail for you to get the job done. Plus, if you have questions or comments about
Windows XP For Dummies,feel free to drop me a line on my Web site at www. andyrathbone.com.
Finally, keep in mind that this book is a reference.It’s not designed to teach you how to use Windows XP like an expert, heaven forbid. Instead, this book dishes out enough bite-sized chunks of information so that you don’t haveto learn Windows.
And What about You?
Chances are you already own Windows XP or are thinking about upgrading. You know what you want to do with your computer. The problem lies in making the computer do what you want it to do. You’ve gotten by one way or another, hopefully with the help of a computer guru — either a friend at the office, somebody down the street, or your fourth-grader.
But if your computer guru isn’t around, this book can be a substitute during your times of need. (Keep a doughnut or Pokémon card nearby in case you need a quick bribe.)
How This Book Is Organized
The information in this book has been well sifted. This newly expanded book contains seven parts, and I divided each part into chapters relating to the part’s theme. With an even finer knife, I divided each chapter into short sec-tions to help you figure out a bit of Windows XP’s weirdness. Sometimes, you may find what you’re looking for in a small, boxed sidebar. Other times, you may need to cruise through an entire section or chapter. It’s up to you and the particular task at hand.
Part I: Windows XP Stuff Everybody
Thinks You Already Know
This part dissects Windows XP’s backbone: Its annoying Welcome screen and user name buttons, the mammoth Start button menu that hides all your important stuff, and your computer’s desktop — the background where all your programs live. It explains how to move windows around, for instance, and click the right buttons at the right time. It explains the Windows XP stuff that everybody thinks that you already know.
Part II: Working with Programs and Files
Windows XP comes with bunches of free programs. Finding and starting the programs, however, often proves to be a chore. This part of the book shows how to prod programs into action. If an important file or program has van-ished from the radar, you discover how to make Windows XP dredge your computer’s crowded cupboards and bring it back.Also, by popular demand, a new chapter explains how to fax, scan, and print your important information.
Part III: Getting Things
Done on the Internet
Turn here for a crash course in today’s computing playground, the Internet. This part explains how to send e-mail and globetrot across Web sites. Best yet, an entire chapter explains how to do it all safely, without viruses and annoying pop-up ads. (And with the newly strengthened firewall.)
An entire section explains Internet Explorer’s new security toolbar and how it stops Web parasites from attaching themselves to your board as you Web surf.
Part IV: Customizing and
Upgrading Windows XP
5
Introduction
And when you’re ready to add a second computer, head to the networking chapter for quick instructions on linking computers to share an Internet con-nection as well as files.
Part V: Music, Movies, Memories
(And Photos, Too)
Turn here for information on playing music CDs, digital music, and movies. Buy some cheap CDs and create your own greatest hits CDs from your favorite tunes. (Or just copy a CD so your favorite one doesn’t get scratched in the car.)
Digital camera owners should visit the chapter on transferring pictures from your camera to your computer, organizing the pictures, and e-mailing them to friends. Bought a camcorder? Head to the section that explains how to edit out the dopey parts and create a movie the relatives will enjoyfor a change.
Part VI: Help!
Although glass doesn’t shatter when Windows XP crashes, it still hurts. In this part, you find some soothing salves for the most painful irritations. Plus, you find ways to unleash the Windows XP program’s wise team of Troubleshooting Wizards.
Stuck with the problem of moving your files from an old computer to a new one? You’ll find help here, as well, with a walkthrough of Windows XP’s Files and Settings Transfer Wizard. (If you’re ready to upgrade your old version of Windows to Windows XP, check out the appendix, too, which holds complete instructions.)
Part VII: The Part of Tens
Icons Used in This Book
It just takes a glance at Windows XP to notice its icons,which are little push-button pictures for starting various programs. The icons in this book fit right in. They’re even a little easier to figure out:
Watch out! This signpost warns you that pointless technical information is coming around the bend. Swerve away from this icon to stay safe from awful technical drivel.
This icon alerts you about juicy information that makes computing easier: A tried and true method for keeping the cat from sleeping on top of the monitor, for instance.
Don’t forget to remember these important points. (Or at least dog-ear the pages so that you can look them up again a few days later.)
The computer won’t explode while you’re performing the delicate operations associated with this icon. Still, wearing gloves and proceeding with caution is a good idea.
There’s a bad corner in every large neighborhood, and the Internet’s global reach makes for some very large bad corners. Look here for information about keeping you, your computer, and your information as safe as possible.
Where to Go from Here
Now, you’re ready for action. Give the pages a quick flip and scan a section or two that you know you’ll need later. Please remember, this is yourbook — your weapon against the computer criminals who’ve inflicted this whole com-plicated computer concept on you. Please circle any paragraphs you find useful, highlight key concepts, add your own sticky notes, and doodle in the margins next to the complicated stuff.
Part I
with Windows XP already installed. Or maybe you have Windows XP at the office, where everyone has to learn it except for the boss, who doesn’t have a computer. Or perhaps your favorite program’s latest version requires Windows XP, so you’ve had to upgrade.
Whatever your situation, this part gives a refresher on Windows XP basics and buzzwords like dragging and dropping, cutting and pasting, and tugging at mischie-vous toolbars.
Chapter 1
What Is Windows XP?
In This Chapter
䊳Understanding what Windows XP is and what it does
䊳Understanding Windows XP’s service packs
䊳Knowing what service pack is on your computer
䊳Downloading and installing Service Pack 2
C
hances are, you’ve probably heard about Windows. In fact, millions of people all over the world are puzzling over it as you read this. Almost every new computer sold today comes with a copy of Windows XP prein-stalled — cheerfully greeting you when first turned on.This chapter helps you understand why Windows lives inside your computer, and how to keep it alive and well with Microsoft’s service packs.It explains which service packs you need to keep Windows XP up-to-date and how to deal with the burdens they lay at your feet in the name of increased security.
What Is Windows and Why
Are You Using It?
The answer to this one’s pretty easy: You’re using Microsoft Windows because you don’t have much choice. Nearly every computer sold since late 2001 comes with Windows XP preinstalled. A few people escaped Windows by buying Apple computers (those nicer-looking computers that cost more). But chances are, you, your neighbors, your boss, your kids at school, and millions of other people around the world are using Microsoft Windows.
Windows gets its name from all the cute little windows it places on your monitor. Each window shows information, such as a picture, a program that you’re running, or a baffling technical reprimand. You can put several win-dows on-screen at the same time and jump from window to window, visiting different programs. You can also enlarge a window to fill the entire screen.
Like the mother with the whistle in the lunch court, Windows controls every window and each part of your computer. When you turn on your computer, Windows jumps onto the screen and supervises any running programs. Throughout all this action, Windows keeps things running smoothly, even if the programs start throwing food at each other.
In addition to controlling your computer and bossing around your programs, Windows XP comes with a bunch of free programs. Although your computer can run without these programs, they’re nice to have. These programs let you do different things, like write and print letters, browse the Internet, play music, and even whittle down your camcorder’s vacation footage into a three-minute short — automatically.
⻬Believe it or not, Windows XP isn’t just the newest version of Windows; it’s actually the best version so far. (Just ask people who upgraded from previous versions.) Windows XP doesn’t crash very often. And if one Windows program crashes, it doesn’t drag the entire computer down with it, like earlier versions did.
⻬Windows XP makes it easier for several people to share a single com-puter. Each person receives his or her own user account. When users click their names at Windows XP’s opening screen, they see their own
work — just the way they left it.
Yes, Microsoft
is
sneaky
Microsoft may tout Windows as your helpful computing companion, always keeping your best interests in mind, but that’s not really true. Windows always keeps Microsoft’sinterests in mind. You’ll find that out as soon as you call Microsoft for help on making Windows work right. Your first two questions are free if you pick up the long distance charges to Redmond, Washington. The third call (and all the rest) cost $35 apiece.
Microsoft also uses Windows to plug its own products and services. Sometimes you click a
menu item that touts something helpful, but Windows simply leads you to a Web site where you can purchase additional items from Microsoft or its business partners.
⻬Because Windows XP is sturdier and more secure than earlier Windows versions, it’s also more difficult to figure out. Computers are pretty dumb, so when a potential security problem arises, they simply make you decide how to handle it. (I cover safe computing in Chapter 10.)
Windows XP’s Luggage: Service Packs
Microsoft launched Windows XP in 2001, making it a creaky old-timer in computer years. To keep its old boat afloat until its replacement in 2006, Microsoft has released not one but two chunky add-on programs calledservice packs.
Service packs, given away for free, provide the Microsoft folks a chance to go back and fix the things they messed up when they first released Windows XP. For instance, if Microsoft discovers a programming mistake that keeps Windows XP from working with a certain computer part, the service pack fixes that particular problem.
Most importantly, service packs repair oodles of security problems. Every week, some smart alec figures out a new way to break into Windows XP. Microsoft analyzes the problem and releases software to plug that security hole. Service packs provide all the patches, fixes, and plaster Windows needs to bring your computer up-to-date.
The next section explains how to tell what service packs are on your com-puter, if any, and how to install Service Pack 2 to make your computer as secure as possible.
⻬Windows XP Service Pack 1 contains all the patches released during Windows XP’s first year of operation. Service Pack 2 contains all the patches in Service Pack 1 and more. Installing Service Pack 2 brings your computer up-to-date with all the patches released through mid-2004.
⻬Although Service Pack 2 includes lots of patches, it doesn’t include the newest patches — patches released after Service Pack 2. To keep your computer up-to-date, be sure to set Windows Update on Automatic, a simple procedure I discuss in Chapter 10.
⻬Microsoft doesn’t let its service packs install on illegitimate copies of Windows XP. If your copy of Windows XP isn’t installed legally, the ser-vice pack leaves this message when you try to install it: The product key used to install Windows is invalid.If you see that mes-sage, contact the person who sold you Windows XP.
What service pack version
is on my computer?
Despite the way service packs polish Windows XP and protect it from evil-doers, your computer certainly doesn’t shout for joy when it has received one. In fact, the only way to know if you have a service pack installed is to probe your computer’s menus. Follow these steps to reveal the service pack that’s currently installed on your computer:
1. Click your Start menu.
2. Right-click on the My Computer icon and choose Properties.
The System Properties dialog box appears, revealing intimate technical details about your computer.
3. Look for your service pack version in the System section.
You should see the words Service Pack as the bottom line of the window’s System section. The number after the words Service Pack reveals its ver-sion number. For example, the computer shown in Figure 1-1 has Service Pack 2 installed. (The mouse’s arrow points to the words.)
⻬If you don’t see the words Service Pack 2 listed, your computer has serious security problems. Jump to the next section to install it as soon as you can.
⻬If your computer already has Service Pack 2, you don’t need to install Service Pack 1. Service Pack 2 includes Service Pack 1.
⻬If you see the words Service Pack 1 listed, you still need to install Service Pack 2.
Figure 1-1:
Your computer should say the words
13
Chapter 1: What Is Windows XP?
What’s in Service Pack 2?
Installing Service Pack 2 is like receiving an updated version of Windows XP with new features — all for free. Here are some of the tastier tidbits that this huge 100MB program brings to Windows XP:
⻬Service Pack 2 contains several years’ worth of security patches and repairs, making Windows XP much safer and more stable.
⻬A pop-up ad blocker to Internet Explorer keeps ads from exploding in your face as you visit Web sites.
⻬Internet Explorer’s new Add-On manager lets you know when some-thing’s trying to install itself onto Internet Explorer. The manager lets you weed out nasty Web parasites but approve the things you do want installed, like helpful toolbars.
⻬The new, improved firewall not only turns itself on automatically but also protects your computer from intruders.
I cover all these features in Chapter 10. You can find also more information about Service Pack 2 on the Internet at www.microsoft.com/security.
Installing Service Pack 2
Microsoft lets people install Service Pack 2 in two different ways depending on how you connect to the Internet, either by dial-up (through the phone lines) or broadband (cable or DSL):
⻬Dial-up:Because Service Pack 2 is such a large download (100MB), dial-up Internet users should probably visit Microsoft’s Web site at support. microsoft.comand sign up to receive Service Pack 2 on a CD.
⻬Broadband:Internet users with this speedy connection can download Service Pack 2 from Windows Update, found by opening Internet Explorer and choosing Windows Update from the Tools menu. Your computer connects to Microsoft’s Windows Update Web site and automatically downloads and installs Service Pack 2.
Even after you install Service Pack 2, you still need to use Windows Update. That keeps you updated with fixes discovered afterMicrosoft released Service Pack 2. I explain how to make Windows Update run automatically in Chapter 10.
What’s Windows XP Professional?
Windows XP comes in two basic versions: Windows XP Home and Windows XP Professional. Both versions look and act almost indistinguishably from each other. Chances are, you’re using Windows XP Home, the version designed for homes and small businesses. Larger businesses often use Windows XP Professional because that version has a few extra menus tucked away for things like advanced corporate security. Other than those extra menus, the two versions are virtually indistinguishable.
If you’re planning on using your computer to connect to the office through a network, ask the person in charge of your office’s computer net-works which version he or she recommends. Windows XP Home connects to most corporate networks without problem, but only Windows XP Professional can connect to a specialized Windows server domain.
Chapter 2
The Desktop, Start Menu, and
Other Windows XP Mysteries
In This Chapter
䊳Starting Windows XP䊳Entering a password
䊳Logging onto Windows XP
䊳Using the desktop
䊳Using the taskbar
䊳Using toolbars
䊳Logging off Windows XP
䊳Turning off your computer
T
his chapter provides a drive-by tour of Windows XP. You’ll turn on your computer, start Windows, and spend a few minutes gawking at its various neighborhoods: the desktop, the taskbar, the Start menu, and the environmen-tally correct (and compassionate) Recycle Bin.Everybody who’s anybody hangs out on the Windows desktop (a fancy word for the Windows background). The taskbar provides a convenient hideaway for leaving the spotlight. When something’s missing, the Start menu is the best place to look it up.
Being Welcomed to the
World of Windows XP
Starting Windows XP is as easy as turning on your computer — Windows XP leaps onto the screen automatically with a futuristic flourish. But before you can start working, Windows XP may throw you a fastball with its brilliant blue Welcome screen: Windows wants you to log on,as shown in Figure 2-1, by clicking your name.
I’ve customized my Welcome screen. Yours will look different. If you don’t see a user name listed for you on the Welcome screen, then you have three options:
⻬If you just bought the computer, use the account named Administrator. Designed to let give the owner full power over the computer, the admin-istrator account user can set up new accounts for new users, install programs, burn CDs, start an Internet connection, and access all the files on the computer — even those of other users. Windows XP needs at least one person to act as administrator, even if your computer isn’t con-nected to other computers. Hit Chapter 13 if you care about this stuff.
⻬Use the Guest account.Designed for household visitors, this account lets guests like the babysitter or visiting relatives use the computer temporar-ily. (Some administrators turn off the Guest account to lock out visitors.)
Figure 2-1:
No Guest account and no user? Then find out who owns the computer and beg that person to set up a user name for you. (If they don’t know how, show them Chapter 13, where I explain how to set up a User Account.)
When first installed, Windows XP dashes back to the Welcome screen when-ever you haven’t touched the computer for ten minutes. To stop this scurrying, right-click on the desktop and choose Properties. Click the Screen Saver tab and remove the check mark next to the On Resume, Display Welcome Screen option. Then you’ll have to log on only when you start up Windows — not throughout the day.
Fiddling around with user accounts
Windows XP allows several people to work on the same computer, yet it keeps everybody’s work separate. To do that, it needs to know who’s currently sitting in front of the keyboard. When you log on — introduce yourself — by clicking your user name,as shown in Figure 2-1, Windows XP presents your personalized desktop, ready for you to make your own personalized mess.17
Chapter 2: The Desktop, Start Menu, and Other Windows XP Mysteries
Running Windows XP for the first time
If you’ve just installed Windows XP or you’re turning on your computer for the first time, you’re treated to a few extra Windows XP spectacles: A hip little box appears on the screen, demonstrat-ing how Windows XP can indeed create cool colors and noises. Then Windows XP leaves you at a box with the following four buttons:
⻬ Digital Media: Click here to check out Windows’ fun multimedia stuff. It contains tours of Media Player — a program for play-ing CDs, videos, DVDs, digital music, and much more. You’ll also find information about the built-in video editor, Movie Maker, and your official digital photo storage bin called My Pictures.
⻬ Rich Internet Experience: Nothing really new here: tours of the Internet Explorer Web browser and the Outlook Express e-mail program. There’s also a plug for MSN
Messenger, a program for bugging your buddies on the Internet.
⻬ Home Networking: On your second or third computer? Perhaps it’s time to link them (with or without cables), run Windows XP’s built-in Network Setup Wizard software, and add the words Network Administrator to your business card. (It’s a great pickup tool in Silicon Valley.)
⻬ Improved User Experience: These buzz-words merely refer you to the Windows Help program. Yawn.
at this chapter’s end) so somebody else can use the computer. Later, when you log back on, your messy desktop will be waiting for you.
Although you may turn your desktop into a mess, it’s your own mess. When you return to the computer, your letters will be just as you saved them. Jerry hasn’t accidentally deleted your files or folders while playing Widget Squash. Tina’s desktop contains links to her favorite Web sites. And all of Carrie’s Phish MP3s stay in her own personalized My Music folder.
Of course, the big question boils down to this: How do you customize the pic-tures next to your user name, like my face in Figure 2-1? After you’ve logged on, open the Start menu (covered in this chapter) and click the little picture at the top. Windows conveniently lets you pick a new one. (For ideas, browse through the digital photos you’ve saved in your My Pictures folder.)
Keeping your account private
with a password
Because Windows XP lets bunches of people use the same computer, how do you stop Rob from reading Diane’s love letters to Henry Rollins? How can Josh keep Grace from deleting his Star Wars movie trailers? Windows XP’s optional
password solves some of those problems.
By typing in a secret password when logging on, as shown in Figure 2-2, you enable your computer to recognize you and nobody else. If you protect your user name with a password, nobody can access your files (except for the computer’s administrator, who can peek anywhere — and even delete your account).
To set up or change your password, follow these steps:
1. Click the Start button, click Control Panel, and click the User Accounts icon.
Figure 2-2:
2. Click your user account’s name and choose Create a Password.
3. Type in a password that will be easy for you — and nobody else — to remember.
Keep your password short and sweet: the name of your favorite veg-etable, for example, or your dental floss brand.
4. In the last box, type a hint that reminds you — and only you — of your password.
5. Click the Create Password button, and Windows XP begins asking for your password whenever you log on.
⻬Passwords are case-sensitive. Caviar and caviar are considered two dif-ferent passwords.
⻬Forgotten your password already? Click the little question mark button in Figure 2-2 that appears whenever you click your user name. Your “hint” appears, hopefully reminding you of your password. Careful, though — anybody can click the question mark and read your hint, so make sure it’s something that only makes sense to you.
Own a laptop? Password protect your account now, before somebody steals your expensive new toy.
⻬When you create your password, Windows XP offers to make your files and folders privateto lock out everybody. Before making your account private, remember that private files are muchmore difficult for repair shops to retrieve if something goes wrong with your computer.
⻬I explain more about user accounts in Chapter 13.
19
Chapter 2: The Desktop, Start Menu, and Other Windows XP Mysteries
Make Windows stop asking me for a password!
Windows asks for your name and password only when it needs to know who’s tapping on its keys. And it needs that information for any of these three reasons:
⻬ Your computer is part of a network, and your identity determines what goodies you can access.
⻬ The computer’s owner wants to limit what you can do on the computer.
⻬ You share your computer with other people, and want to keep others from logging on
with your name and changing your files and settings.
If these concerns don’t apply to you, purge the password by clicking the Control Panel’s User Accounts icon and choosing Remove My Password.
The Desktop
Normally, people want their desktops to be horizontal, not vertical. Keeping pencils from rolling off a normal desk is hard enough. But in Windows XP, your monitor’s screen is known as the Windows desktop,and that’s where all your work takes place. You can create files and folders right on your new electronic desktop and arrange them all across the screen. Each program runs in its own little window on top of the desktop.
Windows XP starts with a freshly scrubbed, empty desktop. After you’ve been working for a while, your desktop will fill up with icons — little push buttons that load your files with a quick double-click of the mouse. Some people leave their desktops strewn with icons for easy access; others organize their work: When they finish working on something, they store it a folder, a task covered in Chapter 4.
The desktop boasts three main parts, shown in Figure 2-3. The taskbar
rests lazily along the desktop’s bottom edge and lists the programs and files you’re currently working on. The Start menu,seen at the taskbar’s left edge, lets you locate and run programs. And unlike the office paper shredder, the desktop’s Recycle Binlets you safely retrieve accidentally deleted files. Whew!
⻬You can start new projects directly from your desktop: Right-click on the desktop, choose New, and select the project of your dreams from the pop-up menu. (The menu lists most of your computer’s pro-grams for quick ’n’ easy access.)
⻬ Are you befuddled about some object’s reason for being? Timidly rest the pointer over the mysterious doodad, and Windows will pop up a little box explaining what that thing is or does. Right-click on the object, and ever helpful Windows XP usually tosses up a menu listing nearly everything you can do with that particular object. This trick works on most icons found on your desktop and throughout your programs.
Cleaning up a messy desktop
When icons cover your desktop like a year’s worth of sticky notes, Windows XP offers several ways to clean up the mess. Many people opt for the Desktop Cleanup Wizard, the built-in robotic housekeeper. Here’s how it works:
1. As shown in Figure 2-4, right-click on a blank part of the desktop, choose Arrange Icons By, and choose Run Desktop Cleanup Wizard.
The Desktop Cleanup Wizard carefully examines your clutter and lists every icon’s last useddate.
2. If you click the OK button, the wizard automatically moves your least-used icons to a new Unleast-used Desktop Shortcuts folder.
Quick, simple, and you can always drag ’em back out of the folder if you miss them.
Recycle Bin
Click to open the Start menu. Taskbar
Figure 2-3:
The Windows XP desktop, which spreads across your entire computer screen, has three main parts.
If you just want your desktop clutter to look more organized, try the other Arrange Icons By choices, each discussed in the following list:
Name:Arrange all icons in alphabetical order using neat, vertical rows.
Size:Arrange icons according to their size, placing the smallest ones at the top of the rows.
Type:Line up icons by their type.All WordPad files are grouped together, for instance, as are all links to Web sites.
Modified:Arrange icons by the date they were last changed.
Auto Arrange:Automatically arrange everything in vertical rows — even newly dumped icons are swept into rows.
Align to Grid:This option places an invisible grid on the screen, and aligns all icons to the grid to keep them nice and tidy — no matter how hard you try to mess them up.
Show Desktop Icons:Always keep this option turned on. When turned off, Windows hides every icon on your desktop. If you can remember in your frustration, click this option again to toggle your icons back on.
Lock Web Items on Desktop:If you’ve chosen a Web site for your desktop’s background (covered in the next section), clicking here locks it in place. (Rarely used.)
Run Desktop Cleanup Wizard:Discussed earlier in this chapter, this cleanup robot automatically drops infrequently used icons in an Unused Icons folder on your desktop.
Figure 2-4:
⻬ These Arrange Icons By options are also available for any of your folders. (You’ll find them under a folder’s View menu.)
⻬Every 60 days, the Desktop Cleanup Wizard automatically offers to clean up your desktop. To turn off the wizard’s bimonthly offers, right-click on a blank part of the desktop, choose Properties, and click the Desktop tab. Choose Customize Desktop and remove the check mark from the Run Desktop Cleanup Wizard Every 60 Days option.
Jazzing up the desktop’s background
To jazz up your desktop, Windows XP covers it with pretty pictures known as a background.(Most people refer to the background as wallpaper.) Windows XP’s background starts as a Teletubbies-green hillside.
When you tire of the Teletubbieslook, choose your own picture — any picture stored on your computer:
1. Right-click on a blank part of the desktop, choose Properties, and click the Desktop tab.
2. Click any of the names listed under Background to slip them onto the little preview screen, shown in Figure 2-5.
Found a keeper? Click the OK button to stick it on your desktop. If you’re still searching, move to the next step.
Figure 2-5:
Try different backgrounds by clicking their names in the Background list box; click the Browse button to see pictures from differ-ent folders.
folder.
Most people store their digital photos in their My Pictures folder, which lives in the My Documents folder. (I explain browsing folders in Chapter 4.)
4. Found a good one? Click the photo and click Open to preview it.
5. Click OK to close the Display Properties box.
Here are some tips for sprucing up your desktop:
⻬As you browse through different pictures, Windows XP automatically decides whether the image should be tiledrepeatedly across the screen,
centereddirectly in the middle, or stretched to fill the entire screen. To override Windows’ automatic choice, select your own preference from the Position box.
⻬You can easily borrow any picture on the Internet for a background. Right-click on the Web site’s picture and select Set as Background from the pop-up menu. Microsoft sneakily copies the image onto your desktop as its new background.
⻬To change Windows XP’s entire look,right-click on the desktop, choose Properties, and click the Themes tab. Aimed at heavy-duty procrastina-tors, different themes splash different colors across Windows’ various buttons, borders, and boxes. I explain more about Themes in Chapter 11. (If you download any themes offered on the Internet, check them with antivirus software, covered in Chapter 10.)
Dumpster diving in the Recycle Bin
The Recycle Bin, that little wastebasket icon in the corner of your desktop, works much like a realrecycle bin. Shown in the margin, it lets you retrieve Sunday’s paper when somebody has pitched the comics section before you had a chance to read it.
You can dump something — a file or folder, for example — into the Windows XP Recycle Bin in one of two ways:
⻬Simply right-click on it and choose Delete from the menu. Windows XP asks cautiously if you’re surethat you want to delete the item. Click Yes, and Windows XP dumps it into the Recycle Bin, just as if you’d dragged it there. Whoosh!
Want something back? Double-click the Recycle Bin icon to see your deleted items. Right-click the item you want and choose Restore. The handy little Recycle Bin returns your precious item to the same spot where you deleted it. (You can also resuscitate deleted items by dragging them to your desktop or any other folder.)
The Recycle Bin can get pretty crowded. If you’re searching frantically for a recently deleted file, tell the Recycle Bin to sort everything by the date and time you deleted it. Click View, point at Arrange Icons By, and choose Date Deleted. (The most recently deleted files are at the list’s bottom.)
To delete something permanently,just delete it from inside the Recycle Bin. To delete everything in the Recycle Bin, right-click on the Recycle Bin and choose Empty Recycle Bin.
To bypass the Recycle Bin completely when deleting files, hold down Shift while pressing Delete. Poof! The deleted object disappears, ne’er to be seen again.
⻬The Recycle Bin icon changes from an empty wastepaper basket to a full one as soon as it’s holding a deleted file. You may have to squint a little to notice the pieces of paper sticking out of the trashcan’s top.
⻬How long does the Recycle Bin hold onto deleted files? It waits until the garbage consumes 10 percent of your hard drive space. Then it begins purging your oldest deleted files to make room for the new. If you’re low on hard disk space, shrink the bin’s size by right-clicking on the Recycle Bin and choosing Properties. Decrease the percentage to automatically delete files more quickly; increase the percentage, and the Recycle Bin hangs onto them a little longer.
⻬ The Recycle Bin only saves items deleted from your own computer’s hard drive. That means it won’t save anything deleted from a floppy, CD, memory card, MP3 player, or digital camera.
⻬ If you delete something from somebody else’s computer over a network, it can never be retrieved. The Recycle Bin only holds items deleted from your own computer, not somebody else’s computer. (For some awful reason, the Recycle Bin on the other person’s computer doesn’t save the item, either.) Be careful.
The Start Button’s Reason to Live
The clearly labeled Start button lives in the bottom-left corner of the desktop, where it’s always ready for action. By clicking the Start button, you can start programs, adjust Windows XP’s settings, find help for sticky situations, or, thankfully, shut down Windows XP and get away from the computer for a while.
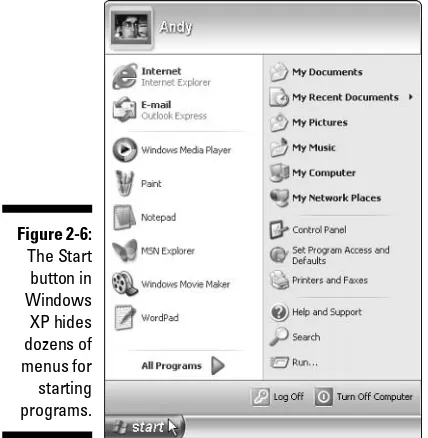
menus full of options as soon as you click it. Just click the button once, and the first layer of menus pops out, as shown in Figure 2-6.
Your Start menu will change as you add more programs to your computer. That’s why the Start menu on your friend’s computer is probably arranged differently than the Start menu on your computer.
⻬ Your My Documents, My Pictures, and My Music folders are always one click away on the Start menu. These folders are specially designed for their contents. The My Pictures folder, for instance, displays little thumb-nails of your digital photos. Their biggest perk? Keeping your files in these folders helps you remember where you stored them. I cover file organization in Chapter 4.
⻬Windows thoughtfully places your most frequently used programs along the left side of the Start menu for easy point ’n’ click action.
⻬See the words All Programs near the Start menu’s bottom left? Click there, and yet another menu squirts out to offer more options.
⻬ Spot something confusing on the Start menu? Hover your mouse pointer over the mysterious icon. Windows responds with a helpful explanatory message. Sometimes a hovering mouse pointer summons yet another menu, listing even more programs available in that category.
⻬Strangely enough, you also click the Start button when you want to stop
using Windows. (You’ll click the Turn Off Computer button at the bottom, a decision-wringing process described at this chapter’s end.)
Making Windows start programs automatically
Many people sit down at a computer, turn it on, and go through the same mechanical process of loading their oft-used programs. Believe it or not, Windows XP can automate this task. The solution is the StartUp folder, found lurking in the Start button’s All Programs menu. When Windows XP wakes up, it peeks inside that StartUp folder. If it finds a program lurking inside, it immediately tosses that program onto the screen.
To make your favorite programs wake up along with Windows XP, follow these steps:
1. Right-click on the Start menu’s Startup icon and choose Open.
The Startup icon, which lives in the Start menu’s All Programs area, opens as a folder.
2. While holding down the Alt key, drag and drop any of your favorite programs or files into the StartUp folder.
You musthold down Alt, as that turns your newly dropped items into shortcuts. You don’t want to drop the actual programs or files.
3. Close the Startup folder.
The Start menu’s prime real estate
When the Start menu pops up, shown earlier in Figure 2-6, it always shows you the items listed below, from top to bottom. You’ll use these things constantly in Windows, so if you’re already bored with this Start button section, please feign interest through the following explanations.
If you find Start menus exciting, you’ll love the upcoming “Customizing the Start menu” section, which explains how to rearrange your entire Start menu.
Internet Explorer:This lets you visit the Internet, covered in Chapter 8.
Outlook Express: Choose this to send or receive e-mail, covered in Chapter 9.
Recently Used Programs:The Start menu lists your six most frequently used programs’ icons above the Start button for easy clicking.
My Documents: Always store your documents in this folder so you’ll know where to find them later.
My Pictures: Keep your digital pictures in this folder. Each picture’s icon is a tiny thumbnail image of its picture.
Figure 2-6:
The Start button in Windows XP hides dozens of menus for starting programs.
it more easily.
My Computer: This displays your computer’s storage areas: folders, disk drives, CD drives, digital cameras, and other attached goodies.
My Network Places:If your computer connects with other computers through a network, click here to visit them.
Control Panel: This lets you adjust your computer’s oodles of confusing set-tings, all described in Chapter 11.
Help and Support: Befuddled? Click here for an answer. (Chapter 20 explains the stoic Windows Help system.)
Search:When you can’t find something on your computer, click here to make Windows find it. (I explain the Windows Search system in Chapter 6.)
Run:Used mostly by computing veterans, this launches a program if you type in its precise name and location.
Log Off: Click here either to let somebody else use the computer, or to save your work and let the computer rest until others use it.
Turn Off Computer: Click this button to restart the computer, turn it off, or let it sit resting in Standby mode.
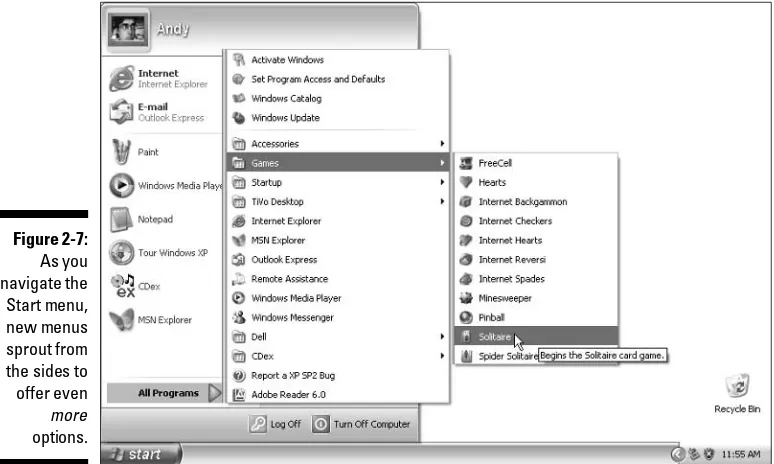
Starting a program from the Start menu
This one’s easy. Click the Start button, and the Start menu pops out of the button’s head. If you see an icon for your desired program, click it, and Windows loads the program.If your program isn’t listed, though, click All Programs, near the bottom of the Start menu. Yet another menu pops up, this one listing the names of pro-grams and folders full of propro-grams. Spot your program? Click the name, and Windows kicks that program to the front of the screen.
When you finally spot your program’s name, just click it. In fact, you never have to actually click the Start menu until you see your desired program’s name. The Start menu opens and closes its menus automatically as you move your mouse pointer near them.
⻬Still don’t see your program listed by name? Then head for Chapter 6 and find the section on finding lost files and folders. Windows XP can track down your missing program.
⻬ Sometimes a little organization works wonders. Right-click on any item on the All Programs menu and choose Sort by Name to alphabetize the entire stack, with folders at the top.
⻬There’s another way to load a lost program — if you can find something you created or edited with that program. For instance, if you wrote let-ters to the tax collector using Microsoft Word, double-click one of your tax letters to bring Microsoft Word to the screen from its hiding place.
⻬If you don’t know how to navigate through your folders, visit Chapter 4. That chapter helps you move gracefully from folder to folder, decreasing the time it takes to stumble across your file.
Figure 2-7:
As you navigate the Start menu, new menus sprout from the sides to offer even
more
options.
Customizing the Start menu
The Windows XP Start menu works great — until you’re hankering for some-thing that’s not listed on the menu, or somesome-thing you rarely use is just getting in the way.
⻬To add a favorite program’s icon to the Start button’s menu,right-click on the program’s icon and choose Pin to Start Menu from the pop-up menu. Windows copies that icon to your Start menu’s left column. (From there, you may drag it to the All Programs area, if you wish.)
⻬To purge unwanted icons from the Start menu’s left column, right-click on them and choose either Unpin from Start Menu or Remove from This List. (Removing an icon from the Start menu doesn’t remove the actual program from your computer; it just removes one of many push buttons that launch it.)
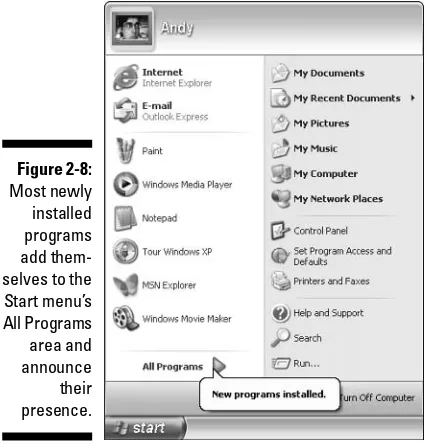
When you install a program, as described in Chapter 11, the program almost always adds itself to the Start menu automatically.Then the pro-gram boldly announces its presence, as shown in Figure 2-8. Click All Programs and then follow the highlighted menu items that lead to your newly installed program.
Figure 2-8: