If we had told people we were going to build a new bug tracker, they would have told us we were com-pletely nuts. A little research into the market would tell you that there are scores, maybe hundreds, of potential competitors, from mega-expensive corporate systems and free open source projects, to on-demand software-as-a-service applications and homegrown tools purpose built to do one thing and do it well. And then there’s Microsoft Excel, the all-in-one list builder and charting tool, which is still incredibly popular among small software teams.
Had we considered the massive competition out there, we may have never created JIRA. Fortunately for us, we had some naïveté in our favour, and no one told us not to do it. We built JIRA to help us track our own consulting business, which is what Atlassian was in 2001, and in 2002 it became a full-fledged product.
There’s two reasons JIRA was successful: an unexpected business model and its flexible architecture. In 2002, Atlassian’s sales model was unlike any other business-to-business software tools. It wasn’t free like an open source project, but it wasn’t expensive either like products from big corporations. It didn’t require any professional services to use. And there were no sales people. It caused some confusion in the market. Can you help us set up an evaluation? Um, just download it and try it. How can we make changes to the license agreement? You can’t. It’s one size fits all. How much for a support agreement? It’s included. Free. Can I send you a purchase order? Sure, or you can use your credit card. A credit card? To purchase enterprise software?
Of course, JIRA’s popularity is more than a price point and business model. Most of the develop-ers who started working on JIRA in 2003 are still at Atlassian today, building atop one of the most feature-rich and flexible issue trackers available. Depending on which company is using it, JIRA has been called a bug tracker, issue tracker, defect tracker, task tracker, project management system, or help desk system. It’s used by waterfall and agile development teams. It’s used by some of the largest corporations in the world to help build their biggest products, and some people use it to manage their personal cross country moves. The permissions system has allowed JIRA to work for both private and public-facing projects.
An ecosystem has been built up around JIRA. As of the time of writing this foreword, there are 273 commercial and open source plugins to JIRA on the Atlassian Plugin Exchange, and hundreds of oth-er integrations built by companies for in-house use or by vendors who sell complementary products. We’re extremely excited for Matt’s book, too. Matt has been a terrific partner who has built custom integrations for JIRA, extending it far and beyond. In some ways, this book is another plugin to JIRA, helping customers to squeeze more value from the application. It’s sure to provide assistance to all the aforementioned customers—the big companies and the small ones, the ones looking to configure it as a bug tracker, and those looking for project management tool.
The final word is about our customers who have pushed the product, our product and support teams, and our imaginations, further then we could have ever done by ourselves. It’s been a lot of fun, and for that, we say thanks, mate.
Practical JIRA Administration
Matthew B. Doar
Practical JIRA Administration
by Matthew B. Doar
Copyright © 2011 Matthew B. Doar. All rights reserved. Printed in the United States of America.
Published by O’Reilly Media, Inc., 1005 Gravenstein Highway North, Sebastopol, CA 95472. O’Reilly books may be purchased for educational, business, or sales promotional use. Online editions are also available for most titles (http://my.safaribooksonline.com). For more information, contact our corporate/institutional sales department: (800) 998-9938 or [email protected].
Editor: Mike Loukides
Production Editor: Kristen Borg
Proofreader: O’Reilly Production Services
Cover Designer: Karen Montgomery
Interior Designer: David Futato
Illustrator: Robert Romano
Printing History:
June 2011: First Edition.
Nutshell Handbook, the Nutshell Handbook logo, and the O’Reilly logo are registered trademarks of O’Reilly Media, Inc. Practical JIRA Administration, the image of Cochin chickens, and related trade dress are trademarks of O’Reilly Media, Inc.
Many of the designations used by manufacturers and sellers to distinguish their products are claimed as trademarks. Where those designations appear in this book, and O’Reilly Media, Inc., was aware of a trademark claim, the designations have been printed in caps or initial caps.
While every precaution has been taken in the preparation of this book, the publisher and authors assume no responsibility for errors or omissions, or for damages resulting from the use of the information con-tained herein.
ISBN: 978-1-449-30541-3 [LSI]
Table of Contents
Preface . . . xi
1. Groups Versus Roles . . . 1
Overview 1
Scaling 2
Updating 2
Project Roles 2
Creating a New Project Role 3
Summary 4
Further Reading 5
2. Resolved, Resolution, and Resolution Date . . . 7
Overview 7
Resolved 7
Resolution 8
Resolution Date 9
Other Approaches 9
Summary 10
Further Reading 10
3. Understanding Schemes . . . 11
Overview 11
Project-Wide Schemes 11
Adding Users to Schemes 12
Notification Schemes 13
Permission Schemes 14
Issue Security Schemes 15
Issue Type Schemes 16
Schemes That Use Issue Types 17
Workflow Schemes 17
Field Configuration Schemes 18
Issue Type Screen Schemes (ITSS) 19
Working with Schemes 21
Documenting Schemes 21
Debugging Schemes 22
The Future of Schemes 23
4. JIRA as a Platform . . . 25
Overview 25
What Can Be Configured 25
What Is Configured System-Wide 26
Worked Example: Configuring JIRA for a New Department 26
Basic JIRA Project Setup 27
Project Lead 27
Project Category and Avatar 27
Notification Scheme 27
Permission Scheme 28
Groups and Roles 28
Hiding Projects from Users 28
Issue Security Scheme 29
Advanced Project Setup 29
Issue Type Scheme 29
Workflow Scheme 30
Field Configuration Scheme 30
Screen Scheme 30
Issue Type Screen Scheme (ITSS) 31
Adding a Custom Field 31
Names Used in the Example 32
Summary 33
5. Creating a Workflow from Scratch . . . 35
Overview 35
Designing a Workflow 36
Implementing a Workflow 38
Deploying and Testing a Workflow 39
Workflows and Events 40
Further Reading 41
6. The User Lifecycle . . . 43
Overview 43
Adding Users 43
Modifying Users 44
Changing a Username 44
Deactivating Users 46
Monitoring Users 46
7. Planning a JIRA Upgrade . . . 47
Overview 47
Preparing for an Upgrade 48
Important JIRA Locations 49
A General Upgrade Procedure 49
Testing an Upgrade 53
Troubleshooting an Upgrade 54
In-Place Database Upgrades 55
Further Reading 55
8. Remote Access to JIRA . . . 57
Overview 57
Email 57
SQL 58
SOAP 59
Debugging a SOAP Client 60
Creating Custom SOAP Methods 61
REST 61
XML and RSS 62
CLI (Command Line Interface) 62
Integrating with Other Applications 63
Further Reading 63
9. Jiraargh! Frustrations . . . 65
Overview 65
Frustrations with Fields 65
Frustrations with Actions 66
More Information Needed! 67
Frustrations with Email 67
Learning JIRA Safely 68
Too Many Administrators 68
Debugging your Configuration 69
Managing Custom Fields 69
Managing Projects 70
Managing Users 70
Further Reading 71
Preface
What This Book Is About
This book is about JIRA, the popular issue tracker from Atlassian. An issue tracker lets people collaborate more effectively when there are things to be done. You can use an issue tracker for everything from tracking bugs in software to customer support re-quests, and beyond.
The book is intended for readers who administer a JIRA instance or design how JIRA is used locally. It assumes a basic familiarity with what JIRA can do and provides more information about how JIRA is intended to be used.
Each chapter should help clarify some confusing aspect of JIRA administration. The chapters are only loosely connected to each other, with the intention that they can be read in any order. Chapters 1 and 2 are “warm-up” chapters that deal with two specific aspects of JIRA administration. Chapters 3 through 5 cover more system-wide aspects. Chapters 6 through 9 cover other similarly focused areas.
The intention of this book is to supplement but not repeat the extensive JIRA docu-mentation, freely available at http://confluence.atlassian.com/display/JIRA/JIRA+Docu mentation.
In selecting the different topics to cover in this book, I was conscious of the different questions that I, as a software toolsmith, am asked about JIRA every day. I chose the most frequently asked and difficult ones. If you can’t find a particular topic and think it should be in a book such as this, then please do contact me with more details. Some of the topics that are covered are expanded versions of entries already posted to my blog “Practical JIRA Development”, at http://jiradev.blogspot.com. The chapters which are based on these entries are Chapters 1, 2, and 4.
JIRA Versions and System Details
This book refers to JIRA version 4.2.4 Standalone, which was released in February 2011. Where there are differences between versions of JIRA (or for JIRA Studio or JIRA WAR/ EAR), these are noted in the text.
The system used throughout this book is a Linux server with JDK 1.6 and MySQL. The main differences for other operating systems, deployment types, databases, and JVMs are the installation instructions and the names and paths of certain files. These details are described in the online JIRA documentation.
Development Environment
This book was written using OSX 10.6.6 on a Mac Mini 2.1, using DocBook 4.5, Emacs 22.1.50.1 and Subversion 1.5.2. The output files were generated using a custom remote toolchain provided by O’Reilly for their authors. Using a remote toolchain makes it easier to use DocBook and allows books to be updated more frequently.
Technical Reviewers
Stafford Vaughan
Stafford started using JIRA in 2005 after completing a Software Engineering degree in Australia and joining CustomWare, Atlassian’s leading services partner. He is a founding author of Atlassian’s official JIRA training course materials, and has spent the past five years delivering training to hundreds of organizations worldwide. Stafford currently lives in San Francisco and works in Silicon Valley.
Bryan Rollins
Bryan is the Product Manager for Atlassian JIRA.
Paul Slade
Paul is a member of the Atlassian JIRA development team.
Matt Quail
Matt is a member of the Atlassian JIRA development team.
Matt Silver
Matt Silver has worked in the technical support field for 10 years and now works for O’Reilly. He’s an avid rock drummer and lives in Northern California.
Conventions Used in This Book
The following typographical conventions are used in this book:
Italic
Indicates new terms, URLs, email addresses, filenames, and file extensions. Constant width
Used for program listings, as well as within paragraphs to refer to program elements such as variable or function names, databases, data types, environment variables, statements, and keywords.
Constant width bold
Shows commands or other text that should be typed literally by the user.
Constant width italic
Shows text that should be replaced with user-supplied values or by values deter-mined by context.
Administration→System→System Information
Shows menu selections within JIRA, in this case the Administration menu item, the System menu item and then the System Information menu item.
This icon signifies a tip, suggestion, or general note.
This icon indicates a warning or caution.
Using Code Examples
This book is here to help you get your job done. In general, you may use the code in this book in your programs and documentation. You do not need to contact us for permission unless you’re reproducing a significant portion of the code. For example, writing a program that uses several chunks of code from this book does not require permission. Selling or distributing a CD-ROM of examples from O’Reilly books does require permission. Answering a question by citing this book and quoting example code does not require permission. Incorporating a significant amount of example code from this book into your product’s documentation does require permission.
We appreciate, but do not require, attribution. An attribution usually includes the title, author, publisher, and ISBN. For example: “Practical JIRA Administration by Matthew B. Doar (O’Reilly). Copyright 2011 Matthew B. Doar, 978-1-449-30541-3.”
If you feel your use of code examples falls outside fair use or the permission given above, feel free to contact us at [email protected].
Safari® Books Online
Safari Books Online is an on-demand digital library that lets you easily search over 7,500 technology and creative reference books and videos to find the answers you need quickly.
With a subscription, you can read any page and watch any video from our library online. Read books on your cell phone and mobile devices. Access new titles before they are available for print, and get exclusive access to manuscripts in development and post feedback for the authors. Copy and paste code samples, organize your favorites,
download chapters, bookmark key sections, create notes, print out pages, and benefit from tons of other time-saving features.
O’Reilly Media has uploaded this book to the Safari Books Online service. To have full digital access to this book and others on similar topics from O’Reilly and other pub-lishers, sign up for free at http://my.safaribooksonline.com.
How to Contact Us
Please address comments and questions concerning this book to the publisher: O’Reilly Media, Inc.
1005 Gravenstein Highway North Sebastopol, CA 95472
800-998-9938 (in the United States or Canada) 707-829-0515 (international or local)
707-829-0104 (fax)
We have a web page for this book, where we list errata, examples, and any additional information. You can access this page at:
http://www.oreilly.com/catalog/9781449305413
To comment or ask technical questions about this book, send email to:
For more information about our books, courses, conferences, and news, see our website at http://www.oreilly.com.
Find us on Facebook: http://facebook.com/oreilly
Follow us on Twitter: http://twitter.com/oreillymedia
Watch us on YouTube: http://www.youtube.com/oreillymedia
Acknowledgments
People at Atlassian who have been particularly helpful over the years include Jonathan Nolen, Sarah Maddox, and Jessie Curtner. The Atlassian founders Mike Cannon-Brookes and Scott Farquhar, and all of the JIRA team have always been responsive and encouraging.
Within the Atlassian community, Jamie Echlin, Nic Brough, Neal Applebaum, and Leonid Maslov stand out for the number of times they’ve answered questions from myself and others in the JIRA Developer’s Forum. Other experts that I have benefited from discussions with include Andy Brook, Jonathan Doklovic, David Fischer, Jobin Kuruvilla, Bob Swift, Vincent Thoulé, and David Vittor. Many thanks to all of you, and see you at the next AtlasCamp!
My sincere thanks also go to all the clients of Consulting Toolsmiths for directly and indirectly providing me with the knowledge of which parts of JIRA confuse many JIRA administrators.
Behind all I do is my dearest wife Katherine and beloved children Lizi, Jacob, and Luke. Thank you all, and may the love of God rest and remain with you always.
CHAPTER 1
Groups Versus Roles
Overview
The difference between JIRA groups and JIRA project roles seems to confuse many JIRA administrators. This chapter explains the differences and what each one is good for.
Up until a few years ago, JIRA had users and groups of users, but no project roles. Groups were pretty powerful—wherever you could do something with a user, you could generally use a group instead.
For instance, if you wanted to allow a specific user john.smith to change the Reporter field in a project’s issues, you could:
1. Create a new permission scheme named something like “john.smith can change Reporter”.
2. Next, add the john.smith user to the appropriate Modify Reporter permission entry in the new permission scheme.
3. Change the appropriate project to use the new permission scheme. You could also do the same thing with a group:
1. Define a new JIRA group named “Can Modify Reporters”. 2. Add the user john.smith to the new group.
3. Create a new permission scheme named something like “Added an extra group of users that can change Reporter”.
4. Add the group (instead of the user) to the appropriate Modify Reporter permission entry in the new permission scheme.
5. Just as before, change the appropriate project to use the new permission scheme. Both of these approaches now allow john.smith to change the Reporter field. So far so good, but there are two main problems with using JIRA groups like this: scaling and updating.
Scaling
If you want john.smith to be able to edit the Reporter field in some projects, and also allow a different user, jane.bloggs, to do the same thing in other projects, then you have to create two permission schemes, one for each user being granted this permission. If you then decide that they are both allowed to edit the Reporter in some shared projects, then you need a third permission scheme. With lots of users, this leads to an explosion in the number of permission schemes (and any other JIRA scheme that sup-ports groups). Keeping track of the difference between each of these schemes is tedious and error-prone, even with the scheme comparison tools (Administration→Scheme Tools).
Updating
As time passes, users may need to be part of different JIRA groups. A project lead usually knows which groups a user should currently be part of. However, only JIRA adminis-trators can change the membership of JIRA groups, which means extra maintenance tasks for them that could be better handled by JIRA project leads.
Project Roles
What was needed to avoid these problems with JIRA groups was another level of in-direction,* and that’s exactly what JIRA project roles are. Figure 1-1 shows the basic
idea.
Figure 1-1. JIRA project roles
JIRA has three default project roles: Administrators, Developers, and Users. The current members of these roles for each project can be seen at Administration→Projects: click on the project name, then Project Roles, and then View Members.
* “All problems in computer science can be solved by another level of indirection.” —David Wheeler, the inventor of the subroutine.
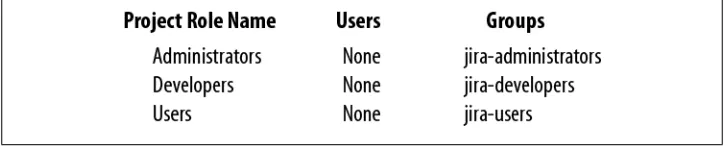
The number and names of the roles can be changed at Administration→Project Role Browser, but for now let’s stick with the three default roles. Every JIRA project has the same set of project roles all the time. The default members of each role for new projects are shown in Figure 1-2.
Figure 1-2. JIRA default roles and their memberships
For each role in every project, you can define who plays that role by adding or removing a user or a group for the role.
For example, you could add an individual contractor using JIRA to the Users role for only the projects they need to work with.
Once you’ve chosen who plays each role for each project, you can use the roles in your schemes. For instance, when you look at the default permission scheme you’ll see that all of the permissions are granted to project roles, not directly to users or groups. The significant thing about roles is that they can be changed for each project by people who are in the Administrators role but aren’t JIRA administrators. These people can now create versions and components for their project without needing to change the un-derlying configuration of JIRA.
To put all that another way:
Who can change a project’s versions and components?
The users who have the Administer Projects permission.
Which users have the Administer Projects permission?
People in the “Administrators” project role.
Which users have the Administrators project role?
Members of the jira-administrators group and anyone else that you add to that role for a project.
Who can change other parts of JIRA’s configuration?
Only members of the jira-administrators group, not users who have the Adminis-trators project role.
Creating a New Project Role
Another way to understand what’s going on here is to create a new project role. Let’s say that for some reason, we want to allow the technical publications (“Tech Pubs”) user assigned to each project to modify the Reporter of an issue.
The default permission scheme already allows users with an Administrator role in a project to modify the Reporter of an issue. But we don’t want to allow the Tech Pubs user to administer the whole project: we just want to give them that one specific permission.
We can create a new role Documentation, at Administration→Project Role Browser. We can also add our Tech Pubs lead bobby.jones as a default member in the “Users” column of the new project role so that he will be in the Documentation role for all new projects by default.
Now every JIRA project has this new role. When a new JIRA project is created, it will have the bobby.jones user in the Documentation role for the project. For existing projects, we can manually add the appropriate Tech Pubs user (or group) to the Doc-umentation role for each project. Once the users for this role have been added, we can edit the appropriate permission schemes and add the Documentation role to the Modify Reporter permission entry. The permission scheme now checks which users are in the
role for each project, rather than looking at a fixed list of users or groups of users. If the Tech Pubs person changes for the project, then the people in the project Admin-istrator role can change the members of the Documentation role for just that project. There is no need to ask the JIRA administrator to make the changes.
For more information about using project roles to control which users can view which projects, see “Hiding Projects from Users” on page 28.
From the other direction, you can also see which roles an individual user has in all the JIRA projects: go to Administration→User Browser, find the user, and click on Project Roles.
Summary
JIRA groups are made up of JIRA users and can only be changed by JIRA administrators. But JIRA project roles are made up of JIRA users and JIRA groups and can be changed per project by project administrators. Project administrators are all the users in the Administrators role for a JIRA project.
Should I use a group or a project role?
If you want to refer to the same set of more than six users across multiple projects, use a group. If you want to refer to a set of users that is poten-tially different per project, use a project role. Also, don’t add new roles without considering whether the existing ones can be used in the per-mission scheme to accomplish what you are trying to do.
Further Reading
http://confluence.atlassian.com/display/JIRA/Managing+Groups discusses JIRA groups in general.
http://confluence.atlassian.com/display/JIRA/Managing+Project+Roles discusses JIRA Project Roles specifically.
Some of the background information to this chapter can be found at http://confluence .atlassian.com/display/JIRA/Migrating+User+Groups+to+Project+Roles, along with the documentation for the JIRA Scheme Comparison Tools. Unfortunately, the scheme tools only work with Permission and Notification Schemes.
CHAPTER 2
Resolved, Resolution, and
Resolution Date
Overview
One thing that sometimes confuses both JIRA users and administrators is the difference between the Resolved status and the Resolution field. This chapter clears up some of the confusion between these very similar-sounding terms. The differences are sum-marized at the end of this chapter (“Summary” on page 10).
Getting this right is important, because many of the standard JIRA reporting gadgets expect the Resolution field to be set as expected—otherwise confusing results occur. For example, gadgets that refer to the date when issues were resolved use the Resolution Date field, which is in turn based on the Resolution field.
Resolved
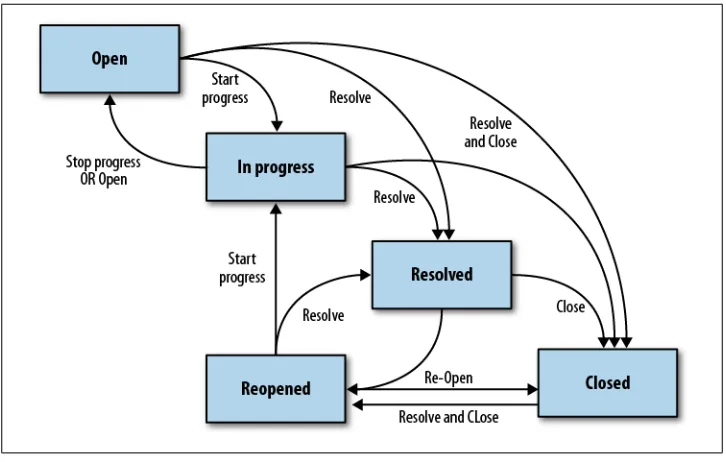
JIRA comes with a default workflow (Administration→Global Settings→Workflows) named “jira”, shown later in Figure 5-1 and summarized below in Figure 2-1. This workflow has the following statuses for an issue, shown in the order they commonly occur.
Figure 2-1. Default JIRA workflow
The idea is that an issue (such as a bug) is created with a status of Open, and is then moved to In Progress and then Resolved by the person who fixes it. The bug is then moved to either Closed or Reopened by someone who checks whether it really was fixed or not. So “Resolved” is just a name for an issue status. The status could just as well have been named “Believed Fixed” or “Ready for Testing”.
If you create a workflow from scratch (see Chapter 5), the Resolved status is not connected in any way with the Resolution field
Resolution
It’s generally a good idea to keep the number of statuses in your workflow as small as possible to make maintenance easier. It makes sense to avoid having lots of statuses with names like:
“Closed and Fixed” “Closed and Won’t Fix”
“Closed Because It’s A Duplicate” “Closed Since…”
The Resolution system field (Administration→Issue Settings→Resolutions) can be used to avoid having lots of similar statuses. The default values for Resolution of Fixed, Won't Fix, Duplicate, Incomplete, and Cannot Reproduce cover many of the reasons that a bug could be closed, and you can change this list if necessary.
The intended use of the Resolution field is that when a bug is created, the field is empty, with no value at all. This is displayed in an issue as a value of “Unresolved”. When an issue is moved to a status such as Resolved or Closed, the Resolve Issue Screen is usually shown during the transition. This screen includes the Resolution field, ready for the user to set a value. A bug can have its Resolution set to “Fixed” while it is moving to the Resolved status, for example.
JIRA expects the Resolution field to be set in any status you would con-sider an issue resolved, and that the Resolution field should be cleared in all other statuses. It’s up to you to make sure this happens, with a transition screen or post-functions when you create or modify work-flows (see Chapter 5).
In the default JIRA workflow, the Resolve Issue Screen is the only screen where you can set the Resolution field for an issue, and this screen is only used for transitions to the Resolved and Closed statuses. In your own workflows you are responsible for mak-ing sure that the Resolution is set. Once the Resolution has been set, the issue is con-sidered resolved by JIRA, even if the status of the issue is not the Resolved status but some other status defined by you (such as “Deployed”).
The only way to remove the resolution from an issue in a standard JIRA installation is to Reopen an issue. Adding the Resolution field to the Default Screen to make it easier to change is a bad idea, because it’s a required field and will get set for issues that aren’t yet resolved.
Another approach to clearing a Resolution field in an issue is to create transitions back to the same status that have a post-function to clear the Resolution. More details on this can be found at How to Clear the Resolution Field.
Resolution Date
The Resolution Date system field is the latest date that any value was set in the Reso-lution system field for that issue. Changing the issue status from Resolved to Closed also used to change the resolution date, but this was fixed in JIRA 4.3.1. The Resolution Date field will only be empty if there is no value at all in the Resolution field.
The Resolution Date is confusingly named Resolved in the list of Issue Navigator columns and some gadgets. This has nothing directly to do with the status named “Resolved”.
Other Approaches
Many organizations using JIRA don’t use the Resolution field for a number of reasons: • It’s hard to reset the value to empty for unresolved issues.
• It doesn’t appear on standard screens, only during transitions.
• It’s hard to make the Resolution field not required on custom transition screens. Instead, they base their reporting only on the name of the statuses in the workflows. They may also create their own custom Select List field named something like
Our Resolution or Sub-status, with its own values such as Unresolved, Fixed, Won't Fix, Duplicate, Incomplete, and Cannot Reproduce.
The drawback of not using the system Resolution field as JIRA intended is that many of the standard JIRA reporting gadgets are no longer useful. Making sure that the Resolution is set correctly in your workflow is a better approach in the long run (see the section “Implementing a Work-flow” on page 38).
A helpful approach to consider in custom workflows is creating a transition for each desired resolution, with a post-function in each transition to set the resolution with-out using a screen. For example, there could be a transition from the current status to Closed named “Duplicate”, which automatically sets the resolution to Duplicate.
Adding a resolution named “Unresolved” to the system Resolution field is a bad idea, because since the Resolution field now has a value, the issue will still be treated as resolved by the standard JIRA gadgets.
Summary
• “Resolved” is just the name of one of the issue statuses in the default JIRA workflow.
• Resolution is a system field with values of Fixed, Not Fixed, and so on. The Reso-lution field is usually set during transitions.
• An unresolved issue is one with no value in the Resolution field.
• The Resolution Date system field is the latest date that the Resolution field was changed to any value.
Further Reading
Some of the points in this chapter are mentioned briefly at http://confluence.atlassian .com/display/JIRA/Configuring+Workflow#ConfiguringWorkflow-About%27open %27and%27closed%27issues.
Clearing the Resolution field is covered at http://confluence.atlassian.com//display/JIRA/ How+to+clear+the+resolution+field+when+the+issue+is+reopened.
The problem of the Resolution Date changing when an issue’s status is updated is described in the JIRA bug JRA-20286.
The Created vs Resolved Gadget described at http://confluence.atlassian.com/display/ JIRA/Adding+the+Created+vs+Resolved+Gadget is a good example of where confusion can occur about what “Resolved” actually means.
CHAPTER 3
Understanding Schemes
Overview
Schemes are a major part of configuring JIRA, but they are also one of the most con-fusing parts of JIRA. This chapter is intended to clear up some of that confusion.
Chapter 4 has a worked example of how schemes can be used.
A JIRA scheme is a collection of configured values that can be used by more than one JIRA project. For example, a Notification scheme describes who receives what kinds of email when issues are changed. The same Notification scheme can be used by more than one JIRA project. In fact, the Default Notification scheme is used by all JIRA projects unless you configure a project differently.
The seven schemes that are being used for a particular JIRA project can be viewed and edited by editing the project (go to Administration→Projects and click on the project name, not Edit).
We’ll cover the four schemes that are similar to the Notification scheme first and look at the remaining three (more complex) schemes later. The top-level page in the Atlassian documentation for all of this information is http://confluence.atlassian.com/display/ JIRA/Defining+a+Project.
Project-Wide Schemes
The four schemes like the Notification scheme that apply to the whole project or to
all issue types within a JIRA project are:
Notification Scheme
Who receives what email when an issue changes
Permission Scheme
Who can do what to an issue
Issue Security Scheme
Who can even view an issue
Issue Type Scheme
What issue types a JIRA project can use
First we’ll take a quick detour to see how JIRA refers to users in such schemes.
Adding Users to Schemes
There are a dozen different ways (shown in Figure 3-1) that JIRA lets you specify a set of users, but happily the same ways can be used in both Notification and Permission Schemes. Issue Security schemes use a subset of these choices.
Figure 3-1. Referring to users in a scheme
The simplest of these are:
Current Assignee
The user that the issue is currently assigned to.
Reporter
The reporter of the issue.
Current User
For permission schemes, the user who is logged in.
Project Lead Component Lead
The project lead is specified in each project’s settings. Component leads are op-tionally configured for each component in a project.
Single Email Address
A specific email address. This only works for issues that can be browsed anonymously.
All Watchers
All users listed in the system Watchers field for an issue. The not-so-obvious ways are:
Single User
A username such as john.smith, not their full name such as “John Q. Smith”.
Group Project Role
In general, use a Project Role instead of a Group, as discussed in Chapter 1.
User Custom Field Value
Use the contents of a custom field of type User Picker or Multi User Picker. Such a field might be populated during a transition or by editing an issue.
Group Custom Field Value
Use the contents of a custom field of type Group Picker or Multi Group Picker. In a notification scheme, all the members of these groups will receive email, so be careful about how many users are involved.
Notification Schemes
A notification scheme controls who receives what email about changes to JIRA issues. A reasonable default notification scheme comes with JIRA.
It’s much easier to add changes to a notification scheme than to undo them. So always keep an unchanged copy of the default notification scheme as an easy way to undo any changes you make later on.
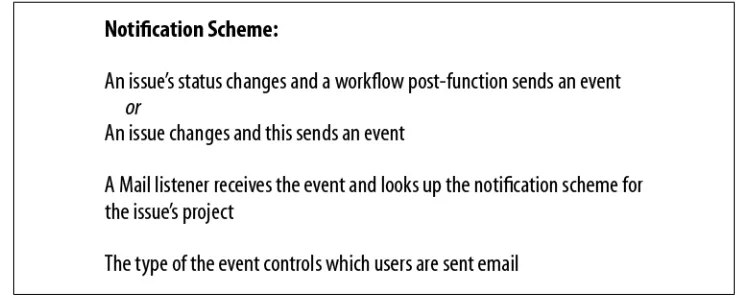
JIRA uses an event-driven model for its notifications. When something such as a com-ment or a status change happens to a JIRA issue, a specific kind of Event is sent within JIRA. Another part of JIRA listens for events and acts on them when they are received. For example, when the JIRA system Mail Listener (Administration→Listeners) receives an event from an issue, it uses the notification scheme for the issue’s project to decide who should receive the email. This process is summarized in Figure 3-2. The actual set of users who are sent email for each different event can be defined in the various ways listed in “Adding Users to Schemes” on page 12.
Figure 3-2. Notification Scheme
You can define your own custom events at Administration→General Configura-tion→Events, and then change the post-function in a workflow transition to make it send (“fire”) the new event. The new event will appear as a new row in all the notifi-cation schemes, and you can then define who should receive email when that transition takes place.
Note that you cannot configure the type of event sent for non-workflow issue operations such as Assign or Comment.
It’s important to avoid spamming your users with too much email, or they’ll just filter it and miss useful information. Be careful how many users you add to a notification scheme.
For more information, see the documentation at http://confluence.atlassian.com/dis play/JIRA/Creating+a+Notification+Scheme.
Permission Schemes
A permission scheme is how you configure who is allowed to do what to a JIRA issue. There are a number of fine-grained permissions, such as “Create Issues” and “Edit Issues”. Each of these permissions has a set of users that are granted that permission, as shown in Figure 3-3. Just like notification schemes, this set of users can be configured in the various ways described in “Adding Users to Schemes” on page 12.
Figure 3-3. Permission Scheme
Just like other schemes, it’s much easier to make changes to a permission scheme than to undo them. Keep an unchanged copy of the default permission scheme as an easy way to undo any changes you make later on.
Once defined, such permissions are used by JIRA in various ways. The most obvious permissions do what they say (e.g., “Link Issues” controls whether a user can link one issue to another). Other permissions such as Resolve Issue and Close Issue can be used in workflow conditions to control who can change an issue’s status.
However, some of the permissions have effects that are not as obvious at first glance. For instance, when editing an issue, the Resolve Issue permission is needed to see the Fix Versions field, and the Schedule Issues permission is needed to see the Due Date field. If the user does not have those permissions, then these fields are hidden—not just grayed out—in an issue’s edit screen.
For more information, see the documentation at http://confluence.atlassian.com/dis play/JIRA/Managing+Project+Permissions.
Issue Security Schemes
An issue security scheme controls who can view or edit a specific issue. In practice, most JIRA projects don’t need to have an Issue Security scheme defined, which is why this scheme is set to “None” by default when you create a new project.
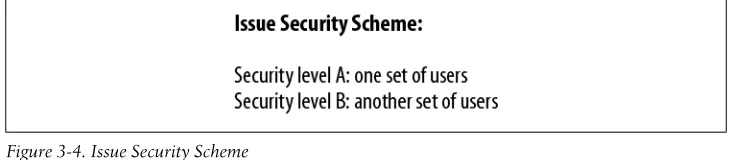
Within an issue security scheme, you can define one or more “security levels” as shown in Figure 3-4. There is actually no hierarchy involved in these levels; they’re really just sets of users. Each security level can have users assigned to it in the same way described in “Adding Users to Schemes” on page 12. You can also choose one level to be a default security level for the scheme.
Figure 3-4. Issue Security Scheme
There is a system field in all issues named “Security Level”, which contains a list of all the different levels configured in the issue security scheme that are active for that issue’s project. Once a security level has been set in this field in an issue, then only users in that level can view or edit the issue. For other users, the issue is invisible and doesn’t appear in searches—or recent issue lists either.
To be able to set the Issue Security field in an issue to anything but the default value, you need to have the Set Issue Security permission ( “Per-mission Schemes” on page 14). The default permission scheme does not give any user this permission.
As an example of using an issue security scheme, the Atlassian support website for JIRA at https://support.atlassian.com/browse/JSP uses an issue security scheme that only al-lows the Reporter and Atlassian staff to see each issue. That way, confidential infor-mation in a support request from one customer is not seen by a competitor who also happens to be using JIRA.
For more information, please see the documentation at http://confluence.atlassian.com/ display/JIRA/Configuring+Issue+Level+Security.
Issue Type Schemes
A JIRA project’s issue type scheme controls which issue types are valid in that project, as shown in Figure 3-5. For instance, most JIRA projects that are not used by developers don’t want to have the Bug issue type to be shown as a choice anywhere.
Figure 3-5. Issue Type Scheme
You can define an issue type scheme by going to Administration→Issue Settings→Issue Types and clicking on the tab Issue Types Scheme (not “Issue Type Schemes” as you might expect). This location is not as obvious as it might be. You can also set the default issue type that will be used when someone is creating an issue, and even change the order of issue types the user will see.
Changing any scheme for lots of projects is generally a long and repetitive task (see
“Managing Custom Fields” on page 69), but not for issue type schemes. The Asso-ciate link in the list of issue type schemes allows you to select multiple projects to change at once.
For more information, see the documentation at http://confluence.atlassian.com/dis play/JIRA/Associating+Issue+Types+with+Projects.
Schemes That Use Issue Types
Every JIRA project has three other schemes whose behavior depends upon the issue type of an issue. For example, the fields for a Bug may be quite different from the fields for a Task—this is defined in a field configuration scheme.
These schemes are more complex than schemes that don’t depend on the issue type, and they’re the schemes that usually confuse JIRA ad-ministrators. One way to keep the two kinds of schemes separate is to remember that these three schemes are the last three of the seven schemes listed when you’re editing a project’s schemes.
The schemes that use an issue’s issue type are:
Workflow Scheme
Which workflow is used for each issue type
Field Configuration Scheme
Which fields are part of each issue type
Issue Type Screen Scheme
Where are the fields displayed in an issue
All of these schemes have the concept of a default. This is what is used if an issue type is not specifically mentioned in the scheme.
Different JIRA projects can all have totally different schemes, but to make maintenance easier you should always try to define schemes that can be reused by more than one project. This is discussed in “Working with Schemes” on page 21.
Workflow Schemes
JIRA is designed to support different workflows. A workflow scheme defines which workflow is used for each issue type, as shown in Figure 3-6. A default workflow can also be chosen in a workflow scheme, and this workflow will be used for all issue types that aren’t specifically mentioned in the scheme.
The workflow scheme is an example of a common naming pattern for these three JIRA schemes: the Foo Scheme is the mapping from an issue type to a particular Foo thing.
One common practice is to start with a single workflow for the default and to then add workflows for specific issue types as necessary. For example, begin with the “Default Workflow”, then add a “Bug Workflow”, a “Task Workflow”, and so on.
For more information, please see the documentation at http://confluence.atlassian.com/ display/JIRA/Activating+Workflow.
Field Configuration Schemes
A field configuration scheme defines which Field Configuration is used for each issue type, as shown in Figure 3-7. A default field configuration can also be set.
Figure 3-7. Field configuration scheme
A Field Configuration (which is not a scheme) is a list of all the possible fields in any issue, with further configuration so that each field is valid and therefore “shown”, or invalid and “hidden”. For instance, the Fix Versions field is useful for a Bug but maybe not for a Task, so it would be configured as hidden in the Task field configuration. When you edit a field configuration, you’ll notice that every possible field is listed, whether or not the field is restricted by issue type or project. This is the expected behavior.
Figure 3-6. Workflow scheme
Each field can also be marked as “Required”, which means that it can’t be left empty. JIRA will try to not allow you to make a field both required and hidden.
You can change a field’s description in a field configuration, and also change the way that the contents of the field are displayed using various renderers. The renderers can show the contents of a field as raw text or can treat the text as wiki markup. If your users complain about JIRA mangling characters in the description, check which ren-derer is being used.
For more information, see the documentation at http://confluence.atlassian.com/dis play/JIRA/Associating+Field+Behaviour+with+Issue+Types.
Issue Type Screen Schemes (ITSS)
I’ve saved the most complex and confusing scheme for last. All the other JIRA schemes either control the behavior of an entire JIRA project (permission, notification, issue security, issue type schemes) or control the behavior differently per issue type. An Issue Type Screen Scheme (ITSS) controls how the fields are displayed for an issue using
two levels of indirection instead of just one. This is shown in Figures 3-8 and 3-9. Other things to note about this scheme are that an “Issue Type Screen Scheme” is entirely different from a “Issue Type Scheme”, and also that the phrase “Screen Scheme” is a great tongue-twister. Try it!
Recall that a field configuration scheme and its field configurations define the fields that are valid for a particular project and issue type. Screens are what control how these fields are viewed by a user.
On the first level of indirection we have Screen Schemes, which are not used directly by a JIRA project. Each Screen Scheme refers to up to three screens—one for creating an issue, one for viewing an issue, and one for editing an issue. This is so that you can have the same set of fields displayed in a different order on each screen (or not show certain fields during issue creation if they don’t make sense there).
I usually define a screen scheme for a single issue type. For example, you might have a Bug Screen Scheme that defines how to display the fields for a Bug during creation, viewing, and editing an issue, as shown in Figure 3-8.
At the second level of indirection, an ITSS defines which screen scheme should be used for each issue type. A default screen scheme can also be chosen in an ITSS.
For more information, see the online documentation at http://confluence.atlassian.com/ display/JIRA/Associating+Field+Behaviour+with+Issue+Types.
Figure 3-8. Screen scheme
Figure 3-9. Issue Type Screen Scheme
Working with Schemes
Even once you’ve understood what the different schemes do in JIRA, they will still need to maintained. Every time that someone asks you to add a new field just for them, you will want to consider the effects of that change on everyone else’s issues. Chapter 4
looks at how to make sure this happens in a controlled way, and the rest of this chapter covers some of the details of making this possible.
There is a necessary balance between the number of schemes and what they all do. I try to have only as many schemes as are needed by the different communities using a particular JIRA instance. You can configure JIRA so that every project has a complete set of schemes, but that’s usually overkill and just makes for a lot of maintenance work later on. Also, if every group in an organization has a different process, then working together is going to be that much harder.
The most important thing to do before changing schemes is to create a backup of your JIRA data. If possible, test all scheme changes on a de-velopment server. Even better, do both.
Documenting Schemes
Each scheme has a name and an optional description. What are good names for schemes? Obviously it’s a personal preference, but I usually name my schemes using a Project Category or Issue Type name, and then the scheme type.
For example, I might have a project category named “Customer Support” for all of the Customer Support department’s JIRA projects. For an ITSS used by all those projects, I would use a name such as “Customer Support ITSS”—and then this scheme would refer to screen schemes with names like “Support Request Screen scheme” and “Train-ing Screen scheme”, us“Train-ing the issue types for the screen scheme names.
I also use the scheme’s description field to record the latest change at the beginning, just after the summary of what a screen is for. The maximum length of the description varies according to the underlying database, but you can assume at least 4000 charac-ters.
Sometimes I also add version numbers to a scheme’s description or name, and update these when I change the scheme. This is useful, but I recommend adding the date as well, since you may end up with branched schemes. Only workflows record the date and user who last changed them.
If I’m really feeling paranoid or the JIRA configuration is particularly complicated, then I may even create a document describing the intended purpose of each scheme and the changes that have been made to it over time. This helps me when I’m trying to work out the effects of a proposed change to a particular scheme.
Debugging Schemes
Sometimes you have to try to understand how a JIRA instance has been configured by another person whose documentation and naming of schemes was perhaps minimal. This usually happens when someone asks you something like “why can’t I edit this field anymore?”
The first thing to do is to see if the names of the various schemes bear any resemblance to what they are actually used for. Just because a scheme is called “Bug Workflow scheme” doesn’t mean that it’s only (or even) being used for bugs. The fastest way to get this information is to go to each scheme administration page and look at the projects that each scheme is assigned to. With luck, you’ll spot an obvious pattern. If the scheme names don’t end in “scheme”, consider adding that to make it clear that it’s a workflow
scheme, not a workflow (for example).
You may also want to compare two schemes to see how they differ. There is a convenient tool for comparing permission and notification schemes available at Administra-tion→Schemes→Scheme Tools. For other scheme types, I find that opening each scheme in a separate tab in my browser allows me to compare them reasonably well side-by-side.
If you decide to do a wholesale renaming of the schemes in your JIRA instance, then I recommend making a backup (of course) and then renaming just one collection of similar projects at a time (such as those with the same project category). Renaming old scheme names with an obvious prefix such as “OLD” can also help you spot the cases that you’ve missed. Since you’ve got a backup, you can also consider deleting inactive schemes.
Once you have a better understanding of which schemes exist and what they’re used for, you can debug the original problem. My process for debugging most scheme prob-lems is as follows:
1. Obtain a specific issue key where the problem can be reproduced.
2. If you can, get a sense of when the problem began, since it may be related to some other scheme change you’ve just made.
3. Note the project, issue type, and status of the issue, and also whether the problem occurs during creating, viewing, or editing the issue.
4. Go to Administration→Projects and click on the project name.
5. Note the names of the seven schemes that are currently being used by this project. 6. For each scheme in turn, view the details of the individual scheme and see what
applies for the specific issue type. Note this information as well.
7. If the problem is about a field, then view the appropriate field configuration and the create, edit, or view screen. The field may be hidden, required, not present on the screen, or present but in another screen tab.
Some fields are only visible if the user has the correct permission, so you may not have the same problem as an administrator. Try creating a user account with the same groups and project roles as the user reporting the problem. Alternatively, log in as the user who reported the problem using the JIRA SU (Switch User) Plugin. 8. If the problem is about a workflow action, check the specific transition’s conditions
and validators first.
9. If the problem seems related to some other scheme, then drill down into that scheme’s definition, bearing in mind the issue type and where the problem was seen.
10. Once you have identified the root cause and fixed it, revert the fix and confirm that the same problem reappears, then fix it again. This confirms that your analysis and changes are correct. You should also check other schemes where the same problem may exist.
Don’t make any change to schemes before making a backup. Ideally, you should debug and fix the problem in a development instance of JIRA before touching the production JIRA.
The Future of Schemes
Schemes have always been a powerful but somewhat confusing part of JIRA. They’re not going to go away, but Atlassian is actively investigating ways to make them easier to use. A sample of how JIRA might present all of the various schemes’ information in the future can be seen in the JIRA Project Configuration Prototype plugin’s home page (https://plugins.atlassian.com/plugin/details/34407).
This work is also typical of how Atlassian makes large feature changes to JIRA. First a plugin is developed that offers the functionality in parallel to the existing functionality, but in a harmless way. Feedback and fixes occur rapidly and then the plugin is bundled with the shipped JIRA package. Many of the core features of JIRA are in fact plugins when you look at their source code.
CHAPTER 4
JIRA as a Platform
Overview
A common request that JIRA administrators receive is to use JIRA for more than its current purpose. The typical case is that someone in one group tells a different group that “you can do that with JIRA, and it’s already installed.” It’s true that JIRA can be used to track many different kinds of issues, and Chapter 3 described how to configure JIRA schemes to do just that.
This idea is, in effect, using JIRA as a platform for different web applications or “vertical solutions” for each group of users. There might be one such web application for Engi-neering JIRA projects, one for Customer Support JIRA projects, and so on. Using JIRA as a platform in this way is part of how it is designed to be used, but it does need a consistent configuration approach to be successful. This is particularly true if different groups don’t want to see any part of other groups in the same JIRA instance.
However there isn’t much documentation on how to do this in a consistent manner. This chapter describes one way to do this using a worked example, and then summa-rizes this in “Summary” on page 33.
What Can Be Configured
For each pair of a JIRA project and issue type, we can change the following:
• Which system and custom fields an issue can use, and whether they are required or not
• Whereabouts on an issue screen the system and custom fields appear • The workflow for an issue, including the statuses available in an issue
On a per-project basis, we can also configure: • The issue types used in the project
• The components and versions available for an issue
• The permissions for what a user can do with an issue, including even knowing the issue exists
• Who can access the whole project
• Who receives email about changes to issues
What Is Configured System-Wide
Some configurations for JIRA are system-wide and affect all the users of a JIRA instance. Such configurations are not part of using JIRA as a platform, but they may have a bearing in discussions between groups because changing them affects everyone. Some of the more common ones that I encounter when discussing this topic are:
• The logo and colors used by JIRA
• Names of system fields; any translation of a field name or status applies everywhere (Administration→Issue Settings→Statuses or Issue Types, Translate)
• Whether unassigned issues are allowed or not
• The maximum attachment size, which is set to 10MB by default
• Priorities; all issues use the same list of priorities in the system priority field • Resolutions; all issues use the same list of resolutions in the Resolution field (this
is most commonly seen during a workflow transition)
For the last two, there is a popular JIRA feature request (JRA-3821) to make priorities and resolutions configurable per project and issue type.
All the other system-wide configurations, such as enabling or disabling voting, can be found at Administration→Global Settings→General Configuration.
Worked Example: Configuring JIRA for a New Department
In this example, we are going to configure JIRA for use by an imaginary accounting department. The information stored is totally different from what appears in a Bug issue type, and includes an example custom field named “Amount”. Only certain peo-ple can see the accounting information in JIRA, and some of this information is still further restricted. The accounting department also requested that they should see nothing about Engineering projects, since that was just unnecessary clutter on their screens.
The first thing to do is to take a backup of your JIRA data, do this work on a develop-ment JIRA instance, or both. The next things to do are:
1. Create a new Project Category for the accounting department, e.g., “Accounts”. Some scheme names will use this word as a prefix, so make sure that the category name is obviously unique and meaningful.
2. Create a new issue type for that department’s issues, for example, “Invoice”. Add a description of what kind of information it contains. Other scheme names will also use this word as a prefix, so make it meaningful.
3. Create a test project with a project key such as ACCTEST. JIRA project keys should generally be as brief as possible since everyone types them frequently.* Once this
project’s configuration is complete, you can create more JIRA projects and con-figure all of them in the same way as this project.
Basic JIRA Project Setup
The next stage is to do the simplest part of the job first. Edit the project configuration with Administration→Projects, then click on the project name ACCTEST (not on Edit).
Project Lead
Set the Project Lead for the project. This user will be the default assignee for issues in the project. With the default notification scheme, email about new issues is sent to the assignee, reporter, and watchers, so the project lead should expect to receive email about issues assigned to them.
Project Category and Avatar
Set the Project Category for the project to the new Accounts category that we just created. Any other future accounting projects, such as ACCMAIN or ACCSUB, will also use this category.
It’s also a nice touch to set an avatar (a small logo) for the project to make it easy for people to quickly distinguish it from other projects. You can upload your own images. One possible idea is to use the same image for all projects in the same category.
Notification Scheme
Open a new browser tab and create a new notification scheme named Accounts Noti-fication scheme. Copying the Default Notification Scheme and modifying the copy is the most common way to do this. The name of this new scheme indicates what the
* You can also edit the jira-application.properties file to allow numbers in the project key, if that helps.
scheme is (a notification scheme) and which category of projects it is intended for (Accounts).
In your original browser tab, set the notification scheme for the project to the new notification scheme, Accounts Notification scheme.
Permission Scheme
Create a new permission scheme named Accounts Permission scheme. Again, copying the Default Permission Scheme and modifying the copy is the most common way to do this.
There should be no need to change any of the permissions except for one. The Set Issue Security permission controls who can change an issue’s security level (see “Issue Se-curity Schemes” on page 15). Add the Administrators role to this permission. As dis-cussed in Chapter 1, we want to use a project role rather than a group here.
Set the permission scheme for the project to the new permission scheme, Accounts Permission scheme.
Groups and Roles
Define a new JIRA group named “Accounting” that contains all the users who should be able to see issues in the Accounts projects.
In the project configuration page, click on Project Roles: View Members, and then: • Delete the jira-users group from the Users role and add the Accounting group. • Delete the jira-developers group from the Developers role and add the Accounting
group.
• Add the project lead as a user to the Administrators role.
Hiding Projects from Users
At this point only Accounting users can see the Accounting projects, which is as in-tended, but they can still see Engineering projects. This is because all of those projects are likely using the jira-users group in their Users role.
To change this, we need to step back and look at how we are defining the Users role for all of the JIRA projects. The Users role is what usually controls who can access a project. There is no way to explicitly block access to a project for a specific group in JIRA. So the approach I usually take is that all users should be members of the default jira-users group, but also members of a group that controls which projects they can see.
In this case I would define a group Engineering, add all the engineers to it, and then change all the Engineering projects’ Users and Developers roles to use this group instead of jira-users.
Now the users in the Accounting group won’t have access to the Engineering projects, and those projects won’t clutter up JIRA for the Accounting users.
Issue Security Scheme
Create a new issue security scheme named Accounts Issue Security scheme:
• Add a security level named “All Accounting” and add the Accounts group to it. Make this level the default one.
• Add another security level named “Confidential Accounting” and add only the accounting users who are permitted to see the more confidential accounting information.
Set the issue security scheme for the project to the new issue security scheme, Accounts Issue Security scheme.
Advanced Project Setup
Now we need to define the more complex schemes and configure the ACCTEST project to use them. These schemes are:
• Issue Type scheme • Workflow scheme
• Field Configuration scheme
• Issue Type Screen scheme, which uses at least one Screen scheme
Issue Type Scheme
An Issue Type Scheme controls which issue types can be used in a project.
Under Administration→Issue Setting→Issue Types, click on the Issue Types Scheme tab to create a new issue type scheme named Accounts Issue Type scheme. Then:
• Add the main accounting issue type Invoice as the default issue type.
• Add other issue types, such as Task and Improvement, only if they will be used by the new department. You can reorder them to change the order in which they appear when a user is creating an issue. The default issue type will be shown as selected at that time.
Now set the issue type scheme for the ACCTEST project to the new issue type scheme,
Accounts Issue Type scheme.
Workflow Scheme
Create a new workflow for the Invoice issue type named Invoice Workflow and add the desired statuses and transitions to the new workflow. See Chapter 5 for more details on how to create a new workflow.
Create a workflow scheme named Accounts Workflow scheme and configure it to use the new workflow for Invoice issue types. For any other issue types that are allowed in the project, add their workflow mappings in Accounts Issue Type scheme.
Set the workflow scheme for the ACCTEST project to be the new workflow scheme,
Accounts Workflow scheme.
Field Configuration Scheme
A field configuration controls which fields are part of an issue type, e.g., what data is part of an Invoice.
Create a new field configuration named Invoice Field Configuration. This is not a scheme. Don’t hide any fields here yet since we’ll use screens to do that later on. If a particular field is required in an Invoice, mark it as such here.
Create a new field configuration scheme named Accounts Field Configuration scheme, and configure this new field configuration scheme to use the Invoice Field Configura-tion for the Invoice issue type.
Now set the field configuration scheme for the ACCTEST project to the new field config-uration scheme, Accounts Field Configuration scheme.
Screen Scheme
Screens control whether a field appears in an issue to a user, and also the order in which the fields appear. Screen Schemes choose which screen is used to create, edit, or view an issue.
Create a screen named Invoice Screen. This screen should have all the fields that are wanted in the Invoice issue type, including the custom field Amount (after it is defined in “Adding a Custom Field” on page 31). You can add more than one field at once, and then reorder them in one go using “Move to Position”.
I recommend starting with just one screen and using it for all three of the screens (Create, View, and Edit). Later on, you can copy and edit the screen and change the screen scheme without having to change the project settings. A good reason to have different screens is that some fields may not be known when an issue is created, or there might be fields that are not directly editable by users.
Create a new screen scheme named Invoice Screen scheme and configure the Create, Edit, and View issue screens to all be the same screen for now. This can also be done by changing the default to use just one screen.
Issue Type Screen Scheme (ITSS)
An Issue Type Screen Scheme (ITSS) ensures that the right sets of screens are used for each issue type.
Create a new ITSS named Accounts ITSS and configure the default screen scheme to be the Invoice Screen scheme defined in “Screen Scheme” on page 30. If there are other issue types, then add mappings for each one to an appropriate screen scheme. For more information, see “Issue Type Screen Schemes (ITSS)” on page 19.
Now set the issue type screen scheme for the ACCTEST project to the new issue type screen scheme, Accounts ITSS.
Adding a Custom Field
Adding a custom field is the real test of all this work, since you’ll probably do it more than once for all the projects in a category. The custom field for this example is named “Amount”.
Define the new custom field with Administration→Issue Fields→Custom Fields and then the Add Custom Field link. Give the field a name and a description. Since the description appears just below the field in the issue screens, make it useful for people by describing what they are expected to enter, perhaps along with an example value. For example, The dollar amount owed, with no dollar sign, e.g., “15.95”.
Since the accounting department will want to be able to search on this field, make sure that the searcher template is not set to “None”.
Now restrict the custom field to just the applicable issue types that uses it. For this example, that’s just the Invoice issue type.
Don’t restrict the custom field to a project, because then you’ll have to come back and do that for every JIRA project that you add to the Ac-counts category. If you have lots of custom fields, that will take a long time to do manually.
Go to Administration→Issue Fields→Screens and add the new custom field to the In-voice Screen (or to the Invoice Create, Invoice View, and Invoice Edit screens if they were defined in “Screen Scheme” on page 30). To ensure that this new field doesn’t interfere with other projects and their issues, don’t add the new field to any other screens.
This is the end of the worked example. Note that when you’re looking for the Amount field to use in a search in the Issue Navigator, you will have to choose a project and an issue type in order for that the custom field to appear as a choice.
Names Used in the Example
This section lists all the different names used in the example above in one convenient place:
Accounts
A project category
ACCTEST, ACCMAIN, ACCSUB
The keys of three JIRA projects in the Accounts project category
Accounting, Engineering
Groups of JIRA users
Users, Developers
The standard JIRA project roles
Invoice
A new issue type
Amount
A custom field in Invoice issues
The seven schemes and the things they control are:
Accounts Notification scheme
The notification scheme for Accounts JIRA projects
Accounts Permission scheme
The permission scheme for Accounts JIRA projects
Accounts Issue Type scheme
The issue type scheme for Accounts JIRA projects
• Invoice—a new issue type used in the ACCTEST JIRA project • Task, Improvement—existing issue types
Accounts Issue S