Magento Beginner's Guide
Second Edition
Learn how to create a fully featured, attractive online
store with the most powerful open source solution
for e-commerce.
Robbert Ravensbergen
Sander Schoneville
Second Edition
Copyright © 2013 Packt Publishing
All rights reserved. No part of this book may be reproduced, stored in a retrieval system, or transmitted in any form or by any means, without the prior written permission of the publisher, except in the case of brief quotations embedded in critical articles or reviews.
Every effort has been made in the preparation of this book to ensure the accuracy of the information presented. However, the information contained in this book is sold without warranty, either express or implied. Neither the authors, nor Packt Publishing, and its dealers and distributors will be held liable for any damages caused or alleged to be caused directly or indirectly by this book.
Packt Publishing has endeavored to provide trademark information about all of the companies and products mentioned in this book by the appropriate use of capitals. However, Packt Publishing cannot guarantee the accuracy of this information.
First published: March 2009
Second edition: June 2013
Production Reference: 1180613
Published by Packt Publishing Ltd. Livery Place
35 Livery Street
Birmingham B3 2PB, UK.
ISBN 978-1-78216-270-4
www.packtpub.com
About the Authors
Robbert Ravensbergen
is an open source and e-commerce expert from the Netherlands. He started to work with open source solutions in the early days of Joomla!. He started his own company, joomblocks.com, from which he has been serving clients with open source solutions since 2009.His first book about WordPress, Kickstart WordPress, Pearson Education, was released in the Netherlands in 2010. After that, several open source related books on Joomla!, Magento, and again WordPress followed. The second edition of Magento Beginner's Guide is his first international book.
Sander Schoneville
is a Technical Director at GroupDeal, a Dutch daily deals site based on Magento. His has his background set in media psychology and business informatics. He combines both fields to create effective websites.He has worked with Magento since its early releases in 2008 and has written a Dutch book about Magento.
About the Reviewers
Eugene Ivashin
was born in Russia and currently resides in Kiev, Ukraine.He graduated from Dnepr State Academy of Building and Architecture in Dnepropetrovsk, Ukraine and got a diploma with distinction as a Building Industry Automation Engineer in 1997.
He has since worked at South Ukrainian Nuclear Power Plant as a repair engineer (six and half years) and got interested in web development at that time. By the end of 2003, Eugene left SU NPP, headed to Kiev and became a web programmer in a small private web design agency where he spent more than 2 years building websites for various customers and growing into a project manager in the process. At the same time, he continued freelancing for separate customers and participating in a few sole proprietorship companies in the area of web development and services. From April 2008, Eugene worked as a web developer and a technical support at ExpoPromoter, a company leading in the tradeshow industry, providing for a large catalog of tradeshow organizers across the world.
Finally, in January 2010, Eugene entered Varien Inc., which was later on rebranded as Magento Inc., as a software engineer, but lately became a Technical Trainer. When Magento was acquired by X.commerce, an eBay company, in August 2011, Eugene became a training manager responsible for providing technical knowledge for all X.commerce employees.
and Enterprise implementations and theming. Karen has worked as a frontend and backend developer on a variety of Magento projects since early 2009. She is an enthusiastic instructor and developer who enjoys experimenting with HTML5, CSS3, and responsive web designs. She is also an instructor and course author for Magento U. Additionally, Karen is the sole inventor of an e-commerce process called Shared Shopping (United States Patent Pending 13/350,321).
www.PacktPub.com
Support files, eBooks, discount offers and more
You might want to visit www.PacktPub.com for support files and downloads related to your book.
Did you know that Packt offers eBook versions of every book published, with PDF and ePub files available? You can upgrade to the eBook version at www.PacktPub.com and as a print book customer, you are entitled to a discount on the eBook copy. Get in touch with us at [email protected] for more details.
At www.PacktPub.com, you can also read a collection of free technical articles, sign up for a range of free newsletters and receive exclusive discounts and offers on Packt books and eBooks.
TM
http://PacktLib.PacktPub.com
Do you need instant solutions to your IT questions? PacktLib is Packt's online digital book library. Here, you can access, read and search across Packt's entire library of books.
Why Subscribe?
Fully searchable across every book published by Packt
Copy and paste, print and bookmark content
On demand and accessible via web browser
Free Access for Packt account holders
Table of Contents
Preface 1
Chapter 1: Installation
13
Installing Magento locally 14
Requirements 14
Time for action – installing Magento on a Windows machine 15
I'm on Mac; what should I do? 25
Installing Magento at a hosting service 28
How to choose a Magento hosting provider 28
Installatron 29
Time for action – installing Magento using Installatron 29
What is SSL and do I need it? 35
Summary 36
Chapter 2: General Configuration
37
The installation is complete; what's next? 37
The Magento Dashboard 38
Managing tax zones and rates 56
Managing tax rules 57
EU business to business VAT 58
Time for action – using VAT validation 59
Chapter 3: Categories and Attributes
61
What you need to know 61
An example category structure 62
Catalog defaults 63
Time for action – catalog settings 64
Working with attributes 70
Time for action – creating your own attribute 72
Using attribute sets 77
Time for action – creating your attribute set 77
Using categories 79
Time for action – creating your first category 80
Summary 84
Chapter 4: Simple Products
85
Adding a Simple Product 85
Step 1 – creating a product and assigning an attribute set 86
Step 2 – the General tab 86
Time for action – filling the General tab 87
Step 3 – the Prices tab 91
Time for action – filling the Prices tab 91
Step 4 – the Meta Information tab 92
Time for action – filling the Meta Information tab 92
Step 5 – the Images tab 93
Time for action – filling the Images tab 94
Step 6 – the Custom tab 97
Time for action – filling the Custom tab 98
Step 7 – the Inventory tab 98
Time for action – filling the Inventory tab 99
Step 8 – the Categories tab 101
Time for action – filling the Categories tab 101
Related products, up-selling, and cross-selling 103
Adding related products in Magento 105
Time for action – adding related products 106
Summary 107
Chapter 5: Beyond Adding Simple Products
109
Virtual products and Downloadable products 110
Adding a Virtual product 110
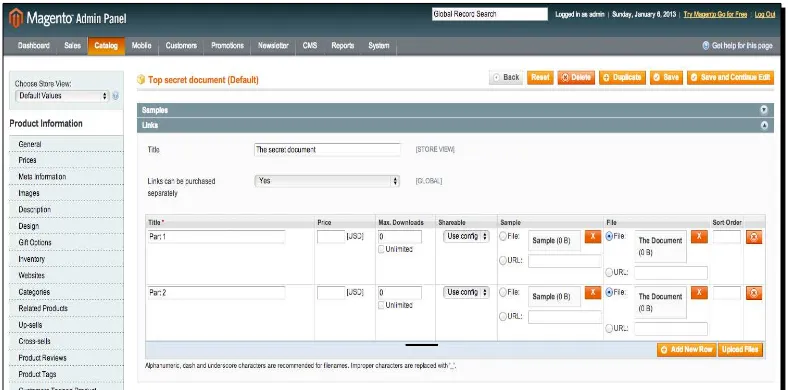
Time for action – adding a Downloadable product 112
Grouped products 122
Time for action – creating a Configurable product 129 Simple products don't already exist 132
Simple products already exist 133
Bundle products 136
Time for action – creating a Bundle product 138
Summary 143
Customer accounts on the frontend 156
Time for action – registering for an account 156
Customer accounts in the backend 159
Time for action – adding a customer 160
Managing an existing customer 163
Summary 167
Chapter 7: Accepting Payments
169
Common payment methods 169
Setting up Magento's default payment methods 171
Setting up PayPal Payments Standard 173
Time for action – starting to sell through PayPal 174
Setting up saved credit cards 179
Setting up checks / money orders 181
Setting up for a bank transfer 184
Setting up cash on delivery 186
Setting up purchase orders 187
Working with payment service providers 188
Selecting the right gateway 189
Setting up a payment service provider – an example 190
Time for action – installing and configuring a PSP extension 190
Summary 193
Chapter 8: Configuring Shipping
195
Logistics in Magento 195
Shipping processes and shipping arrangements 196
Default shipping methods in Magento 196
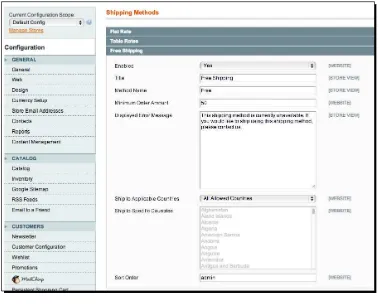
Configuring free shipping 197
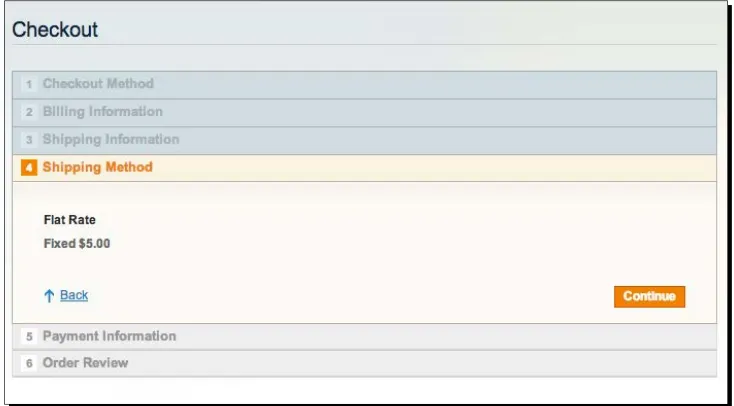
Configuring Flat Rate shipping 198
Table Rate shipping 200
Other ways of calculating shipping costs 205
Presentation of shipping methods in your store 205
Magento's blind spots 206
Purchasing 207
Warehousing 207
Returns processing 208
Summary 208
Chapter 9: Customizing Your Store's Appearance
209
Magento themes 209
Your home page, CMS pages, and static blocks 210
Changing transactional e-mails 216
Time for action – changing the text inside transactional e-mails 218
Choosing between a pre-made and a custom-made theme 221
What to watch out for with premade themes 222 What to watch out for with custom-made themes 223
A combination 223
Suppliers for premade themes 224
Partners for Magento themes 224
Installing a theme 225
Making changes to your theme 227
Kinds of changes 227
Small changes 227
Medium changes 228
Big changes 228
Time for action – changing a heading to normal text 229
Time for action – changing the color of a heading 235
Time for action – removing a block from the right column 238
Summary 243
Chapter 10: Fulfilling Orders
245
Sales orders on the frontend 245
Time for action – creating a first sales order 246
Managing sales orders on the backend 252
Time for action – opening and processing an order 255
Some tips to handle your orders more efficiently 261
Creating sales orders on the backend 261
Time for action – creating a manual Sales Order 262
Returns and Credit Memos 265
Time for action – creating a Credit Memo 266
Chapter 11: Maintaining and Administrating Your Store
271
Managing your store 271
Overview of your Magento installation 272
Go-live checklist configuration settings 276
General settings 277
Web settings 277
HTML Head 278
Placeholder images 278
Contact information and e-mail addresses 279
Tax rates 279
Payment methods and shipping methods 279
Currency 280
Transactional e-mails – password text 280
Admin URL 280
Daily tasks / cron jobs 281
Log cleaning 282
Database backups 282
Product meta information 282
Default images in columns 282
Escalations 283
Further development of your website 283
Time for action – planning for the future 284
Working with partners 286
A Magento theme 286
Functionality 288
Time for action – structuring development partnerships 288
Preface
It was a few years ago, I think it was somewhere in 2008, when I first heard about Magento as the new ''Top open source e-commerce solution''. Actually, at that moment it wasn't yet that good, but I could see the potential of the software already. Especially thinking about other open source solutions such as osCommerce at that time, or VirtueMart running on Joomla. No, those were the days when the e-commerce market was still dominated by large-scale companies and expensive solutions, but things have rapidly changed since then.
During 2009, the first edition of this book was published by Packt, written by William Rice. And at that moment it was actually one of the very first books in the market giving readers the opportunity to learn to work with Magento. Also in that area, times have changed and various new versions of Magento have been released since then. So it's time for a completely updated and rewritten version of that first, popular Magento book. And here it is.
Since 2009 we've been working on several Magento projects and learned to get to know Magento the hard way, sometimes just by trying and failing every now and then. Everyone already experienced with Magento will know what I'm talking about. But don't worry, this book will give you a complete overview of what Magento is, how to install it, and how to use it. When you create an online store with Magento, you usually follow a defined series of steps. This book is arranged to support that process. Each chapter shows you how to get the most out of every step.
By the time you finish reading this book you'll have a basic, but complete online store built on Magento that is ready to start selling.
Introducing Magento
Magento is an ''open source'' software, which basically means that you are allowed to view, edit, and contribute to the source code. A lot of people also think that ''open source'' means ''free''. Although it is certainly true that most open source solutions are available for free, it isn't a mandatory part of the open source principle. Looking at Magento we immediately recognize that, because Magento is available freely as well as in a paid for version. We'll cover more on the differences between those versions later on.
As we already mentioned in this Preface, Magento isn't the only open source e-commerce solution in the market. There are other ones as well. We'll name a few alternatives, without being complete:
OpenCart
PrestaShop
osCommerce (more or less obsolete)
Joomla with VirtueMart
WordPress with e-commerce plugins like WooCommerce
Zen Cart
The first two candidates in this list are the more serious options, whereas the other ones are generally used for smaller shops. But don't get me wrong, as I've already seen excellent shops based on something relatively simple, such as WordPress with WooCommerce as well.
Looking at the commercial/paid market, there are really lots of players and it's hard to make a choice if you're new to the business. Also in here, we'd like to name a few solutions, so that you could get an idea of what's available in the market:
Shopify
X-Cart
Interspire
Volusion
The history of Magento
It was way back in 2001 when Roy Rubin and Yoav Kutner founded a company named Varien. They did many e-commerce implementations during those years, especially using osCommerce. But they were never satisfied with the solution. The lack of stability and flexibility made them think that it could be done better. So they decided to start a new e-commerce project in 2007 and named it Magento. The very first beta version was released in August of that year and it took them until March 2008 to release Magento Version 1.0. From that moment on, things moved fast. The solution became incredibly popular within a couple of years and new versions were released once or twice per year. Starting from that first version in 2008, we've currently reached Version 1.7 at the beginning of 2013.
Meanwhile, a lot has changed in the Varien company. It is now called Magento Inc. and has been acquired completely by eBay during 2011. The Magento community is a bit worried about the plans that eBay has with Magento, especially now that one of the original founders, Yoav Kutner, has left the company. Even keeping possible scenarios in mind, Magento has currently grown to be by far the most popular e-commerce solutions available:
Magento versions
Magento being the number one choice at this moment is great, but what does that mean for the company delivering the solution? How are they making money to continue to support the platform? This is where the various Magento versions come in. During the first few years of Magento, only the free 'Community Edition' was available. Actually, this free Community Edition is the one we'll be covering in this book since most users will start using that version. Magento currently offers two other possibilities:
Enterprise Edition
The Enterprise Edition is Magento's flagship solution, made for large-scale online stores. The Enterprise Edition has functionality on board that the Community Edition is missing and we currently often see that new features are first released in this Enterprise Edition. For companies using this version, the important fact is that Magento offers support on it. The Enterprise Edition has its own version numbers that do not have anything to do with the version number of the Community Edition. Magento Enterprise Edition is currently at Version 1.12 and is currently priced at over $14,000 annually. If you'd like to read more on the Enterprise Edition and its features please browse to:
http://www.magentocommerce.com/product/enterprise-edition.
Formerly, Magento also offered a ''Professional Edition'', which was priced in between the Community and Enterprise Editions. It was discontinued, forcing its customers to the more expensive Enterprise Edition.
Magento Go
More information on Magento Go can be found at:
http://go.magento.com.
Why choose Magento?
We've already mentioned that Magento is currently the most popular e-commerce solution, but why would you choose Magento? There are plenty of alternatives, so what makes Magento so popular? Since you're reading this book you have probably already made your choice. Still it is good to look at a few pros and cons of Magento, to make sure that you made the right decision for your business.
Magento pros
Multi site: One of the strongest pros of Magento is that it's relatively easy to set up multiple stores in multiple languages offering different (or the same) products. You are in control.
Product catalog management: Magento offers extended possibilities to set up
Theming: If you want to change the look and feel of your store, you have to change
your Magento theme or install a completely different one. The number of themes available is huge nowadays, and of course it is also possible to use a custom design for your store. Generally speaking a good Magento theme isn't free. The Marketplace Themeforest (http://themeforest.net) is one of the possibilities to search for and buy a standard Magento theme:
Extensions: Magento is already pretty complete out of the box. But there's always room for improvement or maybe you need to change the functionality because of local requirements. The Magento Community offers a lot of extensions that you can install and use to change the behavior of your store. There are free as well as paid for solutions available and there are (commercial) companies that completely focus on delivering one or multiple Magento extensions.
Scalability: The Magento solution is not only versatile, it is very scalable as well.
You do not need a very large budget to start and once your company is growing, Magento still offers you lots of possibilities. Magento can therefore be a very good choice for small companies with high ambition levels.
Support: Although we already mentioned that official Magento support is available
Magento cons
A book about Magento describing the downside of the software? Yes, we feel that it is important to tell you the whole story. We are indeed Magento fans, but there are downsides to every solution. And Magento has them as well. Let's take a quick look at them:
Magento is consumer oriented: Do you need to run a ''Business to business'' store?
Magento wasn't designed for that originally. Of course it is possible to use Magento that way, but sometimes it doesn't fit so nicely. Recently we've noticed that
Magento is adding functionality to better support this customer group.
Magento is slow: Haven't you heard this one before? The code of Magento is very
well structured but therefore requires more resources than an average website. More on this topic in the next chapter, but remember that if you want to run Magento, you do not go for the cheapest hosting solution.
Magento is difficult: Well, it certainly isn't the easiest solution, because of the large number of features and possibilities. But also if you need to do coding yourself, you need a lot of knowledge about the product. This isn't a programmer's book though, and we feel that learning Magento itself isn't too complicated. This book will help you getting the job done.
What this book covers
Chapter 1, Installation, explains all you need to know to about setting up your own local installation of Magento, or installing Magento at a hosting provider using Installatron.
Chapter 2, General Configuration, talks about Magento as a very versatile but complex product. Before adding your products, you first need to take a closer look at setting up your online store. In this chapter, you'll also learn to set up tax calculations.
Chapter 3, Categories and Attributes, explains that one of Magento's strengths is the way it can handle almost every product type. In this chapter you'll learn to work with Product Categories, Product Attributes, and Attribute Sets.
Chapter 4, Simple Products, talks about adding your first product in your store. During this chapter, you'll learn how to properly set up your products and which fields are important to pay attention to.
Chapter 5, Beyond Adding Simple Products, explains that now that you have added your first product, it's time to explore the other possibilities Magento offers to set up your product catalog. You'll learn to work with downloadable and configurable products.
Chapter 7, Accepting Payments, explains that before being able to start selling, you'll need to set up payment systems, so that you'll be able to receive a payment from your customer. In this chapter we'll show you how to use Magento's common payment methods and how to add your own using a Payment Service Provider.
Chapter 8, Configuring Shipping, will teach you to work with the built-in Shipping Methods of Magento. We also included instructions to work with different kinds of shipping rates.
Chapter 9, Customizing Your Store's Appearance, explains what is often one of the first things you would like to do: changing the look and feel of your online store. However, now that you learned to work with Magento, it's the right time to work in this area and change the way your online store will look.
Chapter10, Fulfilling Orders. Everything is set up now to start receiving your first orders. But once you do, how do you take control of the order process? In this chapter you will learn you how to work with orders, shipping, invoices, and credit notes.
Chapter11, Maintaining and Administrating Your Store, explains that once your store has been set up you're not finished yet. Maintaining your online store is an ongoing process and you have just started it. In this chapter you'll learn which areas you should pay attention to. Besides that we added a checklist that you may use before bringing your store live.
What you need for this book
You do not need any specific software to be able to use the instructions in this book. Just use a modern Windows computer or Mac. You'll need the following tools as well, but it's completely up to you to choose the tool you like:
An FTP client, for instance, Filezilla.
Photo editing software for your images. Photoshop is often used, but expensive. Actually any editing tool that you know how to use should be able to deliver good results.
A text editor, such as Notepad++ (Windows) or Coda 2 (Mac).
Who this book is for
If you are a nontechnical person and are discouraged by the complexity of this powerful e-commerce application, this book is ideal for you. This book would also suit someone with e-commerce knowledge, but requires a guide to getting started with Magento.
To give clear instructions of how to complete a procedure or task, we use:
Time for action – heading
1.
Action 12.
Action 23.
Action 3Instructions often need some extra explanation so that they make sense, so they are followed with:
What just happened?
This heading explains the working of tasks or instructions that you have just completed.
You will also find some other learning aids in the book, including:
Pop quiz – heading
These are short multiple-choice questions intended to help you test your own understanding.
Have a go hero – heading
These practical challenges give you ideas for experimenting with what you have learned.
You will also find a number of styles of text that distinguish between different kinds of information. Here are some examples of these styles, and an explanation of their meaning.
Newterms and importantwords are shown in bold. Words that you see on the screen, in
menus or dialog boxes for example, appear in the text like this: "On the SelectDestination
Location screen, click on Next to accept the default destination."
Warnings or important notes appear in a box like this.
Reader feedback
Feedback from our readers is always welcome. Let us know what you think about this book—what you liked or may have disliked. Reader feedback is important for us to develop titles that you really get the most out of.
To send us general feedback, simply send an e-mail to [email protected], and mention the book title through the subject of your message.
If there is a topic that you have expertise in and you are interested in either writing or contributing to a book, see our author guide on www.packtpub.com/authors.
Customer support
Now that you are the proud owner of a Packt book, we have a number of things to help you to get the most from your purchase.
Downloading the example code
You can download the example code files for all Packt books you have purchased from your account at http://www.packtpub.com. If you purchased this book elsewhere, you can visit http://www.packtpub.com/support and register to have the files e-mailed directly to you.
Errata
Although we have taken every care to ensure the accuracy of our content, mistakes do happen. If you find a mistake in one of our books—maybe a mistake in the text or the code—we would be grateful if you would report this to us. By doing so, you can save other readers from frustration and help us improve subsequent versions of this book. If you find any errata, please report them by visiting http://www.packtpub.com/submit-errata, selecting your book, clicking on the erratasubmissionform link, and entering the details of your errata. Once your
Piracy
Piracy of copyright material on the Internet is an ongoing problem across all media. At Packt, we take the protection of our copyright and licenses very seriously. If you come across any illegal copies of our works, in any form, on the Internet, please provide us with the location address or website name immediately so that we can pursue a remedy.
Please contact us at [email protected] with a link to the suspected pirated material.
We appreciate your help in protecting our authors, and our ability to bring you valuable content.
Questions
1
Installation
OK, so we briefly introduced Magento to you, but actually if all you want to do is to get started? Well, then this chapter is for you. We'll not only discuss how you can set up a local test environment on your machine, but we'll also help you in selecting a good hosting provider for your live store. We'll give an example of installation at a hosting provider, so that you can take all these steps yourself.
This chapter is written especially for you, if you:
Want to set up your own Magento test environment
Want to install Magento using a commonly available hosting service
Are familiar with putting files up on a web server, but that is the limit of your technical knowledge
Are eager to get your store up and running as fast as possible
Already tried installing Magento yourself, but got stuck somewhere
Installing Magento locally
Whether you're working on a Windows computer, Mac, or Linux machine, you will notice very soon that it comes in handy to have a local Magento test environment available. Magento is a complex system and besides doing regular tasks, such as adding products and other content, you should never apply changes to your store directly in the live environment. When you're working on your own a local test system is easy to set up and it gives you the possibility to test changes without any risk. When you're working in a team it makes sense to have a test environment running on your own server or hosting provider. In here, we'll start by explaining how to set up your local test system.
Requirements
Before we jump into action, it's good to have a closer look at Magento's requirements. What do you need to run it?
Simply put, all up-to-date requirements for Magento can be found here:
http://www.magentocommerce.com/system-requirements.
But maybe that's a bit overwhelming if you are just a beginner. So let's break this up into the most essential stuff:
Requirement Notes
Operating system: Linux Magento runs best on Linux, as offered by most hosting companies. Don't worry about your local test environment as that will run on Windows or Mac as well. But for your live store you should go in for a Linux solution because if you decide to run it on anything else other than Linux for a live store, it will not be supported.
Web server: Apache Magento runs on Versions 1.3.x, 2.0.x, and 2.2.x of this very popular web server. As of Version 1.7 of Magento community and Version 1.12 of Magento Enterprise there's a new web server called Nginx that is compatible as well.
Programming language: PHP Magento has been developed using PHP, a programming language which is very popular. Many major open source solutions such as WordPress and Joomla! for instance, have been built using PHP.
Requirement Notes
PHP extensions Magento requires a number of extensions, which should be available on top of PHP itself. You will need: PDO_MySQL, mcrypt, hash, simplexml, GD, DOM, Iconv, and Curl. Besides that you also need to have the possibility to switch off ''safe mode''.
You do not have a clue about all of this? Don't worry. A host offering Magento services already takes care of this. And for your local environment there are only a few additional steps to take. We'll get there in a minute.
Database: MySQL MySQL is the database, where Magento will store all data for your store. Use Version 4.1.20 or (and preferably) newer.
As you can see, even in a simplified format, there are quite some things that need to be taken care of. Magento hosting is not as simple as hosting for a small WordPress or Joomla! website, currently the most popular open source solutions to create a regular site. The requirements are higher and you just cannot expect to host your store for only a couple of dollars per month. If you do, your online store may still work, but it is likely that you'll run into some performance issues. Be careful with the cheapest hosting solutions. Although Magento may work, you'll be consuming too that need server resources soon. Go for a dedicated server or a managed VPS (Virtual Private Server), but definitely for a host that is advertising support of Magento.
Time for action – installing Magento on a Windows machine
We'll speak more deeply about Magento hosting later on. Let's first download and install the package on a local Windows machine. Are you a Mac user? Don't worry, we'll give instructions for Mac users as well later on. Note that the following instructions are written for Windows users, but will contain valuable information for Mac users as well. Perform the following steps to install Magento on your Windows computer:1.
Download the Magento installation package. Head over to http://www.The download screen should look something like this:
2.
If you're a beginner then it is handy to have some sample data in your store. Magento offers a download package containing sample data on the same page, so download that as well. Note that for a production environment you would never install the sample data, but for a test system like the local installation we're doing here, it might be a good idea to use it. The sample data will create a few items and customers in your store, which will make the learning process easier.3.
Next, you need a web server, so that you can run your website locally, on your own machine. On Windows machines, XAMPP is an easy to use all-in-one solution. Download the installer version via: http://www.apachefriends.org/en/ xampp-windows.html. XAMPP is also available for Mac and Linux. The download screen is as follows:Because of this it's best to install XAMPP directly in the root of your hard drive, c:\xampp in most cases. Once you click on OK, you will see the following screen,
which shows the progress of installation:
Once the installation has finished, the software asks if you'd like to start the Control Panel. If you do so, you'll see a number of services that have not been started yet.
The minimum that you should start by clicking the Start button are Apache, the web
5.
Now you're running your own web server on your local computer. Be aware that generally this web server will not be accessible for the outside world. It's running on your local machine, just for testing purposes. Before doing the next step, please verify if your web server is actually running. You can do so by using your browser and going to http://localhost or http://127.0.0.1 If all went well you should see something similar to the following:No result? If you're on a Windows computer, please first reboot your machine. Next, check using the XAMPP control panel if the Apache service is running. If it isn't, try to start it and pay attention to the error messages that appear. Need more help? Start with the help available on XAMPP's website at: http://www.apachefriends.org/en/faq-xampp-windows.html.
Can't start the Apache service? Check if there are any other applications using ports 80 and 443. The XAMPP control panel will give you more information. One of the applications that you should for instance stop before starting XAMPP is Skype. It's also possible to change this setting in Skype by navigating to Tools | Options | Advanced | Connections. Change the port
So, the next thing that needs to be done is installing Magento on top of it. But before we do so, we first have to change a few settings.
6.
Change the following Windows file: C:\Windows\System32\drivers\etc\hosts.Make sure to open your editor using administrator rights, otherwise you will not be able to save your changes. Add the following line to the host file:
127.0.0.1 www.localhost.com.
Do you need a text editor? There are really lots of possibilities when it comes to editing text for the web, as long as you use a ''plain text'' editor. Something like Microsoft Word isn't suitable because it will add a lot of unwanted code to your files! For very simple things like the one above, even Notepad would work. But soon you'll notice that it is much more convenient to use an editor that will help you in structuring and formatting your files. Personally, I can recommend the free Notepad++ for Windows users, which is even available in lots of different languages: http://notepad-plus-plus.org. Mac users can have a look at Coda: http://panic.com/coda/ or TextWrangler http://www.barebones.com/products/textwrangler/.
7.
Unzip the downloaded Magento package and put all files in a subfolder of your XAMPP installation. This could for instance be c:\xampp\htdocs\magento.8.
Now, go to www.localhost.com/magento to check if the installation screen ofBefore you start the installation, first create a MySQL database. To do this, use a second browser tab and navigate to localhost | phpMyAdmin. By default the user
is root, and so without a password you should be able to continue without logging in. Click on Databases and create a database with a name of your choice. Write it down, as you will need it during the Magento installation. After creating the database you may close the browser tab.
9.
It's finally time to start the installation process now. Go back to the installation screen of Magento, accept the license agreement and click on Continue.10.
Next, set your country, Time Zone and Default Currency. If you're working with11.
The next screen is actually the most important one of the installation process and this is where most beginners go wrong because they do not know what values to use. Using XAMPP this is an easy task, however, fill in your Database Name, UserName (root) and do not forget to check the Skip Base URL Validation Before the Next Step box, otherwise your installation might fail:
In this same form there are some fields that you can use to immediately improve the security level of your Magento setup. On a local test environment that isn't necessary, so we'll pay attention to those settings later on when we'll discuss installing Magento at a hosting provider. Please note that the Use Secure URLs
12.
In the last step, yes, really! Just fill out your personal data and chose a username and password. Also in here, since you're working locally you do not have to create a complicated, unique password now. But you know what we mean, right? Doing a live installation at a hosting provider requires a good, strong password! You do not have to fill the Encryption Key field, Magento will do that for you:What just happened?
Congratulations! You just installed Magento for the very first time! Summarizing it, you just:
Downloaded and installed XAMPP
Changed your Windows host file
Created a MySQL database using PhpMyAdmin
Installed Magento
I'm on Mac; what should I do?
Basically, the steps using XAMPP are a bit different if you're using Mac. We shall be using Mac OS X 10.8 as an example of Mac OS version. According to our experience, as an alternative to XAMPP, MAMP is a bit easier if you are working with Mac. You can find the MAMP software here:
http://www.mamp.info/en/downloads/index.html.
And the documentation for MAMP is available here:
http://documentation.mamp.info/en/mamp/installation.
The good thing about MAMP is that it is easy to install, with very few configuration changes. It will not conflict with any already running Apache installation on your Mac, in case you have any. And it's easy to delete as well; just removing the Mamp folder from your Applications folder is already sufficient to delete MAMP and all local websites running on it.
You can find the security settings menu by again going to the Apple menu and then selecting
System Preferences:
In System Preferences, select the Security & Privacy icon that can be found in the first row
as seen in the following screenshot:
In here, press the padlock and enter your admin password. Next, select the Anywhere radio
Open the image you've downloaded and simply move the Mamp folder to your
Applications folder. That's all. Now that you've MAMP installed on your system, you may launch MAMP.app (located at Applications | Mamp | Mamp.app).
While you're editing your MAMP settings, MAMP might prompt you for an administrator password. This is required because it needs to run two processes: httpd (Apache) and mysqld (MySQL). Depending on the settings you set for those processes, you may or may not need to enter your password.
Once you open MAMP, click on the Preferences button. Next, click on Ports. The default
MAMP ports are 8888 for Apache, and 8889 for MySQL. If you use this configuration, you will not be asked for your password, but you will need to include the port number in the URL when using it (http://localhost:8888). You may change this by setting the Apache port to 80, for which you'll probably have to enter your administrator password. If you have placed your Magento installation in the Shop folder, it is advised to call your Magento installation through the following URL: http://127.0.0.1:8888/shop/, instead of http://localhost:8888/shop/. The reason for this is that Magento may require dots in the URL.
The last thing you need to do is visit the Apache tab, where you'll need to set a document root. This is where all of your files are going to be stored for your local web server. An example of a document root is Users | Username | Sites.
To start the Apache and MySQL servers, simply click on Start Servers from the main MAMP
screen. After the MAMP servers start, the MAMP start page should open in your web
browser. If it doesn't, click on Open start page in the MAMP window. From there please select phpMyAdmin. In PhpMyAdmin, you can create a database and start the Magento installation
procedure, just like we did when installing Magento on a Windows machine. See the Time for action – installing Magento on a Windows machine section, point 8 to continue the installation of Magento. Of course you need to put the Magento files in your Mamp folder now, instead of the Windows path mentioned in that procedure.
In some cases, it is necessary to change the Read & Write permissions of your
Magento folder before you can use Magento on Mac. To do that, right-click
on the Magento folder, and select the Get Info option. In the bottom of the
Installing Magento at a hosting service
There are thousands of hosting providers with as many different hosting setups. The difficulty of explaining the installation of Magento at a commonly used hosting service is that the procedure differs from hosting provider to hosting provider, depending on the tools they use for their services. There are providers, for instance, who use Plesk, DirectAdmin, or cPanel. Although these user environments differ from each other, the basic steps always remain the same:
Check the requirements of Magento (there's more information on this topic at the beginning of this chapter).
Upload the Magento installation files using an ftp tool, for instance, Filezilla (download this free at: http://filezilla-project.org).
Create a database. This step differs slightly per hosting provider, but often a tool, such as PhpMyAdmin is used. Ask your hosting provider if you're in doubt about this step. You will need: the database name, database user, password, and the name of the database server.
Browse to your domain and run the Magento installation process, which is the same as we saw earlier in this chapter.
How to choose a Magento hosting provider
One important thing we didn't discuss yet during this chapter is selecting a hosting provider that is capable of running your online store. We already mentioned that you should not expect performance for a couple of dollars per month. Magento will often still run at a cheap hosting service, but the performance is regularly very poor. So, you should pay attention to your choices here and make sure you make the right decision. Of course everything depends on the expectations for your online store. You should not aim for a top performance, if all you expect to do during your first few years is 10,000 dollars of revenue per year. OK, that's difficult sometimes. It's not always possible to create a detailed estimation of the revenue you may expect. So, let's see what you should pay attention to:
Does the hosting provider mention Magento on its website? Or maybe they are even offering special Magento hosting packages? If yes, you are sure that technically Magento will run. There are even hosting providers for which Magento hosting is their speciality.
Ask if the hosting provider has Magento experts working for them and if yes, how many. Especially in case of large, high-traffic stores, it is important to hire the knowledge you need.
Do not forget to check online forums and just do some research about this provider. However, we must also admit that you will find negative experiences of customers about almost every hosting provider.
Are you just searching for a hosting provider to play around with Magento? In that case any cheap hosting provider would do, although your Magento store could be very slow. Take for instance, Hostgator (http://hostgator.com), which offers small hosting plans for a couple of U.S. dollars per month. Anyway, a lot of hosts are offering a free trial period, which you may use to test the performance.
Installatron
Can't this all be done a bit more easily? Yes, that's possible. If your host offers a service named Installatron and if it also includes Magento within it, your installation process will become a lot easier. We could almost call it a ''one-click'' installation procedure. Check if your hosting provider is offering the latest Magento version; this may not always be the case!
Of course you may ask your (future) hosting provider if they are offering Installatron on their hosting packages. The example shown is from Simple Helix provider (http://simplehelix. com), a well-known provider specialized in Magento hosting solutions.
Time for action – installing Magento using Installatron
The following short procedure shows the steps you need to take to install Magento using Installatron:
2.
Next, within Installatron Applications Installer, click on the ApplicationsBrowser option:
3.
Inside Applications Browser, you'll see a list of CMS solutions and webshop software that you can install. Generally Magento can be located in the4.
Of course, click on Magento and after that click on the InstallthisapplicationNote that for this installation, we've chosen to install the Magento sample data, which will help us in getting an explanation of the Magento software. It's fine if you're installing for learning purposes, but in a store that is meant to be your live shop, it's better to start off completely empty.
In the second part of the installation form, there are a few fields that you have to pay attention to:
Switch off automatic updates
5.
Click on the Install button when you are done reviewing the form. Installatron willnow begin installing Magento. You will receive an e-mail when Installatron is ready. It contains information about the URL you just installed and your login credentials to your newfangled Magento shop. That's all! Our just installed test environment is available at http://www.boostingecommerce.com/test. If all is well, yours should look similar to the following screenshot:
How to test the minimum requirements
If your host isn't offering Installatron and you would like to install Magento on it, how will you know if it's possible? In other words, will Magento run? Of course you can simply try to install and run Magento, but it's better to check for the minimum requirements before going that route. You can use the following method to test if your hosting provider meets all requirements needed to run Magento.
First, create a text file using your favorite editor and name it as phpinfo.php. The contents of the file should be:
<?php
Save and upload this file to the root folder of your hosting environment, using an ftp tool such as Filezilla.
Next, open your browser using this address: http://yourdomain.com/phpinfo.php; use your own domain name of course. You will see a screen similar to the following:
Note that in the preceding screenshot, our XAMPP installation is using PHP 5.4.7. And as we mentioned earlier, Magento isn't compatible with this PHP version yet. So what about that? Well, XAMPP just comes with a recent stable release of PHP. Although it is officially not supported, in most cases your Magento test environment will run fine.
What is SSL and do I need it?
SSL (Secure Sockets Layer) is the standard for secure transactions on the web. You'll
recognize it by websites running on https:// instead of http://. To use it, you need to buy an SSL Certificate and add it to your hosting environment. Some hosting providers offer it as a service, whereas others just point to third parties offering SSL Certificates, like for instance, RapidSSL (https://www.rapidssl.com) or VeriSign (http://www.verisign. com), currently owned by Symantec.
We'll not offer a complete set of instructions on using SSL here, which is beyond the scope of this book. However, it is good to know when you'll need to pay attention to SSL. There can be two reasons to use an SSL certificate:
1. You are accepting payments directly on your website and may even be storing credit card information. In such a case, make sure that you are securing your store by using SSL. On the other hand, if you are only using third parties to accept payments, like for example, Google Checkout or PayPal, you do not have to worry about this part. The transaction is done at the (secure part of the) website of your payment service provider and in such a case you do not need to offer SSL.
Summary
2
General Configuration
The first steps are often the hardest and we've seen lots of users struggling with the installation of their Magento environment. But once done, we're ready to continue and start some sales! Unfortunately, there's more that needs to be done before you can bring your store live to the public. This chapter will help you to learn about the settings that control Magento.
This chapter is written especially for you, if you:
Need to take the first steps after installation: what to do next?
Want to learn how to set up websites, stores, and storefronts in Magento
Need to set up a solid system for calculating tax on your orders
Want to learn what you need to do with all those different settings Magento has to offer
The installation is complete; what's next?
In the previous chapter, we did an empty local installation of Magento, as well as an online installation using Installatron. For that second install, we've chosen to install Magento's example data as well. Depending on the steps you've taken, your store might currently be filled or completely empty. In the following screenshot you can see both scenarios:
Don't worry too much if your store looks like the one on the left. Having the sample data available is convenient, but remember that you must find out where everything is located and replace or delete it before you'll be able to bring your store live. An empty store works just as well, because in that case you only have to concentrate on what you need to add. During the next few chapters, we'll be working from our local, empty Magento installation.
The Magento Dashboard
What we didn't do yet, is to take a look at the Magento Admin panel, from which you will configure and maintain your online store. Let's do that first. If you're on a local installation please browse to:
http://www.localhost.com/magento/admin
Or, when you installed the software at a provider go to:
http://www.yourdomain.com/admin
Please note that the exact path depends on the settings you used during installation. Our demo store installed using Installatron can for instance be found at:
http://www.boostingecommerce.com/test/admin
Use the user name and password you created during installation and log in. Next, the Magento Dashboard will appear:
Let's have a quick look at what's available here:
On the top there's a search form, a (commercial) link to Magento Go, and a link to
Log Out.
Next, there's space allocated for system messages. In this example, we will immediately see a warning about indexes being out of date. You do not have to worry about this now, since will touch the topics of caching and indexes later on.
Just above that line, there's another commercial link to Paypal and a link to your inbox messages. Just go ahead and click on it to check what's in it. The messages system of Magento will warn you about important (security) updates, so it's wise to pay attention to it. Just after installation, you may assume that you're on the latest version and that all the messages shown here are obsolete already. Especially when you're planning for a production environment, it would be wise to mark the messages "as read", otherwise they'll keep on coming back. After cleaning up, click on the Dashboard link in the top left menu to return:
Finally, the largest part of the Dashboard screen has been taken by sales statistics. Since we are working on our empty local installation everything is still zero at this moment.
Have a go hero – changing the admin URL
Setting up your store
The System menu, in the top-right corner, will give you almost everything you need to
configure your online store. Almost everything, because some settings, such as taxes for instance, will be set up somewhere else. More about taxes later on in this chapter, but let's first have a look at what the System menu has to offer:
System Menu item What you will need it for
My Account A simple screen holding your login details, e-mail address, and
password.
Notifications The messages screen we already visited above.
Tools Holds a tool to create and manage backups of your store. We
will cover more on maintaining your store later in Chapter 11,
Maintaining and Administrating Your Store. Keep in mind that making backup copies of your store is essential! There's also a tool for compiling Magento, to increase performance, but using it during the set up and development of your store isn't useful.
Web Services These are tools to let your store interact with other systems.
Using these requires a deeper technical knowledge and is beyond the scope of this book.
Design Holds a tool to add temporary design changes to your store. This could be used to display banners during a certain period, but normally you would handle that kind of things in a different way. We will cover more on using designs for your store in Chapter 9,
System Menu item What you will need it for
Import/Export These are tools to export data from Magento to another solution, or to import data from other sources. This could be used to import a customer- or item-database for instance. This requires some technical knowledge to make use of it.
Manage Currency This tool can be used to maintain currency rates. It could be
important if you want to offer automatic currency calculations. You'll often see that you will prefer manual price changes, even if you're working with multiple currencies. That is caused by the fact that automatic currency changes would result in prices like $14.91 instead of $14.95 or simply $15. But, it is possible to use and maintain this table manually as well as automatically.
Transactional Emails This is an important area, because in here you'll be able to control the contents of the automatic messages that Magento will send to your customers. More on Transactional Emails can be found in Chapter 9, Customizing Your Store's Appearance.
Custom Variables These can be used in your Transactional Emails. By defining some custom HTML code here, you'll be able to simply call that piece of code from within your e-mails. This is especially helpful to make sure that you do not have to change every single e-mail template if only one item, (such as a banner for instance) is to be changed. Custom variables can also be used on content pages.
Permissions This gives you the possibility to define users and their roles in
order to make sure that employees can only access the parts they need. This is helpful in larger companies, when you're working with multiple people on the same store.
Magento Connect In here you'll be able to add extensions to increase the
functionality of Magento. Working with extensions through Magento Connect is really great, but you have to be careful as well. We'll cover this part in depth in Chapter 11, Maintaining and Administrating Your Store.
Cache Management Caching is important to keep Magento running at a reasonable
speed. In this area, you can refresh your caches. This is often helpful when you're in the process of setting up your store or making changes to it. For now just remember that if you make changes to your store that are not visible to the visitor, please go here to refresh the cache.
Index Management The same is applicable to (database) indexes, as they make sure
that the information being retrieved from your database is found quickly. Every now and then you need to refresh the indexes of your database.
System Menu item What you will need it for
Order Statuses A table holding the different statuses an order could have.
Normally you do not need to touch it.
Configuration This is where the action is. In this menu item, there are lots and
lots of settings that control your store. The most important ones will be discussed during the remaining part of this chapter.
Managing Stores
Before we jump into the configuration part, it is good to know about the concept of Websites, Stores, and Store Views in Magento.
One of Magento's strong points is the possibility of adding multiple online stores within the same Magento installation. Using this, for example, you have the possibility of running multiple stores in several languages, offering the same (or a similar) set of products. These stores can even use the same settings if you'd like to, or only change those parameters that are important to be different. Magento uses the following naming convention, to set up a structure of online stores:
Website: This is the main level. A Website should contain at least one Store with one Store view underneath it. In the default setup, there is one Website, one Store, and one Store View as shown in the following screenshot:
Store: One level lower you'll find the Store. It's good to know that these three levels are just abstraction levels that you can use to organize your content and settings. The Store level isn't very important, since most settings can be altered on Website or Store View level.
Even above the highest level (Website), there are also settings that are ''Global'', which means that such a setting is the same for your entire Magento installation and there's no possibility to use a different setting on a lower level. This is currently somewhat abstract, but you'll soon see how these levels can be used in practice.
If you'd like to add Websites, Stores, and Store Views, this is the area to do so. Please choose names that make sense as soon as you're going to add anything. The ''default'' names should only be used if you're sticking with one single setup.
It's important to know that this setup doesn't mean that there's a direct connection with the URL/domain names you're using. You can route URL's to Websites or Stores, as well as Store Views. The different possibilities for your domain are as follows:
myonlinestore.com: This sets up your store on a new domain.
myonlinestore.com/newstore: This sets up the new store in a subfolder on your existing domain.
newstore.myonlinestore.com: This set up your store on a subdomain of your existing domain.
In practice, we often see the first option, where we have a single instance of one Website, one Store and one Store View. This is what we'll be doing throughout this book. The second and third options are often used to offer the same website in a different language, for different Store Views. Using the principles above we can create the following structure:
General settings
Once this is clear, it's time to actually go through the settings of Magento and make changes wherever needed.
Navigate to System | Configuration using the menu. In there, the first screen you'll see is the
General section holding data, such as your base country and countries that are allowed. Note
that if you're not selling internationally, it would be good to limit the available countries here, so that visitors are not able to select countries that you do not want to do business with.
There are two things here that refer back to the topic we learned in the previous section:
2. On the right-hand side of every form setting, you will see [GLOBAL], [WEBSITE], or
[STORE VIEW]. This means that the particular setting can be changed at that level. The Postal Code is Optional for the following countries section in the example above for instance is a [Global] setting. This means that if you decide to turn off postal (ZIP) codes for Ireland (they do not use such a system), for instance, then all websites and stores within your Magento installation will stop asking for the postal code. On the other hand, the Allow Countries section is changeable to StoreView
level, which means that it is possible to run an international and national online store next to each other within the same Magento environment.
Scrolling down a bit shows some other settings that you need to take care of:
In here, set the Timezone you're in and determine your regular working days. Don't worry, as
your online store will also be available during weekends. Below that, enter your Store Name
and contact details. The VAT Number field is important for EU businesses, and we will cover more on that topic later on.
Next, we'll have a look at the settings of the Web section (click on the Web menu on the left):
In this section you'll see the Base URL of your store, and in this case our local installation. If you installed Magento at a hosting provider, probably this is already showing your domain name. Although the setting can be changed, please be careful, because changing it without taking the correct steps could break your store!
To explain better what the default content of these fields means, the {{unsecure_base_url}}
value used in first field, Base URL, is used in the fields below. Note that all fields below the
Base URL field use that variable. Hence, changing the first field, will automatically change the others as well.
Search engine optimization
You might have noticed that we did not mention the first fields of the Web section, named,
When working with Magento, or any other web solution, it's very important to optimize your website for the search engines as much as possible. Although your customers and visitors are the most important, it will lead you nowhere if your store is doing badly in the search engines. There's really a lot you can do in this area. As mentioned, by default, Magento has already enabled Search Engine Friendly URLs. This means that the URL shown in the top of your browser would for instance look like this:
http://myonlinestore.com/shoes/womens-boot-brown
Whereas a non-optimized URL could look as follows:
http://myonlinstore.com/ catalog/product/view/id/1537/category/28
The Use Web Server Rewrites setting is set to Yes by default in Magento. This means that the
Search Engine Friendly URLs will be used, which is good, but your webserver has to support it though. When you're working with Apache (or locally Xampp) this generally works fine. You should be able to find a file in the root of your site named .htaccess. Note that the file starts with a point and that it cannot have an extension (like .txt). Whenever you're editing this file, you need to keep the name as it is.
There's much, much more to discover when we are talking about Magento and Search Engine Optimization. We suggest that you first learn to use all the Magento basics in this book. After that, come back here and find more information on Magento and SEO using the following links:
We continue to work in our settings page, in the Default Pages area. For example, it can be used to change which page will be the homepage of your store. In a default setup, we can leave it unchanged.
In the next part, we'll look at the Design section. So save again and click on Design on the left-hand side. The first parts are used to set the design of your store and working with themes. We will cover more on this in Chapter 9, Customizing Your Store's Appearance.
We'll look at the settings at HTML Head, where you can set your Favicon icon (used by browsers) and more important, make some SEO-related settings. Enter your Default meta title and description, just like in the following example. You may also enter a couple of keywords in the Default Keywords field, but please be aware that search engines do not really pay attention to it anymore. So don't overdo it.
You may also use the Title Suffix field if you'd like to see your store name at the end of every meta title, but it's not so common anymore to do so. Also pay attention to the Default
Robots field. By default it will allow search engines to index your site. If you're on a local test
A bit lower on the same page you'll find settings for Header and Footer of your store. These fields also contain some default data that you need to overwrite with your own, since these defaults remain visible to your visitors. Note that the logo field can be overwritten, but then there's no possibility to upload it. You need to move your logo image manually by using your FTP client to the correct location, which is skin/|frontend/|default/|default/| images. Note that this path is only correct if you are still using the default Magento theme. If you're on a local installation of Magento, you can simply copy and paste your file to the correct location.
In most cases, you will not be using the default theme of Magento, but will have installed something different. If you plan to do so, it could very well happen that changing the logo of your theme will work differently. Please read Chapter 8, Configuring Shipping for further instructions on installing a theme
and also read the theme documentation to find out how to configure it.
In the next section, Currency Setup, you can set how your online store should work with