by Stephen Randy Davis
and Chuck Sphar
FOR
111 River Street Hoboken, NJ 07030-5774
www.wiley.com
Copyright © 2006 by Wiley Publishing, Inc., Indianapolis, Indiana Published by Wiley Publishing, Inc., Indianapolis, Indiana Published simultaneously in Canada
No part of this publication may be reproduced, stored in a retrieval system or transmitted in any form or by any means, electronic, mechanical, photocopying, recording, scanning or otherwise, except as permit-ted under Sections 107 or 108 of the 1976 Unipermit-ted States Copyright Act, without either the prior written permission of the Publisher, or authorization through payment of the appropriate per-copy fee to the Copyright Clearance Center, 222 Rosewood Drive, Danvers, MA 01923, (978) 750-8400, fax (978) 646-8600. Requests to the Publisher for permission should be addressed to the Legal Department, Wiley Publishing, Inc., 10475 Crosspoint Blvd., Indianapolis, IN 46256, (317) 572-3447, fax (317) 572-4355, or online at
http://www.wiley.com/go/permissions.
Trademarks:Wiley, the Wiley Publishing logo, For Dummies, the Dummies Man logo, A Reference for the Rest of Us!, The Dummies Way, Dummies Daily, The Fun and Easy Way, Dummies.com, and related trade dress are trademarks or registered trademarks of John Wiley & Sons, Inc., and/or its affiliates in the United States and other countries, and may not be used without written permission. All other trademarks are the property of their respective owners. Wiley Publishing, Inc., is not associated with any product or vendor mentioned in this book.
LIMIT OF LIABILITY/DISCLAIMER OF WARRANTY: THE PUBLISHER AND THE AUTHOR MAKE NO REP-RESENTATIONS OR WARRANTIES WITH RESPECT TO THE ACCURACY OR COMPLETENESS OF THE CON-TENTS OF THIS WORK AND SPECIFICALLY DISCLAIM ALL WARRANTIES, INCLUDING WITHOUT LIMITATION WARRANTIES OF FITNESS FOR A PARTICULAR PURPOSE. NO WARRANTY MAY BE CRE-ATED OR EXTENDED BY SALES OR PROMOTIONAL MATERIALS. THE ADVICE AND STRATEGIES CON-TAINED HEREIN MAY NOT BE SUITABLE FOR EVERY SITUATION. THIS WORK IS SOLD WITH THE UNDERSTANDING THAT THE PUBLISHER IS NOT ENGAGED IN RENDERING LEGAL, ACCOUNTING, OR OTHER PROFESSIONAL SERVICES. IF PROFESSIONAL ASSISTANCE IS REQUIRED, THE SERVICES OF A COMPETENT PROFESSIONAL PERSON SHOULD BE SOUGHT. NEITHER THE PUBLISHER NOR THE AUTHOR SHALL BE LIABLE FOR DAMAGES ARISING HEREFROM. THE FACT THAT AN ORGANIZATION OR WEBSITE IS REFERRED TO IN THIS WORK AS A CITATION AND/OR A POTENTIAL SOURCE OF FUR-THER INFORMATION DOES NOT MEAN THAT THE AUTHOR OR THE PUBLISHER ENDORSES THE INFOR-MATION THE ORGANIZATION OR WEBSITE MAY PROVIDE OR RECOMMENDATIONS IT MAY MAKE. FURTHER, READERS SHOULD BE AWARE THAT INTERNET WEBSITES LISTED IN THIS WORK MAY HAVE CHANGED OR DISAPPEARED BETWEEN WHEN THIS WORK WAS WRITTEN AND WHEN IT IS READ.
For general information on our other products and services, please contact our Customer Care Department within the U.S. at 800-762-2974, outside the U.S. at 317-572-3993, or fax 317-572-4002. For technical support, please visit www.wiley.com/techsupport.
Wiley also publishes its books in a variety of electronic formats. Some content that appears in print may not be available in electronic books.
Library of Congress Control Number: 2005927620 ISBN-13: 978-0-7645-9704-6
ISBN-10: 0-7645-9704-3
Manufactured in the United States of America 10 9 8 7 6 5 4 3 2 1
Stephen R. Davis, who goes by the name of Randy, lives with his wife and son near Dallas, Texas. He and his family have written numerous books, including C++ For Dummiesand C++ Weekend Crash Course.Stephen works for L-3 Communications.
Chuck Spharescaped Microsoft’s C++ documentation camps in 1997, after six years’ hard labor as a senior technical writer. He’s perpetrated two previous tomes, one on object-oriented programming for the Mac and one on Microsoft’s MFC class library. He’s currently finishing a novel about ancient Rome
For Pam and the Moms — Chuck Sphar
Acknowledgments
I would like to thank Claudette Moore and Debbie McKenna, who brought the book to me. I also want to thank Randy Davis for being willing to hand over his baby to a guy he didn’t know. I’d have found that very hard, and I hope I’ve done justice in extending his excellent first edition.
Many thanks are due as well to the fine folks at Wiley, starting with Acquisitions Editor Katie Feltman and Project Editor Kim Darosett. Kim’s astute shaping helped turn me into a For Dummiesauthor, no mean feat. I’d also like to thank Chris Bower for his sharp technical eye and excellent C# knowledge, John Edwards for much of the book’s consistency, and the art, media, and other production folks who turn my files into a real book.
Some of the people who helped bring this book to market include the following:
Acquisitions, Editorial, and Media Development
Project Editor:Kim Darosett
Acquisitions Editor:Katie Feltman
Copy Editor:John Edwards
Technical Editor:Chris Bower
Editorial Manager:Leah Cameron
Media Project Supervisor:Laura Moss
Media Development Specialists:Angie Denny, Travis Silvers, Kit Malone, Steve Kudirka
Media Development Manager:
Laura VanWinkle
Media Development Supervisor:
Richard Graves
Editorial Assistant:Amanda Foxworth
Cartoons:Rich Tennant (www.the5thwave.com)
Composition Services
Project Coordinator: Jennifer Theriot
Layout and Graphics: Carl Byers, Andrea Dahl, Joyce Haughey, Stephanie D. Jumper, Heather Ryan, Erin Zeltner
Proofreaders: Leeann Harney,
Carl William Pierce, Dwight Ramsey, TECHBOOKS Production Services
Indexer: TECHBOOKS Production Services
Publishing and Editorial for Technology Dummies
Richard Swadley,Vice President and Executive Group Publisher
Andy Cummings,Vice President and Publisher
Mary Bednarek,Executive Acquisitions Director
Mary C. Corder,Editorial Director
Publishing for Consumer Dummies
Diane Graves Steele,Vice President and Publisher
Joyce Pepple,Acquisitions Director
Composition Services
Gerry Fahey,Vice President of Production Services
Introduction ...1
Part I: Creating Your First C# Programs ...9
Chapter 1: Creating Your First C# Windows Program ...11
Chapter 2: Creating Your First C# Console Application ...29
Part II: Basic C# Programming ...37
Chapter 3: Living with Variability — Declaring Value-Type Variables ...39
Chapter 4: Smooth Operators ...57
Chapter 5: Controlling Program Flow ...71
Part III: Object-Based Programming ...99
Chapter 6: Collecting Data — The Class and the Array ...101
Chapter 7: Putting on Some High-Class Functions ...127
Chapter 8: Class Methods ...163
Chapter 9: Stringing in the Key of C# ...187
Part IV: Object-Oriented Programming ...211
Chapter 10: Object-Oriented Programming — What’s It All About? ...213
Chapter 11: Holding a Class Responsible ...221
Chapter 12: Inheritance — Is That All I Get? ...251
Chapter 13: Poly-what-ism? ...273
Part V: Beyond Basic Classes ...301
Chapter 14: When a Class Isn’t a Class — The Interface and the Structure ...303
Chapter 15: Asking Your Pharmacist about Generics ...333
Part VI: The Part of Tens ...365
Chapter 16: The 10 Most Common Build Errors (And How to Fix Them) ...367
Chapter 17: The 10 Most Significant Differences between C# and C++ ...379
Bonus Chapter 2: Handling Files and Libraries in C# ...CD27 Bonus Chapter 3: Stepping through Collections ...CD55 Bonus Chapter 4: Using the Visual Studio Interface ...CD99 Bonus Chapter 5: C# on the Cheap ...CD139
Introduction ...1
What’s New in C# 2.0 ...2
About This Book ...3
What You Need to Use the Book ...3
How to Use This Book ...4
How This Book Is Organized ...4
Part I: Creating Your First C# Programs ...4
Part II: Basic C# Programming ...4
Part III: Object-Based Programming ...5
Part IV: Object-Oriented Programming ...5
Part V: Beyond Basic Classes ...5
Part VI: The Part of Tens ...5
About the CD-ROM ...6
Icons Used in This Book ...6
Conventions Used in This Book ...7
Where to Go from Here ...7
Part I: Creating Your First C# Programs ...9
Chapter 1: Creating Your First C# Windows Program . . . .11
Getting a Handle on Computer Languages, C#, and .NET ...11
What’s a program? ...12
What’s C#? ...12
What’s .NET? ...13
What is Visual Studio 2005? What about Visual C#? ...14
Creating a Windows Application with C# ...15
Creating the template ...15
Building and running your first Windows Forms program ...18
Painting pretty pictures ...20
Make it do something, Daddy ...25
Trying out the final product ...27
Visual Basic 6.0 programmers, beware! ...28
Chapter 2: Creating Your First C# Console Application . . . .29
Creating a Console Application Template ...29
Creating the source program ...30
Taking it out for a test drive ...31
Creating Your First Real Console App ...32
Reviewing the Console Application Template ...33
The program framework ...33
Comments ...34
Part II: Basic C# Programming ...37
Chapter 3: Living with Variability —
Declaring Value-Type Variables . . . .39
Declaring a Variable ...40
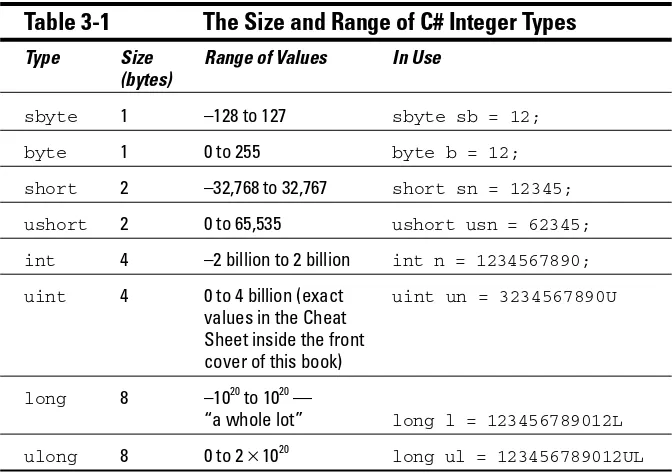
What’s an int? ...40
Rules for declaring variables ...42
Variations on a theme — different types of int ...42
Representing Fractions ...43
Handling Floating Point Variables ...44
Declaring a floating point variable ...45
Converting some more temperatures ...46
Examining some limitations of floating point variables ...46
Using the Decimal Type — A Combination of Integers and Floats ...48
Declaring a decimal ...48
Comparing decimals, integers, and floating point types ...49
Examining the bool Type — Is It Logical? ...49
Checking Out Character Types ...50
Char variable type ...50
Special char types ...50
The string type ...51
What’s a Value-Type? ...52
Comparing string and char ...53
Declaring Numeric Constants ...54
Changing Types — The Cast ...55
Chapter 4: Smooth Operators . . . .57
Performing Arithmetic ...57
Simple operators ...57
Operating orders ...58
The assignment operator ...60
The increment operator ...61
Performing Logical Comparisons — Is That Logical? ...62
Comparing floating point numbers: Is your float bigger than mine? ...63
Compounding the confusion with compound logical operations ...64
Finding the Perfect Date — Matching Expression Types ...66
Calculating the type of an operation ...67
Assigning types ...68
The Ternary Operator — I Wish It Were a Bird and Would Fly Away ...69
Chapter 5: Controlling Program Flow . . . .71
Controlling Program Flow ...72
Introducing the if statement ...73
Examining the else statement ...75
Avoiding even the else ...76
Looping Commands ...80
Introducing the while loop ...80
Using the do...while loop ...84
Breaking up is easy to do ...84
Looping until you get it right ...86
Focusing on scope rules ...89
Understanding the Most Common Control: The for Loop ...90
An example ...91
Why do you need another loop? ...91
Nested Loops ...92
The switch Control ...96
The Lowly goto Statement ...98
Part III: Object-Based Programming ...99
Chapter 6: Collecting Data — The Class and the Array . . . .101
Showing Some Class ...102
Defining a class ...102
What’s the object? ...103
Accessing the members of an object ...104
Can you give me references? ...107
Classes that contain classes are the happiest classes in the world ...108
Generating static in class members ...110
Defining const data members ...111
The C# Array ...111
The argument for the array ...112
The fixed-value array ...112
The variable-length array ...114
Lining Up Arrays of Objects ...118
A Flow Control Made foreach Array ...120
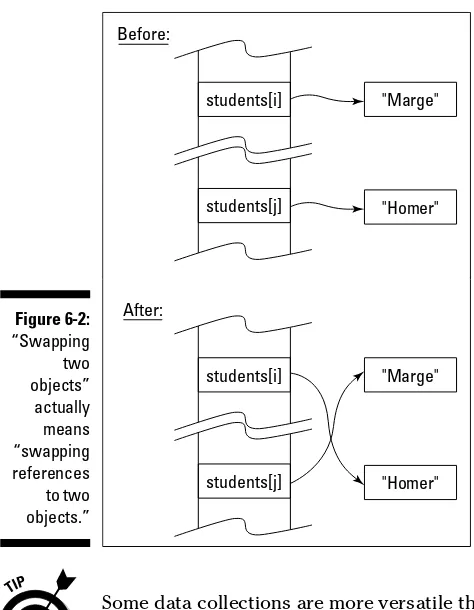
Sorting through Arrays of Objects ...122
Chapter 7: Putting on Some High-Class Functions . . . .127
Defining and Using a Function ...127
An Example Function for Your Files ...129
Having Arguments with Functions ...135
Passing an argument to a function ...136
Passing multiple arguments to functions ...136
Matching argument definitions with usage ...138
Overloading a function does not mean giving it too much to do ...139
Implementing default arguments ...140
Passing value-type arguments ...142
Returning Values after Christmas ...147
Returning a value via return postage ...147
Returning a value using pass by reference ...148
When do I return and when do I out? ...149
The Main( ) Deal — Passing Arguments to a Program ...153
Passing arguments from a DOS prompt ...155
Passing arguments from a window ...157
Passing arguments from Visual Studio 2005 ...159
Chapter 8: Class Methods . . . .163
Passing an Object to a Function ...163
Defining Object Functions and Methods ...165
Defining a static member function ...165
Defining a method ...167
Expanding a method’s full name ...168
Accessing the Current Object ...169
What is the this keyword? ...171
When is this explicit? ...172
What happens when I don’t have this? ...174
Getting Help from Visual Studio — Auto-Complete ...176
Getting help on built-in functions from the System Library ...177
Getting help with your own functions and methods ...179
Adding to the help ...180
Generating XML documentation ...185
Chapter 9: Stringing in the Key of C# . . . .187
Performing Common Operations on a String ...188
The union is indivisible, and so are strings ...188
Equality for all strings: The Compare( ) method ...189
Would you like your compares with or without case? ...193
What if I want to switch case? ...193
Reading character input ...194
Parsing numeric input ...196
Handling a series of numbers ...198
Controlling Output Manually ...200
Using the Trim( ) and Pad( ) methods ...201
Using the Concatenate function ...203
Let’s Split( ) that concatenate program ...205
Controlling String.Format( ) ...206
Part IV: Object-Oriented Programming ...211
Chapter 10: Object-Oriented Programming —
What’s It All About? . . . .213
Object-Oriented Concept #1 — Abstraction ...213
Preparing functional nachos ...214
Preparing object-oriented nachos ...215
Object-Oriented Concept #2 — Classification ...215
Why Classify? ...216
Object-Oriented Concept #3 — Usable Interfaces ...217
Object-Oriented Concept #4 — Access Control ...218
Chapter 11: Holding a Class Responsible . . . .221
Restricting Access to Class Members ...221
A public example of public BankAccount ...222
Jumping ahead — other levels of security ...224
Why Worry about Access Control? ...225
Accessor methods ...226
Access control to the rescue — an example ...227
So what? ...230
Defining class properties ...231
Getting Your Objects Off to a Good Start — Constructors ...233
The C#-Provided Constructor ...233
The Default Constructor ...235
Constructing something ...236
Executing the constructor from the debugger ...238
Initializing an object directly — the default constructor ...241
Seeing that construction stuff with initializers ...242
Overloading the Constructor (Is That Like Overtaxing a Carpenter?) ...243
Avoiding Duplication among Constructors ...245
Being Object Stingy ...249
Chapter 12: Inheritance — Is That All I Get? . . . .251
Inheriting a Class ...252
Why Do You Need Inheritance? ...253
A More Involved Example — Inheriting from a BankAccount Class ...254
IS_A versus HAS_A — I’m So Confused ...257
The IS_A relationship ...257
Gaining access to BankAccount through containment ...258
The HAS_A relationship ...259
When to IS_A and When to HAS_A? ...260
Other Features That Support Inheritance ...261
Changing class ...261
Invalid casts at run time ...262
Avoiding invalid conversions using the is and as keywords ...263
Inheritance and the Constructor ...265
Invoking the default base class constructor ...265
Passing arguments to the base class constructor — mama sing base ...266
The Updated BankAccount Class ...269
The Destructor ...271
Chapter 13: Poly-what-ism? . . . .273
Overloading an Inherited Method ...274
It’s a simple case of function overloading ...274
Different class, different method ...275
Peek-a-boo — hiding a base class method ...275
Polymorphism ...282
What’s wrong with using the declared type every time? ...283
Using “is” to access a hidden method polymorphically ...285
Declaring a method virtual ...286
C# During Its Abstract Period ...288
Class factoring ...288
I’m left with nothing but a concept — the abstract class ...293
How do you use an abstract class? ...294
Creating an abstract object — not! ...296
Restarting a Class Hierarchy ...296
Sealing a Class ...300
Part V: Beyond Basic Classes ...301
Chapter 14: When a Class Isn’t a Class —
The Interface and the Structure . . . .303
What Is CAN_BE_USED_AS? ...303
What Is an Interface? ...305
Can I Get a Short Example? ...306
Can I See a Program That CAN_BE_USED_AS an Example? ...307
Creating your own interface at home in your spare time ...308
Predefined interfaces ...309
Putting it all together ...311
Inheriting an Interface ...316
Facing an Abstract Interface ...316
The C# Structure Has No Class ...319
The C# structure ...320
The structure constructor ...322
The wily methods of a structure ...323
Putting a struct through its paces in an example ...323
“Oh, the Value and the Reference Can Be Friends . . .” — Unifying the Type System ...327
Predefined structure types ...327
So, how do common structures unify the type system? An example ...328
Boxing and unboxing value types ...330
Chapter 15: Asking Your Pharmacist about Generics . . . .333
Getting to Know Nongeneric Collections ...334
Inventorying nongeneric collections ...334
Using nongeneric collections ...335
Writing a New Prescription: Generics ...336
Generics are type-safe ...336
Generics are efficient ...337
Using Generic Collections ...338
Figuring out <T> ...338
Classy Generics: Writing Your Own ...340
Shipping packages at OOPs ...341
Queuing at OOPs: PriorityQueue ...341
Unwrapping the package ...345
Touring Main( ) ...347
Writing generic code the easy way ...348
Saving PriorityQueue for last ...349
Tending to unfinished business ...351
Generically Methodical ...353
Generic methods in nongeneric classes ...355
Generic methods in generic classes ...356
You may need to constrain a generic method, too ...356
Up Against the (Generic) Interface ...357
Nongeneric vs. generic interfaces ...357
Using a (nongeneric) Simple Factory class ...358
Building a generic factory ...359
Part VI: The Part of Tens ...365
Chapter 16: The 10 Most Common Build Errors
(And How to Fix Them) . . . .367
The name ‘memberName’ does not exist in the class or namespace ‘className’ ...368
Cannot implicitly convert type ‘x’ into ‘y’ ...369
‘className.memberName’ is inaccessible due to its protection level ...371
Use of unassigned local variable ‘n’ ...372
Unable to copy the file ‘programName.exe’ to ‘programName.exe’. The process cannot . . . ...373
‘subclassName.methodName’ hides inherited member ‘baseclassName.methodName’. Use the new keyword if hiding was intended ...374
‘subclassName’ : cannot inherit from sealed class ‘baseclassName’ ...375
‘className’ does not implement interface member ‘methodName’ ...376
‘methodName’ : not all code paths return a value ...376
} expected ...377
Chapter 17: The 10 Most Significant Differences
between C# and C++ . . . .379
No Global Data or Functions ...380
All Objects Are Allocated Off the Heap ...380
Pointer Variables Are All but Disallowed ...381
C# Generics Are Like C++ Templates — or Are They? ...381
I’ll Never Include a File Again ...382
Define Your Variable Types Well ...383
No Multiple Inheriting ...383
Projecting a Good Interface ...383
Unified Type System ...384
Appendix: About the CD ...385
System Requirements ...385
Using the CD ...386
What You’ll Find on the CD ...387
The C# programs ...387
Five bonus chapters ...388
NUnit ...389
SharpDevelop ...389
TextPad ...389
Troubleshooting ...389
Bonus Chapters on the CD-ROM!...CD
Bonus Chapter 1: Some Exceptional Exceptions . . . .CD1
Handling an Error the Old-Fashioned Way — (Re)Turn It ...CD1 Returning an error indication ...CD4 I’m here to report, that seems fine to me ...CD7 Using an Exceptional Error-Reporting Mechanism ...CD9 Can I Get an Example? ...CD10 Creating Your Own Exception Class ...CD13 Assigning Multiple Catch Blocks ...CD15 Letting some throws slip through your fingers ...CD17 Rethrowing an object ...CD20 Thinking through how you should respond to an exception ....CD21 Overriding the Exception Class ...CD22
Bonus Chapter 2: Handling Files and Libraries in C# . . . CD27
Dividing a Single Program into Multiple Source Files ...CD28 Dividing a Single Program into Multiple Assemblies ...CD29 Collecting Source Files into Namespaces ...CD30 Declaring a namespace ...CD31 Seeing the importance of namespaces ...CD32 Accessing classes in the same namespace
Collecting Data into Files ...CD43 Using StreamWriter ...CD45 Improving your reading speed and
comprehension through StreamReader ...CD50
Bonus Chapter 3: Stepping through Collections . . . .CD55
Iterating through a Directory of Files ...CD55 Writing Your Own Collection Class: The Linked List ...CD62 An example linked-list container ...CD63 Why bother with a linked list? ...CD73 Iterating foreach Collections: Iterators ...CD73 Accessing a collection: The general problem ...CD74 Letting C# access data foreach container ...CD76 Accessing Collections the Array Way: Indexers ...CD77 Indexer format ...CD78 Example indexer program ...CD78 Looping around the Iterator Block ...CD82 Iterating days of the month: A first example ...CD87 What’s a collection, really? ...CD89 Iterator syntax gives up so easily ...CD90 Iterator blocks of all shapes and sizes ...CD92 Where to put your iterator ...CD95
Bonus Chapter 4: Using the Visual Studio Interface . . . .CD99
Bonus Chapter 5: C# on the Cheap . . . .CD139
Working Without a Net — But Not a .NET ...CD140 Grabbing the free ingredients ...CD141 Going around the C# development cycle ...CD142 Doing C# with SharpDevelop ...CD142 Examining SharpDevelop ...CD143 Comparing SharpDevelop features with Visual Studio ...CD144 Getting help ...CD145 Configuring SharpDevelop ...CD146 Adding a tool to launch the debugger ...CD146 Running the debugger from SharpDevelop ...CD147 Missing debugger stuff ...CD150 Doing C# with TextPad ...CD150 Creating a C# .CS document class ...CD153 Adding a tool of your own: Build C# Debug ...CD155 Configuring a tool to do a Release build ...CD157 Explaining the configuration options
for the Debug and Release tools ...CD158 Dealing with compiler errors ...CD162 Configuring the rest of the tools ...CD162 Testing It with NUnit ...CD165 Running NUnit ...CD166 Testing? I have to do testing? ...CD166 Writing NUnit tests ...CD168 Debugging bugs in your test code ...CD175 Writing Windows Forms Code without a Form Designer ...CD177 It’s just code ...CD177 Doing it the designer’s way ...CD178 Understanding the new partial classes ...CD179 Doing it your own way ...CD180 Making Sure Your Users Can Run Your C# Programs ...CD180 A Poor Coder’s Visual Studio ...CD180
Index...391
T
he C# programming language is a powerful, relatively new descendant of the earlier C, C++, and Java languages. Programming with it is a lot of fun, as you’re about to find out in this book.Microsoft created C# as a major part of its .NET initiative. For what are proba-bly political reasons, Microsoft turned the specifications for the C# language over to the ECMA (pronounced ek-ma) international standards committee in the summer of 2000, long before .NET was a reality. In theory, any company can come up with its own version of C# written to run on any operating system, on any machine larger than a calculator.
When the first edition of this book came out, Microsoft’s C# compiler was the only game in town, and its Visual Studio .NET suite of tools offered the only way to program C# (other than at the Windows command line). Since then, however, Visual Studio has gone through two major revisions — Visual Studio 2003 and, very recently, Visual Studio 2005. And at least two other players have entered the C# game.
It’s now possible to write and compile C# programs on a variety of Unix-based machines using either the Mono or Portable .NET implementations of .NET and C#:
⻬Mono (www.go-mono.com) is an open-source software project spon-sored by Novell Corporation. Version 1.1.8 came out in June 2005. While Mono lags Microsoft’s .NET, just now implementing the 1.1 version that Microsoft released a couple of years ago, it appears to be moving fast.
⻬Portable .NET, under the banner of Southern Storm Software and DotGNU (www.dotgnu.org/pnet.html), is also open-source. Portable .NET is at version 0.7.0 as of this writing.
Both Mono and Portable .NET claim to run C# programs on Windows and a variety of Unix flavors, including Linux and Apple’s Macintosh operating system. At this writing, Portable .NET reaches the greater number of flavors, while Mono boasts a more complete .NET implementation. So choosing between them can be complicated, depending on your project, your platform, and your goals. (Books about programming for these platforms are becoming available already. Check www.amazon.com.)
Making C# and other .NET languages portable to other operating systems is far beyond the scope of this book. But you can expect that within a few years, the C# Windows programs you discover how to write in this book will run on all sorts of hardware under all sorts of operating systems — matching the claim of Sun Microsystems’ Java language to run on any machine. That’s undoubtedly a good thing, even for Microsoft. The road to that point is still under construction, so it’s no doubt riddled with potholes and obstacles to true universal portability for C#. But it’s no longer just Microsoft’s road.
For the moment, however, Microsoft’s Visual Studio has the most mature versions of C# and .NET and the most feature-filled toolset for programming with them.
If all you need is C#, I’ve included a bonus chapter called “C# on the Cheap” on the CD that accompanies this book. That chapter tells you how you can write C# code virtually for free. (You’ll be missing lots of amenities, including the nice visual design tools that Visual Studio 2005 provides, but you can write Windows code without them, especially the kind of code in this book. Bonus Chapter 5 explains how.)
Note:Two authors wrote this book, but it seemed more economical to say “I” instead of “we,” so that’s what we (I?) do throughout.
What’s New in C# 2.0
While C# version 2.0 does have a number of small changes here and there, most of C# 2.0 is still virtually the same as the previous version. The big new additions that this book covers include the following:
⻬Iterator blocks: An iteratoris an object that lets you step through all the items in a collectionof objects. That’s always been possible, but C# 2.0 makes it far simpler to implement. Bonus Chapter 3 on the CD helps you take advantage of the simplicity and flexibility of iterator blocks.
Chapter 15 covers collections.
⻬Generics: This is the big one! Generic features allow you to write highly general, more flexible code. It’s a powerhouse — a programmer’s dream. Chapter 15 shows you how to write far simpler and more type-safecode using generics.
About This Book
The goal of this book is to explain C# to you, but to write actual programs you need a specific coding environment. We’re betting that most readers will be using Microsoft Visual Studio, although we do provide alternatives. In basing the book on Visual Studio, we’ve tried to keep the Visual Studio portions to a reasonable minimum. we could just tell you, “Run your program any way you want,” but instead we may say, “Execute your C# program from Visual Studio by pressing F5.” We want you to be able to focus on the C# language and not on the mechanics of getting simple things to work.
We realize that many, if not most, readers will want to use C# to write graphi-cal Windows applications. C# is a powerful tool for programming graphigraphi-cal Windows applications, but that’s only one area for using C#, and this book must focus on C# as a language. We touch briefly on graphical Windows pro-grams in Chapter 1, but you should get a good grasp of C# before seeking another source to understand Windows programming in full. We also realize that some power users will be using C# to build Web-ready, distributed appli-cations; however, publishing limitations require us to draw the line some-where. C# 2005 For Dummiesdoes not tackle the challenges of distributed programming. The book does explain quite a bit of .NET, though, for the simple reason that much of C#’s power comes from the .NET Framework class libraries that it uses.
What You Need to Use the Book
At a minimum, you need the Common Language Runtime (CLR) before you can even execute the programs generated by C#. Visual Studio 2005 copies the CLR onto your machine for you as part of the installation procedure. Alternatively, you can download the entire .NET package, including the C# compiler and many other nice tools, from Microsoft’s Web site at http:// msdn.microsoft.com. Look for the .NET Software Development Toolkit (SDK). Bonus Chapter 5 on the CD explains how to get these items.
How to Use This Book
We’ve made this book as easy to use as possible. Figuring out a new language is hard enough. Why make it any more complicated than it needs to be? The book is divided into six parts. Part I introduces you to C# programming with Visual Studio. This part guides you step by step in the creation of two differ-ent types of programs. We strongly encourage you to start here and read these two chapters in order before branching out into the other parts of the book. Even if you’ve programmed before, the basic program framework created in Part I is reused throughout the book.
The chapters in Parts II through V stand alone. We have written these chapters so that you can open the book to any one of them and start reading. If you’re new to programming, however, you will have to read Part II before you can jump ahead. But when you return to refresh your memory on some particular topic, you should have no trouble flipping to a section without the need to restart 20 pages back.
Of course, the Part of Tens finishes out the lineup, and there’s more on the CD that accompanies the book.
How This Book Is Organized
Here’s a brief rundown on what you’ll find in each part of the book.
Part I: Creating Your First C# Programs
This part shows you, step by step, how to write the smallest graphical Windows application possible using the Visual Studio 2005 interface. Part I also shows you how to create the basic nongraphical C# framework that’s used in the other parts of this book.
Part II: Basic C# Programming
Part III: Object-Based Programming
It’s one thing to declare variables here or there and to add them and subtract them. It’s quite another thing to write real programs for real people. Part III focuses on how to organize your data to make it easier to use in creating a program.
Part IV: Object-Oriented Programming
You can organize the parts of an airplane all you want, but until you make it do something, it’s nothing more than a collection of parts. It’s not until you fire up the engines and start the wings flapping that it’s going anywhere.
In like fashion, Part IV explains how to turn a collection of data into a real object — an object that has internal members, sure, but an object that can mimic the properties of a real-world item. This part presents the essence of object-oriented programming.
Part V: Beyond Basic Classes
After the airplane gets off the ground, it has to go somewhere. Figuring out classes and the fundamentals of object-oriented programming is only a start. Part V takes the next step, introducing structures, interfaces, and generics, your gateway to more advanced object-oriented concepts — and the wild blue yonder.
Part VI: The Part of Tens
C# is great at finding errors in your programs — at times, it seems a little too good at pointing out my shortcomings. However, believe it or not, C# is trying to do you a favor. Every problem it finds is another problem that you would otherwise have to find on your own.
Unfortunately, the error messages can be confusing. One chapter in this part presents the ten most common C# build error messages, what they mean, and how the heck to get rid of them.
About the CD-ROM
The enclosed CD-ROM contains a host of goodies. First, you find all the source code from this book. A set of utilities is also included. We don’t rec-ommend the SharpDevelop utility for full-scale development of commercial programs, but it’s useful for writing small applications or making a quick change without waiting for Visual Studio to boot up. It’s perfectly adequate for everything in this book. The TextPad editor is Notepad on steroids. It makes a fine cheap platform for programming C#. The NUnit testing tool, wildly popular among C# programmers, makes testing your code easy, whether from Visual Studio, SharpDevelop, or TextPad. Finally, the CD con-tains a bunch of bonus chapters covering features and techniques that wouldn’t fit into the book. Don’t ignore the CD.
Don’t forget the ReadMefile, which has all the most up-to-date information.
Icons Used in This Book
Throughout the pages of this book, we use the following icons to highlight important information.
This icon flags technical stuff that you can skip on the first reading.
The Tip icon highlights a point that can save you a lot of time and effort.
Remember this. It’s important.
Remember this, too. This one can sneak up on you when you least expect it and generate one of those really hard-to-find bugs.
Conventions Used in This Book
Throughout this book, we use several conventions to help you out. Terms that are not “real words,” such as the name of some program variable, appear in thisfont to minimize the confusion factor. Program listings are offset from text as follows:
use System;
namespace MyNameSpace {
public class MyClass {
} }
Each listing is followed by a clever, insightful explanation. Complete programs are included on the CD-ROM for your viewing pleasure. Small code segments are not.
Finally, you’ll see command arrows, as in the phrase, “Choose File➪Open With➪Notepad.” That means choose the File menu option. Then, from the pull-down menu that appears, choose Open With. Finally, from the resulting submenu, choose Notepad.
Where to Go from Here
Obviously, the first step is to figure out the C# language, ideally using C# 2005 For Dummies,of course. You may want to give yourself a few months of writ-ing simple C# programs before takwrit-ing on the next step of discoverwrit-ing how to create Windows applications. Give yourself many months of Windows appli-cation experience before you branch out into writing programs intended to be distributed over the Internet.
In the meantime, you can keep up with C# goings and comings in several loca-tions. First, check out the official source: http://msdn.microsoft.com/msdn. In addition, various programmer Web sites have extensive material on C#, including lively discussions all the way from how to save a source file to the rel-ative merits of deterministic versus nondeterministic garbage collection. Around my house, garbage collection is very deterministic: It’s every Wednesday morning. Here are a few large C# sites:
⻬www.gotdotnet.com, the .NET team’s official site
⻬http://blogs.msdn.com/csharpfaq, a C# Frequently Asked Questions blog
⻬http://msdn.microsoft.com/vcsharp/team/blogs, which is com-prised of personal blogs of C# team members
⻬www.cs2themax.com
Creating Your First C#
Windows Program
In This Chapter
䊳What’s a program? What is C#? Where am I?
䊳Creating a Windows program
䊳Making sure your Visual Studio 2005 C# is in tune
I
n this chapter, I explain a little bit about computers, computer languages, C#, and Visual Studio 2005. Then, I take you through the steps for creating a very simple Windows program written in C#.Getting a Handle on Computer
Languages, C#, and .NET
A computer is an amazingly fast, but incredibly stupid servant. Computers will do anything you ask them to (within reason), and they do it extremely fast — and they’re getting faster all the time. As of this writing, the common PC processing chip can handle well over a billion instructions per second. That’s billion,with a “b.”
Unfortunately, computers don’t understand anything that resembles a human language. Oh, you may come back at me and say something like, “Hey, my telephone lets me dial my friend by just speaking his name. I know that a tiny computer runs my telephone. So that computer speaks English.” But it’s a computer program that understands English, not the computer itself.
For historical reasons, machine language is also known as assembly language. In the old days, each manufacturer provided a program called an assembler that would convert special words into individual machine instructions. Thus, you might write something really cryptic like MOV AX,CX. (That’s an actual Intel processor instruction, by the way.) The assembler would convert that instruction into a pattern of bits corresponding to a single machine instruction.
Humans and computers have decided to meet somewhere in the middle. Programmers create their programs in a language that is not nearly as free as human speech but a lot more flexible and easy to use than machine language. The languages that occupy this middle ground — C#, for example — are called high-levelcomputer languages. (Highis a relative term here.)
What’s a program?
What is a program? In one sense, a Windows program is an executable file that you can run by double-clicking its icon. For example, the version of Microsoft Word that I’m using to write this book is a program. You call that an executable program,or executablefor short. The names of executable program files gener-ally end with the extension .exe.
But a program is something else, as well. An executable program consists of one or more source files.A C# program file is a text file that contains a sequence of C# commands, which fit together according to the laws of C# grammar. This file is known as a source file,probably because it’s a source of frustration and anxiety.
What’s C#?
The C# programming language is one of those intermediate languages that programmers use to create executable programs. C# fills the gap between the powerful-but-complicated C++ and the easy-to-use-but-limited Visual Basic — well, versions 6.0 and earlier, anyway. (Visual Basic’s newer .NET incarnation is almost on par with C# in most respects. As the flagship language of .NET, C# tends to introduce most new features first.) A C# program file carries the extension .CS.
C# is
⻬Flexible:C# programs can execute on the current machine, or they can be transmitted over the Web and executed on some distant computer.
⻬Powerful:C# has essentially the same command set as C++, but with the rough edges filed smooth.
⻬Easier to use:C# modifies the commands responsible for most C++ errors so you spend far less time chasing down those errors.
⻬Visually oriented:The .NET code library that C# uses for many of its capabilities provides the help needed to readily create complicated dis-play frames with drop-down lists, tabbed windows, grouped buttons, scroll bars, and background images, to name just a few.
⻬Internet friendly:C# plays a pivotal role in the .NET Framework, Microsoft’s current approach to programming for Windows, the Internet, and beyond. .NET is pronounced dot net.
⻬Secure:Any language intended for use on the Internet must include serious security to protect against malevolent hackers.
Finally, C# is an integral part of .NET.
What’s .NET?
.NET began a few years ago as Microsoft’s strategy to open up the Web to mere mortals like you and me. Today it’s bigger than that, encompassing everything Microsoft does. In particular, it’s the new way to program for Windows. It also gives a C-based language, C#, the simple, visual tools that made Visual Basic so popular. A little background will help you see the roots of C# and .NET.
Internet programming was traditionally very difficult in older languages like C and C++. Sun Microsystems responded to that problem by creating the Java programming language. To create Java, Sun took the grammar of C++, made it a lot more user friendly, and centered it around distributed development.
When programmers say “distributed,” they’re describing geographically dis-persed computers running programs that talk to each other — in many cases, via the Internet.
Being forced out of Java was just as well because Java has a serious problem: Although Java is a capable language, you pretty much have to write your entire program in Java to get its full benefit. Microsoft had too many develop-ers and too many millions of lines of existing source code, so Microsoft had to come up with some way to support multiple languages. Enter .NET.
.NET is a framework, in many ways similar to Java’s libraries, because the C# language is highly similar to the Java language. Just as Javais both the lan-guage itself and its extensive code library, C#is really much more than just the keywords and syntax of the C# language. It’s those things empowered by a thoroughly object-oriented library containing thousands of code elements that simplify doing about any kind of programming you can imagine, from Web-based databases to cryptography to the humble Windows dialog box.
The previous generation platform was made up of a hodgepodge of tools with cryptic names. .NET updates all that with Visual Studio 2005, with more focused .NET versions of its Web and database technologies, newer versions of Windows, and .NET-enabled servers. .NET supports emerging communica-tion standards such as XML and SOAP rather than Microsoft’s proprietary formats. Finally, .NET supports the hottest buzzwords since object-oriented: Web Services.
Microsoft would claim that .NET is much superior to Sun’s suite of Web tools based on Java, but that’s not the point. Unlike Java, .NET does not require you to rewrite existing programs. A Visual Basic programmer can add just a few lines to make an existing program “Web knowledgeable” (meaning that it knows how to get data off the Internet). .NET supports all the common Microsoft languages and more than 40 other languages written by third-party vendors (see www.gotdotnet.com/team/langfor the latest list). However, C# is the flagship language of the .NET fleet. C# is always the first language to access every new feature of .NET.
What is Visual Studio 2005?
What about Visual C#?
You sure ask lots of questions. The first “Visual” language from Microsoft was Visual Basic, code-named “Thunder.” The first popular C-based programming language from Microsoft was Visual C++. Like Visual Basic, it was called “Visual” because it had a built-in graphical user interface (GUI — pronounced gooey). This GUI included everything you needed to develop nifty-giffy C++ programs.
That sounded like a marketing ploy to me until I started delving into it. Visual Studio .NET differed quite a bit from its predecessors — enough so to warrant a new name. Visual Studio 2005 is the successor to the original Visual Studio .NET. (See Bonus Chapter 4 on the CD for a tour of some of Visual Studio’s more potent features.)
Microsoft calls its implementation of the language Visual C#. In reality, Visual C# is nothing more than the C# component of Visual Studio. C# is C#, with or without the Visual Studio.
Okay, that’s it. No more questions.
Creating a Windows Application with C#
To help you get your feet wet with C# and Visual Studio, this section takes you through the steps for creating a simple Windows program. Windows programs are commonly called Windows applications, WinApps or WinForms apps for short.Because this book focuses on the C# language, it’s not a Web-programming book, a database book, or a Windows programming book per se. In particular, this chapter constitutes the only coverage of Windows Forms visual program-ming. All I have room to do is give you this small taste.
In addition to introducing Windows Forms, this program serves as a test of your Visual Studio environment. This is a test; this is only a test. Had it been an actual Windows program . . . Wait, it isan actual Windows program. If you can successfully create, build, and execute this program, your Visual Studio environment is set up properly, and you’re ready to rock.
Creating the template
Writing Windows applications from scratch is a notoriously difficult process. With numerous session handles, descriptors, and contexts, creating even a simple Windows program poses innumerable challenges.
Visual Studio 2005 in general and C# in particular greatly simplify the task of creating your basic WinApp. To be honest, I’m a little disappointed that you don’t get to go through the thrill of doing it by hand. In fact, why not switch over to Visual C++ and . . . okay, bad idea.
Typically, template programsdon’t actually do anything — at least, not any-thing useful (sounds like most of my programs). However, they do get you beyond that initial hurdle of getting started. Some template programs are rea-sonably sophisticated. In fact, you’ll be amazed at how much capability the App Wizard can build on its own.
After you’ve completed the Visual Studio 2005 installation, follow these steps to create the template:
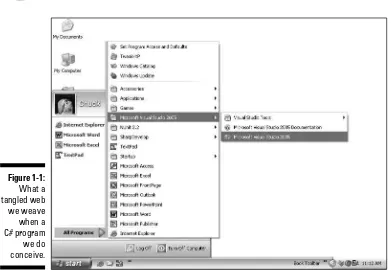
1. To start Visual Studio, choose Start➪All Programs➪Microsoft Visual Studio 2005➪Microsoft Visual Studio 2005, as shown in Figure 1-1.
After some gnashing of CPU teeth and thrashing of disk, the Visual Studio desktop appears. Now things are getting interesting.
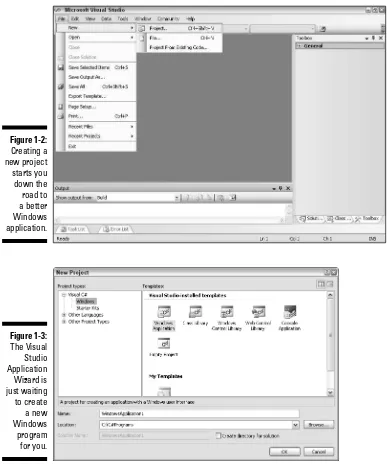
2. Choose File➪New➪Project, as shown in Figure 1-2.
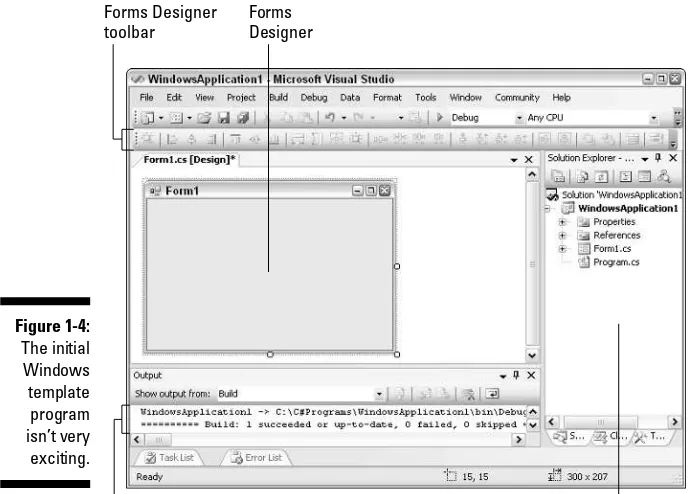
Visual Studio responds by opening the New Project dialog box, as shown in Figure 1-3.
A projectis a collection of files that Visual Studio builds together to make a single program. You’ll be creating C# source files, which carry the extension .CS. Project files use the extension .CSPROJ.
3. Under Project Types, select Visual C#, and under that, click Windows. Under Templates, click Windows Application.
If you don’t see the correct template icon right away, don’t panic — you may need to scroll around in the Templates pane a bit.
Don’t click OK, yet. Figure 1-3:
4. In the Name text box, enter a name for your project, or use the default name.
The Application Wizard will create a folder in which it stores various files, including the project’s initial C# source file. The Application Wizard uses the name you enter in the Name text box as the name of that folder. The initial default name is WindowsApplication1. If you’ve been here before, the default name may be WindowsApplication2, WindowsApplication3, and so on.
For this example, you can use the default name and the default location for this new folder: My Documents\Visual Studio Projects\ WindowsApplication1. I put my real code there too, but for this book, I’ve changed the default location to a shorter file path. To change the default location, choose Tools➪Options➪Projects and Solutions➪General. Select the new location — C:\C#Programsfor this book — in the Visual Studio Projects Location box, and click OK. (You can create the new directory in the Project Location dialog box at the same time. Click the folder icon with a small sunburst at the top of the dialog box. The directory may already exist if you’ve installed the example programs from the CD.)
5. Click OK.
The Application Wizard makes the disk light blink for a few seconds before opening a blank Form1in the middle of the display.
Building and running your first
Windows Forms program
After the Application Wizard loads the template program, Visual Studio opens the program in Design mode. You should convert this empty C# source pro-gram into a Windows Application, just to make sure that the template the Application Wizard generated doesn’t have any errors.
The act of converting a C# source file into a living, breathing Windows Application is called building(or compiling). If your source file has any errors, Visual C# will find them during the build process.
To build and run your first Windows Forms program, follow these steps:
1. Choose Build➪Build projectname(where projectnameis a name like WindowsApplication1 or MyProject).
(or something very close to that). This is the computer equivalent of “No runs, no hits, no errors.” If you don’t bother with the Output window, you should see Build succeededor Build failedin the status bar just above the Start menu.
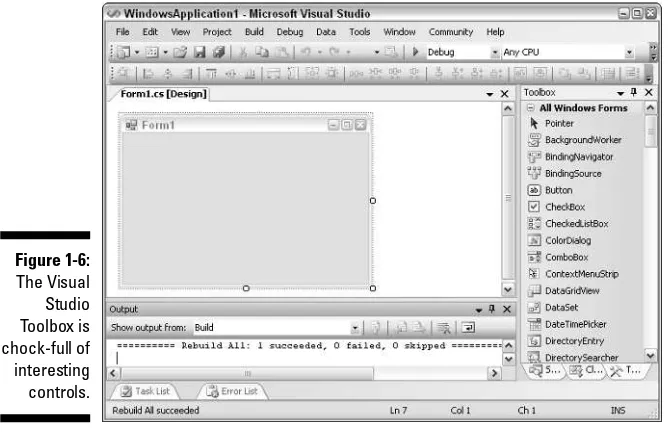
Figure 1-4 shows what Visual Studio looks like after building the default Windows program, complete with Output window. Don’t sweat the posi-tions of the windows. You can move them around as needed. The impor-tant parts are the Forms Designer window and the Output window. The designer window’s tab is labeled “Form1.cs [Design].”
2. You can now execute this program by choosing Debug➪Start Without Debugging.
The program starts and opens a window that looks just like the one in the Forms Designer window, as shown in Figure 1-5.
In C# terms, this window is called a form. A form has a border and a title bar across the top with the little Minimize, Maximize, and Close buttons.
Forms Designer Forms Designer
toolbar
Solution Explorer Output window
3. Click the little Close button in the upper-right corner of the frame to terminate the program.
See! C# programming isn’t so hard.
As much as anything, this initial program is a test of your installation. If you’ve gotten this far, your Visual Studio is in good shape and ready for the programs throughout the rest of this book.
Go ahead and update your resume to note that you are officially a Windows applications programmer. Well, maybe an application (as in one) programmer, so far.
Painting pretty pictures
The default Windows program isn’t very exciting, but you can jazz it up a little bit. Return to Visual Studio and select the window with the tab
Form1.cs [Design](refer to Figure 1-4). This is the Forms Designer window.
The Forms Designer is a powerful feature that enables you to “paint” your program into the form. When you’re done, click Build, and the Forms Designer creates the C# code necessary to make a C# application with a pretty frame just like the one you painted.
In this section, I introduce several new Forms Designer features that simplify your Windows Forms programming. You find out how to build an application with two text boxes and a button. The user can type into one of the text boxes (the one labeled Source) but not in the other (which is labeled Target). When the user clicks a button labeled Copy, the program copies the text from the Source text box into the Target text box. That’s it.
Putting some controls in place
The labeled windows that make up the Visual Studio user interface are called document windowsand control windows.Document windows are for creating and editing documents, such as the C# source files that make up a C# pro-gram. Control windows like the Solution Explorer shown in Figure 1-4 are for managing things in Visual Studio while you program. For much more about Visual Studio’s windows, menus, and other features, read the first half of Bonus Chapter 4 on the CD that accompanies this book.
All those little doodads like buttons and text boxes are known as controls. (You also may hear the term widget.) As a Windows programmer, you use these tools to build the graphical user interface (GUI), usually the most diffi-cult part of a Windows program. In the Forms Designer, these tools live in a control window known as the Toolbox.
If your Toolbox isn’t open, choose View➪Toolbox. Figure 1-6 shows Visual Studio with the Toolbox open on the right side of the screen.
Don’t worry if your windows are not in the same places as in Figure 1-6. For example, your Toolbox may be on the left side of the screen, on the right, or in the middle. You can move any of the views anywhere on the desktop, if you want. Bonus Chapter 4 on the CD explains how.
The Toolbox has various sections, including Data, Components, and Windows Forms. These sections, commonly known as tabs, simply organize the con-trols so you’re not overwhelmed by them all. The Toolbox comes loaded with many controls, and you can make up your own.
Click the plus sign next to Common Controls (or the one labeled All Windows Forms) to reveal the options below it, as shown in Figure 1-6. You use these controls to jazz up a form. The scroll bar on the right enables you to scroll up and down within the controls listed in the Toolbox.
You add a control to a form by dragging the control and dropping it where you want. Follow these steps to use the Toolbox to create two text boxes and a button:
1. Grab the Textbox control, drag it over to the form labeled Form1, and release the mouse button.
You might have to scroll the Toolbox. After you drag the control, a text box appears in the form. If the text box contains text (it may not), it says
textBox1. This is the name the Forms Designer assigned to that particu-lar control. (In addition to its Name property, a control has a Text prop-erty that needn’t match the Name.) You can resize the text box by clicking and dragging its corners.
You can only make the text box wider. You can’t make it taller because by default these are single-line text boxes. The little right-pointing arrow on the text box — called a smart tag— lets you change that, but ignore it until you read Bonus Chapter 4 on the CD.
2. Grab the Textbox control again and drop it underneath the first text box.
Notice that thin blue alignment guides — called snaplines— appear to help you align the second text box with other controls. That’s a cool new feature.
3. Now grab the Button control and drop it below the two text boxes.
A button now appears below the two text boxes.
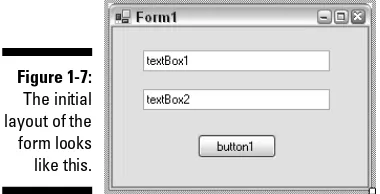
4. Resize the form and use the alignment guides as you move everything around until the form looks pretty.
Figure 1-7 shows the form. Yours may look a little different.
Controlling the properties
The most glaring problem with the application now is that button label.
button1is not very descriptive. You need to fix that first.
Each control has a set of properties that determine the control’s appearance and the way it works. You access these properties through the Properties window. Follow these steps to change the properties of different controls:
1. Select the button by clicking it.
2. Enable the Properties window by choosing View➪Properties Window.
The button control has several sets of properties: the appearance set listed at the top, the behavior properties down below, and several others. You need to change the Text property, which is under
Appearance. (To see the properties listed alphabetically rather than in categories, click the icon at the top of the window with AZ on it.)
3. In the Properties view, select the box in the right-hand column next to the Text property. Type in Copyand then press Enter.
Figure 1-8 shows these settings in the Properties view and the resulting form. The button is now labeled Copy.
4. Change the initial contents of the Textbox controls. Select the upper text box and repeat Step 3, typing the text User types in here. Do the same for the lower text box, typing the text Program copies text into here.
Doing this lets the user know what to do when the program starts. Nothing baffles users more than a confusing dialog box.
5. Similarly, changing the Text property of the Form changes the text in the title bar. Click somewhere in the Form, type in the new name in the Text property, and then press Enter.
I set the title bar to “Text Copy Application.”
6. While you’re changing Form properties, click the AcceptButton prop-erty (under Misc in the Properties window). Click the space to the right of AcceptButton to specify which button responds when the user presses the Enter key. In this case, select button1.
“Copy” is the text on this button, but the name is still button1. You could change that too, if you like. It’s the Form’s Name property — a form property, not a button property.
7. Select the lower text box and scroll through the Behavior properties until you get to one called ReadOnly. Set that to True by clicking it and selecting from the drop-down list, as shown in Figure 1-9.
8. Click the Save button in the Visual Studio toolbar to save your work.
While you work, click the Save button every once in awhile just to make sure you don’t lose too much if your dog trips over the computer’s power cord. Unsaved files show an asterisk in the tab at the top of the Forms Designer window.
Building the application
Choose Build➪Build WindowsApplication1to rebuild the application. This step builds a new Windows Application with the Form you’ve just created. In the Output window you should see a 1 succeeded, 0 failed, 0 skipped
message. Figure 1-9:
Now execute the program by choosing Debug➪Start Without Debugging. The resulting program opens a form that looks like the one you’ve been editing, as shown in Figure 1-10. You can type into the upper text box, but you can’t type into the lower text box (unless you forgot to change the ReadOnly property).
Make it do something, Daddy
The program looks right but it doesn’t do anything. If you click the Copy button, nothing happens. So far, you’ve only set the Appearance properties — the properties that manage the appearance of the controls. Now, follow these steps to put the smarts into the Copy button to actually copy the text from the source text box to the target:
1. In the Forms Designer, select the Copy button again.
2. In the Properties window, click the little lightning bolt icon above the list of properties to open a new set of properties.
These are called the control’s events.They manage what a control does while the program executes.
You need to set the Click event. This determines what the button does when the user clicks it. That makes sense.
3. Double-click the Click event and watch all heck break loose.
The Design view is one of two different ways of looking at your applica-tion. The other is the Code view, which shows the C# source code that the Forms Designer has been building for you behind the scenes. Visual Studio knows that you need to enter some C# code to make the program transfer the text.
Instead of the lightning bolt, you can simply double-click the button itself on the Forms Designer.
When you set the Click event, Visual Studio switches the display to the Code view and creates a new method.Visual Studio gives this method the descriptive name button1_Click(). When the user clicks the Copy button, this method will perform the actual transfer of text from
textBox1, the source, to textBox2, the target.
Don’t worry too much about what a method is. I describe methods in Chapter 8. Just go with the flow for now.
This method simply copies the Text property from textBox1to
textBox2, right at the blinking insertion point.
4. Because button1is now labeled “Copy,” rename the method with the Refactor menu. Double-click the name button1_Clickin the Code window. Choose Refactor➪Rename. In the New Name box, typeCopyClick. Press Enter twice (but take a look at the dialog boxes).
It’s good for a control’s text to reflect its purpose clearly.
New in Visual Studio 2005, the Refactor menu is the safest way to make certain changes to the code. For instance, just manually changing the name button1_Clickfor the method would miss another reference to the method elsewhere in the code that the Forms Designer has gener-ated on your behalf.
The second dialog box for the Rename refactoring shows things that will change: the method and any references to it in comments, text strings, or other places in the code. You can deselect items in the upper pane to prevent them from changing. The lower Preview Code Changes pane lets you see what will actually change. Use the Refactor menu to save your-self lots of error-prone work.
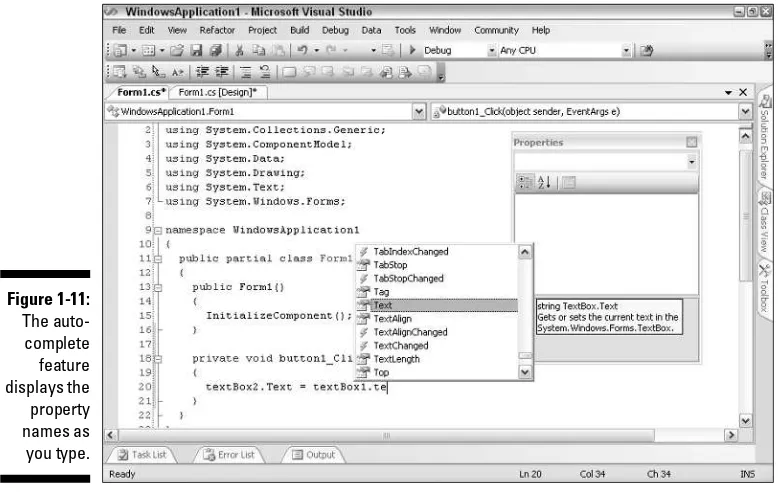
5. Add the following line of code to the CopyClick()method:
textBox2.Text = textBox1.Text;
Notice how C# tries to help you out as you type. Figure 1-11 shows the dis-play as you type the last part of the preceding line. The drop-down list of the properties for a text box helps to jog your memory about which prop-erties are available and how they’re used. This auto-complete feature is a great help during programming. (If auto-complete doesn’t pop up, press Ctrl-Space to display it.)
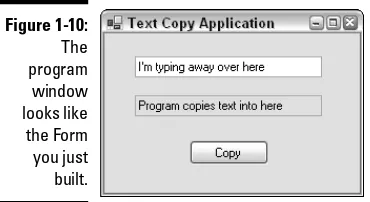
Trying out the final product
Choose Debug➪Start Without Debugging to execute the program one last time. Type some text in the source text box and then click the Copy button. The text is magically copied over to the target text box, as shown in Figure 1-12. Gleefully repeat the process, typing whatever you want and copying away until you get tired of it.
Looking back on the creation process, you may be struck by how picture-oriented it all is. Grab controls, drop them around on the frame, set proper-ties, and that’s about it. You only had to write one line of C# code.
You could argue that the program doesn’t do much, but I would disagree. Look back at some of the earlier Windows programming books in the days before App Wizards, and you’ll see how many hours of coding even a simple application like this would have taken.
Visual Basic 6.0 programmers, beware!
Creating Your First C#
Console Application
In This Chapter
䊳Creating a simple console application template
䊳Reviewing the console application template
䊳Exploring the parts of the template
E
ven the most basic Windows programs can be daunting to the beginning C# programmer. Just check out Chapter 1 if you don’t believe me. A so-called console applicationprogram — or console app (all of us in-the-know types drop off unnecessary syllables when poss) — generates significantly less C# code and is much easier to understand.In this chapter, you use Visual Studio to create a template console app. Then, you manually simplify that template just a little more. You can use the result as a template for many of the programs I describe in this book.
The primary purpose of this book is to help you understand C#. You can’t create the next Starship graphics game in C# until you know the C# language.
Creating the source program
Complete these steps to create your C# console app template:
1. Choose File➪New➪Project to create a new project.
Visual Studio presents you with a window of icons representing the dif-ferent types of applications that you can create.
2. From this New Project window, click the Console Application icon.
Make sure that you select Visual C# and under it, Windows, in the Project Types pane; otherwise, Visual Studio may create something awful like a Visual Basic or Visual C++ application. Then click the Console Application icon in the Templates pane.
Visual Studio requires you to create a project before you can start to enter your C# program. A project is like a bucket in which you throw all the files that go into making your program. When you tell your compiler to build the program, it sorts through the project to find the files it needs to re-create the program.
The default name for your first application is ConsoleApplication1, but change it this time to ConsoleAppTemplate. In future chapters, you can open the template, save it as a new name, and already have the essentials in place.
The default place to store this file is somewhere deep in My Documents. Maybe because I’m difficult (or maybe because I’m writing a book), I like to put my programs where I want them, not necessarily where Visual Studio wants them. In Chapter 1, I show you how to change the default project location to C:\C#Programs(if you want to simplify working with this book).
3. Click the OK button.
After a bit of disk whirring and chattering, Visual Studio generates a file called Program.cs. (If you look in the window labeled Solution Explorer, you see some other files; ignore them for now. If Solution Explorer isn’t visible, choose View➪Solution Explorer.) C# source files carry the exten-sion .CS. The name Programis the default name assigned for the pro-gram file.
The contents of your first console app appear as follows:
using ...
namespace ConsoleAppTemplate {
class Program {
{ } } }
Along the left edge of the code window, you see several small plus (+) and minus (–) signs in boxes. Click the + sign next to using.... This expands a code region,a handy Visual Studio feature that keeps down the clutter. Here are the directives when you expand the region in the default console app:
using System;
using System.Collections.Generic; using System.Text;
Regionshelp you focus on the code you’re working on by hiding code that you aren’t. Certain blocks of code — such as the namespace block, class block, methods, and other code items — get a +/– automatically without a
#regiondirective. You can add your own collapsible regions, if you like, by typing #regionabove a code section and #endregionafter it. It helps to supply a name for the region, such as Public methods. Note that this name can include spaces. Also, you can nest one region inside another (an advan-tage over Visual Basic), but regions can’t overlap.
For now, using System;is the only usingdirective you really need. You can delete the others; the compiler lets you know whether you’re missing one.
Taking it out for a test drive
To convert your C# program into an executable program, choose Build➪Build ConsoleAppTemplate. Visual Studio responds with the following message:
Build started: Project: ConsoleAppTemplate, Configuration: Debug Any CPU -Csc.exe /noconfig /nowarn ... (and much more)
Compile complete -- 0 errors, 0 warnings
ConsoleAppTemplate -> C:\C#Programs\ ... (and more)==Build: 1 succeeded or up-to-date, 0 failed, 0 skipped==
The key point here is the 1 succeededpart on the last line.
As a general rule of programming, “succeeded” is good; “failed” is bad.