â¢à¸Understandà¸theà¸Node.jsà¸asynchronousà¸programmingà¸modelà¸inà¸detailภâ¢à¸Createà¸bothà¸webà¸andà¸network-basedà¸Node.jsà¸applicationsà¸withà¸easeภâ¢à¸Learnà¸toà¸workà¸effectivelyà¸withà¸variedà¸dataà¸sourcesà¸andà¸fileà¸typesà¸
For your convenience Apress has placed some of the front
matter material after the index. Please use the Bookmarks
Contents at a Glance
About the Author ...
xix
About the Technical Reviewer ...
xxi
Acknowledgments ...
xxiii
Introduction ...
xxv
Chapter 1: Getting Started
â
...
1
Chapter 2: The Node Module System
â
...
9
Chapter 3: The Node Programming Model
â
...
29
Chapter 4: Events and Timers
â
...
45
Chapter 5: The Command Line Interface
â
...
59
Chapter 6: The File System
â
...
77
Chapter 7: Streams
â
...
95
Chapter 8: Binary Data
â
...
109
Chapter 9: Executing Code
â
...
129
Chapter 10: Network Programming
â
...
147
Chapter 11: HTTP
â
...
167
â CONTENTS AT A GLANCE
Chapter 13: The Real-Time Web
â
...
205
Chapter 14: Databases
â
...
217
Chapter 15: Logging, Debugging, and Testing
â
...
233
Chapter 16: Application Scaling
â
...
249
Appendix A: JavaScript Object Notation
â
...
263
Introduction
Since its creation in 2009, Node.js has grown into a powerful and increasingly popular asynchronous development framework, used for creating highly scalable JavaScript applications. Respected companies such as Dow Jones, LinkedIn, and Walmart are among the many organizations to have seen Nodeâs potential and adopted it into their businesses.
Pro Node.js for Developers provides a comprehensive guide to this exciting young technology. You will be introduced to Node at a high level before diving deeply into the key concepts and APIs that underpin its operation. Building upon your existing JavaScript skills, youâll be shown how to use Node.js to build both web- and network-based applications, to deal with various data sources, capture and generate events, spawn and control child processes, and much more.
CHAPTER 1
Getting Started
JavaScript was initially named Mocha when it was developed at Netscape in 1995 by Brendan Eich. In September 1995, beta releases of Netscape Navigator 2.0 were shipped with Mocha, which had been renamed LiveScript. By December 1995 LiveScript, after another renaming, had become JavaScript, the current name. Around that time Netscape was working closely with Sun, the company responsible for creating the Java programming language. The choice of the name JavaScript caused a lot of speculation. Many people thought that Netscape was trying to piggyback on the hot name Java, a buzzword at the time. Unfortunately, the naming choice caused a lot of confusion, as many automatically assumed that the two languages were related somehow. In reality they have very little in common.
Despite the confusion, JavaScript became a very successful client-side scripting language. In response to JavaScriptâs success, Microsoft created its own implementation, named JScript, and released it with Internet Explorer 3.0 in August 1996. In November 1996 Netscape submitted JavaScript for standardization to Ecma International, an international standards organization. In June 1997 JavaScript became the standard ECMA-262.
Over the years, JavaScript has remained the de facto standard for client-side development. However, the server space was a completely different story. For the most part, the server realm has belonged to languages such as PHP and Java. A number of projects have implemented JavaScript as a server language, but none of them were particularly successful. Two major hurdles blocked JavaScriptâs widespread adoption on the server. The first was its reputation. JavaScript has long been viewed as a toy language, suitable only for amateurs. The second hurdle was JavaScriptâs poor performance compared with that of some other languages.
However, JavaScript had one big thing going for it. The Web was undergoing unprecedented growth, and the browser wars were raging. As the only language supported by every major browser, JavaScript engines began receiving attention from Google, Apple, and other companies. All of that attention led to huge improvements in JavaScript performance. Suddenly JavaScript wasnât lagging anymore.
The development community took note of JavaScriptâs newfound power and began creating interesting applications. In 2009 Ryan Dahl created Node.js, a framework primarily used to create highly scalable servers for web applications. Node.js, or simply Node, is written in C++ and JavaScript. To drive Node, Dahl tapped into the power of Googleâs V8 JavaScript engine (V8 is the engine inside Google Chrome, the most popular browser in existence). Using V8, developers can write full-blown applications in JavaScript - applications that would normally be written in a language like C or Java. Thus, with the invention of Node, JavaScript finally became a bona fide server-side language.
The Node Execution Model
Node also differs from many other servers in its use of concurrency. A server like Apache maintains a pool of threads for handling client connections. This approach lacks scalability because threads are fairly resource-intensive. Additionally, a busy server quickly consumes all of the available threads; as a result, more threads, which are expensive to create and tear down, are spawned. Node, on the other hand, executes within a single thread. While this may seem like a bad idea, in practice it works well because of the way most server applications work. Normally, a server receives a client request, then performs some high-latency I/O operation such as a file read or database query. During this time the server blocks, waiting for the I/O operation to complete. Instead of sitting idle, the server could be handling more requests or doing other useful work.
In traditional servers, itâs acceptable for a thread to do nothing while blocking on an I/O operation. However, Node has only one thread, and blocking it causes the entire server to hang. To mitigate this problem, Node uses nonblocking I/O almost exclusively. For example, if Node needs to perform a database query, it simply issues the query and then processes something else. When the query finally returns, it triggers an asynchronous callback function that is responsible for processing the queryâs results. A pseudocode example of this process is shown in Listing 1-1.
Listing 1-1. Pseudocode Example of a Nonblocking Database Query var sql = "SELECT * FROM table";
database.query(sql, function(results) { // process the results
});
// do something else instead of waiting
Nodeâs nonblocking, asynchronous execution model provides extremely scalable server solutions with minimal overhead. Many high-profile companies, including Microsoft, LinkedIn, Yahoo!, and the retail giant Walmart have taken notice of Node and begun implementing projects with it. For example, LinkedIn migrated its entire mobile stack to Node and âwent from running 15 servers with 15 instances (virtual servers) on each physical machine, to just four instances that can handle double the traffic.â Node has also received significant media recognition, such as winning the 2012 InfoWorld Technology of the Year Award.
Installing Node
CHAPTER 1 â GETTING STARTED
You can also browse all of the platformsâ binaries, installers, and source code at http://nodejs.org/download. Windows users will most likely want to download the Windows Installer (.msi file), while Mac users should opt for the Mac OS X Installer (.pkg file). Linux and SunOS users can download binaries, but it is probably simpler to install using a package manager.
Installing via Package Managers
For instructions on installing Node via your operating systemâs package manager, go to
https://github.com/joyent/node/wiki/Installing-Node.js-via-package-manager. This page contains instructions for Windows, OS X, and Linux. Again, Windows and Mac users should use the previously discussed installers. As far as Linux is concerned, instructions are available for Gentoo, Debian, Linux Mint, Ubuntu, openSUSE, SLE, Red Hat, Fedora, Arch Linux, FreeBSD, and OpenBSD.
Ubuntu users can install Node and all requisite software using the Advanced Packaging Tool (APT) commands shown in Listing 1-2. These steps also install npm, Nodeâs package management software (covered in Chapter 2).
Listing 1-2. Installing Node Using Ubuntuâs Package Manager
$ sudo apt-get install python-software-properties python g++ make $ sudo add-apt-repository ppa:chris-lea/node.js
$ sudo apt-get update
$ sudo apt-get install nodejs npm
If the add-apt-repository command fails, install the software-properties-common package using the command shown in Listing 1-3.
Listing 1-3. Installing the Software-Properties-Common Package $ sudo apt-get install software-properties-common
Building from Source
If you want to contribute to Nodeâs C++ core, or simply experiment with its functionality, you will need to compile the projectâs source code. You can obtain the source code from the download page, or from the projectâs GitHub repository, https://github.com/joyent/node. Once the code is downloaded, extract it from the archive if applicable. Prior to building Node, Ubuntu users need to install Python and other build tools; use the command shown in Listing 1-4. When installing Python, be sure to install version 2.7, not the newer Python 3.
Listing 1-4. Installing Prerequisite Software Packages on Ubuntu
$ sudo apt-get install python-software-properties python g++ make
Ubuntu and OS X users can build Node by issuing the commands shown in Listing 1-5 from within the source code directory. Note that the full path to the source code directory should not contain any spaces.
Listing 1-5. Installing Node from Source on Ubuntu and OS X ./configure
make
sudo make install
On Windows, you need to install Visual C++ and Python 2.7 in order to build Node. Visual C++ can be downloaded for free from Microsoft with Visual Studio Express. Python is also available free of charge at
www.python.org/. To compile Node, issue the command shown in Listing 1-6.
Listing 1-6. Installing Node from Source on Windows > vcbuild.bat release
Final Installation Steps
No matter which installation route you decided on, by this point Node should be ready to use. To verify that everything is set up correctly, open a new terminal window, and run the node executable (see Listing 1-7). The -v flag causes Node to print the installed version and then exit. In this example, version 0.10.18 of Node is installed.
Listing 1-7. Checking the Version of Node from the Command Line $ node -v
v0.10.18
You should also verify that npm is installed (see Listing 1-8).
Listing 1-8. Checking the Version of npm from the Command Line $ npm -v
1.3.8
CHAPTER 1 â GETTING STARTED
The Read-Eval-Print-Loop
Node provides an interactive shell, known as the Read-Eval-Print-Loop, or REPL. The REPL reads input from the user, evaluates the input as JavaScript code, prints the result, and then waits for more input. The REPL is useful for debugging and for experimenting with small snippets of JavaScript code. To start the REPL, launch Node with no command line arguments. You then see the REPL command prompt, the > character. From the prompt, begin entering arbitrary JavaScript code.
Listing 1-9 shows how to start the REPL and input code. In this example, a variable, named foo, is created with the string value "Hello World!". On the third line, the REPL prints "undefined" because the variable declaration statement returns no value. Next, the statement foo; causes the value of foo to be inspected. As expected, the REPL returns the string "Hello World!". Finally, the value of foo is printed to the terminal using the console.log() function. After foo is printed, the REPL displays "undefined" again, because console.log() returns no value.
Listing 1-9. Starting the REPL and Inputting JavaScript Code $ node
> var foo = "Hello World!"; undefined
> foo;
'Hello World!' > console.log(foo); Hello World! undefined
You can also enter multiline expressions in the REPL. For example, a for loop has been entered into the REPL in Listing 1-10. The ... is used by the REPL to indicate a multiline expression in progress. Note that ... is displayed by the REPL, not typed by the user.
Listing 1-10. An Example of Executing a Multiline Expression in the REPL > for (var i = 0; i < 3; i++) {
... console.log(i); ... }
0 1 2
undefined
REPL Features
Listing 1-11. Autocomplete Options Shown by Typing t Followed by Tab > t
this throw true try
typeof tls tty toLocaleString toString
The REPL also provides a special variable, _ (underscore), that always contains the result of the last expression. Listing 1-12 shows several example uses of _. First, an array of strings is created, causing _ to reference the array. The pop() method is then used to remove the last element of the array, baz. Finally, the length of baz
is accessed, causing _ to become 3.
Listing 1-12. Example Uses of the _ Variable > ["foo", "bar", "baz"]
[ 'foo', 'bar', 'baz' ] > _.pop();
'baz' > _.length 3
> _ 3
REPL Commands
.help
The .help command displays all of the available REPL commands. Listing 1-13 shows the output of running the .help command.
Listing 1-13. Output of the .help REPL Command > .help
.break Sometimes you get stuck, this gets you out .clear Alias for .break
.exit Exit the repl .help Show repl options
.load Load JS from a file into the REPL session
.save Save all evaluated commands in this REPL session to a file
.exit
The .exit command terminates the REPL. This command is equivalent to pressing Control+D.
.break
CHAPTER 1 â GETTING STARTED
Listing 1-14. Terminating a Multiline Expression Using the .break Command > for (var i = 0; i < 10; i++) {
... .break >
.save
filename
The .save command saves the current REPL session to the file specified in filename. If the file does not exist, it is created. If the file does exist, the existing file is overwritten. REPL commands and output are not saved. Listing 1-15 shows an example use of the .save command. In this example, the current session is saved to the file repl-test.js. The resulting contents of repl-test.js are shown in Listing 1-16. Notice that the file does not contain the REPL prompt or output or the .save command.
Listing 1-15. Saving the Current REPL Session Using the .save Command > var foo = [1, 2, 3];
undefined
> foo.forEach(function(value) { ... console.log(value);
... }); 1 2 3
undefined
> .save repl-test.js
Session saved to:repl-test.js
Listing 1-16. The Contents of repl-test.js Generated by the .save Command var foo = [1, 2, 3];
foo.forEach(function(value) { console.log(value);
});
.load
filename
The .load command executes the JavaScript file specified in filename. The file is executed as if each line were typed directly into the REPL. Listing 1-17 shows the output of loading the file repl-test.js from Listing 1-16.
Listing 1-17. The result of executing repl-test.js, using the .load command > .load repl-test.js
> var foo = [1, 2, 3]; undefined
> foo.forEach(function(value) { ... console.log(value);
... }); 1 2 3
.clear
Similar to .break, .clear can be used to terminate multiline expressions. .clear is also used to reset the REPLâs context object. At this point, you donât need to understand the details, but Listing 1-18 shows a Node program that embeds a REPL. In other words, running this program actually invokes an instance of the REPL. Additionally, you can define a custom execution environment for the REPL. In this case, the embedded REPL has a defined variable, foo, that holds the string "Hello REPL". Calling .clear from within the embedded REPL resets the context and deletes foo.
Listing 1-18. Embedding a REPL Within Another Node Program var repl = require("repl");
repl.start({}).context.foo = "Hello REPL";
Executing Node Programs
Although the REPL environment is useful, it is seldom used in production systems. Instead, programs are written as one or more JavaScript files and then interpreted by Node. The simplest Node program is shown in Listing 1-19. The example simply prints the string "Hello World!" to the console.
Listing 1-19. Source Code for the Node Hello World! Program console.log("Hello World!");
Copy the code in Listing 1-19 into a new file, and save it as hello.js. Next, open a terminal window, and execute hello.js (see Listing 1-20). Note that Node does not require you to specify the .js file extension. If the input file is not found and no file extension is provided, Node will try adding the extensions .js, .json, and .node. Node interprets .js files as JavaScript source code and files with a .json extension as JavaScript Object Notation (JSON) files. Files with a .node extension are treated as compiled add-on modules.
Listing 1-20. Executing a Node Program from the Command Line $ node hello.js
Note
â
JSON is a plain text standard for data interchange. This book assumes that the reader is already familiar with
JSON. However, if you need an introduction or refresher, JSON is covered in Appendix A.
Summary
CHAPTER 2
The Node Module System
As a developer, you can solve many complex problems using the core Node functionality. However, one of Nodeâs true strengths is its developer community and abundance of third-party modules. Keeping track of all of these modules is Nodeâs package manager, npm. The npm FAQ page jokingly states that npm is not an acronym for âNode package managerâ and instead is a recursive backronym abbreviation for ânpm is not an acronym.â Regardless of its meaning, npm is a command line tool that, since Node version 0.6.3, comes bundled with the Node environment.
What npm doesâand does very wellâis manage Node modules and their dependencies. At the time of writing, there were over 47,000 packages in the official registry. You can browse all of the available packages at the registryâs site, https://npmjs.org/. In addition to each individual module, the site shows various rankings, including which modules are the most popular and which are depended upon the most. If youâd rather get your hands dirty on the command line, you can search the registry using the npm search command, which lets you search for packages based on one or more keywords. For example, npm search can be used to locate all the modules containing the word database in the name or description (see Listing 2-1). The first time you run this command, expect to experience a short delay as npm builds a local index.
Listing 2-1. Using npm search to Locate Modules in the npm Registry $ npm search database
Installing Packages
In order to use a module, you must install it on your machine. This is normally as simple as downloading a few JavaScript source files (some modules require downloading or compiling binaries as well). To install a package, type npm install, followed by the package name. For example, the commander module provides methods for implementing command line interfaces. To install the latest version of commander, issue the command shown in Listing 2-2.
Listing 2-2. Installing the Latest Version of the commander Package Using npm $ npm install commander
If youâre not interested in installing the latest version of a package, you can specify a version number. Node modules follow a major.minor.patch versioning scheme. For example, to install commander version 1.0.0, use the command shown in Listing 2-3. The @ character is used to separate the package name from the version.
Changes to the major version number can indicate that a module has changed in a non-backwards-compatible way (known as a breaking change). Even changes to the minor version can accidentally introduce breaking changes. Therefore, youâll typically want to install the latest patch of a certain releaseâa scenario that npm supports with the x wildcard. The command shown in Listing 2-4 installs the latest patch of version 1.0 of commander. (Note that the x wildcard can also be used in place of the major and minor revisions.)
Listing 2-4. Installing the Latest Patch of commander 1.0 $ npm install commander@1.0.x
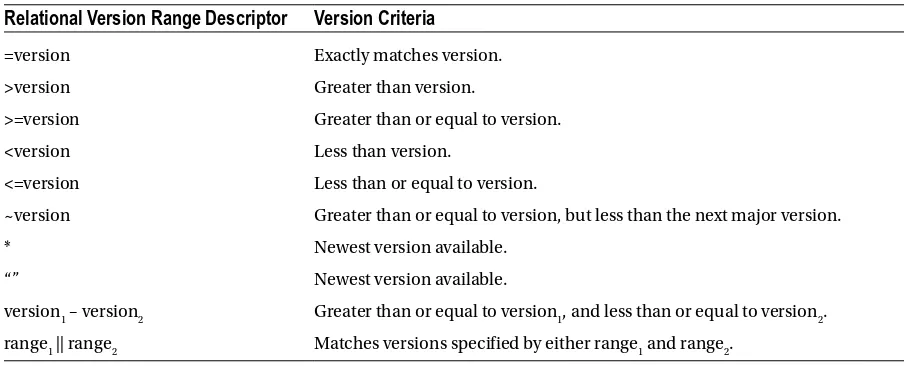
You can also select versions using relational version range descriptors. Relational version range descriptors select the most recent version that matches a given set of criteria. The various relational version range descriptors supported by npm are listed in Table 2-1.
Table 2-1. Relational Version Range Descriptors
Relational Version Range Descriptor
Version Criteria
=version Exactly matches version. >version Greater than version.
>=version Greater than or equal to version. <version Less than version.
<=version Less than or equal to version.
~version Greater than or equal to version, but less than the next major version.
* Newest version available.
ââ Newest version available.
version1 â version2 Greater than or equal to version1, and less than or equal to version2. range1 || range2 Matches versions specified by either range1 and range2.
Based on Table 2-1, all of the commands in Listing 2-5 are valid npm commands.
Listing 2-5. Various npm install Commands Using Relational Version Range Descriptors $ npm install commander@"=1.1.0"
$ npm install commander@">1.0.0" $ npm install commander@"~1.1.0" $ npm install commander@"*" $ npm install commander@""
$ npm install commander@">=1.0.0 <1.1.0" $ npm install commander@"1.0.0 - 1.1.0" $ npm install commander@"<=1.0.0 || >=1.1.0"
Installing from URLs
CHAPTER 2 â THE NODE MODULE SYSTEM
Note
â
You do not need to understand
gitand GitHub to use Node. However, most Node modules use the GitHub
ecosystem for source control and bug tracking. Although GitHub and its use are well outside the scope of this book, it is
highly advisable to become familiar with it.
Listing 2-6. git URL Formats Supported by npm
git://github.com/user/project.git#commit-ish
git+ssh://user@hostname:project.git#commit-ish git+ssh://user@hostname/project.git#commit-ish git+http://user@hostname/project/blah.git#commit-ish
git+https://user@hostname/project/blah.git#commit-ish
Packages can also be installed from tarball URLs. For example, to install the master branch of a GitHub repository, use the syntax shown in Listing 2-7. Though this URL does not point to an actual repository, you can experiment by downloading the commander module: https://github.com/visionmedia/commander.js/tarball/master.
Listing 2-7. Installing a Tarball from a GitHub Repository
$ npm install https://github.com/user/project/tarball/master
Package Locations
When packages are installed, they are saved somewhere on your local machine. Typically, this location is a
subdirectory named node_modules within your current directory. To determine the location, use the command npm root. You can also view all the installed modules using the npm ls command. After installing the commander module, you can verify that it exists using npm ls. For the purposes of this example, install version 1.3.2. Listing 2-8 shows that commander version 1.3.2 is installed. Also, notice that a module named keypress is installed. The tree structure indicates that commander depends on the keypress module. Since npm is able to recognize this dependency, it automatically installs any required modules.
Listing 2-8. Listing All of the Currently Installed Packages Using npm ls $ npm ls
/home/colin/npm-test
ââ⬠commander@1.3.2 âââ keypress@0.1.0
You can also see the installed modules by browsing the node_modules subdirectory. In this example, commander is installed in node_modules/commander, and keypress is installed in node_modules/commander/node_modules/ keypress. If keypress had any dependencies, they would be installed in yet another node_modules subdirectory under the keypress directory.
Global Packages
To install a package globally, simply issue npm install with the -g or --global option. In fact, you can process global packages by adding the -g option to most npm commands. For example, you can view the installed global packages by issuing the command npm ls -g. You can also locate the global node_modules folder using the npm root -g command.
Linking Packages
Using npm, you can create links to local packages. When you link to a package, it can be referenced as if it were a global package. This is especially useful if you are developing a module and want another project to reference your local copy of the module. Linking is also useful if you want to deploy your module without publishing it to the public npm registry.
Package linking is a two-step process. The first step, creating the link, is done by changing to the directory of the project you want to make linkable. Listing 2-9 shows how to create a link to your module, assuming that your module is located in foo-module. After executing the npm link command, verify that the link was created using npm ls -g.
Listing 2-9. Creating a Link Using npm link $ cd foo-module
$ npm link
The second step in module linking, actually referencing the link, is very similar to a package installation. First, change to the directory of the project that will import the linked module. Next, issue another npm link command. However, this time you must also specify the linked moduleâs name. An example of this procedure is shown in Listing 2-10. In the example, the foo-module link from Listing 2-9 is referenced from a second module, bar-module.
Listing 2-10. Referencing an Existing Link Using npm link $ cd bar-module
$ npm link foo-module
Unlinking Packages
The process for removing linked modules is very similar to the process for creating them. To remove a linked module from an application, use the npm unlink command, followed by the name. Listing 2-11 shows the command for removing the linked foo-module from bar-module.
Listing 2-11. Removing a Reference to a Link Using npm unlink $ cd bar-module
$ npm unlink foo-module
Similarly, to remove a link from your system, change to the linked moduleâs directory, and issue the npm unlink command. Listing 2-12 shows how to remove the foo-module link.
Listing 2-12. Removing a Linked Module Using npm unlink $ cd foo-module
CHAPTER 2 â THE NODE MODULE SYSTEM
Updating Packages
Since any package that is actively developed eventually releases a new version, your copy will become outdated. To determine if your copy is out of date, run npm outdated in your project directory (see Listing 2-13). In the example, which assumes that an outdated version 1.0.0 of commander is installed, npm indicates that the latest version is 2.0.0 but that your copy is only 1.0.0. Listing 2-13 checks all of the local packages. You can check individual packages by specifying their names, and you can process global packages by specifying the -g option.
Listing 2-13. Displaying Outdated Packages Using npm outdated $ npm outdated
npm http GET https://registry.npmjs.org/commander
npm http 304 https://registry.npmjs.org/commander
commander@2.0.0 node_modules/commander current=1.0.0
To update any outdated local packages, use the npm update command. Much like outdated, update works on all local packages by default. Again, you can target individual modules by specifying their names. You can also update global packages using the -g option. In Listing 2-14, npm updates itself using the -g option.
Listing 2-14. Updating npm Using npm update $ npm update npm -g
Uninstalling Packages
To remove a package, use either the npm uninstall or npm rm command (the two commands can be used
interchangeably), and specify one or more packages to be removed. You can also remove global packages by providing the -g option. Listing 2-15 shows how to remove the commander module using npm rm.
Listing 2-15. Uninstalling commander Using npm rm $ npm rm commander
The
require()
Function
As shown in the previous section, Node packages are managed using npm. However, to import modules into your programs, the require() function is used. require() accepts a single argument, a string specifying the module to load. If the specified module path exists, require() returns an object that can be used to interface with the module. If the module cannot be located an exception is thrown. Listing 2-16 shows how the commander module is imported into a program using the require() function.
Listing 2-16. Using the require() Function var commander = require("commander")
Core Modules
File Modules
File modules are non-core modules loaded from the file system. They can be specified using absolute paths, relative paths, or from the node_modules directory. Module names that begin with a slash (/) are treated as absolute paths. For example, in Listing 2-17, a file module, foo, is loaded using an absolute path.
Listing 2-17. A File Module Import Using an Absolute Path require("/some/path/foo");
Caution
â
Some operating systems such as Windows use a case-insensitive file system. This allows you to write
require("commander")
,
require("COMMANDER"), or
require("CoMmAnDeR"). However, on a case-sensitive file system
such as Linux, the last two calls would fail. Therefore, you should assume case sensitivity, no matter what operating
system you're using.
Node also supports Windows-style file paths. On Windows, Node allows the slash and backslash characters (/ and \) to be used interchangeably. For the sake of consistency, and to avoid escaping the backslash character, this book primarily uses Unix-style paths. However, be aware that all the paths shown in Listing 2-18 are valid on Windows.
Listing 2-18. Example Module Paths Valid on Windows require("/some/path/foo");
require("C:/some/path/foo"); require("C:\\some\\path\\foo"); require("\\some/path\\foo");
Module paths that begin with one or two dots (. or ..) are interpreted as relative pathsâthat is, they are considered relative to the file that called require(). Listing 2-19 shows three examples of relative module paths. In the first example, foo is loaded from the same directory as the calling script. In the second, foo is located in the calling scriptâs parent directory. In the third, foo is located in a subdirectory, sub, of the calling scriptâs directory.
Listing 2-19. Example Module Imports Using Relative Paths require("./foo");
require("../foo"); require("./sub/foo");
If a module path does not correspond to a core module, an absolute path, or a relative path, then Node begins searching in node_modules folders. Node begins with the calling scriptâs parent directory and appends /node_modules. If the module is not found, Node moves one level up the directory tree, appends /node_modules, and searches again. This pattern is repeated until the module is located or the root of the directory structure is reached. The example in Listing 2-20 assumes that a project is located in /some/path and shows the various node_modules directories that would be searched, in order.
Listing 2-20. Example of the Search Order of node_modules Directories /some/path/node_modules
CHAPTER 2 â THE NODE MODULE SYSTEM
File Extension Processing
If require() does not find an exact match, it attempts to add .js, .json, and .node file extensions. As mentioned in Chapter 1, .js files are interpreted as JavaScript source code, .json files are parsed as JSON source, and .node files are treated as compiled add-on modules. If Node is still unable to find a match, an error is thrown.
It is also possible to programmatically add support for additional file extensions using the built-in require.extensions object. Initially, this object contains three keys, .js, .json, and .node. Each key maps to a function that defines how require() imports files of that type. By extending require.extensions, you can customize the behavior of require(). For example, Listing 2-21 extends require.extensions such that .javascript files are treated as .js files.
Listing 2-21. Extending the require.extensions Object to Support Additional File Types require.extensions[".javascript"] = require.extensions[".js"];
You can even add custom handlers. In Listing 2-22, .javascript files cause require() to print data about the imported file to the console.
Listing 2-22. Adding a Custom Handler to the require.extensions Object require.extensions[".javascript"] = function() {
console.log(arguments); };
Caution
â
Though this feature has recently been deprecated, the module system API is locked, so
require.extensionsis unlikely to ever disappear completely. The official documentation recommends wrapping non-JavaScript modules in
another Node program or compiling them to JavaScript a priori.
Resolving a Module Location
If you are interested only in learning where a package is located, use the require.resolve() function, which uses the same mechanism as require() to locate modules. However, instead of actually loading the module, resolve() only returns the path to the module. If the module name passed to resolve() is a core module, the moduleâs name is returned. If the module is a file module, resolve() returns the moduleâs file name. If the Node cannot locate the specified module, an error is thrown. The example in Listing 2-23 shows usage of resolve() in the REPL environment.
Listing 2-23. Locating the http Module Using require.resolve() > require.resolve("http");
'http'
Module Caching
Listing 2-24. A Dependence Hierarchy Where foo Is Referenced Multiple Times your-project
âââ foo@1.0.0
ââ⬠bar@2.0.0 âââ foo@1.0.0
The
package.json
File
In an earlier section you saw that npm recognizes dependencies between packages and installs modules accordingly. But how does npm understand the concept of module dependencies? As it turns out, all of the relevant information is stored in a configuration file named package.json, which must be located in your projectâs root directory. As the file extension implies, the file must contain valid JSON data. Technically, you do not need to provide a package.json, but your code will essentially be inaccessible to npm without one.
The JSON data in package.json is expected to adhere to a certain schema. Minimally, you must specify a name and version for your package. Without these fields, npm will be unable to process your package. The simplest package.json file possible is shown in Listing 2-25. The packageâs name is specified by the name field. The name should uniquely identify your package in the npm registry. By using npm, the name becomes part of a URL, a command line argument, and a directory name. Therefore, names cannot begin with a dot or an underscore and cannot include spaces or any other non-URL-safe characters. Best practice also dictates that names be short and descriptive and not contain âjsâ or ânodeâ, as these are implied. Also, if you plan to release your package to the general public, verify that the name is available in the npm registry.
Listing 2-25. A Minimal package.json File {
"name": "package-name", "version": "0.0.0" }
A packageâs version is specified in the version field. The version, when combined with the name, provides a truly unique identifier for a package. The version number specifies the major release, minor release, and patch number, separated by dots (npm allows versions to begin with a v character). You can also specify a build number by appending a tag to the patch number. There are two types of tags, prerelease and postrelease. Postrelease tags increase the version number, while prerelease tags decrease it. A postrelease tag is a hyphen followed by a number. All other tags are prerelease tags. The example in Listing 2-26 shows version tagging in action. Several tagged versions and an untagged version (0.1.2) are listed in descending order.
Listing 2-26. Several Tagged Versions and One Untagged Version Listed in Descending Order 0.1.2-7
CHAPTER 2 â THE NODE MODULE SYSTEM
Description and Keywords
The description field is used to provide a textual description of your package. Similarly, use the keywords field to provide an array of keywords to further describe your package. Keywords and a description help people discover your package because they are searched by the npm search command. Listing 2-27 shows a package.json excerpt containing description and keywords fields.
Listing 2-27. Specifying a Description and Keywords in the package.json File "description": "This is a description of the module",
"keywords": [ "foo", "bar", "baz" ]
Author and Contributors
The primary author of a project is specified in the author field. This field can contain only one entry. However, a second field, contributors, can contain an array of people who contributed to the project. There are two ways to specify a person. The first is as an object containing name, email, and url fields. An example of this syntax is shown in Listing 2-28. The example specifies a single primary author and two additional contributors.
Listing 2-28. Specifying an Author and Contributors in the package.json File "author": {
"name": "Colin Ihrig", "email": "colin@domain.com", "url": "http://www.cjihrig.com" },
"contributors": [ {
"name": "Jim Contributor", "email": "jim@domain.com", "url": "http://www.domain.com" },
{
"name": "Sue Contributor", "email": "sue@domain.com", "url": "http://www.domain.com" }
]
Listing 2-29. Specifying an Author and Contributors as Strings Instead of Objects "author": "Colin Ihrig <colin@domain.com> (http://www.cjihrig.com)", "contributors": [
"Jim Contributor <jim@domain.com> (http://www.domain.com)", "Sue Contributor <sue@domain.com> (http://www.domain.com)" ]
The Main Entry Point
Since packages can consist of many files, Node needs some way of identifying its main entry point. Like most other configuration options, this is handled in the package.json file. In the main field you can tell Node which file to load when your module is imported using require(). Letâs assume that your module is named foo, but its main entry point is located in a file named bar.js, which is located in the src subdirectory. Your package.json file should contain the main field shown in Listing 2-30.
Listing 2-30. Specifying the Packageâs Main Entry Point "main": "./src/bar.js"
The
preferGlobal
Setting
Some packages are meant to be installed globally, but there is no way to actually enforce this intention. However, you can at least generate a warning if the user installs your module locally by including the preferGlobal field and setting it to true. Again, this will not actually prevent the user from performing a local install.
Dependencies
Package dependencies are specified in the dependencies field of the package.json file. This field is an object that maps package names to version strings. The version string can be any version expression understood by npm, including git and tarball URLs. Listing 2-31 shows an example of a dependencies field for a package depending only on commander.
Listing 2-31. A Simple dependencies Field "dependencies": {
"commander": "1.1.x" }
CHAPTER 2 â THE NODE MODULE SYSTEM
Developmental Dependencies
Many packages have dependencies that are used only for testing and development. These packages should not be included in the dependencies field. Instead, place them in the separate devDependencies field. For example, the mocha package is a popular testing framework commonly used in the Node community. Packages using mocha for testing should list it in the devDependencies field, as shown in Listing 2-32.
Listing 2-32. Listing mocha as a Developmental Dependency "devDependencies": {
"mocha": "~1.8.1" }
Developmental dependencies can also be automatically added to the package.json file. To do so, append the --save-dev flag to the npm install command. An example of this is the command npm install mocha --save-dev.
Optional Dependencies
Optional dependencies are packages you want to use but can live withoutâfor example, a module that improves cryptography performance. If itâs available, by all means use it. If for whatever reason itâs not available, your
application can fall back on a slower alternative. Normally, npm will fail if a dependency is not available. With optional dependencies, npm will proceed despite their absence. Much as with devDependencies, optional dependencies are listed in a separate optionalDependencies field. Optional dependencies can also be automatically added to the package.json file during installation by specifying the --save-optional flag to npm install.
If you choose to use optional dependencies, your program must still account for the case where the package is not present. This is done by wrapping references to the module inside try...catch and if statements. In the example in Listing 2-33, commander is assumed to be an optional dependency. Since the require() function throws an exception if commander is not present, it is wrapped in a try...catch statement. Later in the program, check that commander has a defined value before using it.
Listing 2-33. Using Defensive Programming when Referencing an Optional Dependency var commander;
try {
commander = require("commander"); } catch (exception) {
commander = null; }
if (commander) {
// do something with commander }
Engines
Listing 2-34. Defining Supported Engine Versions in the package.json File "engines": {
"node": ">=0.10.12", "npm": "1.2.x" }
Scripts
The scripts field, when present, contains a mapping of npm commands to script commands. The script commands, which can be any executable commands, are run in an external shell process. Two of the most common commands are start and test. The start command launches your application, and test runs one or more of your applicationâs test scripts. In the example in Listing 2-35, the start command causes node to execute the file server.js. The test command echoes that no tests are specified. In a real application, test would likely invoke mocha or some other testing framework.
Listing 2-35. Specifying a scripts Field in the package.json File "scripts": {
"start": "node server.js",
"test": "echo \"Error: no test specified\" && exit 1" }
Caution
â
Do your best to avoid using platform specific commands whenever possible. For example, using a Makefile
is common practice on Unix systems, but Windows has no
makecommand.
To execute the start and test commands, simply pass the command name to npm. Listing 2-36, based on the scripts field in Listing 2-35, shows the output of the test command. You can see from the output that npm treats an exit code other than zero as an error and aborts the command.
Listing 2-36. Launching the npm test Command $ npm test
> example@0.0.0 test /home/node/example > echo "Error: no test specified" && exit 1
\"Error: no test specified\"
npm ERR! Test failed. See above for more details. npm ERR! not ok code 0
CHAPTER 2 â THE NODE MODULE SYSTEM
Listing 2-37. Some npm Hooks "scripts": {
"install": "echo \"Thank you for installing!\"", "postinstall": "echo \"You're welcome!\"" }
Additional Fields
A number of other fields are commonly found in the package.json file. For example, you can list your projectâs home page in the homepage field, the software license type in the license field, and the repository where your projectâs source code lives in the repository field. The repository field is especially useful if you plan to publish you module to the npm registry, as your module's npm page will contain a link to your repository. Additionally, by including a repository field, users can quickly navigate to the repository using the command npm repo module-name (where module-name is the npm name of your module).
You can even add your own application-specific fields as long as there are no naming conflicts. For more information on the package.json file, issue the command npm help json.
Generating a package.json File
While the syntax of a package.json file is not terribly complex, it can be tedious and error prone. The hardest part can be remembering your packageâs dependencies and their versions. To help mitigate this problem, Node provides npm init, a command line wizard that prompts you for the values of key fields and automatically generates a package.json file. If you already have a package.json file, npm init maintains all of its information, adding only new information.
As an example, assume that you have a project directory named foo-module. Inside that directory is foo.js, the main entry point of your module. Your module has only one dependency, commander, that has been installed during the course of development. Additionally, you have a test script, test.js, which exercises your module. Now comes the time to create the package.json file. Issue the command npm init, and step through the wizard shown in Listing 2-38.
Listing 2-38. Using npm init to Generate a package.json File $ npm init
This utility will walk you through creating a package.json file. It only covers the most common items, and tries to guess sane defaults.
See `npm help json` for definitive documentation on these fields and exactly what they do.
Use `npm install <pkg> --save` afterwards to install a package and save it as a dependency in the package.json file.
Press ^C at any time to quit. name: (foo-module)
version: (0.0.0) 1.0.0
description: An awesome new Node module. entry point: (foo.js)
test command: test.js git repository:
keywords: node, awesome, foo
author: Colin Ihrig <cjihrig@domain.com> license: (BSD)
{
"name": "foo-module", "version": "1.0.0",
"description": "An awesome new Node module.", "main": "foo.js",
"dependencies": { "commander": "~1.1.1" },
"devDependencies": {}, "scripts": {
"test": "test.js" },
"repository": "", "keywords": [ "node", "awesome", "foo" ],
"author": "Colin Ihrig <cjihrig@domain.com>", "license": "BSD"
}
Is this ok? (yes)
npm WARN package.json foo-module@1.0.0 No README.md file found!
Notice that some values, including the name, foo-module, are parenthesized. These values are npm guesses. You can accept them by pressing the Enter key. If you want to use your own values, simply type them in before pressing Enter. For some fields, such as description, npm will not offer a guess. In these cases, you can either provide a value or leave the field blank, as shown in the git repository field. At the end of the wizard, npm displays the generated JSON data. At this point either accept the proposed data and generate the package.json file, or abort the entire process.
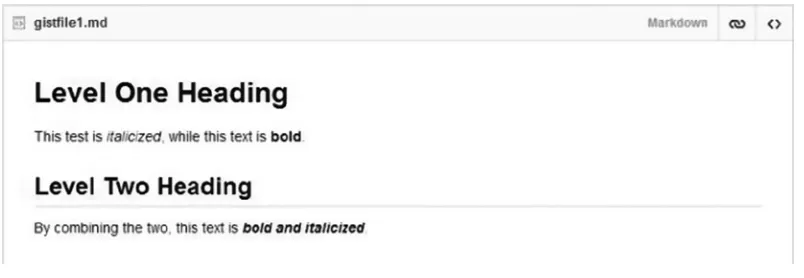
Finally, npm provides a warning message that no README.md file was found. README.md is an optional, yet recommended, file providing documentation on your module. The .md file extension indicates that the file contains
CHAPTER 2 â THE NODE MODULE SYSTEM
Listing 2-39. Using Markdown Syntax #Level One Heading
This test is *italicized*, while this text is **bold**.
##Level Two Heading
By combining the two, this text is ***bold and italicized***.
A Complete Example
This is probably a good time to look at a complete example of a Node program that includes a dependency. In this example, weâll create a Hello World style program that prints colored text to the console. In order to create colored text, the program will import a third party module named colors. The source code for the example program is shown in Listing 2-40. Add the source code to a file named colors-test.js and save it. The first line of code imports the colors module using the require() function. The second line prints the message "Hello Node!" to the console. The .rainbow appended to the console message causes the characters in the string to print in a variety of colors.
Listing 2-40. Using the colors Module to Print Rainbow Text var colors = require("colors");
console.log("Hello Node!".rainbow);
Since colors is not a core module, you need to install it before running the program. To do so, issue the
command npm install colors. After the installation completes, execute the program by issuing the command node colors-test. You should see a colorful message printed to the console. If youâre part of a team, other people will need to run your code. For a program this small, only having one dependency, your teammates could simply check your code out of source control and install colors. However, this approach isnât really feasible for large programs with tens or even hundreds of dependencies. If you ever want anyone else to run your nontrivial programs, youâre going to have to provide a package.json file. To generate package.json, run npm init. Execute the wizard step by step, entering values as needed. (An example package.json file for this project is shown in Listing 2-41.) Your program can now be installed with only your source code, the package.json file, and npm.
Listing 2-41. The package.json file for the Rainbow Text Program {
"name": "colors-test", "version": "1.0.0",
"description": "An example program using the colors module.", "main": "colors-test.js",
"dependencies": { "colors": "~0.6.0-1" },
"devDependencies": {}, "scripts": {
"test": "echo \"Error: no test specified\" && exit 1" },
"repository": "", "keywords": [ "colors", "example" ],
"author": "Colin Ihrig <cjihrig@domain.com>", "license": "BSD"
}
Note
â
Many developers do not check the
node_modulesfolder into source control. As this folder can be regenerated
using
npm, excluding it can save space in source control. However, application developers should consider committing
their
node_modulesfolder to avoid mysterious bugs that can arise if dependencies introduce incompatible changes.
Unfortunately, this can introduce problems when the application is loaded on a different machine or operating system.
An alternative is to use the
npm shrinkwraputility to lock down exact module versions which are known to work.
shrinkwrap
not only locks down the versions for top level dependencies, but also for all of their dependencies
(which can't be accomplished via the
package.jsonfile). Instead of checking
node_modulesinto source control, simply
run
npm shrinkwrap, and check in the resulting
npm-shrinkwrap.jsonfile (in the same directory as
package.json).
Module developers, on the other hand, should not commit their dependencies or use
shrinkwrap. Instead, they should
work to ensure that their code is as compatible as possible across versions.
Module Authoring
CHAPTER 2 â THE NODE MODULE SYSTEM
Listing 2-42. The Contents of foo.js, which Imports the File bar.js var bar = require("./bar");
console.log(bar);
Inside of bar.js, a function named bar() is defined. The module contains two print statements, one at the module level, and another in the bar() function.
Listing 2-43. The Contents of bar.js, which is Imported in Listing 2-42 function bar() {
console.log("Inside of bar() function"); }
console.log("Inside of bar module");
To run the example, issue the command node foo.js. The resulting output is shown in Listing 2-44. The call to require() in foo.js imports bar.js, which causes the first message to be printed. Next, the bar variable is printed, displaying an empty object. Based on this example, there are two questions that need to be answered. First, what exactly is the empty object? Second, how can the bar() function be invoked from outside of bar.js.
Listing 2-44. The Output from Running the Code in Listing 2-42 $ node foo.js
Inside of bar module {}
The
module
Object
Node provides a free variable, module, in every file which represents the current module. module is an object which contains a property named exports, that defaults to an empty object. The value of exports is returned by the require() function, and defines a module's public interface. Since exports was never modified in Listing 2-43, this explains the empty object seen in Listing 2-44.
To make the bar() function available outside of bar.js, we have two choices. First, bar could be assigned to module.exports inside of bar.js (as shown in Listing 2-45). Notice that the exports object has been overwritten with a function.
Listing 2-45. Rewriting bar.js to Export bar() module.exports = function bar() {
console.log("Inside of bar() function"); }
console.log("Inside of bar module");
Listing 2-46. Rewriting foo.js to Access bar() from Listing 2-45 var bar = require("./bar");
console.log(bar); bar();
The drawback to this approach is that the bar module cannot export anything but the bar() function. The second option is to simply attach the bar() function to the existing exports object, as shown in Listing 2-47. This technique allows the module to export an arbitrary number of methods and properties. To accommodate this change, foo.js would access the bar() function as bar.bar().
Listing 2-47. Exporting bar() by Augmenting the Existing exports Object module.exports.bar = function bar() {
console.log("Inside of bar() function"); }
console.log("Inside of bar module");
The module object provides several other properties which are less commonly used. These properties are summarized in Table 2-2.
Table 2-2. Additional Properties of the module Object
Property
Description
id An identifier for the module. Typically this is the fully resolved filename of the module. filename The fully resolved filename of the module.
loaded A Boolean value representing the module's state. If the module has finished loading, this will be true. Otherwise, it will be false.
parent An object representing the module that loaded the current module.
children An array of objects representing the modules imported by the current module.
Publishing to
npm
In order to publish your modules to npm, you must first create a npm user account. Listing 2-48 illustrates the commands required to set up a npm account. The first three commands are used to associate your personal information. The last command, npm adduser, will prompt you for a username and create a npm account (assuming the username is available). Once an account is created, the user's published modules can be viewed at
https://npmjs.org/~username.
Listing 2-48. Creating a npm User Account npm set init.author.name "John Doe"
CHAPTER 2 â THE NODE MODULE SYSTEM
After setting up an npm account, you must create a package.json file for your module. The process for doing this has already been covered in this chapter. Finally, issue the command npm publish to create a npm entry based on the package.json file.
Summary
The Node Programming Model
Before trying to write any meaningful Node applications, itâs important to understand whatâs going on under the hood. Probably the most important thing to understand is that JavaScriptâand Node by extensionâis single threaded. This means that Node applications can do exactly one thing at a time. However, JavaScript can give the illusion of being multithreaded through the use of an event loop. The event loop is used to schedule tasks in Nodeâs event-driven programming model. Each time an event occurs, it is placed in Nodeâs event queue. In each iteration of the event loop, a single event is dequeued and processed. If, during processing, this event creates any additional events, they are simply added to the end of the queue. When the event is completely handled, control is returned to the event loop, and another event is processed.
The example in Listing 3-1 illustrates how the event loop allows multiple tasks to appear to execute in parallel. In this example, setInterval() is used to create two periodic tasks which each run once per second. The first task is a function displaying the string foo, while the second task displays bar. When the application is run, setInterval() causes each function to run approximately once every 1,000 milliseconds. The result is that foo and bar are printed once per second. Remember, to execute a Node program, just type "node", followed by the programâs file name.
Listing 3-1. An Example Application Giving the Illusion of Multithreaded Execution setInterval(function() {
console.log("foo"); }, 1000);
setInterval(function() { console.log("bar"); }, 1000);
Based on the code in Listing 3-1, JavaScript appears to be doing multiple things at once. Unfortunately, it is all too easy to verify its true single-threaded nature. In Listing 3-2, an infinite loop has been introduced into one of the repeating functions. The infinite loop prevents the first function from ever returning. Therefore, control is never passed back to the event loop, preventing anything else from executing. If the code were truly multithreaded, bar would continue to be printed to the console even though the other function was stuck in an infinite loop.
Listing 3-2. Exploiting Nodeâs Single-Threaded Nature by Introducing an Infinite Loop setInterval(function() {
console.log("foo");
while (true) { }
CHAPTER 3 â THE NODE PROGRAMMING MODEL
setInterval(function() { console.log("bar"); }, 1000);
Asynchronous Programming
Another important aspect of the Node programming model is the fact that almost everything is done asynchronously. Asynchronicity is so common that many synchronous functions contain the string sync in their name to avoid confusion. Under Nodeâs paradigm, sometimes referred to as continuation-passing style (CPS) programming, asynchronous functions take an extra argument, a function that is called after the asynchronous code has finished executing. This additional argument is referred to as a continuation or, more commonly, a callback function.
An example of an asynchronous function call is shown in Listing 3-3. This code reads a file from the file system and prints the contents to the screen. Accessing the file system will be revisited later in the book, but for now, this example should be simple enough to understand. The core fs module, imported on the first line, is used for working with the file system. The readFile() method works asynchronously, reading in the file foo.txt using UTF-8 encoding. Once the file is read, the anonymous callback function is invoked. The callback function takes two parameters, error and data, which represent any error conditions and the contents of the file, respectively.
Listing 3-3. An Example of Asynchronous File Reading var fs = require("fs");
fs.readFile("foo.txt", "utf8", function(error, data) { if (error) {
throw error; }
console.log(data); });
console.log("Reading file...");
This short example illustrates two important conventions for Node developers. First, if a method takes a callback function as an argument, it should be the final argument. Second, if a method takes an error as an argument, it should be the first argument. These are not rules of the language but generally agreed upon calling conventions in the Node developer community.
When this program is executed, it demonstrates another important aspect of asynchronous programming. To test the example program, save the source code in a file named file-reader.js. Next, create a second file, foo.txt, in the same directory as the Node script. For simplicity, just add the word "foo" to the file, and save it. Listing 3-4 shows the output of running the example program. Notice that the message Reading file... is displayed before the contents of the file, despite the fact that the message is not printed until the last line of code.
Listing 3-4. Console Output of the File Reader Example Program $ node file-reader.js
Reading file... foo
When readFile() is invoked, it makes a nonblocking I/O call to the file system. The fact that the I/O is
When this happens, the readFile() callback function is invoked, and the file contents are displayed. This behavior appears to contradict the fact that Node programs are single threaded, but you must keep in mind that the file system is not a part of Node.
Callback Hell
The CPS syntax used in Node can easily lead to a situation known as callback hell. Callback hell occurs when callbacks are nested within other callbacks several levels deep. This can lead to code that is confusing and difficult to read and maintain. Callback hell is sometimes referred to as the Pyramid of Doom, its name coming from the pyramidal structure the code takes on.
As an example, letâs revisit the file reader program from Listing 3-3. If we were to access a file that didnât exist, an exception would be thrown, and the program would crash. To make the program sturdier, first check that the file exists and that it is actually a file (not a directory or some other structure). The modified program is shown in Listing 3-5. Notice that the program now contains calls to fs.exists() and fs.stat(), as well as the original call to readFile(). With all of these utilizing callback functions, the level of code indentation increases. Couple this with the indentation from structures like if statements, and you see how callback hell can become a problem in complex Node applications.
Listing 3-5. A File Reader Program with Callback Hell Beginning to Creep In var fs = require("fs");
var fileName = "foo.txt";
fs.exists(fileName, function(exists) { if (exists) {
fs.stat(fileName, function(error, stats) { if (error) {
throw error; }
if (stats.isFile()) {
fs.readFile(fileName, "utf8", function(error, data) { if (error) {
throw error; }
console.log(data); });
} }); } });
CHAPTER 3 â THE NODE PROGRAMMING MODEL
Listing 3-6. The File Reader Example Refactored to Prevent Callback Hell var fs = require("fs");
var fileName = "foo.txt";
function cbReadFile(error, data) { if (error) {
throw error; }
console.log(data); }
function cbStat(error, stats) { if (error) {
throw error; }
if (stats.isFile()) {
fs.readFile(fileName, "utf8", cbReadFile); }
}
function cbExists(exists) { if (exists) {
fs.stat(fileName, cbStat); }
}
fs.exists(fileName, cbExists);
Exception Handling
Asynchronous code also has major implications for exception handling. In synchronous JavaScript code, try ... catch ... finally statements are used to handle errors. However, Nodeâs callback-driven nature
allows functions to execute outside the error-handling code in which they are defined. For example, Listing 3-7 adds traditional error handling to the file reader example from Listing 3-3. Additionally, the name of the file to read has been hard-coded to the empty string. Therefore, when readFile() is called, it is unable to read the file and populates the error argument of the callback function. The callback function then throws the error. Intuitively, one assumes that the catch clause will handle the thrown error. However, by the time the callback function is executed, the try ... catch statement is no longer a part of the call stack, and the exception is left uncaught.
Listing 3-7. An Incorrect Attempt at Asynchronous Error Handling var fs = require("fs");
try {
fs.readFile("", "utf8", function(error, data) { if (error) {
console.log(data); });
} catch (exception) {
console.log("The exception was caught!") }
Synchronous exceptions can still be handled with try...catch...finally statements, but you will find that they are relatively useless in Node. The majority of Node exceptions are of the asynchronous variety, and can be handled in a number of ways. For starters, all functions that take an error argument should be sure to check itâat least the example in Listing 3-7 does that right. In the example, the exception has been detected, but is then immediately thrown again. Of course, in a real application, you would want to handle the error, not throw it.
The second way to process asynchronous exceptions is to set up a global event handler for the processâs
uncaughtException event. Node provides a global object, named process, that interacts with the Node process. When an unhandled exception bubbles all the way back to the event loop, an uncaughtException error is created. This exception can be handled using the process objectâs on() method. Listing 3-8 shows an example of a global exception handler.
Listing 3-8. An Example of Global Exception Handler var fs = require("fs");
fs.readFile("", "utf8", function(error, data) { if (error) {
throw error; }
console.log(data); });
process.on("uncaughtException", function(error) { console.log("The exception was caught!") });
While global exception handlers are useful for preventing crashes, they should not be used to recover from errors. When not properly handled, an exception leaves your application in an indeterminate state. Attempting to move on from such a state can bring additional errors. If your program does include a global exception handler, use it only to gracefully terminate the program.
Domains
A domain is the preferred mechanism for handling asynchronous errors in Node. Domains, a relatively new feature (introduced in version 0.8), allow multiple I/O operations to be grouped into a single unit. When a timer, event emitter (covered in Chapter 4), or callback function registered with a domain creates an error, the domain is notified so the error can be handled appropriately.
CHAPTER 3 â THE NODE PROGRAMMING MODEL
Listing 3-9. Exception Handling Using Domains var fs = require("fs");
var domain = require("domain").create();
domain.run(function() {
fs.readFile("", "utf8", function(error, data) { if (error) {
throw error; }
console.log(data); domain.dispose(); });
});
domain.on("error", function(error) { console.log("The exception was caught!") });
Explicit Binding
As previously mentioned, timers, event emitters, and callback functions created in the context of run() are implicitly registered with the corresponding domain. However, if you create multiple domains, you can explicitly bind to another domain, even in the context of run(). For example, Listing 3-10 creates two domains, d1 and d2. Within d1âs run() method, an asynchronous timer that throws an error is created. Because the exception occurs in d1âs run() callback, the exception is normally handled by d1. However, the timer is explicitly registered with d2 using its add() method. Therefore, when the exception is thrown, d2âs error handler is triggered.
Listing 3-10. An Example of a Bound Callback Function Using Domains var domain = require("domain");
var d1 = domain.create(); var d2 = domain.create();
d1.run(function() {
d2.add(setTimeout(function() { throw new Error("test error"); }, 1));
});
d2.on("error", function(error) { console.log("Caught by d2"); });
d1.on("error", function(error) { console.log("Caught by d1") });
automatically bind it to d1. Instead, the exception thrown by the timerâs callback function does not get caught, and the program crashes.
Listing 3-11. Using remove() to Unbind a Timer from a Domain var domain = require("domain");
var d1 = domain.create(); var d2 = domain.create();
d1.run(function() {
var timer = setTimeout(function() { throw new Error("test error"); }, 1);
d2.add(timer); d2.remove(timer); });
d2.on("error", function(error) { console.log("Caught by d2"); });
d1.on("error", function(error) { console.log("Caught by d1") });
Note
â
Each domain has an array property,
members, that contains all the timers and event emitters explicitly added
to the domain.
Domains also provide a bind() method that can be used to explicitly register a callback function with the domain. This is useful because it allows a function to be bound to a domain without immediately executing the function, as run() would. The bind() method takes a callback function as its only argument. The function returned is a registered wrapper around the original callback. As with the run() method, exceptions are handled through the domainâs error handler. Listing 3-12 revisits the file reader example using the domain bind() method to handle errors associated with the readFile() callback function.
Listing 3-12. An Example of a Bound Callback Function Using Domains var fs = require("fs");
var domain = require("domain").create();
fs.readFile("", "utf8", domain.bind(function(error, data) { if (error) {
throw error; }
CHAPTER 3 â THE NODE PROGRAMMING MODEL
domain.on("error", function(error) { console.log("The exception was caught!") });
There is another method, intercept(), that is nearly identical to bind(). In addition to catching any thrown exceptions, intercept() also detects any Error objects passed as the first argument of the callback function. This eliminates the need to check for any errors passed to the callback function. For example, Listing 3-13 rewrites Listing 3-12 using the intercept() method. The two examples behave identically, but notice that in 3-1