Early praise for
Automate with Grunt
Whether you’re still writing your first Grunt task or trying to come up with a complex workflow, this compact and pragmatic book will prove to be a handy companion and give you the confidence to explore the full and rich Grunt ecosystem.
➤ Peter Cooper
Managing editor, JavaScript Weekly
This book focuses on how Grunt works and not on the “just do this; just do that” steps that you typically see in blog posts and documentation. Brian quickly and effectively shows how to integrate Grunt into your own workflow and how to customize your workflow for ultimate web-development productivity.
➤ Jenna Pederson
Independent developer, 612 Software Foundry
I’ve spent countless hours working with Grunt to build a developer tool called Lineman. Unfortunately, Grunt’s documentation alone was never enough to show me the simplest, most conventional way to accomplish what I needed. If I’d had this book to help me back when I first started, I would have established a deeper, meaningful understanding of Grunt much more quickly!
➤ Justin Searls
Co-Founder, Test Double, LLC
This book is a quick and easy dive into a task-running tool whose power and simplic-ity are surprising. The examples in this book are fun to follow and also incredibly practical for any developer.
Automate with Grunt
The Build Tool for JavaScript
Brian P. Hogan
The Pragmatic Bookshelf
Many of the designations used by manufacturers and sellers to distinguish their products are claimed as trademarks. Where those designations appear in this book, and The Pragmatic Programmers, LLC was aware of a trademark claim, the designations have been printed in initial capital letters or in all capitals. The Pragmatic Starter Kit, The Pragmatic Programmer, Pragmatic Programming, Pragmatic Bookshelf, PragProg and the linking g device are trademarks of The Pragmatic Programmers, LLC.
Every precaution was taken in the preparation of this book. However, the publisher assumes no responsibility for errors or omissions, or for damages that may result from the use of information (including program listings) contained herein.
Our Pragmatic courses, workshops, and other products can help you and your team create better software and have more fun. For more information, as well as the latest Pragmatic titles, please visit us at http://pragprog.com.
The team that produced this book includes:
Susannah Davidson Pfalzer (editor) Candace Cunningham (copyeditor)
David J Kelly (typesetter) Janet Furlow (producer) Ellie Callahan (support)
For international rights, please contact [email protected].
Copyright © 2014 The Pragmatic Programmers, LLC.
All rights reserved.
No part of this publication may be reproduced, stored in a retrieval system, or transmitted, in any form, or by any means, electronic, mechanical, photocopying, recording, or otherwise, without the prior consent of the publisher. Printed in the United States of America.
ISBN-13: 9781941222119
Contents
Acknowledgments . . . vii
Preface . . . ix
1. The Very Basics . . . 1
Installing Grunt and Configuring a Gruntfile 1
Our First Task 4
Handling Parameters 5
Throwing Errors 6
Chaining Tasks 7
Describing Tasks 7
What’s Next? 8
2. Manage Files . . . 11
Creating the Project 11
Creating and Deleting Directories 12
Recursive File Copying 16
Using Values from Files 18
What’s Next? 19
3. One Task, Many Outputs . . . 21
Introducing Multitasks 21
Multitasks and Files 24
What’s Next? 28
4. Build a Workflow . . . 31
Creating the App 32
Wrangling the JavaScript 35
Adding Some Style 39
Simplifying the Build 43
Refreshing the Browser Automatically 45
What’s Next? 46
5. Create a Plug-in . . . 47
The Structure of a Plug-in 47
Creating the Plug-in Skeleton 48
Building Our Plug-in’s Logic 48
Using JSHint to Check for Errors and Problems 52
What’s Next? 54
6. Create Project Scaffolds . . . 55
Using Existing Templates 56
Creating a Custom Template
57
Including Files Conditionally
62
Including File Contents Conditionally
63 What’s Next?
64
Bibliography . . . 67
Acknowledgments
First, thank you for picking up this book. I wrote it because I was frustrated at the lack of meaningful Grunt documentation online. Hopefully you find this a nice, handy quick start.
Next, The Pragmatic Bookshelf continues to be the absolute best place to publish books. Dave Thomas and Andy Hunt always provide just the right amount of guidance, and my wonderful editor Susannah Pfalzer once again made sure that everything I wanted to say actually made sense.
The technical reviewers for this book were excellent and thorough, trying every example to find out what worked and what didn’t, and keeping me honest when it came to explaining how things functioned. Thank you, Andrea Barisone, Kevin Beam, Daniel Bretoi, Trevor Burnham, Alex Henry, Jeff Hol-land, Jessica Janiuk, Jenna Pederson, Stephen Orr, and Justin Searls, for all of your great feedback and insights along the way.
Thanks to my business associates Chris Warren, Chris Johnson, Mike Weber, Nick LaMuro, Austen Ott, Erich Tesky, Kevin Gisi, Jon Kinney, and Myles Steinhauser for their continued support.
Preface
Web development has changed. The days of opening a few text files in your editor of choice and then uploading them to the live site are long gone. Today’s web applications demand complex styling and functionality that only advanced CSS and JavaScript can provide. These assets get quite large and unwieldy, and the process requires a new workflow.
The JavaScript community has embraced Grunt, a powerful automation tool and task runner written in JavaScript, to handle these workflows. With Grunt, you can watch files for changes, concatenate CSS files and JavaScript files together, obfuscate or minify client-side code, run tests, and check your code for syntax errors, all automatically. Unfortunately, a lot of documentation on Grunt centers on copying and pasting various bits of code rather than focusing on how Grunt itself works.
This book will help you understand how Grunt works and show you how you can make it part of your development process. When you’re done you’ll be able to use Grunt on your own projects and build your own tasks and plug-ins.
What
’
s in This Book
This guide is meant to be a quick overview of Grunt, using hands-on examples to illustrate its features.
We’ll start out by looking at the very basics of Grunt, defining some simple tasks as we build our first Gruntfile. We’ll create basic tasks, create tasks that take in parameters, chain tasks together, and document tasks. Then we’ll look at Grunt’s built-in tools for working with files and folders on the file system.
Next we’ll use several Grunt plug-ins together as we configure a workflow to develop a modern single-page web application with CoffeeScript and the AngularJS framework. We’ll cover conversion, minification, and file watching so you can see how easy Grunt makes automating important repetitive tasks. Then we’ll look at what it takes to create our very own plug-in for Grunt. This will give us a chance to explore how Grunt can leverage Node.js and external programs, as well as how to break Grunt tasks into reusable modules. And finally, we’ll use Grunt to create project scaffolds. We’ll play with existing plug-ins and then we’ll create our very own project template that we can use when we start our own web projects.
In addition, each chapter gives you suggestions for further exploration, offering you the opportunity to dig deeper into Grunt.
Who Should Read This Book
If you’re a web developer working with CSS and JavaScript and you’ve never used Grunt, you need this book. Grunt’s features can make your workflow so much easier to manage. If your only experience with Grunt is copying and pasting some lines of configuration, you’ll find value here, as well. Grunt has become a standard for JavaScript projects on both the client and the server. Knowing how it works will be incredibly valuable.
This book assumes that you know some basic programming and that you’re not afraid to write JavaScript code. The Grunt tasks we use will be written in JavaScript using Node.js.
What You Need
You’ll need a computer running Windows 7 or 8 or a modern version of Linux or OS X. You’ll need the ability to install software on your computer, as well as an active Internet connection.
You’ll also need a text editor or your IDE of choice. You can use Sublime Text, which is a commercial editor with a trial period, or any other text editor that you’d write code in.1
We’ll use Node.js, so you’ll need to visit the Node.js website and get the latest version installed.2 You
’ll find installers for all platforms there. Download the one for your operating system and install it using the default options.
1. http://www.sublimetext.com/ 2. http://nodejs.org
Finally, Grunt is a command-line utility, so you’ll use the Command Prompt on Windows or the Terminal on OS X or Linux. This book will guide you through that process, so you’ll be pretty comfortable by the end. If you’re used to graphical programs, it might seem a bit shocking to you that you have to go “old school,” but a lot of modern developers use command-line tools because of the flexibility they offer. You’ll run Grunt on the command line, but you’ll still use your normal workflow and tools to write your apps.
Conventions
As you work through the book, you’ll see some conventions.
When you’re asked to type a command in the Command Prompt or Terminal, which I’ll just refer to as the Terminal, it’ll look like this:
$ grunt
The dollar sign ($) represents the prompt in your Terminal. You never type that part of the command. But when you see it, that means you will need to type the command in your Terminal.
Sometimes you’ll see snippets of code you’ll type out. Those will look like this: basics/kicking_tires/Gruntfile.js
module.exports = function(grunt){
// Your tasks go here
}
The filename above the code indicates the file we’re working with. You can use this to locate the full file in the book’s source code download, too. And if you’re reading the electronic copy of the book, you can click or tap on the name of the file to view the file online.
Sometimes you’ll see output from the screen, which will look like this:
Available tasks
default Custom task. greet Custom task. addNumbers Custom task.
all Alias for "default", "greet:Brian", "addNumbers:2:3" tasks. praise Have Grunt say nice things about you.
This is a hands-on book, so there will be many places where we’ll reference files or commands. The book’s formatting should make it clear which file or command you’re expected to work with.
Where to Go for Help
The book’s web page contains a link to the book’s forum, where you can ask questions and provide feedback.3 When reporting any problems, please be sure to report the version of the book you’re reading.
And now, with all that out of the way, let’s dig into how Grunt works.
3. http://pragprog.com/book/bhgrunt/
CHAPTER
1
The Very Basics
Grunt is a task runner, designed to be more configuration than code. And while many of the examples you’ll see in the wild involve copying and pasting configuration snippets and loading plug-ins, don’t be fooled into thinking that’s all Grunt can do. Sure, there are some amazing plug-ins that will vastly improve your workflow, but if you know JavaScript, Grunt becomes a very powerful automation tool for many types of projects. If you have a man-ual repetitive task you run as part of your development or deployment process, chances are there’s a way to automate that process with Grunt.
In this chapter we’ll set up our first project with Grunt and cover how the basic task system works. We’ll use simple JavaScript programs to highlight and explore Grunt’s basic features. By the end you’ll be able to create basic tasks and handle errors.
Installing Grunt and Configuring a Gruntfile
Before we can do anything with Grunt, we have to install the Grunt command-line tool. Grunt is written in Node.js, and to install it we use npm, the tool Node uses to download and manage dependencies. Open a new Terminal and type the following command:
$ npm install -g grunt-cli
This installs the Grunt command-line utility globally. On Linux or OS X, you may need to run this command using sudo if you get a “Permission Denied”
error.
Instead, we install Grunt into our project as a dependency. The grunt-cli tool we installed globally on our system will then work with the version of grunt within our project. Let’s create a simple project folder and set everything up. Create a new folder called kicking_tires and navigate into that folder in your Terminal:
$ mkdir kicking_tires
$ cd kicking_tires
From here, you could install Grunt with npm install grunt, but there’s a better way. Node.js applications use a file called package.json to store the metadata about a project as well as track a project’s dependencies. If we create this file, we can add Grunt as a dependency to our project, making it easier to set things up in the future.
Type the following command to create a new package.json file.
$ npm init
You’ll be asked a series of questions about your project. For this project you can leave everything at the default settings. Your package.json file will end up looking like this when the wizard finishes:
{
"name": "kicking_tires", "version": "0.0.0", "description": "", "main": "index.js", "scripts": {
"test": "echo \"Error: no test specified\" && exit 1"
},
"author": "",
"license": "BSD-2-Clause"
}
Now that we have this file in place, we can add Grunt as a development dependency like this:
$ npm install grunt --save-dev
Grunt will be installed into the node_modules/ subfolder of the current folder, and it’ll be added to the package.json file as a development dependency. If you look at your package.json file you’ll see this at the bottom now:
"devDependencies": { "grunt": "~0.4.4"
}
The devDependencies section lists dependencies that are used only to build an application. Grunt isn’t something an application needs to run; we use Grunt only as a tool for developing an application. However, a library that lets us connect to a MySQL database would be a true dependency, not a development dependency.
The --save-dev command also saves the version number into the package.json file, and it uses the tilde in front of the version number to signify that any version 0.4.4 or higher is OK for us to use. Version 0.4.7, for example, would be valid, but 0.5.0 would not. This helps us stay current within minor version numbers, but prevents us from accidentally installing a version that’s too new and incompatible. Of course, we can change this version number by hand if we like.
The node_modules folder contains all of the libraries our project depends on. This means you have a copy of the Grunt library itself in the node_modules folder.
Adding things as development dependencies allows new people who want to work on our project to easily download all of the dependencies we specify by issuing the npm install command in the folder that contains the package.json file. In fact, let’s try this now. Remove the node_modules folder and then run npm install. You’ll see that npm fetches Grunt again, creating a new node_modules folder.
With Grunt installed, we can test things out by running it from the command line:
$ grunt
This fires off the grunt-cli library we installed globally, which then uses the grunt library we installed in our project’s node_modules folder. This lets us easily use different versions of Grunt on different projects.
But when we look at our output, we see this message:
A valid Gruntfile could not be found. Please see the getting started guide for more information on how to configure grunt: http://gruntjs.com/getting-started Fatal error: Unable to find Gruntfile.
Grunt is telling us that we need something called a Gruntfile in our project. A Gruntfile is a JavaScript file that specifies and configures the tasks you want to be able to run for your project. It’s like a Makefile. Grunt is specifically looking for a file called Gruntfile.js in the current working directory and it can’t find one, so it doesn’t know what we want it to do. Let’s create a Gruntfile.
Our First Task
Let’s kick the tires. We’ll create the default task, which is the one that runs when we type the grunt command.
Every Gruntfile starts out with some boilerplate code. Create a new file called Gruntfile.js and add this:
basics/kicking_tires/Gruntfile.js
module.exports = function(grunt){
// Your tasks go here
}
If you’re familiar with Node.js and its module system, you’ll understand what’s going on here. If you’re not, it’s not a huge deal; just know that this is what Grunt needs to interpret your tasks. You’re defining a Node.js module that receives a grunt object. You’ll use that object and its methods throughout your configuration files. The tasks you define and configure are then made available to Grunt so that they can be executed.
Now, within the curly braces, define the following task, which prints some text to the screen:
basics/kicking_tires/Gruntfile.js
grunt.registerTask('default', function(){
console.log('Hello from Grunt.');
});
We use grunt.registerTask() to create a new Grunt task. We pass in a task name followed by an associated callback function. Whatever we put in the callback function is executed when we invoke the task.
To see it in action, run this new task from the Terminal:
$ grunt
You’ll see the following output:
Running "default" task Hello from Grunt.
Done, without errors.
In this task we’ve used Node’s console.log function, but we really should use Grunt’s grunt.log() object instead. It’ll give us some flexibility because it supports error logging, warnings, and other handy features.
So, change the following:
basics/kicking_tires/Gruntfile.js
console.log('Hello from Grunt.');
to
basics/kicking_tires/Gruntfile.js
grunt.log.writeln('Hello from Grunt.');
and rerun the task with
$ grunt
You shouldn’t see anything different. This task is not fancy by any means, but it illustrates that Grunt works, and that we can create a simple task. Let’s move on.
Handling Parameters
Grunt task definitions can take in simple arguments. Let’s demonstrate how this works by creating a simple “greeting” task. As before, we’ll use grunt.regis-terTask() to create a task, but this time we’ll define a parameter in the callback function.
basics/kicking_tires/Gruntfile.js
grunt.registerTask('greet', function(name){
grunt.log.writeln('Hi there, ' + name);
});
In the body of the callback, we reference the variable just like we would in any plain JavaScript code.
Run this task with
$ grunt greet
and you’ll see this output:
Running "greet" task Hi there, undefined
Done, without errors.
We didn’t actually pass an argument to the task, and so the `name` parameter’s value is undefined. Grunt didn’t throw an error message at us.
To supply the parameter, we use a colon followed by the value, like this:
$ grunt greet:Brian
And now we see what we’re looking for.
Running "greet:Brian" (greet) task Hi there, Brian
Done, without errors.
We don’t have to stop at one argument, though. We can define tasks with multiple arguments. Let’s create another rather silly task that adds some numbers together.
In the Gruntfile, add this task:
basics/kicking_tires/Gruntfile.js
grunt.registerTask('addNumbers', function(first, second){
var answer = Number(first) + Number(second);
grunt.log.writeln(first + ' + ' + second + ' is ' + answer);
});
To run this task, we have to supply both numbers as arguments to the task, and we do that using colons, like this:
$ grunt addNumbers:1:2
And when we do that, we see this result:
Running "addNumbers:1:2" (addNumbers) task 1 + 2 is 3
Done, without errors.
Pretty easy so far, isn’t it? But what if the user didn’t enter appropriate values? We need a way to handle that gracefully.
Throwing Errors
When things go wrong in our tasks, we’ll want to log error messages. We can do that with grunt.log().
In our addNumbers() task, let’s check to make sure the first argument is a number. If it isn’t, we’ll print an error on the screen:
basics/kicking_tires/Gruntfile.js
if(isNaN(Number(first))){
grunt.warn('The first argument must be a number.');
}
Now run this with
$ grunt addNumbers:a:2
and you’ll see an interesting response from Grunt:
Running "addNumbers:a:2" (addNumbers) task
Warning: The first argument must be a number. Use --force to continue.
Grunt prints out our message and then stops the task. It doesn’t attempt to do the math. However, it tells us that we can force it to continue by running our task with the --force option. Let’s try that:
$ grunt addNumbers:a:2 --force
Running "addNumbers:a:2" (addNumbers) task
Warning: The first argument must be a number. Used --force, continuing. a + 2 is NaN
Done, but with warnings.
We still see the warning, but the task continues. Sometimes we need to allow users to be able to force their way through tasks that don’t work. However, you can prevent people from doing this by using grunt.fatal() instead.
We’ve defined a few tasks in our file, but what if we wanted to invoke all of these tasks at once?
Chaining Tasks
So far we haven’t done anything with Grunt that we couldn’t do with Bash, PowerShell, Perl, Python, or any other scripting language. But Grunt offers the ability to create one task that fires off other tasks. Grunt refers to this as an alias.
To make a task like this we use registerTask() and pass it an array of tasks instead of a callback function.
basics/kicking_tires/Gruntfile.js
grunt.registerTask('all', ['default', 'greet:Brian', 'addNumbers:2:3']);
Notice that when we do this we pass these task names as strings, which means we can pass arguments as well.
We’ve called this task all, but if we renamed it to default we’d be able to run this task by running grunt with no arguments. The default task is commonly used to run the test suite for a project.
Now let’s look at one more basic but really important piece: adding a little documentation to our tasks.
Describing Tasks
registerTask() method can take three arguments. After the name, we can specify a text description of the task.
Let’s define a simple task called praise() that makes Grunt say some words of encouragement to you.
basics/kicking_tires/Gruntfile.js
grunt.registerTask('praise',
'Have Grunt say nice things about you.', function(){
var praise = [
"You're awesome.",
"You're the best developer ever!",
"You are extremely attractive.",
"Everyone loves you!"
]
var pick = praise[(Math.floor(Math.random() * praise.length))];
grunt.log.writeln(pick);
});
Now type this:
$ grunt --help
This shows Grunt’s basic help page, but in the middle of the output you’ll see this:
Available tasks
default Custom task. greet Custom task. addNumbers Custom task.
all Alias for "default", "greet:Brian", "addNumbers:2:3" tasks. praise Have Grunt say nice things about you.
All the tasks we didn’t document just say “Custom task,” but our praise() task shows its description. It’s really important that we document the tasks that we create so others who follow our work will know what those tasks do. As we go forward we’ll be sure to do that.
If you’d like a nicer way to see your tasks, take a look at the grunt-available-tasks plug-in, which gives a simple list of the tasks that isn’t buried in the help.1
What
’
s Next?
In this chapter we looked at the basics of creating our own Grunt tasks, handling arguments for tasks, and adding some documentation along the way. Before moving on, try the following:
1. https://npmjs.org/package/grunt-available-tasks
• Add documentation to the other tasks. Be sure to test each task to make sure you got the syntax right!
• Create a new task that multiplies two numbers. Be sure to add documentation.
• Create a new folder called learning_grunt and then generate a new package.json file. Then create a new Gruntfile in the project, with a default task that prints out “It worked!”
Next we’ll look at how we can use built-in Grunt utilities to work with the file system.
CHAPTER
2
Manage Files
We’ve spent a little time with Grunt covering the basics, but running fun little JavaScript programs doesn’t really show off what Grunt can do. When you’re using Grunt in one of your projects, it’s very likely you’ll do some work with the file system. For example, you might read some settings in from a file, or you might write your own files to disk. You might need to create files and folders or copy files around. You can do all of these things by calling out to the operating system yourself using Node.js, but Grunt provides tools to do it easily. In this chapter we’ll explore those tools as we build a simple Grunt task to copy a manifest of files in our project to a working folder that we can upload to our web server.
Creating the Project
Let’s create a project folder called deployment and then navigate into it:
$ mkdir deployment
$ cd deployment
$ npm init
Fill in the basic information or leave it at its default values. Alternatively, create your own package.json file that contains this:
{
"name": "deploying", "version": "0.0.0",
"description": "A simple project to copy files for deployment."
}
Next, we add Grunt as a dependency:
$ npm install grunt --save-dev
files/simple/deploying/Gruntfile.js
module.exports = function(grunt){
}
Now let’s create a few simple files and folders in this project. First, create an index.html file with a default HTML5 template:
files/simple/deploying/index.html
<!DOCTYPE html>
<html lang="en-US"> <head>
<meta charset="utf-8"> <title>Test page</title>
<link rel="stylesheet" href="stylesheets/style.css"> </head>
<body>
<h1>Test page</h1> </body>
</html>
Then create the folders stylesheets and javascripts:
$ mkdir stylesheets
$ mkdir javascripts
After that, create a stylesheets/style.css file with the following contents: files/simple/deploying/stylesheets/style.css
h1{color: #F00;}
We’re not putting much in the files for this exercise; we just want some text in there so we’ll know later on that the files copied correctly. If we left them blank we wouldn’t be sure if the right things got copied.
Finally, create the file javascripts/app.js, which looks like this: files/simple/deploying/javascripts/app.js
var app = {};
app.name = 'Hello';
With the setup out of the way, let’s jump into how we work with these files in Grunt tasks.
Creating and Deleting Directories
For our task to copy files from their original location to a destination directory, we need to create that destination directory. And every time we want to re-create the destination folder we’ll need to delete it and its contents. So let’s use Grunt’s built-in tools to create two tasks—one to create the folder and one to delete it.
Specifying Configuration Options
Grunt provides grunt.config.init(), which lets us define the configuration for our Grunt tasks by passing in a JavaScript object with the properties and values for our tasks.
files/simple/deploying/Gruntfile.js
grunt.config.init({ });
When you install and configure a Grunt plug-in, you’ll often have to add some properties and values to this configuration object. Typically you’ll add a property for the specific plug-in, and then that property will have its own configuration object.
While we’re not building a plug-in here, let’s follow the same approach. We’ll create a property called copyFiles and place our configuration variables within that object.
A best practice for creating configuration options for a task is to place all options within an options property. This avoids any potential collision with Grunt’s API.
Let’s define our first option. We need a way to specify the destination folder that we’ll copy our files to, so we’ll create an option for the workingDirectory: files/simple/deploying/Gruntfile.js
copyFiles: { options: {
workingDirectory: 'working',
} }
We’re going to leave a trailing comma after the value when we’re writing con-figuration options. That way we won’t forget to add it when we add a new option to this section later. However, this is not valid according to the speci-fications for ECMAScript 6. Grunt and Node.js won’t complain, but JavaScript syntax checkers (and seasoned JavaScript developers) might. When you’re done writing your configurations, you’ll definitely want to remove trailing commas.
Creating a Folder
Grunt’s built-in grunt.util.mkdir() method creates folders, and so all we have to do is create a task, read the name of the directory from our configuration object, and create the folder.
files/simple/deploying/Gruntfile.js
grunt.registerTask('createFolder', 'Create the working folder', function(){
grunt.config.requires('copyFiles.options.workingDirectory');
grunt.file.mkdir(grunt.config.get('copyFiles.options.workingDirectory'));
});
We’re using grunt.config.requires() to ensure that the configuration property we want has been set. The task will abort if the field isn’t specified. Notice that we can use a string with dot notation to look up properties in the configuration object. We then use grunt.config.get() to fetch the value out of the object and use it to create the folder, using the same dot notation.
At the command line we can run
$ grunt createFolder
and we’ll see the new working folder in our directory.
Removing Folders
To remove the working folder, we can write a very similar task, but this time we’ll use Grunt’s grunt.file.delete() method instead. This deletes a file, or a folder and all of its contents.
files/simple/deploying/Gruntfile.js
grunt.registerTask('clean',
'Deletes the working folder and its contents', function(){
grunt.config.requires('copyFiles.options.workingDirectory');
grunt.file.delete(grunt.config.get('copyFiles.options.workingDirectory'));
});
One of the biggest advantages of using these Grunt utilities instead of the raw operating-system commands is that they will work on multiple operating systems. The syntax for recursively deleting folders is very different between Linux and Windows.
Now let’s look at how we copy the files over.
Copying Files
Our project may have lots of files that we don’t want to deploy to the web server. For example, there’s no need to send up our Gruntfile.js or the node_modules folder if we’re building a basic website. So we’ll need to tell Grunt what files we want to copy over. Let’s create a new manifest property of our copyFiles con-figuration object, which will be an array of file paths we want to copy.
files/simple/deploying/Gruntfile.js
copyFiles: { options: {
workingDirectory: 'working',
manifest: [
➤
'index.html', 'stylesheets/style.css', 'javascripts/app.js'
➤
]
➤
Grunt provides grunt.file.copy(), which lets us specify a source file and a destina-tion. Unlike the grunt.file.delete() method, it doesn’t handle folders. We’ll address that later. For now we’ll just be very explicit and list every file we want in our manifest property.
Our copyFiles task will check for the workingDirectory and manifest properties and then iterate over the files in the manifest, copying each file into the working folder.
files/simple/deploying/Gruntfile.js
grunt.registerTask('copyFiles', function(){
var files, workingDirectory;
grunt.config.requires('copyFiles.options.manifest');
grunt.config.requires('copyFiles.options.workingDirectory');
files = grunt.config.get('copyFiles.options.manifest'); workingDirectory =
grunt.config.get('copyFiles.options.workingDirectory');
files.forEach(function(file) {
var destination = workingDirectory + '/' + file;
grunt.log.writeln('Copying ' + file + ' to ' + destination);
grunt.file.copy(file, destination); });
});
We can run this task with
$ grunt copyFiles
Running "copyFiles" task
Copying index.html to working/index.html
Copying stylesheets/style.css to working/stylesheets/style.css Copying javascripts/app.js to working/javascripts/app.js
Done, without errors.
and the files are copied into our working folder.
Now, to make this all fit together nicely, let’s create a new task that runs the clean, createFolder, and copyFiles tasks. Let’s call the task deploy, shall we?
files/simple/deploying/Gruntfile.js
grunt.registerTask('deploy', 'Deploys files',
['clean', 'createFolder', 'copyFiles']);
Run this new task:
$ grunt deploy
Running "clean" task
Running "createFolder" task
Running "copyFiles" task
Copying index.html to working/index.html
Copying stylesheets/style.css to working/stylesheets/style.css Copying javascripts/app.js to working/javascripts/app.js
Done, without errors.
You’ll see that all of the tasks ran in the order we specified, and all of the files were copied into the working folder as expected. Technically, we don’t need the createFolder task; Grunt’s grunt.file.copy() will create the destination folder if it doesn’t exist. But it’s best to be specific.
So far we’ve demonstrated that we can use Grunt’s built-in file tools to copy individual files, but what we’ve built here works only if we specify the individual files we want to copy. That’s not practical in a lot of cases. We might want to copy a folder and all of its files.
Recursive File Copying
Let’s modify the configuration section of Gruntfile.js so it specifies folders as well as files:
files/recursive/deploying/Gruntfile.js
grunt.config.init({ copyFiles: {
options: {
workingDirectory: 'working',
manifest: [
'index.html', 'stylesheets/', 'javascripts/'
] } } });
If we tried to run our tasks right now we’d get errors because Grunt’s built-in copy doesn’t support directories. But we can iterate over the files and folders in our list and then detect if the entry is a file or a folder. If it’s a file we can copy it like before, but if it’s a folder we’ll just have to iterate over the files and folders inside that folder. If you’ve done anything like this in other languages, you’ll know that the solution is to use recursion. And Grunt pro-vides a built-in function for that.
Currently, our copyFiles task loops over the files like this: files/simple/deploying/Gruntfile.js
files.forEach(function(file) {
var destination = workingDirectory + '/' + file;
grunt.log.writeln('Copying ' + file + ' to ' + destination);
grunt.file.copy(file, destination); });
But let’s change this task so it instead calls a function we’ll create, called recursiveCopy():
files/recursive/deploying/Gruntfile.js
files.forEach(function(item) {
recursiveCopy(item, workingDirectory); });
The recursiveCopy() function takes in the source, which is either a file or folder, and the destination folder. This function then checks to see if the source is a file or a folder. If it’s a file, we’ll copy it. But if it’s a folder, we’ll have to dig into the files in the folder and call the recursiveCopy() function again. And if there are folders within folders, we’ll have to handle those the same way. But thanks to the power of recursion, we can declare the function like this: files/recursive/deploying/Gruntfile.js
var recursiveCopy = function(source, destination){
if(grunt.file.isDir(source)){
grunt.file.recurse(source, function(file){
recursiveCopy(file, destination); });
}else{
grunt.log.writeln('Copying ' + source + ' to ' + destination);
grunt.file.copy(source, destination + '/' + source);
} }
We use grunt.file.isDir() to detect whether the source element is a file or a direc-tory. If it’s a file, we print the file to the screen and do the file copy like before. When the file is a directory, we use grunt.file.recurse(), which runs the callback function of our choice against each file or folder in the structure. When grunt.file.recurse() executes the callback, it sends the source file’s absolute path as the first parameter. It can send the root directory, the current file’s direc-tory, and the current file’s name as arguments if the callback function accepts them. But in our case we’ll keep things really simple; we just pass the source to our recursiveCopy() function inside the callback.
A quick run of our copyFiles task shows it’s working:
$ grunt copyFiles
Running "copyFiles" task Copying index.html to working
Copying stylesheets/layout.css to working Copying stylesheets/style.css to working Copying javascripts/app.js to working
Done, without errors.
By combining a little JavaScript code with Grunt’s built-in utilities, we can now clone a directory structure with ease.
Using Values from Files
Occasionally we’ll want to use some of the values from package.json in our projects, such as the project name, the project author, or the license informa-tion. Grunt provides a function called file.readJSON() that, as you might be able to guess from the name, reads JSON data from a file and parses it into a JavaScript object. Add this to the configuration section of the Gruntfile: files/recursive/deploying/Gruntfile.js
pkg: grunt.file.readJSON('package.json'),
grunt.config.init({
➤
It’s very common to see something like this in a Gruntfile. We can use these and other configuration values throughout the Gruntfile in a couple of ways. First, we can just access them as properties of the configuration, like grunt.config.get('pkg.name'). But we can also use Grunt’s templating engine. When we copy files to the source folder, let’s add a version.txt file that includes the name of the app and the version.
At the bottom of the copyFiles() task, add this code: files/recursive/deploying/Gruntfile.js
var content = '<%=pkg.name %> version <%= pkg.version %>'; content = grunt.template.process(content);
grunt.file.write(workingDirectory + '/version.txt', content);
The grunt.template.process() function injects our configuration variables into the template string, giving us a new string that we can write into a file.
Accessing Configuration inside Tasks
Using grunt.config.get() to retrieve values from inside of tasks works fine, but Grunt provides a handy shortcut. Inside a task, we can access this.options() to access the options property of our task’s configuration. This lets us to change the tasks’ name without having to change how we get the task’s associated parameters.
files/options/deploying/Gruntfile.js
files = this.options().manifest;
workingDirectory = this.options().workingDirectory;
Grunt also provides this.requiresConfig() as a shortcut for checking configuration. Unfortunately, unlike this.options(), the this.requiresConfig() method doesn’t look up values relative to the task. But by using this.name() to fetch the task name, we can remove all of the hard-coded configuration in the task, like this:
files/options/deploying/Gruntfile.js
grunt.registerTask('copyFiles', function(){
var files, workingDirectory;
➤ this.requiresConfig(this.name + '.options.manifest');
➤ this.requiresConfig(this.name + '.options.workingDirectory');
➤ ➤
workingDirectory = this.options().workingDirectory; files = this.options().manifest;
➤
files.forEach(function(item) {
recursiveCopy(item, workingDirectory); });
This is a nice refactoring of the copyFiles task. But we can’t do this for the clean and createFolder tasks since those use the copyFiles task’s configuration values. We’ll have to leave those alone.
wanted to use the value of the copyFiles.options.manifest variable in another task’s configuration, you could reference it as <%= copyFiles.options.manifest %> instead. Now, if we run grunt copyFiles again, in our working folder we’ll get a new file called version.txt that contains this:
deploying version 0.0.0
This technique is great for injecting the name of the project, the authors, or even the licensing information into the headings of files.
What
’
s Next?
Grunt’s built-in file utilities make it easy to work with files and folders across operating systems. They form the foundation of many of Grunt’s plug-ins. In addition, the templating mechanism can ease configuration and text genera-tion. Before you move on, try these additional things:
• Inside the copyFiles task, use this.requires() to make the copyFiles task depend on the clean task.
• Break the code that creates the version.txt into its own task. Make sure it depends on the successful completion of the copyFiles task and add your new task to the deploy task.
Now let’s look at multitasks, a powerful Grunt feature that many plug-ins rely on heavily.
CHAPTER
3
One Task, Many Outputs
So far we’ve looked at simple tasks, but sometimes it’s handy to be able to define a single task that does many things at once. For example, let’s say you were creating next week’s new JavaScript framework and you wanted to create a full version and a micro version that includes only the basics. Using Grunt’s multitasks, you can create a single task definition that iterates over a collection of targets and executes code against those targets with ease.
So what’s a target? You could think of a target as a configuration group for a task. You set up a configuration block that specifies the target and the associated data:
concat: { basic: {
src: ['src/awsome.js'],
dest: 'dist/awesome.js',
}, full: {
src: ['src/awesome.js', 'src/plugins/editor', 'src/plugins/hl.js'],
dest: 'dist/awesome-full.js',
}, },
The task then executes its code against all the targets you specify, using the data to determine what the task should do. Many Grunt plug-ins are imple-mented as multitasks.
In this chapter, we’ll explore how multitasks work by working first with targets and data, and then with files.
Introducing Multitasks
look for a configuration section that matches the name of the task. So let’s create a simple configuration that explores how multitasks work.
We’ll use Node.js and the Open Weather API to grab the current temperature of some zip codes. We’ll configure the zip codes as targets and we’ll write a task to fetch the data for the temperatures.
First, create a new folder and a package.json file:
$ mkdir weather
$ cd weather
$ npm init
When prompted for values, use the defaults for everything. Next, install Grunt as a dependency:
$ npm install grunt --save-dev
Then create a new Gruntfile like you’ve done in previous chapters: multitasks/weather/Gruntfile.js
module.exports = function(grunt){
}
Now, our plan is to use a multitask and some zip codes as targets. To do this, we define the configuration section using grunt.initConfig(), and then we specify the targets and some associated zip code for each target:
multitasks/weather/Gruntfile.js
grunt.config.init({ weather: {
home: 60623, work: 60622 }
});
Now we can declare our task: multitasks/weather/Gruntfile.js
grunt.registerMultiTask('weather', 'Fetches weather', function() {
});
The task’s name has to match the configuration section for multitasks. When we run the task, it will automatically look for that configuration block. Now we need to set up some variables. Inside a Grunt multitask we can access the target with this.target and we can access the data associated with that target with this.data.
multitasks/weather/Gruntfile.js
var done, http, location, request, requestOptions, zipCode;
location = this.target; zipCode = this.data;
The location name is the target, and the zip code is the data.
To make the actual request, we’ll use Node’s built-in http module. This module provides a request() method that takes an options object containing information about the type of request, the host, the port, and the path. We configure that like this:
multitasks/weather/Gruntfile.js
requestOptions = {
host: 'api.openweathermap.org',
path: '/data/2.5/weather?units=imperial&q=' + zipCode,
port: 80,
method: 'GET'
}
All that’s left to do is make the request and parse the results. When we make the request, we’ll get the data back in chunks, which we’ll concatenate together. Then when we’ve gotten all the chunks, we’ll join them together, parse the response as JSON data, and display the temperature.
multitasks/weather/Gruntfile.js
Line 1http = require('http');
--done = this.async();
-5request = http.request(requestOptions, function(response) {
- var buffer = [];
-- response.on('data', function(data){
buffer.push(data);
-10 });
-- response.on('end', function(){
var weather = JSON.parse(buffer.join());
-console.log(location + ' : ' + weather.main.temp + ' degrees');
-15 done(); -- }); -request.end(); }); 20
Take a look at line 3. This line is incredibly important. Node’s http module is asynchronous, so when we make a request for the weather data, Node doesn’t wait for the response. Instead, it invokes the callback once the data gets back. Grunt, however, doesn’t wait around. It’ll finish the task run before we get our response.
Grunt has a workaround for this, though. We use this.async() to tell Grunt that this task is asynchronous, and that it should wait until we tell it we’re done. So, on line 3 we create a variable called done by calling this.async(). Then on line 16, once we’ve parsed the response, we invoke done as a function, which tells Grunt we’re all done. It’s kind of a strange pattern, but it works really well. When we run this task, we get our weather report. This book was written in the middle of a very cold winter, so what you’re seeing are real Fahrenheit temperatures for the Chicago area:
$ grunt weather
Running "weather:home" (weather) task home : 1.72 degrees
Running "weather:work" (weather) task work : 1.85 degrees
Done, without errors.
If we added a new target and zip code, we’d get a third response. Multitasks make it very easy to configure a single task to handle multiple outputs. Now let’s look at something a little more practical: file concatenation.
Multitasks and Files
One of the most common uses for multitasks is in creating distribution packages for JavaScript libraries. To demonstrate, let’s take the AngularJS library and create our own custom versions. We’ll create one version that includes just AngularJS and the angular-resource library, and then a second version that also includes the jQuery library.
First, create a new folder called angular and then create a new package.json file in that folder using npm init:
$ mkdir angular
$ cd angular
$ npm init
For the settings, use the defaults. Or you could create your own package.json file that looks like this:
{
"name": "AngularCustom", "version": "0.0.1", "description": "", "devDependencies": {
"grunt": "~0.4.4"
} }
Then install Grunt as a project dependency with npm like we’ve done previously:
$ npm install grunt --save-dev
Then we need to create the Gruntfile itself, using the same skeleton we’ve used before:
multitasks/angular/Gruntfile.js
module.exports = function(grunt){
}
Next we need AngularJS and jQuery. We could download those from the Web, but there’s a quicker way.
Fetching Client-Side Libraries with Bower
Bower is a package manager for client-side libraries, and it’s a great way to quickly grab the libraries our project needs. Bower downloads any libraries we specify into a bower_components folder in our project. First, we’ll install Bower globally:
$ npm install -g bower
Bower uses the Git version-control system to fetch libraries, so you’ll need to install the Git command-line client on your computer. You can get installers for your operating system at the Git website.1 And if you’re on Windows, you’ll need to install Git so that it runs from your Windows Command Prompt, not the default “Bash shell” option. See the Bower website for instructions on this.2
In addition, if you just installed Git, you may need to close and reopen your Terminal window before you can use it.
But once Bower’s all set up, we can use it to fetch Angular and the other libraries, like this:
1. http://git-scm.com/downloads 2. http://bower.io/
$ bower install angular
$ bower install angular-resource
$ bower install jquery
Now, if you look under the bower_components folder, you’ll see folders for angular, angular-resource, and jquery, with the appropriate JavaScript libraries in each folder. That’s a lot easier than finding, downloading, unzipping, and moving a bunch of files around, isn’t it?
Because we didn’t specify any version info, Bower just grabs the latest version it knows about, and that’s good enough for this demonstration.
One last thing before we move on; Bower is great about fetching remote libraries, but the authors of these libraries don’t always use the same folder structure or naming scheme. For example, jQuery puts the library we need in a dist folder, while other libraries might place the files in a lib folder. Other libraries might require us to do some manual steps to produce a library we can include in our web application. So, when you use Bower inspect the files it downloads carefully to find what you’re looking for.
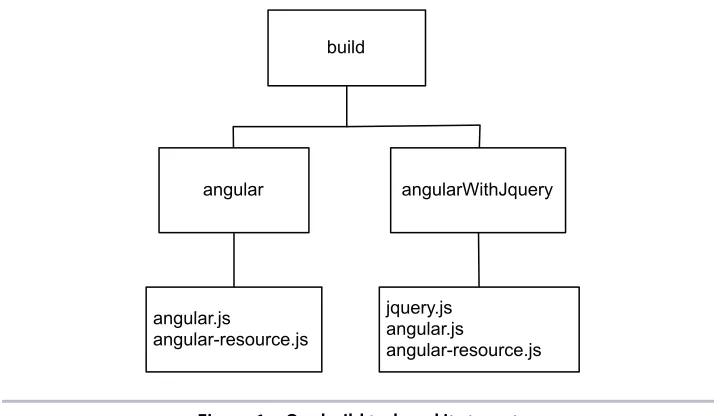
Configuring Targets
We’re going to have one task with two targets. Our first target will include only AngularJS and the angular-resource library. Our other target, which we’ll call angularWithJquery, will also include jQuery. The following diagram illustrates exactly how this will work.
build
angular angularWithJquery
angular.js
angular-resource.js
jquery.js angular.js
angular-resource.js
Figure 1—Our build task and its targets
When we run the build task, the individual targets will be created using the source files we specify.
So, using grunt.initConfig(), let’s create the configuration for our build task. We specify the targets and their respective sources and destinations:
multitasks/angular/Gruntfile.js
grunt.config.init({ build: {
angular: {
src: ['bower_components/angular/angular.js',
'bower_components/angular-resource/angular-resource.js'],
dest: 'dist/angular.js'
},
angularWithjQuery: {
src: ['bower_components/jquery/dist/jquery.js',
'bower_components/angular/angular.js', 'bower_components/angular-resource/angular-resource.js'], dest: 'dist/jquery-angular.js' } } });
We’re specifying the source as an array of files, and the destination as a string. To write the task, we’ll just have to iterate over the source files, join them together, and write out the destination file. Many common Grunt plug-ins use this approach, as Grunt favors configuration over coding.
But since we’re writing our own multitask, we’ll have to do some coding. Let’s see how Grunt makes it easy for us to work with multiple targets and files.
Writing the Task
You’ve already seen how a multitask works. We can access the targets as an array. We iterate over the targets and grab the sources, read the contents of each file, and create a new file using the destination. The whole thing looks like this:
multitasks/angular/Gruntfile.js
Line 1grunt.registerMultiTask('build', 'Concatenate files.', function() {
2 var output = '';
3 this.files.forEach(function(filegroup) {
sources = filegroup.src.map(function(file){
4
return(grunt.file.read(file));
5
});
6
output = sources.join(';');
7 grunt.file.write(filegroup.dest, output); 8 9 });}); 10
On line 3 we iterate over the various targets. In a multitask, we use the files property to access the configured targets and their associated source and destination paths. This is cool because we don’t have to worry about how the task was configured, as Grunt allows for several methods of configuring targets and destinations. All we have to do is iterate over the files array in our task. On line 4 we use JavaScript’s map() function on the source files, using the src property. This is a quick way to iterate over all of the source files, read their contents, and store them in a new array, and is a lot more appropriate than using a standard for loop and concatenating strings.
Since we’ve stored all the file contents in an array, we can join them together using join() and then write the output file to disk.
This code is very similar to the code used by the more “official” grunt-contrib-concat plug-in, but our version doesn’t handle missing source files gracefully. So why did we build our own? Because now you have a good understanding of how Grunt can work with groups of files. When the next new JavaScript or CSS preprocessor comes out, you’ll be able to write your own tasks to process your files. However, you can use Grunt’s grunt.file.exists() to check for a file before reading it in.
At this point, we can run
$ grunt build
and we’ll have a new dist folder with the two versions of our library. Best of all, we can run the targets independently by specifying them directly with grunt build:angular or grunt build:angularWithJquery.
What
’
s Next?
Multitasks are incredibly important in Grunt. Many plug-ins are built around multitasks and they rely on a configuration similar to what we’ve used in this chapter. The concept of targets in Grunt is similar to how it works in Make and other build tools, and so you can use this approach for more than just concatenation of files. Before moving on, spend some time exploring the following:
• Modify the concatenation task we built so that it checks for the existence of source files and stops the task. You can use the filter() method on the filegroup.src array to silently remove missing files or display a warning message, but instead see if you can stop this and any subsequent tasks from firing.
• Right now, when our task concatenates files, it places a semicolon char-acter between files. By using a configuration variable, allow users to specify the character used here.
Now that you understand more about multitasks and configuration, let’s put several existing Grunt plug-ins together and configure them to make a modern web application’s development process pain-free.
CHAPTER
4
Build a Workflow
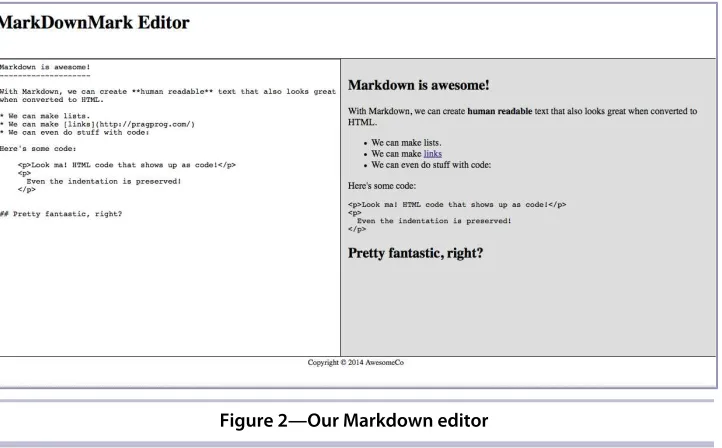
Modern web apps, especially ones with plentiful client-side code, have a lot of resources and dependencies. Grunt makes wrangling those much easier. In this chapter we’ll create a simple Markdown editor with a live preview. The end result will look like the following figure.
Figure 2—Our Markdown editor
The focus of this exercise is to show how to use Grunt as a build tool for an application, and by using Angular, CoffeeScript, and Sass, we can explore how easy Grunt makes it to compile, combine, and minify assets while we work on the application. Even if you’ve never used Angular, Sass, or Coffee-Script before, you should have no problem following along.
To pull this off we’ll build up a Gruntfile that does the following:
1. Converts all of the CoffeeScript files into JavaScript and puts the resulting JavaScript in a temporary folder
2. Concatenates Angular and the Markdown library we’re using with the application logic we just converted from CoffeeScript to make a single app.js file
3. Minifies that app.js file, storing it in assets/app.js, which is where our web page will look for it
4. Adds support for Sass, the CSS preprocessor, by adding a file watcher and then doing a compilation similar to what we did with CoffeeScript 5. Sets things up so that any time we change a CoffeeScript or Sass file, the
whole build process gets kicked off
6. Configures Grunt to reload our web browser when we make changes to any of our application files
We won’t be writing these Grunt tasks ourselves. Instead we’ll rely on several Grunt plug-ins to do all the heavy lifting. We’ll just need to configure the plug-ins to work together.
Let’s get started!
Creating the App
First, create a folder called markdown, and inside of that folder create folders for the CoffeeScript files, the Sass files, and the assets folder, which is where our finalized JavaScript and CSS files will go.
$ mkdir markdown
$ cd markdown
$ mkdir coffeescript
$ mkdir sass
$ mkdir assets
raw HTML back into the interface.1,2,3 Without the sanitation library, Angular won’t let us use the output from the Markdown converter.
To get those libraries, we’ll use Bower like we did in Fetching Client-Side Libraries with Bower, on page 25. Run the following commands:
$ bower install angular
$ bower install angular-sanitize
$ bower install markdown#0.6.0-beta1
We need to build the client-side version of the Markdown library so we can use it in our web application, and we can do that easily thanks to a Grunt task distributed with the library. Execute the following commands:
$ cd bower_components/markdown
$ npm install
$ cd ../../
Running the npm install command inside of the project installs the projects’
dependencies and then runs a Grunt task that builds the distributions for the project. The JavaScript file we need is now located in the bower_components/ markdown/dist folder.
If you’re unable to download the libraries using Bower, you can find everything you need in the workflows folder of the book’s downloadable source code, along with this completed project.
Now let’s look at the application code itself.
The App Logic
Here’s how the user interface works: There’s a single <textarea> field on the page, and we’re using Angular to watch that field for changes. When data in that field changes, the updatePreview() method gets called. This method will use a simple service in Angular to convert the input to HTML. The results get placed back on the page in the update area.
All of the application’s logic will be stored in several separate CoffeeScript files, which will make it easy for us to find things later on. We’re using Coffee-Script for our application logic, and CoffeeScript: Accelerated JavaScript Development [Bur11] does a great job of covering how CoffeeScript works. However, the code we’re using should be easy enough to understand.
1. http://code.angularjs.org/1.2.10/angular.js 2. https://github.com/evilstreak/markdown-js/releases 3. http://code.angularjs.org/1.2.10/angular-sanitize.js
Our Angular app uses a basic module called MarkdownEditor, and we define that in coffeescript/app.coffee like this:
workflow/markdown/coffeescript/app.coffee
@MarkdownEditor = angular.module("markdownEditor", [])
Next, we define the controller that is bound to the HTML page. This controller is what makes it possible to get the data from the page and push the results back to the page:
workflow/markdown/coffeescript/controllers/main_controller.coffee
# The controller
@MarkdownEditor.controller "MainCtrl", ['$scope','$sce', 'MarkdownConverter', ($scope, $sce, MarkdownConverter) ->
$scope.updatePreview = ->
converted = MarkdownConverter.convert($scope.input) $scope.output = $sce.trustAsHtml(converted)
]
This controller uses a service called MarkdownConverter, which we define in coffee-script/factories/markdown_converter.coffee:
workflow/markdown/coffeescript/factories/markdown_converter.coffee
@MarkdownEditor.factory "MarkdownConverter", ->
convert: (input) ->
markdown.toHTML input
This service uses the markdown.js library to do the conversion. Although this code is fairly trivial, the markdown.js library can do additional transformations, and if we wanted to do those transformations, encapsulating them in this factory would keep our code clean and separated.
That takes care of the program logic. Thanks to Angular, there wasn’t much to do.
Creating the Interface
The logic is in place, so now we can connect it to our interface, which is just a simple HTML page with a text area and an output region. Create the file index.html with the following code:
workflow/markdown/index.html
Line 1
<html lang="en-US">
<!DOCTYPE html>
-<head>
-<meta charset="utf-8">
-<title>Markdown Editor</title>
5
<link rel="stylesheet" href="assets/app.css"> </head>
<body ng-app="markdownEditor">
-<header class="masthead">
-<h1>MarkDownMark Editor</h1>
10
</header>
-<div class="content" ng-controller="MainCtrl">
-<section class="editor">
-<textarea class="input"
15
ng-model="input"
-ng-change="updatePreview()">
-</textarea> -</section> -20
<section id="output" class="preview" ng-bind-html="output"></section>
-</div> -<footer> 25
<small>Copyright © 2014 AwesomeCo</small>
-</footer>
-<script src="assets/app.js"></script>
-30
-</html></body>
-Notice the <body> tag. The ng-app attribute is an Angular directive that specifies the module we’re using. Then on line 13 we wire up the controller we want to use with the ng-controller attribute. Everything inside of this element is scoped to the controller. So the controller’s methods are visible to the view, and the fields we bind using ng-model or ng-click are visible to the controller.
This page loads a single app.js file at the bottom. To keep our app easy to develop, we’ve kept its components in separate files. We’ll use Grunt to merge them all together next.
Wrangling the JavaScript
Our index.html file is looking for a file called assets/app.js, but all we have are several separate CoffeeScript files. Using Grunt, we’ll compile those Coffee-Script files into a single JavaCoffee-Script file, then combine that file with the Angular and Markdown libraries, creating a single file we can bring into our document. And to ensure that the file downloads even faster, we’ll minify it, which will remove whitespace and rename variables and functions to reduce the overall file size considerably.
Compiling CoffeeScript
Let’s set up a basic package.json and Gruntfile for our app. First, create package.json with the following contents:
{
"name": "MarkdownEditor", "version": "0.0.1",
"description": "A simple markdown editing app", "main": "index.html",
"author": "Max Power", }
Next, create the Gruntfile.js file in the root of the application with the usual skeleton:
workflow/markdown/Gruntfile.js
module.exports = function(grunt){
};
With those in place, we can install grunt and the grunt-contrib-coffee plug-in with npm:
$ npm install grunt --save-dev
$ npm install grunt-contrib-coffee --save-dev
And now we can configure the CoffeeScript plug-in to build the JavaScript files our browsers crave.
Chunked Configuration
So far we’ve used Grunt’s initConfig() function to set up configuration variables. But we’re going to create a somewhat complex Gruntfile that might be hard to follow after awhile. Grunt offers a more modular way for us to define con-figurations with its config() function. This lets us define our configuration in manageable pieces. Add this to the Gruntfile:
workflow/markdown/Gruntfile.js
grunt.loadNpmTasks('grunt-contrib-coffee');
grunt.config('coffee', { app: {
options: { bare: false },
files: {
'tmp/compiled.js': ['coffeescript/app.coffee',
'coffeescript/factories/*.coffee',
'coffeescript/controllers/*.coffee'] }
} });
As you might be able to guess, the loadNpmModule() loads a Grunt plug-in. Once we load the plug-in, we can configure it.
The CoffeeScript plug-in is designed as a multitask, so we’ll have to specify targets even though we’ll have only a single one. We’ll call our target app and then specify the files. The files key uses a simple JavaScript object, where we specify the destination file as the key, and then an array of source files as the value.
In some cases, you might be able to get away with just specifying coffeescript/ **/*.coffee as the source, which would take all of the CoffeeScript files found within the coffeescript folder. But by being a little more specific, we can ensure that things are included in the right order.
In the Terminal, run the command grunt coffee, and you’ll see the output:
$ grunt coffee
Running "coffee:app" (coffee) task
Done, without errors.
Now, provided that we didn’t make any typos in our CoffeeScript files, we’ll see a new folder, called tmp in our project. It contains a new file called compiled.js that holds the compiled version of our CoffeeScript files. The separate files were stitched together into compiled.js. We’re not done with this file, though.
Concatenating JavaScript
The CoffeeScript compilation task put all of our application files into a single file when it converted them. But we’re going to bundle up the Angular libraries along with our own code to create a single JavaScript file.
We wrote our own simple task to do concatenation back in Chapter 3, One Task, Many Outputs, on page 21, but this time we’ll use the grunt-contrib-concat plug-in instead, as it’s more flexible than what we wrote. To install it use npm as follows:
$ npm install grunt-contrib-concat --save-dev
Once the plug-in is installed, we require it in our configuration file and configure it the same way we did with the CoffeeScript plug-in.
workflow/markdown/Gruntfile.js
grunt.loadNpmTasks('grunt-contrib-concat');
grunt.config('concat', { scripts: {
src: ['bower_components/angular/angular.js',
'bower_components/angular-sanitize/angular-sanitize.js',
'bower_components/markdown/dist/markdown.js',
'tmp/compiled.js'],
dest: 'tmp/app.js'
} });
We pull in the required libraries from the components folders, along with the file generated by our CoffeeScript code. We place the output back in the tmp folder because we’re not quite done with it yet.
Let’s run the task:
$ grunt concat
Running "concat:scripts" (concat) task File "tmp/app.js" created.
Done, without errors.
We’re almost