Extending Swift Value(s) to the Server
Extending Swift Value(s) to the Server by David Ungar and Robert Dickerson
Copyright © 2017 IBM Corporation. All rights reserved. Printed in the United States of America.
Published by O’Reilly Media, Inc., 1005 Gravenstein Highway North, Sebastopol, CA 95472. O’Reilly books may be purchased for educational, business, or sales promotional use. Online
editions are also available for most titles (http://safaribooksonline.com). For more information,
contact our corporate/institutional sales department: 800-998-9938 or [email protected].
Editors: Nan Barber and Susan Conant
Production Editor: Shiny Kalapurakkel
Copyeditor: Christina Edwards
Proofreader: Eliahu Sussman
Interior Designer: David Futato
Cover Designer: Karen Montgomery
Illustrator: Rebecca Panzer
January 2017: First Edition
Revision History for the First Edition 2017-01-25: First Release
The O’Reilly logo is a registered trademark of O’Reilly Media, Inc. Extending Swift Value(s) to the Server, the cover image, and related trade dress are trademarks of O’Reilly Media, Inc.
While the publisher and the authors have used good faith efforts to ensure that the information and instructions contained in this work are accurate, the publisher and the authors disclaim all
responsibility for errors or omissions, including without limitation responsibility for damages
resulting from the use of or reliance on this work. Use of the information and instructions contained in this work is at your own risk. If any code samples or other technology this work contains or describes is subject to open source licenses or the intellectual property rights of others, it is your responsibility to ensure that your use thereof complies with such licenses and/or rights.
Preface: Swift for the Rest of Your
Application
Q: Why did the human put on his boxing gloves? A: He had to punch some cards.
Today’s applications do not run on a single platform. Rather, some parts run on resource-limited devices, and other parts run on a vast and mysterious cloud of servers. This separation has led to a schism in how we build these applications because different platforms have different requirements: the mobile portions must conserve battery power, while the server portions must handle a large number of requests simultaneously. Consequently, programmers use different languages for different parts of applications—for instance, JavaScript for the browser, and Java for the server.
However, constructing an application out of multiple languages is fraught with drawbacks: different teams in the same organization speak different languages—literally—and must master different
developer ecosystems. Precious time must be spent translating concepts across language barriers and a few developers must know all of the languages in order to be effective. Test cases and data models must be replicated in different languages, introducing bugs and incurring future maintenance efforts. Because third-party libraries cannot be shared across groups, each team must learn different APIs to obtain merely the same functionality.
Swift was introduced by Apple in 2014 and replaced Objective-C as the recommended language for all new applications running on Apple devices. Later, when Swift became open source in 2015, it spread to new platforms. Currently, Swift is available on x86, ARM (including Raspberry Pi), and zOS architectures, as well as Linux, macOS, tvOS, watchOS, and iOS operating systems. So, it is now possible to write a whole end-to-end mobile application—front-end, middle, back, and even toaster—all in Swift. That’s why we wrote this book; we wanted to help you, the developer, who is most likely writing in Java or JavaScript, to consider a switch to Swift.
Why adopt Swift?
The Swift language may well be better than what you are currently using.
You can develop and debug in a consistent environment. Integrated development environments (IDEs) offer a tremendous amount of functionality such as text editing, static analysis, code completion, debugging, profiling, and even source-control integration. Switching back and forth between say, Eclipse and Xcode is a bit like switching between French horn and electric guitar: neither easy nor productive.
You can leverage Swift’s features—such as optional types, value types, and functional
programming facilities—to detect many bugs at compile time that would otherwise be hard to find.
Since Swift uses the LLVM compiler toolchain for producing native-code binaries, your
applications have the potential for competitive performance in terms of speed, startup time, and memory usage. However, examination of performance is outside the scope of this book.
You will find an active and approachable community of Swift developers who are creating web posts, books, and videos. In 2016, Swift was cited as the second “Most Loved” language in a StackOverflow survey, and the third most upward trending technology.
This book will introduce you to the Swift language, illustrate some of its most interesting features, and show you how to create and deploy a simple web service. Let’s get started!
CODING STYLE & IMPLEMENTATIONS
In the examples, the space constraints of this medium have led us to indent, break lines, and place brackets differently than we would in actual code. In addition, space has precluded the inclusion of full implementations and blocks of code in this edition contain inconsistencies in color and font. If the inconsistencies confuse you, please consult the repositories in Table P-1.
Table P-1. Where to find code examples
Repository name Referenced in
Book snippets Code snippets from the book
MiniPromiseKit Created in Chapter 3; used in Chapter 5 Pipes Used in Chapter 4
Kitura To-Do List Created in Chapter 5
Acknowledgments
This book would not have been possible without the support, encouragement, and guidance of the IBM Cloud and Swift@IBM leadership team, including Pat Bohrer, Eli Cleary, Jason
Gartner, Sandeep Gopisetty, Heiko Ludwig, Giovanni Pacifici, John Ponzo, and Karl Weinmeister. In addition, we want to extend our thanks to the many IBM Swift engineers and Swift community
members working to bring Swift to the server—including Chris Bailey, Hubertus Franke, David Grove, David Jones, and Shmuel Kallner—for sharing their collective technical insights and creating the tools and libraries described herein. The Swift community’s embrace of Swift on the server
team had the daunting task of editing our lengthy technical drafts and producing this book.
We owe a huge debt of gratitude to the Apple Core Swift Team for their courage, intelligence, talent, wisdom, and generosity for bringing a new language and ecosystem into existence and moving it to open source. Language design involves many difficult and complex tradeoffs, and bringing a new language to the world requires a tremendous amount of work. The rapid acceptance of Swift by developers is powerful testimony to the quality of the language.
Chapter 1. A Swift Introduction
Swift supports several different programming paradigms. This chapter provides a brief overview of the parts of the Swift language that will be familiar to a Java or JavaScript programmer. Swift is not a small language, and this chapter omits many of its conveniences, including argument labels, shorthand syntax for closures, string interpolation, array and dictionary literals, ranges, and scoping
attributes. Swift’s breadth lets you try Swift without changing your programming style while you master its basics. Later, when ready, you can exploit the additional paradigms it offers.
A beginning Swift developer may initially be overwhelmed by the cornucopia of features in the Swift language, since it gives you many ways to solve the same problem. But taking the time to choose the right approach can often catch bugs, shorten, and clarify your code. For instance, value types help prevent unintended mutation of values. Paradigms borrowed from functional programming such as generics, closures, and protocols provide ways to factor out not only common code, but also variations on common themes. As a result, the underlying themes can be written once, used in varying contexts, and still be statically checked. Your programs will be much easier to maintain and debug, especially as they grow larger.
As you read this chapter, you may want to refer to the documentation, The Swift Programming Language (Swift 3 Edition).
Types and Type Inference
Swift combines strong and static typing with powerful type inference to keep code relatively
concise. Swift’s type system and compile-time guarantees help improve the reliability of nontrivial code.
DECIPHERING TYPE ERRORS IN LONG STATEMENTS
If your program won’t compile, you can often clarify a type error by breaking up an assignment statement into smaller ones with explicit type declarations for each intermediate result.
Syntax
Swift’s syntax borrows enough from other languages to be easily readable. Here’s a trivial example:
letaHost = "someMachine.com"
aHost = "anotherMachine.com"// ILLEGAL: can't change a constant
that changes a constant after it has been initialized. (Throughout this book, ILLEGAL means “will not compile.”) This constant is initialized at its declaration, but Swift requires only that a constant be initialized before being used.
varaPath = "something"
aPath = "myDatabase"// OK
aPath is also a String, but is a mutable variable. Swift functions use keywords to prevent mixing up arguments at a call site. For example, here is a function:
func combine(host: String, withPathpath: String) -> String { returnhost+"/"+path
}
and here is a call to it:
// returns "someMachine.com/myDatabase"
combine(host: aHost, withPath: aPath)
Swift’s syntax combines ease of learning, convenience of use, and prevention of mistakes.
Simple Enumerations
In Swift, as in other languages, an enumeration represents some fixed, closed set of alternatives that might be assigned to some variable. Unlike enumerations in other languages, Swift’s come in three flavors, each suited for a particular use. The flavor of an enumeration depends on how much
information its values are specified to include.
An enumeration may be specified by 1) only a set of cases, 2) a set of cases, each with a fixed value, or 3) a set of cases, each with a set of assignable values. (The last flavor is covered in Chapter 2.) The simplest flavor merely associates a unique identifier with each case. For example:
enum Validity { case valid, invalid }
The second flavor of enumeration provides for each case to be associated with a value that is always the same for that case. Such a value must be expressed as a literal value, such as 17 or "abc". For example:
enum StatusCode: Int { case ok = 200
case created = 201 …// more cases go here
The value of this enumeration can be accessed via the rawValue attribute:
func printRealValue(ofe: StatusCode) { print ("real value is", e.rawValue) }
Tuples
As in some other languages, a Swift tuple simply groups multiple values together. For example, here’s a function that returns both a name and serial number:
func lookup(user: String) -> (String, Int) { // compute n and sn
return (n, sn) }
Tuple members can be accessed by index:
letuserInfo = lookup(user: "Washington")
print( "name:", userInfo.0, "serialNumber:", userInfo.1 )
or can be unpacked simultaneously:
let (name, serialNumber) = lookup(user: "Adams")
print( "name:", name, "serialNumber:", serialNumber )
Members can be named in the tuple type declaration:
func lookup(user: String)
-> (name: String, serialNumber: Int) {
// compute n and sn
return (n, sn) }
and then accessed by name:
letuserInfo = lookup(user: "Washington")
print("name:", userInfo.name,
"serialNumber:", userInfo.serialNumber)
When an identifier is declared with let, every element of the tuple behaves as if it were declared with a let:
letsecond = lookup(user: "Adams")
second.name = "Gomez Adams"// ILLEGAL: u is a let
anotherSecond.name = "Gomez Adams"// Legal: x is a var
print(anotherSecond.name) // prints Gomez Adams
When you assign a tuple to a new variable, it gets a fresh copy:
varfirst = lookup(user: "Washington")
varanotherFirst = first
first.name // returns "George Washington"
anotherFirst.name// returns "George Washington" as expected
first.name = "George Jefferson"
first.name // was changed, so returns "George Jefferson"
anotherFirst.name// returns "George Washington" because
// anotherFirst is an unchanged copy
first and anotherFirst are decoupled; changes to one do not affect the other. This isolation enables you to reason about your program one small chunk at a time. Swift has other constructs with this tidy
property; they are all lumped into the category of value types. (See Chapter 2.) The opposite of a value type is a reference type. The only reference types are instances-of-classes and closures. Consequently, these are the only types that allow shared access to mutable state.
Tuples combine nicely with other language features: the standard built-in method for iterating through a dictionary uses key-value tuples. Also, Swift’s switch statements become very concise and
descriptive by switching on a tuple:
enum PegShape { case roundPeg, squarePeg }
enum HoleShape { case roundHole, squareHole, triangularHole }
func howDoes( _peg: PegShape, fitIntohole: HoleShape )
Tuples are a convenient way to aggregate a few constant fields that have no meaningful type apart from the types of the fields.
Custom Operators
As in some other statically-typed languages, Swift allows you to define your own operators based on static types.
Unix pipe, it feeds a result on the left into a function on the right:
9.0 |>sqrt// returns 3
This lets us read code from left to right, in the order of execution. For example:
send(compress(getImage()))
can be rewritten as:
getImage() |>compress|>send
To define this custom operator, you first tell Swift about the syntax:
precedencegroupLeftFunctionalApply { associativity: left
higherThan: AssignmentPrecedence
lowerThan: TernaryPrecedence
}
infixoperator|> : LeftFunctionalApply
then provide a (generic) implementation:
func|> <In, Out> ( lhs: In, rhs: (In) throws -> Out ) rethrows -> Out {
returntryrhs(lhs) }
Judiciously used, custom operators can help make code clear and concise.
Closures
Swift includes closures: anonymous functions defined inline, which can read and write to their enclosing lexical scope. A closure is a first-class entity, a reference type which can be assigned to constants and variables, passed as arguments, and returned as results. Functions and methods are just special cases of closures with a slightly different syntax for their definition. Closures
support functional programming, which can be particularly helpful in dealing with asynchrony (Chapter 3).
DECIPHERING TYPES ERRORS IN CLOSURES
Most of the time, the Swift compiler can infer the types of closure arguments and results. When it cannot, or when the code includes a type error, the error message from the compiler can be obscure. You can often clarify type errors by adding types to a closure that are not strictly necessary. In the example below, if the compiler were to complain about a type, you could add the (previously implicit) types:
func makeChannel()
Swift includes full support for class-based object-oriented programming, including classes, instances, constructors (called “initializers”), instance variables, static variables, computed virtual getters and setters, inheritance, and final attributes. When one method overrides another, it must be annotated in the code. This requirement prevents some errors. Experienced Swift programmers tend to reserve objects for things requiring shared access to a mutable state. (See Chapter 2.)
Protocols Define Interfaces
As with other typed languages, Swift includes a notion that the expected behavior of an entity is separate from any particular embodiment of that entity. The former is called a protocol and the latter a concrete type—think interface versus class if you’re a Java programmer. A Swift protocol lets you define what is expected of a type without specifying any implementation. For example, the operations expected of any HTTP_Request might be that it can supply a URL and a requestString:
protocol HTTP_Request_Protocol { varurl: URL {get}
varrequestString: String {get} }
In other languages, Abstract_HTTP_Request might need an abstract requestString. But in Swift, the protocol serves that purpose:
Abstract_HTTP_Request, HTTP_Request_Protocol
{
varrequestString: String { return"GET" } }
class Post_HTTP_Request:
Abstract_HTTP_Request, HTTP_Request_Protocol
varrequestString: String { return"POST" }
When declaring a variable to hold a request, instead of using the type Abstract_HTTP_Request, use the type HTTP_Request_Protocol:
letaRequest: HTTP_Request_Protocol
= Get_HTTP_Request(url: …/* some URL */)
aRequest.requestString// returns "GET"
In the following, you’ll see an example of a generic protocol, which could not be used as a type. As in other languages, protocols help to prevent errors as well as remove dependencies on the
representation.
Generic Protocols
Generic entities allow the same basic code to apply to different types. In addition to concrete types, Swift also allows protocols to be generalized to different types, although the mechanism differs. For example, suppose you have two responses, a TemperatureResponse and a
FavoriteFoodResponse:
Even though each answer is a different type, they can share the same description by adopting a common protocol:
struct TemperatureResponse: ResponseProtocol { letcity: String
letanswer: Int
}
letanswer: String
}
The associatedtype in the protocol works a bit like a type parameter, except that instead of being passed in, it is inferred from context. Any protocol with an associated type is considered to be
generic. Self, which denotes the concrete type conforming to the protocol, is also considered to be an associated type.
Unfortunately, generic protocols such as this one are more difficult to use than nongeneric ones. Specifically, they cannot be used in place of types, but only as generic constraints. So, you cannot write a declaration to hold a value that conforms to ResponseProtocol:
varsomeResponse: ResponseProtocol// ILLEGAL
But you can write a function that will work on any type that conforms to ResponseProtocol:
func handleResponse <SomeResponseType: ResponseProtocol> ( response: SomeResponseType ) { … }
Because a generic protocol cannot be used as a type, it is often helpful to split up a generic protocol into generic and nongeneric protocols. A full discussion of these generic protocols is beyond the scope of this book. Generic protocols support generic functions, structures, and objects by providing a way to express requirements and implementations that apply to entities that themselves generalize over the types of their arguments, results, or constituents.
Extending Classes, Structures, and Enumerations
Like many other languages, Swift allows you to add new behavior to a preexisting construct. In Swift, this capability is called an extension, and can be used with classes, structures, enumerations, and protocols. The last case is a bit different because protocol extensions supply default behavior, just as method bodies in Java interfaces do.
As you might expect, Swift’s extension facility is especially useful for large programs because the entity you want to extend is likely to have been defined in a separate library. You might not even have source code for it!
Less obviously, Swift’s extensions help in two other situations:
1. An extension can add a bit of specialized functionality that is only visible within a single file. Suppose that in some computation you find yourself squaring a number often, such as (a/b) * (a/b) + (c/d) * (c/d). You could add the following to the file containing that code:
private extension Int {
}
Now you can rewrite the above as (a/b).squared + (c/d).squared. The extension adds a new member to Int without cluttering up its namespace everywhere.
2. You might have a set of classes where each performs the same set of functions. Extensions let you group the code by function as opposed to class. An extension need not be in the same file or even the same module as the original definition. For example, you might have classes for city and state that each perform a country lookup:
class City { letname: String
init(name: String) { self.name = name } func lookupCountry() -> String { … } }
class State { letname: String
init(name: String) { self.name = name } func lookupCountry() -> String { … } }
Extensions let you group the lookup functions together:
extension City { func lookupCountry() -> String { … } }
extension State { func lookupCountry() -> String { … } }
This lets you put functionality where it makes the most sense, whether in a type defined by a library, limited to the scope of a single file, or together with similar functionality for different types.
Unlike Smalltalk, Swift closures cannot return from the home method’s scope (a.k.a., nonlocal return), so they cannot be used to extend the built-in control structures.
Chapter 2. Optional Types, Structures, &
Enumerations
Programming is hard and debugging is harder, but maintaining and debugging large programs that run asynchronously and concurrently is hardest. It makes sense to place the burden of checking certain runtime properties of your program on the compiler rather than the developer. Swift’s optional types and structures let you tell the compiler more about your program now so that you spend less time debugging later. These features rely on a combination of compile-time checks and runtime techniques that, in most cases, do not reduce performance.
Optional Types Exterminate Nil-Value Bugs
Programs represent uninitialized or absent values with nil (a.k.a., null). If your code fails to handle a nil value anywhere one can occur, bad things can happen. So Swift incorporated the might-be-nil versus can-never-be-nil distinction into its static type system. These are called “just” and “maybe” in Haskell. For example, suppose you are trying to extract the “Content-Type” entry from the header fields of an HTTP request. You have the header fields represented as a dictionary with String keys and values:
letheaderFields: [String: String] = …
Swift uses subscript notation to look up the value of a given key in a dictionary:
letcontentType = headerFields["Content-Type"]
and Swift will infer a type for contentType. But that type is not “String”! It is “String?” with a
question mark, because String represents a value that can never be nil, whereas String? represents a value that be either a String or nil. The latter is called an optional type. The dictionary lookup returns an optional type because the dictionary might not contain a key for “Content-Type.” The type String? is not the same type as String and Swift won’t let you use the value of an optional type without an explicit check:
ifcontentType.hasPrefix("text") // ILLEGAL
There are many convenient ways to perform this check. For example, the if-let form checks if the value is nonnil. If so, it assigns the value to a new variable that is local to the then-part. If the value is nil, it executes the else-part, if any.
ifletct = headerFields["Content-Type"] { contentType = ct
}
else {
contentType = "no contentType"
}
The ?? nil-coalescing operator allows you to substitute a value for nil. It only evaluates the
expression on the right if the one on the left is nil. For example, you might use ?? to supply a default value for a missing dictionary entry:
letcontentType = headerFields["Content-Type"] ?? "none"
Swift’s treatment of nil values will significantly improve the quality of your programs over many other languages. Swift’s optionals add security without inconvenience.
SURPRISINGLY HELPFUL, A PERSONAL NOTE FROM DAVID
For decades, I had programmed in languages that treat null as a universal value of any type. When I adopted Swift, I was quite surprised by how much its treatment of nil improved the quality of my code. The unexpected benefit arose where a variable was not optional because it was guaranteed to never be nil. As a result, that variable was eliminated as a potential source of crashes.
Structures Isolate Mutation
A Swift structure (struct) is like an instance of a class: it groups values together, the values can be fixed or variable, and it includes methods that operate on those values. However, unlike an instance of a class, a structure is a value type. Assigning a structure to a variable creates a fresh copy,
decoupling the assignee from the assigned value. Whenever a struct is assigned to a new variable, as for instance when passed as an argument to a function, the struct is passed by value; in other words, the new variable receives a copy of every value in the structure.
STRUCTURE MUTATION GUARANTEES A structure provides two guarantees about its mutability:
1. When passed to another routine or placed in another variable, the original structure is insulated from any changes to the passed structure and vice versa.
2. When a structure is associated with an identifier via a let statement, the value of the identifier may not change.
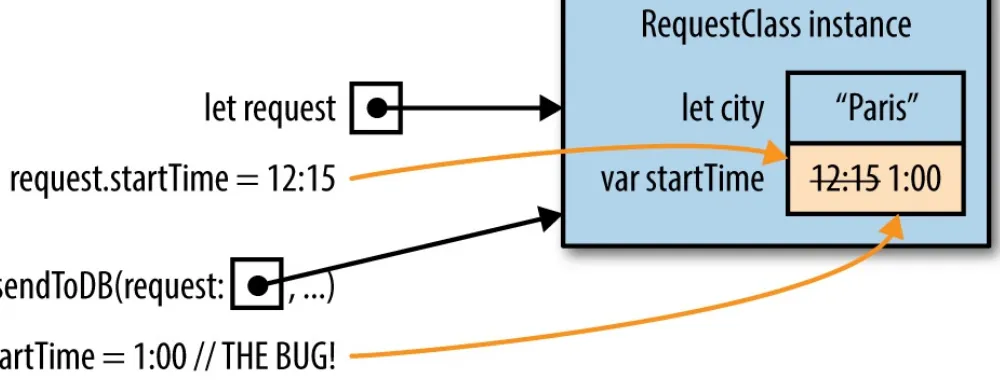
Using structures can prevent bugs. Suppose you need to send a request to a database to find out the
current temperature in a given city, and you also need to check and see how long the database took. You could use a class with an instance variable, startTime:
class TemperatureRequestClass { letcity: String
varstartTime: Date? = nil// an optional Date
init(city: String) { self.city = city
} }
After creating a request object:
letrequest = TemperatureRequestClass(city: "Paris")
you might hand it off to be processed:
request.startTime = Date.now
sendToDB(request: request, callback: receivedResponse)
and later print the time difference:
func receivedResponse(temperature: Int) {
letdbTime = Date.now.timeIntervalSince(request.startTime!) print("It took", dbTime,
"seconds to discover that the temperature in", request.city, "is", temperature)
}
But if there’s a bug in that sendToDB routine, it could corrupt the startTime!
func sendToDB(
request: TemperatureRequestClass, callback: (Int) -> Void
) {
…// Do lots of slow work to prepare to connection
request.startTime = Date.now//The BUG!
…// Send the request on the prepared connection
}
Figure 2-1. Because instances of classes are reference types, when request is passed to sendDB that function gets a reference to the same object. Then when it incorrectly mutates startTime, the original object is corrupted.
Swift provides a better way—using a structure instead of a class:
struct TemperatureRequestStruct { letcity: String
varstartTime: Date? = nil
init(city: String) { self.city = city
} }
Because your calling code alters the startTime, which is contained in a structure, it must put that structure in a var, not a let:
varrequest = TemperatureRequestStruct(city: "Paris")
Now, the Swift compiler catches the error before the program can even run!
func sendToDB(
request: TemperatureRequestStruct, callback: (Int) -> Void
) {
…// Do lots of slow work to prepare to connection
request.startTime = Date.now// ILLEGAL: will not compile!!
…// Send the request on the prepared connection
}
Why is this assignment an error? Function parameters are lets by default, and the let-ness of the request parameter “flows down” into the startTime field.
But what if you see the compile error and try a quick fix to get your code through the compiler?
mutableRequest.startTime = Date.now
Swift will still protect your code from the bug because even though sendToDB has changed the
startTime, it would not change for the caller. The caller would not see the mutation because when the request was passed to sendToDB, it was copied. (See Figure 2-2.) Value types are always copied.
Figure 2-2. Because structures are value types, the sendToDB function receives a whole new copy of the request. The first attempt at mutation won’t even compile because parameters are lets. If the request is assigned to a mutableRequest var, the
mutation will compile but won’t corrupt the original.
Mutating Methods
Unlike any other value type, a structure can include methods that mutate the contents of var fields in the structure. As a helpful signal to the programmer, such methods must be annotated with mutating. This requirement highlights the places where side effects could occur:
struct TemperatureRequestStruct { …
varstartTime: Date? = nil
mutatingfunc clearStartTime() { startTime = nil } }
Since a let prohibits mutation, a mutating function may be invoked only upon a var. Unlike mutating an instance variable of a class, a mutation to a structure only changes the copy referenced by one
variable:
letrequest1 = TemperatureRequestStruct(city: "Paris")
varrequest2 = request1 // makes a copy because is a struct
request1.clearStartTime() // ILLEGAL: cannot mutate a let
request2.clearStartTime() // OK, but does not change request1
STRUCTURES CONTAINING REFERENCES TO OBJECTS A structure may contain a reference to an instance of a class, and vice versa. If a structure contains such a reference, some of the desirable properties of a value type may be lost. In particular, if a structure includes an attribute that computes its result by querying a class instance, the result may be subject to unexpected changes. This problem is transitive: it can occur even if your value type contains a value type from a library and that type contains a reference to a class instance. Despite its potential for havoc, it is the above feature that enables the Swift standard library to provide one of the most valuable features of Swift, collection value-types: Swift’s Arrays, Dictionaries, and Sets are structures, and therefore provide strong support for mutation isolation and debugging. Under the covers, they use class instances to optimize mutation with the goal of providing both performance and robust semantics. For instance, if you write a function that passes an array into a library, you can rest assured that the library cannot change your array. It behaves as if copied, but can often avoid the actual expense of copying.
Default Implementations with Protocol Extensions
Swift classes can inherit from each other, but if you want to factor out behavior that two structures share, instead of creating a super-class, you must use a protocol extension. This technique is sometimes called protocol-oriented programming. For example, suppose you write two similar structures, a temperature request and an ozone-level request:
struct TemperatureRequest { letcity: String
letstate: String
varstartTime: Date? = nil
init(city: String, state: String) { self.city = city
self.state = state
}
varcityAndState: String { returncity+", "+state } }
letstate: String
Both structures have identical cityAndState properties that return a string combining the city and state. You can factor out the common code with a protocol and a protocol extension. First, the
Request protocol ensures that the properties used by the common code, in this case city and state, are implemented by the adopter of the protocol. Then the protocol extension adds the
new cityAndState property to all objects that conform to the Request protocol.
protocol Request {
struct TemperatureRequest: Request { letcity: String
struct OzoneRequest: Request { letcity: String
A protocol extension cannot add new requirements to a protocol, nor can it add additional data fields to an object; all it can do is add implementations of new behavior to the types that adopt the protocol. (A full description of protocol extensions is outside the scope of this book; see The Swift
Programming Language (Swift 3).)
Structures with protocols and protocol extensions provide one way to replace a class hierarchy and limit mutation. Swift includes yet another: enumerations with associated values. These can do an even better job in the right situations.
Structures are like instances of classes that are always copied when being passed around. Use
structures wherever you don’t need separate references to the same mutable state. With structures, you don’t have to code the copy operation, you don’t have to clutter up the code with copying, and in the case of larger structures, the compiler can optimize away much of the expense of copying. Substituting a structure for an instance of a class changes the easiest thing to write from passing a reference to copying a value. Bye-bye bugs.
Enumerations with Associated Values
In Swift, there is usually more than one way to express a given concept. For instance, you can choose between a class and a structure. Moreover, Swift includes many features from the functional
programming school. Judiciously exploited, these constructs can clarify, shorten, and generalize your code. Like color TV, air conditioning, or the smartphone, you may never have missed this next
construct, yet may soon find you would not think of living without it. One of these is the enumeration with associated values.
As described in “Simple Enumerations”, a Swift enumeration represents a value taken from a fixed set—for example, one of a fixed set of HTTP requests:
enum HTTP_Request_Kind {
case get, post// other request types omitted for brevity
}
But Swift enumerations can do so much more because any case can also include one or more associated values. Such an enumeration is more like a discriminated union than a Java or C
enumeration. It can replace a small class hierarchy or a group of structures that implement a common protocol.
For example, suppose you need to implement HTTP requests with an equality (==) operation. You could create a class hierarchy, with an abstract superclass containing common code and concrete subclasses for each kind of request. But since you don’t want any asynchronous code to mutate
requests, you would do better to use structures and a protocol. The protocol would have to be generic (because a requirement of == references the associated type, Self). However, recall that Swift
disallows the use of a generic protocol as a type:
protocol HTTP_Request {
staticfunc == (a: Self, b: Self) -> Bool
}
struct Get: HTTP_Request {...}
struct Post: HTTP_Request {...}
letrequests: [HTTP_Request] = ... // also ILLEGAL
So you could neither declare a variable that could contain any kind of request, nor an array that could contain a mixture of requests.
However, since the set of requests is fixed, there is no need to allow others to create new kinds of requests. Thus, an enumeration with associated values is the best fit.
enum HTTP_Request {
HTTP_Request, that subsumes every kind of request. As a consequence, the same array can hold any kind of HTTP_Request:
letrequests: [HTTP_Request] = [
.get (destination: url1, headerFields: [:]),
.post(destination: url2, headerFields: [:], data: someData) ]
and you can test different kinds of requests for equality with each other:
if aRequest == anotherRequest
Enumerations as Inside-Out Class Hierarchies
When you replace a class hierarchy with an enumeration, it’s like turning the hierarchy inside out: the hierarchy first divides the code into various types, such as the request types above; then, within each class the methods divide up the code by function. But the methods of an enumeration first divide up the code by function, and the switches within each function then divide up the code by case.
The enumeration isn’t always better than the hierarchy. There are drawbacks to using an enumeration: More code
Instead of implicit dynamic dispatching within a class hierarchy, you must write explicit switch statements.
Less extensibility
You can add a subclass to a class that was defined in a different file, but you cannot add a case to an enumeration that was defined in a different file. (This restriction can be a benefit where
appropriate.) An enumeration is favored when the set of cases is less likely to expand later; a class hierarchy is favored when the set of cases is more likely to expand, or be expanded by importers of your library.
Awkward for common data
A superclass or protocol offers better support than an enumeration for data attributes that are common to all the alternatives. It may be better to use a structure holding the common attributes and an enumeration for the specifics.
As you get used to Swift, you will find more and more uses for generic enumerations with associated values.
An enumeration with associated values provides a single, concrete type for disparate cases. Where the set of alternatives is fixed and has few data attributes in common, an enumeration with associated values can significantly improve the quality of your code.
Figure 2-3. Issues to ponder when choosing an aggregate
Instantiate a Class for a Thing with an Identity
Use an instance of a class to represent a thing in the real world with an identity that persists as its state changes. For example, to model a user whose identity remains the same as his location changes, you use a class:
class User {
letname: String // the User’s name can not change
varlocation: String // the User’s location can change
init( name: String, location: String ) { self.name = name
self.location = location
} }
All of the different variables in your program that refer to the same user will “see” the user’s location change when any variable changes the location instance variable.
Otherwise, Replace the Class with a Value Type
An instance of a class is passed by reference: any portion of your program with that reference can couple to any other portion with that reference by changing a field in that instance. In contrast, a value type is passed by value: handing off a value type to another portion of your program (or a library) does not create the potential for future interaction.
The potential for interaction impedes the prevention and elimination of bugs. Most bugs surface as undesired behavior resulting from unexpected values in data structures. Fixing the bug requires you to find the statement that wrote the bad value. But if the bad value occurs in an instance of a class, you must examine every place in the program that could possibly refer to that instance. Even if the fault turns out to be in a part of the program that is obviously related to the bug, the mere chance that it could be in some unrelated part imposes significant practical and psychological overhead in the search for the offending code.
Value types help with both sorts of reverse reasoning. They help to get from crash to offending code by reducing coupling. With value types, your program has fewer potential interconnections that you must trace and rule out. They also help with backtracking from code to rationale because there are fewer things to be believed about a value type than a reference type. Once an instance of a value type is referenced by a let, you don’t have to believe any details about how its mutation preserves
invariants because there can be no further mutations. Whenever possible, replace a class with a value type, such as a structure or enumeration.
The values associated with an instance of an enumeration cannot change.
The immutability implied by a let constant holding a tuple or structure flows down into its fields.
Each time a tuple or structure is passed to another variable it is copied. The two variables are decoupled unless passed via in-out, and in that case the caller cannot pass a constant and must mark the variable to be passed with an
ampersand prefix.
Any member function that mutates a structure must be specially marked and cannot be invoked on a constant.
If you are currently using a language with little support for optional types or value types, your code will benefit from moving to Swift and using them wherever you can. The assurances they provide about freedom from nil values, mutation, and coupling will help you write cleaner code. This code will be easier to reason about, maintain, and debug.
Unless it is passed in-out, in which case the caller must mark it with an ampersand.
Swift does include a way to pass in a structure so that the callee can mutate it—in-out parameters. But the call site looks different when passing such a parameter, so that you need only inspect the local part of the code to see that there might be a possibility of mutation.
1
Chapter 3. Swift Promises to Tame
Asynchrony
Server-side applications typically make requests to other web services or databases, and these
requests are usually asynchronous; the application does not stop to wait for the result to return. These requests may succeed or fail, and often the result contains the input to the next asynchronous
request. For example, consider an application that can find the temperature at the user’s home. The application makes a request to a database to discover where the user lives, then makes a subsequent request to a weather service to get the temperature in that location. But if the database is missing an entry for a user, the subsequent request to the weather service must be skipped. In addition to
sequencing the chain of asynchronous operations, an application must vary the sequence to cope with errors. The required logic can be a challenge to program.
This chapter shows how Swift’s support for first-class functions can be harnessed to implement promises, one of the most effective constructs for programming such chains. After reading this chapter, you will understand how promises work, and why they are so beneficial. To illustrate this, we have implemented a very basic version of PromiseKit called MiniPromiseKit that you can clone, refer to, and use in your projects.
This chapter explains promises in three incremental steps:
1. Synchronous operations are linked together in a chain, each operation depending on the previous one, and each potentially throwing an exception. By using the Result enumeration, the divergent control flow that results from handling exceptions gets restructured into a simpler linear data flow that is easier to follow.
2. The nested callbacks needed to chain asynchronous operations are hard to read and maintain. This section shows how to transform the nest into a straightforward chain of BasicPromises.
3. Steps 1 and 2 converge, combining Result and BasicPromise into Promise. This synthesis
simplifies and clarifies the construction of chains of asynchronous operations that cope with errors at any stage.
Each of these steps takes advantage of Swift’s extensibility and static checking to create more concise and robust code.
PROMISEKIT CONVENTIONS
Faced with many different names for the concepts in this chapter, we chose the terminology used in PromiseKit because it is one of the most popular libraries in this domain. It is a third-party, open-source library written by Max Howell and
Step 1: Chaining Synchronous Errors
To set the stage for programming chains of asynchronous requests, you encapsulate exceptions
thrown by synchronous calls. For example, suppose you need to print out the ambient temperature at a user’s home. You are composing two calls: one that returns the city where a user lives, and another that returns the temperature of a given city. Each operation can fail by throwing an exception:
enum City { case Austin, Mountain_View, Podunk }
Since each call returns a unique exception, you coalesce the exception handling into a single catch block that reports a specific error:
do {
In the preceding code, the getCity and getTemperature functions either return an answer or throw an exception. In turn, each of their call sites must implicitly test for the exception and conditionally branch to the catch block. But in order to prepare for asynchronous requests, you need to eliminate those branches. So, you’ll change each of those functions to return something, a Result, that contains either an answer or the error, with a bit of information to indicate which. Following PromiseKit nomenclature, call the successful case fulfilled and the type of that value FulfilledValue. Call the error case rejected. It will always have type Error.
How do you implement Result? Use a Swift generic enumeration with associated values. Just as with a generic class, a generic enumeration can handle a multitude of result types, including in this example both City and Int. Here is the enumeration with its cases:
enum Result<FulfilledValue> { case fulfilled(FulfilledValue) case rejected(Error)
}
1
The last argument to the initializer for Result is a closure, which the initializer invokes. If the closure returns normally, the initializer creates a fulfilled Result that includes the closure’s return value. If the closure throws an exception, the initializer creates a rejected Result that includes the error:
extension Result {
Using trailing closure syntax to omit the parentheses, a Result might be created as follows:
letaResult = Result<City> { trygetCity(of: "David") }
SUCCESS CAN BE VACUOUS
Since Swift treats the Void type consistently, Result can also be used with a closure that does not return anything, such as Result() {}.
Now that you have a Result<City>, use it to get the temperature for a city. Although you could write a switch statement for this particular chain:
func getTemperatureFromCity( aResult: Result<City> ) -> Result<Int>
You can do better by encapsulating the switch statement inside a reusable member function of Result:
} } }
Now the chain can be written more simply:
Result { trygetCity(of: user) } .then { trygetTemperature(in: $0) } .then { print("temperature:", $0) }
If getCity encounters an error, the calls to getTemperature and print will never occur because getCity returns a rejected case.
To process rejected results, two methods, recover and catch, respectively, allow errors to be replaced with successful results or merely caught:
extension Result {
For example, if you were willing to assume that any unknown users lived in Austin, you could situate them there with a recover:
// Type inference allows omission of <City> after Result below:
Result { trygetCity(of: user) } .recover { _in .Austin } .then { trygetTemperature(in: $0) } .catch { print("error:", $0) } .then { print("temperature:", $0) }
Imagine the complexity of the control flow you would otherwise need, such as branching into
recovery code if the first link failed, and bypassing the temperature query if the recovery code failed.
The code would be complicated and obscure; it would be easy to make mistakes. Result modularizes the control flow: it is linear at this level, from recover to then to catch to then. It is only inside of these methods that the control flow branches. Result exploits Swift’s support for higher-order
functions to pass the work required to handle each eventuality (as closures) into other functions (then, catch, and recover). Instead of conditionally branching at the top level, the enumeration carries the information as data.
FUNCTIONS OPERATING ON FUNCTIONS
Result encapsulates control flow by providing functions that operate on functions. Such functions that operate on functions instead of data are called "higher-order functions.” These functions-on-functions are a hallmark of functional programming and can be a bit mind-bending at first, but once understood, they can do a lot to improve the quality of your code. To stave off cognitive overload, you can try out these functions-that-wrap-functions a little at a time, first to defend against nils (for instance, by using map or flatMap), then to untangle error handling. As code gets moved into higher-order functions, the compiler helps out more and more to simplify the code and prevent bugs.
So far, this book has dealt with only synchronous operations, but server-side programming often relies on asynchronous operations such as web requests and I/O. The next step shows how functions operating on functions can help tame asynchrony by unpacking nested callbacks.
Step 2: Linearizing Nested Callbacks
Now that you’ve straightened out the code to handle synchronous errors, apply the same techniques to straighten out nested callbacks: pass the work into other functions as closures, and arrange these functions into a tidy linear sequence.
Composing Asynchronous Operations
Asynchronous operations are usually programmed with callbacks, and when an operation depends on the result of a previous operation, those callbacks must be nested. But this nesting obfuscates the sequence of operations. For example, suppose getting the user’s city and that city’s temperature require asynchronous operations with callbacks:
func requestCity( ofuser: String,
_callback: @escaping (City?, Error?) -> Void
) {
DispatchQueue.global(qos: .userInitiated).async { switchuser {
default: callback(nil, Errors.unknownUser)
Getting the temperature of the user’s city now requires a callback nested inside of a callback. Despite Swift’s trailing closure syntax, the code below is still obscure:
requestCity(of: user) {
Although the code first requests a city and then requests a temperature for that city, callbacks don’t allow the second request to be written after the first. Instead, it ends up inside the first. Since asynchronous programming with callbacks is functional programming, it is not surprising that its practitioners have found a way out. Because Swift supports functional programming, that way is open to you.
Replacing Callbacks
In order to get rid of nested callbacks, an asynchronous operation must return some thing that can be fed to the next operation. That thing must be something that can be created and returned before the first asynchronous operation completes. That way, it can be passed on to the next operation without being nested inside the first operation. This thing is commonly called a future or a promise. It works like a Unix pipe between two threads: the first thread creates the pipe and immediately returns it. Then, the second thread receives the pipe and waits for some data. Later, the first thread computes its data and sends it down the pipe. The pipe wakes up the second thread and presents it with the data from the first thread.
define a BasicPromise, which does not account for errors. Recall that Result is generic because the value for success can be any type, but that type can be determined statically. BasicPromise is also generic for the same reason. Call the type of the value for (eventual) success Outcome. Because a shared BasicPromise communicates the readiness of a result, it must be a class:
classBasicPromise<Outcome>.
BasicPromise has three fundamental operations : Creating
A BasicPromise object:
letaBasicPromise = BasicPromise<Int>()
Fulfilling the promise
When an outcome becomes available, fulfill the promise with the outcome:
aBasicPromise.fulfill(17)
Chaining one promise to another
The code that consumes the outcome of a fulfilled promise goes in the body of a then. Although this body is called back, it does not itself invoke the next step. Instead, it returns a new value, which could be another BasicPromise, to continue the chain. Here is a simple example using then:
aBasicPromise
.then {
// asynchronous request returning a BasicPromise
}
.then { print($0) }
SPECIFYING A DISPATCHQUEUE
Since then runs its body asynchronously, you might want the body to run on a specific DispatchQueue. Methods such as then take an optional argument to allow you to specify a DispatchQueue. In PromiseKit, the DispatchQueue defaults to .main, which can often result in a deadlock. We suggest .userInitiated instead.
There are three versions of then:
1. The simplest one takes a body with no return value and calls it when the original BasicPromise is fulfilled:
func then(
onq: DispatchQueue = BasicPromise.defaultQueue, executeconsumer:
@escaping (Outcome) -> Void
)
2. Sometimes the body synchronously processes the result of the original BasicPromise. In such a case, the then operation needs to continue the chain by returning a new BasicPromise for the transformed result:
func then<NewOutcome> (
onq: DispatchQueue = BasicPromise.defaultQ, executetransformer:
@escaping (Outcome) -> NewOutcome
) -> BasicPromise<NewOutcome>
3. Finally, the body may perform another asynchronous operation with the result of the original BasicPromise. Such a body must return a new BasicPromise with the new result. As in the previous case, the then operation containing that body also needs to return a new BasicPromise for the new result. However, the BasicPromise returned by the then method cannot be the same one that its body returns because the then method must return something immediately, so then returns a new BasicPromise, which will eventually be fulfilled with the right result:
func then<NewOutcome>(
onq: DispatchQueue = BasicPromise.defaultQ, executeasyncTransformer:
@escaping (Outcome)
-> BasicPromise<NewOutcome> ) -> BasicPromise<NewOutcome>
In order to use BasicPromises, you will have to wrap each request so that it returns a BasicPromise result instead of receiving a callback argument. For example, ignoring errors for now, assume there is an existing function that has a callback, requestCityIgnoringErrors:
} }
Although you could write a general wrapper for turning a function that receives a callback into one that returns a promise, skip that step for now and just write two wrappers for this running example:
func requestCityIgnoringErrors(ofuser: String) -> BasicPromise<City>
{
letpromise = BasicPromise<City>()
requestCityIgnoringErrors(of: user) { promise.fulfill($0) } returnpromise
}
// Also wrap the temperature request:
func requestTemperatureIgnoringErrors(incity: City) -> BasicPromise<Int>
{…}
Using BasicPromises, the composition of asynchronous queries becomes just as simple as that of synchronous ones:
requestCityIgnoringErrors(of: user)
.then { requestTemperatureIgnoringErrors(in: $0) } .then { print("Temperature is", $0) }
The BasicPromise has wrapped the asynchrony inside of an abstraction. Now, the call to print need not be nested inside the temperature request, which need not be nested inside the city request. Instead, a promise is passed along from each link in the chain to the next. Inside of these promises, events are being synchronized, threads launched, and answers awaited. Requests are written in the order they occur and asynchronous code becomes clearer.
But what about errors?
Step 3: Coping with Asynchronous Errors
The Result enumeration and the BasicPromise class combine to handle asynchronous errors with style and grace.
Promising Either Success or Failure
You could handle asynchronous errors by using a Result enumeration as the Outcome of a BasicPromise:
func requestCity(ofuser: String) -> BasicPromise<Result<City>>
{
DispatchQueue.global(qos: .userInitiated).async {
func requestTemperature(incity: City) -> BasicPromise<Result<Int>>
{…}
With these request routines, the asynchronous chain would be:
requestCity(of: user)
But this code is a bit cumbersome. You can fix it.
Promises with Handy Shortcuts for Success Versus Failure
The final version, called Promise, is presented here. It stands for the result of an asynchronous
computation that may fail. Under the covers, the implementation of Promise in the MiniPromiseKit is just a structure holding a BasicPromise that takes a Result for its Outcome.
struct Promise<FulfilledValue> {
letbasicPromise: BasicPromise<Result<FulfilledValue>>
}
The Promise methods named “then” only run their bodies if the computation has succeeded, and the
BasicPromise, a Promise only gets fulfilled if the computation succeeds, and it gets rejected if the computation fails. In addition to explicitly calling reject, a body can also signal failure by throwing an exception.
Here is a requestCity function that returns a Promise. It creates the Promise with pending, a static function that returns a new Promise, together with its fulfill and reject functions. It simulates the asynchrony that would occur with a real web request with an asynchronous invocation of the switch statement:
func requestCity(ofuser: String) -> Promise<City> { // obtain a new Promise & fulfill & reject functions
let (promise, fulfill, reject) = Promise<City>.pending()
Using Promises, a chain of asynchronous requests that also handles errors becomes quite readable:
requestCity(of: user)
.then (on: myQ) { requestTemperature(in: $0 ) } .then (on: myQ) { print("Temperature is", $0 ) } .catch(on: myQ) { print("error:", $0 ) }
The first requestCity sends out a request. If the request later fails, each of the then blocks will bypass its body, and only the catch will run its body. If the request instead succeeds, the first invocation of the then method will run its body, requesting the temperature of the city that was returned from the city request. Then, if the temperature request succeeds, the temperature will be printed. Otherwise, the body of the catch will run.
Although the code above is asynchronous, it is as clear as the synchronous version:
Result { trygetCity(of: user) }
.then { trygetTemperature(in: $0) } .then { print("temperature:", $0) } .catch { print("error:", $0) }
Space precludes a thorough tour through the implementation here; see MiniPromiseKit.
If you know other functional languages, you might recognize the enumeration by names such as “maybe” or “either.”
Throughout this chapter, in the interest of brevity, we omit public on what would normally be exported library declarations. We also omit the @discardableResult function attribute, which silences warnings when a function is invoked without consuming its return value.
Following PromiseKit, we reuse “catch” as a method name to introduce error-handling code. (Swift permits the reuse of many of its reserved words by quoting them in backticks.) Don’t confuse this “catch” method invocation with the “catch” Swift keyword.
See MiniPromiseKit for full implementations.
“Catch” here is just another method name, a sort of pun on the catch keyword in Swift.
1
2
3
4
Chapter 4. Swift Package Manager
Reinventing the wheel is a great way to waste your time and effort. When another developer has already created a solid library that performs a function needed by your application, you can save weeks of time if you are able to reuse it. The Swift ecosystem is growing very quickly, and often there are many similar libraries that solve the same problem. If you adopt Swift for your project, you
will find hundreds of Swift packages on GitHub or listed in the IBM Swift Package Catalog, which
can be easily incorporated with the aid of the Swift Package Manager (SwiftPM). Whether you are looking to store your data in a database, parse JSON, or use reactive programming, chances are that there is a Swift package out there that can do what you need it to.
As a developer, you might want to add one of these libraries to your project. This is where the SwiftPM comes into play. If you already use a package manager such as Rust’s Cargo, NodeJS’s
npm, Java’s Maven, or Ruby’s Gem, you will feel right at home using the SwiftPM. It helps to resolve
dependencies by automatically downloading the sources that match the version you want, and
arranges the build process so that you have the executable or Swift library that you need. Because the SwiftPM works on many platforms, you can kick off builds, test, or fetch dependencies with shell commands. In addition, you can use it to generate an Xcode project, as described in “Developing in Xcode”.
Semantic Versioning
When SwiftPM fetches a required package, it must fetch an appropriate version that will work with your project. So, each package uses a three-level version number, consisting of major, minor, and patch numbers:
The major version indicates API compatibility. The minor version indicates functionality. The patch version indicates fixes.
The major version is incremented when there are changes made to the API that could break the
packages that depend on it. The minor version is incremented when there is a new feature added that does not break the compatibility with older versions. The patch version is incremented when bugs are fixed that do not break backwards compatibility.
made to the repository does not affect the many applications that could be using the library.
Consider this typical workflow: suppose your project uses the master branch for your production-ready releases, and currently your project is at version 0.1.3. When developing a new API-breaking feature, you can branch from the master into a new feature branch called add_feature. From this feature branch, you can tag a new release: 0.2.0. The existing stable code at 0.1.3 will not be affected. You can change the Package.swift file in your executable to point to majorVersion 0 and minor version 2 for your development. This will clone the repository at version 0.2.0 and not 0.1.3.
Creating an Application
This section steps you through the process of using the SwiftPM to create a new project from scratch, find a package to include, import that package, and build your project.
First, generate a new executable project by creating a new directory called MyProject. The following command uses the name of the current working directory for automatically creating a new project with that name:
~$ cd MyProject
MyProject$ swift package init --type executable
Creating executable package: MyProject Creating Package.swift
Creating .gitignore Creating Sources/
Creating Sources/main.swift Creating Tests
There were a few files created in that step. The Sources/main.swift is the main entry file, and it starts off with very basic Swift code for a “Hello, World!” application. All executable projects or targets will contain a main.swift in the Sources directory or a subdirectory in the Sources directory,
respectively.
print("Hello, world!")
The Tests directory is empty. See “Creating Your Own Library” for unit-testing information.
The built .gitignore file specifies which files or directories to exclude from the git repository. Here, these are the .build directory, Packages directory, and any .xcodeproj files. These files and folders will be built during the compilation step, and are not necessary to check into your project.
The Package.swift file is a manifest file containing the name of the package and other information such as the dependencies that your project has:
import PackageDescription
Now, produce an executable file from your project by running swift build:
$ swift build
Compile Swift Module ‘MyProject’ (1 sources) Linking ./.build/debug/MyProject
The swift build command reads the Package.swift file and checks if there are any dependencies to fetch. Next, it runs the Swift compiler, swiftc, on each of your .swift files to convert them into swift modules. Finally, it links the .swiftmodule files to produce your executable, which is left in the .build/debug/ directory. Run your program now:
$ ./build/debug/MyProject
Hello, world!
COMPILING IN RELEASE MODE
Projects can be built in either debug or release mode. By default, swift build compiles the project in debug mode. When moving your project to production, consider building your project in release mode so that you have the best performance. You may compile with swift build –-configuration release, which will generate an optimized executable in the directory .build/release. Consequently, debugging symbols will be included and optimizations excluded so that LLDB can examine data, add breakpoints, and step through your program.
The Package.swift file describes the project and how to build it. Builds are not described by a
special language like Gradle or a Makefile—it’s native Swift code! You don’t have to learn another language to control the build process. You can write if statements that will select the correct library to use based on whether you are running on Darwin or Linux:
#ifos(macOS) ||os(iOS) ||os(tvOS) ||os(watchOS)
import Darwin
#elseifos(Linux)
import Glibc
#endif
The system’s environment variables can also influence the build process. For example, you can check for the existence of an environment variable before executing a code block:
letenv = ProcessInfo.processInfo.environment
ifenv["MY_SYSTEM_ENV"] == "true" { ... }
Importing a Library in Your Project
Once the necessary boilerplate for a Swift project has been created, you can add new dependencies to it—for example, that nifty pipe operator ( |>) introduced in Chapter 1. First, find the source code,
Catalog in your browser and search for “Pipes” in the search bar as shown in Figure 4-1.
Figure 4-1. Searching for a package in the IBM Swift Package Catalog
Figure 4-2. Pipes library description page on IBM Swift Package Catalog
Click on “Include project in your code,” which will copy the necessary dependency link to your clipboard so you can paste it into Package.swift.
Go back to your Package.swift file and insert that dependency in your Package constructor:
import PackageDescription
letpackage = Package( name: "MyProject", dependencies: [
.Package(url: "https://github.com/IBM-Swift/Pipes.git", majorVersion: 0, minor: 1),
]
)
OTHER GIT SERVERS