ES6 for Humans
The Latest Standard of
JavaScript: ES2015 and Beyond
Deepak Grover Hanu Prateek Kunduru
Delhi, India Seattle, Washington, USA
ISBN-13 (pbk): 978-1-4842-2622-3 ISBN-13 (electronic): 978-1-4842-2623-0 DOI 10.1007/978-1-4842-2623-0
Any source code or other supplementary material referenced by the author in this book is available to readers on GitHub via the book’s product page, located at www.apress.com/9781484226223. For more detailed information, please visit http://www.apress.com/source-code.
Contents at a Glance
About the Authors ...
xiii
About the Technical Reviewer ...
xv
Acknowledgments ...
xvii
■
Chapter 1: Getting Started with ES6 ...
1
■
Chapter 2: New Syntax in ES6 ...
11
■
Chapter 3: Destructuring ...
37
■
Chapter 4: Classes in ES6 ...
49
■
Chapter 5: Modules ...
65
■
Chapter 6: Symbols in ES6 ...
75
■
Chapter 7: Arrays and Collections ...
81
■
Chapter 8: Iterators and Generators ...
97
■
Chapter 9: Promises in ES6 ...
109
■
Chapter 10: Meta Programming ...
117
■
Chapter 11: Beyond ES6 ...
129
Contents
About the Authors ...
xiii
About the Technical Reviewer ...
xv
Acknowledgments ...
xvii
■
Chapter 1: Getting Started with ES6 ...
1
ES6 The Specification ...
1
History of ECMA, ECMAScript, and JavaScript ...
2
One JavaScript ...
3
Using ES6 ...
4
Setting Up ES6 Using Babel and webpack ...
5
Transpiling with Babel ...
5
Setting Up an ES6 Boilerplate ...
5
Adding Your Generated bundle.js script to your index.html ...
8
Summary ...
10
■
Chapter 2: New Syntax in ES6 ...
11
Variable Declarations: let, const, and Block Scoping ...
11
Block Scoping with let and const ...
12
More on Temporal Dead Zones ...
14
Variables Declarations in loops ...
15
Using Arrow Functions to Create IIFEs ...
18
A Tale about this ...
19
Using Arrow Functions ...
24
Default Function Parameters ...
25
Rest and Spread Operators ...
27
The Spread Operator ...
29
Object Literal Extensions ...
30
Template Literals and Delimiters ...
32
Tagged Template Literals ...
32
Summary ...
35
■
Chapter 3: Destructuring ...
37
Destructuring of Objects and Arrays ...
37
Object Destructuring Syntax ...
38
Assignment Using Destructuring ...
40
Default Values ...
41
Nested Destructuring ...
42
Destructuring Using the rest Syntax ...
44
Destructured Parameters ...
45
Summary ...
47
■
Chapter 4: Classes in ES6 ...
49
Classes in ES6 ...
49
Defining Classes in ES6 ...
51
Class Declarations ...
51
Class Expressions ...
52
Class Methods and Accessor Properties ...
53
Using Constructor Environments ...
57
Using WeakMaps ...
57
Static Methods and Properties ...
58
Class Inheritance and the Super Keyword ...
59
Inheriting Static Properties...
61
Method Overriding ...
62
Inheritable Built-Ins ...
63
Summary ...
64
■
Chapter 5: Modules ...
65
Module Systems and a Little History ...
65
The Module Pattern in Traditional JavaScript ...
66
Modules in ES6 ...
66
Exporting ...
67
Default Exports ...
67
Importing ...
68
Importing Default Values ...
69
Exporting an Imported Binding ...
70
Renaming Identifiers ...
70
Loading Modules ...
71
Modules in Web Browsers ...
71
Loading Modules with <script> ...
71
Loading Modules Asynchronously in Browsers ...
72
Common Pitfalls ...
72
Syntax ...
72
Read-Only Bindings ...
73
Module Specifier ...
74
Summary ...
74
■
Chapter 6: Symbols in ES6 ...
75
Symbols ...
75
Applications of Symbols ...
76
Symbols and Registry ...
79
Symbol.for(key) ...
79
Symbol.keyFor(symbol) ...
80
Built-In Symbols ...
80
Summary ...
80
■
Chapter 7: Arrays and Collections ...
81
Arrays and New Methods ...
81
Array.from() ...
81
Array.of() ...
83
New Array.Prototype Methods ...
84
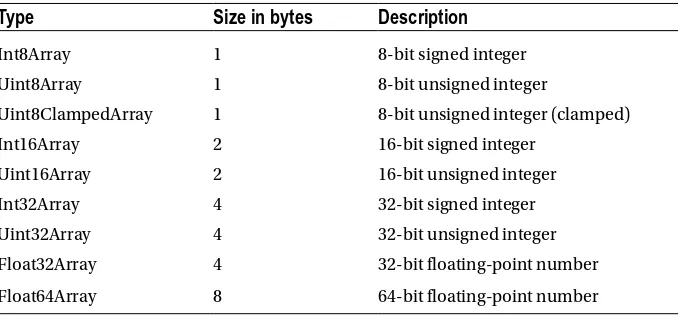
Typed Arrays ...
89
Basics of Using Typed Arrays ...
89
Typed Arrays and Normal Arrays ...
90
Map and WeakMap ...
91
Map ...
91
WeakMap ...
93
Set and WeakSet ...
94
Set ...
94
WeakSet ...
95
Iterables and Iterators ...
97
Iteration Protocols ...
100
Iterable Protocol ...
100
Iterator Protocol ...
100
Iterator as an Iterable ...
101
return( ) and throw( ) in Iterators ...
102
Generators ...
102
Generator Function ...
103
Communicating with Generators ...
104
Completing Early ...
106
Summary ...
108
■
Chapter 9: Promises in ES6 ...
109
Promises Overview...
109
Creating a Promise ...
110
Consuming a Promise with then( ) and catch( ) ...
111
Chaining of Promises ...
113
Error Handling ...
114
Combining Promises with Promises.all ...
115
Summary ...
116
■
Chapter 10: Meta Programming ...
117
Meta Programming in ES5 and ES6 Overview ...
117
Proxies in ES6 ...
118
Traps in Proxy Handler ...
119
has ...
121
ownKeys ...
122
Reflect ...
125
Summary ...
127
■
Chapter 11: Beyond ES6 ...
129
ES2016 ...
129
The includes method on Arrays ...
129
The Exponentiation Operator ** ...
130
ES2017 ...
130
Asynchronous Functions ...
131
Atomics and Shared Memory ...
132
Object.entries() and Object.values( ) ...
132
padStart and padEnd ...
132
Object.getOwnPropertyDescriptors( ) ...
133
Trailing Commas in Function Parameter lists & calls ...
134
Summary ...
134
Getting Started with ES6
Around 46% of the world’s population have Internet access today and the numbers are steadily increasing. While you’re reading this, there are people out there who are using Internet services to book a cab, or a flight, or a table for two at a fancy restaurant; the point is that the Internet today has made people’s lives easier. More and more web apps are being built everyday with the goals of saving people time, providing them with a higher standard of comfort or simply for entertainment. These apps are accessible on the go, and a lot of them are built using JavaScript.
According to the StackOverflow Developer Survey, JavaScript is the most commonly used programming language on earth. The ubiquity of the web platform is driving developers to use JavaScript more than any other language, leading to the evolution of JavaScript platforms like Node.js, front-end frameworks like Angular & React, and complete webstacks like MEAN (MongoDB, ExpressJS, AngularJS and NodeJS).
This book discusses the core concepts of ES 2015 (popularly referred to as ES6) and beyond, while focusing on the best development practices. By the time you finish reading this book, you will have a good understanding of core ES6 concepts, features, and their applicability in the modern-day development workflow.
ES6 The Specification
For many years ECMAScript 6 (ES6) had been in the works but on June 17, 2015, the 109th Ecma General Assembly approved the 6th Edition of ECMA-262 standards, making official a major upgrade to what we know and love as JavaScript.
The evolution of JavaScript, more specifically ECMAScript, is primarily community driven and TC39 is the official committee in charge of it. TC39 is primarily constituted by members that represent various stakeholders like the major browser companies and other invited members. They meet and communicate on a regular basis and are tasked with maintaining and upgrading the standard for the ECMAScript programming language and the libraries that extend its capabilities. In the process, they consider and evaluate the proposals for complementary and additional technologies for evolving ES. If you are interested in knowing more or checking out the agendas and minutes of their meetings, they are all available online on GitHub (https://github.com/tc39/tc39-notes).
do collaborative design work, usually one or two committee members are assigned as champions responsible for maintaining a proposal and to do design work and report back to the committee.
For a proposal to become a standard, it has to go through multiple stages. The initial feature sketch of the proposal, which is also referred to as a “Strawman proposal,” is the first stage discussed by the committee and if it agrees that it is important, it is considered an official proposal. The proposed feature then needs to be implemented at least by two major JavaScript engines to get feedback from the community and evolve the proposal further. Once the proposal passes through these stages and incorporates feedback, TC39 approves it and will include it in the new edition of the ECMAScript standard.
History of ECMA, ECMAScript, and JavaScript
For someone unaware of the history of JavaScript, it can get pretty confusing quickly with so many different names like JavaScript, ECMAScript, different version numbers, and other popular offshoots like ActionScript, JScript, and TypeScript, which are all different forms of JavaScript.JavaScript was originally developed by Brendan Eich as a scripting language for the web for use in the Netscape browsers. The name itself was chosen for marketing reasons due to the rising popularity of Java around the time, even though it had nothing to do with Java. In an attempt to standardize the language and the specification, it was submitted to ECMA International, a body for standardization of information and communication technology and consumer electronics. Eventually, the language standardized in ECMA-262 was just called ECMAScript or ES in abbreviated form, since JavaScript was a name trademarked by Sun and now belongs to Oracle. None the less, the language is still commonly referred to as JavaScript by everyone. There were many variations in implementations with ECMAScript as the backbone, like a slightly different adoption for the Internet Explorer by Microsoft called JScript. ActionScript is another example of a derived language developed by Adobe.
The initial versions ES1 and ES2 were released in 1997 and 1998, but in 1999, the ES3 release was a major upgrade with new features like regular expressions, improved string handling, more control statements, better error handling, and try catch exception handling among many other enhancements that we commonly use in JavaScript today. It had a widespread base implementation in various forms across major browsers and engines.
After the release of ES3, work on ES4 was well under way with many radical changes and a massive scope. Updated features included new syntax, modules, classes, classical inheritance, private object members, optional type annotations, and more. The proposed changes led to many differences, both technical and political, among various stakeholders in the community, resulting in it being put on hold in 2003. Parts of the proposed features made their way into implementations like ActionScript and Jscript. NET. After receiving feedback from these implementations, TC39 decided to resume work on ES4 in 2005, but by this time there was a big split in the community and two major groups had formed with differences on the way forward.
the fifth edition of ECMA-262, also described as ECMAScript 5, and the committee never released an ECMAScript 4 standard to avoid confusion. ES5 would be a small incremental update and they would work on the next major release, which would be more modest than ES4, dropping many proposed features like packages, namespaces, and early binding. This proposed release was code named ES Harmony due to the nature of the meeting.
ES5 was released in December 2009, and it is currently the most widely supported version in modern browsers today. It came with many enhancements to the standard library and updated language semantics via a strict mode.
When it was apparent that plans for ES Harmony were becoming too ambitious for a single release, they split up the first set of features with the highest priority and code named the release ES. Next, to avoid premature naming with a version number in light of what happened with ES4, once it matured the specification was called ECMAScript 6.
ES6 took a long time to become official. The deadline for ES6 proposals was May 2011 and no major proposals were considered after that; but starting with the later versions, TC39 decided to time-box releases and release a new version every year with smaller incremental changes using whatever features are approved by that time. Hence the committee decided to change the naming convention of the versions to denote the year of release. Hence the official name of ES6 was changed to ECMAScript 2015 just before the final release, but the name ES6 was so widely used for years that ES2015 is still commonly referred to as ES6 and that’s why we chose to refer to the new specification as ES6 throughout this book. But going forward, ES versions will be officially referred to by their year of release. So when we say ES6, we are referring to the broader changes in ES2015.
To look at ES6 from a bird’s eye view, the specification drafts are divided into four major parts: the goals, the requirements, the means, and the themes. The goals aspire to fix the common pitfalls in JavaScript and add new features, while the requirements state that both of them need to be done in such a way that it does not break any existing code, while preserving the lightweight nature of the language.
We won’t be digging into all the goals here. But you should know that these goals aspire to make it a better language for writing complex applications, libraries, etc. Keeping versioning simple and incremental, ES6 avoids versioning; this is best described by the philosophy of One JavaScript. For example, in ES6 everything is ES6 code: there are no parts that are specific only to ES5.
ES6 aims to provide better support for large applications and library creation. It offers enhancements like classes, modules, lexical block scoping, iterators, generators, native language support for promises, and much more.
The development of ECMAScript Standard is community driven and the
requirements and features of the language will still continue to evolve for betterment in the future releases.
One JavaScript
So the ES specification aspires to upgrade the language and avoid versioning. This is done by always being backward compatible, that is, all valid ES5 code is also valid for ES6 code. Therefore, ES6 is designed to not have any breaking changes and none of the previous features are removed. Hence in theory specifying the version is not required for the engines. So instead of removing existing features, you introduce new and better features.
What does this mean for you, a JavaScript developer? Since ES6 is a superset of ES5 you will not need to migrate any old code. Your existing JS code is valid ES6 code as well. Therefore to reiterate there is nothing you need to do. Therefore, everything you learned and use in existing JavaScript can be brought over to ES6, and it has more and better tools to add to your existing arsenal. This can be really helpful if you wish to incrementally port your current system into ES6 because everything is backward compatible.
Using ES6
Many JavaScript environments including web browsers and Node.js are actively working on implementing all the features of ECMAScript 6 and later. But it will take some time before ES6 is universally supported all across the Internet. At the time of writing this book, the latest version of chrome has 97% of features implemented and Safari has 100% of the features implemented. You can check the current feature-wise support for all engines at http://kangax.github.io/compat-table/es6/.
Until all of ES6 features are universally supported we need a way of converting ES6 into compatible JavaScript code. This is where transpiling comes in. Transpiling (transformation + compiling) is a technique in which we use special tools to transform ES6 code into its closest equivalent, ES5 code, to work on older browsers or environments.
Consider the following ES6 code:
const fruits = ["apples", "bananas", "oranges"]; let store = {
fruits };
store.fruits; // ["apples", "bananas", "oranges"]
This roughly transpiles to:
var fruits = ["apples", "bananas", "oranges"]; var store = {
fruits: fruits };
store.fruits; // ["apples", "bananas", "oranges"]
Setting Up ES6 Using Babel and webpack
In order to use ES6 in your projects today, there are a set of build tools you will need to get things up and running. In this section, we will be discussing a few build tools, and we will be setting up an ES6 Boilerplate that you can use as a starter kit for your ES6 projects.
Transpiling with Babel
Babel.js is an awesome tool that lets you transpile your ES6 code into ES5 code that can then be run in current JavaScript environments. Babel supports the latest version of JavaScript through syntax transformers, and these plug-ins allow you to use new syntax, without waiting for browser support.
The first step is to install Babel on your local machine using npm.
■
Note Before you continue, make sure you have Node.js and npm already installed. If
you don’t have node and npm installed, you can visit https://nodejs.org/en/ to set up
your development environment.
npm install -g babel-cli
Now, you can run any file with ES6 code from your command line using: babel-node <filename.js>
But transpiling every file manually isn’t efficient and, in most cases, isn’t the solution for managing large projects. So let’s set up an ES6 starter kit that will help you automate the build process and make the development process more efficient.
Setting Up an ES6 Boilerplate
In order to transpile an ES6 project, we will be using babel-loader and webpack that will help us generate a bundled output with all the transpiled code and related dependencies.
Start a New Project
Run the following set of commands in your terminal to start a new project: mkdir es6-boilerplate
cd es6-boilerplate npm init –yes
Install webpack and webpack-dev-server
Webpack is a very flexible module bundler that takes modules with dependencies and generates static assets representing those modules. We will be using webpack to let babel-loader transpile our ES6 code into traditional ES5 code and generate a bundled output file. npm install –-save-dev webpack
Besides webpack, we need to use webpack-dev-server to serve our app and transpile the code on the fly. But, note that webpack-dev-server is a development server and should not be used for production.
npm install –-save-dev webpack-dev-server
■
Note To read more about webpack and webpack-dev-server in detail, you can visit
https://webpack.js.org/concepts/.Install Babel in the Project
You can install babel into your project very easily using the following npm packages: npm install --save-dev babel-loader babel-core babel-preset-es2015
The next step is to configure babel to use ES2015 presets by adding a new file .babelrc in the root directory of your project with the following JSON:
{
"presets": ["es2015"] }
Your package.json file should more or less look like this: {
"name": "es6-boilerplate", "version": "1.0.0",
"description": "ES6 Boilerplate", "devDependencies": {
"babel-core": "^6.24.1", "babel-loader": "^6.4.1",
"babel-preset-es2015": "^6.24.1", "webpack": "^2.4.1",
"webpack-dev-server": "^2.4.2" }
Now, create a new index.html file and index.js file in the root directory of your project And your current project directory should look like the following:
.
├── index.html ├── node_modules ├── package.json ├── index.js
Configuring Webpack
The next step is to set up webpack by creating a configuration file - webpack.config.js in the root directory of your project.
A webpack configuration file is a CommonJS-style module where a configuration object is exported out of this module.
// webpack.config.js
module.exports = { entry: './index.js', output: {
path: './dist', filename: 'bundle.js' }
};
Here, entry is the path to the source of your project and webpack will analyze your entry file for dependencies and generate a bundled output (which includes all the dependency modules). Note that only the entry module is executed on startup.
Add Loaders
Loaders allow you to preprocess files as you load them. Loaders provide a powerful way to handle front-end build steps and can transform files from a different language, like CoffeeScript to JavaScript or inline images as data URLs. For example, babel-loader uses Babel to load ES2015 files.
So now, modify webpack.config.js to process all .js files using babel-loader: module.exports = {
entry: './index.js', output: {
module: { rules: [{
test: /\.js$/,
exclude: /node_modules/, use: 'babel-loader' }]
} };
The above configuration implies the following: 1. ‘./index.js’ is the entry point of the application. 2. Output will be generated in ‘./dist/bundle.js’.
3. We are processing every .js using the babel-loader, excluding node_modules to avoid external libraries to go through Babel, slowing down compilation.
Adding Your Generated bundle.js script to your
index.html
Now we can include the bundle.js script into our html file to run the code. <!DOCTYPE html>
<html> <head>
<meta charset="utf-8">
<meta http-equiv="X-UA-Compatible" content="IE=edge"> <title>ES6 Boilerplate</title>
</head> <body>
<h1>ES6 Boilerplate</h1>
<p>Check console for details</p> <div id="main"></div>
<script src="dist/bundle.js"></script> </body>
</html>
To compile your .js file, you can run the following command in your terminal: webpack
You can also use following additional flags with webpack: • webpack for building once for development.
• webpack -w for continuous incremental build in development (fast!).
• webpack -d to include source maps.
■
Pro Tip We can achieve prettier output using webpack – progress – colors that add a
progress bar and colors in the webpack output in the terminal.
Setting Up a Development Server
To start a development server to test your code, you can run the following command: webpack-dev-server -d --progress --colors
This binds a small node-express server on localhost:8080, which serves your static assets as well as the bundle (compiled automatically). It automatically updates the browser page when a bundle is recompiled.
We can also add these webpack commands to your package.json scripts. "scripts": {
"start": "webpack-dev-server --hot --inline", "watch": "webpack -w -d",
"build": "webpack -p" },
Now, you can use this:
• npm start to run a dev server at localhost:8080 and watch for/ recompile on changes.
• npm run watch to only watch for/recompile on changes on your own web-server.
• npm run build to generate a minified, production-ready build.
Let’s try this out with a helloWorld() function inside our index.js file: const helloWorld = () => {
console.log("Hello! We are all set!"); console.log("Arrow functions are working"); };
helloWorld();
You can run npm run watch to see the transpiled code in your bundle.js file located inside the dist directory, which will have this chunk of transpiled ES5 code: function(module, exports) {
Finally, we also recommend using ESLint in your project to use best practices and avoid errors while writing your code. You can find the above boilerplate code at https://github.com/metagrover/ES6-boilerplate, which also has an .eslintrc file that contains the standard rules and configurations we use.
Summary
JavaScript is one of the most powerful languages on the Web today, and it is only getting stronger. ES6, or officially ES2015 and the versions that follow, brings in a new paradigm to JavaScript. As we will see in the next few chapters, there is a lot of new stuff for a conventional JavaScript developer. But it is important for existing JavaScript developers to become aware of the new features to stay ahead of the curve as more and more features become mainstream in the world of browsers and frameworks.
JavaScript is moving quicker than ever before and transpilers and shims/polyfills are important tools to keep you on the forefront of where the language is headed. ECMAScript 6 comes with a very extensive list of new additions to the language and each of these features was carefully considered, discussed at length, and chosen by the community to become a part of the standard. Now it’s up to us developers to use and apply the new standard to our products to better serve the people using them.
You might be asking yourself, is the change worth it. Is integrating ES6 into your projects and work necessary and do you really need to change the existing ways of doing things. We would like to say "Yes, it is worth it," and through this book we aspire to encourage you to adapt to this new world. Even if you face some resistance in moving away from the old ways, we suggest you stick with it and change your practices.
The JavaScript community is extremely vibrant and dynamic with things changing at a rapid rate. ES6/ES2015 knowledge is now expected among JavaScript developers. The new language constructs have not only become popular, but are now also widely supported. Mastering the inner workings of ES6 will let you build modern applications and give you access to a more powerful language and help you improve your programming skills.
New Syntax in ES6
The new features introduced in ECMAScript 6 represent the foundation upon which JavaScript applications will be built in the future. In this chapter we will take a look at the changes and new additions to the ES6 syntax that help in fixing a lot of things that went wrong with the previous versions of JavaScript. We will discuss in detail about new ways of declaring variables and defining scope. We will also introduce new concepts like arrow functions, default function parameters, spread and rest operators, and object literal extensions.
Variable Declarations: let, const, and Block
Scoping
In the past, all variables in JavaScript were declared using the keyword var. These variables were function scoped, meaning their scope was within the function enclosing them, and this could sometimes be confusing to developers coming from other languages. So, if you needed to create a new block with its own scope, you would have to wrap your desired code inside a regular function or an immediately invoked function expression.
Following is an example of regular function level scopes: var price = 10; // Global Declaration
function showPrice() {
var price = 12; // Local Declaration using var console.log(price); // 12
}
showPrice();
console.log(price); // 10
Following is an example of function level scopes with IIFE: var price = 10; // Global Declaration
(function () {
var price = 12; // Local Declaration using var console.log(price); // 12
})();
The above code demonstrates that the variable price is now scoped to the enclosing function and the changes are not leaked to the parent scope, in this case global scope. The new value price = 12 is only available inside the enclosing function scope.
If we replace the function scope with a block scope ( ‘if’ block), it looks like this:
var price = 10; if (price) { price = 12;
console.log(price); // 12 }
console.log(price); // 12
The above code makes it clear that the changes inside the ‘if’ block are leaked to the parent scope, which tells us that the var declarations are bound to the function scope and does not create block scopes.
Prior to ES6, JavaScript used functional scoping, but block scoping is more common than functional scoping across most programming languages. With ES6, we now have two additional ways for declaring variables, let and const, both of which declare variables that are block scoped.
Block Scoping with let and const
Quite simply, block scoping means that a new scope is created between a pair of { }. The variables declared using the keywords let and const only exist within the innermost block that surrounds them.
In the following example, what do you think will be printed to the console when you execute the following code snippet?
let nbr = 42; {
let nbr = 1000; }
console.log(nbr);
The value 42 is printed to the console, because the second nbr variable is scoped to the block within which it is declared and does not affect the nbr variable outside of the block, where it remains 42. Normally, you wouldn’t use a block like that unless it were in a control flow statement like an if condition or in a loop, but this explains how a variable is block scoped.
We now know that var is bound to function scope, whereas let and const are block scopes, which means if you've got a set of curly brackets (a block of code), you have a block scope. But, the catch is you can declare a variable inside of its block scope only once.
Consider the following example:
const value = 42;
console.log(value); // 42 value = 1000; // TypeError
■
Note
Trying to change the value of a const variable will throw a TypeError. Changing an
immutable binding in strict mode only causes an exception SetMutableBinding().
Make sure that you always initialize the variable with a value declared using const; otherwise it will throw an error. Consider the following example:
const item; // SyntaxError: Missing initializer in const declaration
If you need a constant with an undefined value, you'd still have to do something like this:
const value = undefined;
If you know that the value of your variables is not going to change throughout your code, you should be using const; otherwise use let to declare your variables. We recommend moving away from the practice of using var to declare variables as it is cleaner, more efficient, and easy to debug if you use block scoping. let and const avoid the source of misunderstanding, especially for programmers with expectations set by languages with block scope. let and const throw an exception if you try to access the variables declared by them outside the blocks they were declared and do away with hoisting, helping you localize the effects of your code fragments.
Consider the following example to understand how hoisting affects the variables declared using the keyword var:
console.log(nbr); // undefined var nbr = 42;
The above example prints undefined to the console because of hoisting. When we declare the variable nbr using var, due to hoisting it becomes equivalent to declaring the variable at the start of the scope with its value set to undefined. But if you moved the console.log statement after the declaration, it would print the number 42, due to the fact that entering the scope of the variable declared using var, that is, its surrounding function, creates a binding. The variable is then initialized by setting the value to undefined. When the execution reaches the declaration, this variable is then set to the specified value in the assignment statement.
Let's take a look at a similar example using let:
This would actually give you a Reference Error: nbr is not defined since no hoisting takes place here. This can be a big help in debugging different types of bugs that can be caused by a variable being used before it is declared. This Reference Error is technically called a Temporal Dead Zone (TDZ) error because you are accessing a variable that's been declared but not yet initialized.
More on Temporal Dead Zones
The main takeaway from this discussion is that let and const declare variables with a temporal dead zone (TDZ), in contrast to the hoisting that happens when you use var. The variable in the Temporal Dead Zone is not yet initialized with any value. A memory binding is created and remains uninitialized when the variable is declared. Trying to get or set the variable at this point raises a Reference Error. When the program flow reaches the declaration, the variable is then set to the value specified in the statement; otherwise it is set to undefined if there is no assignment in the statement.
const works in a similar fashion, the only difference being that it needs an initializing value during declaration, which cannot be changed later.
let data = true;
if (true) { // enter new scope, TDZ starts
// Uninitialized binding for "data" is created
console.log(data); // ReferenceError
let data; // TDZ ends, "data" is initialized with "undefined" }
console.log(data); // true
As soon as the initialization occurs with the assignment of a value to the variable, the TDZ ends.
The temporal dead zone primarily exists to catch errors. You should not be able to access a variable before it is declared, and even if you do by accident you should be warned about it. TDZ was the best solution for const to work the way it does and having let also having a TDZ makes switching between them very easy. TDZs helps us ensure that a variable in runtime always has the correct value.
if (true) {
console.log(typeof anUndeclaredVariable); // 'undefined' console.log(typeof random); // ReferenceError (TDZ)
let random; }
that variable is in the temporal dead zone when you call typeof. Therefore, it is a good practice to always make variable declarations at the top of your scope. This check is also useful for conditionally creating global variables using var. You can check if a global variable exists by doing something like this:
if (typeof globalVariable === 'undefined') { var globalVariable = { ··· };
}
■
Note
const is used to declare an immutable variable but it does not make the value
contained in the variable immutable.
In the following code snippet obj is a constant, but the value it points to is mutable; therefore you can add a property to it but you cannot assign a different value to obj.
const obj = {};
obj.key = 42;
console.log(obj.key); // 42
obj = {}; // TypeError
If you wanted to you could make the value itself immutable by freezing it.
const obj = Object.freeze({});
obj.key = 42;
console.log(obj); // {}
Remember that Object.freeze() is shallow. It will only freeze the properties of the object passed to it. Only one level of properties of the object become immutable and not the objects that might be stored in its properties.
Variables Declarations in loops
For loops (for, for-in, for-of) let you declare variables in their heads. But the way you declare these variables using var, let, or const changes things. Let’s look at each of these cases.
In a basic for-loop, using var creates a single binding for that variable
let arr = [];
arr.push(function () { return i }); }
let value = arr[0]();
console.log(value); // 3
You might have expected the output to be 0, but the output is 3 because a closure gets formed over the variable i at the end of the loop. i is set to 3 and each instance of i in the body refers to the same binding. Therefore, the function always returns 3. Now let’s take a look at the case where i is declared using let:
let arr = [];
for (let i=0; i < 3; i++) {
arr.push(function () { return i }); }
let value = arr[0]();
console.log(value); // 0
When we use let in a for-loop, each iteration of the loop will get its own i variable and any closures created close over their own value of i.
In the case of const, it works similar to var because the initial assigned value to a const variable will not change again.
for (const i=0; i<3; i++) { console.log(i);
}
// TypeError: Assignment to constant variable (due to i++)
Variable Declarations with Function Parameters and
Global Scope
If you declare a variable using let inside a function, having the same name as a parameter, ES6 will throw a static (load-time) error.
function fn(param) {
let param; // SyntaxError: Identifier 'param' has already been declared }
function fn(param) { {
let param; }
}
The global object in JavaScript (window in browsers and global in Node.js) has always been confusing. That’s why in ES6 a distinction was introduced. Consider the following example:
let notGlobal = "hello"; var isGlobal = "what up";
{ console.log(notGlobal); } // hello { console.log(isGlobal); } // what up
global.isGlobal //'what up' global.notGlobal // undefined
All properties of the global objects are global variables. Therefore, in the global scope var declarations and function declarations create such properties. But global variables created using let and const declarations will not be properties of the global object.
Arrow Functions
Arrow Functions are another major syntax update in ES6. Arrow functions are functions defined using a new syntax, the “fat” arrow =>. The arrow is based on a similar concept from CoffeeScript. They help in making code more readable by opting out of the function and return syntax and read the same way the function executes. In this section, we will discuss in detail about how arrow functions are used and when it makes sense to use them.
The basic syntax of an arrow function is as follows:
var fn = data => data;
The first part of the left-hand side of the assignment statement is the argument that is provided to the function. If there is only one argument, you do not need any additional syntax. The next part is the arrow and then the expression that is to be returned. In this case it just returns the argument. The function is effectively equivalent to
var fn = function(data) { return data;
};
Consider another example:
In the code above, we declare a new function called getNumber and assign it using an arrow function. The empty parentheses () denotes that the function has no parameters and finally, the function returns the value 42. In arrow functions, we can leave out the return keyword. The expression specified after the arrow will get returned as long as it is not wrapped in { }.
var getPrice = (quantity, tax) => (quantity * 5) * (1 + tax); console.log(getPrice(2, .095)); // 10.95
Note that you can skip the parentheses () in case of exactly one parameter, but you will always need to use it when you have zero or more than one parameter.
If you want to specify a more traditional function block with more than one expression you need to wrap the body in braces. But you would specifically need to use the return keyword to specify the return value. Check the following code snippet for an example:
var getPrice = (quantity, tax) => { let price = (quantity * 5)
price *= (1 + tax); return price; }
console.log(getPrice(2, .095)); // 10.95
Curly braces represent the function’s body. If you want the arrow function to return an object literal outside the body, you must wrap the literal in parentheses. For example:
var getNumber = data => ({ data: "check", number: 42 });
// effectively equivalent to:
var getNumber = function(data) { return {
data: "check", number: 42 };
};
An object literal wrapped in parentheses shows that the braces are an object literal instead of the function body.
Using Arrow Functions to Create IIFEs
var fn = function(number) { return {
getNumber: function() { return number; }
}; }(42);
console.log(fn.getNumber()); // 42
In the code above, an IIFE is used to create the getNumber() method, which uses the number argument as a return value, ensuring the number property is effectively a private member of the returned object. Something very similar can be achieved using an arrow function as well by wrapping it in parentheses.
var fn = ((number) => { return {
getNumber: function() { return number; }
}; })(42);
console.log(fn.getNumber()); // 42
One distinction to note is that arrow functions are function expressions and are not function declarations. They are anonymous function expressions that have no named reference for the purposes of recursion or event binding or unbinding.
There’s more to arrow functions than just the pretty and cleaner syntax. Arrow functions do save us a few lines of code and characters, but the real purpose of the arrow functions is to handle the this keyword within functions. this behaves differently inside an arrow function. But before we discuss that, in the next section let’s take a look at how the this keyword works in general.
A Tale about this
In JavaScript, this is the current execution context of a function. Let’s take a look at what it means in the following scenarios:
1. Function Invocation
function getContext() {
console.log(this); // Global or Window }
When this is used outside any function scope, it also refers to the global scope. Check the following code snippet:
if (this === window) {
console.log("this refers to the Global context"); }
■
Note
If you’re in strict mode
("use strict"), thiswould be
undefined.
2. Method Invocation
Method invocation means an object’s method is called and in this case, this is the object that owns the method in a method invocation.
let myObj = { name: 'fancy',
operation: function() { console.log(this); }
}
myObj.operation(); // { name: 'fancy', operation: [Function: operation]}
Method Invocation, that is, on calling myObj.operation(), [myObj object] will be printed in the console.
Now, let’s try this:
let x = myObj.operation; x(); // Window
Here, x refers to the operation() method inside [myObj object]. Calling x() would mean that we are making a function invocation instead of a method invocation and therefore, this will refer to the Global (or Window) object.
If we were to call x with the [myObj object] (for method invocation), we will have to use .call() method:
let x = myObj.operation; x(); // Window
3. Constructor Invocation
Constructor invocation happens when an object is created using the new keyword. Consider the following example:
function Employee(name, department, salary) { this.name = name;
this.department = department; this.salary = salary;
console.log("Welcome " + this.name + "!"); }
let john = new Employee('John', 'Sales', 4000); // Welcome John!
new Employee('John', 'Sales', 4000) is a constructor invocation of the Employee function. The result of execution is a new object and this refers to the newly created object.
The constructor function Employee() can be written as a class in ES6 that we will discuss later in this book.
this
in Arrow Functions
Let’s take a look at how this works inside an Arrow function. Arrow Functions are designed to lexically bind the context, which means that this refers to the enclosing context where the arrow function is defined. Unlike a normal function, an arrow function does not create its own execution context, but takes this from the outer function where it is defined. Consider the following code:
function Employee(firstName, department, salary) { this.firstName = firstName;
this.department = department; this.salary = salary;
this.getInfo = function() {
// outer function context = Employee object return function () {
// inner function context = Global object console.log(this.firstName + " from " + this.department + " earns " + this.salary); };
} }
In the above example, we created a constructor function called Employee and created a new employee object called jim using the constructor function with the new keyword. In order to print the employee information, we need to use the function returned by jim.getInfo(). Check the following code snippet:
let printInfo = jim.getInfo();
printInfo(); // undefined from undefined earns undefined
Here, printInfo refers to the inner function and since we are simply making a function invocation, this refers to the Global object that does not have any Employee properties and hence produces undefined whenever a property on this is used.
Let's look at how this behaves differently if we replace the inner function with an arrow function:
function Employee(firstName, department, salary) { this.firstName = firstName;
this.department = department; this.salary = salary;
this.getInfo = function() {
// outer function context = Employee object return () => {
// inner function context = surrounding context = Employee object console.log(this.firstName + " from " +
this.department + " earns " + this.salary); };
} }
let jim = new Employee('Jim', 'Finance', 5200);
let printInfo = jim.getInfo();
printInfo(); // Jim from Finance earns 5200
In this case, the this keyword refers to the context of the function enclosing the arrow function unlike the previous case where it referred to the Global object. At this point, it is important to note that arrow functions do not change their context on invocation. Consider the following example:
function Employee() { this.firstName = 'Mike', this.department = 'HR', this.salary = 4500,
let mark = new Employee();
mark.getContext(); // [Employee object]
let context = mark.getContext;
context(); // [Employee object] (regardless of a function invocation)
In the above example, the context of the arrow function was set on declaration and it cannot be changed. An important thing to note here is that you cannot “rebind” an arrow function. The context is always fixed. Check the following code snippet for an example:
var details = { number: 42,
operation: function () {
return () => console.log(this.number); }
};
var details2 = { number: 84 };
details.operation().bind(details2)(); // 42
In the above example, we are setting the details2 number to 84. But we know we cannot bind a new object to the arrow function. The engine does not throw any error, it just ignores the bind completely. So 42 is printed even if we call the operation method with the details2 object. This also applies to call and apply. So with an arrow function, calls to bind, call, or apply will not be able to change to value of this.
It is clear from this example that inside a function the value of the this keyword cannot be changed. The value of this inside a function will remain constant, but you will still be able to use bind, call, and apply on arrow functions.
var product = (x, y) => x * y;
console.log(product.call(null, 2, 3)); // 6 console.log(product.apply(null, [2, 3])); // 6
var multiply = product.bind(null, 2, 3);
console.log(multiply ()); // 6
■
Note
Normally in JavaScript extra newlines between code do not mean anything and
the code still works properly, but with arrow functions, it is a problem. We cannot put the
arrow symbol on a newline. ES6 forbids a line break between the parameter definition and
the arrow of an arrow function.
Another important aspect of Arrow functions is that they cannot be called with new since they do not have the construct method and cannot be used as constructors. They will produce an error when used with new. Check the example below:
var newFn = () => {},
object = new newFn(); // error - you can't use arrow functions with 'new'
Normally when a function is declared in ES5, it has a prototype property that is used in construction functions. But since you cannot use new on an arrow function, there is no need for a prototype. Hence, functions declared using arrow function, do not have access to a prototype field.
var details = () => 42;
console.log(details.hasOwnProperty("prototype")); // false
Similar to non-arrow functions that do not have duplicate named parameters in strict mode, arrow functions cannot have duplicate named parameters in either strict or non-strict mode.
Using Arrow Functions
So whenever you have a short single-statement inline function expression, with a computed return value and the function does not make a this reference a self-reference, you can replace it with an arrow function.
If you have functions that use the var self = this hack to deal with the this issue, or a .bind(this) call for proper this binding, arrow functions were built to help out with this exact problem. For example, consider the following code snippet where we are waiting for 1 second to toggle btn-active class on btn click.
$('.btn').on('click', function() { var self = this;
setTimeout({
$(self).toggleClass('btn-active'); }, 1000);
Without arrow functions, we will need to store the context in a variable to be able to access it inside our setTimeout function. This can be simply rewritten with arrow functions as this:
$('.btn').on('click', function() { setTimeout(() => {
$(this).toggleClass('btn-active'); }, 1000);
});
Hence, along with shorter and more concise syntax, arrow functions handle the this keyword a little differently, making it easier to manage the code in many situations.
Default Function Parameters
Unlike the common pattern in other languages, functions in JavaScript are unique in the aspect that they allow you to call them by passing any number of parameters irrespective of the parameters declared in the function definition. This gives the developer an opportunity to use any value for the parameters in case no argument is specified. In ES5, if the argument is not specified, its value would be set to undefined. The pattern commonly used to set defaults for unspecified parameters was something like this,
function getSum(a,b) {
a = (a !== undefined) ? a : 1; b = (b !== undefined) ? b : 41;
console.log( a + b ); }
getSum(); // 42 getSum(1, 2); // 3 getSum(10); // 51 getSum(null, 6); // 6
ES6 tries to streamline this process by giving us the ability to set a default value to the parameter in the function declaration statement itself.
var getSum2 = function(a = 1, b = 41) { console.log(a + b);
}
When we call the function, if we do not specify any argument, the default value of the parameter gets used. The syntax to specify a default value is the parameter followed by an equal sign “=” and an expression after that.
var getAnswer = function(number = 42, item = "universe") { console.log(number + " is the answer to " + item); }
getAnswer(undefined, "life"); // 42 is the answer to life
Here, we are passing undefined as the first parameter, and ES6 will use the default value 42 instead.
Function default values can be more than just simple values like 42; they can be any valid expression, even a function call. You can use complex expressions as default values for parameters. Default value expressions are evaluated lazily, meaning they're run only if a parameter's argument is not present or is undefined.
var getName = function(firstName = "John", lastName = "Doe") { console.log(firstName + " " + lastName);
}
getName("Jane"); // Jane Doe
You can also access the other variables in the expression used as the default value.
var defaultName = "John";
var getName = function(firstName = defaultName, lastName = "Doe") { console.log(firstName + " " + lastName);
}
getName(); // John Doe
You can also access a function when specifying a default for an argument.
var getFirstName = () => "John";
var getName = function(firstName = getFirstName(), lastName = "Doe") { console.log(firstName + " " + lastName);
}
In the above few examples, if we try to check the number of arguments:
var getName = function(firstName, lastName = "Doe") { console.log(arguments.length);
}
getName("John"); // 1
Even though the second argument gets a default value, arguments.length only returns the number of arguments passed to it.
Let’s take a look at a little more complicated example:
var getPrice = function(quantity = price, price = 5) { console.log(quantity + ", " + price);
}
getPrice(); // ReferenceError: price is not defined
Think of the function declaration and arguments like a scope. The parameters of a function declaration are in their own scope between the parentheses (...). Do not confuse this with the function body scope. JavaScript has not yet reached the price declaration when evaluating quantity and hence it does not know the value of price. The reference to an identifier in a default value expression first matches the formal parameters' scope before looking to an outer scope.
Like we discussed in the section on let declarations ES6 has a TDZ that does not allow the variable to be accessed before it is initialized. Therefore, in the above example a TDZ reference error occurs when you try to use a parameter before it is declared.
Another awesome feature of the default parameters in ES6 is the fact that they work even when creating a dynamic function:
var getNumber = new Function("number = 42", "return number;"); console.log(getNumber()); // 42
Rest and Spread Operators
JavaScript has always had the feature of allowing functions to be passes fewer or more parameters than formally specified in the function declaration without any problems. Default Parameters, as discussed earlier, help you accept fewer values as parameters and still have the other parameters assigned a value.
■
Note
Do not confuse this term to the web services concept of REST. This has nothing to
do with REST in web services. Rest here refers to gathering up parameters and putting them all
into a single array. Spread refers to spreading out the elements of an array (or even a string).
Let’s look at an example,
var showCollections = function (id, ...collection) { console.log(collection instanceof Array); };
showCollections(42, "movies", "music"); // true
The ... symbol is the rest symbol. It precedes a named parameter. This named parameter will become an Array that will just gather up all the remaining parameters passed to the function. Hence here, Collections is set to an array. To make this more clear if we execute the above program this way,
var showCollections = function (id, ...collection) { console.log(collection);
};
showCollections(42, "movies", "music"); // ["movies", "music"]
The Rest parameter gathers up all the remaining parameters after the id parameter and makes it into an array called collection. Excluding the first defined parameter ‘id’, everything will be placed in the Array.
If we call the same function by passing it just one value which is the id, it logs out an empty array [].
Let’s look the length property of the function. If we call showCollections.length, it will give us the number of parameters in the function.
var showCollections = function (id, ...collection) {}; console.log(showCollections.length); // 1
The length property ignores the Rest parameter. In this case, it is 1. The length property of the function only counts the number of named parameters excluding the rest parameter. Now let's look at the case where we check the arguments.length inside the function:
var showCollections = function (id, ...collection) { console.log(arguments.length);
};
We already had an arguments object, which we can use to check all the parameters passed to a function without having to define each parameter specifically. Remember we can have both named and unnamed parameters in a function. In this case, even though we have two parameters in the function definition, arguments object is going to refer back to the original function call and three is the number of arguments passed to the function.
In the ES4 specification, Rest parameters were meant to replace arguments and arguments object was completely done away with, but ES4 never came into being and in ES6, this concept was reintroduced, but this time the 'arguments' has not been removed from the language.
We can use the Rest operator in a function constructor. Check the following where we are creating a new function that has a rest parameter and returns the very first argument that is passed into it.
var getFirst = new Function("...args", "return args[0]"); console.log(getFirst(1, 2)); // 1
The Spread Operator
The spread operator, which is also denoted by ... before an array, does essentially the reverse operation of a rest operator. It spreads out an array and passes the values into the specified function. Consider the following example:
let values = [200, 300, 400]; let newSet = [100, ...values, 500]
console.log(newSet); // [100, 200, 300, 400, 500]
The spread operator is very closely related to the rest parameters. In this particular format as a spread operator, ... is used like a concatenation or insertion mechanism where the values array is inserted in between existing values to assign the newly formed array to newSet.
In case of the rest parameters, you can combine multiple arguments into a single array, while in case of the spread operator you can specify a single array that can be split into separate arguments that can be passed into a function or method. Let us look at another example using the Math.max() method and the spread operator:
let numbers = [-25, 100, 42, -1000];
console.log(Math.max(...numbers, 900)); // 900
In the above case, Math.max is passed five arguments, the first four being -25, 100, 42, and -1000 and another fifth argument we added 900. The result is the maximum among them which is 900. Therefore, the spread operator spreads out the values in an array as arguments in a function call.
If we try to spread out an empty array, which might be missing two values like [,,] the last comma is considered a trailing comma that is ignored. The parameters spread out would also be undefined. Consider the following example:
function printInput(...input) { console.log(input); }
let input = [,,];
printInput(...input); // [undefined, undefined]
Object Literal Extensions
ES6 introduces some new extensions for Object Literals.
To declare object literals, currently using variables we have to use the following coding pattern:
var price = 4.20, quantity = 20; var invoiceData = {
price: price, quantity: quantity };
console.log(invoiceData);
Declaring price and quantity twice is kind of redundant, but now ES6 offers a shorthand making writing this simpler. Check the following example:
const price = 4.20, quantity = 20; const invoiceData = {
price, quantity };
console.log(invoiceData);
We can just list the field once and the object literal in ES6 is smart enough to interpret that we want a field called price and want the context data set to the value of the variable called price. This shorthand notation reduces code and also makes it easier to read.
ES6 also gives us a short notation to write functions in an object literal. Check the following code snippet, for example:
calculateTotal() {
return this.price * this.quantity; }
};
console.log(invoiceData.calculateTotal());
In the above shorthand notation, you no longer need the keyword function. When we use the function shorthand within an object literal, this refers to the context of the code just like an arrow function. It does not refer to the object that contains the function. It behaves exactly like an arrow function.
Note that you can use dynamic field names in an object literal:
const field = 'dynamicRandom'; const price = 5.99;
const quantity = 2; const invoiceData = { [field]: price, quantity,
calculateTotal() {
return this.price * this.quantity; }
};
console.log(invoiceData); // { dynamicRandom: 5.99, // quantity: 2,
// caculateTotal: [Function: calculateTotal] }
The field in the object gets assigned the name dynamicField. You can actually use an entire expression and make naming properties even more dynamic:
const field = 'dynamicRandom'; const price = 5.99, quantity = 2; const invoiceData = {
[field + "-01"]: price, quantity,
calculateTotal() {
return this.price * this.quantity; }
};
console.log(invoiceData); // { dynamicRandom-01: 5.99, // quantity: 2,
// caculateTotal: [Function: calculateTotal] }
Template Literals and Delimiters
Strings in JavaScript have been historically limited, lacking the capabilities one might expect coming from other programming languages. ES6 introduces Template Literals, which provide you a way to define strings with additional functionalities like:
• String interpolation • Embedded expressions • Multiline strings without hacks • String formatting
Template Literals use backticks (``) rather than the single or double quotes. Template literals, in the end, always produce strings. A template literal can be written as follows:
let user = `Kevin`;
Template literals allow string substitutions that provide us a way to substitute any valid JavaScript expression inside a string. Template Literals can contain placeholders for string substitution using the ${ } syntax. Consider the following example:
console.log(`Hi ${user}!`); // Hi Kevin!
In the above example, the template literal is delimited by backticks (`) and the interpolated expressions inside the literal are delimited by ${ and }.
We can also substitute a lot more than variable names. Template Literals allow us to use expression interpolation to embed readable inline math, for example:
let a = 10; let b = 20;
console.log(`Sum of ${a} and ${b} is ${a+b}`);
Template literals also allow you to add multiline strings easily (without the use of \n):
console.log(`I am line-one I am line-two`);
// I am line-one // I am line-two