Off the Cassette Tape and onto CD:
Migrating Analog Audio Data to Digital Format
David Mead*
This article describes the equipment you will need and the basic procedure for getting recorded material off of cassette tapes and into digital format.
Why migrate?
You have to understand first of all, I’m not a computer techie. When we first came to Indonesia umpteen years ago and started learning the national language, I used two cassette recorder/players, patch cords, and had (and made use of) a large supply of loop tapes and other cassette tapes. To this day, a microphone, a recorder, and the simple magnetic cassette tape is the technology I feel most comfortable with.
Cassette tapes, of course, have their limitations. They come mainly only in 60- and 90-minute varieties. Also, the tape is prone to run out at inopportune times, or you end up with leftover tape on the cassette. And once recorded on, cassette tapes are notoriously difficult to search. In addition, magnetic tape is highly susceptible to mold and to becoming brittle, making it a poor choice for long-term storage
(whether back-up or archiving). Finally, computer programs designed to analyze speech from an acoustic perspective cannot be used while the data remains only on the cassette tape. All these limitations are overcome once analog audio data is converted to digital format.
This article, then, is a practical guide for those of you who know that they should do something about their moldering cassette tapes, but who, like me, have been dragging their feet on the matter. It is written from the perspective of a novice, and I share with you what I’ve learned on the way.1 I hope you find the information helpful. Section 1 tells you what equipment you will need. Section 2 outlines the basic procedure for migrating analog audio data to digital format. Section 3 discusses minor editing of the digital sound file.
*
After completing a Ph.D. degree in linguistics at Rice University in 1998, David Mead returned to the Indonesia Branch where he and his wife had worked in the late 1980s. He currently serves as the Indonesia Branch Linguistics Coordinator and works with a language project on the island of Sulawesi.
1 Particular thanks go to Terry Gibbs (JAARS), Ken Jackson (NAB), Joan Spanne (Director, Language and Cultures Archives),
and Henry and Rosmarie Knecht (VMS Nasuli) for their technical advice, and to Keith Hibbard (Davao Regional Director) who taught me the ropes of working with Cool Edit 2000.
SIL Forum for Language Fieldwork 2007-008, December 2007
Assembling the equipment
If you have data stored magnetically on a cassette tape, and you want to convert that data to digital format, you will need the following equipment.
A good cassette player, that is, a player that will faithfully convert the magnetic data into an electronic signal.2
A patch cord to connect the cassette player with the computer.
Earphones will also be handy, especially if you plan to work in a public place, such as your local SIL office. In some cases, a good microphone may also be useful (for example, to add lead-in explanation to an existing sound file).
A computer. The computer will have to have a sound card (if it has places to plug in a microphone and an input line,3 it has a sound card) and a generous amount of free hard disk space. This last requirement is because digital sound files can quickly grow extremely large—figure about ten megabytes per minute of recorded material. Assuming that you will eventually want to move sound files off your hard drive for backing up or archiving (or simply to free up disk space!), you will need access to some means to do this. In most cases, you will do this by burning sound files onto a CD. (You won’t be able to use your 3½" floppy drive, since even zipped sound files will be too large). If your computer itself doesn’t have a CD writer, then you should plan ahead how you will do this, for example by networking to a CD writer, by transferring to an external hard drive, or—as last resort—even removing your computer’s hard drive and temporarily connecting it to another machine.
A software program for recording and editing sound files. There are numerous programs available, from the high-end, professional Source ForgeTM retailed by Sony (list price $399) down to freeware. The basic functionality you will need in a software program are: (a) record, (b) cut, copy, and paste, and (c)
normalize (see below). Curiously, not every program out there can do these three things; see the end of this article for a review of options.
The program described in this article, Cool Edit 2000TM, can do all these things (plus many others), and do them well. For the past few years it has been the program endorsed by our folks at JAARS Vernacular Media Services (VMS), but in mid-2003 the property rights to Cool Edit were acquired by Adobe. What is essentially the same program now sells under the name of Adobe AuditionTM, at a price which might put it out of the range of many of our members.4
2
We suggest that you not try to convert old reel-to-reel tapes yourself. One of the difficulties with these tapes is finding a machine that will maintain a consistent speed to play them on,. If the tape is not played at a constant speed, errors will be introduced into the digital file which can never be removed. Even some cassette tapes, if the tape is particularly old and brittle or otherwise damaged, would better be left to a professional. Commercial contractors who provide such services can be found on the web, for example http://www.soundsaver.com/. SIL personnel should inquire first with JAARS VMS.
3 I have discovered that some recent laptop computer models have a microphone jack, but not a line in jack. You will need a line
in jack.
4
Adobe Systems Incorporated acquired the technology assets of Syntrillium Software in May 2003. On August 18th, 2003 Adobe released a rebranded version of Cool Edit Pro 2.1 as Adobe Audition™ software. The Syntrillium.com website states: “If you own Cool Edit Pro 2.x, you can download a complimentary upgrade to Adobe Audition. To download and install Adobe Audition, you will need to provide your Cool Edit Pro 2.x serial number and have Cool Edit Pro 2.x installed on your computer. If you own Cool Edit 2000 or Cool Edit Pro 1.x, you can purchase an upgrade to Adobe Audition for just $99. You can purchase
I was pleasantly surprised when I finally got around to installing a sound editing program on my
computer. Then, with just my computer plus a microphone, I discovered that I had all the functionality of my old two-cassette player/recorder-patch cord-loop tape setup, and much more!
Migrating from audio to digital format
Assemble your equipment. Use a patch cord to connect the cassette player to the line in jack of your computer’s sound card. If you are using headphones, plug them into the headphone jack. Start your computer and open your sound editing and recording program. You are ready to begin the process of converting your analog data on cassette tape into digital format.
The following steps are written in terms of using the specific program Cool Edit. However, the general procedure is the same for all sound editing programs. For each recording, the basic migration process has three steps: adjusting the record volume level, the recording itself, and finally normalizing and saving the file.
Step 1: Adjusting the volume level
Adjusting the record volume level is the most complicated step, because like most sound recording and editing programs, Cool Edit itself does not directly control volume levels (either record or playback). Instead, you have to adjust these through your computer’s sound card mixer. Here’s how to do it.
(a) Across the very bottom of the Cool Edit interface is a scale, marked off in decibels (dB), from some negative number up to zero. These are your level meters for left and right tracks. Double-click within the meter area, and two quivering red lines will appear. These show you what the recording levels would be if you were recording at the moment (but you are not).
(b) Turn your cassette player on. The red lines should jump to a higher level. This is the basic noise level of the system as you have it set up. If you are in the range of -40 dB, everything is fine. Professionals, using the best equipment and recording directly into digital mode, might have a system noise level of -60 dB or lower. Unfortunately, even the best equipment can’t help you, since there is already noise on your cassette tape, and this will be the source of most of the noise in the final digital file. Therefore in your case, achieving a low amount of system noise is not that vital.
(c) Start the cassette tape, playing (a sample of) the material which you would like to record. The Cool Edit level meters (red lines) should become much more active. If it pegs out at zero, the very right tip of the level meter also turns (and stays) red. This means that the record volume is too high (technically, the signal is overloaded, or as some say in recording lingo, you’re “too hot”). Click on this rightmost red portion (the overload indicator) whenever you want to turn it back to black. If you persist with recording an overloaded signal, you’ll end up with truncated waveforms, as shown in Figure 2. To avoid truncated waveforms (highly recommended!), adjust the record volume level (see below).
Figure 2. A truncated waveform
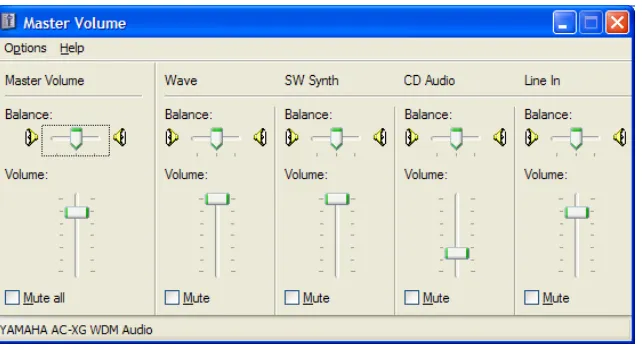
(d) Open your sound card’s volume control (within Cool Edit, try Options, Windows Mixer;
alternatively, right-click the speaker icon on the Windows task bar, then Open Volume Controls; or try Start, Control Panel, Multimedia, Audio, where you should find some way to open the volume controls). My volume control mixer interface looks like this:
Figure 3 Volume control mixer interface
(e) Under Options choose Properties, then select Recording, and put checks in the boxes for microphone, line (in), and loop back, then select OK.
(f) Select Line (in). As you move the volume level, you should see a corresponding change in the Cool Edit level meters. Ideally, you want the highest peaks on the Cool Edit level meters to reach to about -3 dB.
Step 2: Recording
The actual recording process is simple, because in the lower left-hand corner of the Cool Edit interface is a set of control buttons that look just like the buttons on a cassette recorder. The first step, though, is to open a new file. Within Cool Edit, choose File, New, and in the ensuing dialog box select 44,100 (sample rate), stereo (channels), and 16-bit (resolution). This combination of values is known as “standard CD quality,” and can be played by all sound cards (your sound card may have a distaste for certain nonstandard combinations). These standards are also sufficient for archiving purposes (though some archivists suggest a rate of 96,000 samples per second). The sample rate refers to how many times the input waveform is sampled per second. At 16-bit resolution, a single sample can have one of 216 = 65,536 possible amplitude values.
Next, start the tape on the cassette player. Listen to the tape on your headphones, and when you reach the point where you want to begin recording, click on the record button (with the red circle) in the bottom left corner of the Cool Edit interface. Click on the stop button (with the black square) when you want to end recording. It’s okay to start recording a bit early and stop a bit late, because as explained in the next section you can always edit out extra material. If during the recording process you would like or not like to see the waveform as it is being created, make sure under Options, Setting, General that the “live update during record” option is/is not selected.
It is better not to record more than thirty minutes into a single digital file and best to keep each recording under twenty minutes. Cool Edit has been known to do strange things with large sound files. Do not expect to get one entire side of a ninety minute cassette tape (viz., forty-five minutes) into a single sound file. 5
Step 3: Normalizing and saving the file
The final step is to normalize and save the file. Normalizing simply means amplifying the sound so that the loudest sounds do not surpass a certain preset level. To normalize the file within Cool Edit, go through these steps:
The normalizing process will bring the highest peaks to -1 dB and adjust everything else accordingly. Save the digital sound file as you would a document from some other program. The most important thing to remember is that in the Save As Type box, make sure that Windows PCM (*.wav) is selected. (Caution, some other formats also use the wav extension!) It is fine to leave the “Save extra non-audio information” unchecked.
If you are new to Cool Edit and you saved your sound file as, say, Xxxx.wav, you may notice that next to it is another file, named Xxxx.pk. The extension pk stands for “peak”, and peak files simply contain information that helps Cool Edit load corresponding wav files faster than otherwise. You can keep the .pk
5
file around, or you can safely delete it. Under Options, Settings, System, you can also turn off their creation altogether.
Editing the digital sound file
Because in sound editors the sound file is displayed visually in a waveform display box, copying, cutting, and pasting work much the same as in a text document. (Be aware that in Cool Edit <ctrl>-L lets you work with just the left track, while <ctrl>-R does the same for the right track; click within the nonhighlighted track to unselect, or use <ctrl>-B to work with both).
You can clean up a file by cutting dead portions from the beginning and end of a sound file. You can also cut dead time from the middle of a sound file, but please heed the following cautions. First, if you choose to cut from the middle (or transform, or otherwise edit only a section) of a sound file, after making your selection, in Cool Edit go to Edit, Zero Crossings and adjust so that both boundaries of your selection lie at zero crossings. Otherwise, you may end up inadvertently creating a discontinuity in the wave form, which will be heard as a “click” when played back.
Figure 4. A discontinuity caused by not setting selection boundaries to zero crossings
Second, when we record someone telling a story, timing, pitch, and volume are part of the “raw” data that we want to preserve. When preparing a recording for easier listening (say, for public broadcast), we would want to do things such as eliminate long pauses and amplify portions where the speaker spoke softly. However, this removes linguistic data that would be better left preserved in our archived records.
Likewise, noise reduction filters, if set wrong, can remove acoustic information that native speakers make use of (though the recording may sound fine to our ears). For such reasons, archived sound files should be kept as close to the original as possible, and careful note should be made about any important
modifications along the way.
Mono or stereo?
A digital sound file can be saved in either mono channel or stereo channel mode. To visually see the difference between the two, take one of your newly created stereo wav files and within Cool Edit select Edit, Convert Sample Type, and choose mono (leaving the other settings unchanged). You now have a mono (single track) file that has merged the left and right tracks of your original file. Now select Edit, Convert Sample Type and choose stereo. You now have a stereo file with identical left and right tracks. At this point, to preserve your original file, click on File, Close without saving changes.
There are reasons for keeping your data in mono format. First, a mono wav file is only half the size of a corresponding stereo file. This can be a substantial savings, considering the size of most sound files. Because they are smaller, mono files also take less time to load. And in our line of work—where
recordings are typically made with a single microphone—converting to mono format usually involves no loss of data. If, on the other hand, you recorded a live performance with two microphones, with
In fact, look again at one of your new stereo sound files. It sometimes turns out that one track is
considerably weaker than the other—or perhaps even (nearly) empty. If this is the case, then converting to mono format is even preferred. The procedure is the same as outlined above, except under Edit, Convert Sample Type, rather than using a fifty-fifty mix of left and right tracks, use a hundred-to-zero percent mix.
Converting between mono and stereo mode with Cool Edit is so effortless that I hardly hesitate at all to save things in mono mode. Bear in mind that if you go directly from mono digital back to cassette tape (say you are making a cassette master from a sound file on your computer), you will need a patch cord with a mono to stereo bridge.
Clicks and pops
Crackles and pops go well with breakfast cereal, but you’d rather not have them in your electronic sound files. Not only do they grate on the ears; large pops (even a single one) can interfere with the process of normalizing a wav file just described above. Clicks and pops are fairly easy to eliminate if they occur in dead space because you can cut them out of the electronic file or replace them with a flat signal (silence), but they are problematic when they occur in the midst of speech or music. Unfortunately, nice click detection and repair algorithms come only with the high-end (higher priced) sound editors. If you have problems with pops, clicks, or static on a recording, you may have to find a friend with one of these programs, or contact your local VMS department.
By the way, here are two practical tips for when you are recording. Supply the person you want to record with a glass of water to drink, and you’ll avoid the small pops associated with dry mouth. Likewise, you can avoid background rustling simply by having papers placed on a stand, rather than held in the hand. See Maddieson (2001) for additional practical advice about making recordings in the field.
Saving to formats other than Windows PCM (wav)
Mostly you will want to work with wav files which have been saved in Windows PCM format. PCM stands for “pure uncompressed pulse code modulation formatted data.” Uncompressed data is great for maintaining fidelity and uncompressed data is also the standard for archiving! Other formats (even some other formats which use the wav extension) involve compression schemes to make the files smaller, but which invariably degrade the sample quality to a greater or lesser extent. You should consider saving to some other format only as an “output” process when you have reason to do so, always being sure to keep the original, uncompressed wav file.
Here’s a bit about two other sound file formats you are likely to come across. An MPEG Layer 3 (.mp3) file is created using one of certain compression schemes. MPEG Layer 3 files have the advantage of being about a tenth the size of corresponding wav files. This means that instead of the seventy-four minutes of sound per CD typical of standard wav files (or double that, if mono format), you could get over twelve hours of sound on a single CD! For the same reason, mp3 files are great for sharing as email attachments or over the internet. However, you can never uncompress an mp3 file back to wav format without loosing fidelity, and in particular you will lose information about higher frequencies, which can never be restored. (To see this graphically, in Cool Edit select View, Spectral View, then compare an mp3 file with the wav file from which you created it.) Buried in its help files, Cool Edit carries this warning: “Opening and re-saving an mp3 file will cause it to be compressed again, causing the artifacts that are part of the
If you save wav files to a CD, your computer will be able to play the files but a CD player will not. To play on a CD player (for example, if you want to distribute music, folktales, or Bible recordings on CD), your files will need to be in CD Audio (.cda) format. A CD Audio file consists of a 1 kb. wrapper with instructions on how to play an internal file, which is always an uncompressed “standard CD quality” wav file (viz. 16-bit stereo using a sample rate of 44,100 bps). You cannot save to cda format within Cool Edit, but there are several other programs available on the market for doing so (Roxio’s Easy CD CreatorTM is one of the more popular professional programs). Before spending money on one of these programs, however, you should check to see if your computer already has this capability, since many CD writers are smart enough nowadays to save wav files in cda format. In fact, a friend of mine recently tried copying several wav files from her computer’s hard drive to a recordable CD, only to discover that they had
automatically all been saved as cda files! (To save them as wav files, she had to tell the CD writer that they were data files, not music files.)
A program such as CDex (freeware) can act as a “CD ripper,” that is, a program which strips the wrapper off a cda file and restores the internal wav file.
Finally, while you will be doing most of your work with sound files that are of standard CD quality, by way of comparison here are a few other standards:
Digital Audio Tape (DAT) 48,000 bps, 16-bit, stereo Standard CD quality 44,100 bps, 16-bit, stereo
Archiving quality 44,100 (or 96,000) bps, 16 bit, mono or stereo AM Radio quality 22.050 bps, 8-bit, mono
Telephone quality 11,025 bps, 8-bit, mono Voice modem quality 8,000 bps, 16-bit, mono
This brief guide hasn’t told you everything about electronic sound recording and sound files, but hopefully it has given you enough information to get you started. Enjoy your foray into electronic sound—it’s likely to become a prolonged stay!
Appendix: Some other programs for recording and editing sound
I downloaded some other sound recording and editing programs, specifically looking at their suitability for getting material off cassette tapes and into electronic format. The following notes are therefore not intended to capture the full range of capabilities of these programs. These notes also give some tips on how to perform various functions within the concerned program. The first two programs are
recommended above the others. One is specifically not recommended.
Audacity v1.0.0 (freeware) Recommended. Download at: http://audacity.sourceforge.net/
Comments
Goldwave v5.06 ($40.00) Recommended. Download at: http://www.goldwave.com/.
Comments
Goldwave v5.06 supports wav, mp3, and other formats. Record in mono or stereo mode. Prior to recording, you must specify the length of time you want to record. To save left (or right) track as mono, choose Edit, Channel, Left (or Right); then Edit, Copy; then Edit, Paste New. To normalize the wave signal, choose: Effect, Volume… Maximize. This program also has a noise reduction filter and a rudimentary pop/click filter. The Help menu is clearly written and the interface is easy to use. A trial (shareware) version is available.
RockN Audio Editor v2.7 ($19.95).
Download at: http://www.rocknaudio.com/RockN_Audio_Editor.htm.
Comments
The RockN Audio Editor v2.7 supports wav, mp3, cda, and other formats. Editing features include cut and paste and other effects. It can do normalization to –0.5 db (only one preset level available). It does not set selections to zero crossings, but under Setup, Data, you can have all edit boundaries smoothed by cross-fading. Includes CD ripper. RockN Wav Maker v2.8 ($9.95) is similar but supports wav format only. The trial version allows you to open the program ten times, with each session limited to 15 minutes.
Audio Edit (Audio Editor/Sound Recorder) v3.4 ($24.00). Download at: http://www.audiosoftware.org/.
Comments
Audio Edit (Audio Editor/Sound Recorder) v3.4 will export into wav and mp3 formats. Left and right tracks are displayed as a single track (cannot be separately edited). There is easy conversion between mono and stereo format and different sampling rates. It handles three levels of undo/redo. Various affects are available, but a ‘normalize’ function seems to work in a non-standard way.
Soliton II v2.3.1 (freeware).
Download at: http://biphome.spray.se/baxtrom/soliton.htm.
Comments
Soliton II v2.3.1 works exclusively with wav files. It has only a Simple record feature. Simple edits include normalizing, changing the sampling rate, and also some basic filters and effects. It has no cut or paste function and no undo function. Use a left click to set the left end of a selection, and a right click to set the right end of a selection (zero crossings have to be eye-balled). There is no help file, but the interface is fairly intuitive.
Speech Analyzer v2.5 ($19.95) (also available on the Word & Deed 1.2/1.3 CD) can be purchased at:
http://www.ethnologue.com/tools_docs/speech_tools.asp.
Comments
Speech Analyzer v2.5 is a great program for language learning and acoustic analysis, but its editing capability is limited to cut and paste. It has no normalizing capability. Selections are automatically set to zero crossings. Recordings are saved in wav format, mono track only.
Pratt v4.1.28 (freeware).
Download at: http://www.fon.hum.uva.nl/praat/.
Comments
Audio Record Wizard v3.8 ($24.95) NOT recommended. Download at: http://www.nowsmart.com/arwizard/.
Comments
Audio Record Wizard v3.8 supports microphone, line-in, and other sources. Recordings can be saved in wav or mp3 format. Does not have any editing capabilities. A trial version allows for recording up to 3 minutes of sound.