Postal Address: FEED FORWARD PUBLICATIONS, PO Box 578, BENTLEY, West Australia, 6102. E-mail Address: [email protected]
BELT BUCKET ELEVATOR DESIGN NOTES
DISCLAIMER
These notes are intended to assist and provide direction in the process of designing belt bucket elevators. They are not a substitute for conducting a thorough engineering analysis of the design requirements. Because the author
and publisher do not know the context in which the notes are to be used and cannot review the resulting design they accept no responsibility for the consequences of using them.
The author claims copyright over all the material in these notes – 15 March 2001.
CONTENTS OF DESIGN NOTES
1.0
Overview of belt bucket elevators and their use.
2.0
Determine throughput capacity.
3.0
Determine belt speed and throw.
4.0
Calculate motor power.
5.0
Calculate top and bottom pulley shaft sizing.
6.0
Drive arrangement and design.
7.0
Shaft bearing and seal arrangement.
8.0
Selecting elevator frame structural members.
9.0
Inlet and outlet chute design.
10.0
Considerations in choosing panel materials.
11.0
Selecting belts and buckets.
12.0
Methods to take-up belt tension.
13.0
Protection against bogging the buckets.
14.0
Clean-out considerations.
15.0
Dust extraction requirements.
16.0
Installing the bucket elevator in place.
17.0
Correct operation of belt bucket elevators.
Postal Address: FEED FORWARD PUBLICATIONS, PO Box 578, BENTLEY, West Australia, 6102. E-mail Address: [email protected]
The left-hand column provides descriptive text.
NECESSARY INFORMATION Required product parameters. Service use.
Material chemical name.
Bulk density – mass/volume – kg/m3 Maximum duty – kg/hr or m3/hr Maximum lump size - dimensions
average size
percentage of lumps in total Height product is to be raised (meters) and angle of incline if any. Provide enough height at the outlet of the discharge chute so the product is always falling following discharge. Product characteristics – abrasiveness
flowability – free/cohesive/slug dampness – % moisture friability – firm/breaks/powders
Operating environment, location and conditions – corrosive/damp
Service required – continuous/intermittent. Open or closed boot design.
SELECT BUCKET SIZE AND SPACING
The size and number of buckets is determined from the required throughput using an iteration process.
Select the bucket from the range in the bucket supplier’s catalogue. Only 2/3 (67%) of the bucket’s design capacity is used in calculations.
Centrifugal discharge conveys usually have a spacing between buckets that is 2 to 3 times the bucket projection, though the spacing can be greater for free-flowing products.
DETERMINE BELT SPEED
The bucket spacing times the number of buckets per second determines the required belt speed. The speed for centrifugal bucket elevators is usually in the range of 1 m/s to 2 m/s to insure the product throws into the chute at the head pulley.
CALCULATE HEAD PULLEY DIAMETER A simplifying assumption is made that the throw
commences at the top of the head pulley. At this point the centrifugal force and gravity force are balanced.
Centrifugal force = Putting both forces equal to each other - The right-hand column provides an example.
The right-hand column provides an example.
NECESSARY INFORMATION Product parameters.
Raise crushed product from mill outlet to storage silo. Aluminium Sulphate.
5.5 m including length of discharge chute into 4 m high storage silo.
Intermittent – up to 12 hours per day 6 days a week Open boot bottom, elevator will sit on a concrete floor. SELECT BUCKET SIZE AND SPACING
5,000 kg/hr throughput.
Select a bucket 150 mm wide x 100 mm projection with a volume of 0.78 litre.
Using 2/3 of the volume give a capacity of 0.5 litre. 0.5 lt. is 0.0005 m3 and holds 0.85 kg of product. (0.0005 m3 x 1700 kg/m3).
To move 5000 kg/hr using 150 x 100 buckets requires 6,000 buckets per hour or 100 buckets per minute. Select a bucket spacing of 300 mm.
DETERMINE BELT SPEED
100 buckets per minute/60 sec per minute = 1.7 bucket/sec. 1.7 bucket/sec x 0.3 m = 0.5 m/sec. This is too low and will prove to be insufficient for a clearance throw into the discharge chute. The bucket spacing will need to be increased and the calculation repeated.
CALCULATE HEAD PULLEY DIAMETER
The head pulley diameter is 50 mm. This size, though accurately calculated, is not practical. It is far too small. The buckets cannot deform sufficiently to go around the pulley without over-stressing both buckets and belt.
Postal Address: FEED FORWARD PUBLICATIONS, PO Box 578, BENTLEY, West Australia, 6102. E-mail Address: [email protected]
CALCULATE THROW INTO CHUTE AND CHUTE SIZE
Using the standard trajectory formula s=u⋅t+0.5⋅a⋅t2
Where s = displacement (m) u = initial velocity (m/s)
a = acceleration (m/s2) = gravity constant g = 9.8 m/s2
t = time (sec)
The trajectory after the product leaves the bucket can be graphed and the chute height determined.
The horizontal component at top dead centre of the pulley where acceleration due to gravity in the horizontal direction is zero is given by sh =u⋅t meters.
The vertical component at top dead centre where velocity in the vertical direction is zero is given by 2
5 . 0 a t
sv = ⋅ ⋅
meters.
The distance of the chute from the vertical center of the head pulley must be sufficient to allow the buckets to clear the wall of the elevator on the downward leg.
DETERMINE THE DRIVE ARRANGEMENT
With the head pulley size determined and the linear belt speed known, the RPM of the head pulley can be calculated.
Usually a 4-pole motor at 1450 RPM with a reduction gearbox of suitable ratio is selected to drive the head pulley. The gearbox can be a direct drive or shaft-mounted unit depending on the available space and access.
The belt velocity using a bucket spacing of 700 mm with the removal rate of 1.7 bucket/sec x 0.7 m = 1.2 m/sec. The pulley diameter is now
mm r
d = ⋅2=(1.22⋅9.8)⋅2=300
. The diameter could be made slightly larger if so desired.
CALCULATE THROW INTO CHUTE AND CHUTE SIZE
Calculate the horizontal and vertical position of the product for every 0.1 seconds of flight time.
TIME
From the table it is noted that after 0.2 seconds of flight the product has traveled 240 mm horizontally from top dead centre and 195 mm vertically. The pulley radius is 150 mm which means the product is clear of the pulley by 90 mm. But it is not yet clear of the 270 mm radius circle scribed by the lip of the bucket (allowing for belt thickness).
This distance is reached shortly after 0.2 seconds. A satisfactory chute depth would be 600 mm, with the chute opening starting 350 mm from the vertical centre of the head pulley. This makes the bucket elevator 700 mm deep. Because of the 150 mm width of the buckets a 175 mm wide belt on 200 mm wide head pulley will be used. To provide clearance to the wall the elevator it will be 250 mm wide.
Postal Address: FEED FORWARD PUBLICATIONS, PO Box 578, BENTLEY, West Australia, 6102. E-mail Address: [email protected] Combining the above tension equations allows T1 to be
determined.
The weight of the rubber belt depends on the ply of the belt, its width and length. Since the belt tension is know the belt can be selected. The belt supplier can advise the belt to be used. Select a belt specifically for bucket elevators and not horizontal conveyors. Those used on bucket elevators contain more weaving than those for horizontal conveyors. Select the belt with a safety factor beyond the calculated loads for long life under intermittent and shock load conditions.
The shaft undergoes both bending and torsion simultaneously.
The bending and torsional stresses are combined into an equivalent stress Se in the formula -
p
where M = largest bending moment Nm T = shaft torque
Kb= shock factor bending Kt = shock factor torsion
Kcb = stress concentration factor bending Kct = stress concentration factor torsion Fs = allowable shear stress (MPa) Zp = polar section modulus = ✁ d
3
/16 for a solid bar
The maximum allowable shear stress is half the maximum principle stress. In addition a factor of safety of 2 for shock loading and stress raisers is included.
For rotating shafts under minor shock loads Kb varies from 1.5 to 2.0 and Kt varies form 1.0 to 1.5. In heavy shock load conditions Kb varies from 2.0 to 3.0 and Kt varies form 1.5 to 3.0. Stress concentration factors can be found from stress concentration graphs for the form of stress raiser involved.
The force at the head pulley drive sprocket is in the proportionate ratio of drive train sprocket diameters.
η
The load on the bearings is the sum of the belt tension and the drive force considering their direction of action.
The pulley and shaft self self-load and the belt material loads will need to estimated and later checked if suitably accurate.
The buckets are 150 mm wide so the belt will be 175 mm wide inside a 225 mm wide elevator frame. The elevator height is 5.5 m and the belt length about 12 m. For the purpose of the example a 4-ply 36-oz belt will be used with a mass of 0.0018 kg/mm width/metre length/ply.
A 12-metre, 175 mm wide, 4 ply belt weighs 15 kg and produces 150 N downward force.
The mass of the head pulley can be estimated by assuming it will be made of 300 mm diameter steel pipe of 12 mm thickness with end plates of 12 mm thick flat plate. The shaft will be assumed to be 50 mm solid bright steel bar 400 mm long. The head pulley mass is calculated at 22 kg and 220 N force. It can be seen that the self-load forces are minor when compared to the product load generated forces.
The free-body diagram can now be completed with all the forces acting on the shaft. With the drive and load forces known the reactions at the bearings can be determined by balancing the moments at each bearing. The shear force and bending moment diagrams for the shaft can be drawn to indicate the position of the highest bending stress.
The highest bending stress is at the drive-end head pulley hub.
At the same time the shaft is undergoing torsional stress from the drive. The worst case under torsion would be if the buckets were bogged and the geared motor applied full power of 1.1 kW. This produces a torque T at the pulley shaft of
Postal Address: FEED FORWARD PUBLICATIONS, PO Box 578, BENTLEY, West Australia, 6102. E-mail Address: [email protected] SHAFT BEARING AND SEAL ARRANGEMENT
Once the shaft size is determined the bearing size can be selected. Follow the bearing manufacturer’s selection process for calculating the required bearing type and configuration for the equipment design life and service factors.
Provide shaft seals for the bearing at the bearing housing and at the penetration into the elevator frame. The bearing must ne ver be exposed to dust or dirt or moisture while in the production environment. Do everything necessary to protect the bearing. The bearing and seal suppliers can advise other ways of mounting and protecting the bearing.
The best bearing arrangement design is to stand the bearing off the elevator frame with a clearance of around 25 mm.
ELEVATOR FRAME MEMBERS
The frame can either be made of an angle iron skeleton to which sheets of steel are attached or from sheets of steel pressed to the required rectangular shape that are flanged and bolted together.
The thickness and lengths of section used in the frame must be sufficient to prevent buckling under load.
INLET AND DISCHARGE CHUTE DESIGN
The inlet chute should be designed to promote product flow and to minimise the amount of bucket drag. Preferably the product feed falls into the buckets as they come around the tail pulley without being dragged through a fully plugged boot.
The feed chute should be made with a slightly smaller width than the buckets. It should be sufficiently steep to insure product always flows and does not build back. Test the product’s flowability if possible by putting some on a bent sheet of the elevator chute material shaped into a ‘U’ the same width as the chute. Tilt it to find the angle that produces flow.
Insure there are no restrictions or protrusions into the chute that will cause the product to build back.
The discharge chute size is known from the initial design. The angle at which it is set must meet the same criteria as the inlet.
HEAD AND TAIL PULLEY DESIGN
The head pulley dimensions have been determined. For simplicity the tail pulley should be to the same dimensions as the head pulley. This will keep the buckets a constant distance off the elevator wall and aid product pick-up and simplify chute design and fabrication. Both head and tail pulleys need to be crowned to centralise the belt and permit the belt to be tracked if it wanders. The crowning should be 2 degrees both left and right from the center of the drum.
The head pulley could be rubber lagged if desired to increase the coefficient of friction and lower the belt tension. This will allow use of a lighter duty belt. But there is always the possibility the lagging will be stripped off during operation. It is best to design for a metal drum and use lagged pulleys only when detection of bogged conditions is installed.
Ribbing can also be mounted on the top pulley to increase friction and act by ‘digging’ into the rubber belt and producing a grabbing effect. The ribs are placed across the full axial length of the drum and positioned so that at least two ribs are always in contact with the belt. The rigs should be 3 mm to 4 mm high and contoured into the drum so as not to rip the belt.
The tail pulley should be a self-cleaning design. This can be achieved in two ways –
- constructing the pulley drum of 20 mm or 25 mm round bars of length wider than the belt. The bars are spaced around the end plates with gaps for product to fall through. Size the spacing between ribs with sufficient clearance for small product to fall through. Larger product will not fit through the gaps.
- provide a twin opposed-cone hub with the cone’s base starting at the center and tapering to the shaft at the ends of the pulley. 20 mm or 25 mm round bars are welded to the outer rim of the cones and gussetted back to the cone wall for stiffness.
Postal Address: FEED FORWARD PUBLICATIONS, PO Box 578, BENTLEY, West Australia, 6102. E-mail Address: [email protected]
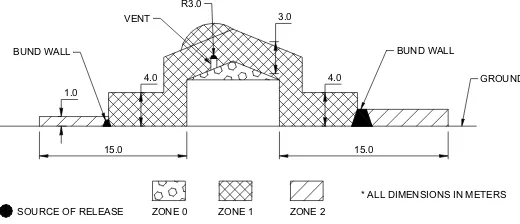
HAZARDOUS ZONES
The designation (naming) of the zones reflect whether the hazard is a flammable gas or an explosive dust and the likelihood that a hazard will be present. For a gas/vapour the zones and their definition are listed below.
• Zone 0 – a volume of space an explosive gas atmosphere is continuously present. An example is the vapour space in a fuel storage tank.
• Zone 1 – a volume of space an explosive gas atmosphere occurs periodically in normal operation. An example is while filling the fuel tank of a car.
• Zone 2 – a volume of space an explosive gas atmosphere is not normally expected and if it does occur, it will only be present for a short period of time. An example is a spill from overfilling a car fuel tank.
Figure No. 1 Zone classification for a flammables tank.
For dusts the zone designations are noted below and reflect the probability of the occurrence of an explosive mixture.
• Zone 20 – a volume of space where a combustible dust cloud is present for lengthy periods during normal operation or layers of combustible dust will form. An example is inside a dust collector.
• Zone 21 – a volume of space where a combustible dust cloud is likely to occur during normal operation or layers of combustible dust will gather during operation. An example is beside a 25-kg bag filling-head.
• Zone 22 – a volume of space where due to abnormal conditions a combustible dust cloud may occur infrequently and for short periods of time or layers of combustible will gather over an extended period of time. An example is inside a grain milling room that gradually accumulates dust over years of operation.
Once the zone is designated the appropriate hazard protection measures suited to the zone must be applied.
MINIMISING SURFACE TEMPERATURES
To prevent hot surfaces from causing gases and dusts to ignite, their temperatures must be kept below the ignition temperature. Electrical apparatus, like motors, build up heat in operation. Their surface temperature rises and unless they are properly selected for the hazardous area they may introduce an explosion risk.
Electrical equipment can be designed and built to a specific temperature class that limits the maximum surface temperature. There are two designations within the surface temperature classification system. Group I apparatus are used in the mining industry and Group II equipment are used everywhere else. Within Group II there is a second rating system known as the maximum surface temperature designation and is shown in Table No. 1.
T1 T2 T3 T4 T5 T6 450oC 300oC 200oC 135oC 100oC 85oC
Table No. 1. Maximum Surface Temperature
EXPLOSION PROTECTION TECHNIQUES
As already noted the three requirements that must coincide for an explosion to occur are - the presence of a fuel, at the right concentration to burn, when ignition is present.
One explosion control principle is to purposely introduce a non-flammable atmosphere into the process. An example is the use of inert nitrogen or carbon dioxide gas to replace air inside reactors mixing flammable chemicals or inside mills grinding explosive powders.
15.0 15.0
3.0 R3.0
VENT
BUND WALL BUND WALL
GROUND 1.0
4.0 4.0
ZONE 0 ZONE 1 ZONE 2
* ALL DIMENSIONS IN METERS SOURCE OF RELEASE
Postal Address: FEED FORWARD PUBLICATIONS, PO Box 578, BENTLEY, West Australia, 6102. E-mail Address: [email protected]
B e l t c o n v e y o r t u n i n g .
ABSTRACT
Belt conveyor tuning. A belt conveyor is a moving surface used to transport product from one end to the other. In its basic form it consists of a driving head pulley, a tail pulley, the moving belt, support rollers, cleaning devices, tensioning mechanisms and a structural frame. Though simple in concept its many components need to work together as a system to get the best performance and operating life. Critical to that is an understanding of how to care for a belt conveyor and tune it for successful operation.
Keywords: materials handling, bulk material transport
Belt conveyors are used to transport anything from matches to bulk material such as iron ore and quarried stone. The belt can be made of natural fibres, rubber, plastic or metal. Regardless of its construction and purpose there are basic requirements to its successful operation that must be met.
How a Belt Conveyor Works
Figure No 1 is a simple sketch of a belt conveyor. An electric motor and gearbox turn the head drum (or head pulley). The belt is pulled tight to produce friction between it and the head drum. The friction overcomes the load and drag forces and the belt moves around the circuit from the head pulley to the tail pulley and back to the head pulley.
Figure No. 1. A Basic Belt Conveyor
Only friction is used to drive the belt. If the friction falls the belt will slip or stop moving even though the head pulley keeps turning. The friction between the belt and pulley depends on the friction properties of the surfaces in contact, the amount of surface in contact (the arc and width in contact) and the tension in the two lengths of the belt.
The loaded side of the belt is the tight side and the return side is the loose side. The tight side needs to carry as much tension as possible to minimise the load on the drums, the shafts and the bearings. Getting the maximum friction possible between belt and head pulley does this.
Often a head pulley will be herringbone grooved or coated in rubber (or other such treatment) to increase the friction. Another option is to increase the arc of contact. A jockey (snubber) pulley is placed under the slack side close to the drum. By lifting the return belt higher so it comes off the head pulley further around the circumference the contact area and hence the friction is increased.
Tensioning the belt also increases friction. This can be by jacking the head and tail pulleys further apart and forcing the belt harder against the drums or by making the slack (loose) side tighter. Tightening the slack side goes against the ideal of keeping the slack side tension low and the tight side tension high. If the loose side is used for tensioning, the load carrying components are made larger to take greater forces.
Maximising Belt Conveyor Operating Life.
Once a belt conveyor is designed and installed it is there for years to come! The very best practice to adopt to promote long, trouble-free life is to be sure that the designer has designed it with quality components that can handle the entire range of forces generated in its use. One way to insure that is to engineer every part taking a load and then review the design calculations and the component selection using independent, experienced equipment users and maintainers querying the designer for the assumptions, reasons and proof behind each design selection.