• Table ofContents • Index
JSP™ and XML Integrating XML and Web Services in Your JSP™ Application
By Casey Kochmer, Erica Frandsen
Publisher : Addison Wesley Pub Date : March 19, 2002 ISBN : 0-672-32354-0 Pages : 592
The first Internet revolution was all about delivering information to people. We are now in the second
revolution, which focuses on delivering information to systems. XML is the tool that makes this new revolution a reality, and Web services are the methods by which
businesses will drive system-to-system communication. JSP(TM) and XML takes you beyond the basics, giving you practical advice and in-depth coverage. In the book, you'll learn the technologies and techniques needed to create your own Web services for use in JSP applications. Written by programmers for programmers, the book will help you successfully utilize these exciting technologies with minimal hassle and maximum speed.
Using JSP with a Database Other Considerations Basic Design Concepts
Chapter 3. Understanding Web Services What Is a Web Service? The Relationship Between XML and JSP
Chapter 7. Successfully Using JSP and XML in an Application Using a Java Representation of an XML Document
Why Not Just Use SAX or DOM?
Chapter 8. Integrating JSP and Web Services Thinking in JSP and Web Services
Integrating a Web Service into a JSP Page When Should You Build Your Own Web Service? Building a Corporate Web Service
Apache SOAP Help
Summary
Chapter 9. Advanced JSP and XML Techniques Accessing Web Services from a Browser Handling Large XML Documents
Handling Special Characters and Encoding Using XML Tag Libraries Handling XML Files Directly
Building an XML Servlet Handler
Summary
When to Use XML with Reports Data Source for Reports
ResultSet
to XML Bringing It All Together The Sorting Table Stylesheet The Cross Tab StylesheetSummary
Chapter 12. Advanced XML in Reporting Systems Multiple-Page Reports
Reports on Data with One-to-Many Relationships Real-World Reporting Systems
Well-Formed Documents Revisited
Summary
Chapter 13. Browser Considerations with XML Client-Side XML and Browser Support
Client-Side JavaScript and XML Client-Side Transformations and XML
Summary Registering Within UDDI
Using Java to Access a WSDL Document
Summary
Chapter 15. Advanced Application Design Dynamic JSP
SOAP Server Security Concerns Quick Takes
Summary
Part IV. Appendixes
Appendix A. Setting Up
Installing the JSP Environment NetBeans
The MySQL Database Server
Summary
Appendix B. Introduction to JSP and How Things Work JSP Basics
JSP Actions, Directives, and Implicit Objects A More Robust JSP Example
Additional Information About JSP
Summary
Appendix C. Tag Library Tag Library Overview What Is a Tag Library?
The Six Steps to Building Tag Libraries Tag Library Concepts
Building a Tag Library General Notes
Summary
Appendix D. XSL Reference XSLT and XPath
Reference
Copyright
Many of the designations used by manufacturers and sellers to distinguish their products are claimed as trademarks. Where those designations appear in this book, and Addison-Wesley were aware of a trademark claim, the designations have been print ed in initial capital letters or in all capitals.
The author and publisher have taken care in the preparation of this book, but make no expressed or implied warranty of any kind and assume no responsibility for errors or omissions. No liability is assumed for incidental or consequential damages in connection with or arising out of the use of the information or programs contained herein.
The publisher offers discounts on this book when ordered in quantity for special sales.
For more information, please contact:
Pearson Education Corporate Sales Division
201 W. 103rd Street
Indianapolis, IN 46290
(800) 428-5331
Visit AW on the Web: www.awl.com/cseng/
Copyright © 2002 by Pearson Education
All rights reserved. No part of this publication may be reproduced, stored in a retrieval system, or transmitted, in any form or by any means, electronic,
05 04 03 02 4 3 2 1
First Printing: March 2002
Credits
Executive Editor
Rochelle J. Kronzek
Acquisitions Editor
Michelle Newcomb
Development Editor
Mark Ray
Managing Editor
Matt Purcell
Project Editor
Christina Smith
Production Editors
Seth Kerney
Rhonda Tinch-Mize
Matt Wynalda
Indexer
Mandie Frank
Suzanne Thomas
Technical Editor
Craig Pfeifer
Team Coordinator
Pamalee Nelson
Interior Designer
Gary Adair
Cover Designer
Alan Clements
Page Layout
Rebecca Harmon Michelle Mitchell
Dedications
Writing this book was a long process. As in all choices, this project had its rewards and its consequences. In the end, the most important lesson I learned was one of life, not JSP. I can share my thoughts in this poem. I dedicate the book to anyone who takes a moment to read my poetry.
with the wonder it deserves It's all anyone can ever do —Casey Kochmer
I dedicate this book to my family: Jim, Judy, Kristina, and my friends. You have made me what I am today, and for that I thank you.
Life is not measured by the number of breaths we take, but by the moments that take our breath away.
About the Authors
Casey Kochmer is a cofounder of the JSP Insider Web site. As president of AmberJack Software, Casey is a JavaServer Pages (JSP), HTML, XHTML, XML, DHTML, and Web service specialist. He was previously a senior programmer, trainer, and Internet expert for Starling Consulting, where he mentored users in JavaServer Pages, Active Server Pages (ASP), XML usage, and Internet practices. His job was to help customers integrate the latest
technology at an appropriate time relative to the needs of a project. His mantra is that a project should implement usable and maintainable technology rather than using the latest technology for technology's sake. Casey codes and builds
specialized applications using JSP, ASP, and various databases depending on customer needs. He has coauthored several books, including Professional JSP, Second Edition and Beginning JSP Web Development.
Erica Frandsen is an XML, ASP, and SQL Server expert. Experienced in TCP/IP networking, she is a founder of Sound Home Networks. While working as a network consultant, she installs, configures, and maintains networks for clients. Previously, Erica worked as a programmer and consultant for Starling Consulting, where she designed ASP and SQL systems using XML. Earlier in her career, she used these same technologies to create an online tax paying system for businesses in the state of Washington. She also was the Webmaster for several sites. In her free time, Erica brews beer, plays with computer
Acknowledgments
I would like to thank Michelle, Mark, and Matt for their excellent work. Without their perseverance this book would never have happened. Thank you, guys!
Also, I pay tribute to Mari Nowitz and Nathan Hamilton. Without my most excellent neighbors, I might have died of starvation and lack of influence from the real world. Thanks for being there when I needed you!
I would also like to thank Steve and Brad at Kundalini for their excellent coffee.
Introduction
The purpose of this book is to teach you how to implement XML and Web services within a JSP Web application or site. The book will start very simply and then work its way up in complexity. This will make the book accessible to a wide range of readers.
The target audience includes new and intermediate JSP programmers. However, this book will be useful for any JSP programmer who wants to expand his or her XML or Web service implementation knowledge. The book is also geared
towards helping a JSP programmer think in terms of the combination of JSP, XML, and Web services. The goal is to show how to usefully integrate these technologies into your projects and share the lessons we have learned in building Web applications.
On XML
We are programmers who spend quite a bit of time building Web applications. Over the past few years, we have been implementing XML in our projects. However, implementing XML is easier said than done at times. Even worse, many times XML is implemented in ways that can be harmful to a project. You should never use XML for XML's sake. This book is a reflection of our ordeals in learning the various tools and the methods of incorporating XML in a useful way into a Web site.
The problem for developers hasn't been about finding information on XML, but about using XML successfully within Web applications. While there are plenty of solid XML titles, no title really focuses on how to integrate XML into your JSP project. This book is written with the JSP developer in mind. We want to help teach XML, XSL, XPath, and the entire alphabet soup that goes along with XML. By showing how to use XML within a JSP framework, we intend to help make implementing XML both easy and advantageous for the JSP developer.
Web services are the latest fad. They are so new that many of the accompanying tools are still in beta or are only now being released into the marketplace. It's still very early to learn Web services. Web services are too new for anyone to truly be an expert in the field. This makes learning Web services both an exciting and a strange experience. Our intention is to teach you how to incorporate Web
services into JSP. We will remove the confusion that surrounds Web services and give a clear path to learning the basics. This book will show the various elements that constitute a Web service.
On the Structure of the Book
The book is divided into four parts. Part I is designed to introduce you to each of the technologies exemplified throughout this book. Part II drills deeply into the various tools for each of these technologies. Part III shows how to successfully combine all these technologies to make your project easier and faster to
implement. Part IV contains appendixes that provide reference material.
Part I
: Data, XML, and Web Services Introduction
This part is intended to ground you. We do not assume that you already know a great deal about JSP, XML, or Web services; these three topics are introduced in Chapters 1–3.
Chapter 1: Integrating JSP and Data
This chapter shows how to use JSP and a database together. The chapter serves to ground you in JSP and show you how to perform basic database connectivity.
Chapter 2: Introduction to XML/XSL
This chapter is a whirlwind tour of XML and XSL. It introduces each of the major concepts that are needed for XML and begins teaching XSL and XPath.
Chapter 3 introduces the concepts of Web services. Web services are a confusing topic, and the chapter focuses on the basic concepts you will need to use them.
Part II
: Integrating JSP and XML
Part II is a review of the tools, APIs, and logic required to successfully implement XML and Web services. These chapters introduce the various
concepts of Web services and the various parsers for XML. Once you've studied these chapters, you will have enough knowledge to begin using XML and Web services successfully.
Chapter 4: A Quick Start to JSP and XML Together
This chapter gives you a quick start to mixing JSP and XML together. The chapter reviews the basic XML APIs and works through some examples of merging JSP and XML.
Chapter 5: Using DOM
This chapter teaches the important aspects of the DOM API. The DOM is the standard supported by the W3C for working with an XML file programmatically.
Chapter 6: Programming SAX
This chapter teaches you the ins and outs of the SAX API. SAX is probably the most common API used to read in an XML file. Most of the time, SAX is used automatically by other XML APIs. However, this chapter is very important because understanding SAX is critical for handling more complicated XML-based processes.
Chapter 7: Successfully Using JSP and XML in an Application
and a database. The goal of this chapter is to begin walking you through the integration of XML in a natural way within your JSP application.
Chapter 8: Integrating JSP and Web Services
Chapter 8 examines how to use a Web service within your JSP site. This chapter covers two important Web services topics. The first is using a Web service; the chapter shows the most efficient way to use a Web service within your JSP application. The second topic is building a Web service; the chapter walks through the creation of a Web service that can be used by other applications.
Chapter 9: Advanced JSP and XML Techniques
This chapter explores XML concepts that aren't discussed in other chapters. Topics include accessing a Web service from an HTML page, XML encoding issues, ways of processing large XML documents, and XML tag libraries.
Part III
: Building JSP Sites to Use XML
Building a JSP site requires far more than just knowing how to use JSP. It requires the ability to think in terms of building a Web application. Web
application design is a fine art that involves integrating many different tools as a seamless unit within a JSP project. To this end, Part III covers the
implementation of XML and Web services from an application point of view. The chapters in this part cover many topics, from Web service security to building XML reporting systems. We show many different facets of Web application design, from the server to the often-overlooked browser client.
Chapter 10: Using XSL/JSP in Web Site Design
Chapter 11: Using XML in Reporting Systems
No matter what the Web application, it's a safe bet that there will be some reporting involved. This chapter examines how reporting systems can benefit from the appropriate placement and use of XML.
Chapter 12: Advanced XML in Reporting Systems
This chapter builds on the examples in Chapter 11. Additional concepts and topics to enhance an XML-based reporting system are shown in this chapter's examples. Among the examples is one that shows how to create reports that show a one-to-many relationship in the database.
Chapter 13: Browser Considerations with XML
JSP developers often overlook client-side XML processing. This is a serious oversight, as browsers are a growing and improving XML client-side tool. This chapter examines how using the browser can enhance handling of XML data and reduce Web server load.
Chapter 14: Building a Web Service
In this chapter, we build a Web service system for news delivery. The code within this chapter is based on a Web service within a production environment. The goal is to show the design and full integration of a complete Web service.
Chapter 15: Advanced Application Design
This chapter covers two topics. First, we'll show you how to build JSP pages that update themselves. This advanced capability permits JSP sites to be more
Appendixes
The appendixes support the material presented in the main part of the book. Their contents are briefly described here.
Appendix A: Setting Up
This appendix covers basic information about setting up the JSP container and introduces NetBeans for the creation of all your JSP pages.
Appendix B: Introduction to JSP and How Things Work
For new JSP users, this appendix offers a crash course on JSP and how it works.
Appendix C: Tag Library
This book uses JSP tag libraries as much as possible. For users who are new to JSP, this appendix quickly covers how to build and use a JSP tag library.
Appendix D: XSL Reference
XSL is used extensively in this book. Appendix D is a reference to the most commonly used XSL tags and XPath functions.
A Word about Source Code
All the source code from the listings and programs included in this book is available via download from the Sams Publishing Web site at
www.samspublishing.com.
Throughout the book, we create sample class files and JSPs and then build on them later in the same or another chapter. Whenever we do so, we clearly
or changed are indicated in boldface type.
How to Use the Book
As we mentioned earlier, this book is geared toward new and intermediate JSP programmers. How you use the book, and where you begin reading, will depend on your experience level. Here are a few tips to get you started.
For All Users
If possible, we recommend coding the examples. In programming, the best way to learn is by coding, and the examples have been geared to enable you to do so. If you have any questions about initially setting up the JSP container or
NetBeans to create JSPs, refer to Appendix A.Otherwise, the first time a specific component is used, it will be referenced for installation at that time.
In many respects, coding the examples is very important because this book explores many different concepts. If you don't write the code, many of the concepts are likely to slip by or not sink in as deeply as they should. We also encourage you to expand and tweak the examples. Try to break the code and find out why it breaks. As programmers, we learn best by coding and by fixing
broken code. Coding is best learned by experience; don't shy away from this reality.
For New JSP Users
We are not going to assume that you already know JSP like the back of your hand. Someone with little or no JSP experience can pick up this book and learn how to use JSP and XML. The code and topics are built in a logical and easy manner to help show what is required in using XML within your JSP projects. Beginning JSP programmers will want to study the chapters in Part I closely. The examples are simple enough that they will be a great learning aid. New JSP
readers will also benefit from reading Appendix B.
The best starting place will depend on your skills. For users who are
inexperienced in XML or Web services, Part I is still your best bet. Otherwise, we recommend skimming the first section, as there is quite a bit of information within each chapter. These chapters have some information that can benefit more experienced readers. However, if you find that you already know the Part I
material, skip ahead to Part II.
Conventions Used in This Book
The following typographic conventions are used in this book:
Code lines, commands, statements, variables, and any text you type or see onscreen appears in a
mono
typeface.Placeholders in syntax descriptions appear in an italic mono typeface. Replace the placeholder with the actual filename, parameter, or whatever element it represents.
Italics highlight technical terms when they're being introduced and defined. The book also contains Notes to help you spot important or useful
information more quickly.
A Final Note
This book was written as a reference for JSP, XML, and Web services. Learning this material on our own was a long process, and our goal is to help give JSP developers some insights into building JSP Web applications. The fact is, XML and Web services are both fast becoming essential tools to most JSP
applications. The problem is trying to learn everything at once. Our goal was to provide integrated examples of practical JSP, XML, and Web service
Part I: Data, XML, and Web Services
Introduction
IN THIS PART
1 Integrating JSP and Data
2 Introduction to XML/XSL
Chapter 1. Integrating JSP and Data
IN THIS CHAPTER
Using JSP with a Database Other Considerations Basic Design Concepts Summary
One of the most important concepts in building any application is the concept of data. Our applications are driven by data, and the tools that specialize in the handling of data form a central part of any application. XML is a specification that is geared to handle data. However, in using XML, it quickly becomes important to have access to several other tools. Usually a database is the first tool that will be used alongside XML. Oftentimes, the data for our XML files will come directly from a database. In addition, it will be important to import data from an XML file into a database. Using a database is important enough that this first chapter is dedicated to showing how to access and submit data to a database.
This chapter has two goals. The first is to show you how to access a database from JSP. If you are already familiar with using a database within JSP, it's advisable that you proceed to Chapter 2, "Introduction to XML/XSL." It's important to note that several chapters in this book will use a database in the examples. This makes setting up a test database very important. Instructions for setting up the MySQL test database used in all the examples can be found in Appendix A,"Setting Up."
The second goal is to ensure that newer JSP programmers have a chance to get more familiar with JSP before moving further into the book. This chapter is intended to be extremely accessible to newer JSP programmers regardless of their current skill level. This means that the chapter is very basic; more advanced JSP programmers will only want to skim this chapter quickly. Programmers who are just starting to learn about JSP are encouraged to first read Appendix
Using JSP with a Database
This section will not cover how to build or maintain a database. In addition, due to the vast number of databases, it would be impossible to cover special
database-specific details. This means the examples here will be kept as generic as possible to help ease the process of porting code from database to database. The examples in this chapter will be using the MySQL database.
To make life simple, we are going to build several examples. The first example will be used to enter data into the database. The second example will be used to view the data in the database. The logic in these examples assumes that the BannerAds table has been created according to the instructions for setting up the MySQL database found in Appendix A.
Entering the Data
The actual process of entering data should be split across several JSP pages. One page will be a data input page. This page will only concern itself with gathering the data. The second page will be an action page that will run on the JSP server to process the results created through the input page. It's a good idea to split logic across several JSP pages. This is a perfect example of a case in which this is true. It's possible to build a single page to perform all the tasks of the input and action pages. Using one page would leave the code entangled and difficult to maintain with too much happening for a single page. This is especially true with more complicated database pages. Using two pages makes the logic more closely match the process and makes it easier for other programmers to understand what is going on within the pages.
The input page, shown in Listing 1.1, gathers data from the user and should be saved as
webapps/xmlbook/chapter1/UpdateTableForm.jsp
.Listing 1.1 UpdateTableForm.jsp
<html>
<head><title>Update Table Form</title></head>
<body>
<form action="UpdateTableAction.jsp" method="post" name="update">
<table>
<tr>
<td>Name</td>
<td><input type="text" name="name" value="" size="40"/></td>
</tr>
<tr>
<td>LinkText</td>
<td><input type="text" name="linktext" value="" size="50"/></td>
</tr>
<tr>
<td>Link</td>
<td><input type="text" name="link" value="" size="50"/></td>
</tr>
<tr><td> Action </td>
<td>
<input type="radio" name="Action" value="update" /> Update
<input type="radio" name="Action" value="delete" /> Delete
<input type="radio" name="Action" value="new" checked /> New
</td>
</tr>
<tr><td><input type="SUBMIT" value="Submit" /> </td>
</tr>
</table>
</form>
</body>
</html>
However, we've kept it as a JSP page out of habit. Typically, an input page such as this would have other active features such as security validation, which would require it to use some JSP processing.
Now it's time to build an action page. This page, whose code is shown in Listing 1.2, will receive the data from the input page and then update the database. Save this file as
webapps/xmlbook/chapter1/UpdateTableAction.jsp
.Listing 1.2 UpdateTableAction.jsp
<%@page import = "java.sql.*" %>
<%
/* Step 1) Get the data from the form */
String ls_name = request.getParameter("name");
String ls_link = request.getParameter("link");
String ls_linktext= request.getParameter("linktext");
String ls_action = request.getParameter("Action");
/* Step 2) Initialize Variables */
String ls_result = "Database was updated";
String ls_query = "";
String ls_dburl = "jdbc:mysql://localhost/xmlbook";
String ls_dbdriver = "org.gjt.mm.mysql.Driver";
/* Step 3) Create a query */
if (ls_action.equals("new"))
{ ls_query = " insert into BannerAds (name,link,linktext)";
ls_query += " values (";
ls_query += "'" + ls_name + "',";
ls_query += "'" + ls_link + "',";
if (ls_action.equals("delete"))
{
ls_query = " delete from BannerAds where name = ";
ls_query += "'" + ls_name + "'";
}
if (ls_action.equals("update"))
{ ls_query = " update BannerAds";
ls_query += " set link= " + "'" + ls_link + "',";
ls_query += " set linktext= " + "'" + ls_linktext + "'";
ls_query += " where name = " + "'" + ls_name + "'";
}
/* Step 4) Make a database connection */
Connection l_dbconn = null;
try
{
Class.forName(ls_dbdriver);
/* getConnection(URL,User,Pw) */
l_dbconn = DriverManager.getConnection(ls_dburl) ;
/*create a SQL Statement */
Statement l_statement = l_dbconn.createStatement();
l_statement.execute(ls_query);
}
catch (ClassNotFoundException e)
{ ls_result = " Error creating database drive class!";
ls_result += " <br/>" + e.toString();
}
{ ls_result = " Error processing the SQL!";
ls_result += " <br/>" + e.toString();
}
finally
{
/* We must close the database connection now */
try
{ if (l_dbconn != null)
{ l_dbconn.close(); }
}
catch (SQLException e)
{ ls_result = "Error in closing connection.";
ls_result += " <br/>" + e.toString();
}
}
%>
<html>
<head><title>Updating a Database</title></head>
<body>
The following query was submitted:
<br/><br/>
<%=ls_query%>
<br/><br/>
The Result was:
<br/><br/>
<%=ls_result%>
<br/><br/>
</body>
</html>
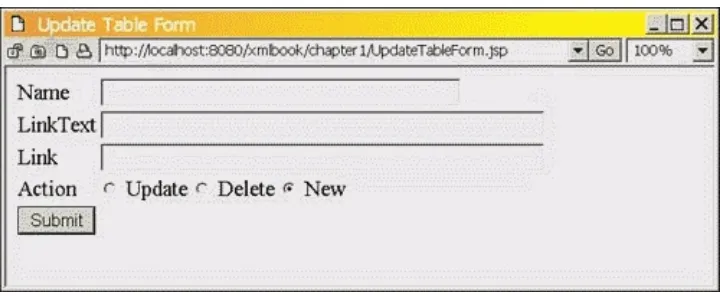
Now it's time to run everything and then discuss what's happening behind the scenes. First, let's launch the UpdateTableForm.jsp page to start the data entry process, as Figure 1.1 shows.
Figure 1.1. Running UpdateTableForm.jsp.
Let's go ahead and enter some data. As sample data, the examples here are using the following values: site1, JSP Site, and www.jspinsider.com. Once this page is submitted it will trigger the
UpdateTableAction.jsp
action page to produce the results shown in Figure 1.2.Figure 1.2. Results from UpdateTableAction.jsp.
It's time to review and examine the UpdateTableAction.jsp page. The first step is to import the JDBC classes:
<%@page import = "java.sql.*" %>
Then the page needs to gather up the results from the UpdateTableForm.jsp page. Notice that the user request for this page comes as a result of clicking the Submit button on UpdateTableForm.jsp. This submits the form and puts the results in the HTTP header. In JSP, the
request
implicit object can be used to gather these values. ThegetParameter
method is used to collect the value of the name/value pair. Each name/value pair contains the name of the form element and the value that was submitted with that element. This code grabs the value of the form element namedname
and puts it into the string variablels_name
.String ls_name = request.getParameter("name");
The next major step is to initialize the JDBC setting information. The code will need the URL at which the database is open for client connections and the JDBC driver used to connect with the database. Note thatxmlbook
in the following line of code represents the database name. The values for our example areString ls_dburl = "jdbc:mysql://localhost/xmlbook";
String ls_dbdriver = "org.gjt.mm.mysql.Driver";
The next few lines are where the code creates a SQL statement to be executed by the database. In this example, several different SQL commands exist since
entering, modifying, and deleting data require slightly different SQL statements. For example, the following code generates an update statement for when it is required to edit an existing record:
if (ls_action.equals("update"))
{ ls_query = " update BannerAds";
}
Now the fun stuff happens; we get to connect and use the database. The first step in using a database is creating a
Connection
object:Connection l_dbconn = null;
The
Connection
object is our door into the database. Within the context of theConnection
, the SQL statements will be executed and the resultsreturned to us for our use.
All functions of connecting and using a database should be enclosed within a Java
try-catch
block. A lot can go wrong when working with a database. This means that the code needs to be ready to handle any exceptions that might happen. Notice that theConnection
object is created before thetry-catch
block. We have a subtle reason behind our timing in declaring ourConnection
object. Database connections are both expensive in processing and precious in that they are usually limited in quantity. This means thatdatabase resources are often managed by a Web application. A database connection should always be closed after the code is finished with the connection. The best place to close a database connection is within the
finally
block of thetry-catch
block. In this example, the following code exists to perform the closing task:finally
{
/* We must close the database connection now */
try
{ if (l_dbconn != null)
{ l_dbconn.close(); }
}
catch (SQLException e)
{ ls_result = "Error in closing connection.";
ls_result += " <br/>" + e.toString();
}
The example only attempts to close the connection if it was actually created. If it wasn't opened, it would still be
null
and nothing would happen. Theadvantage of using the
finally
block to close the database connection is that the database will still close even when an error happens within thetry-catch
block.Okay, back to the example. After the connection object is created, the next step is to load the JDBC driver:
Class.forName(ls_dbdriver);
The act of loading the JDBC driver has the effect of registering the driver with the
DriverManager
object. This means that once the JDBC driver is loaded, it's possible to create the connection to the database:l_dbconn = DriverManager.getConnection(ls_dburl);
The
getConnection
function is overloaded and has several formats. In this example, the database doesn't need a user or a password to log insuccessfully. However, most of the time a database will require an account. When this is the case, the following code can be used to connect to the database:
l_dbconn = DriverManager.getConnection(databaseURL,User,Password);
The code will apply SQL statements to the database through this connection. Todo so, a
Statement
object is required to run the actual SQL statement that we have:Statement l_statement = l_dbconn.createStatement();
object at a given moment. The code in this example is effectively thread safe.
The last step is to actually execute the SQL statement:
l_statement.execute(ls_query);
JDBC will take the SQL statement and execute it against the database. In the preceding code snippets, the data is only being put into the database. This means that we don't need to capture a
ResultSet
.One last piece of JDBC code to review involves catching the exceptions:
catch (SQLException e)
{ ls_result = " Error processing the SQL!";
ls_result += " <br/>" + e.toString();
}
As stated earlier, database interactions are prone to many types of errors. This means that capturing exceptions is especially important in JDBC interactions. As a rule, a programmer should always capture
SQLException
s. The choice should be made to either handle the error, or at the very least report the exception to the user. It is a poor programming practice to disregard errors, as they happen fairly regularly.The rest of the page is straightforward HTML. The only new piece of code we haven't used yet is the JSP expression statement:
<%=ls_query%>
The JSP expression is a handy shortcut method for dumping the string value of an object to the output stream. This is no different from using an
out.print
statement. As to which method is better, it comes down to which method is most convenient at the time of use within the code.Viewing the Data
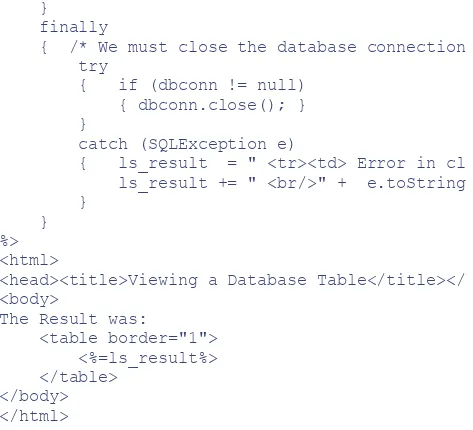
build a page to view this data. This example is called UsingACursor.jsp. The name reflects the fact that the code will loop through a database using a cursor. Ironically, you won't see any mention of a cursor in the code, since the code will default to a forward only cursor. What all this means is that when we get the data, we need to loop through the
ResultSet
one row at a time. Since it is a forward only cursor, it's only possible to move forward; the cursor can't go back to a record once it has moved to the next record. There are several different types of cursors, but forward only cursors are the easiest and fastest type to use.Armed with this brief explanation, let's plow forward and write the example page, as shown in Listing 1.3. This file should be saved as
webapps/xmlbook/chapter1/UsingACursor.jsp
.Listing 1.3 UsingACursor.jsp
<%@page import = "java.sql.*" %>
<% /* Step 1) Initialize Variables */
String ls_result = "Nothing Happened";
String ls_query = "select name,link,linktext from BannerAds";
String ls_dburl = "jdbc:mysql://localhost/xmlbook";
String ls_dbdriver = "org.gjt.mm.mysql.Driver";
/* Step 2) Make a database connection */
Connection dbconn = null;
try
{ Class.forName(ls_dbdriver);
dbconn = DriverManager.getConnection(ls_dburl);
/*create a SQL Statement */
Statement statement = dbconn.createStatement();
if (statement.execute(ls_query))
{ /* Step 3) If we have a result lets loop through
to get the data */
ResultSetMetaData metadata = results.getMetaData();
/* validate result. Note switch to while loop if
we plan on multiple results from query */
if(results != null )
{
/* Use ResultSetMetaData object to determine the columns */
int li_columns = metadata.getColumnCount();
ls_result = "<tr>";
for ( int i = 1; i <= li_columns; i++)
{ls_result += "<td>" + metadata.getColumnLabel(i) + "</td>";}
ls_result += "</tr>";
/* Loop through the columns and append data to our table */
while(results.next())
{ results.getRow();
ls_result += "<tr>";
for ( int i = 1; i <= li_columns; i++)
{
ls_result += "<td>" + results.getObject(i).toString() + "</td>";
}
ls_result += "</tr>";
}
}
}
}
catch (ClassNotFoundException e)
{ ls_result = " <tr><td> Error creating database drive class!" ;
ls_result += " <br/>" + e.toString() + "</td></tr>";
}
catch (SQLException e)
}
finally
{ /* We must close the database connection now */
try
{ if (dbconn != null)
{ dbconn.close(); }
}
catch (SQLException e)
{ ls_result = " <tr><td> Error in closing connection.";
ls_result += " <br/>" + e.toString() + "</td></tr>";
}
}
%>
<html>
<head><title>Viewing a Database Table</title></head>
<body>
The Result was:
<table border="1">
<%=ls_result%>
</table>
</body>
</html>
This page is very similar to UpdateTableAction.jsp, but instead of launching a query to modify the database, it launches a query to retrieve data. The hard work is just looping through a
ResultSet
object (the cursor) . As the code loops through the data, the example will convert the data into a string to be displayed on the HTML page.The page produces the results shown in Figure 1.3.
We are only reviewing the sections of the page that differ from the UpdateTableAction.jsp page found in Listing 1.2.
This example runs a very different style of SQL:
String ls_query = "select name,link,linktext from BannerAds";
This select statement will return all of the data from the BannerAds table storedin the xmlbook database. It begins by using the keyword select and listing the field names to be selected. Then the table name after the from keyword tells the statement which table to use.
Later, the code executes the SQL against the database:
if (statement.execute(ls_query))
In this call, the code checks to see whether a
ResultSet
is created upon execution of the SQL. If the statement is true then there exists aResultSet
(the results from the SQL query).ResultSet results = statement.getResultSet();
ResultSetMetaData metadata = results.getMetaData();
The next important step is to grab both theResultSet
, which has our datafrom the SQL query, and the
ResultSetMetaData
object, which contains the data that describes theResultSet
. First, thereturned is unknown:
int li_columns = metadata.getColumnCount();
Once the number of columns has been determined, it becomes easy to loop through and build a list of the column names:ls_result = "<tr>";
for ( int i = 1; i <= li_columns; i++)
{ls_result += "<td>" + metadata.getColumnLabel(i) + "</td>";}
ls_result += "</tr>";
Notice that the code wraps the results with HTML. It does this so that when the string result is sent out to the browser, it will be formatted as an HTML table.
Once the column headers have been created, the next step is to loop through the results and create rows for each record. This string will be put into the
ls_result
table string:while(results.next())
{ results.getRow();
ls_result += "<tr>";
for ( int i = 1; i <= li_columns; i++)
{
ls_result += "<td>" + results.getObject(i).toString() + "</td>";
}
ls_result += "</tr>";
}
results.getObject(i).toString()
Then we use the
toString()
function to easily convert it to aString
in the same call.Finally, in the HTML portion of the JSP page, the preformatted result string is placed into a table:
<table border="1">
<%=ls_result%>
</table>
Overall, this example illustrates the basic steps of pushing data into and out of a database. After this, the next step is determining what to do with the data. In later chapters, we'll write some examples that convert data to XML from a database resultset.
Other Considerations
We need to quickly cover a few more issues in this chapter. These are things that programmers may not learn unless they are lucky enough to have well-trained coworkers, or have been burned on a project.
Connection Pooling
The code examples didn't use connection pooling. As a rule, connection pooling should be used to speed up database access and reduce the number of database connections used by any Web application. It turns out that one of the more expensive operations you can perform in terms of time and resources is simply connecting to the database. Each connection to a database takes time to perform and resources to manage. If a site had 10,000 users, it would be impractical to use 10,000 connections. Instead, it's better to pool the connections and reuse them on a need only basis. This prevents the overhead of creating and destroying connections repeatedly. Instead, they remain open and are available for use
For example, if a project has 10,000 users, it might only need 500 connections at any one moment. Connection pooling software tends to be simple to use within a project. Most J2EE application servers will offer some form of connection
pooling. For smaller JSP projects, you can find connection pooling from several resources. One good open source project to check out is PoolMan, which can be downloaded at http://www.codestudio.com. In addition, in JDBC 3.0, the drivers can be built to include connection pooling to make it transparent to the
programmer.
Testing Components
In JSP, a programmer has many opportunities to use prebuilt components. As a rule, however, you should never assume that a component is perfect. If you are seeing strange behavior within your code, always perform a reality check to make sure that the component is working as expected. This holds true for any component, including JDBC drivers.
A Story of a Driver
This story will illustrate why early testing is important when using any component in a Java project.
On this project, we were using the Sybase SQL Server Database and Sybase JConnect, a free JDBC driver. The driver was installed and everything worked perfectly. That is, at first it did. Everything worked well for the initial simple SQL queries. As soon as the queries began to get larger, though, the application began to have problems.
The code was using a scrolling cursor and the query speed was pathetic. A SQL query that should run in a minute was taking the code 15 minutes to process. This was a problem. In investigating the problem, we closely reexamined the documentation for clues. Fortunately, the problem was listed in the
documentation. The problem was that for large cursors, a scrolling cursor could have poor performance and cause crashes due to memory usage. Because this project had extra large cursors, this was a serious problem.
better or rebuild the logic. Since budget was an issue, we chose to keep the JConnect driver and update the code to use a more limited forward cursor. After we rewrote the code, the program worked well enough for the project to move onward again. Then we began to notice a string of mysterious packet dropping errors.
After doing some research on the Sybase listserv, we discovered that other users were having the same problem and that it was a networking issue with the driver and NT. Luckily for us, the project was developed under NT, but deployed on Unix. Thankfully, the problem was specific to NT and never occurred on the Unix box.
The project taught us some important lessons. The most important was that one shouldn't assume that a JDBC driver or any other component will always work as expected. Nothing is bug free, and budgeting time and resources to deal with unexpected problems will in the end save money and permit the timely delivery of projects.
Testing for Scale
A common mistake made with database use in a project is to neglect to fully test load your application. Usually, smaller test databases are used to build a system. This makes life simple for initial building. However, SQL is easy to write and not always easy to optimize. As an example, on one project we had some SQL that worked fine on the test database and ran in under a minute. Once we moved the SQL to use production data, the same SQL took over 2 hours to run against the several million rows of data. The problem was fixed with some SQL
optimization and some sweat, ending up with runtimes around 5 minutes. In this case, you should focus on the consequence, not the actual problem, because it's the lesson that is important. Always test at some point with data that closely matches the size load of your project. It's easy to build a system to work with small datasets. However, the large final dataset will always clobber your system if you haven't prepared for it.
everything works fine. Once we get into larger XML files or databases, the rules change and every ounce of performance can make or break a project.
Basic Design Concepts
As a rule of thumb, JSP should be used as a presentation layer. This means that the logic within a JSP page should be geared towards only generating the actual formatting of the output. All reusable or modular logic should be pushed into a JavaBean or a tag library. Generally, these modular objects are also referred to as business objects. The term business object is used because business logic should generally be placed into JavaBeans. The reason for this is that moving code into a lower level, such as a JavaBean, makes it reusable across many pages. The other benefit is that the final code in the JSP page will be modular and easier to update and maintain. We will demonstrate this by using a readily available database tag library. If you are interested in learning how to build and use your own tag library, check out Appendix C,"Tag Library."
Conversely, you should avoid putting presentation level logic (any logic used to create the display) into lower components such as JavaBeans or tag libraries. The reason pertains to flexibility; placing presentation logic in a lower level object forces the object into only producing a certain type of formatted output. As an example, if you built an object that produced hard-coded HTML, it would be difficult to use the same object to produce an XML document. If you look back to the UsingACursor.jsp example, the code from the result would only work for an HTML table. It would be awkward to recode everything in order to change the format or to add special formatting.
Using a Tag library
The Jakarta project has a collection of open source tag libraries for anyone to freely use within a project. The one tag library we are interested in is the
DBTags custom tag library. This library has a series of prebuilt functions to both read and write to a database. The actual description and code can be downloaded from http://jakarta.apache.org/taglibs/doc/dbtags-doc/intro.html.
After downloading the DBTags tag library, you will need to perform the following steps:
1. Copy the .tld (tag library descriptor) file into the
xmlbook/WEB-INF
directory.Copy the tag library's JAR file into the
xmlbook/WEB-INF/lib
directory.Modify the
xmlbook/WEB-INF/web.xml
file. Add the following lines between the<web-app></web-app>
tags.<taglib>
<taglib-uri>http://jakarta.apache.org/taglibs/dbtags</taglib-uri>
<taglib-location>/WEB-INF/dbtags.tld</taglib-location>
</taglib>
Restart Tomcat. This will permit Tomcat to find and register the database tag library.
Now we are ready to build a JSP page to view the data. Save the file shown in Listing 1.4 as
webapps/xmlbook/chapter1/ViewTable.jsp
.Listing 1.4 ViewTable.jsp
<%@ taglib uri="http://jakarta.apache.org/taglibs/dbtags" prefix="sql" %>
<html>
<%-- Step 1) Make a database connection --%>
<sql:connection id="connect">
<sql:url>jdbc:mysql://localhost/xmlbook</sql:url>
<sql:driver>org.gjt.mm.mysql.Driver</sql:driver>
</sql:connection>
<%-- Step 2) Create a query --%>
<table border="1">
<sql:statement id="statement" conn="connect">
<sql:query>
select name,link,linktext from BannerAds
</sql:query>
<%-- Step 2a) loop through the query result --%>
<tr>
<td>Name</td>
<td>Link</td>
<td>LinkText</td>
</tr>
<sql:resultSet id="data">
<tr>
<td><sql:getColumn position="1"/></td>
<td><sql:getColumn position="2"/></td>
<td><sql:getColumn position="3"/></td>
</tr>
</sql:resultSet>
</sql:statement>
</table>
<%-- Step 3) Close the Database Connection --%>
<sql:closeConnection conn="connect"/>
</html>
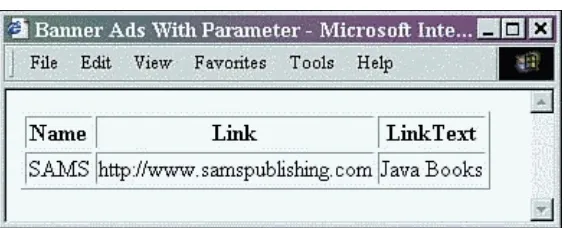
Running this page will produce results similar to Figure 1.4.
Figure 1.4. Results from ViewTable.jsp.
Let's review what happened in this page.
The first line tells the JSP container where to find the tag library. Tomcat looks up the URI (uniform resource identifier) reference in the web.xml file and obtains a prefix to use when referencing the database tags:
<%@ taglib uri="http://jakarta.apache.org/taglibs/dbtags" prefix="sql" %>
The prefix means that in this example, any tag starting with
<sql:
will resolve to the DBTags custom tag library.The code follows a path of logic almost identical to that of the database
examples. The difference is that the custom tags are performing the JDBC logic. All a programmer needs to do is provide the custom tags with the connection and SQL information. Following the logic, the next step is to tell the tag library
where to make the database connection:
<sql:connection id="connect">
<sql:url>jdbc:mysql://localhost/xmlbook</sql:url>
<sql:driver>org.gjt.mm.mysql.Driver</sql:driver>
</sql:connection>
statement to apply to the database:
<sql:statement id="statement" conn="connect">
<sql:query>
select name,link,linktext from BannerAds
</sql:query>
After we have the SQL statement loaded, it is possible to use a result tag to loop through and extract the data. In this example, the code puts the data into a table row, but it could just as easily put the data into an XML file or another format:
<sql:resultSet id="data">
<tr>
<td><sql:getColumn position="1"/></td>
<td><sql:getColumn position="2"/></td>
<td><sql:getColumn position="3"/></td>
</tr>
</sql:resultSet>
Finally, notice that the code still has to close the database connection:
<sql:closeConnection conn="connect"/>
The custom tag library we are using is still young. At the time of this book's publication, it didn't have a method to extract the field names. Therefore, the example page had the column names hard-coded:
<tr>
<td>Name</td>
<td>Link</td>
<td>LinkText</td>
</tr>
own tags to the library, including one to resolve field names. Also, if any of the included custom tags don't work the way your project requires, it's possible to recode the tags to better suit your needs. This is one of the benefits of open source tag libraries.
Summary
This chapter has reviewed some of the basics of JSP and how to connect to a database. Keep in mind that using a database is a subject that could fill an entire book on its own. We intentionally kept the code and information presented in this chapter simple and brief. The goal was to give just enough information to get you started down the road to using a database. You should walk away knowing how to connect, update, and retrieve data from a database. With this starting knowledge, you can now begin to learn XML. Throughout the book, we will create examples that use both XML and a database at the same time (in most real-world projects, using a mixture of XML and a database will be a given). This will be especially true in Chapter 11, "Using XML in Reporting Systems," where we will create an automatic system to populate the database with
thousands of records to test a sample reporting system.
Now, the book gets into the fun stuff. The first step will be to review XML. The next chapter will introduce XML, XSL, and XPath. It covers most of the basics of using XML and includes quite a bit of information. so get a cup of coffee and enjoy the ride.
Chapter 2. Introduction to XML/XSL
IN THIS CHAPTER
What Is XML? Rules of XML On to Using XML XSL
Summary
The goal of this chapter is to walk you through the basics of XML and XSL. If you have never used XML or XSL before or know only a little bit about them, consider this your whirlwind course to get you on your feet.
One of the wonderful aspects of XML is its simplicity. It really doesn't take much to get up and running with XML. Therefore, this chapter is geared to race through the basics of XML. We will cover enough XML to enable you to use the rest of this book with confidence. After discussing XML, we will plunge into XSL. If you are already comfortable with XML, don't hesitate to skip ahead to the XSL section.
What Is XML?
XML is the Extensible Markup Language. It's called extensible because the modular nature of its structure enables you to make modifications easily by changing or adding data features. More importantly, XML is actually a "meta-language." That is, XML is really a specification that dictates how to describe languages and data.
XML's design gives us the following powerful features:
share XML data between people and applications. XML permits you to create custom markup (your own tags). This permits XML to represent a limitless number of documents.
NOTE
Document is the term used for a single collection of XML data. A document can be stored as a file, as an object, or within a database. It is not where the document is stored, but rather the collection of data constituting the document that is the defining feature of an XML document.
Data can be stored and arranged in a way that is customizable for your needs. Documents may be organized exactly how you want them.
Unicode (an international standard for text) is the standard character set for XML and thus an immense number of languages and characters are
supported. Documents can be created in nearly any language.
XML is based on simple character text, which makes it easy to transport an XML document between systems or across the Internet.
Document structure and quality can be checked. This means it is possible to validate the overall document, syntax, and data types before the data is processed by an application. Therefore, it is possible to add more robust and complete error detection within an application.
XML can easily be mixed with stylesheets to create almost any output desired. An XML document should only consist of data. You can reuse the data in many different ways. It is easy to reuse a single set of data and reformat the data to display differently just by swapping stylesheets. In addition, once a stylesheet is built, it can be reused against many different XML documents as long as they have the same structure. Later in the book we will show the full power of stylesheets as we build some reports.
When combined, these features create a means of describing data that is independent of any language or system. This permits us to reuse XML data across systems and businesses. It all comes down to a set of very simple and well-thought-out rules.
Rules of XML
To help explain XML, we've created the sample XML file shown in Listing 2.1.
Listing 2.1 Sample XML Document shows.xml
<?xml version="1.0"?>
<SHOWS>
<PERFORMANCE>
<TITLE>Fairy Princess</TITLE>
<AUTHOR/>
<DESCRIPTION>
Scratch sound with emphasis on color, texture.
</DESCRIPTION>
<DATE status="canceled">09/11/2001</DATE>
</PERFORMANCE>
</SHOWS>
Use a text editor to create this file and save it to your hard disk as shows.xml. Over the next few sections we will refer back to this file to illustrate the structure of XML. Later, this file will be used for showing examples within a browser.
Tags and Elements
All XML markup consists of tags. Here is a sample tag:
Tags are used to build an element. Here is a sample element:
<PERFORMANCE></PERFORMANCE>
An XML file author creates tags to describe the data that the file contains. These tags are very similar to HTML tags. Elements are the foundation of XML
documents.
Tag and Element Basics
First, let's cover three commonly used terms with regard to tags. The terms are opening tag, closing tag, and empty tag. An opening tag is the first tag of a pair; in our sample element in the preceding section,
<PERFORMANCE>
is an opening tag. The closing tag is the end tag of a pair; in our sample element,</PERFORMANCE>
is the closing tag. Finally, an empty tag is a standalone tag that has no data, and looks like this:<PERFORMANCE/>
An element consists of an opening tag, a closing tag, and everything in between. All data within an XML document is expressed with tags. Elements can contain other elements, data or text, or can be empty and contain nothing between the tags. Elements can also contain a mix of data and other elements.
<PERFORMANCE>
Marks Bros. Theater
<TITLE>Fairy Princess</TITLE>
</PERFORMANCE>
Here are the basic rules for using tags:
Tags are case sensitive. This means that
<NAME>
and<Name>
are different tags. Take care to ensure that the case of opening and closing tags match.disallowed whitespace would be
< NAME>
. However, whitespace at the end of tags is allowed, as in<NAME >
.The tag name must start with either a letter or an underscore.
The tag name may contain any of the following: letters, numerals, hyphens (
-
), periods (.
), or underscores (_
).Each tag must be closed. This means that, where an opening tag is created, there must eventually be a closing one of the same name. When a tag contains no data, you can either close it immediately after opening it (
<AUTHOR></AUTHOR>
, for example) or use an empty tag (for instance,<AUTHOR/>
).Each element must be appropriately nested before another tag is opened. Unlike HTML, which is tolerant of inappropriately nested tags, XML has strict nesting rules. In XML, if a tag is opened inside an element, it must be closed inside that element also. For example, in HTML the following will work:
<B><FONT color="red">text here</B></FONT>
However, in XML this is not valid because the font tag is opened within the bold tag and is closed after the end of the bold tag. This violates the rule that a tag must be closed within the same element in which it was opened. In this case, the font tag was not closed within the bold element. A correct version would look like this:<B><FONT color="red">text here</FONT></B>
Root Element
In the shows.xml example document (see Listing 2.1) the root element is
<SHOWS>
. Notice that<SHOWS>
is the first tag that is neither an XML declaration in the document nor a processing tag, and the closing tag</SHOWS>
is the last. Finally, note that every other tag is inside theSHOWS
element.Attributes
Attributes are another important part of XML documents. An attribute is a name/value pair that can be found in an opening tag. Attributes provide
additional information to a particular element. Embedded in a tag, an attribute looks like the following:
<DATE status="canceled">09/11/2001</DATE>
Attributes are useful for providing properties of an element. In the preceding code snippet, notice that the property name/value pair is
status="canceled"
. This is relevant to the date of the performance—if the information regarding that performance were requested, it would beimportant to note that it had been canceled. Many times, attributes and elements can be interchangeable in their functionality. That is, data expressed as an
attribute could also be expressed as an element. In XML, it just doesn't make a difference because data is data. However, it will make a difference when you are processing an XML document. Here is a simple set of guidelines:
Any data that needs to be displayed should be stored as an element.
Any data meant to modify the way an element displays should be stored as an attribute.
Keep in mind that these are just guidelines. With experience, you will get a sense of whether data would be best stored as an attribute or an element.
Several rules exist regarding attributes:
The property name is case sensitive. An attribute named
Status
is not the same as one namedstatus
.There can never be two properties of the same name in any one tag.
There can be more than one attribute per tag.
There must be quotation marks around the value of an attribute. Either single quotes or double quotes may be used. If you need to use single quotes or double quotes within the actual value (for example,
owner="bill 'slim' jones"
), use the other type of quotation marks to contain the value.The XML Declaration
Let's take a closer look at shows.xml (see Listing 2.1). The first line is called the XML declaration and looks like this:
<?xml version="1.0"?>
This line exists to tell the XML processor that this is indeed an XML file. It tells us that the file is based on version 1.0 of the XML specification. Notice that the version property name/value pair is an attribute that follows the earlier rules.
Some of the more useful properties of the document declaration are listed here:
version
— Sets the version of the XML specification being used by the XML document. Currently there is only one version of the specification (version 1.0). However, by declaring this property, you can ensure that the XML processor will know which version of the specification the XML document uses when the next version is released and thus maintain backwards compatibility.encoding
— Defines the character encoding. The default is UTF-8. This is the character set used within the XML document. The character setdefines the numeric value of each character in a file.
files that must be processed, such as an external stylesheet or document type definition (DTD). When you are working with a standalone XML document, you will see a performance gain in document processing when you use the
standalone
attribute.Here are two document declaration examples:
<?xml version="1.0" encoding="UTF-8" ?>
<?xml version="1.0" standalone="yes" ?>
Document Type Declaration
The beginning of an XML file may contain other things after the XML declaration. The document can specify entity declarations, the root element, instructions to XML parsers, or the document type definition (DTD) that should be used to validate the XML document.
The DTD describes the structural requirements of an XML document. This means that a DTD can define the following:
The elements and attributes that can appear in a document
Which elements are child elements and what number, order, and placement they must have
The default values for elements and attributes
It is used to ensure that each XML document follows a specific document model, and thus is in the exact format required for whatever processing may come its way.
Listing 2.2 shows a DTD for the shows.xml file found in Listing 2.1.
Listing 2.2 External DTD File shows.dtd for shows.xml