November 2012
U.S.
Department of Transportation
Federal Highway Administration
Steel Bridge Design Handbook
Structural Analysis
Publication No. FHWA-IF-12-052 - Vol. 8
Notice
This document is disseminated under the sponsorship of the U.S. Department of Transportation in the interest of information exchange. The U.S. Government assumes no liability for use of the information contained in this document. This report does not constitute a standard, specification, or regulation.
Quality Assurance Statement
The Federal Highway Administration provides high-quality information to serve Government, industry, and the public in a manner that promotes public understanding. Standards and policies are used to ensure and maximize the quality, objectivity, utility, and integrity of its information. FHWA periodically reviews quality issues and adjusts its programs and processes to ensure continuous quality improvement.
Steel Bridge Design Handbook:
Structural Analysis
Publication No. FHWA-IF-12-052 – Vol. 8
November 2012
Technical Report Documentation Page
1. Report No.
FHWA-IF-12-052 – Vol. 8 2. Government Accession No. 3. Recipient’s Catalog No.
4. Title and Subtitle
Steel Bridge Design Handbook: Structural Analysis
5. Report Date
November 2012
6. Performing Organization Code
7. Author(s)
Domenic Coletti, PE (HDR) and Jay Puckett, PE, Ph. D. (University of Wyoming)
8. Performing Organization Report No.
9. Performing Organization Name and Address
HDR Engineering, Inc.
12. Sponsoring Agency Name and Address
Office of Bridge Technology Federal Highway Administration 1200 New Jersey Avenue, SE Washington, D.C. 20590
13. Type of Report and Period Covered
Technical Report
March 2011 – November 2012
14. Sponsoring Agency Code
15. Supplementary Notes
This module was edited in 2012 by HDR Engineering, Inc., to be current with the AASHTO LRFD Bridge Design Specifications, 5th Edition with 2010 Interims.
16. Abstract
An important aspect of the structural analysis process is the selection of the mathematical model and associated analysis method. Few absolute guidelines are available for the selection of an analysis method. The number of permutations resulting from various combinations of complicating physical features and mathematical models is virtually boundless. This decision should be based on an evaluation of the nature and complexity of the structure, a thorough understanding of the expected behavior, and
knowledge of the capabilities and limitations of the various analysis options. Therefore, this module provides an overview for the structural analysis of steel girder bridges. Discussions include the applicable loads, descriptions of the various tools and
techniques available, and considerations for selecting the appropriate application or technique for a given bridge.
17. Key Words
Steel Bridges, Analysis Models, 2D Grid, 3D Finite Element Model, Influence Surface, Live Load
18. Distribution Statement
No restrictions. This document is available to the public through the National Technical Information Service, Springfield, VA 22161.
19. Security Classif. (of this report)
Unclassified 20. Security Classif. (of this page) Unclassified 21. No of Pages 22. Price
Form DOT F 1700.7 (8-72) Reproduction of completed pages authorized
Steel Bridge Design Handbook:
Structural Analysis
Table of Contents
FOREWORD ... 5
1.0 INTRODUCTION ... 7
1.1 Analysis Dimensionality ... 7
1.2 Categories of Steel Girder Bridges ... 8
1.3 Complicating Factors ... 9
1.4 Summary of Analysis Tools and Techniques ... 11
2.0 LOADS ... 12
2.1 Live Load Modeling ... 12
2.2 Distribution Factor Method—Example ... 13
2.3 Distribution Factor Method—Concepts ... 13
2.4 Multiple Presence Factors ... 14
2.5 Live Load Positioning ... 15
2.6 Centrifugal Force Effects ... 15
2.7 Modeling of Other Loads ... 15
2.7.1 Dead Loads ... 15
2.7.2 Wind Loads ... 16
2.7.3 Thermal Loads ... 17
2.7.4 Seismic Loads ... 18
3.0 BEHAVIOR CONSIDERATIONS ... 19
3.1 Primary Bending ... 19
3.2 Torsional Stress Effects ... 19
3.3 Lateral Flange Bending ... 23
3.4 Torsional Deformation Effects ... 26
3.5 Load Shifting ... 27
4.0 SIMPLIFIED ANALYSIS METHODS ... 29
4.1 Girder Modeling... 29
4.2 Live Load Modeling ... 30
4.3 Girderline Analysis Using Classical Beam Analysis Methods ... 31
4.4 Computerized Approaches Based on Classical Beam Analysis Methods ... 32
4.5 Approximate Modeling of Curvature Effects ... 33
4.6 V-Load Method (for curved I-shaped girders)... 34
4.7 M/R Method (for curved box-shaped girders) ... 35
4.8 Computerized Approaches to the V-Load and M/R Methods ... 36
5.0 RIGOROUS ANALYSIS METHODS ... 37
5.1 2-D "Grid" Analysis Methods ... 37
5.1.1 Stiffness Modeling for Grid Analysis ... 39
5.1.2 Live Load Modeling for Grid Analysis ... 42
5.1.3 Advantages and Disadvantages of Grid Analysis ... 42
5.1.4 Limitations of Grid Analysis ... 44
5.2 3-D Analysis Methods ... 44
5.2.1 Stiffness Modeling for 3-D Analysis ... 45
5.2.2 Load Modeling for 3-D Analysis ... 46
5.2.3 Advantages and Disadvantages of 3-D Analysis ... 47
5.2.4 Limitations of 3-D Analysis... 47
5.3 Beyond Linear Elastic Behavior and Analysis ... 47
6.0 CLOSING REMARKS ... 49
7.0 REFERENCES ... 50
List of Figures
Figure 1 Illustration of live load distribution. (a) Basic girder bridge, (b) Distribution of a concentrated load such as a wheel load through the deck to various girders and then to the girder supports (after Ref. 15). ... 12 Figure 2 Reduction in Dimensionality to a Girderline with AASHTO Distribution Factors (after Ref. 15). ... 13 Figure 3 Plan view of the development of torque in a curved girder. Vertical loads (primarily gravity loads) are applied to the girder at its centerline, but the centerline of a curved girder is not coincident with a straight line (chordline) drawn between support points. The resulting offset represents a moment arm that, when multiplied by the vertical loads, results in a torque on the girder. ... 20 Figure 4 Illustration of the primary normal stresses which can occur in a curved or skewed I-shaped girder. ... 20 Figure 5 Illustration of the primary shear stresses which can occur in a curved or skewed I-shaped girder. ... 21 Figure 6 Illustration of the primary shear stresses which can occur in a curved or skewed box-shaped girder. ... 22 Figure 7 Illustration of the primary normal stresses which can occur in a curved or skewed box-shaped girder. ... 22 Figure 8 Right (non-skewed) cross frames in skewed bridges connect girders at different points along their span length. As a result, the cross frames are subject to differential displacements. Due to their high in-plane stiffness they undergo an in-plane rotation rather than racking. The top corners of the cross frames move horizontally, causing lateral flange bending in the girders. .... 23 Figure 9 Cross frames skewed to match the bridge skew also induce lateral flange bending. Girders undergo primary bending rotation as well as deflection, and cross frames must rotate with the girders. But, since the axis of cross frame rotation is not perpendicular to the plane of the girder webs, the cross frames try to rack. However, again due to their high in-plane stiffness, they instead experience an in-plane rotation, causing lateral flange bending. ... 25 Figure 10 Detail of skewed cross frame deflections during girder rotation. ... 25 Figure 11 Illustration of the vertical deflection, twisting deformation and warping deformation experienced by curved steel I-shaped girders. ... 26
Figure 12 Illustration of the load shifting phenomenon experienced by curved girders in multiple-girder bridges. The analogy of an eccentrically loaded pile group or bolt group is
apparent in this illustration... 27
Figure 13 Basic free-body diagrams of the V-Load method (5), (shown in a positive moment region) ... 35
Figure 14 Basic free-body diagrams of the M/R method (6). ... 36
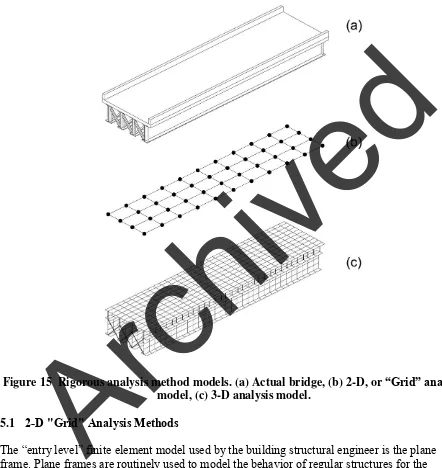
Figure 15 Rigorous analysis method models. (a) Actual bridge, (b) 2-D, or “Grid” analysis model, (c) 3-D analysis model. ... 37
Figure 16 Plane Frame Element. ... 38
Figure 17 Plane Grid Element... 38
Figure 18 A slab-on-girder bridge with a possible grillage mesh. ... 39
Figure 19 Modeling of cross frames for reduction from a 3-D structure to a 2-D element. ... 41
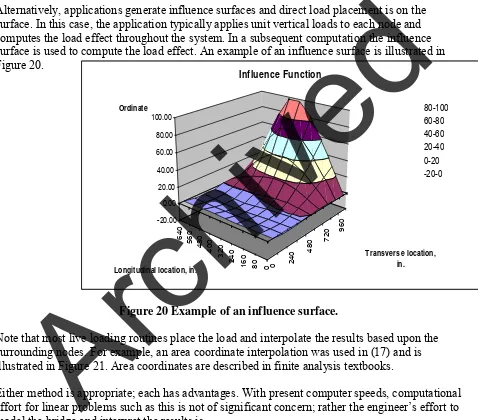
Figure 20 Example of an influence surface. ... 42
Figure 21 Illustration of the distribution of a wheel load to various nodes in a grid analysis using area coordinate interpolation... 43
FOREWORD
It took an act of Congress to provide funding for the development of this comprehensive handbook in steel bridge design. This handbook covers a full range of topics and design examples to provide bridge engineers with the information needed to make knowledgeable decisions regarding the selection, design, fabrication, and construction of steel bridges. The handbook is based on the Fifth Edition, including the 2010 Interims, of the AASHTO LRFD Bridge Design Specifications. The hard work of the National Steel Bridge Alliance (NSBA) and prime consultant, HDR Engineering and their sub-consultants in producing this handbook is gratefully acknowledged. This is the culmination of seven years of effort beginning in 2005.
The new Steel Bridge Design Handbook is divided into several topics and design examples as
follows:
Bridge Steels and Their Properties
Bridge Fabrication
Steel Bridge Shop Drawings
Structural Behavior
Selecting the Right Bridge Type
Stringer Bridges
Design Example: Three-span Continuous Straight I-Girder Bridge
Design Example: Two-span Continuous Straight I-Girder Bridge
Design Example: Two-span Continuous Straight Wide-Flange Beam Bridge
Design Example: Three-span Continuous Straight Tub-Girder Bridge
Design Example: Three-span Continuous Curved I-Girder Beam Bridge
Design Example: Three-span Continuous Curved Tub-Girder Bridge
These topics and design examples are published separately for ease of use, and available for free download at the NSBA and FHWA websites: http://www.steelbridges.org, and
http://www.fhwa.dot.gov/bridge, respectively.
The contributions and constructive review comments during the preparation of the handbook from many engineering processionals are very much appreciated. The readers are encouraged to submit ideas and suggestions for enhancements of future edition of the handbook to Myint Lwin at the following address: Federal Highway Administration, 1200 New Jersey Avenue, S.E., Washington, DC 20590.
M. Myint Lwin, Director Office of Bridge Technology
1.0 INTRODUCTION
An overview of structural analysis of steel girder bridges is provided in this portion of the Steel Bridge Design Handbook. Discussions include the applicable loads, descriptions of the various tools and techniques available, and considerations for selecting the appropriate application or technique for a given bridge.
An important aspect of the structural analysis process is the selection of the mathematical model and associated analysis method. Few absolute guidelines are available for the selection of an analysis method. The number of permutations resulting from various combinations of
complicating physical features and mathematical models is virtually boundless. This decision should be based on an evaluation of the nature and complexity of the structure, a thorough understanding of the expected behavior, and knowledge of the capabilities and limitations of the various analysis options. Selection of a suitable analysis method is key to accurate and complete analysis results that are calculated to an appropriate level of refinement.
1.1 Analysis Dimensionality
All bridges are three-dimensional systems. However, depending upon its complexity, the actual system can potentially be mathematically reduced to a two-dimensional or one-dimensional model. For example, as outlined in the simplified live load distribution discussion below, a three-dimensional bridge can be reduced to a one-three-dimensional girder with the application of just a few simple modification factors.
This potential for reduction and a clear understanding of dimensionality are important. When and how to make these types of dimensional reductions are important decisions that depend on the objectives of the analysis and are a key focus of this module.
Some bridges may be effectively modeled directly using a 1-D model, e.g., a straight I-girder bridge with moderate or no skew. A 1-D model considers an individual girder outside the context of the system and models transverse distribution of live load using an empirically-based
approach.
In some cases, a system can be reduced from three-dimensional (3-D) to a two-dimensional (2-D) grillage (grid) model. This model can include the effect of girder eccentricity and cross frame stiffness in an indirect and/or approximate manner.
The other cases a 3-D analysis approach which includes the depth of the system in the model and associated cross frames, etc., is appropriate. Such models often include shell elements or brick elements to model the deck and use shell and/or frame elements for the girders and transverse components (such as cross-frames).
The above categorizations are simplified for the purposes of this discussion. Many variants exist; for example, another approach often used in current practice is a variant on the 2-D approach called the plate-and-eccentric-beam approach, in which the girders and cross frames are modeled
using a 2-D grillage (grid) approach, but the deck is modeled using plate or shell elements offset from the girder and cross-frame grillage to address the depth of the structure.
1.2 Categories of Steel Girder Bridges
For this discussion of analysis options and tradeoffs, it is useful to group the most common steel girder bridge types into broad categories. These categories are presented below, generally listed in order of increasing behavioral complexity:
• Straight, Non-Skewed, I-Shaped Girder Bridges
• Straight, Non-Skewed, Box-Shaped Girder Bridges
• Straight, Skewed, I-Shaped Girder Bridges
• Straight, Skewed, Box-Shaped Girder Bridges
• Curved I-Shaped Girder Bridges, Skewed or Non-Skewed
• Curved Box-Shaped Girder Bridges, Skewed or Non-Skewed
The choice of analysis method is directly influenced by the nature and complexity of the structure as well as the analysis objectives and the resources available.
In general terms, the behavior of straight girders is less complicated than curved girders. Often straight girders can be analyzed using relatively simple methods. Alternately, curved girders experience torsional effects, both locally within each girder as well as globally through the entire superstructure. This complex behavior often suggests the need for more rigorous analysis.
Adding skew to either a straight or curved girder bridge complicates the behavior and associated analysis required to capture it. Compared to a non-skewed bridge, increased differential
deflection between girders in a skewed bridge results from the adjacent girders and their supports being at different longitudinal positions. The connection of adjacent girders by cross frames affects the loads in both the girders and the cross frames. This behavior is influenced by various geometric parameters including girder spacing, length of bridge, radius of curvature, and skew angle. Quantifying these effects often requires a more refined analysis than would be required for a non-skewed bridge.
Box-shaped girders (a.k.a., tub girders) are generally considered more complicated structures than I-shaped girders. Box-shaped girders have more pieces and parts than I-shaped girders, and these work together as a structural system in more complicated ways than simple I girder plus cross frame systems. The analysis of box-shaped girders by modeling them as line elements requires a number of simplifying assumptions and several additional calculations at the end of the analysis to determine all of the individual member load effects.
1.3 Complicating Factors
In addition to the various levels of complexity inherently associated with different structure types, other factors can also complicate the analysis of any steel girder bridge. In some cases, these complicating factors can be addressed outside the analysis, perhaps by some simple supplemental hand calculations; in other cases these factors may suggest the need for using a more rigorous analysis method. Some of these factors include:
• Flaring of Bridge Width (Variable Girder Spacing) – Some of the more simplified
analysis approaches cannot efficiently address the changes in loads and section properties associated with variable girder spacing.
• Flaring of Girder Width (Variable Width Box-Shaped Girders) – Variation of the width
of a box-shaped girder to accommodate a flaring bridge width results in changes to many structural parameters. Some of the more simplified analysis approaches cannot address these changes.
• Bifurcation (Splitting/Merging) of Bridges and of Girders – Splitting girderlines at
discontinuous bents (i.e., at breaks in superstructure units) may add little, if any, complication to an analysis, but splitting girder lines within a continuous unit and/or away from a support usually involves complicated framing. If a more simplified analysis method is used, the designer must carefully calculate loads in many members, often by hand, needing to make simplifying assumptions that may lead to inaccuracies. In these cases, using a more rigorous analysis method could allow for direct modeling of both load and stiffness.
• Longer Spans – As span lengths increase, so do the magnitudes of loads and load effects
such as moments, shears, and deflections. A more rigorous analysis may be justified in these cases because the greater refinement might lead to economic savings in girder sizes, or – perhaps more importantly - better prediction of deflections, allowing the designer to better address constructibility issues.
• Deeper/Larger Girders – Deeper girders are often associated with longer span lengths,
and the same considerations in choosing an analysis method apply. In addition, some structural response effects become more pronounced in deeper girders. For example, twisting deformations produce greater transverse deflections of cross frame connection points. Bigger, stiffer girders can also require greater forces to maneuver in the field if they are out of position during erection, making the accurate calculation of deflections more important.
• Exceeding the Limits of Applicability of the Current Girderline Live Load Distribution
Factors – The live load distribution factors provided in the AASHTO LRFD Bridge
Design Specifications, 5th Edition (referred to herein as the AASHTO LRFD (5th Edition,
2010)) (1) are not universal; as with any approximate analysis method, limits to their applicability exist. For example, the AASHTO empirical live load distribution factor approach is not applicable for bridges featuring severe skew, curvature, variable girder
spacing, and other complications. Some refined analysis techniques can directly calculate the distribution of live loads to various girders by means of direct structural analysis, avoiding the need to use live load distribution factors. Alternatively, as suggested above, even relatively simple 1-D (line girder) analysis models can still use live load distribution factors that are based upon rigorous analysis.
• Type of Diaphragms/Cross-Frames – Modeling truss-type cross frames (as opposed
to rolled section or built-up plate diaphragms) in more simplified analysis models (such as grid analysis models) involves making simplifying assumptions to approximate the response of a truss structure using a line-element model. Furthermore, the results of the line-element model need to be converted back to individual member forces for design of the cross frame. More rigorous analysis methods allow direct modeling of truss-type cross frames.
• Severe Curvature or Skew – Skew in a steel girder bridge introduces complexity to
the system stiffness and associated load paths; in cases of severe skew a more rigorous analysis may be warranted even for straight girder bridges in order to more carefully quantify differential deflections, cross frame forces and associated fatigue stresses and bearing reactions (at different construction stages as well as in service). Currently there is little quantified guidance correlating the severity of skew to the required level of analysis refinement, although ongoing research is anticipated to begin providing this guidance in the near future.
• Variable Web Depth (Haunched Girders) – More simplified analysis methods either
do not allow for non-prismatic girder cross sections, or require simplifying assumptions to model the section properties and leave the calculation of stress
resultants in nonparallel flanges to the designer. While the approximations introduced in stiffness modeling typically have a negligible effect on the final results of the stiffness analysis used to determine load effects, the more important aspect of modeling non-prismatic girders is the use of the associated section properties in the computation of stresses due to the load effects and the associated resistances. Minor non-prismatic features such as flange transitions with a uniform depth web can typically be safely ignored for structural analysis. However, such variations must be included in the computations of stresses and resistances.
• Unusual Substructures (Integral Substructures, Flexible Substructures such as Single
Column Piers or Straddle Bents, or Multiple Fixed Piers) – Unusual substructure
configurations can noticeably affect the structural response of superstructure elements. For example, if a bent cap provides different vertical stiffness at each bearing, the load distribution to the girders is affected. Likewise, integral
substructures present additional stiffness and loading complexity. Thermally-induced stresses may be introduced in girders by excessive restraint of expansion/contraction by unusual substructures. Load effects and resulting forces and stresses can be increased due to the increased stiffness near integral features such as pier caps and abutments.
• Complicated Bearing Configurations – In some cases, the orientations of fixed,
partially fixed, or free bearings, particularly in curved girder bridges, affect the end restraint provided to girders thereby changing the structural response.
The presence of one or more of these complicating factors should prompt the consideration of increased refinement in one or more of the following:
• Modeling of the stiffness either locally and/or globally,
• Calculation of load effects,
• Calculation of deflections and rotations, and
• Modeling of various loading effects (dead load, live load, thermal load, and accounting for the sequence of their application)
In these cases, using a rigorous analysis method may be desirable if it allows direct calculation of important load effects, in lieu of approximating these effects manually outside the main analysis by a less rigorous approach. For example, it may be more desirable to analyze a bridge with variable girder spacing using a more refined analysis technique such as a 2-D or 3-D approach in order to address distribution of live load in a more rigorous manner than could be achieved with a 1-D approach using the AASHTO empirical live load distribution factors with approximate manual adjustments based only on evaluation of girder spacing.
1.4 Summary of Analysis Tools and Techniques
In this module, many analysis methods are discussed and placed in a context of their level of refinement and also their level of complexity. These can be placed into two broad categories:
Simplified Analysis Methods: Girderline simplification supported by the following mathematical methods:
• Classical beam analysis (for straight girders)
• V-Load Method (for curved I-shaped girders)
• M/R Method (for curved box-shaped girders)
More Rigorous Analysis Methods: Two or three dimensional models supported by the following types of numerical models and applications:
• Grillage “grid” analysis via 2-D computer applications
• 3-D analysis via applications using a combination of frame, plate, membrane, and/or shell elements.
2.0 LOADS
Loads and Load Combinations are outlined in detail in the module titled Loads and
Combinations. Application of these loads in an analysis is discussed herein.
2.1 Live Load Modeling
There are two fundamental ways to apply live loads:
• Apply the distributed effects of a full lane to a girderline model
• Apply the 3-D representation of load to a rigorous model.
Figure 1 Illustration of live load distribution. (a) Basic girder bridge, (b) Distribution of a concentrated load such as a wheel load through the deck to various girders and then to the
girder supports (after Ref. 15).
2.2 Distribution Factor Method—Example
In the first case, wheel loads illustrated in Figure 1 are applied to a 1-D beam model and the actions are determined. These actions are subsequently scaled to account for the transverse load distribution, i.e., the amount of load applied to a girderline. This scale factor is called a
distribution factor. Section 4 of the AASHTO LRFD (5th Edition, 2010) (1) provides equations to determine these factors that are a function of the bridge parameters including girder spacing, S, span length, L, girder stiffness, Kg, and deck thickness, ts. The live load distribution factor for a
composite girder bridge with two or more (multiple) design lanes loaded is:
Simple modifications also are provided for skew, e.g.,
Skew Adjustment = 1 – c1(tan θ)1.5
Figure 2 Reduction in Dimensionality to a Girderline with AASHTO Distribution Factors (after Ref. 15).
Reference Section 4 of the AASHTO LRFD (5th Edition, 2010) (1) for all of these formulas and methods.
2.3 Distribution Factor Method—Concepts
As previously described, spatial dimensionality may be reduced by using a distribution factor. For this discussion, bending moment is used for illustration but the concepts are similar for shear, reactions, or deflection. The maximum moment at a critical location is determined with a numerical method and is denoted as Mrefined. Next, the same load is applied to maximize moment
in a single girder at the same critical longitudinal location and a 1-D beam analysis is performed. The resulting maximum moment is denoted as Mbeam.
The distribution factor, g, is defined as
g = Mrefined / Mbeam
In the case of a 1.5-D analysis illustrated above, this factor is used to convert the load effects established in the beam-line analysis to the estimated results of the entire system. Thus, the beam line is analyzed for the live load and then multiplied by the distribution factor, g, to obtain the estimated load effect for the beam in the system.
In the research and specification development work, these factors are established by analyzing many systems with refined methods to establish the actions. Hundreds of analyses are performed for bridges and the effects of the relative stiffness of the various components, geometry effects, and load configuration are studied. The results of these analyses are then used to establish empirically-based formulas that contain the relevant system parameters as variables. The development of the AASHTO LRFD (5th Edition, 2010) (1) distribution factors followed this
approach.
These formulas can then be used by designers to estimate the distribution factors without performing the refined analysis. Some compromise is made in accuracy but this method
generally gives good results for routine bridges. The critical aspect of using distribution factors is understanding their limitations and the restrictions on their use relative to the bridge under
consideration. Often, the same considerations that suggest using a more rigorous modeling approach (e.g., 3-D vs. 2-D modeling) suggest using a more rigorous approach to calculating live load effects.
2.4 Multiple Presence Factors
Within the AASHTO LRFD (5th Edition, 2010), equations provided for distribution factors
contain the effects of load within adjacent traffic lanes. The development of these equations, e.g., AASHTO LRFD (5th Edition, 2010) (1), included one-, two-, three-, etc. loaded lanes. In each
analysis, the multiple presence factors were applied as outlined in the module titled Loads and
Combinations (i.e., m =1.2, 1.0, 0.85, 0.65).
The AASHTO methods often require the use of the lever rule or the rigid rotation method; see Section 4 of the AASHTO LRFD (5th Edition, 2010) (1). In these cases, the multiple presence
factors must be applied during the analysis for the number of lanes considered in that analysis. For example, if the lever rule is used for one loaded lane, then a multiple presence factor of m = 1.2 must be applied.
In a similar manner, when a rigorous analysis is used, the multiple presence factors must be applied by the analyst and the controlling number of loaded lanes is established. This is one of the complicating features of 2-D and 3-D modeling as critical load placement, multiple presence, and enveloping all of this for one- and multiple lanes loaded are required.
2.5 Live Load Positioning
AASHTO LRFD (5th Edition, 2010) (1) requires that a standard design vehicle (and lane load) have a 6 ft gage, or spacing, between wheel lines. A truck is positioned within a design lane 10 feet wide which in turn is positioned within a 12 foot traffic lane to maximize loading effects. Additional requirements include the following:
• The outside wheel shall be placed no closer than 2 ft from edge of the lane or the face of the barrier except as noted below
• The outside wheel should not be placed closer than 1 ft from the face of the barrier for deck overhang design
• The minimum spacing between wheel lines of adjacent trucks is 4 ft
• The transverse location of one truck or several adjacent trucks can be anywhere within the transverse cross section that meets the above.
For practical application of the above, automated algorithms are used to place the truck, apply multiple presence factors, and envelope the results.
2.6 Centrifugal Force Effects
In addition to modeling vertical live load effects, since most analyses include a relatively refined live load model where individual wheel lines are used as the live load tracks, the transverse load and overturning effects of centrifugal force and superelevation in curved bridges should be included in the analysis. A simple method for including these effects is presented in reference (5).
2.7 Modeling of Other Loads
2.7.1 Dead Loads
Self-weight of girders can be modeled manually as a distributed load in most analysis methods and is often calculated automatically by computer analysis programs.
Self-weight of other members such as diaphragms, cross frames, bracing, stiffeners, etc., are often approximated in simpler analysis methods as a percentage of girder self-weight, and assumed to be applied uniformly to the girders. In more rigorous analysis methods (such as 2-D Grid analyses or 3-D analyses), the self-weight of many of the larger components (such as diaphragms, cross frames, or bracing) may be calculated automatically by the computer analysis if these members are individually entered in the application.
Even in the most rigorous 3-D analyses though, it is often the case that smaller members such as stiffeners are not directly modeled and their self-weight is typically applied as a percentage of the girder self-weight.
Other non-composite loads are usually modeled as distributed line loads on the girders, e.g., the self-weight of concrete haunches. The self-weight of the deck is usually distributed to each girder based on simple span behavior (i.e., tributary area) and then modeled as distributed line loads on the girders.
One complication that arises in assessing the effects of deck and haunch dead load is the need to consider staged deck placement, particularly in larger, longer bridges. In such cases, the concrete deck is often placed in sections which are allowed to harden prior to placement of the next deck section. In addition, the concrete strength varies for each placement since it is time-dependent, and the concrete does not achieve its full strength before subsequent sections are placed. The calculation of load effects must consider the changing stiffness and the implications of load effects introduced to various parts of the structure in their non-composite condition, with later loads being applied to a structure which is partly composite and partly non-composite.
A distinct but important topic is the need to address lateral flange bending which can occur during deck placement due to the application of deck overhang bracing reactions to the bottom flange. Reference (23) offers a good treatment of this subject.
The modeling of load effects carried in a composite manner is a topic with some degree of subjectivity involved. The AASHTO LRFD (5th Edition, 2010) (1) allow for the distribution of
composite loads equally to all girders in a cross section. However, many designers use this provision only on narrow structures; for wider structures they will give some consideration to the location and nature of the load. For example, in a wide superstructure, the distribution of barrier rail loads to only a few of the exterior girders may be reasonable. Several owner/agencies also have specific guidelines on this topic. In most cases, these simplifying assumptions are based primarily on engineering judgment, although some designers use a simplified method such as the lever rule. If a more rigorous analysis method (such as a 3-D analysis) is used, often the analysis model can assess the distribution of various composite loads in a more refined manner. It should be noted that the self weight of the barriers and other discrete permanent load effects are
generally small relative to other loads.
2.7.2 Wind Loads
Wind loads should be included in the analysis. The key task is determining the appropriate method for addressing these loads.
In many cases it may be appropriate to address the effects of wind loads separately from the primary analysis of the girders. The primary wind load effects on simpler, shorter span structures are to induce lateral flange bending stresses to the bottom flanges and to contribute to cross frame and diaphragm loads.
A common assumption is to distribute the wind load resulting from wind pressure on the girder web equally to the top and bottom of the girder. The load distributed to the top of the girder is directly carried into the deck with no effect on the girder. The load effect in the deck itself is
transfer of the wind loads to supports. The support shear connectors and diaphragms transfer the wind load, as they do transverse seismic loads, to the bearings (if non-integral supports are used) and the substructure.
The wind load distributed to the bottom of the girder is applied to the bottom flange as a
transverse distributed load along the length of the girder. The bottom flange may be modeled as a continuous beam on multiple pinned supports (because the cross frames are relatively stiff) and the resulting lateral flange bending stresses are based upon the lateral flexural bending moment. These stresses are superposed, typically according to the one-third rule, with the girder flange primary bending stresses due to gravity loads and thus included in the girder design as
appropriate. In many cases it can be shown that these added lateral flange bending stresses do not control the design due to the nature of the load factors in the AASHTO load combinations. Section 3 of the AASHTO LRFD (5th Edition, 2010) (1) includes these stresses in the load effects and outlines their application in detail for various limit states.
The reactions at each cross frame are calculated and applied as loads to the cross frames. The cross frames act to transfer this load to the top of the next adjacent girder via either truss action or shear diaphragm action depending on whether the cross frame is a truss cross frame or a plate-like member (e.g., a channel, bent plate, or deep W-section). Again, the load transferred to the top of the girder is assumed to be directly transferred into the deck as previously described. The loads induced in the cross frames are added to any other load effects as appropriate. In the case of straight, non-skewed girders, this wind load is often the only quantified load in the
intermediate cross frame analysis. (Transverse seismic load is of interest for support cross frames, as discussed below.)
In some cases, it may be appropriate to include the wind load effects directly in the main superstructure analysis. Wind load may have a more pronounced influence on the girder design in long span, deep girders, or girders with unusual framing plans or unusual substructure conditions. Experience and engineering judgment are required in determining when it may be appropriate to include wind loading directly in the main girder design.
Evaluation of the construction sequence should address wind load effects. Often, large parts of a steel girder bridge are erected and exposed to wind loading prior to deck placement and often prior to complete installation of all girders and cross frames. Insufficiently braced girders can suffer damage or even collapse due to wind loading during construction. Additionally, some nominal deflection check under a normal wind should be conducted to insure that the entire system is not so flexible as to jeopardize worker safety or create work delays.
2.7.3 Thermal Loads
Thermal effects can also cause loads in steel girders. Whether these loads are significant or negligible depends on several factors such as the structural configuration of the bridge, fixity of the bearings, and the nature of the thermal effects.
For example, in bridges with relatively simple framing plans and using bearings that freely allow thermal expansion and contraction of the superstructure it is reasonable to neglect the effects of
routine temperature rise and fall in the design of the superstructure. But in bridges with complex framing plans, the bearings may provide some restraint to thermal movements. Similarly, bridges that feature unusual bearing conditions or bridges that use integral substructures may also present cases where thermal movements are restrained and may induce internal loads and stresses.
Careful assessment of the restraints, particularly as a result of bearing type and configuration, and their impact on thermally-induced loading effects is advised in such cases.
A thermal gradient is another potential cause of temperature-related loads. If, due to the nature of the thermal effect or the nature of the structure, a thermal gradient occurs across the cross section of a girder, internal stresses will develop. For example, if part of a girder is exposed to
significant solar radiation, while another part of the girder is shaded, the heated part of the girder will expand relative to the shaded portion, causing internal stresses due to the variation of
temperature with depth.
2.7.4 Seismic Loads
For routine bridges seismic loads, like wind loads, are treated as equivalent static lateral loads. These lateral loads in turn are a function of the seismicity of the site and the weight of the bridge. All other things being equal, therefore, steel bridges have an inherent advantage seismically since they typically weigh less than half of the concrete superstructure alternative.
There are two distinct philosophies for addressing seismic effects on structures: i) ductile “capacity design,” and ii) seismic isolation. In ductile capacity design, each element in the seismic load path must possess adequate resistance and ductility to transmit inertial loads from the superstructure mass into the ground. For typical steel bridges, most of the mass is in the deck. Thus, the transverse seismic load path over the supports consists of shear connectors,
diaphragms, bearings, substructures and their interconnections. In seismic isolation design, the uncoupling of the superstructure from the substructure reduces the magnitude of the seismic forces that must be transmitted through the elements in the seismic load path, albeit at the
expense of larger movements. Sources addressing these concerns specific to steel superstructures include references 25 through 29.
A complete discussion of the effects of seismic loads on steel girder bridge superstructures is beyond the scope of this document. However, it can be said that seismic effects on
superstructures should be considered for bridges in regions of high seismicity, particularly if an unusual superstructure configuration is used. Noncomposite structures such as those used for freight rail or light rail transit bridges, or bridges featuring unusually large or very concentrated loads with potential for significant inertial loading, also represent cases that may warrant such consideration.
In many cases the owner/agency may have specific guidance for the design and analysis of bridges in earthquake prone regions.
3.0 BEHAVIOR CONSIDERATIONS
The behavior of steel girder bridges can be broadly divided into two categories:
• Primary Bending — Vertical shear, vertical moment, vertical deflections and end rotations, as are experienced by all bridges.
• Horizontal Curvature and Skew Effects — Torsional stresses, warping and lateral flange bending, load shifting, and warping and twisting deformations
Note: In the following sections, many effects are characterized as curvature effects. However, similar twisting and lateral flange bending effects occur in straight skewed steel girder bridges as is described in detail later.
3.1 Primary Bending
Curved and/or skewed steel girder bridges experience the same gravity loading effects (dead load and live load) as straight girder bridges. All bridges are subject to primary shear and bending moment effects as well as vertical deflections and end rotations. These effects are familiar to bridge engineers, so an extensive discussion is not warranted; however, it is important to mention them because they are an essential component of stress and deformation for straight, curved, and/or skewed steel girder bridges.
3.2 Torsional Stress Effects
In addition to the basic vertical shear and bending effects described above, a curved girder is also subjected to torsional effects. The torsion in curved girders arises from the fact that the center of loading (center of gravity) of each span in a curved girder is offset from a chord line drawn between the supports for that span. This offset represents an eccentricity which, when multiplied by a given vertical load (dead load or live load), results in a torque on the girder (Figure 3).
Figure 3 Plan view of the development of torque in a curved girder. Vertical loads (primarily gravity loads) are applied to the girder at its centerline, but the centerline of a
curved girder is not coincident with a straight line (chordline) drawn between support points. The resulting offset represents a moment arm that, when multiplied by the vertical
loads, results in a torque on the girder.
Figure 4 Illustration of the primary normal stresses which can occur in a curved or skewed I-shaped girder.
Torsion in steel girders causes normal stresses and shear stresses. Because I-shaped girder and box-shaped girders carry these stresses in different ways, they are considered separately.
I-shaped girders have low St. Venant torsional stiffness, so warping stresses are the primary torsional load effect. The total state of normal stress in an I-shaped girder is a combination of axial stress, primary vertical bending stress, horizontal bending stress and warping normal stress (Figure 4).
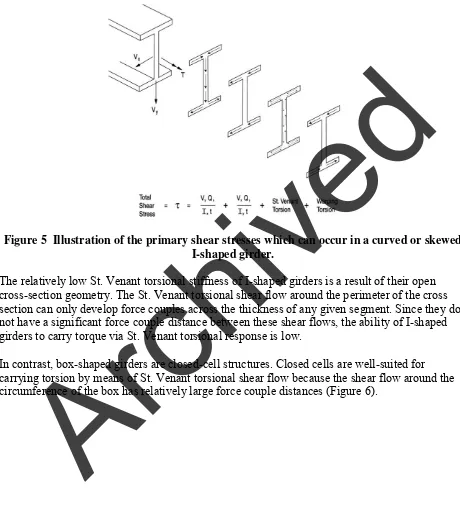
The total state of shear stress in an I-shaped girder is a combination of vertical shear stress, horizontal shear stress, a small St. Venant torsional shear stress, and warping shear stress (Figure 5
Figure 5 Illustration of the primary shear stresses which can occur in a curved or skewed I-shaped girder.
The relatively low St. Venant torsional stiffness of I-shaped girders is a result of their open cross-section geometry. The St. Venant torsional shear flow around the perimeter of the cross section can only develop force couples across the thickness of any given segment. Since they do not have a significant force couple distance between these shear flows, the ability of I-shaped girders to carry torque via St. Venant torsional response is low.
In contrast, box-shaped girders are closed-cell structures. Closed cells are well-suited for carrying torsion by means of St. Venant torsional shear flow because the shear flow around the circumference of the box has relatively large force couple distances (Figure 6).
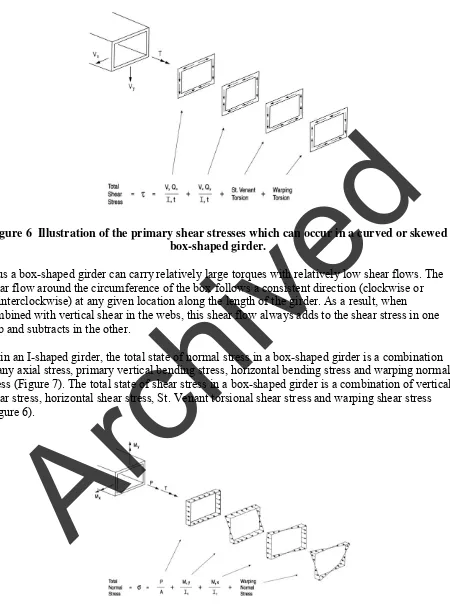
Figure 6 Illustration of the primary shear stresses which can occur in a curved or skewed box-shaped girder.
Thus a box-shaped girder can carry relatively large torques with relatively low shear flows. The shear flow around the circumference of the box follows a consistent direction (clockwise or counterclockwise) at any given location along the length of the girder. As a result, when combined with vertical shear in the webs, this shear flow always adds to the shear stress in one web and subtracts in the other.
As in an I-shaped girder, the total state of normal stress in a box-shaped girder is a combination of any axial stress, primary vertical bending stress, horizontal bending stress and warping normal stress (Figure 7). The total state of shear stress in a box-shaped girder is a combination of vertical shear stress, horizontal shear stress, St. Venant torsional shear stress and warping shear stress (Figure 6).
Figure 7 Illustration of the primary normal stresses which can occur in a curved or skewed
3.3 Lateral Flange Bending
Many practical effects result from the way girders carry torsion. For example, the warping normal stresses caused by torsion as described above for I-girders represent one source of what are called lateral flange bending stresses. Lateral flange bending stresses are an important part of the design equations for flange stresses in I girders. Most curved I-girder analysis techniques include, as a key feature, some method of calculating lateral flange bending stresses, and most formulae for girder design (applied loads/stresses vs. load/stress capacity) include an accounting of lateral flange bending stresses.
Note that curvature is not the only source of lateral flange bending stresses. Other causes include wind loads, construction loads and differential girder displacement. Related to the latter and of interest to this discussion, though, is the effect of skew in causing lateral flange bending moments.
As mentioned previously, skewed bridges exhibit many of the same behaviors as curved girders. For example, in a bridge with straight girders, but with an overall skew and right (non-skewed) cross frames, the cross frames cause lateral flange bending.
Figure 8 Right (non-skewed) cross frames in skewed bridges connect girders at different points along their span length. As a result, the cross frames are subject to differential displacements. Due to their high in-plane stiffness they undergo an in-plane rotation rather
than racking. The top corners of the cross frames move horizontally, causing lateral flange bending in the girders.
Right cross frames in skewed bridges connect adjacent girders at different positions along the length of each girder, with each girder experiencing different displacements at the point of connection. At these locations, the deflections of the girders attempt to cause forced racking displacements in the cross frames (Figure 8), but the cross frames, being much stiffer in the transverse direction than the girders, resist these deformations by developing internal loads and instead undergo an in-plane rotation, which causes lateral flange bending in the girders.
The cross frame loads include horizontal components that induce lateral flange bending effects, analogous to the effects that are the basis of the V-Load method of curved girder analysis
discussed later.
Furthermore, near the ends of the girders in skewed bridges, cross frames begin to act as alternate load paths as their stiffness approaches or exceeds that of the girders. Even if select cross frames are oriented along the skew, or if select cross frames are omitted (8), the remainder of the cross frames still undergo this type of behavior and cause the skewed girder system to exhibit characteristics similar to a curved girder system, even if the girders themselves are straight.
It may initially seem that this effect can be avoided by skewing the cross frames so that girders are not connected at points of differential deflection, but this does not completely eliminate the introduction of cross frame-induced lateral flange bending. Bending rotations (rotations about the horizontal transverse axis of the girder) are associated with vertical deflections of the girders caused by primary vertical bending. These primary bending rotations are well-known. Assuming uniform bending along the skewed bridge cross-section, skewed cross frames would connect the girders at points of identical deflection and rotation.
However, as the cross frames rotate to match the primary girder rotations, they also try to rack because they are trying to rotate about the transverse axis of the girders, which is not coincident with the centerline axis of the cross frames because they are skewed. However, due to their high in-plane stiffness, the cross frames resist this racking deformation by developing internal forces and instead experience an in-plane rotation. So as the top and bottom corners of the cross frames move forward and backward to follow the primary girder rotation, they also move outward and inward along the plane of the cross frame (Figure 9), inducing lateral flange bending in the girder flanges. Figure 10 shows a more detailed view of the relative displacements of the top and
bottom struts of the cross frames as they rotate with the girder. Beckman and Medlock (24) provide a detailed discussion of this behavior and other skewed steel bridge considerations.
Figure 9 Cross frames skewed to match the bridge skew also induce lateral flange bending. Girders undergo primary bending rotation as well as deflection, and cross frames must rotate with the girders. But, since the axis of cross frame rotation is not perpendicular to the plane of the girder webs, the cross frames try to rack. However, again due to their high
in-plane stiffness, they instead experience an in-plane rotation, causing lateral flange bending.
Figure 10 Detail of skewed cross frame deflections during girder rotation.
The examples above are just a sample of how a straight bridge with a skew exhibits behavior similar to that of a curved girder bridge and why it must be designed using many of the same approaches. Several references (5, 11, 12, 30, and 31) offer good discussions of the effects of curvature and skew in steel girder bridges.
3.4 Torsional Deformation Effects
In addition to causing significant stresses in both I-shaped and box-shaped girders, torsion also causes significant deformations. Curved girders not only deflect vertically, they also twist. They not only experience end rotations, they also warp (Figure 11). Depending on the sharpness of the curvature, the length of the spans, the framing of the bridge and the magnitude of the loads, these deformations can become significant, sometimes large enough to be a serious consideration affecting the constructor's ability to assemble adjacent girders in the field.
Figure 11 Illustration of the vertical deflection, twisting deformation and warping deformation experienced by curved steel I-shaped girders.
Curved girder bridges behave as an integral system, where the movement of one individual girder influences that of the others. The sequence of erection, as well as the number of girders in place and connected by cross frames at any given time during erection affects their response to loading. Contract plans should clearly indicate the assumed erection sequence (32). If the constructor chooses to erect the girders in a different sequence an engineer should review (and reanalyze) the proposed erection sequence in detail during shop drawing review.
The AASHTO LRFD (5th Edition, 2010) (1) explicitly require designers to assess these
deformations, address them as appropriate on their plans and indicate the assumed erection sequence and intended girder positions at various stages of construction.
Again, note that these deformation issues are not limited exclusively to curved girders. Skewed bridges experience many of the same phenomena.
3.5 Load Shifting
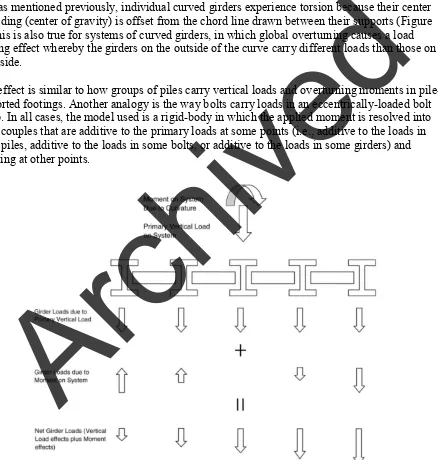
As was mentioned previously, individual curved girders experience torsion because their center of loading (center of gravity) is offset from the chord line drawn between their supports (Figure 3). This is also true for systems of curved girders, in which global overturning causes a load shifting effect whereby the girders on the outside of the curve carry different loads than those on the inside.
This effect is similar to how groups of piles carry vertical loads and overturning moments in pile-supported footings. Another analogy is the way bolts carry loads in an eccentrically-loaded bolt group. In all cases, the model used is a rigid-body in which the applied moment is resolved into force couples that are additive to the primary loads at some points (i.e., additive to the loads in some piles, additive to the loads in some bolts, or additive to the loads in some girders) and relieving at other points.
Figure 12 Illustration of the load shifting phenomenon experienced by curved girders in multiple-girder bridges. The analogy of an eccentrically loaded pile group or bolt group is
apparent in this illustration.
As an example, this behavior in a simple span curved girder bridge results in the girders on the outside of the curve carrying more load (Figure 12). This behavior characteristic generally holds for most curved girder bridges, but exceptions exist where variations in the direction of this type of behavior can occur depending on issues such as the span length balance in multiple span continuous girder bridges (4).
Not only is this load shifting phenomenon itself significant, but the specific load path for achieving this load shifting is also important. Loads are transferred from one girder to the next through the cross frames, which are thus primary load carrying members and must be designed, fabricated, and inspected as such.
4.0 SIMPLIFIED ANALYSIS METHODS
Approximate analysis techniques for curved and skewed steel girder bridges cover a range of methods. The most commonly used methods are described here.
Approximate analysis techniques have several advantages that make them attractive for specific applications, even in this age of computerization. Many of the approximate analysis techniques are based on equilibrium approaches and are quite transparent, giving the engineer a good feel for one distribution of forces through a bridge. Most of the approximate analysis techniques are also relatively simple and quick to use, making them valuable for preliminary designs or as approximate tools for validating more complex analyses.
However, approximate analysis techniques should only be considered rough tools for bridges with anything beyond the most basic geometry and framing. The simplifications and
approximations involved in applying the approximate analysis techniques to more complex bridges tend to reduce the accuracy of their results, particularly with regard to the prediction of structural deformations. Use of approximate analysis techniques should be limited to preliminary design or the design of relatively simple structures.
4.1 Girder Modeling
How to approach the modeling of individual girders depends greatly on the type of analysis method being used and whether girders are considered individually or the entire superstructure system is modeled. In the case of most of the simplified analysis methods, however, the typical approach is to model a single girder, rather than modeling the entire multiple girder cross section.
For such an analysis, the designer must determine appropriate cross-sectional properties. The non-composite steel girder cross-sectional properties are generally easy to quantify as the dimensions of the girder are clearly and unambiguously identified. For the composite case, the problem becomes slightly more complex, with an important parameter being the “effective width” of the composite deck. The AASHTO LRFD (5th Edition, 2010) Specifications (1) offer
explicit guidelines for effective width estimates.
Box-shaped sections deserve some special mention when discussing effective width of the composite deck because each girder has two webs and two top flanges, and thus two sets of effective deck widths. Overlaps of the calculated effective deck width between flanges in a single box section should be neglected in calculating the girder’s composite cross section properties; however gaps in effective deck widths when wide web spacings are used may exist. Again, the AASHTO LRFD (5th Edition, 2010) Specifications (1) offer guidance.
A subset of the modeling of composite section properties is the appropriate treatment of the cross section in negative moment regions. In those areas, because the deck is in tension, it is often cracked, and its effectiveness as part of the cross section is subject to some debate. Various different opinions on how to address this issue exist among owner/agencies. Some engineers consider the bridge to be composite throughout, in both positive and negative moment regions.
Others consider the girders to be composite in the positive moment region only, and count only the girder cross section in negative moment regions. Still others consider the girder composite in the positive moment region, but will consider only the girder cross section plus the cross
sectional properties of the deck longitudinal reinforcing in the negative moment regions. Designers are advised to discuss the preference of the appropriate owner-agency with regard to this issue.
Another consideration in modeling a single girder is quantifying the lateral support of the girder. Typically the calculation of loading effects (moments, shears, deflections, and stresses) is not affected by lateral support conditions, but the calculation of the capacity of various elements, particularly compression flanges, is strongly dependent on lateral support. Load-dependent second-order effects may be estimated with codified magnifications. Most commonly, this issue breaks down to simply modeling the cross-frame spacing as this is usually the primary
consideration in determining the unbraced lengths of compression flanges.
What constitutes a lateral support is also an important issue. Recent research into lateral bracing of steel compression members has shown that minimum stiffness and strength requirements must be met in order for a lateral support to adequately brace a compression flange (13).
The modeling of support conditions is of great importance when modeling a single girder, just as it is when modeling the entire superstructure in more rigorous analysis methods. Consideration should be given to bearing configurations and any restraints offered by bearings, as well as by integral substructures, when used.
Keep in mind that simply using an “integral” substructure does not ensure that the support offers rotational restraint to the girder. Most designers and owner-agencies neglect any restraint from integral abutments in superstructure design. Typically, the design and detailing of integral end bents/abutments focuses on providing flexibility for accommodating bridge thermal movements without inducing excessive loads into the end bent/abutment. For this reason, most engineers have concluded that the relative stiffness of integral end bents/abutments is much less than that of the superstructure and that the girder can be assumed to behave like a simply-supported structure at the end bent/abutment.
However, integral supports do offer restraint against torsional rotations associated with lateral torsional buckling. Additionally, maintenance-prone joints are often reduced, eliminated, or relocated off the structure through the use of integral substructures.
4.2 Live Load Modeling
Component dead loads on bridges are generally static (permanent), unchanging loading
conditions which are usually relatively easy to deal with. Live loads, on the other hand, are much harder to quantify as they represent a myriad number of loads applied in an infinite number of positions and combinations of positions across the length and width of the bridge. How live loads are addressed can make the analysis either simple to perform and understand or make it
unmanageable and overwhelming.
There are two primary ways to address live load modeling for bridge structures. First is what can be called the “brute force” method, which involves running analyses of multiple live load cases. In computer applications, this is accomplished using a live load generator — a computer routine that produces literally hundreds or thousands of live load cases, each representing a different load (truck load, lane load, combinations of multiple truck or lane loads, etc.) applied at different positions along the structure. For each live load case, the analysis model is fully calculated and shear and moment results for all key members are developed. The multiple live load case method generates a huge pool of results to develop the load effect envelopes for various members in the structure.
An alternative to the multiple live load case method is the influence line, or influence surface method. An influence surface is an influence line approach applied in two dimensions rather than just one dimension. A full explanation of the influence surface method is beyond the scope of this module, but a summary description is warranted.
In this approach, the response of a given point in the model (e.g., a point on a girder, deck, cross frame, etc.) is calculated for a unit load vertically applied to the deck surface at numerous locations, usually in a grid. Instead of presenting these responses in terms of the results of multiple iterative analyses, however, the responses are directly presented in terms of the
maximum and minimum response. The influence surface approach to modeling live load effects thus allows focus on the maximum/minimum loading responses of the structure at given
locations. The amount of output from an influence surface analysis is much less, and the designer can focus on the critical loading effects rather than spending substantial time collating thousands or millions of numbers to determine envelope results.
The specific influence surface approach and the associated algorithms used by different applications can vary significantly. Some applications position for critical effects, some will move a truck or group of trucks longitudinally along the bridge (influence surface), while others will move the same transversely. The computational effort required within the application is strongly dependent upon the type of algorithm used.
The value of an influence surface approach becomes apparent for the more complicated and involved levels of analysis discussed later.
4.3 Girderline Analysis Using Classical Beam Analysis Methods
Straight, non-skewed bridges are ideal candidates for using classical beam analysis techniques such as the moment distribution method, the moment-area theorem, etc. These types of structures have a structural behavior that is reasonably modeled in one dimension only and can often be characterized simply by beam analysis. Typically this is referred to as line girder analysis or
girderline analysis.
Classical beam analysis techniques have several advantages that make them attractive for
specific uses. Many of the classical beam analysis techniques are based on direct equilibrium and are quite transparent, clearly illustrating the distribution of forces through a bridge. Most
classical beam analysis techniques also are simple and quick to use, making them valuable for preliminary designs or as approximate tools for validating more complex analyses.
However, girderline analysis techniques should only be considered approximate tools for bridges with characteristics beyond the most basic geometry and framing. The simplifications and
approximations involved in applying the classical beam analysis techniques to more complex bridges tend to reduce the accuracy of their results, particularly with regard to the prediction of structural deformations. Use of girderline analysis techniques should be limited to the design of relatively simple structures.
In addition, before undertaking an analysis using the classical beam analysis techniques by hand, designers are advised to consider the complications which may arise from the need to model moving live loads, as described in detail above. Similarly, designers should consider the complexity associated with performing the AASHTO specified capacity calculations at all potentially critical sections along the length of the girder. Performing these code checks by hand for strength, service, fatigue, deflection and other issues can be simple for shorter structures but may become a very tedious task for longer bridges.
Prudence is required in applying simple girderline analysis methods to bridges with complicated framing plans. While these simpler methods may be more transparent and easier to implement, the number of simplifying assumptions and approximations needed to adapt a girderline analysis to a complex framing plan may affect the accuracy and understanding of important behavior.
A full discussion of the classical beam analysis methods is not warranted in the Steel Bridge Design Handbook as these methods are documented in numerous textbooks.
4.4 Computerized Approaches Based on Classical Beam Analysis Methods
One way to address the complexity of live load modeling in a girderline analysis is to computerize the analysis calculations. There are numerous ways to incorporate computer technology into a girderline analysis. Usually, the extent of the design process covered in the computer application determines the effort required to create and use that tool. An application may be as simple as a spreadsheet that tabulates moments and shears for the beam, or it may be as complicated as a custom program which covers the entire design process, from generation of geometric parameters and cross section properties, quantification of framing considerations, calculations of shears, moments, stresses, and deflections, and comparisons to specification-derived capacities and other code provisions.
Spreadsheets offer flexibility and control in girderline analyses. The limitations to the
complexity and extent of the spreadsheet are based primarily on the time and money available and the skills of the designer in programming the spreadsheet.
However, care should be exercised in using spreadsheets. As with any computer application, a spreadsheet can become a “black box” approach that is difficult to document, check, and interpret. Moreover, quality control and validation may be limited in many cases. For example,
applications. Finally, the spreadsheet can easily be changed when used by different engineers, and a sheet of the same filename can become a different, non-validated application.
In addition, the multiple paths and decision points in the current AASHTO steel girder design provisions may prove to be difficult to program efficiently in a spreadsheet. Spreadsheets are efficient for calculating a large number of values using simple formulas, but are much less efficient when used for calculating values that may result from complex formulas or processes often dependent on the value of one or more other variables with several conditional execution paths.
A more efficient approach to addressing the complexities in steel girder design may be found in applications that are developed using a formal programming language where spreadsheets constraints are removed. However both significant computer science and engineering experience are required to address the complexities of the current steel girder design provisions.
Applications for girderline analysis are most often commercially licensed or otherwise developed by specialized consultants. Several steel girderline design applications are available, both from commercial software companies and from various bridge owner-agencies (either for free or at a nominal cost).
In all cases, any computerized approach, whether a spreadsheet or a program, whether commercially-purchased or “home-grown,” should always be verified and spot-checked by independent calculations performed either by hand or by an independent computer tool. Most computer applications are complex tools and even minor programming errors can drastically affect the results of engineering computations. Details about validation of applications can be found in references (21, 22).
4.5 Approximate Modeling of Curvature Effects
A girderline analysis can also serve as the basis for an approximate curved girder analysis. First, the curved girder is modeled as a straight girderline, using developed span lengths (i.e., using span lengths measured along the curve arc length of that girder). Next, the effects calculated by the girderline analysis are increased by factors that account for the effects of curvature (i.e., for the “load shifting” that occurs in curved girder bridges where the girders on the outside of the curve carry more load than those on the inside of the bridge (5, 8).
Note that when the central angle is small enough, the AASHTO LRFD (5th Edition, 2010)(1)
allow for the effects of curvature to be neglected in the calculation of gravity load effects in curved girder bridges.
Whether the global effects of curvature are included or neglected, designers must always account for lateral flange bending effects in curved girders, regardless of how slight the curvature. When using approximate methods to address curvature, this is most easily done using lateral flange bending equations.