Microsoft Press
A Division of Microsoft Corporation One Microsoft Way
Redmond, Washington 98052-6399
Copyright © 2010 by Microsoft Corporation
All rights reserved. No part of the contents of this book may be reproduced or transmitted in any form or by any means without the written permission of the publisher.
Library of Congress Control Number: 2009940759
A CIP catalogue record for this book is available from the British Library.
Microsoft Press books are available through booksellers and distributors worldwide. For further infor mation about international editions, contact your local Microsoft Corporation office or contact Microsoft Press International directly at fax (425) 936-7329. Visit our Web site at www.microsoft.com/mspress. Send comments to [email protected].
Microsoft, Microsoft Press, Access, ActiveX, Excel, Expression, Groove, InfoPath, Internet Explorer, OneNote, OpenType, Outlook, PivotTable, PowerPoint, SharePoint, SkyDrive, SmartArt, Visio, Windows, Windows Live, Windows Mobile, Windows Server, and Windows Vista are either registered trademarks or trademarks of the Microsoft group of companies. Other product and company names mentioned herein may be the trademarks of their respective owners.
The example companies, organizations, products, domain names, e-mail addresses, logos, people, places, and events depicted herein are fictitious. No association with any real company, organization, product, domain name, e-mail address, logo, person, place, or event is intended or should be inferred.
This book expresses the author’s views and opinions. The information contained in this book is provided without any express, statutory, or implied warranties. Neither the authors, Microsoft Corporation, nor its resellers, or distributors will be held liable for any damages caused or alleged to be caused either directly or indirectly by this book.
Acquisitions Editors: Juliana Aldous Atkinson and Rosemary Caperton Developmental Editor: Sandra Haynes
Project Editor: Lynn Finnel
iii
Table of Contents
Acknowledgments . . . .ix
Introduction . . . .xi
3
Collaborate in the Office and Around the World. . . 29
Part II
Hit the Ground Running
4
Create and Share Compelling Documents with Word 2010 . . . . 41
Save Your Presentation as a Video . . . 102
9
Collaborate Effectively with SharePoint Workspace 2010 . . . . 117
What Can You Do with SharePoint Workspace 2010? . . . 118
SharePoint with InfoPath and SharePoint Business Connectivity Services . . . 128
Using SharePoint Workspace on the Go . . . 128
10
Create Effective Marketing Materials with Publisher 2010. . . . 129
Starting Out with Publisher 2010. . . 129
Collapse and Expand Page Navigation Panel . . . 130
Use the Mini Toolbar . . . 131
Table of Contents vii
Password Protecting a File . . . 169
Limiting File Changes. . . 170
Setting Role-Based Permissions. . . 171
Recovering Unsaved Versions . . . 172
Working with the Trust Center. . . 173
14
Training Made Easy. . . 177
Getting Help in Office 2010 . . . 177
Finding What You Need on Office Online . . . 180
Take Your Learning to the Next Level with Microsoft eLearning . . . 182
ix
Acknowledgments
Writing a book is a fun and typically fast-paced process that involves the talents of many individuals, and some projects involve more team members than others. First Look Microsoft Office 2010 was a particularly exciting and challenging project because it involved working with Office 2010 in its various stages of development—which is like writing about a moving target—and coordinating ongoing feedback from the people on the front lines: Office 2010 product managers, reviewers, and content providers.
xi
n What You’ll Find in First Look: Microsoft Office 2010
You’ve probably noticed that part of living and working in the world today requires that you do many things at once. For many of us, managing multiple tasks is our normal work mode. You prepare a new presentation for a client while you’re working collaboratively with your team, corresponding with people through e-mail, and inserting Microsoft Office Excel data— which might be changing moment to moment—into the slides you create.
And if you’re like many people, you’re multitasking when out of the office, too. You check e-mail while you wait in line for your morning coffee, or you make a quick edit to finalize a report when you’re waiting for your luggage at the airport, Or perhaps you set up a group meeting with teammates on three continents and trade documents just moments before it starts so that you’re all looking at the same plan.
Welcome to Office 2010. Whether you work primarily in the office or on the go, you’ll find smart tools in this release that enable you to get your work done easier, faster, and more professionally than ever. All the freedom to multitask built into Office 2010 has an upside you might not expect: being able to work anywhere, anytime means more flexibility, which trans-lates to higher efficiency and effectiveness. And when your work is done quickly and well, you have more time left over for the people, places, and possibilities that intrigue you.
The Road to Office 2010
Did you know that Microsoft Office celebrated its twenty-fifth birthday in 2009? Throughout the last two and a half decades, Office has grown and improved dramatically—partially thanks to developments in technology, but primarily thanks to you.
comes together to provide current, relevant pictures that show which features you want and need most in the programs you use every day. No matter where you fit on the scale ranging from new user to power user, the new features in Office 2010 give you the option of becom-ing more productive, more collaborative, and more mobile as you work.
We live in interesting times. There’s a major shift occurring in the way technology weaves through all aspects of our lives. Limitations that seemed all but insurmountable a few years ago—such as having your team divided among three different continents or needing to access your data immediately when you’re away from your desk—are now gone for good.
Office 2010 makes it possible to work virtually anywhere—on the desktop, on the train, in the carpool line, in the coffee shop—with almost anyone, on any continent. And no longer are you tied to your desktop PC—now you can work on the go using Web-based and mobile versions of your favorite Office applications.
The tools you use in Office 2010 on a daily basis are no longer just designed for creating documents or spreadsheets—although the programs do help you accomplish those common tasks, and with style. The Office 2010 applications also deliver features you’ve been asking for—professional formats that are a breeze to apply, easy exchange of data among applica-tions, and streamlined techniques that enable you to get more out of the time you invest in the documents and presentations you create.
Worldwide, Office users demonstrate that they want reliable, easy-to-use applications that enable them to produce professional results, work collaboratively in both local and global teams, and work anywhere from flexible locations limited only by Web access or phone reach. These three ideas—express yourself, collaborate, and work anywhere—are the key visions behind the changes in Office 2010.
Fast, professional, collaborative, flexible. You’re going to love this new release!
Who Uses Office 2010?
Introduction xiii
Note The dramatic redesign of the Office interface, introduced in Office 2007, was due in part to a desire to help Office users discover a wider range of tools in their favorite programs. Customer research had shown that most users worked with specific tools in the applications they were familiar with, but a larger percentage of users weren’t getting the full benefit from the programs they might have if they had been aware of the wider range of features and possibili-ties. Data is showing that the redesign of Office really did reach this goal—Word 2007 and Excel 2007 users are now using four times as many features as they used in previous versions, and for PowerPoint, the increase in feature use is a factor of five.
Today’s Office 2010 users often move back and forth among applications, depending on the tasks they’re engaged in at any given time. Here are some typical scenarios:
n Meredith is a customer service representative in a large company. Her job includes fast-paced communications: she receives and sends e-mail messages to dozens of cus-tomers, prepares and sends proposals, updates Web information, and tracks campaign results in the customer services database. Occasionally, Meredith gets to lead brain-storming sessions for new campaigns (she loves that) and compiles the notes for the team. Printouts of colorful SmartArt diagrams she created in Word and PowerPoint—as well as her favorite “The Far Side” cartoon—are hanging on her cubicle walls. Her daily tasks require a whole palette of applications: Outlook, Word, PowerPoint, Publisher, OneNote, and occasionally, Access.
n Ian is a mid-level manager in the communications department of the same company. As team leader, he is in charge of planning, budgeting, and managing all reports and support materials that are developed to support the company’s product line. He uses Outlook for scheduling and task management, and works with Word, Access, and Excel for reviewing and working with important data. Ian’s team also prepares company reports and public relations materials using Word and Publisher.
n Dominik is marketing coordinator—she is responsible for messaging campaigns, running budgets, hiring contractors, working with the board, maintaining a data-base, conducting webinars, providing online training, and more. She uses Word, Excel, PowerPoint, Outlook, Publisher, and Access, and she needs to be available for decisions and updates continually. Because she manages a department of five, she uses Microsoft SharePoint 2010 to keep the team organized and working efficiently.
n Todd is the IT manager for the business. He is in charge of upgrading, deploying, and training staff on Office 2010. He also secures and backs up all files, writes custom utili-ties for the Web portal, and works in customer and staff support. He is a programmer and power user of all Office applications, but he has a small staff, so he needs to be able to offer training and support in a cost-effective and productive way.
Office 2010 includes a range of features that will support the daily activities of each of these users. The consistent look and feel of the Ribbon helps ensure that users are comfortable and confident working with any of the Office applications. Changes in each of the applications make it easier to produce and share professional results in a variety of ways. And not only do the Office applications work together smoothly as an integrated system, they provide easy collaboration, anywhere access, and all the productivity tools users need as their work tasks change and grow.
What’s in Microsoft Office 2010?
Similar to earlier releases, Microsoft Office 2010 is available in several versions, each designed with a specific group of users in mind, and each accessible via PC, browser, or phone. Here’s what you’ll find in each version of Microsoft Office 2010:
n Office Professional Plus 2010 is for the high-end user who collaborates with others, manages data, and needs flexibility, mobility, and coauthoring capabilities. This edition includes Word 2010, Excel 2010, PowerPoint 2010, OneNote 2010, Outlook 2010, Publisher 2010, Access 2010, SharePoint Workspace 2010, InfoPath 2010, and Communicator 2010.
n Office Professional 2010 is designed for the business user who needs all the power of the traditional applications as well as access to data management tools. This ver-sion includes Word 2010, Excel 2010, PowerPoint 2010, OneNote 2010, Outlook 2010, Publisher 2010, and Access 2010.
n Office Standard 2010 removes Access 2010 from the mix. It offers users who work with documents, worksheets, marketing materials, presentations, notebooks, and—of course—e-mail and schedules just what they need: Word 2010, Excel 2010, PowerPoint 2010, OneNote 2010, Outlook 2010, and Publisher 2010.
Introduction xv
n Office Home and Student 2010 is geared toward student and home users, offer-ing the traditional applications for creatoffer-ing documents, worksheets, presentations, and workbooks: Word 2010, Excel 2010, PowerPoint 2010, and OneNote 2010.
n Office Professional Academic 2010 is designed for faculty members who need access to all the core applications—Word 2010, Excel 2010, Outlook 2010, PowerPoint 2010—as well as OneNote 2010, Access 2010, and Publisher 2010.
n Office Starter 2010 is for the beginning user who wants to work with only Word 2010 and Excel 2010.
Office 2010 System Requirements
In keeping with green efforts to maximize efficiency on systems users already have, Office 2010 was designed for any system capable of running Office 2007. Here are the suggested system requirements for Office 2010:
n Computer and processor: 500-MHz processor or higher.
n Memory: 256 MB (megabytes) of RAM or more.
n Hard disk space: 2 GB (gigabytes)*.
n Drive: CD-ROM or DVD drive.
n Display: 1024 by 768 or higher resolution monitor.
n Operating system: Windows XP SP3 (32-bit), Windows Vista SP1 (32-bit or 64-bit), Windows 7 (32-bit or 64-bit), Windows Server 2003 R2 with SP2 (32-bit or 64-bit), or Windows Server 2008 with SP1 (32-bit or 64-bit). Terminal Server and Windows on Windows (WOW) are also supported. **
* Part of the used hard disk space can be released after installation is complete.
** WOW allows users to install 32-bit Office 2010 on 64-bit systems.
What You’ll Find in
First Look: Microsoft Office 2010
clearly and creatively, work seamlessly with a group to get things done efficiently and on time, and access and work with your files virtually anywhere with a similar look and feel whether you’re using your PC, browser, or phone. To showcase these key points, First Look: Microsoft Office 2010 follows this organization:
n Part I, “Envision the Possibilities,” introduces you to the changes in Office 2010 and shows you how you can make the most of the new features to fit the way you work today. Chapter 1, “Welcome to Office 2010,” gives you a play-by-play introduction to new features; Chapter 2, “Express Yourself Effectively and Efficiently,” details the great feature enhancements and visual effects throughout the applications; and Chapter 3, “Work Anywhere with Office 2010,” explores the flexibility factor by presenting a set of scenarios that enable users to complete their work no matter where their path takes them.
n Part II, “Hit the Ground Running,” focuses on each of the Office 2010 applications in turn, spotlighting the key new features and showing how they relate to the whole. These chapters provide a how-to guide for many of the top features you’re likely to use right off the bat, and they offer inspiring ideas on how to get the most from your favorite applications.
n Part III, “Next Steps with Office 2010,” zooms up to the big picture and provides examples to help you think through interoperability. How often do you use the vari-ous Office applications together? Customer research shows that people often don’t realize how well the applications work together as a complete system—which means they might be laboring over items they could easily incorporate from somewhere else. This part of the book provides examples for integrating the applications and explores Office 2010 security and training opportunities, as well.
First Look: Microsoft Office 2010
1
Part I
Envision the Possibilities
Office 2010 ushers in a new era in productivity software by making the reliable tools you’ve come to expect from Microsoft easier to use and more powerful than ever. In this part of the book, you’ll get the big picture view of how Office 2010 improves the way you work every day.
This part of First Look: Microsoft Office 2010 includes the following chapters:
n Chapter 1: Welcome to Office 2010
n Chapter 2: Express Yourself Effectively and Efficiently
3
Chapter 1
Welcome to Office 2010
In this chapter:
n Features that Fit Your Work Style
n Changes in Office 2010
n Exploring the Ribbon
n New Backstage View
n Languages and Accessibility
n Coming Next
This is an exciting time to be working with technology. Changes are occurring with what feels like ever-increasing speed. The world is growing continually smaller, and far-away places are more and more within our reach. Today our coworkers are almost as likely to be working on a different continent as they are to be down the hall. Opportunities are possible now that we couldn’t envision a few years back—more of us are telecommuting, training by webinar, and planning projects virtually, all of which is accomplished through Web and phone access to the tools that make it all possible.
Office 2010 was designed with evolving workplace trends in mind. With Office 2010, you can use familiar, reliable Office applications to work more efficiently, produce better-than-ever results, collaborate in real time with peers in your office or around the world, and con-tinue your work from any point on the globe with Web or phone access. And even though these are big changes, they fit easily into what you’re already doing. The tools you need to implement these changes in your work efforts don’t have a steep learning curve. By add-ing to the functionality of your favorite features (Print, Paste, and Picture Effects, to name a few examples), Office 2010 helps you get more done with less effort. And the collaboration and anywhere access features make working with anyone, anytime, a natural and intuitive process.
Features that Fit Your Work Style
What’s exciting about Office 2010 is that it’s more than a set of powerful tools that help you meet and manage the demands of your fast-paced workday. For example, if you do most of your work at your desk, crunching numbers, answering e-mail, and preparing reports, Office 2010 helps you work faster, manage huge worksheets, design effective documents easily, and present your work in new, visual, and flexible ways that help your diverse audience under-stand your ideas.
If you work primarily in a team, you’ll find that Office 2010 makes collaboration easy with features that enable you to share files, co-author documents, and even contact teammates in real time.
If you work predominantly on the road—and frequently need to get updates on projects, add items to the calendar, or approve new documents and strategies—Office 2010 gives you the flexibility to use the Office applications you know and love regardless of whether you’re logging in from your PC, your browser, or your phone.
In Part II, “Hit the Ground Running,” you get a closer look at the new features in each of your favorite Office 2010 applications.
Office 2010 at a Glance
With Office 2010, you can
n Increase your productivity with more effective, reliable tools
n Express your ideas creatively and effectively, for multiple audiences
n Produce and share professional results easier and faster
n Communicate—and manage communications—easily whether you work independently, collaboratively, or remotely
n Gain more freedom and flexibility to work anywhere, with anyone
n Enjoy the consistent and high-quality Office experience from your PC, browser, or phone
Changes in Office 2010
Chapter 1 Welcome to Office 2010 5
Tip One significant change that has a large impact on processing speed and power is that Office 2010 is now available in a 64-bit version. This expanded capacity really shines in Excel, where enormous spreadsheets require that kind of processing power.
Let Your Ideas Soar
Office 2010 shows that powerful programs don’t have to be difficult to use. Program design-ers know that usdesign-ers today need a great variety of powerful, flexible tools, and that it’s impor-tant that those tools and features be easy to find and use. For this reason, you’ll find quick access to style galleries, themes, and more that help you select professional designs, choose from color schemes that work, and create a professional look whether you’re creating docu-ments, worksheets, presentations, notebooks, or database tables.
To help you take your ideas to the next level, Office 2010 offers artistic effects and picture editing, video editing in PowerPoint, new data visualizations (including sparklines and slicers) in Excel, and the ability to manipulate fonts professionally in Word. And this is just the begin-ning—there’s much more, as you’ll see in the chapters in Part II, “Hit the Ground Running.”
And not only will your output be better, but the whole document creation process is easier, thanks to enhanced search features, simplified navigation, the contextual spell checker, translation tools, and more.
Collaborate Easily and Naturally
Unless you’ve been living off the grid for the last couple of years, you’ve probably noticed that the world has gotten substantially smaller, thanks to the continuing expansion of Web technologies. Blogs, social media, and new online publishing alternatives have steeped most of us in a culture that is always on, always connected, and always talking.
An increasing number of people are now working in teams, and those teams might be spread throughout the office or located around the world. A writer in Omaha could be working with a software developer in India who might have been hired by an administrator in Scotland. This geographical diversity within a project team is no longer an unusual occurrence—an increasing number of Office 2010 users need to collaborate with peers and clients all over the globe.
Microsoft SharePoint Workspace 2010, included with Microsoft Office Professional Plus, enables users to move files online and offline easily. Team leaders and members use SharePoint Workspace to create and update the team calendar, conduct project manage-ment, assign tasks, create document libraries, and more. Team members can collaborate in real time, and their documents show who is working on what so that duplication of effort or trading outdated versions of files is no longer a problem when several users work on the same document.
Presence information is available with Office Communicator throughout Office 2010, enabling you to see which of your teammates are online and communicate instantly—via instant messaging, e-mail, or phone—to clarify questions on the project. You don’t have to leave the application you are working in to ask questions you need answered right away.
Work Anywhere—and Everywhere
Laptop, notebook, desktop, kiosk—any place that gives you an on-ramp to the Internet is a potential workplace in Office 2010. Office 2010 Web Apps let you work with the famil-iar Office 2010 interface and work with your Word 2010, Excel 2010, PowerPoint 2010, and OneNote 2010 files. You can share files with other users by using Windows Live or SharePoint Workspace 2010 and then open and work with the files on your PC when you get back to the office.
If you are a gadget lover, you might already have a smartphone with all the bells and whis-tles you can get. Office Mobile 2010 gives you another way to work on the go, using your Windows Mobile smartphone. You can write up an idea before breakfast, create a new docu-ment, and share it with the team—all before you get into work in the morning. Later, on the way to meet a vendor, you can add a few more details, insert a picture, and send the file for review—all from your phone.
Office Mobile works with Word, Excel, Outlook, PowerPoint, and SharePoint Workspace. The application windows have been customized to fit the small phone screen and browser so that you can find what you need easily and enjoy the familiarity of the Office 2010 interface.
Chapter 1 Welcome to Office 2010 7
Exploring the Ribbon
At the top of the interface in all Office 2010 applications, the Ribbon brings you all the tools you need—and only the tools you need—to complete specific tasks in the various Office 2010 applications. The Ribbon includes tabs that reflect the various tasks you perform within each of the applications, and each tab contains tool groups offering the tools you need as you work with the files you create, Every application has the same look and feel, which en-ables you to learn the Ribbon once in your favorite or most often used Office program and then easily find your way around any other Office program. The Ribbon was introduced in Office 2007 and has been improved in Office 2010 to include some new tools and provide more flexibility. You can use the Minimize The Ribbon button to hide the Ribbon so that you have more room to work on-screen, and you can customize the Ribbon to create your own tabs and tool groups specific to your needs.
The simple design of the Ribbon enables you to find the tools you need in the tab that re-flects the task you want to perform. When you want to add a picture to your annual report, for example, you look in the Insert tab and find Picture in the Illustrations group. Figure 1-1 introduces you to the Ribbon in Word 2010 and Excel 2010.
Tabs
Quick Access toolbar Groups Microsoft Office Button
Dialog box launcher
A Quick Look at the Ribbon
The Ribbon simplifies the way you find and work with tools and options in Office. With a simple, easy-to-understand layout for your commands, the Ribbon helps you find the tools you need:
n Ribbon Tabs Each tab provides a set of tools related to an overall task you are likely to be performing in a specific application. In Figure 1-1, the Word 2010 tabs are File, Home, Insert, Page Layout, References, Mailings, Review, and View; the Excel tabs are File, Insert, Page Layout, Formulas, Data, Review, and View. The File tab takes you to Microsoft Office Backstage view, which gives you a central place to work with the files you create in Office 2010 applications.
n Ribbon Groups Within each tab are groups that help organize common commands to help you quickly find what you need for a specific task. For example, on the Insert tab in Word 2010, you’ll find Picture, Clip Art, Shapes, SmartArt, Chart, and Screenshot in the Illustrations group.
Chapter 1 Welcome to Office 2010 9
Contextual Tabs
In addition to the tabs, groups, and tools shown in the Ribbon during normal use, contextual tabs appear when you perform specific actions in a file. The fact that they appear only when you need them is part of the beauty of the Office 2010 interface—this keeps the number of commands on-screen at any one time at a minimum and easy to navigate through. For example, when you click a photo in a Word document, the Picture Tools contextual tab ap-pears, providing options related to picture editing. (See Figure 1-3.)
FIGURE 1-3 The contextual tab provides options related to the task you are performing.
New Backstage View
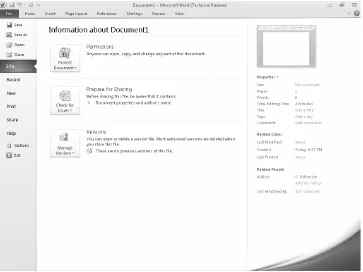
FIGURE 1-4 Backstage view helps you prepare, manage, and share the files you create.
Backstage view is organized in three panels. The left panel includes the commands you’ll use to work with the files you create. The center panel offers related options, and the third panel displays a preview image of the selection or additional options. For example, when you click Print, the center panel shows print options, and the right panel displays a preview of your document as it will appear in print. This streamlines the print process so that you can preview and print your document in one step.
Managing Files in Backstage View
In Backstage view, you’ll find the commands you traditionally found on the File menu: New, Open, Recent, Close, Save, Save As, Print, and Exit. In addition to each of these basic file-management commands, you’ll find Share, which enables you to share the file in a variety of ways. You can share your desktop directly from Backstage view by using Communicator inte-gration, sending the file by e-mail or fax, or saving it to a SharePoint Workspace or to a blog.
Chapter 1 Welcome to Office 2010 11
Backstage view is designed to give you access to important tools users sometimes forget to use. For example, you can run the Document Inspector by clicking Check For Issues in the Info panel of the Backstage view and clicking Inspect Document.
Streamlined Printing
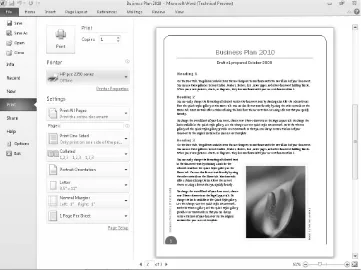
Another great time-saving feature in Backstage view is the new Print process. Microsoft re-search shows that more than 60 percent of Office users print more than 60 times per month. That’s a lot of time clicking Print options! Now in Office 2010, Print Preview has been com-bined with Print so that instead of working through multiple dialog boxes, you get a one-page view of how the file will look in print. (See Figure 1-5.) You can choose your options right on the screen and click Print—and you’re done.
FIGURE 1-5 Now you can preview and print in one smooth process.
Languages and Accessibility
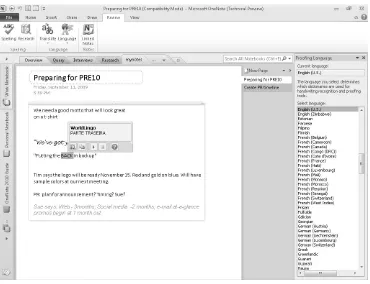
Online, which provides all kinds of content for Office users—including tips and tricks, how-to articles, and video tutorials—provides content in more than 90 languages.
You’ll find the Translate tool, which enables you to translate words or phrases, in the Review tab of Word 2010, Excel 2010, PowerPoint 2010, and OneNote 2010. Or you can use the Mini-Translator tool for on-the-spot translations. (See Figure 1-6.) The Editing Language feature enables you to choose the language used by the dictionary for the proofing tools you select.
FIGURE 1-6 Translate words or phrases on the fly, and choose the language dictionary you want to use.
In terms of extending the reach of applications for users who are differently abled, Microsoft works with more than 175 partners to create assistive software that enables Office to provide screen readers, high-visibility color schemes, and special keyboards.
Coming Next
13
n Working Font Magic in Word 2010 and Publisher 2010
n Creating Data Visualizations in Excel 2010
n Editing Video in PowerPoint 2010
n Communicating Visually in Access 2010
n Enhancing and Streamlining Communications in Outlook 2010
n Coming Next
People use Microsoft Office to do many, many things. Depending on the nature of your work, you might create documents, design worksheets, prepare reports, develop and manage databases, create and give presentations, e-mail clients and coworkers, gather information, analyze information, and share information. And that’s just Monday!
Chances are that many tasks you do in Office 2010 involve communicating ideas to others. Those others might be peers, clients, board members, prospective customers, students, and more. You need to be able to create, prepare, and share worksheets, charts, reports, databases, Web pages, e-mail messages, and brochures that other people can view and understand. And of course, once they understand what you’re sharing, you want them to give you the response you’re hoping for—whether that’s a new contract, an important sale, startup funding, or accolades for a job well done.
thoughts more creatively than ever, bringing more visual energy to the items you produce. Specifically, this chapter introduces you to features that help you do the following:
n Improve the formatting of your Word 2010 text by adding special artistic effects such as shadows, reflections, glows, and more.
n Take advantage of the professional typography capabilities available in many OpenType fonts, such as ligatures and stylistic sets. Edit pictures within your document, worksheet, brochure, or presentation by using the image-editing features in the various Office 2010 applications.
n Edit videos within PowerPoint 2010, customizing the length, formatting, and effects to meet your needs.
n Create data visualizations that help your customers grasp the trends in your Excel 2010 data.
Understanding Your Audience
Beginning with the end in mind is a good approach for just about any document, worksheet, presentation, notebook, and database you create in Office 2010. When you first begin a new file, consider your answer to the following questions:
n Who will be reading or using this file?
n What will they expect to see?
n Do you have photos that support the points you’re making in the document or worksheet?
n Will you use special text effects to call attention to key points, headlines, or labels in Word 2010?
n Will charts, diagrams, or screen shots help your audience understand what you want them to do?
Chapter 2 Express Yourself Effectively and Efficiently 15
How Visuals Help
Not too long ago, most business reports weren’t very exciting. They might have had a cover page, a column or two, and maybe a page border. The title might have been in a larger font (Times Roman, most likely), and the body text was probably your basic 10-point or 12-point standard font. But it was just business communication, right? Better to focus on the facts and leave the fancy stuff to the marketing brochures.
The affordability of color laser printers and the ability to design attention-getting materials on the desktop have changed all that. Today we recognize that no matter what we produce, our materials are competing for readers’ attention. And research shows us that documents, presentations, notebooks, and worksheets that are clear, easy to read, and include visual cues that help lead our eyes to the most important points capture our attention and reinforce key concepts in the document or presentation.
By adding special artistic effects to text; formatting headlines, captions, and tables in an in-viting way; and thinking through the way you use pictures, charts, diagrams, and more, you can dramatically increase the power of your message and make sure your readers get the point.
Benefits of Pictures in Communications
The images you add to your documents, worksheets, presentations, notebooks, and e-mail messages serve several purposes. They not only add visual interest and give your readers’ eyes a rest, they are also known to provide the following real communication benefits:
n Pictures linked to written text increase attention and help recall.
n Pictures help improve your readers’ comprehension.
n Readers’ emotional response to pictures can help or hinder communication.
n Readers with lower literacy skills show improved comprehension when pictures are used in documents.
n Captions help readers make the connection between pictures and text.
Adding Text Effects
What are your favorite formatting features in the different Office 2010 applications? Most people use boldface text to make sure headings, row and column labels, and table headings stand out. You might also use the styles in Word or Excel to apply the look you want to the different elements in your file, make changes to font size or color, and occasionally use more specialized text controls such as small caps and strikethrough.
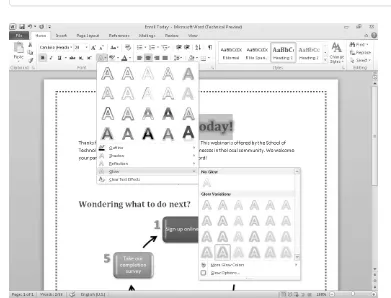
Word 2010 includes a number of easy-to-apply text effects that help you add special artistic touches to the text in your documents. Now in addition to using 3-D effects, you can add glows, bevels, shadows, reflections, and outlines. (See Figure 2-1.) These text effects apply directly to your text and can be included in styles you create. And they act like traditional text when you check spelling or edit your document.
Chapter 2 Express Yourself Effectively and Efficiently 17
Adding Artistry to Your Images
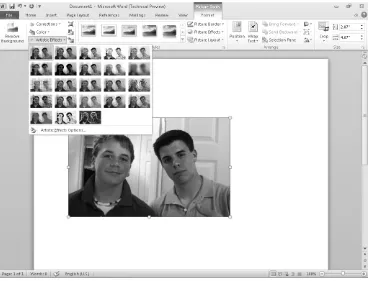
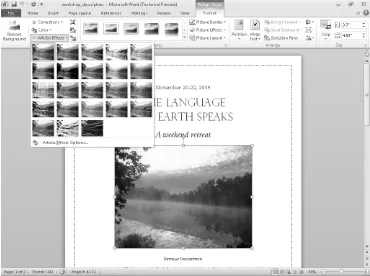
Great photos can be more than just nice-looking images when you apply special artistic effects to the pictures you use in your files. Now Office 2010—specifically, Word 2010, Excel 2010, Outlook 2010, and PowerPoint 2010—includes a palette of artistic filters you can apply to images in your documents. (See Figure 2-2.)
FIGURE 2-2 Choosing artistic effects.
You can choose from a variety of effects that apply different filters to the selected im-age, including chalk, watercolor, sponge, rain, and more. You can also use the new Remove Background feature to remove an image from the foreground and place it on a different background. This feature is great for product catalogs, or for any image in which you need to spotlight a particular element without showing a background that might detract from the central element you hope will catch the reader’s eye.
FIGURE 2-3 With artistic effects, one photo can be used to communicate several different ideas.
When will you use artistic effects in the files you create? Here are just a few ideas:
n Use an artistic photo or treatment of your company logo to show that this year’s annual report demonstrates innovation and creativity.
n Create an effect viewers will remember by choosing not to show a product or place in a realistic way.
n Capture your readers’ attention and communicate something new by modifying an existing photo they will recognize.
Correcting and Recoloring Pictures
Of course, not all images you take on your digital camera or phone are ready to use just as you’ve captured them. The lighting might be wrong in that product photo; the person might be just slightly out of focus; the range of contrast in the picture of the new building might be too great to show up well in print.
Although the Picture tools in Office 2007 went a long way toward giving you control over the images you add to your files, they were limited in the range of changes they allowed. You could adjust the picture by changing the contrast and brightness, recoloring the image, applying styles and effects, or arranging the picture on the page. The Corrections tools in Office 2010 give you a customizable palette of choices for brightness and contrast, and they allow you to set your own standards for sharpening or softening images. This means you can now insert and edit photos as you work in Word 2010, Excel 2010, PowerPoint 2010, and Outlook 2010 without ever leaving the application.
Chapter 2 Express Yourself Effectively and Efficiently 19
Leaving the Background Behind
One of the great new artistic tools in Office 2010 is Remove Background, which lets you pull the object of a photo from its background. This is a great technique when you’re preparing product information, introducing a new employee, or creating materials to spotlight a key element you don’t want your readers to miss.
To grab an image in the foreground and remove it from the background of your photo, use the new Background Removal tool on the Picture Tools tab of Word 2010, Excel 2010, PowerPoint 2010, and Outlook 2010. Here’s how:
1. Select the photo, click the Picture Tools Format tab, and click Background Removal.
2. Drag the bounding box to include the areas of the image you want to display. The magenta areas are those that will be removed.
3. Use the Remove Background tool in the upper left area of the Ribbon to mark areas of the image you want to keep or remove.
4. Click Close Background Removal to complete the task.
Pretty neat, eh? Experiment with this feature to discover ways you can point your readers’ attention to just what you want them to see in your images.
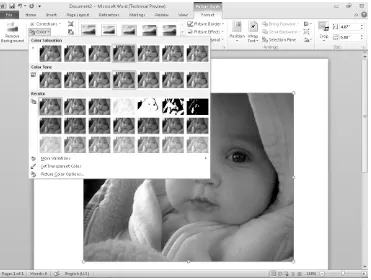
FIGURE 2-4 The Color tools in Office 2010 allow more choices for saturation, tone, and recoloring.
Color Effects Defined
If you’re new to the whole landscape of picture editing, you might be wondering what the new features in the Color tools of Office 2010 enable you to do. Here’s a quick in-troduction to the phrases and what they mean:
n Color saturation controls the amount of color used in the picture—in other words, how saturated the image is with the colors represented. A picture with a Saturation of 0 percent is a black-and-white image; a picture with a Saturation of 400 percent is flooded with color. (Use this option only for special effects.)
Chapter 2 Express Yourself Effectively and Efficiently 21
n Recoloring applies a color filter to the image, making it monochrome (in blue, red, green, or purple, for example) and creating a special artistic look that can fit the color scheme in the file you’re preparing.
Working Font Magic in Word 2010 and Publisher 2010
Another new feature in Office 2010 that adds a touch of visual sophistication to the files you create is support for OpenType typography. OpenType fonts are a type of scalable font de-veloped by Microsoft and Adobe to provide an expressive font format that enables software users to create files reflecting an increasingly diverse range of languages. Word 2010 and Publisher 2010 now support the typography features found in some OpenType fonts, such as working with ligatures and stylistic sets. Word 2010 and Publisher 2010 also include support for Number Forms and Spacing. (The feature is called Number Styles in Publisher.)
A ligature is a character in typography that consists of two or more connecting letters; for example, the letters fi are often set as a ligature. Ligatures were originally invented (back in the dark ages when typesetters cast type in lead before inking them and printing pages) to save space and reduce typesetting effort.
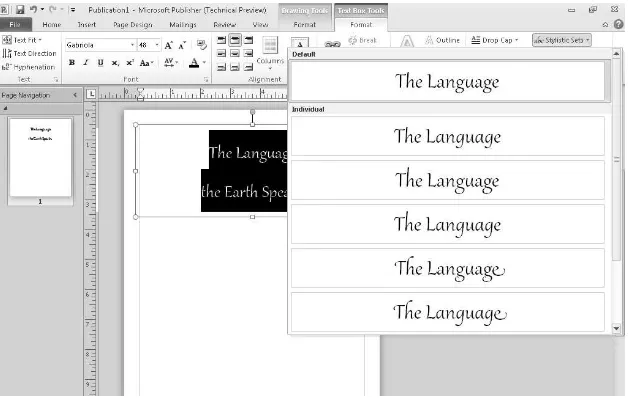
A stylistic set is a font displayed with a specific set of characteristics, enabling you to get a subtly different look and feel for selected text even though you’re using the same font throughout a document. Gabriola, a new font in Office 2010, offers a variety of stylistic sets you can try in your documents. Different stylistic sets might give you a whole range of choices for that particular font, including whether you want to display serifs or not, how characters with extenders are displayed, and much more.
FIGURE 2-5 Fine-tuning fonts in Word 2010.
Ligatures and stylistic sets work similarly in Publisher 2010. Here you can choose the typographical controls from the Typography group in the Text Box Tools Format contextual tab. (See Figure 2-6.)
Chapter 2 Express Yourself Effectively and Efficiently 23
Tip Publisher 2010 also includes a number of specialized font options, including stylistic alterna-tives, and specialized number styles. You’ll learn more about the steps involved in working with fonts in Publisher 2010 in Chapter 10, “Create Effective Marketing Materials with Publisher 2010.”
Creating Data Visualizations in Excel 2010
If you work with numbers all day long, you’re probably comfortable with a language many other people struggle to understand. Equations and trend lines make perfect sense to you; business intelligence is part of your language; numbers tell you what you need to know about product status, market saturation, and potential return on investment. You build your documents and presentations around these numbers.
But wait a minute! Could you please translate that for the rest of us?
Excel 2010 now includes simple but effective tools that will enable even the most advanced numbers people to show the rest of us what the numbers mean in a language we can under-stand. Take sparklines, for example. Newly added sparklines are small graphical representa-tions of data on your worksheets—small charts that can depict a trend and visually convey to your audience what the values actually mean. Sparklines can show, for example, an increase in enrollment for new webinars, a spike in sales related to a recent event, or a fall-off in hard goods purchasing.
When you use sparklines to illustrate the data in your worksheet, you help those for whom numbers might be a foreign language stop struggling with what it all means and enable them to clearly understand your point. Figure 2-7 shows simple sparklines added to a column on a worksheet to illustrate the data trend reflected in the displayed row.
The conditional formatting features in Excel 2010 have been improved and expanded with new icon sets, data bars that are capable of showing negative values, and proportional dis-plays in data bar sets. You can also control the formatting of data bars to get just the right effect in the worksheets and documents you prepare.
FIGURE 2-7 Sparklines give you data snapshots in Excel 2010.
Editing Video in PowerPoint 2010
It’s no secret that seeing how something is done in video format is a simple way to learn a new technique, whether you’re changing the oil in your car, learning how to plant a rosebush, or designing a new brochure in Publisher 2010. A video clip enables you to share with others the “how to” as well as the “why” because you can explain the reasons for the action while you’re demonstrating the technique for those viewing the clip.
Are you ready to let your creativity out of the box? Take a look at the new video capabilities in PowerPoint 2010. Now the video from your files is embedded by default, which means that you no longer have to carry all your media files along whenever you copy, move, or share a presentation. Because the video is embedded, you can edit the video directly in PowerPoint without using any other video-editing software.
The video-editing features in PowerPoint 2010 enable you to shorten long video segments, apply fade-in and fade-out settings, add bookmarks to help you quickly access important points in the video or even trigger animation from key points in your video. Figure 2-8 shows you several of the available video-editing capabilities in PowerPoint 2010.
Chapter 2 Express Yourself Effectively and Efficiently 25
FIGURE 2-8 PowerPoint 2010 includes powerful video-editing and formatting tools that enable you to modify video without leaving the program.
Communicating Visually in Access 2010
Maybe it’s all about the data for you. You design elegant databases; you create new data tables and forms. You know how to put together such a sophisticated query that it leaves others in awe. When you need to communicate your ideas to others who aren’t as comfort-able with data as you are, chances are that you know what happens when other peoples’ eyes glaze over. They are no longer listening, which means they aren’t following what you’re saying. How can you make sure they understand what your data is saying in a way that makes sense? Access 2010 data visualizations can help.
Conditional formatting in Access 2010 now supports data bars, which enable you to depict data visually so that your audience can understand your ideas. See Figure 2-9. In addition to the traditional data bars, now you can set negative values for data bar display as well. Improved tools in Access 2010 enable you to apply a greater range of conditional format-ting to the tables and reports you create. Here are other ways you can add visual elements to Access 2010:
n Display an image on the background of your reports by using the Background Image feature in the Report Design Tools Format tab.
FIGURE 2-9 Access 2010 lets you add data bars that help you compare data values at a glance.
Enhancing and Streamlining Communications in
Outlook 2010
One of the big changes you’ll notice right away in Outlook 2010 is that the Ribbon replaces the menu and toolbars at the top of the main Outlook window. (See Figure 2-10.) Now all the tools you need—including the new Quick Steps—are within easy reach and you can find the right commands when you need them.
All the formatting capabilities—SmartArt graphics, styles, and Office themes—are available for the e-mail messages you create. This means that even though the messages you create compete for attention with the hundreds of messages your recipients receive, you can take steps to make sure your messages are as compelling and inviting as possible.
Chapter 2 Express Yourself Effectively and Efficiently 27
to find specific items on your Web site, including a screen shot can show readers what you’re talking about and help them understand an important process.
Tip Setting up Outlook 2010 to send items to your mobile phone is as simple as clicking the File tab to display Backstage view, choosing Options, and clicking Mobile. If you have an SMS Service Provider, you can send calendar items, reminders, and messages to your mobile phone by sim-ply choosing the options you want to set and clicking OK. If you don’t yet have an SMS Service Provider, you can find one on Office.com.
FIGURE 2-10 The main window of Outlook 2010 now sports the Ribbon, offering the tools you need within easy reach.
Not only can you make your e-mail messages look more attractive and inviting for those you contact, but Outlook 2010 gives you a number of ways to keep up with the mountain of messages you receive every day. Here are a few of the key features that help you manage the volume of mail you receive:
n Conversation View enables you to view the most relevant threads of a conversation and suppress redundant threads. Having the ability to remove redundant messages in the conversation saves Inbox space and helps you manage the volume of e-mail you receive.
n Easily manage and clean up threads and move on to more pressing tasks without getting bogged down in messages that don’t relate to the task at hand.
n Easily manage your multiple e-mail accounts, whether you want to combine home and work or any one of a number of Web-based e-mail accounts. Now you can bring them all together in one place with Outlook 2010.
FIGURE 2-11 With Outlook 2010, you can easily add and enhance pictures, screen shots, and more.
Coming Next
29
n Stay in Touch with Your Team
n Co-Author Files Across Applications
n Use the Presence Icon to See Author Availability
n Using the Office Web Apps
n Sharing on the Road with Office Mobile
Depending on the type of work you do, you might work on your own most of the time, or you might work as part of a larger group—or perhaps, several groups. Your groups might come together to complete a specific project—for example, to produce a new marketing plan—or they might work together over the long term, completing multiple projects. Whether your need for collaboration is short term or ongoing, you’ll find features in Office 2010 that enable you to
n Work with others simultaneously on the same file.
n Connect instantly with others working on your document or presentation.
n Know when others are actively working in the document you are viewing.
n Collaborate in real time with others working from their PCs, browsers, or phones.
It’s All About the Teamwork
What Teams Look Like Today
So how many of us are working in groups today? The exhaustive research data Microsoft compiled shows that 52 percent of those surveyed currently work on two or more project-based teams. Others responded that most of their work is done independently, but they collaborate with others occasionally.
How do teams work collaboratively?
n Surprisingly, many workers collaborate by e-mail, sending versions of documents back and forth. This isn’t the most accurate or most secure method of working collabora-tively because file versions can be misplaced and a sensitive file might be vulnerable to interception unless it’s encrypted or sent only on the company intranet.
n Others collaborate via instant messaging (IM), discussing projects, making decisions, and planning next steps.
n Still others use social networking tools to discuss items in a group, set up an event, and more.
n Some businesses encourage the use of an employee portal or provide collaboration software to facilitate teamwork.
n Other ways to collaborate include face-to-face meetings (of course) as well as shared blogs, wikis, SharePoint sites, and more.
Office 2010 makes collaborating a natural and intuitive process by bringing collaboration tools into all the major applications. You can share your team document on SharePoint, share OneNote notebooks, create Word and PowerPoint projects, and ask fellow authors questions while you work.
Team Tasks and Methods
In most workplace environments, teams are made up of people who are brought together by role, not by choice. This means you might be part of a group that is an interesting mix of per-sonalities and talents. No matter how similar or how different team members might be, your team will need to accomplish two primary goals to be productive and deliver what you came together to create:
n You need to be able to communicate effectively.
Chapter 3 Collaborate in the Office and Around the World 31
The content of each team’s tasks might vary widely. One team might be organized to assess the need for a human resources program; another team might come together to produce an annual report. Still another team might be charged with planning, hosting, and evaluating a national event.
Whatever the focus your work has or whatever the objective is you’re working toward, you need to be able to share information, connect with others, and coordinate your efforts. Along the way, each and every team needs to discover how to work together most effectively to get the job done.
A Quick Look at Group Process
American psychologist Bruce Tuckman studied group dynamics, and in 1965, he proposed that every group goes through four stages:
n Forming is the stage in which the group comes together. During this stage, the members get to know one another and begin the process of communicat-ing. Some members might be polite and others might be anxious, but basi-cally everyone is on his or her best behavior.
n Storming is the stage when team members begin evaluating their place in the group and struggling to determine the overall work goals of the group. Personalities might clash at this point as the group begins to carve out helpful ways to interact.
n Norming occurs when the group members begin to settle into individual roles that feel like a good fit for the group. The anxiety of testing roles and bound-aries calms down, personality differences are less of an obstacle, and the lead-ership of the group seems suitably established.
n Performing is the stage when the group finally comes together as a team. The group has a shared vision of the final goal of the work and is able to move productively toward that end.
Benefits of Office 2010 Collaboration
No matter where your team might be in the group-formation process, the tools in
Office 2010 can help you communicate effectively, share questions and concerns, complete project-related tasks, and speak each others’ languages. With the tools in Office 2010, you can streamline the following team-related activities:
n Staying in touch no matter where you’re working
n Creating shared folders that others can use to access project assets such as images, logos, charts, documents, and more
n Working with more than one teammate on the same file at the same time
n Checking the online status of other authors of your shared document using the presence icon
n Translating words and phrases easily as you work
Stay in Touch with Your Team
Chapter 3 Collaborate in the Office and Around the World 33
Share Files in the Workspace
You can create new workspaces related to specific projects your team will be working on and set up the elements you want to share. Because SharePoint Workspace 2010 is a true Office 2010 application, you can simply drag and drop the files you want to work on later offline or make available to the team into the Documents library. (See Figure 3-2.)
FIGURE 3-2 You can easily drag and drop files to a workspace to share items with the team.
The files are available whether you’re offline or connected to the server; when a server connection is established, features such as Check In and Check Out are enabled, and you can navigate easily through the original site to sync, download, or review files.
FIGURE 3-3 With SharePoint Workspace 2010, you can have conversations with teammates on topics related to your shared project.
Share Files and Folders
SharePoint Workspace 2010 also enables you to create shared folders in your own system so that you can exchange files easily with your server or share them with other people. By creat-ing and sharcreat-ing a folder with files related to your specific folder, teammates can access the resources they need in the shared folder you created. This enables you to share files easily without uploading them to your company’s server space and also gives you an easy way to organize and work with files you eventually check back in to the server.
Co-Author Files Across Applications
Chapter 3 Collaborate in the Office and Around the World 35
Tip You also can simultaneously edit a shared notebook that is stored on SharePoint or Windows Live with others who are using OneNote 2010, OneNote Web App, and OneNote Mobile 2010.
No matter how many people on your team are working together online at the same time, each person can work on her respective section, and then changes are synchronized au-tomatically when the file is saved or when the user logs on the next time. The names of all authors are displayed next to the areas of the document they are editing. Additionally, a pop-up list of available authors is available on the application status bar when the shared document is active. (See Figure 3-4.)
FIGURE 3-4 Co-authoring enables you to see who else is working on the current document.
Connect via Presence
The Presence icon is a new feature in Office 2010 that shows you the availability of team members when you’re working on shared documents. When you point to the icon, a contact card expands, listing the ways you can contact that person. (See Figure 3-5.)
If you’re using Windows Live for document sharing, you’ll be able to send an instant message to other authors working on the document. You’ll also be able to schedule a meeting, add the author to your Microsoft Outlook contacts, and work with Outlook properties. If you’re using Office Communicator R2, you’ll have these choices and also be able to start a video call, tag the contact for presence alerts, and add the contact to your Quick Contacts list.
FIGURE 3-5 When you click the Presence icon of a contact, the contact card for that person is displayed.
So how does Office 2010 know all this information about the various members of your team? The Presence icon reflects online status information available in either Windows Live or Office Communicator.
Microsoft Office Communicator 2007 R2
Microsoft Office Communicator 2007 R2 is an enterprise communications tool that enables you to unify the various ways you communicate with others—by e-mail, instant message, voice, or video.
Chapter 3 Collaborate in the Office and Around the World 37
Using Office Web Apps
Today more and more of us are escaping the confines of the cubicle and venturing out to work in unusual places—the corner coffee shop, classroom, convention floor, park bench, or client office. Flexibility is good, but we also need an easy, secure, and reliable way to ac-cess mission-critical documents and files. We need to review records, update reports, quickly check the budget, get an estimate on reservations, and approve the finals on the four-color report before it goes to the printer.
The new Office Web Apps enable you to access and work with your files anywhere in the world you have Web access. (See Figure 3-6.) And if you don’t have Internet Explorer, no problem—Office Web Apps support Windows Internet Explorer 7 or later for Windows, Safari 4 or later for Mac, and Firefox 3.5 or later for Windows, Mac, and Linux. That means that whether you’re logging in on a Mac, PC, or kiosk at a hotel or airport, you’ll find the same reliable Microsoft Office interface and be able to review, edit, and save the files that are important for your work.
Sharing on the Road with Office Mobile
Office Mobile 2010 (shown in Figure 3-7) lets you take Office with you wherever you go— whether you’re carrying your laptop with you or not. Using Office Mobile 2010, you can easily check e-mail in Outlook Mobile 2010, organize your inbox, update schedules and tasks, and even work on your favorite Office documents, all from your favorite smart phone.
The rich interface for small devices enables you to view and edit files from your mobile phone. You can choose from a variety of display options, perform editing and formatting operations, and send files to SharePoint Server 2010 or to your Windows Live account.
FIGURE 3-7 The clear, easy-to-read Office Mobile interface makes it simple for you to read e-mail, work with Office Mobile applications, and send and receive files.
Coming Next
The collaboration features in Office 2010 enable you to continue working with your favorite applications in real time, no matter where you are or who you’re working with. With
First Look: Microsoft Office 2010
39
Part II
Hit the Ground Running
Each of the applications in Office 2010 offers new ways to communicate your ideas more visually and effectively, features that enable you to collaborate easier than ever before, and ways to access your work from anywhere, anytime. Whether you spend your time in Office 2010 generating content, managing projects, or analyzing financial data, you will discover new capabilities that streamline your tasks, add professional impact, and add flexibility and creativity along the way.
This part of the book introduces you to the new features in each application and gives you some hands-on experience with different elements so that you can get up to speed quickly with this new release:
n Chapter 4: Create and Share Compelling Documents with Word 2010
n Chapter 5: Create Smart Data Insights with Excel 2010
n Chapter 6: Manage Rich Communications with Outlook 2010
n Chapter 7: Produce Dynamic Presentations with PowerPoint 2010
n Chapter 8: Organize, Store, and Share Ideas with OneNote 2010
n Chapter 9: Collaborate Effectively with SharePoint Workspace 2010
n Chapter 10: Create Effective Marketing Materials with Publisher 2010
41
What’s the big story in Microsoft Word 2010? Think flexibility and freedom of expression. Imagine working on documents in the quiet of your neighborhood coffee shop, collaborat-ing with a coauthor who lives in Taipei, or docollaborat-ing a quick review on your smartphone before you forward the document to a major client.
Word 2010 is designed to be simple to use and yet give you all the tools you need to create sophisticated, professional documents that express your ideas clearly and well. The new fea-tures enable you to work efficiently and collaboratively, in a consistent, familiar interface, whether you’re working on your computer, in your browser, or on your smartphone.
Additionally, you’ll discover simplified ways for getting around in the document and an expanded slate of tools that enable you to include great quality fonts and picture effects so that your finished product looks as good as possible. This chapter introduces you to the key new features in Word 2010 and encourages you to try a few techniques along the way.
Start Out with Word 2010
Ribbon
Status bar elements View controls
FIGURE 4-1 TheWord 2010 window maximizes your workspace while providing tools across the top and document information and views along the bottom.
Tip To display the Customize Status Bar list and add other information elements to the status bar, right-click the status bar at the bottom of the Word window.
Get Familiar with the Word Ribbon
Chapter 4 Create and Share Compelling Documents with Word 2010 43
FIGURE 4-2 The Ribbon offers just the tools you need, depending on what you’re working on in Word.
Contextual tabs appear when you select a specific element in the document—for example, when you click a picture, the Picture Tools contextual tab appears, as you see in Figure 4-3.
FIGURE 4-3 Contextual tabs offer tools that relate to the selected object in the document.
One great feature common to all Office 2010 applications is the ability to customize the Ribbon so that you can add your own tabs, putting together the tools you use most often in the configuration that fits you best. You can create your own custom tabs or tab groups, and move tools on the existing Ribbon tabs to create groups just the way you want them.
Tip You can hide the Ribbon easily and maximize your work area by pressing Ctrl+F1 or clicking the Minimize The Ribbon button on the right side of the window above the Ribbon.
Find What You Need Easily with the Navigation Pane
FIGURE 4-4 With the Navigation Pane, you can move easily through the document by clicking the heading of the section you want to see.
The improved search features offered in the Navigation Pane enable you to find the content you need, whether it is in the basic body text or headings of the document or whether it appears in your document in the body text, headings, tables, graphics, footnotes, sidebars, or comments.
Chapter 4 Create and Share Compelling Documents with Word 2010 45
Print and Preview in a Single View
If you are like most Word users, you print your documents on a regular basis. And using Print Preview is part of the process, enabling you to make sure the overall page looks the way you want it to look, the pictures are in the right places, and the headings are in the appropriate spots. Word 2010 smooths out the printing process by combining the print and preview tasks into a single step.
Now you can preview and print your document in Backstage view with literally a single click. You can still change your print options, setting print quality, choosing the paper source and size, and specifying the number of copies before you print. You can also page through the document easily and shrink or enlarge the page view so that you can check all details easily before sending the document to the printer.
Format Your Text
Word users typically spend quite a bit of time formatting documents. New features in Word 2010 enable you to apply stylized effects to text, use high-quality fonts, and choose just the right paste options for the task at hand so that your documents look professional with just a little help from you.
Did You Know?
n Eighty percent of all documents use fewer than 20 styles.
n Word users include an average of 16 styles in each document.
n The most common formatting changes are font size, font face, and font color.
Step by Step: Printing and Previewing
Because the print and preview features are streamlined into one process in Word 2010, you can easily review and print the file. Here’s how to print and preview a document in Backstage view:
1. Open a document or create a new document that you’d like to print. If you create the file, save it before you prepare to print.
3. Click Print. The document appears in the Print Preview window to the right of the Print options.
4. Preview the document by clicking the Previous Page or Next Page controls in the bottom left corner of the preview window. You can also change the size of the page display by adjusting the Zoom control in the lower right corner of the preview window.
5. Use the options in the center column to choose the print settings you want to apply to the printed document. For example, you might need to select your printer, specify the pages you want to print, or change from one-sided to double-sided printing.
6. When the document in the preview looks the way you want your printout to appear, click the Print button at the top of the center column.