Small Form Factor PCs
by Duane Wessels; Matthew J. Weaver Publisher: O'Reilly
Pub Date: April 22, 2008
Print ISBN-13: 978-0-596-52076-2 Pages: 304
Table of Contents | Index
Overview
Shoebox sized and smaller, small form factor PCs can pack as much computing muscle as anything from a PDA to a full-sized desktop computer. They consume less power, have few or no moving parts, and are very quiet. Whether you plan to use one as a standalone PC or want to embed it in your next hacking project, a small form factor PC may be the next thing you build. Small Form Factor PCs is the only book available that shows you how to build small form factor PCs -- from kits and from scratch -- that are more interesting and more personalized than what a full-sized PC can give you. Included in the book are projects for building personal video recorders, versatile wireless access points, digital audio jukeboxes, portable firewalls, and much more. This book shows you how to build eight different
systems, from the shoebox-sized Shuttle system down to the stick-of-gum sized gumstix. With thorough illustrations and step-by-step instructions, Small Form Factor PCs makes it easy for anyone who wants to get started building these tiny
Small Form Factor PCs
by Duane Wessels; Matthew J. Weaver Publisher: O'Reilly
Pub Date: April 22, 2008
Print ISBN-13: 978-0-596-52076-2 Pages: 304
Table of Contents | Index Preface
Introduction
What Is Small Form Factor? Why Small Form Factor?
Step 1: Install and Configure Gentoo Linux Step 2: X Windows and XMMS
Step 3: Infrared Remote Control Case Modding
Extra Credit
Digital Video Recorder with MythTV Introducing the Shuttle ST62K XPC Operating System: Gentoo Linux X Windows
MythTV
Adding a Remote Control
Home Network Gateway
A Portable, USB-Powered, Bridging Firewall Introducing the OpenBlockS
SSD Linux
Turning the OpenBlockS into an Ethernet Bridge Using the Firewall
Cheap Wi-Fi SSH Client
Introducing the ZipIt Wireless Messenger Updating the ZipIt Firmware
Playing with the BURN3 Firmware Loading OpenZipIt
Playing with OpenZipIt Extra Credit
Bluetooth LED Sign
Introducing the gumstix Assembling the System Exploring the gumstix
Building Software for the gumstix Learning About Bluetooth
The Pro-Lite LED Sign Putting It All Together
Sending Messages to the Sign Extra Credit
Running an NFS Server About NFS
The Exports File
Starting NFS Services Mounting
Small Form Factor PCs
by Matthew Weaver & Duane Wessels
Copyright © 2008 O'Reilly Media, Inc. All rights reserved. Printed in U.S.A.
Published by Make:Books, an imprint of Maker Media, a division of O'Reilly Media, Inc., 1005 Gravenstein Highway North,
Sebastopol, CA 95472.
O'Reilly books may be purchased for educational, business, or sales promotional use. For more information, contact our
corporate/institutional sales department: 800-998-9938 or [email protected].
Print History: April 2008: First Edition Publisher: Dale Dougherty
The O'Reilly logo is a registered trademark of O'Reilly Media, Inc. The MAKE: Projects series designations, Small Form Factor PCs, and related trade dress are trademarks of O'Reilly Media, Inc. The trademarks of third parties used in this work are the property of their respective owners.
experience. Chemicals, electricity, and other resources used for these projects are dangerous unless used properly and with adequate precautions, including safety gear. Some illustrative photos do not depict safety precautions or equipment, in order to show the project steps more clearly. These projects are not intended for use by children.
Use of the instructions and suggestions in Small Form Factor PCs is at your own risk. O'Reilly Media, Inc. and the authors disclaim all responsibility for any resulting damage, injury, or expense. It is your responsibility to make sure that your
activities comply with applicable laws, including copyright. ISBN-10: 0-596-52076-X
Preface
Miniaturization has been one of the great success stories of computer engineering. Most of us know that the world's first computers, such as ENIAC and the various Mark Is, were huge machines that occupied whole rooms. By the early 1980s we had more powerful computers that sat on our desks. But
personal computers stopped shrinking for the next 20 years or so. Why is my Pentium 4 system from 2005 about the same size as my Apple II from 1981?
One reason, of course, is that while the size of the computer remained the same, engineers were able to pack more into that space. Both processors and memory have increased in density over the years, generally following Moore's Law. Another reason is that equipment manufacturers now build more features into the hardware. My Pentium 4 motherboard includes built-in Ethernet, video, sound, USB, and FireWire, in addition to the old-fashioned serial and parallel ports. In the good ol' days, each of those would have required an expansion card of some sort. Finally, certain physical characteristics of our computer systems have remained the same over the years in the interest of compatibility. PCI cards are the same height as ISA
expansion cards so that both fit in past and future computer cases. The 200 MB hard drive from my IBM PS/2 fits in the same bay as my P4's new 250 GB hard drive.
In recent years we have seen a renewed interest in
miniaturization of computer systems. Companies such as VIA Technologies and Soekris Engineering were among the first to market small, low-power, general-p-urpose computer systems to individual consumers. People began to realize that certain tasks and applications, such as routing and firewalling, don't require super-fast systems. Who wants a big, hot, noisy computer in their home or office when a small, silent, mini-computer works just as well?
computers with a small footprint. That is, a SFF PC has most of the same features as its standard-sized ancestor: fast
processor, plenty of memory, hard drive, video, sound, etc. SFF PCs usually have fewer expansion options due to their smaller size, however.
In this book we consider even smaller, and less powerful,
systems as small-form-factor computers. It would be a stretch to call them PCs, since many don't have hard drives, video, or sound. For some, it may be more appropriate to think of them as embedded devices, although that is another vague term. Whatever you or we call them, we think you'll enjoy learning about these small computers.
How to Use This Book
Our primary goal with this book is to expose you to a variety of small-form-factor computers and devices. We want to show you how they work, how they look (inside and outside), and how you can use them. We've come up with a number of projects that demonstrate their features and capabilities. We hope that you find the projects both interesting and useful.
Even if you're not interested in putting SFF computers to the uses that we've documented, you'll still find useful information in this book. For example, we'll show you how to load an
operating system onto a Compact Flash card using TFTP and NFS, and how to bootstrap the OS onto a laptop hard drive from another PC. If you have other projects or applications in mind, the information in this book will help you select an appropriate platform. Our project descriptions aim to help you understand the advantages, and disadvantages, of the computers that we've used.
Another reason to read the book (and do the projects) is to see how easily you can get Linux and BSD operating systems
ARM, and XScale processors. For some of them we'll even show you how to cross-compile your own programs.
Who Should Read This Book
We've written this book for people who like to tinker with both computer hardware and software. Along the same lines, we expect that you have a "do it yourself" attitude, either because you simply want to understand how something works, you want some extra features, or you don't trust product manufacturers to get it right. We also assume that you already have a minor fascination with miniature computers. If you still need some convincing, check out Chapter 1 for the list of things that we especially like about SFF computers.
Most of our projects involve some hardware assembly. For the most part, however, you won't need any fancy tools.
Screwdrivers and pliers will come in handy. The only time you'd need a soldering iron is to build a custom cable or two.
We devote the most space in each chapter to providing detailed instructions on how to install and configure the software
components. Every project is based on an open source
operating system, including Linux, OpenBSD, and FreeBSD. Previous exposure to at least one of these operating systems will be helpful. However, we try to not make too many
assumptions about your experience. With a little patience and perseverance, even first-time Unix users will be able to get up and running with our instructions.
Organization of This Book
This book includes eight individual small-form-factor projects, each in its own chapter. We've chosen to place chapters roughly in order of decreasing computer size. We'll start with a couple of Mini-ITX based systems and finish with a computer the size of a stick of gum. Here is a brief description of each computer:
The introduction to the book includes a brief discussion of what "small form factor" means and why you might be interested in using SFF systems. We also introduce you to the hardware components used for each project, including where to get them and about how much they cost.
Chapter 2, Digital Audio Jukebox
Here we turn a Mini-ITX motherboard, a little memory, a laptop hard drive, and an infrared receiver into a digital jukebox. The IR receiver allows you to control the jukebox with a standard universal remote. We'll show you how to install and configure Gentoo Linux, the XMMS audio player, and a few ancillary programs. If you're so inclined, we also have a few hints for mounting the components into an antique radio cabinet.
Chapter 3, Digital Video Recorder
In this project we show you how to build your own digital video recorder. We used the toaster-sized ST62K "XPC" from Shuttle and a TV tuner card from Hauppauge. Of all the projects in the book, this one requires the most CPU processing power and storage capacity. We use Gentoo Linux as the operating system and MythTV for the actual DVR application.
Chapter 4, Home Network Gateway
a Compact Flash card for storage, which allows it to be silent and use very little power.
Chapter 5, Network Monitor
In this project we'll help you build a system that can monitor the health and status of a small home or office network. We'll use Snort for passive detection of malicious traffic, Nagios for active monitoring of hosts and links, and RRDTool to store and generate traffic graphs. Our operating system of choice is FreeBSD. The hardware is Soekris'
net4801, which has a faster CPU than the net4501 and accepts a laptop hard drive.
Chapter 6, Wi-Fi Extender
We feature the Access Cube from 4G Systems in this
chapter, which is a low-power, cube-shaped device designed for wireless applications. It has one Ethernet port and room for two Mini PCI Wi-Fi cards. We'll use it to build a wireless network router that you can use to extend the reach of existing wireless networks. The Access Cube runs a version of Linux called OpenEmbedded.
Chapter 7, Portable Bridging Firewall
Chapter 8, Cheap Wi-Fi SSH Client
Here, we show you how to load new firmware on the ZipIt Wireless Messenger. The ZipIt is a cheap handheld device with a thumb keyboard, LCD display, Wi-Fi interface, and very good battery life. We think it makes a good little SSH client that you can take places where you'd rather not take your laptop computer.
Chapter 9, Bluetooth LED Sign
Our final project features the smallest computer in the book. The gumstix is a modular device running a
customized Linux distribution. The particular model that we've chosen has a built-in Bluetooth interface. We'll use it to add Bluetooth connectivity to a scrolling LED message sign.
Recommended Reading
While reading this book, you may want to consult some of these other O'Reilly resources for more information.
Wireless Hacks, Second Edition and/or Linux Unwired
Linux in a Nutshell or Linux Cookbook BSD Hacks
Unix Power Tools, Third Edition
Using Code Examples
This book is here to help you get your job done. In general, you may use the code in this book in your programs and
from this book does not require permission. Selling or
distributing a CD-ROM of examples from O'Reilly books does require permission. Answering a question by citing this book and quoting example code does not require permission.
Incorporating a significant amount of example code from this book into your product's documentation does require
permission.
We appreciate, but do not require, attribution. An attribution usually includes the title, author, publisher, and ISBN. For example: "MAKE Projects Small Form Factor PCs, by Duane Wessels and Matthew Weaver. Copyright 2008 O'Reilly Media, Inc., 059652076X."
If you feel your use of code examples falls outside fair use or the permission given above, feel free to contact us at
Code samples and configuration files used in this book are available from http://sffbook.org/code.
Conventions Used in This Book
The following typographical conventions are used in this book:
Italic
Used to indicate new terms, filenames, file extensions, and directories. For example, a path in the filesystem will
appear as /Applications/Utilities.
Constant Width
Used to indicate commands, options, classes, keys,
Constant Width Bold
Used in examples and tables to show commands or other text that should be typed literally by the user.
Constant Width Italic
Used in examples and tables to show text that should be replaced with user-supplied values.
Acknowledgments
Duane would like to thank the following people and companies: Mini-box.com for donating power adapters, an IDE-to-CF
adapter, and other toys. Plat'Home in Japan (http://www.plathome.co.jp/) for donating the
OpenBlockS/266. Shuttle (http://www.shuttle.com/) for
donating the Zen ST62k XPC. O'Reilly Media for the gumstix. My sincere thanks to all the technical reviewers who took the time to read drafts of the book and provide feedback: Craig Hughes, Dave Hylands, Joel Jaeggli, Ken Keelan, Fernando
Maymi, Brendan White, and N. E. Whiteford. I know myself that it takes a lot of time and effort to be a reviewer. You have
earned my respect and thanks for stepping up to the task. As usual, it's been a pleasure to work with the folks at O'Reilly Media. Our editor, Brian Jepson, didn't give up on us even after missing a few deadlines. And to all the other top-notch O'Reilly folks, thanks for turning a bunch of XML mumbo-jumbo into a beautiful-looking book.
remind me someday to tell you how much fun it was to work on the book during your naps, and after falling asleep with you each night. Sleep well Mugs!
Matthew would like to thank the following people and companies:
Pascal Dornier (http://pcengines.ch/) for donating a WRAP board. Shuttle (http://www.shuttle.com/) for donating an
SN85G4 XPC, and AMD (http://www.amd.com/) for donating a suitable Athlon CPU. Mikrotik (http://www.mikrotik.com/) for donating a RouterBOARD 230.
I owe my largest debt of gratitude to Duane. He's not only
responsible for the best work in this book, he's also given me a leg up more times than I deserve one.
Everyone at O'Reilly has been extremely patient and easy to work with. Brian Jepson has been invaluable in countless ways. Lastly, thanks to my friends and colleagues for all their help: Amy Silver, for her support and advice; Jared Spiegel, for his guidance with the occasional technical jam; David Hardy, Tanya Bokat, and Greg Willson at Nedernet for everything.
Safari® Enabled
When you see a Safari® enabled icon on the cover of your favorite technology book, that means it's available online through the O'Reilly Network Safari Bookshelf.
Safari offers a solution that's better than e-books: it's a virtual library that lets you easily search thousands of top tech books, cut and paste code samples, download chapters, and find quick answers when you need the most accurate, current information. Try it for free at http://safari.oreilly.com.
How to Contact Us
Please address comments and questions concerning this book to the publisher:
O'Reilly Media, Inc.
1005 Gravenstein Highway North Sebastopol, CA 95472
(800) 998-9938 (in the United States or Canada) (707) 829-0515 (international or local)
(707) 829-0104 (fax)
We have a web page for this book, where we list errata,
examples, and any additional information. You can access this page at:
http://www.oreilly.com/catalog/smallffpfg
To comment or ask technical questions about this book, send email to:
For more information about our books, conferences, Resource Centers, and the O'Reilly Network, see our web site at:
Introduction
In this book we present eight projects based around small form factor computers. Before delving into those projects, we'll
spend a little time talking about what the term small form factor (SFF) means to us and why we think SFF systems are
interesting. We also introduce the hardware for each project in this chapter, and finish up with a list of other SFF systems that we weren't able to include in this book.
What Is Small Form Factor?
For many computer enthusiasts, the phrase small form factor brings to mind cube-shaped systems about the same size as a stack of books. If you visit a site such as www.sfftech.com, you'll see many such systems. These days they generally have a Pentium 4 or Athlon processor; a couple of hard drive bays; one or two PCI expansion slots; built-in audio, video, Ethernet, USB, FireWire; and more. They make great desktop
replacements and are often used as "media center" PCs. This book takes the small-form-factor concept a few steps
further to include the very wide range of small, general-purpose computer systems now available to individual consumers. Until recently, small computers were largely considered embedded systems that ran custom software applications. They were available only in large quantities to commercial users and system integrators.
So what do these systems have in common? One answer is that they all appeal to us simply because of their size. As geeks and gadget freaks, we are always fascinated with smaller and
smaller phones, cameras, music players, and computers. The trend is always toward smaller and smaller devices, or at least toward packing more performance and functionality in the same space.
Another common characteristic is that they can all run open source software, such as Linux, BSD Unix, and a myriad of
additional applications. This means that these SFF systems have a certain hardware openness as well. Even though the
computers are extremely small, they are still "PC compatible." For the most part, you won't have to worry about buying,
finding, or writing a special driver to use any of the built-in
serial, audio, Ethernet, Wi-Fi, and other interfaces. Open source is not necessarily a requirement, however. You can certainly run Microsoft Windows on the Shuttle- and Mini-ITX-sized systems. You can probably even run DOS on the smaller, x86-based
Why Small Form Factor?
You may be wondering why you should choose a SFF platform for a particular task instead of simply using a full-size PC. Most people choose smaller systems because they use less power, produce less noise, generate less heat, and, of course, take up less space. Not surprisingly, these characteristics are all related as well. Let's look at each characteristic in some depth:
Size
Size is an obvious characteristic of small computer systems. You might choose to use a Mini-ITX or XPC computer on your desktop simply because it takes up less space, leaving more room for your piles of papers. If you'd like to have a PC in your entertainment center, you probably want an enclosure that looks good and blends in with your other devices (DVD player, audio amp). Small computers are
often popular with gamers who bring them to LAN parties or just over to a friend's house.
Data centers usually charge for both space and bandwidth. You can fit two Mini-ITX systems in a 19-inch-wide, 1U rack-mountable enclosure.
Anyone who regularly travels with computers is strongly motivated to find the smallest one to do the job. If the
computer is small enough, you can carry it with you or fit it in your luggage. If your computers must be boxed and
shipped, you'll appreciate the lower shipping costs from
smaller, lighter systems. Maybe you'd like to put a computer in your car, on your sailboat, or even on your bicycle.
Smaller is also better for access points and surveillance
Power
The power demands of today's high-end desktops are, in our opinion, just a little outrageous. It is not uncommon to see 500 watt power supplies these days. One company has begun selling a 1 kilowatt PSU. If you have multiple
computers in your home or office, you should really think about how much power they consume, and whether you can get by with something that uses less. For example, you
don't need a power-hungry AMD Athlon or Intel Pentium 4 in your office for your firewall. A low-power (4 watts)
computer described in this book can do the job just as well. Power is also important when you think about
uninterruptible power supplies and battery backups. When the power goes out, a 4 watt Soekris box will stay running about 10 times longer than a 40 watt Pentium III system. The requirements of some SFF systems are low enough that power over Ethernet (which delivers a maximum of 12.95 watts) becomes a possibility. Another nifty idea is to supply power from a solar panel.
Heat
The heat generated by a computer is directly related to the power that it consumes. In simple terms, every watt that goes in comes out of the computer as waste heat. Data centers have huge air conditioners that move the heat from inside to outside, consuming even more power in the
Not only do SFF systems generate less heat, many of them run without any fans at all, which brings us to...
Noise
There is also a rough correlation between the noise that a computer generates and the power that it consumes. The source of noise in most computers comes from things that spin: hard drives and fans. You can certainly build quiet full-sized desktop systems by using large, low-speed fans and power supplies with gigantic passive heat sinks. However, you'll have a hard time making them truly silent.
Small Form Factor Systems
We use eight different SFF systems for the projects in this book, plus various accessories, cables, and connectors. Here's a
description of each hardware platform, including where you can buy your own and how much you should expect to pay.
VIA EPIA ME6000
VIA Technologies has been one of the pioneers in the SFF
movement. Their small Mini-ITX motherboards (17 cm x 17 cm) seem to be especially popular with case modders and people who build media PCs. VIA's Mini-ITX motherboards are different than most because they have a built-in Cyrix CPU. Cyrix
processors are, for most purposes, compatible with the Intel x86 line. They are also known for running cooler than their Intel and AMD counterparts. While Cyrix CPUs may be very energy efficient, they do not have the same levels of performance as the Intel/AMD offerings.
In Chapter 2, we'll show you how to build a digital audio
jukebox based on the VIA EPIA ME6000. The processor runs at 600 MHz, which is more than enough for decoding and playing music. The ME6000 has built-in audio, video, and Ethernet, as well as a number of other standard devices. To complete the project, we also use a laptop hard drive, one stick of SDRAM, and an infrared remote-control receiver. ME6000 motherboards are available from a number of online retailers for about $150. We also use the PW-70A power adapter from Mini-box.com (a.k.a. Ituner Networks). The PW-70A takes the place of a standard ATX power supply. It takes a 12 Volt DC input and provides various output voltages on an ATX connector. Ituner Networks was generous enough to donate the PW-70A and other items for the book. Visit their site at http://www.mini-box.com.
Shuttle is another company that is largely responsible for the success and popularity of SFF systems. Their "XPCs" are
roughly cube-shaped boxes designed both for looks and
features. Shuttle generously sent us an ST62K for use in the book, and we felt that it would make a good digital video recorder (DVR). This project is described in Chapter 3.
The ST62K is a bare-bones system, which means it comes with only the motherboard, case, and power supply. The CPU,
memory, and hard drive must be purchased separately. The ST62K takes an Intel Socket 478 (Celeron or Pentium 4) CPU and DDR SDRAM. We use a 2.2 GHz processor, 512 MB of
memory, and a 120 GB hard drive. The motherboard has built-in video, Ethernet, and sound. The ATI Radeon 9100 IGP video processor also has a built-in TV output. Unfortunately, we had some difficulty getting the TV output to work well with the X Window System on Linux.
The ST62K is currently selling for about $250 from a number of online retailers. However, due to relatively short product life cycles in the computer industry, it may not be available by the time you read this book (however, you will be able to find
comparable offerings from Shuttle).
Another key component of the DVR is a TV tuner card. We chose the relatively inexpensive WinTV-GO from Hauppauge, whose cards are well supported in Linux. In retrospect, we recommend that you get a fancier version, such as the WinTV-PVR250. The ST62K has one PCI slot, which is where the TV tuner card will go. We also use an infrared receiver and
universal remote control for this project. Soekris net4501
Soekris Engineering makes a number of small, low-power computers that are designed to be used as
networking/communication devices. They are all about the size of a small textbook and run silently. They feature varying
Soekris computers can boot and run from Compact Flash memory.
We'll use a Soekris net4501 (their first product) in Chapter 4 to build a gateway for your home or office network. The gateway can be configured to provide Dynamic Host Configuration
Protocol (DHCP), Domain Name System (DNS), Network Address Translation (NAT), and firewall (packet filtering) services. The net4501 is a good choice because it has three Ethernet ports. Its 486-class processor and 64 MB RAM can easily handle the amount of traffic typically found on a home network. It takes up very little space, generates very little heat, and requires very little maintenance.
The net4501 also has two PCI slots, which you can use to add a Wi-Fi interface. One of them is a Mini-PCI slot, which is
commonly found in laptops. The other is a standard-sized PCI slot that accepts 3.3 volt PCI cards.
You can buy the Soekris net4501 board and case directly from Soekris Engineering at http://www.soekris.com. The current cost is about $170 in single quantities. You'll also need a power supply. We recommend the "mini switch mode" model from Soekris, which costs $11.
The only other item we need to complete the project is a
Compact Flash card. We recommend at least 128 MB, but you really don't need more than 256 MB for this project.
Soekris net4801
Our next project (see Chapter 5) uses another Soekris
computer. Compared to the net4501, the net4801 has a faster processor (266 MHz, 586-class), and more memory (256 MB). It also has two features that no other Soekris computers have: USB and a built-in 44-pin IDE interface. We won't use the USB interface, but we will add a laptop hard drive instead of using the Compact Flash slot for storage.
You can use it to actively and/or passively monitor hosts and routers on your network. The entire system is built from open source software packages, including Snort, Nagios, and
RRDTool. Snort is an intrusion-detection system that passively monitors network traffic. Nagios actively monitors hosts and services by periodically probing them. RRDTool is a very nice system for storing and displaying various types of
measurements. We'll use it to display bandwidth usage.
The net4801 is currently priced at $240 and is available from http://www.soekris.com. You'll also need to buy the 2.5-inch hard drive mounting kit ($10), power supply ($11), a laptop hard drive, and a 40-to-44-pin IDE adapter. The hard drive and adapter are not available from Soekris Engineering, but you can find them from many online vendors. You'll use the IDE adapter to connect the laptop hard drive to a standard PC (with a CD-ROM drive) so you can install the operating system. The project uses less than 2 GB of disk space, so any size laptop hard drive will work. In fact, if you have an old laptop lying around, you can probably remove its hard drive and use it in the net4801 (and you could use the laptop to install the operating system, eliminating the need to use the 40-to-44 pin IDE adapter and a desktop computer). Note that older 12.5 mm laptop drives don't fit in the net4801.
4G Access Cube
4G Systems, based in Hamburg, Germany, introduced the
Meshcube in mid-2004. Since then, it has been renamed to the Access Cube. The Access Cube is designed specifically for "mesh routing" and other wireless applications. The mainboard
consists of a MIPS processor, 32 MB flash memory, 64 MB RAM, built-in Ethernet, and USB. An expansion card has two Mini-PCI slots, which are normally used for 802.11 Wi-Fi cards. The
orange-sized case has two Wi-Fi antenna connectors.
quality. If you travel often, you might take the cube with you so that you can use nearby Wi-Fi networks from your hotel room. You can also use the extender as a network address translator, providing service to multiple hosts through a network that requires authentication and gives you only one IP address. The Access Cube is available directly from 4G Systems in
Germany. Prices are not currently posted, but the cube should cost about 200 Euros. Visit their web sites,
http://www.meshcube.org/ and http://www.4g-systems.de/en/, or contact them at [email protected]. You can also buy the Cube in the United States from Closed Networks, Inc
(http://www.closednetworks.com/).
In addition to the Access Cube itself, you'll also need two 802.11 Mini-PCI cards and Wi-Fi antennas with RP-SMA
connectors. Both of these should be available from 4G Systems or a number of other online retailers, such as
http://www.netgate.com/. Typical prices are $50 to $70. You can also sometimes salvage an 802.11 Mini-PCI card from an old laptop that has built-in Wi-Fi.
Plat'Home OpenBlockS/266
OpenBlockS is a micro server from the Plat'Home company in Japan. It is similar in size to the Access Cube, although more brick- than cube-shaped. Plat'Home generously donated an OpenBlockS/266 to us for the book. It has one serial and two Ethernet ports, a 266 MHz PowerPC processor, 64 MB RAM, and 8 MB flash memory. One of its most interesting features is that you can fit a laptop hard drive inside the case or use a Compact Flash adapter.
Our project for the OpenBlockS, in Chapter 7, is to create a portable bridging firewall. By placing the two Ethernet ports in bridging mode, you can use the firewall on any network without any configuration changes at all. We envision this firewall to be particularly useful in situations where you need one only
unprotected and unpatched Windows PC can become infected in less time than it takes to download and apply software updates. The next time you have to reinstall the operating system on your Mom's computer, bring this little firewall with you.
Another nice feature of the OpenBlockS is that it requires only 5 volts DC input. This means that you can power it from a USB port, which also provides 5 volts DC and a maximum of 500 mA. The OpenBlockS draws between 500 and 640 mA, so this only works if the host system provides more current than required by the USB specification.
If you'd like to order an OpenBlockS from outside of Japan, visit the Fat Gadget web site: http://www.fatgadget.jp/english/. The cost is about $500. Inside Japan you can probably order it
directly from Plat'Home. The kit should come with a power supply and serial port cable, but does not include a Compact Flash card. For this project we recommend at least a 256 MB CF card. You'll also need a DC power plug and USB cable if you want to build a USB power cable for the OpenBlockS.
ZipIt Wireless Messenger
The ZipIt Wireless Messenger is a small and inexpensive handheld device with a QWERTY keyboard, LCD display, and built-in Wi-Fi. It runs an instant messenger (IM) application that connects to the AOL, Yahoo!, and MSN instant messenger
servers. The product is really marketed to families with kids, so the kids won't tie up the family PC while chatting with their
pals. Internally, the ZipIt has an ARM-based processor, 16 MB of RAM, and 2 MB of flash memory.
Although the handheld messenger gadget is a great idea, with a little software hacking, you can turn the ZipIt into a portable SSH client. In Chapter 8, we'll show you how to load a new
firmware image onto the ZipIt. You can then use SSH to log into your home or office systems, read your email, and more.
retailers and stores such as Target. It even comes in different colors! The only other thing you'll need is an existing Windows or Linux computer to use as a server when loading the new firmware.
gumstix waysmall
The tiniest device in the book is the gumstix "waysmall"
computer by gumstix, inc. It is smaller than a cell phone and a little larger than a pack of gum. gumstix systems are modular and come in a variety of configurations and features. A platform board contains the processor, memory, and optional Bluetooth interface. Expansion boards contain additional devices, such as Compact Flash or Multi Media Card (MMC) slots, serial ports, USB, and Ethernet.
We're using a gumstix basix platform board and a waysmall STUART expansion board. The processor is a 200 MHz Intel XScale (ARM) PXA255. It has 64 MB RAM, 4 MB flash, an MMC slot, and the built-in Bluetooth module. The expansion board has two serial ports, USB, and the power connector.
In Chapter 9, we connect the gumstix to a scrolling LED
message sign. We configure the gumstix to receive messages via Bluetooth and then send them to the sign to be displayed. You might use this project as a way for people to entertain themselves at a party or meeting, or in a more serious setting such as an office, manufacturing area, or Network Operations Center.
You can buy the gumstix components directly from the
gumstix.com web site. The 200 MHz basix with Bluetooth is about $145 and includes a Bluetooth antenna. You can get the waysmall-st kit, which includes the waysmall STUART expansion board, power supply, and a little case, for $30 more. Since the gumstix uses round serial port connectors, we recommend that you purchase a null modem cable ($12) or two from the
For the scrolling LED sign, we recommend the Pro-Lite "Tru-Color II" signs (a.k.a. model PL-M2014R), which have a serial port interface and a known communications protocol. These are occasionally available on eBay, but you can find them other places as well, including the manufacturer's web site at
http://www.pro-lite.com/indoor-singleline.htm. You may also be able to find the Pro-Lite signs at retailers such as Office Depot, Office Max, and Staples. Prices vary quite a bit. We paid $150 for ours through eBay. The Office Depot web site says the list price is $425. Office Max is currently selling the Tru-Color II for $200.
More Cool Hardware
The projects in this book represent only a subset of all the small computer systems out there. Here are some more computers and other devices that we think are interesting:
Linksys WRT54G/GS/GX
Linksys' wireless routers are perhaps one of the most well-known hackable devices. The original WRT54G has five Ethernet ports, one 802.11g Wi-Fi interface, 16 MB RAM, 4 MB flash, and a 125 MHz Broadcom/MIPS CPU. Newer
models may have more and faster components. Best of all, these devices are quite inexpensive, often selling for $70 or less. http://seattlewireless.net/index.cgi/LinksysWrt54g has quite a bit of info about hacking the firmware on Linksys WRT54G routers, and you can download firmware images from http://openwrt.org/.
Nano-ITX
Hot on the heels of their Mini-ITX motherboards, VIA came out with the Nano-ITX form factor. Whereas Mini-ITX is 17 x 17 cm, Nano-ITX is 12 x 12. It seems that Nano-ITX
motherboards are a little hard to find at the moment, and are much more expensive than the Minis. VIA's EPIA-N has almost all of the standard devices, connectors, and
interfaces you'd expect to find on a full-sized motherboard. Two interesting differences, however, are the use of Mini-PCI instead of standard Mini-PCI, and the use of SODIMM, rather than SDRAM or DDR memory. Both Mini-PCI and SODIMM are commonly used in laptops.
Apple iPod
you can load Linux firmware onto it. In fact, you can "dual-boot" your iPod with either the Apple firmware or the
iPodLinux firmware. One of the best reasons for doing so is so you can play additional file formats, such as Ogg Vorbis, or so you can record higher-quality sound with your iPod (the Apple firmware in older iPods supports only 16-bit, 8 KHz mono). See http://ipodlinux.org for more information.
NorhTec
NorhTec (http://www.norhtec.com/) offers a number of
small computer systems. Some use Mini-ITX motherboards; others use custom hardware. Their smallest product, the MicroServer GP+, has VGA video, mouse/keyboard, a
parallel port, Ethernet, USB, audio, and TV video input and output connectors. The case has room for a 2.5-inch hard drive as well.
PC Engines WRAP board
The PC Engines (http://www.pcengines.ch/) Wireless Router Application Platform boards are similar in size and features to products from Soekris Engineering. They include 1–3 Ethernet ports, 1–2 Mini-PCI slots, Compact Flash for storage, and a serial console port.
WildLab LAMB-RT-01
The LAMB-RT-01 is a very small computer designed to run Linux. It has a 66 MHz AMD processor, 16 MB RAM, a
Compact Flash slot, and two Ethernet ports. The whole
package is about 3 x 3 x1 inches. If you can read Japanese, visit http://www.wildlab.com/. They have an English
Unfortunately, it seems that WildLab is no longer selling the LAMB-RT-01, although they have released schematic
diagrams for anyone interested in building his own.
Sharp Zaurus SL-C3100
Sharp has produced a number of Zaurus PDAs that run
Linux, although they have mostly been exclusively available in Japan. The most recent model, the SL-C3100, has a
640x480 color display, a 4 GB hard drive, Compact Flash, and Secure Digital memory slots. It uses an Intel XScale processor (similar to the gumstix), 64 MB RAM, and up to 128 MB internal flash memory.
OQO Model 01+
The OQO model 01+ is another handheld computer that packs laptop-like features into a PDA-sized package. It has a 30 GB hard drive, a Transmeta processor, 512 MB RAM, USB, FireWire, Wi-Fi, Bluetooth, sound, and an 800x480 color display. The OQO comes with Windows XP, but a number of folks are figuring out how to make it run Linux. Unfortunately, it's more expensive than many full-sized laptops.
Mini-box M-100
inside the case. See http://www.mini-itx.com/news/10339296/.
OpenBrick
The OpenBrick (http://www.openbrick.org/) is another dead product. We believe it was originally manufactured by a Taiwanese company called Lucky Star, and sold as the NET-2100. It had a 300 MHz Geode processor, 128 MB RAM, VGA, keyboard, mouse, PCMCIA, CF, USB, Ethernet, and a 2.5-inch hard drive slot.
Black Dog
Realm Systems Inc. makes The BlackDog Mobile Personal Linux Server. It looks like a large USB thumb drive but is in fact a PowerPC-based computer system. It receives power from the USB port and uses Ethernet-over-USB to
communicate with the host computer. When you plug it into a Windows or Mac system, you get a virtual X desktop that allows you to run Linux applications. The manufacturer's site is http://www.projectblackdog.com.
Nokia 770
The Nokia 770 Internet tablet is a handheld, PDA-sized device with an ARM processor, 800x480 color touch screen, 128 MB RAM, and built-in Wi-Fi and Bluetooth. In addition, the 770 is remarkable because it is not a phone, and
because Nokia is open about their use of (Debian) Linux. In fact, Nokia has open-sourced the 770's development
Digital Audio Jukebox
What You Need
Mini-ITX motherboard with built-in audio, video, and network interface
Memory for the Mini-ITX motherboard (at least 256 MB)
Adapter cable for motherboard's second serial port Laptop (2.5-inch) hard drive
Laptop hard drive 44-to-40 pin adapter
Power supply or adapter, such as the PW-70A from Mini-box.com
Irman infrared receiver Universal remote control
Mini-ITX case or other enclosure Speakers
Fan speed controller (optional)
Small fan for a custom enclosure (optional) LCD display (optional)
Spare CD-ROM drive for OS installation
Depending on how far you want to take this project, you'll spend anywhere from a few days to a few weeks on it. If you choose to create your own enclosure, you'll probably find that is the hardest part.
For this project, we chose the VIA EPIA-M motherboard. It is one of their many Mini-ITX form-factor boards. As of this
writing (early 2006) the EPIA-M comes with either a 1 GHz or 600 MHz CPU. We opted for the 600 MHz version (model
ME6000) because it is advertised as fanless. Note the two
passive heat sinks on the ME6000, shown in Figure 2-1. As we'll discuss later, that doesn't necessarily mean you can get by
without any fans at all.
The "M" in EPIA-M might stand for multimedia. This motherboard is designed specifically for audio and video
applications. That means it has more built-in hardware features than some of VIA's other Mini-ITX motherboards. For example, its CLE266 North Bridge provides both MPEG-2 acceleration and six-channel audio. The EPIA-M also has a jack for TV output (NTSC, PAL, and S-Video).
Additional EPIA-M characteristics include:
One DDR266 184-pin memory slot, supporting up to 1 GB of RAM.
Two parallel ATA133 (PATA) connectors and one floppy disk connector.
Four USB2.0 ports with two jacks on the rear panel. Two FireWire ports in the form of 9-pin headers on the motherboard.
Built-in fast Ethernet. One PCI slot.
Two COM ports, one parallel port, mouse, and keyboard. Only one of the COM ports has a connector on the rear panel. To utilize the second, you'll need to connect a cable to a 9-pin header on the motherboard.
Additional Hardware
You'll need some additional hardware to build the jukebox. Some items, such as the power supply and memory, are
mandatory. Others, like the wireless network interface and LCD display, are optional.
Power converter
The EPIA-M has a standard ATX power-supply connector.
However, you probably don't want to use an actual ATX power supply because it's quite noisy and large. You can use an ATX power supply if you like, of course, although it is overkill. The EPIA-M system (with laptop hard drive) normally consumes less than 40 watts of power, while most ATX power supplies are
rated for about 300 watts.
Instead, we like the power converters available from Mini-box.com (http://www.mini-Mini-box.com). They make a few different models, depending on power requirements and
motherboard shape. For the EPIA-M, we are using the PW-70A, shown in Figure 2-2 and Figure 2-3 (notice the ATX connector on the component board), which they were kind enough to donate for the book.
Mini-box's power converters snap directly onto the ATX connector without any cables, as shown in Figure 2-4. This eliminates the 20 or so wires that standard ATX power supplies have between the box and the motherboard connector. The PW-70A takes 12 volts DC input. In addition to the ATX connector, it also has one standard hard drive molex output, one floppy/CD-ROM-type power connector, and a general-purpose 5 volt lead. The PW-70A manual says that the most it can power is two 5400-RPM hard drives, a floppy or CD-ROM, and 1 GB of RAM. Since 7200 RPM hard drives consume more power, you should not connect more than one of them at a time to this power converter. Our jukebox is well within these requirements, since we'll be using a single laptop hard drive. In fact, when we
Be careful:
In our personal experience, the Mini-box power converters are not as robust as standard ATX power supplies. We managed to ruin two of them by doing stupid things like plugging cables into the wrong
connectors and by using home-made cables that may have been wired up incorrectly. Our best guess is that these adapters don't have any current overload
protection that prevents them from burning out. We've never had any problems during normal operation—only when fiddling with something on the motherboard.
Memory
The EPIA-M takes standard 184-pin DDR SDRAM, although it has only one slot. It is rated for 266 MHz (PC2100) memory, and we're using a 256 MB stick. Future motherboard models may accept faster memory, so be sure to check the specs before you buy.
Inserting the memory is relatively simple. Notches on the bottom of the SDRAM board ensure that it fits only one way. Rest the memory on top of the slot, then push down on the ends as shown in Figure 2-5. You should hear a solid "snap" as you push down, and the little clips on the end will move to hold the board firmly in place.
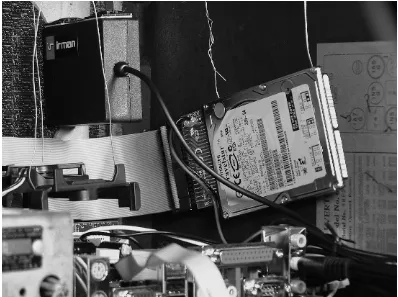
Hard drive
We recommend using a laptop (2.5-inch) hard drive for this project because of its small size. (Figure 2-6 shows a typical drive, in case you've never seen one before.) They also tend to be quieter and consume less power than the standard 3.5-inch drives. The downside to using a laptop drive is that they are more expensive (per GB) and come in smaller capacities. As of this writing, 80 GB Hitachi Travelstar (2.5-inch) drives are
selling for about $110, while you can get a 250 GB Deskstar (3.5-inch) for $100. In other words, the larger drive gives you three times the space for about the same money.
The ME6000 Mini-ITX motherboard has a standard (40 pin) PATA connector. You'll need a 2.5-inch hard drive adapter and a 40-pin PATA cable to connect the hard drive to the
what kind you get. One end has a 44-pin female connector for the hard drive. The other end is a 40-pin male connector for the PATA cable. The adapter also has a molex connector that
supplies power to the drive.
Use caution when connecting the adapter to the 2.5-inch hard drive since the pins bend easily. Also take care to align the
connectors correctly. If you are not careful, you might connect it upside down, or off by one. Pin 1 should be labeled on most hard drives and adapters. If you look at the hard drive pins straight on, you'll see two separate sets of pins. The 44-pin
block is the PATA connector. Next to that is a small 4-pin jumper block. If you look closely at Figure 2-7, you should be able to see that the adapter connects only to the PATA pins and should not touch the jumper block. Pin 1 of the PATA connector is on the side closest to the jumpers. Your PATA cable should have a red stripe down one side, which also indicates pin 1.
Enclosure
You'll need to either buy or build an enclosure for your Mini-ITX system. Certainly, using a manufactured case saves time and effort. Note, however, that Mini-ITX cases tend to be more expensive than standard ATX cases. A number of nice, small cases are available from companies such as Travla, Morex,
Cubid, Hoojum, and Scythe. Most of the cases should support a PCI card and CD drive, but some may not. Some of the very slim cases may require special low-profile memory.
You should also think about cooling requirements when shopping for cases. This project is based around the fanless EPIA-M motherboard. Most of the Mini-ITX cases have a case fan to provide cooling. Some of the very small cases may have a tough time keeping the system cool enough. If noise is an important factor, you may want to look at the fanless
e-OTONASHI case by Scythe. It has a heat lane that mounts on top of the CPU and dissipates heat through the bottom of the case.
If you're up to the task, building your own case can be quite fun. We think that nonfunctioning antique radios make excellent jukebox cases. You can probably find one at a local antique
On/off switch
If you'll be using an off-the-shelf Mini-ITX case, you don't need to worry about the on/off switch. On the other hand, if you plan to build your own enclosure, as we do, you'll need to fabricate a simple on/off switch.
We visited the local hardware store and purchased a push-button switch for a few dollars. The harder part is finding a cable with an appropriate connector that you can solder to the switch. The pins on the motherboard are a standard IDC header (0.10 inches apart). If you can't find an appropriate cable,
search the Web for "replacement ATX power switch." CPU/system fan
The EPIA-M is advertised as fanless, which means you can get by with a passive heat sink as long as something provides a little airflow to remove excess heat. We recommend that you put a fan in your enclosure and use something like the Zalman Fanmate controller, shown in Figure 2-8, to reduce its speed. That way, you still get some airflow while keeping the system relatively quiet. We used an old CPU fan because it is about the right size and already has the necessary two-wire connector. Remote control
With an infrared remote control, you can control the jukebox much like a normal stereo CD player. You can change the
volume, pause the music, fast forward/reverse, skip ahead, etc. We'll show you how to use the Irman infrared receiver by
Evation (http://www.evation.com/) for this project. As you can see in Figure 2-9, the Irman is nothing more than a small box connected to a serial cable. The infrared sensor hides behind a small red window inside the box.
Cable for second serial port
The VIA EPIA-M motherboard has just one serial port on the back panel. We recommend that you use it as a remote console while building the system and in case the network is down. This means you can't put the infrared receiver on that serial port. A second serial port is available on the motherboard, but to use it you'll need to get a special cable, such as the one in Figure 2-11. To find a place where you can buy a cable like this, search the Web for "IDC10 DB9 serial" and "internal serial cable."
Note: You may have to update the VIA EPIA-M BIOS in order to get the second serial port to work. This is apparently a common problem with these motherboards. BIOS files are available for download from http://www.viavpsd.com/.
The second serial port connector is near the rear of the motherboard, right next to the large, pinkish parallel port
connector. (Refer to Figure 2-12.) It looks like two rows of five pins sticking up, except that one of the corner pins is missing. The adapter cable connector has one of the holes blocked out so that you can only attach it in one way. The cable also probably has a pink stripe down one side, marking pin 1. That stripe should be on the side closest to the rear of the motherboard.
Wi-Fi (optional)
The jukebox needs a network connection so you can upload new songs and perform system administration tasks. You can use the EPIA's built-in Ethernet port, although who really wants Ethernet cables running through the house? The EPIA-M has one PCI expansion slot, which you can use for a wireless network card. Unfortunately, we won't be able to give you all the details of setting up the wireless interface in this chapter. See Chapter 6 for some good hints, or grab a copy of Linux Unwired (O'Reilly).
LCD display (optional)
Since the jukebox isn't connected to a monitor, you might want to use an LCD display. There, you can display the artist name, song title, and other information. If you are building or
Step 1: Install and Configure Gentoo
Linux
We chose Gentoo Linux for this particular project. If you already have a favorite Linux distribution, feel free to use that one
instead. However, the remainder of this section is Gentoo-specific.
If you've never installed Gentoo Linux before, start by having a look at their online handbook. Since our platform is the VIA EPIA-M, we'll refer to the "x86" documentation at
http://www.gentoo.org/doc/en/handbook/handbook-x86.xml. We cover the important points here, but you'll probably want to follow along in their documentation as well.
If you are new to Linux altogether, you may want to have a good reference by your side, such as Linux Cookbook (O'Reilly), Linux in a Nutshell (O'Reilly), and Linux Administration
Handbook (Prentice Hall).
The Gentoo Live CD
The first chapter of the Gentoo handbook is an introduction to the philosophy and terminology of Gentoo. It takes only a minute or two to read. The second chapter explains your
options for downloading a Gentoo Live CD and talks about the three types of installation stages. We recommend downloading the Minimal Live CD and then performing a stage3 installation. However, if you'll be performing the installation somewhere with a slow network, you may want to go ahead and download the Universal Live CD image instead.
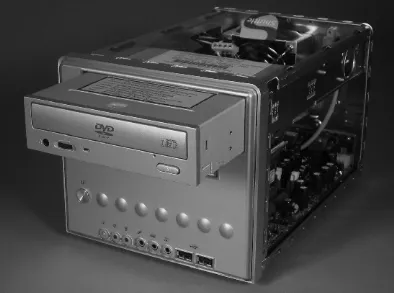
If you don't plan on having a CD-ROM in your final jukebox, you'll need to connect one temporarily to perform the
installation. Note that the Mini-box PW-70A has two power connectors. The larger one should be connected to the laptop HD adapter. The smaller connector fits floppy and slim CD-ROM drives. If you don't happen to have a slim CD-ROM, you'll need an adapter or a "Y" splitter for the larger connector. Another option is to temporarily use a standard ATX power supply during the installation.
If none of those suggestions work for you, take the laptop hard drive to another system that already has a CD-ROM. If you take this route, be aware that you may need to account for hardware differences when moving the drive back to the Mini-ITX system. As the Gentoo CD boots, it pauses briefly and gives you a
chance to load a special kernel or specify certain options:
ISOLINUX 3.09 2005-06-17 Copyright (C) 1994-2005 H. Peter Anvin Gentoo Linux Installation LiveCD
http://www.gentoo.org/
Most likely you can use the default and just press Enter. We found it necessary to use a nonstandard kernel because our old VGA monitor does not support the higher resolution (probably 800x600) that the default kernel uses. At the boot prompt, we typed gentoo-nofb and were happy to see a good,
old-fashioned VGA text screen.
When Gentoo finishes booting, you'll see a root shell prompt. During the installation, you may find it useful to switch to another (virtual) screen. While one screen is tied up with a
procedure that takes a long time, you can use another screen to plan ahead or monitor its progress. To access the virtual
screens, type Alt-N on your keyboard, where N is a number from 1 to 6.
Configuring the network interface
The first task after booting is to get the network working, although if you have the Universal Live CD, you may not need to. We found that the EPIA's built-in NIC is not recognized or configured by default. This can be confusing because ifconfig may show an eth0 interface, but it appears to be some sort of firewire-to-Ethernet device. If you're using a VIA motherboard, load the via-rhine kernel module and then start the DHCP
client:
# modprobe via-rhine # ifconfig eth1
# dhcpcd eth1 # ifconfig eth1
Partitioning the hard disk
The second step is to partition your hard drive for Linux. The Gentoo Handbook covers this in some detail in Chapter 4. We suggest that you follow their recommendations and create three partitions: a small boot partition, a swap partition, and
everything else on one large root filesystem. If your hard drive has been previously partitioned, you'll need to delete your
existing partitions as described in the handbook. Assuming the drive is unpartitioned, here's how to create the first one:
# fdisk /dev/hda
Disk /dev/hda: 30.0 GB, 30005821440 bytes 255 heads, 63 sectors/track, 3648 cylinders
Units = cylinders of 16065 * 512 = 8225280 bytes
Device Boot Start End Blocks Id System Command (m for help): n
Command action e extended
p primary partition (1-4) p Partition number (1-4): 1
First cylinder (1-3876, default 1): (Hit Enter)
Using default value 1
Last cylinder or +size or +sizeM or +sizeK (1-3876, default 3876):
Also set the bootable flag for this partition: Command (m for help): a
Partition number (1-4): 1
The procedure is similar for adding the other two partitions. For the swapspace we generally recommend that it match the
upgrade to. We recommend using 512 MB for swap, even if you have only 256 MB of memory:
Command (m for help): n Command action
e extended
p primary partition (1-4) p Partition number (1-4): 2
First cylinder (1-3876, default 6): (Hit Enter)
Using default value 6
Last cylinder or +size or +sizeM or +sizeK (1-3876, default 3876):
After adding the swap partition, be sure to change its type to Linux Swap by using the t command:
Command (m for help): t Partition number (1-4): 2
Hex code (type L to list codes): 82
When adding the third and final partition, select the default value for the last cylinder to use up the rest of the disk: Code View:
Command (m for help): n Command action
e extended
p primary partition (1-4) p Partition number (1-4): 3
First cylinder (1-3876, default 69): (Hit Enter)
Using default value 69
When you're done, check the partition with the p command. The particular numbers for your hard drive are likely to be different than these:
Disk /dev/hda: 30.0 GB, 30005821440 bytes 255 heads, 63 sectors/track, 3648 cylinders
Units = cylinders of 16065 * 512 = 8225280 bytes
Device Boot Start End Blocks Id System /dev/hda1 * 1 5 40131 83 Linux
/dev/hda2 6 68 506047+ 82 Linux swap /dev/hda3 69 3648 28756350 82 Linux
When finished, use w to save the new partition table and exit: Command (m for help): w
The partition table has been altered!
Calling ioctl() to re-read partition table.
Now you can put filesystems on two of them and prepare the other for swapping:
# mke2fs /dev/hda1 # mke2fs /dev/hda3 # mkswap /dev/hda2
Next, turn on the swapspace and mount the new filesystems under /mnt/gentoo so you can start installing files on them: # swapon /dev/hda2
# mkdir /mnt/gentoo/boot
# mount /dev/hda1 /mnt/gentoo/boot # mkdir /mnt/gentoo/proc
# mount -t proc none /mnt/gentoo/proc
Downloading an installation tarball
Now it's time to download the stage3 tarball. Start by cd-ing to the recently mounted filesystem; then open
http://www.gentoo.org/main/en/mirrors.xml in a browser: # cd /mnt/gentoo
# links http://www.gentoo.org/main/en/mirrors.xml
Select a site close to you and navigate through the
subdirectories. First go to releases, then x86. Here you'll find one or two release directories. Just choose the most recent. At the time of this writing, it was the 2005.1 directory. Under that, you select the directory named stages.
In the stages directory, you'll see a list of CPU types, such as athlon-xp, i686, pentium3, pentium4, and x86. The CPU on VIA's EPIA-M motherboard is perhaps closest to the Pentium 3. However, as we learned the hard way, some binaries built for Pentium 3 do not work on the VIA CPU. The i686 binaries don't work either. The x86 architecture is the one that works for this system, so go into that directory.
Now you'll see large tarballs for stages 1, 2, and 3. Download the stage 3 file and save it in the /mnt/gentoo directory. The letter d initiates a download in links.
# pwd
/mnt/gentoo
# tar xjfp stage3-x86-2005.1.tar.bz2
Installing portage
Your next task is to install Gentoo's Portage system. This is a collection of scripts and patches similar to FreeBSD's ports and NetBSD's packages. When you install software on Gentoo Linux, Portage downloads the necessary source code, patches it if
necessary, and then compiles and installs it.
The first step is to select one or more of the Gentoo mirror sites. Gentoo's mirrorselect program has a feature whereby it tries to automatically find the best mirror site. We found that it doesn't work all that well, however, and recommend that you select the mirror site manually. You can use this command: # mirrorselect -i -o >> /mnt/gentoo/etc/make.conf
Look through the list and pick one or two mirror sites that you think are either topologically or geographically nearby.
Afterwards you may want to look at the
/mnt/gentoo/etc/make.conf file and make sure it worked. Until your new system is fully ready to boot from the hard drive, you'll use chroot to run commands from within the new filesystem. But first you must copy over the DNS configuration: # cp -L /etc/resolv.conf /mnt/gentoo/etc/resolv.conf
Unfortunately, for us tcsh lovers, bash is the only shell available by default. Oh well, we'll have to live with it for a while. After entering the chroot shell, the following commands update your environment variables:
# env-update
# source /etc/profile
Now you are ready to install the Portage files. It's as simple as running this command:
# emerge sync
Since Portage consists of more than 100,000 files, the transfer is likely to take quite a while. Now would be a good time to take a break or read ahead in this chapter. When it completes, you may see a message telling you that "an update to portage is available." If so, install the update with this command:
# emerge portage
You might also see a message suggesting that you run etc-update. This is a tool that helps keep your configuration files up to date after installing an update to an existing package. You might as well run etc-update if asked to, although you can probably wait and do it later if you prefer.
amount of X-windows-related code that gets compiled. We recommend the following USE flags setting:
USE="-X -gtk -gtk2 -kde -gnome -qt"
Note: To edit files at this point, you'll need to use a text editor named nano. This is GNU's version of the pico editor
popularized by the PINE email user agent. If you've used PINE before, you should have no problems with nano. If you prefer another editor, such as vi, install it now with emerge.
Have a look at the Gentoo handbook for additional information on USE flags. If you find the concept too overwhelming at this point, don't worry about it. Everything should still work no matter what settings you have.
Configure your kernel
You are now ready to configure and compile a kernel for the system. The first step is to select a kernel source package and install it. Gentoo has a web page,
http://www.gentoo.org/doc/en/gentoo-kernel.xml, which
describes all of the kernel choices they provide. We suggest that you play it safe and just use the gentoo-sources package. This is a recent Linux-2.6 kernel with a few patches for improved security and performance. To install the sources, run this command:
# emerge gentoo-sources