For your convenience Apress has placed some of the front
matter material after the index. Please use the Bookmarks
v
Contents at a Glance
About the Authors ...
xvii
About the Technical Reviewer ...
xix
Introduction ...
xxi
Chapter 1: Introducing the Rails Framework
■
...
1
Chapter 2: Getting Started
■
...13
Chapter 3: Getting Something Running
■
...27
Chapter 4: Introduction to the Ruby Language
■
...45
Chapter 5: Working with a Database: Active Record
■
...61
Chapter 6: Advanced Active Record: Enhancing Your Models
■
...81
Chapter 7: Action Pack: Working with the View and the Controller
■
...
121
Chapter 8: Advanced Action Pack
■
...151
Chapter 9: JavaScript and CSS
■
...191
Chapter 10: Sending and Receiving E-Mail
■
...203
Chapter 11: Testing Your Application
■
...219
Chapter 12: Internationalization
■
...251
Chapter 13: Deploying Your Rails Applications
■
...267
Appendix A: Databases 101
■
...273
Appendix B: The Rails Community
■
...
281
Appendix C: Git
■
...285
Introduction
What Is This Book About?
In the past several years, the Web has exploded to include information on every facet of our lives. It touches everything we do; even some refrigerators have included access to the Internet. Ruby on Rails has played a part in fueling that explosion. This book will equip you with the knowledge you need to build real production web applications. It leads you through installing the required prerequisites on Windows, OS X, or Linux and then jumps straight into building applications. It is meant for the novice programmer who has some command line experience but little or no programming experience. At the end of the book, you should have a firm grasp on the Ruby language and the Rails framework.
Chapter 1 introduces you to the current web landscape and then goes over some of the ideals and principles that the Rails framework is built on. It teaches you about the MVC paradigm and shows how Rails implements each piece of that paradigm (model, view, and controller).
Chapter 2 walks you through installing Ruby, Rails, and the SQLite database. It is broken down by operating system, and when finished, will give a level platform among all three. You should be able to follow along with the book no matter which platform you choose. It also will show you how to build a quick “Hello World” application to make sure everything is working correctly.
Chapter 3 dives right in and starts the blog application that we’ll use throughout the rest of the book. We’ll continually build on this application, enhancing and refactoring as we go along. You’ll create your first model in this chapter, the article model. We’ll cover how migrations work and even get Rails to construct our first scaffold. At the end of this chapter, you’ll have a working blog application, although it will be lacking features. We’ll add those in the following chapters.
Chapter 4 slows down a little bit from the previous chapter and takes you on a tour of the Ruby language. If you’ve used Ruby for a while and feel comfortable with it, feel free to skim over this. If you’re new to Ruby, this chapter will teach you everything you need to know to use Rails. Ruby is an easy to pick up language, and the syntax is very inviting and easy to read. Although we won’t add any code to our blog application here, you will get to use the Ruby language inside the Ruby console.
Chapter 5 shows you how Rails uses Active Record to let you interact with any number of databases. Rails abstracts away the difficult bits (unless you need them) and lets you interact with databases in an object-oriented way. You’ll learn how to create new records, find records, and even update and delete them. We’ll also apply some basic validations so we can be sure our data are just the way they should be.
Chapter 6 expounds on the previous chapter. You’ll dive deeper into Active Record and your models. You will build more complex validations and custom instance methods. A major component of this chapter is the relation between your models and how Rails lets you define those relations. Your models for the blog application will have complex relations and validations.
In Chapter 7 we’ll cover the view and controller parts of MVC. We will flesh out the blog application and walk through the code that Rails generated for the scaffold of our controllers and views.
xxii
Chapter 9 goes over the Asset Pipeline that was added in Rails 3.2 and how to add JavaScript and CSS. We’ll enhance our application with JavaScript dabbling in Ajax and animation. This chapter covers CoffeeScript and SASS and how they integrate into the Rails landscape. At the end of this chapter, your application will have a nice layer of spit and polish.
Chapter 10 adds e-mail capability to our application. You will be able to suggest articles to friends and even be notified when your article has new comments. It will also discuss methods to receive e-mail into your application.
Chapter 11 covers one of the most important topics in Rails applications: testing. You can be sure that after this chapter you’ll be able to add new features without breaking old ones. You’ll test whether your application behaves exactly the way you think it should.
Chapter 12 covers internationalization. After all, it is the World Wide Web, and not everyone speaks the same language. We’ll translate our web application into another language, and along the way you’ll learn how to translate the application into as many languages as you like.
Chapter 13 will show you how to deploy your web application to Heroku, one of the leading Platform As A Service (PAAS) providers. This will allow you to present your application to the world quickly and easily so you can start building a user base.
CHAPTER 1
Introducing the Rails Framework
Rails is a web application framework for the Ruby programming language. Rails is well thought out and practical: it will help you build powerful web sites quickly, with code that’s clean and easy to maintain.
The goal of this book is to give you a thorough and complete understanding of how to build dynamic web applications with Rails. This means more than just showing you how to use the specific features and facilities of the framework, and more than just giving you a working knowledge of the Ruby language. Rails is quite a bit more than just another tool: it represents a way of thinking. To completely understand Rails, it’s essential that you know about its underpinnings, its culture and aesthetics, and its philosophy of web development.
If you haven’t heard it already, you’re sure to notice the phrase “the Rails way” cropping up every now and again. It echoes a familiar phrase that has been floating around the Ruby community for a number of years: “the Ruby way.” The Rails way is usually the easiest way—the path of least resistance, if you will. This isn’t to say that you can’t do things your way, nor is it meant to suggest that the framework is constraining. It simply means that if you choose to go off the beaten path, you shouldn’t expect Rails to make it easy for you. If you’ve been around the UNIX circle for any length of time, you may think this idea bears some resemblance to the UNIX mantra: “Do the simplest thing that could possibly work.” You’re right. This chapter’s aim is to introduce you to the Rails way.
The Rise and Rise of the Web Application
Web applications are extremely important in today’s world. Almost everything we do today involves web applications. We check our e-mail on the Web, and we do our banking on the Web. We even use our phones to access the web more than we actually make phone calls! As connections get faster, and as broadband adoption grows, web-based software, and similarly networked client or server applications, are poised to displace software distributed by more traditional (read, outdated) means.
For consumers, web-based software affords greater convenience, allowing us to do more from more places. Web-based software works on every platform that supports a web browser (which is to say, all of them), and there’s nothing to install or download. And if Google’s stock value is any indication, web applications are really taking off. All over the world, people are waking up to the new Web and the beauty of being web based. From e-mail and calendars, photos and videos, to bookmarking, banking, and bidding, we’re living increasingly inside the browser.
Due to the ease of distribution, the pace of change in the web-based software market is fast. Unlike traditional software, which must be installed on each individual computer, changes in web applications can be delivered quickly, and features can be added incrementally. There’s no need to spend months or years perfecting the final version or getting in all the features before the launch date. Instead of spending months on research and development, you can go into production early and refine in the wild, even without all the features in place.
2
When a fix is pushed to the server hosting the web application, all users get the benefit of the update at the same time, usually without any interruption in service. That’s a level of quality assurance you can’t offer with store-bought software. There are no service packs to tirelessly distribute and no critical updates to install. A fix is often only a browser refresh away. And as a side benefit, instead of spending large amounts of money and resources on packaging and distribution, software developers are free to spend more time on quality and innovation.
Web-based software has the following advantages; it is: Easier to distribute
•
Easier to deploy
•
Easier to maintain
•
Platform-independent
•
Accessible from anywhere
•
The Web Isn’t Perfect
As great a platform as the Web is, it’s also fraught with constraints. One of the biggest problems is the browser itself. When it comes to browsers, there are several contenders, each of which has a slightly different take on how to display the contents of a web page. Although there has been movement toward unification and the state of standards compliance among browsers is steadily improving, there is still much to be desired. Even today, it’s nearly impossible to achieve 100% cross-browser compatibility. Something that works in Internet Explorer doesn’t necessarily work in Firefox, and vice versa. This lack of uniformity makes it difficult for developers to create truly cross-platform applications, as well as harder for users to work in their browser of choice.
Browser issues aside, perhaps the biggest constraint facing web development is its inherent complexity. A typical web application has dozens of moving parts: protocols and ports, the HTML and cascading style sheets (CSS), the database and the server, the designer and the developer, and a multitude of other players, all conspiring toward complexity.
Despite these problems, the new focus on the Web as a platform means the field of web development is evolving rapidly and quickly overcoming obstacles. As it continues to mature, the tools and processes that have long been commonplace in traditional, client-side software development are beginning to make their way into the world of web development.
The Good Web Framework
Among the tools making their way into the world of web development is the framework. A framework is a collection of libraries and tools intended to facilitate development. Designed with productivity in mind, a good framework provides a basic but complete infrastructure on top of which to build an application.
Having a good framework is a lot like having a chunk of your application already written for you. Instead of having to start from scratch, you begin with the foundation in place. If a community of developers uses the same framework, you have a community of support when you need it. You also have greater assurance that the foundation you’re building on is less prone to pesky bugs and vulnerabilities, which can slow the development process.
A good web framework can be described as follows:
• Full stack: Everything you need for building complete applications should be included in the box. Having to install various libraries or configure multiple components is a drag. The different layers should fit together seamlessly.
• Open source: A framework should be open source, preferably licensed under a liberal, free-as-in-free license like the Berkeley Software Distribution (BSD) or that of the Massachusetts Institute of Technology (MIT).
CHAPTER 1 ■ INTRODUCING THE RAILS FRAMEWORK
A good web framework provides you with the following:
• A place for everything: Structure and convention drive a good framework. In other words, unless a framework offers a good structure and a practical set of conventions, it’s not a very good framework. Everything should have a proper place within the system; this eliminates guesswork and increases productivity.
• A database abstraction layer: You shouldn’t have to deal with the low-level details of database access, nor should you be constrained to a particular database engine. A good framework takes care of most of the database grunt work for you, and it works with almost any database.
• A culture and aesthetic to help inform programming decisions: Rather than seeing the structure imposed by a framework as constraining, see it as liberating. A good framework encodes its opinions, gently guiding you. Often, difficult decisions are made for you by virtue of convention. The culture of the framework helps you make fewer menial decisions and helps you focus on what matters most.
Enter Rails
Rails is a best-of-breed framework for building web applications. It’s complete, open source, and cross-platform. It provides a powerful database abstraction layer called Active Record, which works with all popular database systems. It ships with a sensible set of defaults and provides a well-proven, multilayer system for organizing program files and concerns.
Above all, Rails is opinionated software. It has a philosophy of the art of web development that it takes very seriously. Fortunately, this philosophy is centered on beauty and productivity. You’ll find that as you learn Rails, it actually makes writing web applications pleasurable.
Originally created by David Heinemeier Hansson, Rails first took shape in the form of a wiki application called Instiki. The first version, released in July 2004, of what is now the Rails framework, was extracted from a real-world, working application: Basecamp, by 37signals. The Rails creators took away all the Basecamp-specific parts and what remained was Rails.
Because it was extracted from a real application and not built as an ivory tower exercise, Rails is practical and free of needless features. Its goal as a framework is to solve 80% of the problems that occur in web development, assuming that the remaining 20% are problems that are unique to the application’s domain. It may be surprising that as much as 80% of the code in an application is infrastructure, but it’s not as far-fetched as it sounds. Consider all the work involved in application construction, from directory structure and naming conventions, to the database abstraction layer and the maintenance of state.
Rails has specific ideas about directory structure, file naming, data structures, method arguments, and, well, nearly everything. When you write a Rails application, you’re expected to follow the conventions that have been laid out for you. Instead of focusing on the details of knitting the application together, you get to focus on the 20% that really matters.
Since 2004, Rails has come a long way. The Rails team continues to update the framework to support the latest technologies and methodologies available. You’ll find that as you use Rails, it’s obvious that the core team has kept the project at the forefront of web technology. The Rails 4 release is better than ever. Speed, security, and ease of use were major focuses of this release and it shows.
Rails Is Ruby
4
Before Rails came along, not many people were writing web applications with Ruby. Other languages like PHP and ASP were the dominant players in the field, and a large part of the Web is powered by them. The fact that Rails uses Ruby is significant because Ruby is considerably more expressive and flexible than either PHP or ASP. This makes developing web applications not only easy, but also a lot of fun. Ruby has all the power of other languages, but it was built with the main goal of developer happiness.
Ruby is a key part of the success of Rails. Rails uses Ruby to create what’s called a domain-specific language
(DSL). Here, the domain is that of web development; when you’re working in Rails, it’s almost as if you’re writing in a language that was specifically designed to construct web applications—a language with its own set of rules and grammar. Rails does this so well that it’s sometimes easy to forget that you’re writing Ruby code. This is a testimony to Ruby’s power, and Rails takes full advantage of Ruby’s expressiveness to create a truly beautiful environment.
For many developers, Rails is their introduction to Ruby—a language with a following before Rails that was admittedly small at best, at least in the West. Although Ruby had been steadily coming to the attention of programmers outside Japan, the Rails framework brought Ruby to the mainstream.
Invented by Yukihiro Matsumoto in 1994, it’s a wonder Ruby remained shrouded in obscurity as long as it did. As far as programming languages go, Ruby is among the most beautiful. Interpreted and object oriented, elegant and expressive, Ruby is truly a joy to work with. A large part of Rails’ grace is due to Ruby and to the culture and aesthetics that permeate the Ruby community. As you begin to work with the framework, you’ll quickly learn that Ruby, like Rails, is rich with idioms and conventions, all of which make for an enjoyable, productive programming environment.
In summary, Ruby can be described as follows:
An interpreted, object-oriented scripting language
•
Elegant, concise syntax
•
Powerful metaprogramming features
•
Well suited as a host language for creating DSLs
•
This book includes a complete Ruby primer. If you want to get a feel for what Ruby looks like now, skip to Chapter 3 and take a look. Don’t worry if Ruby seems a little unconventional at first. You’ll find it quite readable, even if you’re not a programmer. It’s safe to follow along in this book learning it as you go and referencing Chapter 3 when you need clarification. If you’re looking for a more in-depth guide, Peter Cooper has written a fabulous book titled Beginning Ruby: From Novice to Professional, Second Edition (Apress, 2009). You’ll also find the Ruby community more than helpful in your pursuit of the language. Be sure to visit http://ruby-lang.org for a wealth of Ruby-related resources.
Rails Encourages Agility
Web applications aren’t traditionally known for agility. They have a reputation of being difficult to work with and a nightmare to maintain. It’s perhaps in response to this diagnosis that Rails came onto the scene, helping to usher in a movement toward agile programming methodologies in web development. Rails advocates and assists in the achievement of the following basic principles of software development:
Individuals and interactions over processes and tools
•
Working software over comprehensive documentation
•
Customer collaboration over contract negotiation
•
Responding to change over following a plan
•
So reads the Agile Manifesto,1 which was the result of a discussion among 17 prominent figures (including Dave
Thomas, Andy Hunt, and Martin Fowler) in the field of what was then called “lightweight methodologies” for software development. Today, the Agile Manifesto is widely regarded as the canonical definition of agile development.
CHAPTER 1 ■ INTRODUCING THE RAILS FRAMEWORK
Rails was designed with agility in mind, and it takes each of the agile principles to heart almost obsessively. With Rails, you can respond to the needs of customers quickly and easily, and Rails works well during collaborative development. Rails accomplishes this by adhering to its own set of principles, all of which help make agile
development possible.
Dave Thomas and Andy Hunt’s seminal work on the craft of programming, The Pragmatic Programmer (Addison-Wesley, 1999), reads almost like a roadmap for Rails. Rails follows the don’t repeat yourself (DRY) principle, the concepts of rapid prototyping, and the you ain’t gonna need it (YAGNI) philosophy. Keeping important data in plain text, using convention over configuration, bridging the gap between customer and programmer, and, above all, postponing decisions in anticipation of change are institutionalized in Rails. These are some of the reasons that Rails is such an apt tool for agile development, and it’s no wonder that one of the earliest supporters of Rails was Dave Thomas himself.
The sections that follow take you on a tour through some of Rails mantras and, in doing so, demonstrate how well suited Rails is for agile development. Although we want to avoid getting too philosophical, some of these points are essential to grasp what makes Rails so important.
Less Software
One of the central tenets of Rails’ philosophy is the notion of less software. What does less software mean? It means using convention over configuration, writing less code, and doing away with things that needlessly add to the complexity of a system. In short, less software means less code, less complexity, and fewer bugs.
Convention Over Configuration
Convention over configuration means that you need to define only configuration that is unconventional.
Programming is all about making decisions. If you were to write a system from scratch, without the aid of Rails, you’d have to make a lot of decisions: how to organize your files, what naming conventions to adopt, and how to handle database access are only a few. If you decided to use a database abstraction layer, you would need to sit down and write it or find an open source implementation that suited your needs. You’d need to do all this before you even got down to the business of modeling your domain.
Rails lets you start right away by encompassing a set of intelligent decisions about how your program should work and alleviating the amount of low-level decision making you need to do up front. As a result, you can focus on the problems you’re trying to solve and get the job done more quickly.
Rails ships with almost no configuration files. If you’re used to other frameworks, this fact may surprise you. If you’ve never used a framework before, you should be surprised. In some cases, configuring a framework is nearly half the work.
Instead of configuration, Rails relies on common structures and naming conventions, all of which employ the often-cited principle of least surprise (POLS). Things behave in a predictable, easy-to-decipher way. There are intelligent defaults for nearly every aspect of the framework, relieving you from having to explicitly tell the framework how to behave. This isn’t to say that you can’t tell Rails how to behave: most behaviors can be customized to your liking and to suit your particular needs. But you’ll get the most mileage and productivity out of the defaults, and Rails is all too willing to encourage you to accept the defaults and move on to solving more interesting problems.
Although you can manipulate most things in the Rails setup and environment, the more you accept the defaults, the faster you can develop applications and predict how they will work. The speed with which you can develop without having to do any explicit configuration is one of the key reasons why Rails works so well. If you put your files in the right place and name them according to the right conventions, things just work. If you’re willing to agree to the defaults, you generally have less code to write.
6
Don’t Repeat Yourself
Rails is big on the DRY principle, which states that information in a system should be expressed in only one place. For example, consider database configuration parameters. When you connect to a database, you generally need credentials, such as a username, a password, and the name of the database you want to work with. It may seem acceptable to include this connection information with each database query, and that approach holds up fine if you’re making only one or two connections. But as soon as you need to make more than a few connections, you end up with a lot of instances of that username and password littered throughout your code. Then, if your username and password for the database change, you have to do a lot of finding and replacing. It’s a much better idea to keep the connection information in a single file, referencing it as necessary. That way, if the credentials change, you need to modify only a single file. That’s what the DRY principle is all about.
The more duplication exists in a system, the more room bugs have to hide. The more places the same information resides, the more there is to be modified when a change is required, and the harder it becomes to track these changes.
Rails is organized so it remains as DRY as possible. You generally specify information in a single place and move on to better things.
Rails Is Opinionated Software
Frameworks encode opinions. It should come as no surprise then that Rails has strong opinions about how your application should be constructed. When you’re working on a Rails application, those opinions are imposed on you, whether you’re aware of it or not. One of the ways that Rails makes its voice heard is by gently (sometimes, forcefully) nudging you in the right direction. We mentioned this form of encouragement when we talked about convention over configuration. You’re invited to do the right thing by virtue of the fact that doing the wrong thing is often more difficult.
Ruby is known for making certain programmatic constructs look more natural by way of what’s called syntactic sugar. Syntactic sugar means the syntax for something is altered to make it appear more natural, even though it behaves the same way. Things that are syntactically correct but otherwise look awkward when typed are often treated to syntactic sugar.
Rails has popularized the term syntactic vinegar. Syntactic vinegar is the exact opposite of syntactic sugar: awkward programmatic constructs are discouraged by making their syntax look sour. When you write a snippet of code that looks bad, chances are it is bad. Rails is good at making the right thing obvious by virtue of its beauty and the wrong thing equally obvious by virtue of ugliness.
You can see Rails’ opinion in the things it does automatically, the ways it encourages you to do the right thing, and the conventions it asks you to accept. You’ll find that Rails has an opinion about nearly everything related to web application construction: how you should name your database tables, how you should name your fields, which database and server software to use, how to scale your application, what you need, and what is a vestige of web development’s past. If you subscribe to its worldview, you’ll get along with Rails quite well.
Like a programming language, a framework needs to be something you’re comfortable with—something that reflects your personal style and mode of working. It’s often said in the Rails community that if you’re getting pushback from Rails, it’s probably because you haven’t experienced enough pain from doing web development the old-school way. This isn’t meant to deter developers; rather, it means that in order to truly appreciate Rails, you may need a history lesson in the technologies from whose ashes Rails has risen. Sometimes, until you’ve experienced the hurt, you can’t appreciate the cure.
Rails Is Open Source
The Rails culture is steeped in open source tradition. The Rails source code is, of course, open. And it’s significant that Rails is licensed under the MIT license, arguably one of the most “free” software licenses in existence.
CHAPTER 1 ■ INTRODUCING THE RAILS FRAMEWORK
Moreover, anyone is free to submit patches for bugs or features, and hundreds of people from all over the world have contributed to the project over the past nine years.
You’ll probably notice that a lot of Rails developers use Macs. The Mac is clearly the preferred platform of many core Rails team developers, and most Rails developers are using UNIX variants (of which Mac OS X is one). Although there is a marked bias toward UNIX variants when it comes to Rails developers, make no mistake, Rails is truly cross-platform. With a growing number of developers using Rails in a Windows environment, Rails has become easy to work with in all environments. It doesn’t matter which operating system you choose: you’ll be able to use Rails on it. Rails doesn’t require any special editor or Integrated Development Environment (IDE) to write code. Any text editor is fine, as long as it can save files in plain text. The Rails package even includes a built-in, stand-alone web server called WEBrick, so you don’t need to worry about installing and configuring a web server for your platform. When you want to run your Rails application in development mode, simply start up the built-in server and open your web browser. Why should it be more difficult than that?
The next chapter takes you step by step through the relatively painless procedure of installing Rails and getting it running on your system. But before you go there, and before you start writing your first application, let’s talk about how the Rails framework is architected. This is important because, as you will see in a minute, it has a lot to do with how you organize your files and where you put them. Rails is a subset of a category of frameworks named for the way in which they divide the concerns of program design: the model-view-controller (MVC) pattern. Not surprisingly, the MVC pattern is the topic of our next section.
The MVC Pattern
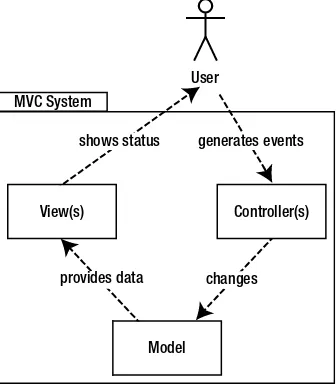
Rails employs a time-honored and well-established architectural pattern that advocates dividing application logic and labor into three distinct categories: the model, view, and controller. In the MVC pattern, the model represents the data, the view represents the user interface, and the controller directs all the action. The real power lies in the combination of the MVC layers, which Rails handles for you. Place your code in the right place and follow the naming conventions, and everything should fall into place.
Each part of the MVC—the model, view, and controller—is a separate entity, capable of being engineered and tested in isolation. A change to a model need not affect the views; likewise, a change to a view should have no effect on the model. This means changes in an MVC application tend to be localized and low impact, easing the pain of maintenance considerably while increasing the level of reusability among components.
Contrast this to the situation that occurs in a highly coupled application that mixes data access, business logic, and presentation code (PHP, we’re looking at you). Some folks call this spaghetti code because of its striking resemblance to a tangled mess. In such systems, duplication is common, and even small changes can produce large ripple effects. MVC was designed to help solve this problem.
MVC isn’t the only design pattern for web applications, but it’s the one Rails has chosen to implement. And it turns out that it works great for web development. By separating concerns into different layers, changes to one don’t have an impact on the others, resulting in faster development cycles and easier maintenance.
The MVC Cycle
Although MVC comes in different flavors, control flow generally works as follows (Figure 1-1):
The user interacts with the interface and triggers an event (e.g., submits a registration form).
•
The controller receives the input from the interface (e.g., the submitted form data).
•
The controller accesses the model, often updating it in some way (e.g., by creating a new user
•
with the form data).
The controller invokes a view that renders an updated interface (e.g., a welcome screen).
•
The interface waits for further interaction from the user, and the cycle repeats.
8
If the MVC concept sounds a little involved, don’t worry. Although entire books have been written on this pattern, and people will argue over its purest implementation for all time, it’s easy to grasp, especially the way Rails does MVC.
Next, we’ll take a quick tour through each letter in the MVC and then learn how Rails handles it.
The Layers of MVC
The three layers of the MVC pattern work together as follows:
• Model: The information the application works with
• View: The visual representation of the user interface
• Controller: The director of interaction between the model and the view
Models
In Rails, the model layer represents the database. Although we call the entire layer the model, Rails applications are usually made up of several individual models, each of which (usually) maps to a database table. For example, a model called User may map to a table called users. The User model assumes responsibility for all access to the users table in the database, including creating, reading, updating, and deleting rows. So, if you want to work with the table and, say, search for someone by name, you do so through the model, like this:
User.where(:name => 'Linus').first
This snippet, although very basic, searches the users table for the first row with the value Linus in the name
column and returns the results. To achieve this, Rails uses its built-in database abstraction layer, Active Record. Active Record is a powerful library; needless to say, this is only a small portion of what you can do with it.
Chapters 5 and 6 will give you an in-depth understanding of Active Record and what you can expect from it. For the time being, the important thing to remember is that models represent data. All rules for data access, associations, validations, calculations, and routines that should be executed before and after save, update, or destroy operations are
View(s) MVC System
generates events shows status
User
Controller(s)
provides data
Model
changes
CHAPTER 1 ■ INTRODUCING THE RAILS FRAMEWORK
neatly encapsulated in the model. Your application’s world is populated with Active Record objects: single ones, lists of them, new ones, and old ones. And Active Record lets you use Ruby language constructs to manipulate all of them, meaning you get to stick to one language for your entire application.
Controllers
For the discussion here, let’s rearrange the MVC acronym and put the C before the V. As you’ll see in a minute, in Rails, controllers are responsible for rendering views, so it makes sense to introduce them first.
Controllers are the conductors of an MVC application. In Rails, controllers accept requests from the outside world, perform the necessary processing, and then pass control to the view layer to display the results. It’s the controller’s job to field web requests, like processing server variables and forming data, asking the model for information, and sending information back to the model to be saved in the database. It may be a gross
oversimplification, but controllers generally perform a request from the user to create, read, update, or delete a model object. You see these words a lot in the context of Rails, most often abbreviated as CRUD. In response to a request, the controller typically performs a CRUD operation on the model, sets up variables to be used in the view, and then proceeds to render or redirect to another action after processing is complete.
Controllers typically manage a single area of an application. For example, in a recipe application, you probably have a controller just for managing recipes. Inside the recipes controller, you can define what are called actions. Actions describe what a controller can do. If you want to be able to create, read, update, and delete recipes, you create appropriately named actions in the recipes controller. A simple recipes controller would look something like this:
class RecipesController < ApplicationController def index
# logic to list all recipes end
def show
# logic to show a particular recipe end
def create
# logic to create a new recipe end
def update
# logic to update a particular recipe end
def destroy
# logic to delete a particular recipe end
end
10
Views
The view layer in the MVC forms the visible part of the application. In Rails, views are the templates that (most of the time) contain HTML markup to be rendered in a browser. It’s important to note that views are meant to be free of all but the simplest programming logic. Any direct interaction with the model layer should be delegated to the controller layer, to keep the view clean and decoupled from the application’s business logic.
Generally, views have the responsibility of formatting and presenting model objects for output on the screen, as well as providing the forms and input boxes that accept model data, such as a login box with a username and password or a registration form. Rails also provides the convenience of a comprehensive set of helpers that make connecting models and views easier, such as being able to prepopulate a form with information from the database or the ability to display error messages if a record fails any validation rules, such as required fields.
You’re sure to hear this eventually if you hang out in Rails circles: a lot of folks consider the interface to be the software. We agree with them. Because the interface is all the user sees, it’s the most important part. Whatever the software is doing behind the scenes, the only parts that an end user can relate to are the parts they see and interact with. The MVC pattern helps by keeping programming logic out of the view. With this strategy in place, programmers get to deal with code, and designers get to deal with templates called erb (Embedded Ruby). These templates take plain HTML and use Ruby to inject the data and view specific logic as needed. Designers will feel right at home if they are familiar with HTML. Having a clean environment in which to design the HTML means better interfaces and better software.
The Libraries That Make Up Rails
Rails is a collection of libraries, each with a specialized task. Assembled together, these individual libraries make up the Rails framework. Of the several libraries that compose Rails, three map directly to the MVC pattern:
• Active Record: A library that handles database abstraction and interaction.
• Action View: A templating system that generates the HTML documents the visitor gets back as a result of a request to a Rails application.
• Action Controller: A library for manipulating both application flow and the data coming from the database on its way to being displayed in a view.
These libraries can be used independently of Rails and of one another. Together, they form the Rails MVC development stack. Because Rails is a full-stack framework, all the components are integrated, so you don’t need to set up bridges among them manually.
Rails Is Modular
One of the great features of Rails is that it was built with modularity in mind from the ground up. Although many developers appreciate the fact that they get a full stack, you may have your own preferences in libraries, either for database access, template manipulation, or JavaScript libraries. As we describe Rails features, we mention alternatives to the default libraries that you may want to pursue as you become more familiar with Rails’ inner workings.
Rails Is No Silver Bullet
CHAPTER 1 ■ INTRODUCING THE RAILS FRAMEWORK
As much as we’ve touted the benefits of Rails, it’s important for you to realize that there are no silver bullets in software design. No matter how good Rails gets, it will never be all things to all people, and it will never solve all problems. Most important, Rails will never replace the role of the developer. Its purpose is to assist developers in getting their job done. Impressive as it is, Rails is merely a tool, which when used well can yield amazing results. It’s our hope that as you continue to read this book and learn how to use Rails, you’ll be able to leverage its strength to deliver creative and high-quality web-based software.
Summary
This chapter provided an introductory overview of the Rails landscape, from the growing importance of web applications to the history, philosophy, evolution, and architecture of the framework. You learned about the features of Rails that make it ideally suited for agile development, including the concepts of less software, convention over configuration, and DRY. Finally, you learned the basics of the MVC pattern and received a primer on how Rails does MVC.
13
Getting Started
For various reasons, Rails has gained an undeserved reputation of being difficult to install. This chapter dispels this myth. The truth is that installing Rails is relatively easy and straightforward, provided you have all the right ingredients. The chapter begins with an overview of what you need to get Rails up and running and then provides step-by-step instructions for the installation. Finally, you’ll start your first Rails application.
An Overview of Rails Installation
The main ingredient you need for Rails is, of course, Ruby. Some systems, such as OS X come with Ruby preinstalled, but it’s often outdated. To make sure you have the best experience with this book it’s best if you start from a clean slate, so you’ll install it. After you have Ruby installed, you can install a package manager (a program designed to help you install and maintain software on your system) called RubyGems. You use that to install Rails.
If you’re a Ruby hacker and already have Ruby and RubyGems installed on your computer, Rails is ridiculously easy to get up and running. Because it’s packaged as a gem, you can install it with a single command:
$ gem install rails
That’s all it comes down to—installing Rails is a mere one-liner. The key is in having a working installation of Ruby and RubyGems. Before you get there, though, you need one other ingredient to use Rails: a database server.
As you’re well aware by now, Rails is specifically meant for building web applications. Well, it’s a rare web application that isn’t backed by a database. Rails is so sure you’re using a database for your application that it’s downright stubborn about working nicely without one. Although Rails works with nearly every database out there, in this chapter you use one called SQLite. SQLite is open source, easy to install, and incredibly easy to develop with. Perhaps that’s why it’s the default database for Rails.
You start by installing Ruby and RubyGems, and you use the magical one-liner to install Rails. Then, you install SQLite and make sure it’s working properly. Here are the steps in order:
1. Install Ruby 2.0.
2. Install Rails.
3. Install SQLite.
CHAPTER 2 ■ GETTING STARTED
No matter which platform you’re using, you need to get familiar with the command line. This likely isn’t a problem for the Linux crowd, but it’s possible that some OS X users and certainly many Windows users don’t have much experience with it. If you’re using OS X, you can find a terminal emulator in /Applications/Utilities/Terminal.app. If you’re on Windows, you can open a command prompt by choosing Start ➤ Run, typing cmd, and clicking OK. Note that you’ll use the command line extensively in your travels with Rails. A growing number of IDEs make developing applications with Rails even simpler, and they completely abstract the use of a command-line tool; but stick to the command line to make sure you grasp all the concepts behind many commands. If you later decide to use an IDE such as Aptana’s RadRails, JetBrains’ RubyMine, or Oracle’s NetBeans, you’ll have a great understanding of Rails and will understand even better where the IDE is speeding up your work.
Also, a quick note for OS X users: if you’re using a Mac and would prefer to use a package manager such as Fink or MacPorts, the Linux instructions will prove useful.
Go ahead and flip to the section that describes your platform (OS X, Windows, or Linux), and let’s begin.
Installing on Mac OS X 10.8 Mountain Lion
You’d think that given the prevalence of OS X among Rails developers (the entire core team uses OS X), installing Rails on OS X would be easy. And you’d be correct. First, we need to install Apple’s Developer Tools so that we can compile packages. Note that SQLite is preinstalled on OS X, so that’s one thing we don’t need to worry about.
Installing the Apple Developer Tools (Xcode)
You need the Apple Developer Tools installed to be able to compile some of the Ruby gems you may need in the future. Before you can compile source code on your Mac, you need to install a compiler. Apple’s Developer Tools package, Xcode Tools, includes a compiler and provides the easiest way to set up a development environment on your Mac. The easiest way to download Xcode is from the Mac App Store. Click the Apple menu ➤ App Store and search for Xcode.
Note
■
Xcode is a large download, over 1 GB, so be patient. It may take a while.
Installing Command Line Tools
Once you have Xcode installed you now need to install the command line tools. Inside of Xcode click Xcode ➤
Preferences ➤ Downloads. You should see a listing for the command line tools with a download button next to it. Once that is downloaded, you can continue to the next step.
Installing Homebrew
For this next piece you’ll need to dig into the terminal a bit, but don’t worry we’ll guide you through it. Homebrew is a great package manager for OS X that is written in Ruby no less. It will help you to install the other pieces you’ll need as you go. To install Homebrew, enter the following command into the terminal (Applications ➤ Utilities ➤ Terminal):
15
Installing RVM
Now you’ll need to install a common Ruby tool called the Ruby Version Manager (RVM). It helps you manage versions of Ruby and various gems that you may use for projects. Its install is just as simple as Homebrew. It’s just one command:
\curl -L https://get.rvm.io | bash -s stable
You can test to see if Ruby is installed correctly by asking Ruby for its version number:
ruby --version
ruby 2.0.0p0 (2013-02-24 revision 39474) [x86_64-darwin12.3.0]
If your output isn’t exactly like this, don’t panic. Ruby is often updated with new security patches and features, but it should at least say Ruby 2.x.xpx.
Installing Rails
To install Rails, use the command line:
gem install rails
That’s it! Rails is installed, let’s check the version to make sure everything went well:
rails -v
Rails 4.0
Great! Ruby, SQLite, and Rails are installed and working correctly.
Installing on Windows
Installation on Windows is easy thanks to installer packages. You start by installing Ruby 2.0.
Installing Ruby
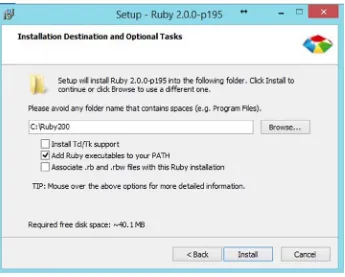
Installing Ruby on Windows is marvelously easy thanks largely to the one-click installer for Ruby. You can read more and download the installer from its web site: http://rubyinstaller.org/.
The latest version of the installer at the time of this writing is Ruby 2.0.0-p195 for Ruby 2.0, which you can download using this URL: http://rubyforge.org/frs/download.php/76955/rubyinstaller-2.0.0-p195.exe.
CHAPTER 2 ■ GETTING STARTED
When the installer is finished, you can test to see if Ruby is working and that your environment is correctly configured by opening your command prompt and asking Ruby its version number:
> ruby --version
ruby 2.0.0p195 (2013-02-24 revision 26273) [i386-mingw32]
Installing Rails
You’ll be pleased to know that Ruby 2.0 comes bundled with RubyGems, a package-management system for Ruby (http://rubygems.org), which makes installing Ruby libraries, utilities, and programs a breeze. This includes Rails installation.
First, let’s update RubyGems and its sources list. Open your command prompt and issue the following gem
command:
> gem update –system
Now, to install Rails, issue the following gem command in your command prompt:
> gem install rails
17
Be forewarned that the gem command can take some time. Don’t be discouraged if it seems to be sitting there doing nothing for a few minutes; it’s probably updating its index file. RubyGems searches for gems in its remote repository (http://rubygems.org), so you need to be connected to the Internet for this command to work.
After spitting out some text to the screen and generally chugging away for a few minutes, the gem program should exit with something like the following before dumping you back at the command prompt:
Successfully installed rails-4.0
That’s all there is to it! The one-click installer takes care of most of the work by installing and configuring Ruby; and because Rails is distributed as a RubyGem, installing it is a simple one-liner.
You can double check that Rails was installed successfully by issuing the rails -v command at the command prompt:
> rails -v
Rails 4.0
Installing SQLite
To install SQLite on Windows, download the following files from the SQLite web site (www.sqlite.org/download.html):
sqlite-3_6_23_1.zip - http://www.sqlite.org/sqlite-3_6_23_1.zip
sqlitedll-3_6_23_1.zip - http://www.sqlite.org/sqlitedll-3_6_23_1.zip
Note that the version number may be different by the time you read this. Unzip both files, and move their contents to the Ruby bin directory C:\Ruby20\bin. When you’re done, you can test that you’ve correctly installed SQLite by issuing the following command from the command prompt:
> sqlite3 –version
3.6.23.1
Now that you’ve installed SQLite, let’s install its Ruby binding—a Ruby library that allows you to talk with SQLite. To install the SQLite3 Ruby binding, issue the following gem command from the command prompt:
> gem install sqlite3-ruby
With Ruby, Rails, and SQLite happily installed, it’s time to take them for a test drive. Unless you feel like reading the installation instructions for Linux, you’re free to skip ahead to the “Creating Your First Rails Application” section.
Installing on Linux
CHAPTER 2 ■ GETTING STARTED
Note
■
Ubuntu Linux is a top-notch distribution that’s rapidly gaining mindshare in the Linux community. At the time of
this writing, it’s the most popular Linux distribution for general use and is largely responsible for the increased viability of
Linux as a desktop platform. It’s freely available from
http://ubuntu.organd highly recommended.
Just about all Linux distributions (including Ubuntu) ship with a package manager. Whether you’re installing programs or code libraries, they usually have dependencies; a single program may depend on dozens of other programs in order to run properly, which can be a struggle to deal with yourself. A package manager takes care of these tasks for you, so you can focus on better things.
Ubuntu Linux includes the Debian package manager apt, which is what the examples in this book use. If you’re using a different distribution, you likely have a different package manager, but the steps should be reasonably similar.
Before you begin installing Ruby, Rails, and SQLite, update the package library using the apt-get update
command:
$ sudo apt-get update
The apt-get program keeps a cached index of all the programs and their versions in the repository for faster searching. Running the update command ensures that this list is up to date, so you get the most recent versions of the software you need.
Installing Ruby
Before you install Ruby, you need to install a few libraries required by the components you’re installing. Enter the following command:
$ sudo apt-get install build-essential curl
You’re going to use the Ruby Version Manager to let Ruby install it for you. This makes everything a snap:
$ \curl -L https://get.rvm.io | bash -s stable
You can test that this is working by asking Ruby for its version number:
$ ruby --version
ruby 2.0.0p195 (2013-05-14) [i686-linux]
Installing Rails
Now you can use RubyGems to install Rails. Enter this command:
19
After spitting out some text to the screen and generally chugging away for a little while, the gem program should exit with a message like the following:
Successfully installed rails-4.0
You can verify this claim by asking Rails for its version number:
$ rails --version
Rails 4.0
With Ruby and Rails happily installed, you’re ready to move on to the next step: installing SQLite.
Installing SQLite
To install SQLite with apt-get, issue the following command:
$ sudo apt-get install sqlite3 libsqlite3-dev
If all goes according to plan, you can test your SQLite3 installation by invoking the sqlite3 program and asking for its version number:
$ sqlite3 --version
3.6.16
Now that you’ve installed SQLite, let’s install its Ruby binding—a Ruby library that allows you to talk with SQLite. To install the SQLite3 Ruby binding, issue the following gem command from the command prompt:
$ sudo gem install sqlite3-ruby
With Ruby, Rails, and SQLite happily installed, it’s time to take them for a test drive.
Creating Your First Rails Application
CHAPTER 2 ■ GETTING STARTED
$ rails new hello
create
create README
create Rakefile
create config.ru
create .gitignore
create Gemfile
create app
create app/controllers/application_controller.rb
create app/helpers/application_helper.rb
create app/views/layouts/application.html.erb
create app/mailers
...
If you look closely at the output, you see that the subdirectories of app/ are named after the MVC pattern introduced in Chapter 1. You also see a name that was mentioned briefly in Chapter 1: helpers. Helpers help bridge the gap between controllers and views; Chapter 7 will explain more about them.
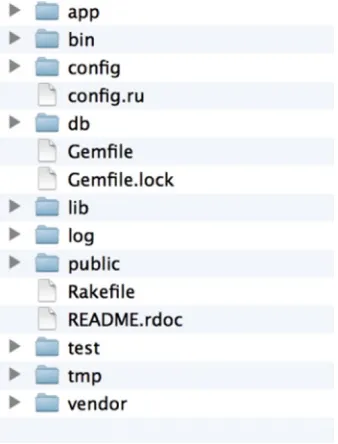
Rails generated a new directory called hello. If you look at the folder structure, you’ll see the following:
Gemfile app db log test
README config doc public tmp
Rakefile config.ru lib script vendor
Starting the Built-In Web Server
Next, let’s start up a local web server so you can test your new project in the browser. True, you haven’t written any code yet, but Rails has a nice welcome screen that you can use to test whether the project is set up correctly. It even gives you some information about your Ruby environment.
Ruby ships with a built-in, zero-configuration, pure Ruby web server that makes running your application in development mode incredibly easy. You start up the built-in web server using the rails server command. To start the server now, make sure you’re inside the directory of your Rails application, and then enter the following commands:
$ bundle install
Fetching source index from http://rubygems.org/
...
Your bundle is complete! Use 'bundle show [gemname]' to see where a
21
$ rails server=> Booting WEBrick
=> Rails 4.0.0 application starting in development on http://0.0.0.0:3000
=> Call with -d to detach
=> Ctrl-C to shutdown server
[2013-05-22 14:26:54] INFO WEBrick 1.3.1
[2013-05-22 14:26:54] INFO ruby 2.0.0 (2013-05-14) [i386-darwin10.2.0]
[2013-05-22 14:26:54] INFO WEBrick::HTTPServer#start: pid=5181 port=3000
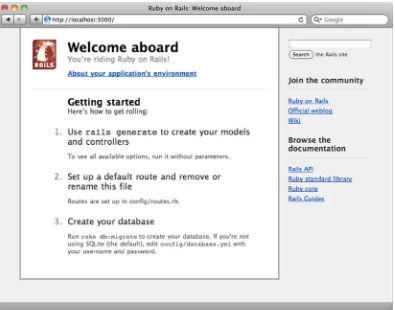
The message from the rails server command tells you that a web server is running at the IP address 0.0.0.0 on port 3000. Don’t be alarmed by this all-zeros address—it simply means that the server is running locally on your machine. The hostname localhost also resolves to your local machine and is thus interchangeable with the IP address. We prefer to use the hostname variant.
With the server running, if you open http://localhost:3000/ in your browser, you’ll see the Rails welcome page, as shown in Figure 2-2. Congratulations! You’ve put Ruby on Rails.
CHAPTER 2 ■ GETTING STARTED
The welcome page is nice, but it doesn’t teach you much. The first step in learning how Rails works is to generate something dynamic. You’re about to learn why you called this project “hello”!
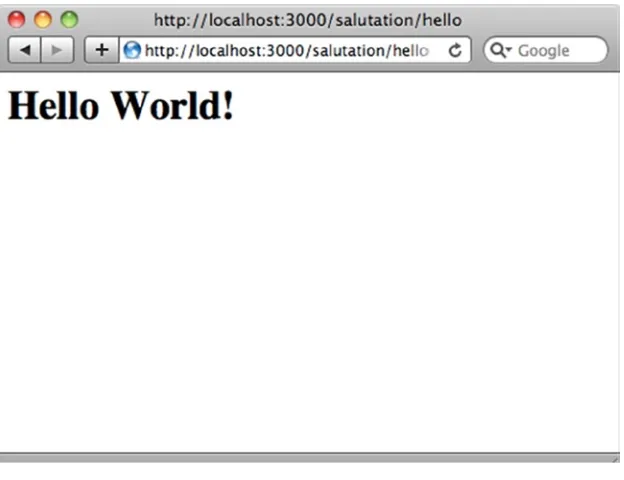
We’re sure it would be in violation of the law of programming books if we didn’t start with the ubiquitous “Hello World” example. And who are we to disobey? In the next few steps, you make your Rails application say hello; and in doing so, you learn a few new concepts. Your goal is to have a request with the URL
http://localhost:3000/salutation/hello respond with a friendly “Hello World!” message.
First things first: stop the web server by pressing Ctrl+C in the command prompt window. That should bring you back to your prompt.
Note
■
Notice how easy it is to start and stop a local server? That’s the whole point of the built-in server in a nutshell.
You shouldn’t need to be a system administrator to develop a Rails application.
Generating a Controller
You use the rails command’s generate option to create certain files within your project. Because you’re dealing with the request and response cycle (you request a URL, and the browser receives a response), you generate a controller that is responsible for handling salutations:
$ rails generate controller salutation
create app/controllers/salutation_controller.rb
invoke erb
create app/views/salutation
invoke test_unit
create test/functional/salutation_controller_test.rb
invoke helper
create app/helpers/salutation_helper.rb
invoke test_unit
create test/unit/helpers/salutation_helper_test.rb
Not unlike the rails command you used to generate your application, the rails generate controller
command creates a bunch of new files. These are mostly empty, containing only skeletal code (often called stubs). You could easily create these files on your own. The generator merely saves you time and the effort of needing to remember which files to create and where to put them.
The salutation controller was created in the app/controllers directory and is sensibly named
salutation_controller.rb. If you open it with a text editor, you see that there’s not much to it, as shown in Listing 2-1.
Listing 2-1. The app/controllers/salutation_controller.rb File
23
Creating an Action
If you want SalutationController to respond to a request for hello, you need to make an action for it. Open
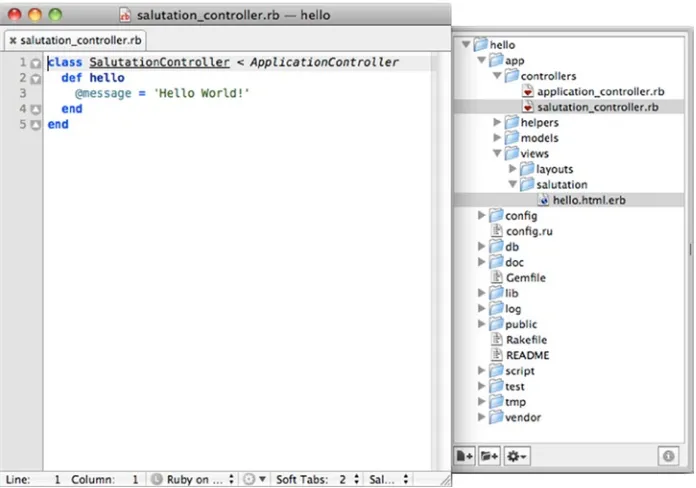
salutation_controller.rb in your text editor and add the hello action, as shown in Listing 2-2.
Listing 2-2. The Updated app/controllers/salutation_controller.rb File: http://gist.github.com/319866
class SalutationController < ApplicationController def hello
@message = 'Hello World!' end
end
Actions are implemented as Ruby methods. You can always tell a method definition because of the def keyword. Inside the action, you set a Ruby instance variable called @message, the value of which you output to the browser.
Creating a Template
With your action successfully defined, your next move is to add some HTML into the mix. Rails makes it easy by separating the files that contain HTML into their own directory as per the MVC pattern. In case you haven’t guessed, HTML is the responsibility of the view.
If you look in the app/views directory, you see another product of the controller generator: a directory called
salutation. It’s linked to the salutation controller, and it’s where you put template files that correspond to your
salutation actions.
Note
■
Because Rails allows you to embed Ruby code in your HTML by using the ERb Templating library, you use the
.html.erb (HTML + ERb) extension for your templates.CHAPTER 2 ■ GETTING STARTED
Start by creating a new, blank file in app/views/salutation/. Name it hello.html.erb, and add the code shown in Listing 2-3. Notice the <%= %> syntax that surrounds the @message variable: these are known as Embedded Ruby (ERb) output tags. Chapter 7explains more about ERb. For now, it’s only important to know that whenever you see
<%= %> in a template, whatever is between the tags is evaluated as Ruby, and the result is printed out.
Listing 2-3. The app/views/salutation/hello.html.erb File: http://gist.github.com/319910
<html> <body>
<h1><%= @message %></h1> </body>
</html>
You now have to tell your Rails application how to respond to a URL. You do that by updating the config/routes.rb file. You don’t need to worry about the details of how the routes file work for now, Chapter 8will cover that. Replace the contents of your config/routes.rb file and make sure it looks like Listing 2-4.
Listing 2-4. The config/routes.rb File: http://gist.github.com/319933
Hello::Application.routes.draw do
get ':controller(/:action(/:id(.:format)))' end
It looks like you’re all set. The salutation controller fields the request for hello and automatically renders the
hello.html.erb template. Start up the web server again using the rails server command, and request the URL
http://localhost:3000/salutation/hello in your browser. You should see the result shown in Figure 2-4.
25
Sure enough, there’s your greeting! The hello template reads the @message variable that you set in the controller and, with a little help from ERb, printed it out to the screen.
In case you didn’t notice, the URL http://localhost:3000/salutation/hello maps directly to the controller and action you created because of the change you made to your config/routes.rb file. This is achieved by the following URL pattern:
:controller(/:action(/:id(.:format)))
For now, it’s enough that you can make the mental connection between URL segments and the code in your application. When you read the URL http://localhost:3000/salutation/hello, you can translate it into a request for the hello action on the salutation controller.
Summary
This chapter covered a lot, so you should be proud of yourself. You went from not having Rails installed to getting a basic Rails application up and running. You learned how to install Ruby and how to manage packages with RubyGems (which you used to install Rails). You also learned how to create a new Rails project using the rails command and how to use the generator to create a new controller. And you learned how controller actions correspond to templates. The stage is now set for the next chapter, where you begin building a more full-featured project.
CHAPTER 3
Getting Something Running
The best way to learn a programming language or a web framework is to dig in and write some code. After reading the first two chapters, you should have a good understanding of the Rails landscape. Chapter 4 will lead you through the Ruby language, but first let’s write a little code to whet your appetite. This chapter builds a foundation and will get you excited by walking you through the construction of a basic application. You will learn how to create a database and how to connect it to Rails, as well as how to use a web interface to get data in and out of the application.
You will receive a lot of information in this chapter, but it shouldn’t be more than you can absorb. The goal is to demonstrate, not to overwhelm. Rails makes it incredibly easy to get started, and that’s a feature this chapter highlights. There are a few places where Rails really shines, and getting something running is one of them. By the end of this chapter, you’ll have a working web application to play with, explore, and learn from. You’ll build on this application throughout the rest of the book, adding features and refining functionality.
An Overview of the Project
This chapter will walk you through building a simple blog application that lets you create and publish articles, like WordPress or Blogger. The first iteration focuses on the basics: creating and editing articles.
Before you start coding, let’s sketch a brief summary of the goals and flow of the application at a very high level. The idea isn’t to focus on the nitty-gritty, but instead to concentrate on the general case.
Your application will have two kinds of users: those who post and publish articles and those who wish to comment on existing articles. In some cases, people will play both roles. Not all users will need to create an account by registering on the site. It will also be nice if people can notify their friends about interesting articles using a feature that sends a friendly e-mail notification to interested parties.
You will add some of these features in later chapters. Other application requirements will likely come up as you continue, but these are enough to get started. In the real world, specifications are seldom correct the first time around, so it’s best not to dwell on them. Rails doesn’t penalize you for making changes to an application that’s under construction, so you can engage in an iterative style of development, adding and incrementing functionality as you go.
You start with what matters most: articles. You may wonder why you don’t begin with users. After all, without users, who will post the articles? If you think about it, without articles, what could users do? Articles are the epicenter of the application, so it makes the most sense to start there and work out the details as you go. Ready? Let’s get started!
Creating the Blog Application
28
To begin, from the command line, go to the directory where you want to place your new application; then, issue the rails command to generate the application skeleton and base files:
$ rails new blog
create
create README.rdoc create Rakefile create config.ru create .gitignore create Gemfile ...
As you recall from the example in Chapter 2, the rails command takes as an argument the name of the project you want to create and generates a directory of the same name that contains all the support files. In this case, it creates a subdirectory called blog in the current working directory. Change into the blog directory and get oriented.
Figure 3-1 shows the directory structure.
Figure 3-1. The Rails directory structure
CHAPTER 3 ■ GETTING SOMETHING RUNNING
Your first stop is the config directory. Of the little configuration there is to do in a Rails application, most of it takes place in this aptly named location. To get an idea of what Rails expects as far as databases go, open the
config/database.yml file in your editor and take a peek. You should see something like the file shown in Listing 3-1 (comments are omitted here).
Listing 3-1. The config/database.yml File
# SQLite version 3.x # gem install sqlite3 #
# Ensure the SQLite 3 gem is defined in your Gemfile # gem 'sqlite3'
development: adapter: sqlite3
database: db/development.sqlite3 pool: 5
timeout: 5000
# Warning: The database defined as "est" will be erased and # re-generated from your development database when you run "rake". # Do not set this db to the same as development or production. test:
adapter: sqlite3
database: db/test.sqlite3 pool: 5
timeout: 5000
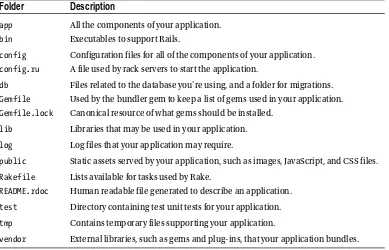
Table 3-1. Rails Directory Structure
Folder
Description
app bin
All the components of your application. Executables to support Rails.
config config.ru
Configuration files for all of the components of your application. A file used by rack servers to start the application.
db Gemfile Gemfile.lock
Files related to the database you’re using, and a folder for migrations. Used by the bundler gem to keep a list of gems used in your application. Canonical resource of what gems should be installed.
lib Libraries that may be used in your application.
log Log files that your application may require.
public Static assets served by your application, such as images, JavaScript, and CSS files.
Rakefile README.rdoc
Lists available for tasks used by Rake.
Human readable file generated to describe an application.
test Directory containing test unit tests for your application.
tmp Contains temporary files supporting your application.
30
production: adapter: sqlite3
database: db/production.sqlite3 pool: 5
timeout: 5000
The first thing you should notice is the different sections: development, test, and production. Rails understands the concept of environments and assumes you’re using a different database for each environment. Therefore, each has its own database connection settings, and different connection parameters are used automatically. Rails applications run in development modes by default, so you really only need to worry about the development section at this point. Still, other than the database names (db/*.sqlite3), there should be little difference between the connection parameters for each environment.
This example uses the default SQLite database because it’s easy to use and set up. However, you can use the database management system of your choice by passing the –d or --database= option to the rails command with one of the following options as per your preference: mysql, oracle, postgresql, sqlite2, sqlite3, frontbase, or ibm_db.
If you select a database other than SQLite, the rails command may prefill the database parameter based on the database server and project name: blog in this case. If you give your application a different name (say, a snazzy Web 2.0 name like blog.ilicio.us *beta) with a database server such as MySQL, you’ll see something different here. It doesn’t matter what you name your databases, as long as database.yml references the correct one for each environment. Let’s stick with the convention and create the databases using the default names.
WHAT IS YAML?
The .yml extension refers to a YAML file. YAML (a recursive acronym that stands for “YAML Ain’t Markup
Language”) is a special language for expressing objects in plain text. Rails can work with YAML natively and can
turn what looks like plain text into Ruby objects that it can understand.
YAML is whitespace sensitive: it uses spaces (not tabs) to convey structure and meaning. Make sure your editor
knows the difference between tabs and spaces, and be sure that when you’re editing YAML files, you use
only spaces.
Creating the Project Databases
You may think that to create a new database, you’ll use your favorite database administration tool. However, because you already told Rails the database connection details, you can now run a Rake task that talks to the database and issues all the necessary commands to set up the databases. Jump to the command prompt and type:
$ rake db:create