PUBLISHED BY Microsoft Press
A Division of Microsoft Corporation One Microsoft Way
Redmond, Washington 98052-6399
Copyright © 2010 by Tony Northrup and Mike Snell
All rights reserved. No part of the contents of this book may be reproduced or transmitted in any form or by any means without the written permission of the publisher.
Library of Congress Control Number: 2010933008 ISBN: 978-0-7356-2740-6
Printed and bound in the United States of America.
Microsoft Press books are available through booksellers and distributors worldwide. For further infor mation about international editions, contact your local Microsoft Corporation office or contact Microsoft Press International directly at fax (425) 936-7329. Visit our Web site at www.microsoft.com/mspress. Send comments to: tkinput@ microsoft.com.
Microsoft and the trademarks listed at http://www.microsoft.com/about/legal/en/us/IntellectualProperty/ Trademarks/EN-US.aspx are trademarks of the Microsoft group of companies. All other marks are property of their respective owners.
The example companies, organizations, products, domain names, e-mail addresses, logos, people, places, and events depicted herein are fictitious. No association with any real company, organization, product, domain name, e-mail address, logo, person, place, or event is intended or should be inferred.
This book expresses the author’s views and opinions. The information contained in this book is provided without any express, statutory, or implied warranties. Neither the authors, Microsoft Corporation, nor its resellers, or distributors will be held liable for any damages caused or alleged to be caused either directly or indirectly by this book.
Acquisitions Editor: Martin DelRe Developmental Editor: Karen Szall Project Editor: Rosemary Caperton
Editorial Production: Online Training Solutions, Inc.
Technical Reviewer: Kenn Scribner; Technical Review services provided by Content Master, a member of CM Group, Ltd.
Exam 70-515: Web Applications Development
with Microsoft .NET Framework 4
ObjECTivE ChAPTER LEssOn
1. DEvELOPing WEb FORms PAgEs
1.1 Configure Web Forms pages. Chapter 1 Lessons 2 and 3
1.2 Implement master pages and themes. Chapter 2 Lessons 1 and 2
1.3 Implement globalization. Chapter 6 Lesson 1
1.4 Handle page life cycle events. Chapter 1
Chapter 3 Lesson 1 Lesson 1
1.5 Implement caching. Chapter 2 Lesson 3
1.6 Manage state. Chapter 3 Lessons 2 and 3
2. DEvELOPing AnD Using WEb FORms COnTROLs
2.1 Validate user input. Chapter 5 Lesson 1
2.2 Create page layout. Chapter 5 Lessons 2 and 3
2.3 Implement user controls. Chapter 7 Lesson 1
2.4 Implement server controls. Chapter 4
Chapter 7 Lessons 1 and 2 Lesson 2
2.5 Manipulate user interface controls from code-behind. Chapter 2 Chapter 4 Chapter 5
Lesson 1 Lessons 1 and 2 Lesson 2
3. imPLEmEnTing CLiEnT-siDE sCRiPTing AnD AjAX
3.1 Add dynamic features to a page by using JavaScript. Chapter 9 Lesson 2
3.2 Alter a page dynamically by manipulating the DOM. Chapter 9 Lesson 3
3.3 Handle JavaScript events. Chapter 9 Lessons 2 and 3
3.4 Implement ASP.NET AJAX. Chapter 9 Lesson 1
3.5 Implement AJAX by using jQuery. Chapter 9 Lesson 3
4. COnFigURing AnD EXTEnDing A WEb APPLiCATiOn
4.1 Configure authentication and authorization. Chapter 13 Lesson 2
4.2 Configure providers. Chapter 13 Lesson 1
4.3 Create and configure HttpHandlers and HttpModules. Chapter 10 Lesson 1
4.4 Configure initialization and error handling. Chapter 3
Chapter 8 Lesson 1 Lesson 1
4.5 Reference and configure ASMX and WCF services. Chapter 10 Lessons 2 and 3
4.6 Configure projects and solutions, and reference assemblies. Chapter 1 Lesson 3
4.7 Debug a Web application. Chapter 8 Lessons 1 and 2
4.8 Deploy a Web application. Chapter 8 Lesson 3
5. DisPLAying AnD mAniPULATing DATA
5.1 Implement data-bound controls. Chapter 12 Lesson 2
5.2 Implement DataSource controls. Chapter 12 Lesson 1
5.3 Query and manipulate data by using LINQ. Chapter 11 Lessons 1 and 2
5.4 Create and consume a data service. Chapter 10 Lessons 2 and 3
5.5 Create and configure a Dynamic Data project. Chapter 12 Lesson 3
6. DEvELOPing A WEb APPLiCATiOn by Using AsP.nET mvC 2
6.1 Create custom routes. Chapter 14 Lesson 2
6.2 Create controllers and actions. Chapter 14 Lesson 2
6.3 Structure an ASP.NET MVC application. Chapter 14 Lesson 1
6.4 Create and customize views. Chapter 14 Lesson 2
Exam Objectives The exam objectives listed here are current as of this book’s publication date. Exam objectives
Contents
For my partner, Chelsea Knowles
—T
onyn
orThrupContents at a Glance
Acknowledgments
xxv
Introduction
xxvii
ChAPTER 1 Introducing ASP.NET 4 1
ChAPTER 2 Using Master Pages, Themes, and Caching 41
ChAPTER 3 Handling Events and Managing State 97
ChAPTER 4 Using Server Controls 161
ChAPTER 5 Input Validation and Site Navigation 227
ChAPTER 6 Globalization and Accessibility 291
ChAPTER 7 Creating Custom Web Controls 329
ChAPTER 8 Debugging and Deploying 387
ChAPTER 9 Working with Client-Side Scripting, AJAX, and jQuery 453
ChAPTER 10 Writing and Working with HTTP Modules
and Web Services 551
ChAPTER 11 Connecting to and Querying Data with LINQ 623
ChAPTER 12 Working with Data Source Controls
and Data-Bound Controls 685
ChAPTER 13 Implementing User Profiles, Authentication,
and Authorization 787
ChAPTER 14 Creating Websites with ASP.NET MVC 2 831
Answers
881
Index
925
About the Authors
967
Contents
Contents
Acknowledgments
xxv
introduction
xxvii
Hardware Requirements . . . .xxviii
Software Requirements . . . .xxviii
Using the Companion Media . . . .xxviii
How to Install the Practice Tests xxix How to Use the Practice Tests xxix How to Uninstall the Practice Tests xxxi Microsoft Certified Professional Program . . . .xxxi
Errata and Book Support . . . .xxxi
We Want to Hear from You . . . xxxii
Stay in Touch . . . xxxii
Chapter 1 introducing AsP.nET 4
1
Before You Begin . . . 2Lesson 1: Understanding Web Communications . . . 3
The Web Server’s Role 4 The Web Browser’s Role 5 Understanding the Role of HTTP 5 Lesson Summary 14 Lesson Review 14 Lesson 2: Creating a Website and Adding New Webpages . . . 15
Creating Websites 15
Creating ASPX Pages 23
Website Compilation 28
Using Assemblies 29
Lesson Summary 31
Lesson Review 31
Contents
Lesson 3: Working with Web Configuration Files . . . 32 Understanding the Configuration File Hierarchy 33
Processing the Configuration Files 34
Changes to .NET Framework 4 Configuration Files 34
Editing Configuration Files 34
Lesson Summary 38
Lesson Review 38
Case Scenarios . . . 38
Case Scenario 1: Creating a New Website 39
Case Scenario 2: Placing Files in the Proper Folders 39 Suggested Practices . . . 39 Create a New Website by Using Visual Studio 2010 39
Add a Webpage to the Website 40
Program a Web Application 40
Examine Settings for a Web Application 40
Take a Practice Test . . . 40
Chapter 2 Using master Pages, Themes, and Caching
41
Before You Begin . . . 42 Lesson 1: Using Master Pages . . . 43
Overview of Master and Content Pages 44
Creating a Master Page 45
Creating Content Pages 47
Attaching Master Pages to Content Pages 48
Referencing Custom Master Page Properties, Methods,
and Controls from Content Pages 48
Creating Nested Master Pages 51
Dynamically Changing Master Pages 52
Lesson Summary 58
Lesson 2: Using Themes . . . 60
Themes Overview 60
Creating a Theme 61
Creating a Skin File 64
Adding a Cascading Style Sheet to Your Theme 65
Rules for Applying Themes 66
Applying a Theme Programmatically 67
Lesson Summary 73
Lesson Review 74
Lesson 3: Caching . . . 75
Application Caching 75
Page Output Caching 80
Programmatically Invalidating Cached Pages 85
Lesson Summary 91
Lesson Review 91
Case Scenarios . . . 92 Case Scenario 1: Providing Consistent Formatting
for an External Web Application 92
Case Scenario 2: Improving the Performance of
a Public Website 93
Suggested Practices . . . 94
Implement Master Pages and Themes 94
Implement Caching 95
Take a Practice Test . . . 95
Chapter 3 handling Events and managing state
97
Before You Begin . . . 98 Lesson 1: Understanding the ASP.NET Life Cycle
and Handling Events . . . 99
The ASP.NET Application Life Cycle 100
Understanding the Life Cycle of an ASP.NET Webpage
and Its Controls 103
Lesson Summary 119
Lesson 2: Using Client-Side State Management . . . 120 Choosing Client-Side or Server-Side State Management 121
View State 123
Hidden Fields 128
Cookies 129
Query Strings 133
Lesson Summary 141
Lesson Review 142
Lesson 3: Using Server-Side State Management . . . 143
Application State 144
Session State 145
Lesson Summary 154
Lesson Review 154
Case Scenarios . . . 155 Case Scenario 1: Selecting the Proper Events to Use 155 Case Scenario 2: Remembering User Credentials 156 Case Scenario 3: Analyzing Information for Individual
Users and for All Users 156
Suggested Practices . . . 157
Respond to Application and Session Events 157
Create Event Handlers for Pages and Controls 157 Manage State by Using Client-Based
State Management Options 158
Manage State by Using Server-Based
State Management Options 158
Maintain State by Using Database Technology 158 Take a Practice Test . . . 159
Chapter 4 Using server Controls
161
Before You Begin . . . 162 Lesson 1: Exploring Common Server Controls . . . 163
Web Server Controls 163
The Label Control 167
The TextBox Control 171
The CheckBox Control 172
The RadioButton Control 172
The DropDownList Control 173
The ListBox Control 175
The Button Control 175
HTML Server Controls 177
Lesson Summary 184
Lesson Review 185
Lesson 2: Exploring Specialized Server Controls . . . 186 The Table, TableRow, and TableCell Controls 187
The Image Control 189
The ImageButton Control 191
The ImageMap Control 192
The Calendar Control 197
The FileUpload Control 202
The Panel Control 205
The MultiView and View Controls 207
The Wizard Control 210
The Xml Control 214
Lesson Summary 223
Lesson Review 223
Case Scenarios . . . 224 Case Scenario 1: Determining the Type of Controls to Use 225 Case Scenario 2: Determining How to Prompt for Data 225 Case Scenario 3: Implementing a Calendar Solution 225 Suggested Practices . . . 226
Implement Server Controls 226
Chapter 5 input validation and site navigation
227
Before You Begin . . . 228 Lesson 1: Performing Input Validation . . . 228Understanding the Validation Framework 229
Understanding the RequiredFieldValidator Control 232
Using the CompareValidator Control 232
Using the RangeValidator Control 234
Using the RegularExpressionValidator Control 234
The CustomValidator Control 235
Lesson Summary 244
Lesson Review 244
Lesson 2: Performing Site Navigation . . . 245
Is Page Navigation Necessary? 246
Choosing a Method to Navigate Pages 246
Client-Side Navigation 247
Cross-Page Posting 248
Client-Side Browser Redirect 250
Server-Side Transfer 251
Using the Site Map Web Server Control 252
Lesson Summary 259
Lesson Review 259
Lesson 3: Using Web Parts . . . 260
What Are Web Parts? 261
The WebParts Namespace 263
Defining Web Part Zones 264
Creating Web Parts 265
Enabling Users to Arrange and Edit Web Parts 266
Connecting Web Parts 269
Personalizing Web Parts 274
Lesson Summary 286
Case Scenarios . . . 287 Case Scenario 1: Determining the Proper Validation Controls
to Implement on a User Name 288
Case Scenario 2: Implementing a Site Map 288
Case Scenario 3: Meeting Customization Requirements
for an Internal Insurance Application 288
Suggested Practices . . . 289
Validate User Input 289
Create Page Layout 290
Take a Practice Test . . . .290
Chapter 6 globalization and Accessibility
291
Before You Begin . . . 292 Lesson 1: Configuring Globalization and Localization . . . 292
About ASP.NET Resources 293
Using Local Resource Files 293
Using Global Resources 300
HTML Layout Best Practices 304
Setting the Culture 305
Lesson Summary 311
Lesson Review 311
Lesson 2: Configuring Accessibility . . . 312
Public Accessibility Guidelines 313
How ASP.NET Controls Support Accessibility 313
Improving Visual Accessibility 314
Improving the Accessibility of Forms That
Require User Input 316
Testing Accessibility 318
Lesson Summary 324
Case Scenarios . . . 325 Case Scenario 1: Upgrading an Application
for Multiple Languages 325
Case Scenario 2: Making a Web Application Accessible 326 Suggested Practices . . . 326
Implement Globalization 326
Implement Accessibility 327
Take a Practice Test . . . 327
Chapter 7 Creating Custom Web Controls
329
Before You Begin . . . 330 Lesson 1: Creating User Controls . . . 331
Creating User Controls 331
Defining User Control Events 333
Defining Properties in User Controls 337
Adding a User Control to a Page 339
Dynamically Loading User Controls 339
Creating a Templated User Control 340
Lesson Summary 353
Lesson Review 353
Lesson 2: Creating Custom Web Server Controls . . . 355
Creating a Custom Web Server Control 356
Adding Toolbox Support for a Custom Web Server Control 364 Creating a Custom Designer for a Custom Web Server Control 370
Creating a Composite Control 372
Creating a Templated Custom Web Server Control 377
Registering Your Controls in Web.config 378
Lesson Summary 383
Lesson Review 383
Suggested Practices . . . 385
Create a New User Control 385
Create a New Custom Web Server Control 386
Create a New Composite Web Server Control 386
Create a New Templated Control 386
Take a Practice Test . . . 386
Chapter 8 Debugging and Deploying
387
Before You Begin . . . .388 Lesson 1: Debugging Websites . . . 389
Configuring ASP.NET for Debugging 389
Defining Custom Error Pages 392
Debugging Remotely 394
Debugging Client-Side Script 396
Lesson Summary 400
Lesson Review 401
Lesson 2: Troubleshooting Websites . . . 402
Implementing Tracing 402
Monitoring a Running Web Application 412
Lesson Summary 416
Lesson Review 416
Lesson 3: Deploying Websites . . . 418
Publishing Web Applications 419
Web Deployment Projects 425
Web Setup Projects 427
Deploying Web Applications by Using the Copy Web Tool 439 Precompiling and Publishing ASP.NET Websites 441
Installing ASP.NET 4 on IIS 442
Lesson Summary 446
Lesson Review 447
Case Scenarios . . . .448
Case Scenario 1: Debugging 448
Suggested Practices . . . .449
Debug a Website 449
Troubleshoot a Website 450
Publish a Web Application 450
Use a Web Setup Project 450
Use the Copy Web Tool 451
Precompile and Publish a Web Application 451
Take a Practice Test . . . 451
Chapter 9 Working with Client-side scripting, AjAX,
and jQuery
453
Before You Begin . . . 454 Lesson 1: Creating AJAX-Enabled Web Forms . . . 455
Introducing ASP.NET AJAX 456
The AJAX Server Controls 457
Lesson Summary 469
Lesson Review 470
Lesson 2: Creating Client Scripts with the Microsoft AJAX Library . . . 471
Creating Your Own Client Scripts 472
Creating Your Own Client Callbacks 480
Working with the Microsoft AJAX Library 483
Building Client Capabilities with AJAX 494
Lesson Summary 518
Lesson Review 518
Lesson 3: Implementing jQuery . . . 520
Introducing the jQuery Library 521
Selecting and Traversing the DOM 524
Handling Client-Side Events 530
Adding Effects and Animations to a Page 533
Implementing AJAX with jQuery 534
Lesson Summary 545
Case Scenarios . . . 547 Case Scenario 1: Using the ASP.NET AJAX Extensions 548 Case Scenario 2: Using the Microsoft AJAX Library 548
Case Scenario 3: Using jQuery 549
Suggested Practices . . . .549
Add Partial-Page Update Support to a Page 549
Create Client Code by Using the Microsoft AJAX Library 550
Write Interactive Client Code with jQuery 550
Take a Practice Test . . . 550
Chapter 10 Writing and Working with hTTP modules
and Web services
551
Before You Begin . . . 552 Lesson 1: Creating HTTP Handlers and HTTP Modules . . . 552
Creating a Custom HTTP Handler 553
Asynchronous Handlers and Pages 558
Creating a Custom HTTP Module 566
Lesson Summary 573
Lesson Review 574
Lesson 2: Creating and Consuming XML Web Services . . . 574
Creating an ASP.NET Web Service 576
Consuming an ASP.NET Web Service 580
Authentication and XML Web Services 586
Lesson Summary 591
Lesson Review 592
Lesson 3: Creating and Consuming WCF Services . . . 593
Introducing WCF 594
Creating a WCF Service with ASP.NET 596
Consuming a WCF Service in an ASP.NET Page 600
Calling a WCF Service from Client Script by Using
AJAX (REST and JSON) 603
Creating WCF Data Services 607
Lesson Summary 619
Case Scenarios . . . 620 Case Scenario 1: Working with HTTP Requests 620
Case Scenario 2: Selecting a Service Model 621
Suggested Practices . . . 621
Work with XML HTTP Handlers and Modules 621
Work with XML Web Services 622
Work with WCF Services 622
Take a Practice Test . . . 622
Chapter 11 Connecting to and Querying Data with LinQ
623
Before You Begin . . . 624 Lesson 1: Getting Started with LINQ . . . 625
Introducing LINQ 625
Querying Data with LINQ 628
Transforming Data with LINQ 637
Lesson Summary 647
Lesson Review 647
Lesson 2: LINQ and ADO.NET . . . .649
LINQ to DataSet 649
LINQ to SQL 664
LINQ to Entities 672
Lesson Summary 680
Lesson Review 681
Case Scenarios . . . .682
Case Scenario 1: Writing LINQ Queries 682
Case Scenario 2: Working with LINQ and ADO.NET 682 Suggested Practices . . . .683
Write LINQ Queries 683
Work with LINQ and ADO.NET 683
Chapter 12 Working with Data source Controls
and Data-bound Controls
685
Before You Begin . . . 686 Lesson 1: Connecting to Data with Data Source Controls . . . 687
Understanding the Data Source Controls 687
Using Objects as Data Sources with ObjectDataSource 690 Connecting to Relational Databases by Using SqlDataSource 698 Working with Access Data Files and
AccessDataSource Controls 702
Connecting to an Entity Model by Using EntityDataSource 703 Connecting to XML Data by Using XmlDataSource 707 Connecting to LINQ-Based Data by Using LinqDataSource 711 Connecting to Site Navigation Data
by Using SiteMapDataSource 712
Lesson Summary 719
Lesson Review 720
Lesson 2: Working with Data-Bound Web Server Controls . . . 721
Introducing Data-Bound Controls 721
Simple Data-Bound Controls 724
Composite Data-Bound Controls 728
Hierarchical Data-Bound Controls 741
Lesson Summary 753
Lesson Review 754
Lesson 3: Working with ASP.NET Dynamic Data . . . 755
Getting Started with Dynamic Data Websites 756
Extending and Customizing Dynamic Data 763
Using Dynamic Controls in Existing Sites 777
Lesson Summary 781
Lesson Review 782
Suggested Practices . . . 784
Create Pages by Using Each of the Controls 784
Create a Master-Detail Solution by Using
the Data-Bound Server Controls 784
Work with Dynamic Data Websites 785
Take a Practice Test . . . 785
Chapter 13 implementing User Profiles, Authentication,
and Authorization
787
Before You Begin . . . 788 Lesson 1: Working with User Profiles . . . 788
User Profile Basics 789
Configuring a User Profile Provider 790
Defining the User Profile 792
Identifying Users 794
Setting and Saving a User Profile 796
Recognizing a Returning Visitor 797
Lesson Summary 802
Lesson Review 802
Lesson 2: Using ASP.NET Membership . . . .804
Using the WSAT to Configure Security 804
Logon Controls 807
The FormsAuthentication Class 813
The Membership Class 815
The Roles Class 816
Configuring Websites to Require Windows Authentication 817 Restricting Access to ASP.NET Websites, Files, and Folders 818
Lesson Summary 824
Lesson Review 824
Suggested Practices . . . 829
Configure Authentication and Authorization 829
Configure Profiles 830
Take a Practice Test . . . 830
Chapter 14 Creating Websites with AsP.nET mvC 2
831
Before You Begin . . . 832 Lesson 1: Understanding ASP.NET MVC Applications . . . 832
The ASP.NET MVC Architecture 833
The Structure of an ASP.NET MVC Application 837
Running Your First ASP.NET MVC Webpage 839
Lesson Summary 845
Lesson Review 846
Lesson 2: Creating Models, Views, and Controllers . . . 847
Defining a Model and Business Rules 848
Creating Controllers 851
Creating Views 856
Customizing MVC Routing 867
Lesson Summary 875
Lesson Review 876
Case Scenarios . . . 878 Case Scenario: Creating an ASP.NET MVC Application 878 Suggested Practices . . . 878
Work with Controllers, Views, and Routing 879
Take a Practice Test . . . 879
Answers 881
Index 925
About the Authors 967
What do you think of this book? We want to hear from you!
Acknowledgments
W
e would like to thank the hardworking people at Microsoft Press, in particular Rosemary Caperton, for getting us involved and for her guidance on this work. Many thanks also to Kathy Krause and her team at OTSI (www.otsi.com) for keeping the book on schedule and providing excellent editing suggestions. She left no stone unturned and made us both seem like better writers than we are.Thanks also go to our fantastic technical editor, Kenn Scribner. He added a lot to this book by challenging our coding examples, working through the labs, getting the CD right, and helping ensure consistency. It was truly great to have such a strong technical editor on the team.
Finally, we would like to thank our families and friends for their patience and understanding during the long nights and weekends that are the writing process.
Contents
Introduction
T
his training kit is designed for developers who plan to take Microsoft Certified Technical Specialist (MCTS) exam 70-515, as well as for developers who need to know how to develop applications by using the Microsoft .NET Framework 4 and Microsoft ASP.NET. We assume that before you begin using this kit, you have a working knowledge of Windows and Microsoft Visual Basic or Microsoft Visual C#. The topics in this training kit cover what you need to know for the exam as described on the Skills Measured tab for the exam, which is available athttp://www.microsoft.com/learning/en/us/exam.aspx?ID=70-515&locale=en-us#tab2. By using this training kit, you’ll learn how to do the following:
■ Create a web application by using web server controls, event handlers, application state, and session state.
■ Create websites that take advantage of master pages, themes, and cascading style sheets. ■ Use the wide variety of controls that ship with ASP.NET, including those for validation,
navigation, user input, data binding, and much more.
■ Create user controls and custom web server controls.
■ Create a web application that stores user-specific information and preferences. ■ Develop accessible web applications that can be used by a global audience.
■ Write rich Internet applications (RIAs) by using client script, Asynchronous JavaScript and XML (AJAX), and jQuery.
■ Connect your web applications with data by using Microsoft ADO.NET, Microsoft Language-Integrated Query (LINQ) queries, LINQ to SQL, the Entity Framework, and more.
■ Write template-driven, data-bound websites by using Dynamic Data in ASP.NET. ■ Monitor, troubleshoot, and debug ASP.NET applications.
■ Build service-oriented applications (SOAs) by using Hypertext Transfer Protocol (HTTP) handlers and modules, web services, and Windows Communication Foundation (WCF).
■ Add authentication and authorization features to your application to improve security and add multiple access levels.
■ Build websites based on the ASP.NET MVC 2 framework.
Refer to the objective mapping page in the front of this book to see where in the book each exam objective is covered.
How to Install the Practice Tests xxix
How to Use the Practice Tests xxix
How to Uninstall the Practice Tests xxxi
hardware Requirements
We recommend that you use a computer that is not your primary workstation to do the practice exercises in this book, because you will make changes to the operating system and application configuration.
To use the companion CD, you need a computer running Windows XP with Service Pack 3 (SP3), Windows Vista with SP2, Windows 7, Windows Server 2003 with SP2, Windows Server 2003 R2, Windows Server 2008 with SP2, or Windows Server 2008 R2. The computer must meet the following minimum requirements:
■ Personal computer with at least a 1-GHz 32-bit (x86) or 64-bit (x64) processor ■ At least 1 GB of RAM (x86 systems) or 2 GB of RAM (x64 systems)
■ At least a 40-GB hard disk ■ DVD-ROM drive
■ Super VGA (800 x 600) or higher resolution video adapter and monitor ■ Keyboard and Microsoft mouse or compatible pointing device
software Requirements
The computer used with the companion CD-ROM should also have the following software:
■ A web browser such as Windows Internet Explorer
■ An application that can display PDF files, such as Adobe Acrobat Reader, which can be downloaded at www.adobe.com/reader
■ Microsoft Visual Studio 2010 Professional, a trial version of which can be downloaded at http://www.microsoft.com/visualstudio/en-us/products/2010-editions/professional
These requirements will support use of the companion CD-ROM.
Using the Companion media
The companion media (CD) included with this training kit contains the following:
■ Practice tests You can reinforce your understanding of programming with ASP.NET 4 by using electronic practice tests that you customize to meet your needs from the pool of lesson review questions in this book, or you can practice for the 70-515 certification exam by using tests created from a pool of 200 realistic exam questions, which give you many practice exams to ensure that you are prepared.
Note DigiTAL COnTEnT FOR DigiTAL bOOk READERs
If you bought a digital-only edition of this book, you can enjoy select content from the print edition’s companion media. Go to http://go.microsoft.com/fwlink/?Linkid=206094 to get your downloadable content. This content is always up to date and available to all readers.
How to Install the Practice Tests
To install the practice test software from the companion CD to your hard disk, perform the following steps:
1. Insert the companion CD into your CD drive and accept the license agreement. A CD menu appears.
Note iF ThE CD mEnU DOEs nOT APPEAR
If the CD menu or the license agreement does not appear, AutoRun might be disabled on your computer. Refer to the Readme.txt file on the CD for alternate installation instructions.
2. Click Practice Tests and follow the instructions on the screen.
How to Use the Practice Tests
To start the practice test software, follow these steps:1. Click Start, click All Programs, and then select Microsoft Press Training Kit Exam Prep. A window appears that shows all the Microsoft Press training kit exam prep suites installed on your computer.
2. Double-click the lesson review or practice test you want to use.
Note LEssOn REviEWs vs. PRACTiCE TEsTs
Select the (70-515) Web Applications Development with Microsoft .NET Framework 4
lesson review to use the questions from the “Lesson Review” sections of this book.
Select the (70-515) Web Applications Development with Microsoft .NET Framework 4
practice test to use a pool of 200 questions similar to those that appear on the 70-515
Lesson Review Options
When you start a lesson review, the Custom Mode dialog box appears so that you can con-figure your test. You can click OK to accept the defaults, or you can customize the number of questions you want, how the practice-test software works, the exam objectives to which you want the questions to relate, and whether you want your lesson review to be timed. If you are retaking a test, you can select whether you want to see all the questions again or only the questions you missed or did not answer.
After you click OK, your lesson review starts.
■ Article i To take the test, answer the questions and use the Next and Previous buttons to move from question to question.
■ Article ii After you answer an individual question, if you want to see which answers are correct—along with an explanation of each correct answer—click Explanation.
■ Article iii If you prefer to wait until the end of the test to see how you did, answer all the questions, and then click Score Test. You will see a summary of the exam objec-tives you chose and the percentage of questions you got right, both overall and per objective. You can print a copy of your test, review your answers, or retake the test.
Practice Test Options
When you start a practice test, you choose whether to take the test in Certification Mode, Study Mode, or Custom Mode:
■ Certification mode Closely resembles the experience of taking a certification exam. The test has a set number of questions. It is timed, and you cannot pause and restart the timer.
■ study mode Creates an untimed test during which you can review the correct answers and the explanations after you answer each question.
■ Custom mode Gives you full control over the test options so that you can customize them as you like. In all modes, the test user interface is basically the same but with differ-ent options enabled or disabled depending on the mode. The main options are discussed in the previous section, “Lesson Review Options.”
How to Uninstall the Practice Tests
To uninstall the practice test software for a training kit, use the Uninstall A Program option in Windows Control Panel.
microsoft Certified Professional Program
Microsoft certifications provide the best method for proving your command of current Microsoft products and technologies. The exams and corresponding certifications are developed to validate your mastery of critical competencies as you design and develop, or implement and support, solutions with Microsoft products and technologies. Computer professionals who become Microsoft-certified are recognized as experts and are sought after industry-wide. Certification brings a variety of benefits to the individual and to employers and organizations.
More INfo ALL ThE miCROsOFT CERTiFiCATiOns
For a full list of Microsoft certifications, go to www.microsoft.com/learning/mcp/default.asp.
Errata and book support
We’ve made every effort to ensure the accuracy of this book and its companion content. If you do find an error, please report it on our Microsoft Press site at Oreilly.com:
1. Go to http://microsoftpress.oreilly.com.
2. In the Search box, enter the book’s ISBN or title.
3. Select your book from the search results.
4. On your book’s catalog page, under the cover image, you’ll see a list of links. Click View/Submit Errata.
You’ll find additional information and services for your book on its catalog page. If you need additional support, please email Microsoft Press Book Support at [email protected].
We Want to hear from you
At Microsoft Press, your satisfaction is our top priority, and your feedback our most valuable asset. Please tell us what you think of this book at:
http://www.microsoft.com/learning/booksurvey
The survey is short, and we read every one of your comments and ideas. Thanks in advance for your input!
stay in Touch
Let’s keep the conversation going! We’re on Twitter: http://twitter.com/MicrosoftPress
Preparing for the Exam
C h A P T E R 1
Introducing ASP.NET 4
T
he web development experience continues to evolve with Microsoft Visual Studio 2010 and Microsoft ASP.NET 4. The most important improvements are:■ Simplified deployment of applications, settings, and data.
■ Easy redirection of search engine–friendly URLs to different pages. ■ Cascading style sheet–friendly rendering for many controls. ■ Applications that start up before the first user request. ■ Extensible request validation for more flexible security. ■ Easy setting of meta tags at run time.
■ The ability to enable view state for individual controls to reduce page sizes. ■ Static client IDs to allow web server controls to be reliably accessed from JavaScript. ■ The inclusion of AJAX jQuery scripts in Visual Studio templates.
■ Improved Language-Integrated Query (LINQ) capabilities for creation of strongly typed queries for collections and databases.
■ Dynamic Data templates for rapid development of data-driven websites. ■ Compressed session state data.
■ A new Chart control for quick creation of interactive three-dimensional charts. ■ Built-in ASP.NET MVC 2 for creation of layered applications that are easily testable. With these new tools, you can build highly interactive, robust web applications more efficiently than ever. All of these enhancements were developed to give ASP.NET developers more control and increased confidence when building and deploying the next generation of websites.
This chapter introduces the basics of website development with ASP.NET. Lesson 1, “Understanding Web Communications,” describes the key players in any website: the server, the browser (or client), and Hypertext Transfer Protocol (HTTP). This serves as a basis for under- standing the architecture of all web communications. In Lesson 2, “Creating a Website and Adding New Webpages,” you will learn the key components that make up an ASP.NET devel-opment site. Lesson 3, “Working with Web Configuration Files,” describes how to configure the many aspects of an ASP.NET application.
Contents
Chapter 1: introducing AsP.nET 4
1
Before You Begin . . . 2 Lesson 1: Understanding Web Communications . . . 3
The Web Server’s Role 4
The Web Browser’s Role 5
Understanding the Role of HTTP 5
Lesson Summary 14 Understanding the Configuration File Hierarchy 33
Processing the Configuration Files 34
Changes to .NET Framework 4 Configuration Files 34
Editing Configuration Files 34
Lesson Summary 38
Lesson Review 38
Case Scenarios . . . 38
Case Scenario 1: Creating a New Website 39
Case Scenario 2: Placing Files in the Proper Folders 39 Suggested Practices . . . 39 Create a New Website by Using Visual Studio 2010 39
Add a Webpage to the Website 40
Program a Web Application 40
Examine Settings for a Web Application 40
Exam objectives in this chapter:
■ Developing Web Forms Pages■ Configure Web Forms pages. ■ Handle page life cycle events.
■ Configuring and Extending a Web Application
■ Configure projects and solutions, and reference assemblies.
Lessons in this chapter:
■ Lesson 1: Understanding Web Communications 3
■ Lesson 2: Creating a Website and Adding New Webpages 15
■ Lesson 3: Working with Web Configuration Files 32
before you begin
To complete the lessons in this chapter, you should be familiar with developing applications in Visual Studio by using Microsoft Visual Basic or Microsoft Visual C#. In addition, you should be comfortable with all of the following:
■ The Visual Studio 2010 Integrated Development Environment (IDE)
■ A basic understanding of Hypertext Markup Language (HTML) and client-side scripting ■ Making assemblies available to other applications
■ Working with Visual Studio projects, files, classes, and designers
real World
Tony Northrup
Lesson 1: Understanding Web Communications
Like all client-server applications, web applications have two distinct components:■ Client Also known as the front-end interface, the web browser presents the user interface, accepts user input, and sends data to the server for processing.
■ server Also known as the back end, the web server responds to requests from clients for specific pages. It responds with an HTML page that includes instructions for how to generate the user interface.
The web browser (the client) and the web server communicate by using Hypertext Transfer Protocol (HTTP), a text-based network protocol assigned to TCP port 80. If the server has a certificate, the client and server can use HTTP Secure (HTTPS) to authenticate the server and encrypt communications. HTTPS is assigned to TCP port 443.
Communications typically follow these steps:
1. A user enters an address, such as http://www.microsoft.com/, into the web browser.
2. The web browser connects by using HTTP and sends a GET request, such as GET / (to retrieve the root page), to the web server.
3. The web server processes the requested page. This action might cause the server to return static HTML or image files, or it might execute ASP.NET code that performs workflow tasks or connects to a database.
4. The web server uses HTTP to send a response back to the web browser. If the request was processed successfully, the web server returns the HTTP status code 200, along with an HTML document. If the server cannot find the page, it returns the code 404. If the user requests an outdated or relocated page, the server returns the code 302 and the new URL so that the browser can access the correct page. This is known as redirection. Several other responses are possible as well, depending on the particular situation.
5. The user’s web browser then processes the response by displaying the HTML page (if the code was 200), showing an error message (if the code was 404), or loading a different page (if the code was 302). Other server responses are similarly handled by the browser, depending upon the response.
This process is repeated each time the user clicks a button or link.
After this lesson, you will be able to:
■ Describe the web server’s role in responding to requests for resources. ■ Describe the web browser’s role in submitting requests and presenting the
response to the user.
■ Examine HTTP communications to determine what is being sent between the client and server and whether the communications were successful.
Estimated lesson time: 20 minutes
The Web Server’s Role
The web server provides the content and the web browser displays it to the user. At the simplest, a web server sends static files, such as static HTML or image files, through an HTTP connection to a web browser.
Modern web servers do far more, however. When a web server receives a request, some of the actions it takes are to:
1. verify that the request is structured legitimately. Sometimes, malicious clients send malformed web requests to compromise web servers. Web servers must be able to detect this and respond appropriately—usually by ignoring the request.
2. Authenticate itself. If the server has a Secure Sockets Layer (SSL) certificate and the request was made with HTTPS, the web browser uses the certificate to authenticate the server. The web server will also encrypt all content before returning it to the web browser.
3. Authenticate the user. If the content requires authorization, the web server verifies that the user has submitted credentials. If the user has not been authenticated, the web server redirects the user to an authentication form.
4. Authorize the user. After the Web server authenticates the user, the web server verifies that the user is allowed to access the requested content.
5. Determine how to handle a request. If the web browser requested static content or was simply determining whether cached content could still be used, the web server can directly respond. If the web browser requested an ASP.NET page, the web server must forward the request to ASP.NET.
6. handle errors. If a server cannot process the user’s request, it provides error informa-tion to the web browser.
8. Compress output. Before returning a page to a web browser, a web server can compress the content to reduce the bandwidth required.
9. Log access. Web servers typically record usage information for security and performance-monitoring purposes.
The Web Browser’s Role
Despite the attention web browsers receive, their role is relatively simple:
1. send requests to the web server. If the user enters http://www.microsoft.com, the web browser resolves the www.microsoft.com Domain Name System (DNS) address, uses HTTP to connect to the server, and requests a page.
2. Authenticate the server. If the server has an SSL certificate and the request was made with HTTPS, the web browser uses the certificate to authenticate the server and then decrypt future communications.
3. Process the response. If the server has provided HTML, the browser retrieves embed-ded objects, such as images, videos, or animations referenced in the HTML. If the server has provided an error, redirection, or other response, the browser responds appropriately.
4. Display hTmL and embedded objects. Web browsers use HTML standards to deter-mine how to display a webpage to the user. Because HTML can contain embedded objects, a web browser might have to display dozens of objects to render a single webpage.
5. Run client scripts. Client scripts, such as those written in JavaScript, enable interactive and responsive pages without reloading the page.
Understanding the Role of HTTP
HTTP is a text-based communication protocol that is used to request webpages from a web server and send responses back to a web browser. When a webpage is requested, the browser sends a request to the web server. The request might look like the following.
GET /default.aspx HTTP/1.1 Host: www.northwindtraders.com
More INfo hTTP/1.1 sPECiFiCATiOn
For more information about the current HTTP standard (HTTP/1.1), see the specification at
http://www.w3.org/Protocols/rfc2616/rfc2616.html.
The second line of the request (Host: www.northwindtraders.com) identifies the name of the website. Most web servers host multiple websites with a single IP address, and need to know the website’s name to return the correct page. This process involves using host headers to identify the website that will handle the request.
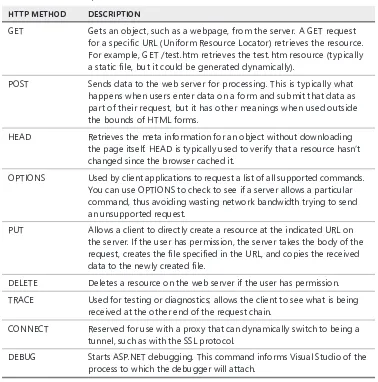
HTTP supports other commands, as shown in Table 1-1. If a website has Distributed Authoring and Versioning (DAV) enabled, many more commands are available, including LOCK and UNLOCK.
TAbLE 1-1 Common HTTP/1.1 Methods
hTTP mEThOD DEsCRiPTiOn
GET Gets an object, such as a webpage, from the server. A GET request for a specific URL (Uniform Resource Locator) retrieves the resource. For example, GET /test.htm retrieves the test.htm resource (typically a static file, but it could be generated dynamically).
POST Sends data to the web server for processing. This is typically what happens when users enter data on a form and submit that data as part of their request, but it has other meanings when used outside the bounds of HTML forms.
HEAD Retrieves the meta information for an object without downloading the page itself. HEAD is typically used to verify that a resource hasn’t changed since the browser cached it.
OPTIONS Used by client applications to request a list of all supported commands. You can use OPTIONS to check to see if a server allows a particular command, thus avoiding wasting network bandwidth trying to send an unsupported request.
PUT Allows a client to directly create a resource at the indicated URL on the server. If the user has permission, the server takes the body of the request, creates the file specified in the URL, and copies the received data to the newly created file.
DELETE Deletes a resource on the web server if the user has permission. TRACE Used for testing or diagnostics; allows the client to see what is being
received at the other end of the request chain.
CONNECT Reserved for use with a proxy that can dynamically switch to being a tunnel, such as with the SSL protocol.
What Is Distributed Authoring and Versioning?
D
istributed Authoring and Versioning (DAV) is a set of extensions to HTTP/1.1 that simplifies website development when work is being carried out in a team scenario. DAV is an open standard and is available on numerous platforms. DAV provides the ability to lock and unlock files and the ability to designate versions.DAV is built directly on HTTP/1.1, so no other protocols, such as File Transfer Protocol (FTP) or Server Message Block (SMB), are required. DAV also provides the ability to query the web server for various resource properties such as file names, time stamps, and sizes. DAV also gives developers the ability to perform server-side file copying and moving. For example, you can use the HTTP GET and PUT commands to retrieve files from the web servers and save them to different locations, or you can use DAV’s COPY command to tell a server to copy a file.
The communication from the web browser to the web server is referred to as a request. In ASP.NET, there is a Request object that is used to represent the web browser’s communications to the web server. ASP.NET wraps the resource request in an object that can be queried in code. By wrapping the HTTP request in a programmable object, ASP.NET provides your code access to things such as the cookies associated with your site, the query string parameters passed with the URL, and the path to the requested resource, and allows you to work with other relevant request-based information.
The communication from the web server back to the web browser is wrapped in the Response object. You can use this object to set cookies, define caching, set page expiration, and more. When a web server responds to a request, it uses what it finds in the Response object to write the actual, text-based HTTP response, such as the following.
HTTP/1.1 200 OK
Server: Microsoft-IIS/6.0 Content-Type: text/html Content-Length: 38
<html><body>Hello, world.</body><html>
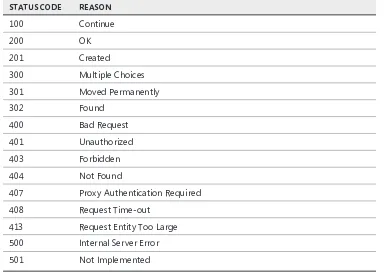
The first line indicates the communication protocol and version information. It also includes the status code for the response and the reason that describes the status code. The status codes are three-digit numbers and are grouped as shown in Table 1-2.
exaM tIp
TAbLE 1-2 Status Code Groups
sTATUs CODE
gROUP DEsCRiPTiOn
1xx Informational: The request was received, and the server is continuing to process.
2xx Success: The action was successfully received, understood, and accepted. 3xx Redirect Command: The client must access a different resource instead. 4xx Client Error: The request has a syntax error or the server does not know
how to fulfill the request.
5xx Server Error: The server failed to fulfill a request that appears to be valid.
In addition to the status code groups, HTTP/1.1 defines unique status codes and reasons. A reason is nothing more than a very brief description of the status code. Table 1-3 shows a list of common status codes and reasons.
TAbLE 1-3 Common Status Codes and Their Reasons
sTATUs CODE REAsOn
100 Continue
200 OK
201 Created
300 Multiple Choices
301 Moved Permanently
302 Found
400 Bad Request
401 Unauthorized
403 Forbidden
404 Not Found
407 Proxy Authentication Required
408 Request Time-out
413 Request Entity Too Large
500 Internal Server Error
The second line of the response indicates the type of web server (Server: Microsoft-IIS/6.0). The third line (Content-Type) indicates the type of resource that is being sent to the web browser as part of the response. This indicator is in the form of a Multipurpose Internet Mail Extensions (MIME) type. In this example (Content-Type: text/html), the file is an HTML text file. The MIME type is a two-part designator that is shown as type/subtype, in which the first part is the resource type (text, in this example) and the second part is the resource subtype (html, in this example). Some common MIME types are shown in Table 1-4.
TAbLE 1-4 Common MIME Types
mimE TyPE DEsCRiPTiOn
text Textual information. Subtypes include plain, html, and xml.
image Image data. Subtypes are defined for two widely used image formats, jpeg and gif, and other subtypes exist as well.
audio Audio data. Requires an audio output device (such as a speaker or head-phones) for the contents to be heard. An initial subtype, basic, is defined for this type.
video Video data. The subtype mpegis often used. Typically, videos are not transferred directly, but are read from an embedded object, such as a JavaScript or Adobe Flash object.
application Any binary data. The subtype octet-stream is typically used.
The next line is content length (Content-Length: 38 in this example). This simply indicates the size of the content (in “octets,” or 8-bit bytes) that follows. After the Content-Length line, the response message is returned. The browser attempts to process the content based on its MIME type. For example, it interprets HTML for HTML MIME types and shows a picture for image MIME types.
Submitting Form Data to the Web Server
The HTML <form> tag can be used to create a webpage that collects data from the user and sends the collected data back to the web server. The form tag is nested inside the <HTML> tags. The form tags typically include information for the user in the form of text, and input tags for defining controls such as buttons and text boxes. A typical use of the <form> tag might look like the following.
<form method="POST" action="getCustomer.aspx"> Enter Customer ID:
<input type="text" name="Id">
This example form prompts the user for a customer ID, displays a text box that collects the desired customer ID, and also displays a Submit button that initiates the sending of data to the web server. The method attribute of the form tag indicates the HTTP command (POST) to use when sending the request to the server. The action attribute is the relative URL of the page to which the request will be sent.
There are two HTTP commands that can be used to submit the form data to the web server:GET and POST. When the GET command is used, the form data is appended to the URL as part of the query string. The query string is a collection of key–value pairs, separated by an ampersand (&) character. The start of the query string is indicated by a question mark (?). The following provides an example.
GET /getCustomer.aspx?Id=123&color=blue HTTP/1.1
Host: www.northwindtraders.com
In this example, a GET request is made to the web server for a webpage called getCustomer.aspx on the root of the website (indicated by the forward slash). The query string contains the form data following the question mark (?).
When the GET command is used to send data to the server, the complete URL and query string can be seen and modified in the address bar of the web browser, as shown in Figure 1-1. This allows users to easily bookmark or link to the results of the form, which is important for search pages. However, it’s not a good choice for authentication pages, because the user’s credentials would be visible in the URL. It’s also not a good choice when the user needs to transfer large amounts of information, because when Windows Internet Explorer and Inter-net Information Services (IIS) are used, the limit for a query string is 1,024 characters (other browsers and server implementations also have limitations, although they might not limit the length to the values IIS and Internet Explorer use).
FigURE 1-1 Returning form results by using a GET request shows the input in the address bar.
The POST command is a better choice for submitting credentials and large amounts of data. When the POST command is used, the data is placed into the message body of the request as follows.
POST /getCustomer.aspx HTTP/1.1 Host: www.northwindtraders.com
Using the POST command removes the input from the URL and overcomes size constraints. Instead, the data is hidden in the message body.
Sending data back to the server as part of your request is often referred to as a postback in ASP.NET. Although its name comes from the POST command, it is possible to perform a post-back by using the GET command already described. An ASP.NET webpage contains a property called IsPostBack that is used to determine if data is being sent back to the web server or if the webpage is simply being requested.
real World
Tony Northrup
T
here’s no better way to understand HTTP than to watch your own web browser’s inner workings as you surf. Though you can find several free sniffer appli-cations on the web, my favorite is Microsoft Network Monitor (available fromhttp://www.microsoft.com/downloads). You can also purchase several browser
add-ons that monitor HTTP within your browser session, including HttpWatch from http://www.httpwatch.com/ and Fiddler from http://www.fiddler2.com/.
Quick Check
1. What protocol is used to communicate between the web browser and the web server?
2. In ASP.NET, what does the Request object represent?
3. In ASP.NET, what does the Response object represent?
Quick Check Answers
1. HTTP is used for web browser and web server communication.
2. The Request object in ASP.NET wraps the communication from the web browser to the web server.
PrActIcE
Exploring hTTP
In this practice, you explore HTTP by using Telnet, the terminal emulation application that is built into Windows.
ExErcIsE 1 Starting and Configuring Telnet
In this exercise, you start the Telnet client and configure it to work with HTTP.
1. From the Windows Features Control Panel tool, add the Telnet Client feature.
2. Open a command prompt. You can do so by selecting Start | All Programs | Accessories | Command Prompt.
3. Start Telnet. In the command prompt window, enter the following command to start the Telnet client.
Telnet.exe
4. Configure Telnet to echo typed characters. Enter the following command into the Telnet window, which will cause locally typed characters to be displayed as you type them.
set localecho
Telnet will respond with the following.
Local echo on
5. Set carriage return and line feed to On. Enter the following command to instruct Telnet that it should treat the Enter key as a combination of carriage return and line feed.
set crlf
Telnet will respond with the following.
New line mode - Causes return key to send CR & LF
6. Open a connection to a website. Enter the following command into the Telnet command window to open a connection to www.bing.com on TCP port 80, the default port for a web server.
o www.bing.com 80
Telnet responds with the following.
Connecting To www.bing.com. . .
Note that Telnet will not indicate that you are indeed connected.
8. Attempt to retrieve the default page. Enter the following lines. After typing the second line, press Enter two times to indicate the end of the message to the web server.
GET / HTTP/1.1 Host: www.bing.com
After you have pressed Enter two times, the Bing website will return an HTML page. Notice that the status code is 200, which means that the server was able to return the page without a problem. The message body contains HTML with a hyperlink to the new location.
9. Press Ctrl+[ to return to the Telnet prompt. Repeat the process with www.contoso.com. This time, you should receive an HTTP 301 message, which redirects you to a different page.
10. Press Ctrl+[ to return to the Telnet prompt. Repeat the process with www.microsoft.com. This time, you should receive an HTTP 200 message. If you examine the HTML, you’ll notice that the web server returned an error message indicating that you did not provide a valid HTTP User-Agent header. Browsers use the User-Agent header value to indicate the browser’s type and capabilities.
ExErcIsE 2 Monitoring HTTP with Network Monitor
In this exercise, you use Network Monitor to examine HTTP communications.
1. Visit http://www.microsoft.com/downloads and search for Network Monitor. Download the latest version of the software and install it by using the default settings.
2. Restart your computer to ensure that the Network Monitor drivers are bound to your adapters.
3. Launch Network Monitor.
4. In Network Monitor, click the New Capture button. Then click Start.
5. Open Internet Explorer and visit your home page. Wait for the page to load.
6. In Network Monitor, click the Stop button.
Network Monitor recorded all the packets that Internet Explorer transmitted and received, and those packets are visible in the Frame Summary pane. Unfortunately, Network Monitor also recorded communications from other network applications.
7. To filter the Frame Summary to display only HTTP packets, type hTTP in the Display Filter pane, and then click Apply.
Network Monitor displays just the HTTP packets.
8. In the Frame Summary pane, select the first frame. In the Frame Details pane, expand the Http section. Notice the command that was transmitted (probably GET), the URI, and the host.
9. In the Frame Summary pane, select the HTTP response, which is probably the second frame. In the Http section of the Frame Details pane, notice the StatusCode (probably 200), the server, the command that was transmitted (probably GET), the URI, and the host.
Lesson Summary
■ The web server is responsible for accepting requests for a resource and sending the appropriate response.
■ The web browser is responsible for displaying data to the user, collecting data from the user, and sending data to the web server.
■ HTTP is a text-based communication protocol that is used to communicate between web browsers and web servers by using TCP port 80 by default.
■ Secure HTTP (HTTPS) uses TCP port 443 by default.
■ Each HTTP method indicates the desired action. The most common methods are GET and POST.
■ The process of sending data to a web server from a browser is commonly referred to as a postback in ASP.NET programming.
■ You can troubleshoot HTTP by using a sniffer such as Microsoft Network Monitor.
Lesson Review
You can use the following questions to test your knowledge of the information in Lesson 1, “Understanding Web Communications.” The questions are also available on the companion CD in a practice test, if you prefer to review them in electronic form.
Note AnsWERs
Answers to these questions and explanations of why each answer choice is correct or incorrect are located in the “Answers” section at the end of the book.
1. From within an ASP.NET page, you need to run a section of code only if the user has previously loaded the page and is submitting data as part of a form. Which Page object property should you use?
A. IsCallback
B. IsReusable
c. IsValid
D. IsPostBack
2. You are troubleshooting a problem users have when submitting information with a form. The form data does not appear in the web browser’s address bar, but you know the web server is receiving the form data. After capturing the web communications with a sniffer, which type of HTTP request should you examine to see the data the user submitted?
A. PUT
B. CONNECT
c. POST
Lesson 2: Creating a Website and Adding new
Webpages
Visual Studio creates the initial structure for your website automatically. However, the structure itself does nothing useful. To create a functional website, you will need to add ASPX pages and write Visual Basic or C# code to turn the ASPX pages into dynamic HTML pages.
This lesson shows you how to create a new website with Visual Studio, describes the contents of the default website, and teaches you how to add your own ASPX web forms.
After this lesson, you will be able to: ■ Create a new website within Visual Studio.
■ Understand the various configuration options available when defining a new website.
■ Add new web forms to a website. Estimated lesson time: 35 minutes
Creating Websites
The Visual Studio project system allows you to define a new website project based on how you intend to access the site content hosted on the site’s web server. You can create a web project connected to a file-system–based server on your computer, an IIS server, or an FTP server. The option that is right for your website project depends on how you want to run, share, manage, and deploy your project. The following describes each option in further detail:
■ File system A file-system–based website stores all of the files for the website inside a directory of your choosing. When you debug the website, Visual Studio runs the light-weight ASP.NET development server that is included in Visual Studio. A file-system–based site is great when you want to run and debug your website locally but do not want to run a local IIS web server (or cannot due to security restrictions on your network).
■ FTP An FTP-based website is useful when you want to connect to your site via FTP to manage your files on a remote server. This option is typically used when your website is hosted on a remote computer and your access to the files and folders on that server is through FTP.
Creating a Website Project
You can create a new website project directly from Visual Studio. The basic steps for doing so are as follows:
1. In Visual Studio, use the File menu to create a new website (File | New | Web Site). This launches the New Web Site dialog box, as shown in Figure 1-2. This dialog box contains properties for setting the website type, location, Microsoft .NET Framework version, and default programming language.
2. Select the website type, location, and default programming language.
3. You might also want to select the target framework for your project. New to Visual Studio 2010 is the ability to code against multiple versions of the .NET Framework. You can choose among versions 2.0, 3.0, 3.5, and 4. Unless you need to use an earlier version, you should always use 4.
4. When you have defined your website, click OK to finish setting it up. Depending on your type selection, you might be prompted to enter additional information.
FigURE 1-2 The New Web Site dialog box.
You can also use Visual Studio to create an ASP.NET web application. Use the File menu to create a new project (File | New | Project), and then select ASP.NET Web Application or ASP.NET Empty Web Application. Web applications and websites function and perform similarly, but web applications differ from websites in several important ways. For example, with a web application:
■ You can create an MVC application.
■ Visual Studio stores the list of files in a project file (.csproj or .vbproj), rather than relying on the folder structure.
■ You cannot mix Visual Basic and C#.
■ You must compile the application before deployment, which prevents you from testing a page if another page will not compile.
■ You do not have to store the source code on the server. ■ You can control the assembly name and version.
■ You cannot edit individual files after deployment without recompiling.
Typically, website projects are the right choice when one developer will be creating and managing a website. Web application projects are better for enterprise environments with multiple developers and formal processes for testing, deployment, and administration.
Creating a File-System–Based Website
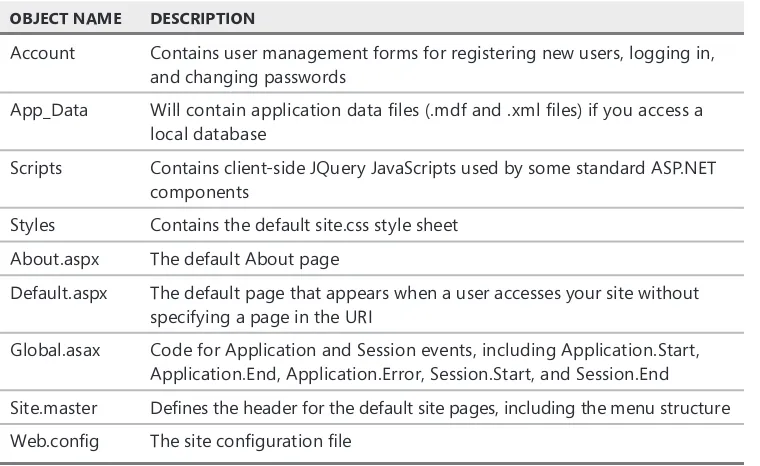
A file-system–based website runs locally on the ASP.NET web server that ships with Visual Studio. This option allows you to keep your development local until you are ready to publish code to a server for sharing. To create a file-system–based website, you use the New Web Site dialog box and select File System from the Web Location list box (see Figure 1-2). You then simply set a valid folder location for storing your website files locally on a hard drive.
Visual Studio creates the folder for your site and adds two content webpages (Default.aspx and About.aspx), their behind files, and a master file named Site.master, with a code-behind file. The default website template also creates the folder App_Data, as well as a configuration file called Web.config. When the website opens, Visual Studio displays the Default.aspx page in HTML Source view, where you can see the page’s HTML elements. Figure 1-3 shows an example of the IDE after a new website has been created.