• • •
For your convenience Apress has placed some of the front
matter material after the index. Please use the Bookmarks
and Contents at a Glance links to access them.
Contents at a Glance
About the Author ...
xiii
About the Technical Reviewer ...
xv
Introduction ...
xvii
Chapter 1: Hello World
■
...
1
Chapter 2: Build and Run
■
...
7
Chapter 3: Variables
■
...
11
Chapter 4: Operators
■
...
15
Chapter 5: Objects
■
...
19
Chapter 6: Strings
■
...
23
Chapter 7: Numbers
■
...
27
Chapter 8: Arrays
■
...
29
Chapter 9: Dictionaries
■
...
33
Chapter 10: For Loops
■
...
35
Chapter 11: While Loops
■
...
37
Chapter 12: Do While Loops
■
...
39
Chapter 13: For-Each Loops
■
...
41
Chapter 14: If Statements
■
...
43
Chapter 15: Switch Statements
■ CONTENTS AT A GLANCE
Chapter 17: Class Methods
■
...
57
Chapter 18: Inheritance
■
...
59
Chapter 19: Categories
■
...
65
Chapter 20: Blocks
■
...
69
Chapter 21: Key-Value Coding
■
...
73
Chapter 22: Key-Value Observation
■
...
75
Chapter 23: Protocols
■
...
81
Chapter 24: Delegation
■
...
85
Chapter 25: Singleton
■
...
89
Chapter 26: Error Handling
■
...
91
Chapter 27: Background Processing
■
...
95
Chapter 28: Object Archiving
■
...
97
Chapter 29: Web Services
■
...
101
Introduction
Objective-C is a tool that you can use to create stunning applications for the Mac, iPhone, and iPad. This unique programming language traces its linage back to the C programming language. Objective-C is C with object-oriented programming.
Today, learning programming is about learning how to shape our world. Objective-C programmers are in a unique position to create mobile applications that people all over the world can use in their daily lives.
Objective-C is a delight to use. While other programming languages can feel clumsy at times, Objective-C will show you its power and reach with grace. Problems that seem intractable in other programming languages melt away in Objective-C.
CHAPTER 1
Hello World
Xcode
Objective-C is a programming language that extends the C programming language to include object-oriented programming capabilities. This means that most classic C programming procedures are used in Objective-C programs. For the purposes of this book, you will need to have an idea of how C programming works.
Before you write any Objective-C code, you will need to have the proper tool for the job. For Objective-C, this tool is Xcode. Xcode will be your primary code editor and integrated development environment (IDE).
Note
■
Xcode requires a Mac. You cannot install Xcode on a Windows-or Linux-based
computer.
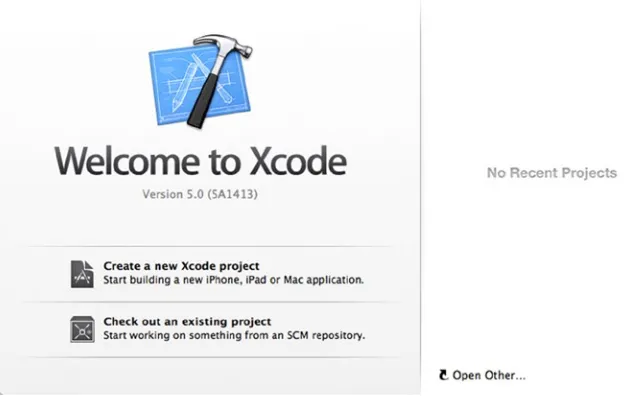
To install Xcode, go to the Mac App Store by selecting your Mac’s menu bar and then choosing � ➤ App Store. Use the App Store search feature to locate Xcode by typing the word Xcode into the textbox next to the hourglass. Press return to search for Xcode. You will be presented with a list of apps, and Xcode should be the first app in the list. Install Xcode by clicking the button with the word free next to the Xcode icon. See Figure 1-1
CHAPTER 1 ■ HELLO WORLD
Creating a New Project
Open Xcode by going to your Applications folder and clicking the Xcode app. You will be presented with a welcome screen that includes text that reads Create a new Xcode project (see Figure 1-2). Click the text Create a new Xcode project to get started.
CHAPTER 1 ■ HELLO WORLD
The next screen that appears will list options for creating apps both for iOS and Mac. In this book, you will be using a Mac Command Line Tool app, so set up this by choosing OSX ➤ Application ➤ Command Line Tool.
When the next screen appears, just give your new project a name, choose the type Foundation, leave the other settings as they are, and then click Next.
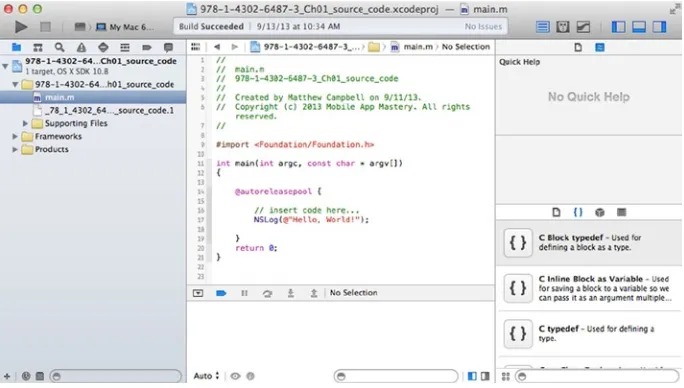
Now choose a folder to save the Xcode project on your Mac. Once you do this, an Xcode screen will appear. The Xcode screen will include a list of files on the left and a code editor in the center (see Figure 1-3).
Figure 1-3. Code editor and project navigator
Hello World
Writing Hello World in code is what we do when want to make sure that we have set up a code project correctly. Xcode makes this really easy to do because new Command Line Tool projects come with Hello World already coded.
CHAPTER 1 ■ HELLO WORLD
When you do this you will see code that looks a bit like this:
#import <Foundation/Foundation.h>
int main(int argc, const char * argv[]){ @autoreleasepool {
// insert code here... NSLog(@"Hello, World!"); }
return 0; }
Much of the code above sets up the application, starting with the #import statement. This statement imports the code that you need, called Foundation, for your Objective-C program to work.
The next part of the code above is the function named main, which contains all the program code and returns the integer 0 when the program is complete.
Inside the main function you will see an Objective-C auto release pool. Auto release pools are required to support the memory management system used with Objective-C. The auto release pool is declared with the @autoreleasepool keyword.
In the middle of all this code, you can see the Hello World code, which looks like this:
NSLog(@"Hello, World!");
The first piece of this is the function NSLog. NSLog is used to write messages to the
CHAPTER 1 ■ HELLO WORLD
Note
■
By default the console log is hidden along with the debugger at the bottom of the
screen. To see these two components you must unhide the bottom screen by clicking the
Hide or Show Debug Area toggle located in the top right-hand part of the Xcode screen.
This button is located in the middle of a set of three buttons.
The string Hello World is enclosed with quotes ("") and the Objective-C escape character @. The @ character is used in Objective-C to let the compiler know that certain keywords or code have special Objective-C properties. When @ is before a string in double quotes, as in @"Hello, World!", it means that the string is an Objective-C NSString object.
Code Comments
There is one more line of code that Xcode helpfully inserted into this project for you. This line of code is a good example of a code comment and begins with these two special characters: //. Here is what the code comment looks like:
// insert code here...
Code comments are used to help document your code by giving you a way to insert text into the program that will not be compiled into a working program.
CHAPTER 1 ■ HELLO WORLD
Build and Run
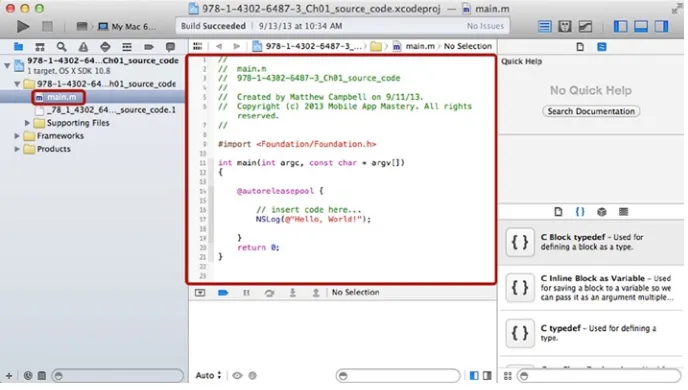
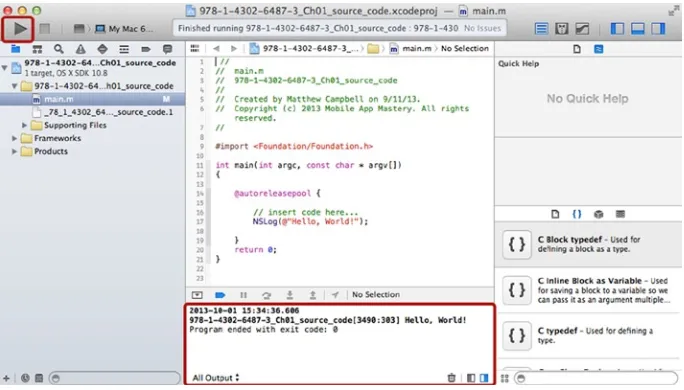
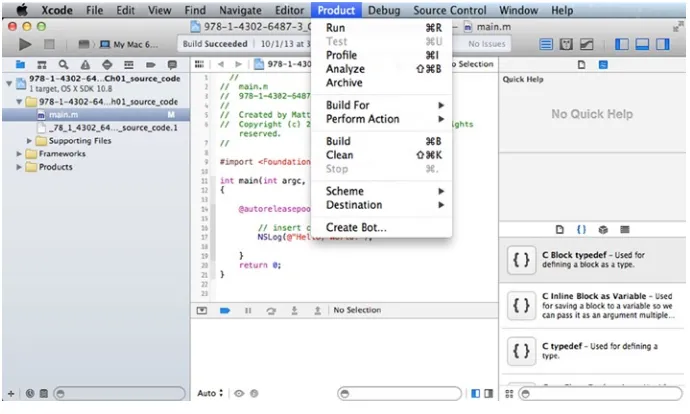
To test the code, click the Run button in the top upper left area of the Xcode screen. See Figure 1-6 to see which button to push.
When you click the Run button, Xcode will compile the code in the Xcode project and then run the program. The program you have been working on will print out the words Hello World. You can see the output circled in Figure 1-6.
Figure 1-6. Building and running the Hello World code
Where to Get More Information
This book is a quick reference for Objective-C, and I have focused on the code and patterns that I judge will be most useful for most people. However, this means that I can’t include everything in this book.
The best place to get complete information on Objective-C and the Mac and iOS applications that you can create with Objective-C is the Apple Developer web site. You can get to the Apple Developer web site by using a web browser to navigate to
http://developer.apple.com/resources.
CHAPTER 2
Build and Run
Compiling
Objective-C code needs to be turned into machine code that runs on an iOS device or a Mac. This process is called compiling, and Xcode uses the LLVM compiler to create machine code. Xcode templates used to create new projects, like you did in Chapter 1, will have the settings that the compiler needs to set this up for you.
Building
Compiling code is usually only part of the process involved with creating an app. Apps destined to be distributed to Mac and iPhone users require other resources in addition to the compiled code. This includes content like pictures, movies, music, and databases.
These resources, along with an app directory structure, are all packed into a special file called a Bundle. You will use Xcode to compile your source code and then package everything into the bundle that you need for you app. This process is called Building in Xcode.
CHAPTER 2 ■ BUILD AND RUN
Build and Run
Use the Build and Run button (see Figure 2-2) located in the upper left-hand area of your Xcode screen (this is an arrow that looks like a play button) to build your app.
CHAPTER 2 ■ BUILD AND RUN
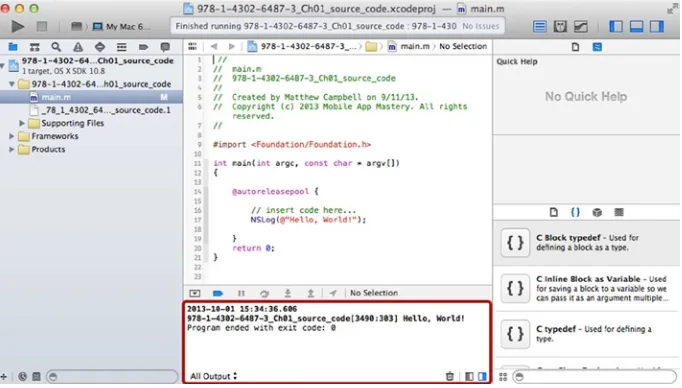
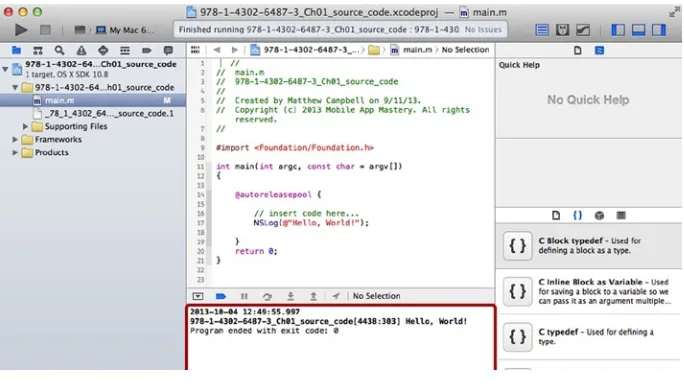
Xcode will not only build your app, but execute the code as well. If you click the Build and Run button for the current program, you should see the following text appear in your console log (also shown in Figure 2-3):
Figure 2-3. Console log’s Hello World output
2014-01-12 06:22:48.382
Ch01_source_code[13018:303] Hello, World! Program ended with exit code: 0
Your output won’t match mine exactly, but you should see the words Hello World! and the name of your project on the screen.
Note
CHAPTER 3
Variables
Variables Defined
Objective-C stores information in variables. These are divided into two types: primitive types and composite types. Primitive variables store one piece of information, such as a number or a character. Composite variables store a set of information, such as three related numbers and a character.
Data Types
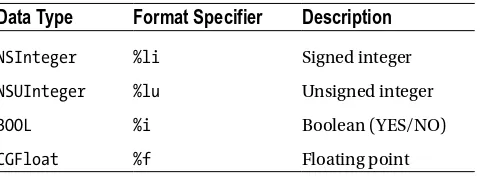
Table 3-1 shows the most common primitive data types that you will see in Objective-C.
Table 3-1. Objective-C Data Types
Data Type
Format Specifier
Description
NSInteger %li Signed integer
NSUInteger %lu Unsigned integer
BOOL %i Boolean (YES/NO)
CGFloat %f Floating point
Note
CHAPTER 3 ■ VARIABLES
Declaring Variables
Variables are declared in Objective-C with their data type first, followed by a variable name. You must declare a variable before using it. Variable names should be meaningful, but you can name a variable anything that you want.
Here is how you would declare an integer in Objective-C:
NSUInteger numberOfPeople;
Assigning Values
You can use the assignment operator (=) to assign a value to a variable, like so:
numberOfPeople = 100;
Once you have assigned a value, you can retrieve and use that value by referencing the variable name.
NSLog(@"The number of people is %lu", numberOfPeople);
Note
■
You may have noticed that the NSLog statement required the %lu symbol. This
symbol is called a format specifier and NSLog will use it as a placeholder to insert values in
the comma-separated list that appears right after the string. See Table
3-1
for a list of the
format specifiers that you must use with Objective-C data types.
You can also declare variables and assign values on the same line if you like.
NSUInteger numberOfGroups = 20;
Integer Types
Integers are whole numbers, so any number that doesn’t need a decimal point is an integer. In Objective-C, integers are expressed with the data types NSInteger and
NSUInteger.
NSUIntegers are unsigned integers, which means that they can only be positive numbers. The maximum value that an NSUInteger can take depends on the system for which the Objective-C code is compiled. If you compile for a 64-bit Mac, the maximum value will be 18,446,744,073,709,551,615.
For 32-bit platforms like the iPhone 5 and below, the maximum value is
4,294,967,295. You can check these numbers yourself using the NSUIntegerMax constant.
CHAPTER 3 ■ VARIABLES
NSIntegers are signed integers, which means that they can be either positive or negative. The maximum value of an NSInteger is half of the NSUInteger value because
NSInteger must support both positive and negative numbers.
So, if you need huge numbers, you may need to stick to NSUInteger, but if you need to handle both positive and negative numbers, you will need NSInteger. You can check the minimum and maximum value of NSInteger on your system with the NSIntegerMin
and NSIntegerMax constants.
NSLog(@"NSIntegerMin is %li", NSIntegerMin); NSLog(@"NSIntegerMax is %li", NSIntegerMax);
Boolean Types
Boolean date types are used when values can either be true or false. In Objective-C, this data type is declared as a BOOL type. BOOL types have values that are either YES or NO.
BOOL success = YES;
Since Objective-C stores BOOL values as 1 for YES and 0 for NO, you must use the %i
format specifier print out a BOOL value. %i is another format specifier for integers.
NSLog(@"success is %i", success);
The NSLog statement above will print out 1 for YES and 0 for NO, but some people prefer to see the YES or NO strings printed out to the log. You can do so using this alternate statement:
NSLog(@"success: %@", success ? @"YES" : @"NO");
Here the variable success was replaced with a statement that has to be evaluated. This statement will return either the string YES or the string NO depending on the value of the variable success. If success is zero, then whatever is in the last position of the statement is returned, and if success is any other value then whatever is in the first position is returned. The ternary operator (?) tells the compiler to evaluate the statement.
Float Types
Float types are represented in Objective-C with the CGFloat data type. CGFLoat is what you use when you want decimal places in your number. For example, if you want to represent a percent, you may do something like this:
CGFloat percent = 33.34;
CHAPTER 3 ■ VARIABLES
Scope
Like most programming languages that trace their history back to C, Objective-C variables have their scope determined by the placement of these curly brackets, { }. When you enclose lines of code in { }, you are defining a block of code. Variables placed inside a block of code can only be used from inside that block of code. This is called scope.
For example, let’s take the previous example that declared an unsigned integer called
numberOfPeople, assigned a value to this variable, and then printed this value out to the log.
NSInteger numberOfPeople; numberOfPeople = 100;
NSLog(@"The number of people is %li", numberOfPeople);
This code works perfectly fine because the variable numberOfPeople remains in scope the entire time you need it to. But if you use curly brackets to enclose the first two lines of code in their own region, the variable will work when you assign the value but not when you attempt to write out the value to the log. You will not be able to compile your program if you try to write out numberOfPeople to the log outside of the scope defined by the curly brackets.
{
NSInteger numberOfPeople; numberOfPeople = 100; }
NSLog(@"The number of people is %li", numberOfPeople);
CHAPTER 4
Operators
Operators Defined
Operators are used to perform operations on values. You can do arithmetic, assignment, logical, and relational operations with operators.
Arithmetic Operators
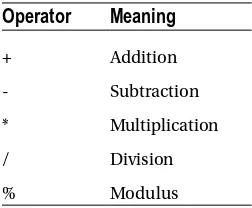
Arithmetic operators are used to perform math on values. You can use arithmetic operators to perform addition, subtraction, multiplication, division, and modulus (the remainder from a division operation). Table 4-1 lists Objective-C’s arithmetic operators.
Table 4-1. Arithmetic Operators
Operator
Meaning
+ Addition - Subtraction * Multiplication / Division % Modulus
An operation will look like a math problem.
1.0 + 2.0 – 3.0 * 4.0 / 5.0;
The result from the line of code above won’t do much because the result isn’t being stored or used in a function. You can use the results of an operation immediately in a function like:
CHAPTER 4 ■ OPERATORS
You can also use an assignment operator to store the result in a variable to be used later on.
CGFloat t2 = 1.0 + 2.0 - 3.0 * 4.0 / 5.0;
You may notice that floating point numbers are used in the operations above. Each number in the expression has a decimal point and zero, and the t2 variable data type is
CGFloat. This was deliberate because I suspected that the operation would result in a fractional number, requiring a floating point variable to be represented correctly.
Note
■
Using the correct data types is essential when doing arithmetic operations, and
the compiler will assume that any number without a decimal place is an integer. Operations
involving only integers will return integers, which means that the result will be rounded.
This could easily lead to unexpected results in your calculations.
Operator Precedence
Operators are evaluated from left to right. Multiplication, division, and modulus operators are evaluated before addition and subtraction operators. If you want to change the order that operators are evaluated, you can enclose parts of the expression in parentheses. Doing this will change the results of your expressions, as shown:
NSLog(@"%f", 1.0 + 2.0 - 3.0 * 4.0 / 5.0); // 0.600000 NSLog(@"%f", 1.0 + (2.0 - 3.0 * 4.0) / 5.0); // -1.000000 NSLog(@"%f", (1.0 + 2.0 - 3.0 * 4.0) / 5.0); // -1.800000
Assignment Operators
The assignment operator (=) is used to assign a value to a variable. You can assign a value or the results of an operation to a variable using the assignment operator.
NSUInteger t2 = 100; NSUInteger t3 = 10 * 10;
Increment and Decrement Operators
You can combine the addition and subtraction operators with the assignment operator as a shortcut. Add a ++ to the variable name and the value will be incremented by 1 and automatically assigned to the variable.
CHAPTER 4 ■ OPERATORS
The line of code above will increment t2 by 1, making the value of t2 equal to 101. The following is the longer way of doing the same thing:
t2 = t2 + 1;
You can also reduce the value of t2 by adding the decrement operator (--) to the variable name.
t2--;
Relational Operators
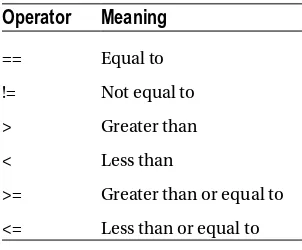
Relational operators are used to evaluate the relationship between two values. When you use relational operators, the result will be a BOOL data type. You can evaluate whether two values are the same or different. See Table 4-2 for a list of the available relational operators.
Table 4-2. Relational Operators
Operator
Meaning
== Equal to != Not equal to > Greater than < Less than
>= Greater than or equal to <= Less than or equal to
Here is an example of how to use a relational operator:
BOOL t4 = 5 < 4;
NSLog(@"t4 = %@", t4 ? @"YES" : @"NO"); // NO
This case seems trivial, but when you have variables whose values you don’t know beforehand, evaluating relational operators is important. Relational operators are also used in if statements, which are a key programming tool. If statements are covered later.
Logical Operators
Logical operators are used when you are evaluating more than one relationship between entities. These operators are used with the relational operators and they also return a
CHAPTER 4 ■ OPERATORS
See Table 4-3 for a list of available logical operators.
Table 4-3. Logical Operators
Operator
Meaning
&& AND
|| OR
! NOT (Reverse result)
Here’s an example of how to use the logical operators:
CHAPTER 5
Objects
Objects Defined
Objective-C objects are entities that contain both behavior and attributes in one place. Behaviors are coded in methods while attributes are coded in properties. Objects can also include private instance variables. Private instance variables are used when data storage is required, but not needed to be shared.
NSObject Class
NSObject is the root class in Objective-C. A class is a definition that has all the code needed to make an object’s methods and properties work. NSObject is called the root class because it has all the code needed to make objects work in Objective-C and every other class inherits from the NSObject class.
Object Declaration
A class is used like a data type. Data types are used to declare a variable and you have many variables for each data type. A class is used to declare an object and you can have one class with many objects.
Here is how you would declare an NSObject object:
NSObject object;
Object Constructors
While data type variables can just be assigned to a value, objects require functions called constructors. Constructors assign memory resources to the object and do any setup that the object needs to function. Usually, you will see constructors split up into two functions called alloc and init.
CHAPTER 5 ■ OBJECTS
The init function will sometimes have a different name, but it will usually start with the letters init. For example, here is a constructor for an NSURL object that will point to my web site:
NSURL *url = [[NSURL alloc] initWithString:@"https://mobileappmastery.com"];
Notice that instead of init you have initWithString:. There aren’t any rules, other than convention, when it comes to names of constructors.
While the pattern of alloc and init is the most common, you will also see object creation with other function names and with the new keyword.
NSDate *today = [NSDate date]; NSObject *object2 = [NSObject new];
While the new constructor is uncommon, the new keyword can be used in place of
alloc and init. Constructors other than new, alloc, and init are used for temporary objects. The date object above is an example of an object that is used on a temporary basis because you usually just want to get a timestamp and move on. There is no reason to maintain an object like this for a long time.
Note
■
Temporary objects like the date object in the example are used more often
in projects where ARC is not being used for memory management. ARC, or Automatic
Reference Counting, is a system that manages each object’s memory requirements.
Projects built with ARC use temporary objects like the date object above when functionality
is needed, but the object doesn’t need to be maintained for any length of time.
Object Format Specifier
When you want to use NSLog to print out data type values you must use a format specifier like %lu, %li, %f, or %i. The value gets substituted into the NSLog string, giving you a way to observe variable values. You can do this with objects as well.
NSObject objects and every object that derives from NSObject use the %@ format specifier. The output you get from NSLog depends on the type of object. If you print out the object from the example above like this
NSLog(@"object = %@", object);
you will get output that gives you details about the object including the class name and memory address.
CHAPTER 5 ■ OBJECTS
Other objects will report back more specific information; what gets reported back depends on the type of object. If you tried the same trick with the url NSURL object like this
NSLog(@"website = %@", url);
the console would present a listing of the web site URL.
website = https://mobileappmastery.com
Messages
When you want an object to do something, you send a message to the object. Sending a message directs the object to execute the method defined in the class that corresponds to the message.
For instance, you could remove a file from your shared directory by sending a message to an NSFileManager object.
NSFileManager *fileManager = [NSFileManager defaultManager]; [fileManager removeItemAtPath:@"/Users/Shared/studyreport.txt" error:nil];
The first line of code above is declaring an NSFileManager object named
fileManager. In the second line of code, you can see the example of the message being sent. The message is removeItemAtPath:error: and you send this message by writing this out and including the parameters (here, these are the item to remove and an optional error object). All of this is enclosed in square brackets, [ ], and ends with a semi-colon.
If you were to look at the class definition in the header file for NSFileManager, you would find the declaration for this method:
- (BOOL)removeItemAtPath:(NSString *)path error:(NSError **)error;
CHAPTER 6
Strings
NSString
NSString is the class used in Objective-C to work with strings. NSString manages the list of characters that forms a string. NSString objects are immutable, which means that once you create an NSString object you can’t change it.
NSString objects can be created with many different constructors, but the most common way you’ll see NSString objects created is with the @ symbol followed by quotes. In fact, you’ve seen this already in the Hello World example from Chapter 1.
NSLog(@"Hello, World!");
That parameter is an NSString object, although it’s hard to see since you don’t need the explicit NSString declaration here. More often you will see NSString objects created like this:
NSString *firstName = @"Matthew"; NSString *lastName = @"Campbell";
Here is another NSString constructor, stringWithFormat:, that is used often when other variables and objects are used to compose a new string:
NSString *n = [NSString stringWithFormat:@"%@ %@", firstName, lastName];
This constructor, stringWithContentsOfFile:encoding:error:, is used to create a new NSString object based on the contents of a file.
NSString *fileName = @"/Users/Shared/report.txt"; NSString *fileContents = [NSString
stringWithContentsOfFile:fileName
CHAPTER 6 ■ STRINGS
NSMutableString
Sometimes you want to be able to add or remove characters to a string as your program executes. For instance, you may want to maintain a log of changes users make in your program and you don’t want to create new strings each time a change is made. These situations call for NSSMutableString.
You can use the same constructors to create NSMutableString objects except for the shortcut where you assign an object to a string contained in @"". To create a simple
NSMutableString, use the stringWithString: constructor.
NSMutableString *alpha = [NSMutableString stringWithString:@"A"];
Inserting Strings
You can insert strings into a mutable string at any point in the list of characters that make up the mutable string. You just have to be sure that the insertion point that you specify is in range of the list of characters. Don’t attempt to insert a string in position 20 if your string is only 10 characters long. You can find out the length of a string by sending the
length message to the string.
To insert a string, you will need to specify both the string that you want to insert and the starting position. Here is how you would insert a B into the alpha mutable string:
[alpha insertString:@"B"
atIndex:[alpha length]];
Here you are sending the insertString:atIndex: message. The first parameter is @"B", which is the string you want to add to the mutable string A. The atIndex:
parameter is the length of the alpha string since you want to append the B to the end of the A string to produce @"AB".
If you really just want to append a string, there is an even easier method available to do that. You can send the appendString: message, which only requires the string parameter. The insertion point is not required because it is assumed that the string will be appended to the end of the mutable string.
[alpha appendString:@"C"];
Deleting Strings
CHAPTER 6 ■ STRINGS
NSRange range; range.location = 1; range.length = 1;
[alpha deleteCharactersInRange:range];
This code will delete the B from the ABC string you created in the previous steps.
Note
■
When you use NSRange, you should keep in mind that strings are stored as a list
of letters that start with the index of 0.
Find and Replace
Anyone who has used a word processor knows how convenient the find and replace function can be. You just supply the program with the text that you want to replace and the text that you want in its place. NSMutableString also has this ability.
To do find and replace with a mutable string you will need to define a range and supply the string that you are looking for and the string that you put in the first string’s place. There are also search options that you can specify.
range.location = 0; range.length = 2;
[alpha replaceOccurrencesOfString:@"AC"
withString:@"ABCDEFGHI" options:NSLiteralSearch range:range];
The first thing you are doing here is reusing the NSRange range variable to specify what part of the string you want to look at. You are going to start at the beginning and search the entire length of the string.
Next, you define the string that you want to replace, @"AC", and the string that you want to use as a replacement, @"ABCDEFGHI".
In the options you set the NSLiteralSearch option. This means that the method will require an exact match for your strings. You could also specify NSCaseInsensitiveSearch
to ignore case and NSRegularExpressionSearch, which lets you use a regular expression.
Note
■
Regular expressions are a tool used to search strings for patterns. They are used
in many programming languages. A full explanation of regular expressions is out of the
scope of this book, but worth looking into if you spend a lot of time working with strings.
CHAPTER 7
Numbers
NSNumber
NSNumber is the class used in Objective-C to work with numbers. NSNumber gives you a way to turn floating point and integer values into object-oriented number objects. While you can’t use NSNumber objects in expressions, NSNumber objects become useful when complicated formatting is required.
NSNumber objects can be created with many different constructors, but the most common way you’ll see NSNumber objects created is with the @ symbol followed by a number.
NSNumber *num1 = @1; NSNumber *num2 = @2.25;
Sometimes you may want to use special constructors that are matched to numbers stored in a particular way.
NSNumber *num3 = [NSNumber numberWithInteger:3]; NSNumber *num4 = [NSNumber numberWithFloat:4.44];
Converting to Primitive Data Types
NSNumber objects can’t be used in expressions, but NSNumber has some built-in functions that will return the object in a primitive data type form. You will have to use these functions to convert numbers before using them in expressions.
CGFloat result = [num1 floatValue] + [num2 floatValue];
The function used above is floatValue but there are more like intValue and
doubleValue that match primitive data types from C programming like int and
CHAPTER 7 ■ NUMBERS
Formatting Numbers
NSNumber becomes very useful when you want to format numbers for displays in reports and presentations. When used with the NSNumberFormatter class you can output numbers as localized currency, scientific notation, and they can even be spelled out.
To do this, you must create a new number formatter and then set the formatting style that you want to use.
NSNumberFormatter *formatter = [[NSNumberFormatter alloc] init]; formatter.numberStyle = NSNumberFormatterCurrencyStyle;
Then you can send the stringFromNumber: message to get the formatted number. Here is an example of doing this in the context of using NSLog to write a message to the console:
NSLog(@"Formatted num2 = %@", [formatter stringFromNumber:num2]);
This will output $2.25 from my computer since I’m set up in the United States. Your output will differ depending on the locale that you have set on your Mac or iOS device.
Converting Strings into Numbers
You can also convert a string into a number. If you have a number represented as a string, you can use a number formatter to convert the string into an NSNumber object.
Just change the number formatter style to the style in which the number was stored. Then create a new NSNumber object with the NSNumberFormatter numberFromString:
message. Here is how to convert the string “two point two five” into the number 2.25:
formatter.numberStyle = NSNumberFormatterSpellOutStyle;
CHAPTER 8
Arrays
NSArray
NSArray is a class used to organize objects in lists. NSArray can maintain an index of objects, search for objects, and enumerate through the list. Enumeration is the process of moving through a list one item at a time and performing an action on each item in the list. To create an array, you include a comma-separate list of objects enclosed in square brackets and started with the @ symbol.
NSArray *numbers = @[@-2, @-1, @0, @1, @2];
NSArray *letters = @[@"A", @"B", @"C", @"D", @"E", @"F"];
The NSArray object numbers has a list of NSNumber objects, while letters has a list of strings. Any object can be put into an NSArray object, but not primitives like NSInteger.
Referencing Objects
You put objects in arrays so that you have an easy way of getting references to these objects later. The general way of getting these references is to send an objectAtIndex:
message to the array. Here is how to get the number object reference from the second position in the numbers array:
NSNumber *num = [numbers objectAtIndex:1];
If you know that you want the last object in the list, you use lastObject to return the last object in the list.
Note
■
Array indexes in Objective-C start with 0.
CHAPTER 8 ■ ARRAYS
Sometimes you might already have a reference to the object in question, but you want to find out the index number that corresponds to the object’s position in the array. You can use indexOfObject: to get this information.
NSUInteger index = [numbers indexOfObject:num];
Enumeration
Enumeration is the process of moving through a list one item at time. Usually, you will be performing some type of action on each item, like writing out the object’s contents to the log or modifying a property on the object.
Blocks, or anonymous functions, are used to perform enumeration with arrays. Blocks are functions that are not attached to an object. You can define a block on enclosing lines of code in curly brackets. Blocks can be treated like objects, which means that you can pass a block to an enumeration method just like you could do for a variable or an object.
Note
■
Blocks deserve their own treatment, apart from their use in arrays, and so more
details about using blocks will be covered in Chapter 20.
Let’s say you want to go through the array of numbers and print out each
number’s value when squared. You could enumerate through the list using the NSArray enumerateObjectsUsingBlock: method. This method will give you a reference to the current object, which you can use to perform this simple operation.
[numbers enumerateObjectsUsingBlock:^(id obj, NSUInteger idx, BOOL *stop) { NSLog(@"obj ^ 2= %f", [obj floatValue] * [obj floatValue]);
}];
All of the code after the colon is the block code. This block starts with the ^ symbol. Then you can see a comma-separated list of parameters followed up by curly brackets. The code inside the curly brackets is the block, and the parameters declared in the parentheses are the variables that the block can reference.
NSMutableArray
More often than not, you need to be able to add and remove items from an array as your program executes code. You could be maintaining a list of action items or video game characters. When you need to do this, you can use NSMutableArray.
CHAPTER 8 ■ ARRAYS
You can’t use the shortcut for array creation here, though, and NSMutableArray will require you to use a constructor, like this:
NSMutableArray *mArray = [NSMutableArray arrayWithArray:@[@-2, @-1, @0]];
The constructor used above is arrayWithArray: and you just passed on an NSArray object to this constructor to get started.
To add an object to a mutable array, you use the addObject: message.
[mArray addObject:@1];
To remove an object, you must use the removeObject: message and pass a reference to the object that you want to remove.
[mArray removeObject:@1];
If you want to exchange one object with another, you can use the method
exchangeObjectAtIndex:withObjectAtIndex:.
[mArray exchangeObjectAtIndex:0 withObjectAtIndex:1];
CHAPTER 9
Dictionaries
NSDictionary
NSDictionary is a class used to organize objects in lists using keys and values.
NSDictionary can maintain an index of objects and let you retrieve an object if you have the right key. Usually, the key will be an NSString object while the value will be whatever type of object you are indexing.
To create a dictionary, you include a comma-separate list of key value pairs enclosed in curly brackets and started with the @ symbol.
NSDictionary *d1 = @{@"one": @1, @"two": @2, @"three": @3};
This creates a dictionary of NSNumber objects that you can reference with their string keys. So, the key string @"one" can be used to retrieve the NSNumber object 1.
Referencing Objects
You put objects in dictionaries so that you have an efficient way of getting references to these objects bases on keys. The general way of getting these references is to send an
objectForKey: message to the dictionary. Here is how to get the number referenced by the key @"one":
NSNumber *n1 =[d1 objectForKey:@"one"];
Enumeration
Enumeration is the process of moving through a list one item at time. Usually, you will be performing some type of action on each item, like writing out the object’s contents to the log or modifying a property on the object.
You can enumerate through a dictionary in almost the same way as you do with an array. But you will get a reference to each key in the dictionary as well as each object.
[d1 enumerateKeysAndObjectsUsingBlock:^(id key, id obj, BOOL *stop) { NSLog(@"key = %@, value = %@", key, obj);
CHAPTER 9 ■ DICTIONARIES
Just like with the array enumeration procedure discussed in Chapter 8, the block code declaration starts with the ^ character and the block code is enclosed in the curly brackets, { }.
Here is the output that would be generated with this message:
key = one, value = 1 key = two, value = 2 key = three, value = 3
NSMutableDictionary
NSDictionary is an immutable object, so once you create an NSDictionary object you can’t add or remove items from the dictionary. If you need to add or remove items from a dictionary, you must use the NSMutableDictionary class.
You can’t use the shortcut for array creation here, though, and NSMutableDictionary
requires you to use a constructor, like this:
NSMutableDictionary *md1 = [[NSMutableDictionary alloc] init];
The easiest thing to do is to follow the alloc and init pattern to create an empty dictionary to which you can add objects. When you are ready to add an object to the dictionary, you will need a key and the value that you want to add. These two parameters will be supplied to the setObject: for Key: method.
[md1 setObject:@4 forKey:@"four"];
To remove an object, send the removeObjectForKey: message and supply the key.
[md1 removeObjectForKey:@"four"];
You can remove every object from a mutable dictionary by sending the
removeAllObjects message.
CHAPTER 10
For Loops
For Loops Defined
Loops are used when you want to repeat a similar type of task many times. For loops are used when you know beforehand how many times you want to repeat a similar line of code. Here is a for loop that will write to the console window 10 times:
for (int i=0; i<10; i++) { NSLog(@"i = %i", i); }
This for loop will produce this output:
i = 0 i = 1 i = 2 i = 3 i = 4 i = 5 i = 6 i = 7 i = 8 i = 9
Let’s take a closer loop at the parts of this loop. The first thing is the for keyword. This lets the compiler know that you are coding a for loop.
Next, you have a series of code lines enclosed in parenthesis: (int i=0; i<10; i++). These lines of code specify a starting condition (int i=0;), an ending condition (i<10), and an increment instruction (i++). This means that the loop will repeat 10 times by starting at 0 while the variable i increases by 1 each time the loop executes as long as
i is less than 10.
CHAPTER 10 ■ FOR LOOPS
For Loops and Arrays
More often than not, you will use a for loop to go through a list and do something with each object in that list. Let’s assume that you have an array named list that has a five
NSNumber objects ranging from -2.0 to 2.0.
NSArray *list = @[@-2.0, @-1.0, @0.0, @1.0, @2.0];
Let’s say that you want to construct a string that includes all values in list but spelled out with words. For example, you want a string minus two, minus one, etc. You would need to use NSNumberFormatter and an NSMutableString, both of which have been covered in the chapters on numbers and strings.
Just to set this up, let’s get the number formatter, mutable string, and array before you go into the for loop.
NSArray *list = @[@-2.0, @-1.0, @0.0, @1.0, @2.0]; NSMutableString *report = [[NSMutableString alloc] init]; NSNumberFormatter *formatter = [[NSNumberFormatter alloc] init]; formatter.numberStyle = NSNumberFormatterSpellOutStyle;
Note that you are specifying NSNumberFormatterSpellOutStyle here so that the number formatter can give you the value of each number object spelled out.
Since you want the for loop to move through each number in the array list, you will need to find out how many objects are contained in list. NSArray objects have a count
property that you can use to get the number of objects contained in the array, and you can use this value directly in the for loop.
for (int i=0; i<list.count; i++) {
NSNumber *num = [list objectAtIndex:i];
NSString *spelledOutNum = [formatter stringFromNumber:num]; [report appendString:spelledOutNum];
[report appendString:@", "]; }
What you are doing above is going through each object in list and getting a reference to the number in the list that corresponds to the index that is associated with the current value of i.
Next, you use the number formatter to get the spelled-out string version of the number. Finally, you append this spelled-out string value to the end of the mutable string. Here is what the output would look like:
CHAPTER 11
While Loops
While Loops Defined
Like for loops, while loops are used when you want to repeat a similar type of task many times. While loops are used when you want to execute a line of code many times until a condition is met. Here is a while loop that will write to the console window 10 times:
int i = 0;
while (i < 10) {
NSLog(@"i = %i", i); i++;
}
This while loop will produce this output:
i = 0 i = 1 i = 2 i = 3 i = 4 i = 5 i = 6 i = 7 i = 8 i = 9
The loop above does the same thing as the for loop from Chapter 10, but note that the specifications for the loop are in different spots. The first thing that you will notice is that you need to have a counter variable on hand to use in a while loop. You can’t just put the counter variable right in the body of the loop like you did before. So you need a separate line of code before the while loop to declare and assign the counter variable.
CHAPTER 11 ■ WHILE LOOPS
Then you have the while loop itself that is started with the while keyword. In the parentheses after the while keyword is the ending condition, (i < 10). This means that the loop will go on as long as the value of i is less than 10.
Finally, you have a code block defined by curly brackets. The code contained in these curly brackets will execute each time you go through the loop. You have one line of code,
NSLog(@"i = %i", i);, to write to the log. You also increment the counter variable in this code block, i++;.
Note
■
It’s important to remember to increment the counter variable here. If you don’t do
this, then i will never go beyond 10. The loop will never end, which will effectively cause
your program to hang until a user terminates it.
While Loops and Arrays
Now let’s go ahead and repeat the example from Chapter 10 where you formatted a list of numbers in an array with a loop. This is the array and other objects that you worked with in Chapter 10:
NSArray *list = @[@-2.0, @-1.0, @0.0, @1.0, @2.0]; NSMutableString *report = [[NSMutableString alloc] init]; NSNumberFormatter *formatter = [[NSNumberFormatter alloc] init]; formatter.numberStyle = NSNumberFormatterSpellOutStyle;
You are going to do the same thing you did in Chapter 10, but you will use the while
loop instead.
int i = 0;
while(i < list.count) {
NSNumber *num = [list objectAtIndex:i];
NSString *spelledOutNum = [formatter stringFromNumber:num]; [report appendString:spelledOutNum];
[report appendString:@", "]; i++;
}
What you are doing above is going through each object in the list and getting a reference to the number in the list that corresponds to the index that is associated with the current value of i.
CHAPTER 12
Do While Loops
Do While Loops Defined
Do while loops are used for the same reasons as for loops and while loops. The syntax is different, and do while loops are notable because the code in the block will execute at least once. This is because the ending condition is not evaluated until the end of the loop. Here is how you would code a do while loop to count to 10:
int i = 0;
do{
NSLog(@"i = %i", i); i++;
}while (i <10);
This do while loop will produce this output:
i = 0 i = 1 i = 2 i = 3 i = 4 i = 5 i = 6 i = 7 i = 8 i = 9
The loop above does the same thing as the for loop from Chapter 10 and the while
loop in Chapter 11. The specifications for the do while loop are similar to the while loop but they are located in different lines of code.
Like the while loop, you need to have a counter variable on hand.
CHAPTER 12 ■ DO WHILE LOOPS
Then you have the do while loop itself that is started with the do keyword. Immediately after the do keyword you have a code block defined by curly brackets. The code contained in these curly brackets will execute each time you go through the loop. You have one line of code, NSLog(@"i = %i", i);, to write to the log. You also increment the counter variable in this code block, i++;.
The condition (i < 10) is after the while keyword right after the code block. This means that the loop will go on as long as the value of i is less than 10.
Note
■
It’s important to remember to increment the counter variable here. If you don’t do
this, then i will never go beyond 10, and the loop will never end, which will effectively cause
your program to hang until a user terminates it.
Do While Loops and Arrays
Now let’s go ahead and repeat the example from Chapter 10 and Chapter 11 where you formatted a list of numbers in an array with a loop. This is the array and other objects that you worked with in Chapter 10 and Chapter 11:
NSArray *list = @[@-2.0, @-1.0, @0.0, @1.0, @2.0]; NSMutableString *report = [[NSMutableString alloc] init]; NSNumberFormatter *formatter = [[NSNumberFormatter alloc] init]; formatter.numberStyle = NSNumberFormatterSpellOutStyle;
You are going to use the do while loop instead.
int i = 0; do {
NSNumber *num = [list objectAtIndex:i];
NSString *spelledOutNum = [formatter stringFromNumber:num]; [report appendString:spelledOutNum];
[report appendString:@", "]; i++;
}while(i < list.count);
NSLog(@"report = %@", report);
You will end up with a mutablable string that you can write out to the console log. The output will look like this:
CHAPTER 13
For-Each Loops
For-Each Loops Defined
For-each loops are a more specific type of loop that can only be used with collection objects like NSArray and NSDictionary. You can use a for loop when you want to move through a list of objects to perform an action on each object in the list.
For example, let’s take the array example from Chapter 8.
NSArray *numbers = @[@-2, @-1, @0, @1, @2];
In Chapter 8, you used the enumeration method with a block to go through the list and square each number. You can use a for loop as an alternative to the enumeration method.
for (NSNumber *num in numbers){
NSLog(@"num ^ 2= %f", [num floatValue] * [num floatValue]); }
This loop starts with the for keyword before a specification in parentheses. The specification starts with an object type (NSNumber) and a variable that will give you a reference to the current object in the list, (*num).
Next, you can see the keyword in followed by the array (numbers). Taken all together, you can read this as “for each number num in the array numbers, do something.” The something here is defined in the code block that comes right after the first part of the loop. It will go through the entire array and square each number, producing the following output:
CHAPTER 13 ■ FOR-EACH LOOPS
For Loops with NSDictionary
Dictionaries are a little bit more complicated than arrays because dictionaries maintain a list of keys and objects. You might expect that a for each loop used on a dictionary would yield a list of objects; however it turns out that you will just get a list of the dictionary keys.
So, if you code a for each loop with an NSDictionary, as in
NSDictionary *d1 = @{@"one": @1, @"two": @2, @"three": @3}; for (id object in d1){
NSLog(@"object = %@", object); }
you will get output that lists out all the keys like this :
object = one object = two object = three
If you want to output values in the dictionary, you will need to send the
objectForKey: message to the dictionary.
for (id object in d1){
NSNumber *num = [d1 objectForKey:object]; NSLog(@"num = %@", num);
}
This for loop will print out the values of the objects.
CHAPTER 14
If Statements
If Statements Defined
If statements are used when you want to make a choice to execute code based on the trueness of a condition. To make this work, you evaluate an expression that uses relational operators to yield a YES or NO result. If you evaluate an express to be true, then you can execute the code; otherwise you can ignore the code.
You need the if keyword and an expression here along with a code block to use the if statement.
if(1 < 2){
NSLog(@"That is true"); }
The statement is saying that if 1 is less than 2, then execute the code that will print out the string “That is true” to the console log.
Else Keyword
You can also define an alternate action with the else keyword. This gives you a way of executing either one of two actions based on the results of the expression that you are evaluating.
if(1 < 2){
NSLog(@"That is true"); }
else{
CHAPTER 14 ■ IF STATEMENTS
Nested If Else
Each if statement can contain nested if statements. This gives you a way of testing multiple conditions. Generally speaking, it’s best to limit yourself to three nested if statements at most. Here is what a nested if statement looks like:
if(1 > 2){
NSLog(@"True"); }
else{
if(3 > 4){
NSLog(@"True"); }
else{
NSLog(@"Not True"); }
}
If Statements and Variables
Generally you will see if statements used along with variables that are used to keep track of the state of a program. You can use variables inside the parentheses as part of the expression in the if statement or you can test the variables directly.
BOOL isTrue = 1 == 2;
if(isTrue){
NSLog(@"isTrue = %@", isTrue ? @"YES" : @"NO"); NSLog(@"That was a true statement.");
} else{
NSLog(@"isTrue = %@", isTrue ? @"YES" : @"NO"); NSLog(@"That was not a true statement."); }
In the code above, you are assigning the result of an expression to the Boolean variable isTrue and then testing this later on with an if statement.
Here is what you will see in the console log if you test this code for yourself:
isTrue = NO
CHAPTER 15
Switch Statements
Switch Statements Defined
Switch statements are used to execute code based on the value of an integer. To make a switch statement work, you need to define a level variable and then you need to write a code block for each possible value of the level variable that you expect.
For this chapter, let’s assume you are writing code to help you do some geometry work. You have different shapes that you need to work with and you want to calculate the area of each shape. You can keep track of what type of shape you are working with by using an NSInteger variable like shape.
NSInteger shape = 0;
Each value of the NSInteger shape will correspond to a type of shape. Zero could be a square, one could be a parallelogram, and two could be a circle. Variables like shape are called a level variable because they represent possible levels.
For the purposes of this example, you also need a variable to store the results of any calculation you make, which is why you have a float variable named area.
float area;
Switch Keyword
Now, let’s get to the switch statement itself. To start a switch statement, you need the
switch keyword followed by the level variable in parentheses. Also, you should use curly brackets to create a code block for the switch statement.
switch (shape) { }
Case Keyword
CHAPTER 15 ■ SWITCH STATEMENTS
switch (shape) {
case 0:{
float length = 3; area = length * length;
NSLog(@"Square area is %f", area); break;
}
}
What you see above is the case keyword followed by the value that you are testing for, which is 0. Then you have a colon followed by curly brackets that define the code block that will execute whenever the value of shape is 0.
break Keyword
At the end of the code block above you can see the break keyword. This keyword will return control the program back to the main program and outside of the case statement. If this statement didn’t appear, then every line of code after would execute whenever the first case was true (switch statements stop evaluating the level variable once it finds a true value).
Complete Switch Statement
Here is what the statement looks like with multiple case statements:
switch (shape) { case 0:{
float length = 3; area = length * length;
NSLog(@"Square area is %f", area); break;
} case 1:{
float base = 16; float height = 24; area = base * height;
NSLog(@"Parallelogram area is %f", area); break;
} default:{ area = -999;
NSLog(@"No Shape Specified"); break;
CHAPTER 15 ■ SWITCH STATEMENTS
Default Case
If you look closely at the code above, you can see that there is a default keyword. This keyword is used to define a default case, which is a way to define a code block that will execute if none of the other conditions are met. So, if the value of shape happened to be 6 and had no code block defined, you would be sure that at least the code that was included in the default case would execute.
Here is what you will find in the console log if you run the code from this chapter:
CHAPTER 16
Defining Classes
Classes
I covered objects when I demonstrated the Objective-C objects used to work with strings, number, arrays, and dictionaries. Objects are an essential object-oriented programming pattern. While you will often simply use Foundation objects that are already set up for you, usually you will need to define your own types of objects customized for your app.
You can use classes to define your own object types. Classes are code definitions that are used to create objects. The primary purpose of coding class definitions is to express an entity that has attributes and behaviors.
Attributes are called properties when coding classes and behaviors are called methods. Properties are used to describe an object while methods are used to get objects to perform an action.
You need to do two important tasks when defining a class: code an interface and code an implementation.
Class Interfaces
You use a class interface to specify the name of the class and the properties and methods that make up the class. Here is how you would set up a class called Project:
#import <Foundation/Foundation.h>
@interface Project : NSObject
@end
The line of the code that begins with the #import imports the Foundation framework. This framework is needed whenever you want to work with Objective-C classes like
NSObject or NSString (which you almost always do).
In particular, you need to reference NSObject since that will be your base class. A base class is what your class will be derived from and provides a starting point for you.
CHAPTER 16 ■ DEFINING CLASSES
In the line that starts with @interface keyword, you can use the name of the class,
Project, and the base class NSObject, which comes after the colon. The @interface keyword must be matched with the @end keyword.
Property Forward Declarations
Properties require a forward declaration that is coded in the class interface. These belong in the space between the @interface line and @end line.
#import <Foundation/Foundation.h>
@interface Project : NSObject
@property(strong) NSString *name;
@end
Property forward declarations start with the @property keyword followed by a property descriptor in parenthesis. See Table 16-1 for a list of the possible parameter descriptors that you can use.
Table 16-1. Parameter Descriptors
Attribute
Description
Readwrite The property needs both a getter and a setter (default).
Readonly The property only needs a getter (objects cannot set this property).
strong The property will have a strong relationship.
weak The property will be set to nil when the destination object is deallocated.
assign The property will simply use assignment (used with primitive types).
Copy The property returns a copy and must implement the NSCopying
protocol.
retain A retain message will be sent in the setter method.
nonatomic Specifies the property is not atomic (not locked while being accessed).
CHAPTER 16 ■ DEFINING CLASSES
Note
■
Terms like strong, retain, and weak have to do with how memory management
is handled for the property value. Both strong and retain mean that your class objects will
always retain a reference to the property value, which guarantees that the object will stay
in scope for as long as you need it. Property descriptors weak and assign don’t provide this
guarantee.
Method Forward Declarations
Methods also need forward declarations. While properties describe an object, methods represent actions that an object can take. Here is how you would add a forward declaration to the Project class:
#import <Foundation/Foundation.h>
@interface Project : NSObject
@property(strong) NSString *name;
-(void)generateReport;
@end
Method forward declarations start with the minus sign followed by the return type in parenthesis. This method has a void return type, but you can have any datatype or class as a return type for a method.
After that is the method’s signature, which I will talk more about once you see a method that includes parameters. Here is an example of a method that includes parameters:
#import <Foundation/Foundation.h>
@interface Project : NSObject
@property(strong) NSString *name;
-(void)generateReport;
-(void)generateReportAndAddThisString:(NSString *)string andThenAddThisDate:(NSDate *)date;
CHAPTER 16 ■ DEFINING CLASSES
In this parameter, you can see that the method signature is broken up into two parts. Each part has a parameter and a parameter descriptor separated by a colon. In Objective-C, method signatures are a collection of parameter descriptors and parameters. When you have no parameters (like the first method), you just have a parameter descriptor to describe the method.
Implementing Classes
Defining the class interface is the first part of the process of defining a class. The next part is called the implementation because this is where you provide the code implementation that makes the class objects work.
To start implementing a class, you use the @implementation keyword along with the class name.
#import "Project.h"
@implementation Project
@end
The first line of code is importing the Project forward declarations into this file so the class is aware of what needs to be implemented.
Note
■
While it is not required, usually class interfaces and implementations will be coded
in separate files. Interface files end with the .h file extension and are sometimes called
header files. Implementation files end with the .m file extension and are sometimes called
code files.
The implementation begins with the @implementation keyword followed by the name of the class Project. Implementations end with the @end keyword. Now, you need to implement the properties and methods.
Properties are implemented for you automatically and you don’t need to take any action to make properties work.
Implementing Methods
CHAPTER 16 ■ DEFINING CLASSES
#import "Project.h"
@implementation Project
-(void)generateReport{
NSLog(@"This is a report!"); }
@end
When you implement a method that includes parameters, you can reference those parameter values in your code.
#import "Project.h"
@implementation Project
-(void)generateReport{
NSLog(@"This is a report!"); }
-(void)generateReportAndAddThisString:(NSString *)string andThenAddThisDate:(NSDate *)date{ [self generateReport];
NSLog(@"%@", string); NSLog(@"Date: %@", date); }
@end
Private Properties and Methods
The procedures above define properties and methods publically. This means that other objects can reference these properties and use those methods. Classes that are derived from this class can use and override these properties and methods. If you want to prevent that from happening to make properties and methods private, you can use a class extension.
Class Extensions
CHAPTER 16 ■ DEFINING CLASSES
You can put a class extension in the implementation file like this:
#import "Project.h"
@interface Project()
@property(strong) NSArray *listOfTasks;
-(void)generateAnotherReport;
@end
@implementation Project
-(void)generateReport{
NSLog(@"This is a report!"); }
-(void)generateReportAndAddThisString:(NSString *)string andThenAddThisDate:(NSDate *)date{ [self generateReport];
NSLog(@"%@", string); NSLog(@"Date: %@", date); }
-(void)generateAnotherReport{ NSLog(@"Another report!"); }
@end
The class extension looks like the interface but has empty parenthesis after the class name. The forward declarations that are in the class extension above follow the same rules as the other forward declarations for properties and methods. Class extensions must end with the @end keyword (each @interface requires a matching @end).
Local Instance Variables
CHAPTER 16 ■ DEFINING CLASSES
Instead, you can use an instance variable or ivar in these situations. Instance variables can be included right in the class extension, like this: