Exam Ref 70-697 Configuring Windows
Devices
Second Edition
Exam Ref 70-697 Configuring Windows Devices, Second Edition Published with the authorization of Microsoft Corporation by: Pearson Education, Inc.
Copyright © 2018 by Pearson Education
All rights reserved. Printed in the United States of America. This publication is protected by copyright, and permission must be obtained from the publisher prior to any prohibited reproduction, storage in a retrieval system, or transmission in any form or by any means, electronic, mechanical, photocopying, recording, or likewise. For information regarding permissions, request forms, and the appropriate contacts within the Pearson Education Global Rights & Permissions Department, please visit www.pearsoned.com/permissions/. No patent liability is assumed with respect to the use of the information contained herein. Although every precaution has been taken in the preparation of this book, the publisher and author assume no responsibility for errors or omissions. Nor is any liability assumed for damages resulting from the use of the information contained herein.
ISBN-13: 978-1-5093-0785-2 ISBN-10: 1-5093-0785-0
Library of Congress Control Number: 2018938485 1 18
Trademarks
Microsoft and the trademarks listed at https://www.microsoft.com on the “Trademarks” webpage are trademarks of the Microsoft group of companies. All other marks are property of their respective owners.
Warning and Disclaimer
Every effort has been made to make this book as complete and as accurate as possible, but no warranty or fitness is implied. The information provided is on an “as is” basis. The authors, the publisher, and Microsoft Corporation shall have neither liability nor
responsibility to any person or entity with respect to any loss or damages arising from the information contained in this book or programs accompanying it.
Special Sales
For information about buying this title in bulk quantities, or for special sales opportunities (which may include electronic versions; custom cover designs; and content particular to your business, training goals, marketing focus, or branding interests), please contact our corporate sales department at [email protected] or (800) 382-3419.
For government sales inquiries, please contact [email protected]. For questions about sales outside the U.S., please contact [email protected].
Proofreader
Troy Mott
Technical Editor
Byron Wright
Cover Designer
I would like to dedicate this book to Annette and Tommy, for being so supportive and encouraging whenever I work on projects that sometimes eat into our quality time together. This book is also for the reader–having taught thousands of IT Professionals over my career, I hope this book reaches a greater audience and helps you achieve your career aspirations. Work hard and aim for the stars!.
—ANDREW BETTANY
Writing this book has been a team effort, and I am delighted to have been a part of that team. Aside from the folks at Pearson and my co-author, Andrew, I’d like to mention my dog, Lucy. Her enthusiasm for long walks undoubtedly helped me clear my head, and thus to deliver chapters on time to our editor, Trina Macdonald.
Contents at a glance
IntroductionImportant: How to use this book to study for the exam
CHAPTER 1 Manage Identity
CHAPTER 2 Plan desktop and device deployment
CHAPTER 3 Plan and implement a Microsoft 365 solution
CHAPTER 4 Configure networking
CHAPTER 5 Configure storage
CHAPTER 6 Manage data access and protection
CHAPTER 7 Manage remote access
CHAPTER 8 Manage apps
CHAPTER 9 Manage updates and recovery
Contents
Important: How to use this book to study for the exam
Chapter 1 Manage Identity
Skill 1.1: Support Microsoft Store, Microsoft Store for Education, Microsoft Store for Business, and cloud apps
Integrate Microsoft account and personalization settings Install and manage software
Sideload apps into offline and online images Sideload apps by using Microsoft Intune Deep link apps using Microsoft Intune
Skill 1.2: Support authentication and authorization Support user authentication
Support workgroup, homegroup, and domain membership Configure local accounts and Microsoft accounts
Configure Workplace Join
Chapter 2 Plan desktop and device deployment
Skill 2.1: Migrate and configure user data Configure user profiles
Migrate user profiles
Skill 2.4: Configure security for mobile devices Configure BitLocker
Chapter 3 Plan and implement a Microsoft 365 solution
Skill 3.1: Support mobile devices Support mobile device policies
Support mobile access and data synchronization Support broadband connectivity
Support Mobile Device Management by using Microsoft Intune Skill 3.2: Deploy software by using Microsoft Intune
Use reports and In-Console Monitoring to identify required updates Approve or decline updates
Configure automatic approval settings
Skill 3.3: Manage devices with Microsoft 365 Solution Provision user accounts
Enroll devices into Microsoft 365 Business Enroll devices into Microsoft 365 Enterprise View and manage all managed devices
Configure Microsoft Intune subscriptions
Configure the Microsoft Service Connection Point role Manage user and computer groups
Configure location-aware printing
Skill 4.3: Configure and maintain network security Windows Defender Security Center
Configure Windows Firewall
Configure Windows Firewall with Advanced Security Configure connection security rules with IPsec
Configure authentication exceptions
Manage permissions including Sharing, NTFS and Dynamic Access Control Support Encrypting File System
Troubleshoot Encrypting File System Controlling access to removable media Support BitLocker and BitLocker To Go
Configure BitLocker using command-line tools
Chapter 6 Manage data access and protection
Co-existence of OneDrive and OneDrive for Business Skill 6.2: Configure file and folder access
Encrypt files and folders by using Encrypting File System Configure NTFS permissions
Configure Remote Desktop client for Windows 10 Mobile, iOS, and Android Configure Remote Desktop settings
Scenario 2
Skill 8.1: Deploy and manage RemoteApp apps Configure RemoteApp prerequisites
Configure RemoteApp and Desktop Connections settings Configure Group Policy Objects for signed packages Subscribe to the Desktop Connections feeds
Support iOS and Android
Configure Remote Desktop Web access for distribution Skill 8.2: Support desktop apps
Support desktop app compatibility by using Application Compatibility Tools Support desktop application co-existence
Install and configure User Experience Virtualization Deploy desktop apps by using Microsoft Intune Thought experiments
Chapter 9 Manage updates and recovery
Skill 9.1: Configure system recovery
Restore previous versions of files and folders Recover files from OneDrive
Configure update settings
Configure Windows Update policies Manage update history
Roll back updates
Update Microsoft Store apps Thought experiments
Scenario 1 Scenario 2 Scenario 3
Thought experiment answers Scenario 1
Scenario 2 Scenario 3 Chapter summary
About the authors
ANDREW BETTANY, Microsoft Most Valuable Professional (Windows and Devices for IT), Dad, IT Geek, training mentor and consultant, entrepreneur, and author.
As a Microsoft Most Valuable Professional (MVP), Andrew is recognized for his Windows expertise, and is the author of several publications, including Windows exam certification prep, Microsoft official training materials, and an author of video training materials for LinkedIn Learning and Pluralsight.
Having managed the IT Academy at the University of York, UK for years, he now focuses his time training and writing. As a Microsoft Certified Trainer, Andrew delivers learning and consultancy to businesses on many technical areas including Microsoft 365, Azure, and Windows.
He has co-founded the “IT Masterclasses” series of short intensive technical courses,
www.itmasterclasses.com, and is passionate about helping others learn technology. He is a frequent speaker and proctor at Microsoft Ignite conferences worldwide.
Active on social media, Andrew can be found on LinkedIn Facebook and Twitter. He lives in a village just outside of the beautiful city of York in Yorkshire (UK).
Introduction
The Configuring Windows Devices exam (70-697) is separated into nine sets of objectives.
This book contains nine chapters that clearly detail what those objectives are and the content that you can expect to see on the exam. Because each chapter covers a part of the exam, you should
concentrate on one chapter at a time and complete the thought experiments and review questions. This book covers the general, high-level knowledge you need to know to answer questions regarding why and when you might perform tasks relating to the exam objectives.
Prior to taking the certification exam, you should fully prepare to the best of your ability and we assume that you have some practical experience supporting Windows devices within the workplace. You are also probably reading this book as part of your final preparations and that you feel almost ready to take the exam. In this book we have included how-to steps and walkthroughs whenever we feel that they are useful, and we hope that you will perform the tasks on your system or within a
virtual machine to crystalize your knowledge. Throughout the book there are numerous notes and links to resources on the Internet, which should add even more depth to your preparation. You should
expect that Windows 10 will evolve constantly, through Windows upgrades, and you should always supplement your learning with practical experience obtained by using the latest build of the operating system because there are always new things to learn and fresh challenges to master.
This book covers every major topic area found on the exam, but it does not cover every exam question. Only the Microsoft exam team has access to the exam questions, and Microsoft regularly adds new questions to the exam, making it impossible to cover specific questions. You should
consider this book a supplement to your relevant real-world experience and other study materials. If you encounter a topic in this book that you do not feel completely comfortable with, use the “Need more review?” links you’ll find in the text to find more information and take the time to research and study the topic. Great information is available on https://docs.microsoft.com and in blogs and
forums.
Organization of this book
This book is organized by the “Skills measured” list published for the exam. The “Skills measured” list is available for each exam on the Microsoft Learning website: http://aka.ms/examlist. Each chapter in this book corresponds to a major topic area in the list, and the technical tasks in each topic area determine a chapter’s organization. If an exam covers six major topic areas, for example, the book will contain six chapters.
Microsoft certifications
MORE INFO ALL MICROSOFT CERTIFICATIONS
For information about Microsoft certifications, including a full list of available certifications, go to http://www.microsoft.com/learning.
Microsoft Virtual Academy
Build your knowledge of Microsoft technologies with free expert-led online training from Microsoft Virtual Academy (MVA). MVA offers a comprehensive library of videos, live events, and more to help you learn the latest technologies and prepare for certification exams. You’ll find what you need here:
http://www.microsoftvirtualacademy.com
Quick access to online references
Throughout this book are addresses to webpages that the author has recommended you visit for more information. Some of these addresses (also known as URLs) can be painstaking to type into a web browser, so we’ve compiled all of them into a single list that readers of the print edition can refer to while they read.
Download the list at https://aka.ms/examref697ed2/downloads
The URLs are organized by chapter and heading. Every time you come across a URL in the book, find the hyperlink in the list to go directly to the webpage.
Errata, updates, & book support
We’ve made every effort to ensure the accuracy of this book and its companion content. You can access updates to this book—in the form of a list of submitted errata and their related corrections— at:
https://aka.ms/examref697ed2/errata
If you discover an error that is not already listed, please submit it to us at the same page.
If you need additional support, email Microsoft Press Book Support at [email protected].
Please note that product support for Microsoft software and hardware is not offered through the previous addresses. For help with Microsoft software or hardware, go to
http://support.microsoft.com.
Stay in touch
Important: How to use this book to study for the exam
Certification exams validate your on-the-job experience and product knowledge. To gauge your readiness to take an exam, use this Exam Ref to help you check your understanding of the skills tested by the exam. Determine the topics you know well and the areas in which you need more experience. To help you refresh your skills in specific areas, we have also provided “Need more review?” pointers, which direct you to more in-depth information outside the book.
The Exam Ref is not a substitute for hands-on experience. This book is not designed to teach you new skills.
We recommend that you round out your exam preparation by using a combination of available study materials and courses. Learn more about available classroom training at
http://www.microsoft.com/learning. Microsoft Official Practice Tests are available for many exams at http://aka.ms/practicetests. You can also find free online courses and live events from Microsoft Virtual Academy at http://www.microsoftvirtualacademy.com.
This book is organized by the “Skills measured” list published for the exam. The “Skills
measured” list for each exam is available on the Microsoft Learning website: http://aka.ms/examlist. Note that this Exam Ref is based on this publicly available information and the author’s
CHAPTER 1
Manage Identity
Identity is an important concept in Windows. This chapter tests your understanding of how identities are managed in Windows to provide users with a consistent and secure environment. You’ll learn how to support Microsoft Store and Office 365 applications, install applications into images, and support authentication and permissions mechanisms in Windows.
IMPORTANT
Have you read page xxi?
It contains valuable information regarding the skills you need to pass the exam.
Skills in this chapter:
Skill 1.1: Support Microsoft Store, Microsoft Store for Education, Microsoft Store for Business, and cloud apps
Skill 1.2: Support authentication and authorization
Skill 1.1: Support Microsoft Store, Microsoft Store for Education,
Microsoft Store for Business, and cloud apps
This section covers supporting and installing apps from a variety of sources, including Microsoft Store, Microsoft Store for Education, Microsoft Store for Business, Microsoft Office 365, and Microsoft Intune. You’ll see how to use a Microsoft account to synchronize app and Windows settings across multiple devices. You’ll also see how to install apps into Windows Imaging Format (WIM) images, and manage the installation and availability of apps, including sideloading and deep linking.
This section covers how to:
Integrate Microsoft account and personalization settings
Install and manage software with Microsoft Office 365 and Microsoft Store apps Sideload apps into online and offline images
Sideload apps by using Microsoft Intune Deep link apps by using Microsoft Intune
Integrate Microsoft account and personalization settings
laptops, tablets, and smartphones. In Windows 10, you can associate a Microsoft account with two separate account types:
Local account A local account is stored in the local Security Account Manager (SAM) database on a Windows 10 computer.
Domain account A domain account is stored in the Active Directory Domain Services (AD DS) database on a domain controller. Domain accounts can be used to authenticate a user on Windows computers joined to the domain.
A Microsoft account can provide settings synchronization across local and domain accounts. For example, a user might associate his Microsoft account with a local account on his home computer and a domain account at work. With this configuration, the user can have settings like Internet Explorer favorites or app configuration settings that remain consistent regardless of which computer he is signed in to.
Associating a Microsoft account with a local or domain account
FIGURE 1-1 The Your Info tab in the Accounts category in the Settings app
To associate a Microsoft account with a local Windows account, complete the following steps: 1. From the Desktop, click the Start button, and then click Settings.
2. In the Settings app, click Accounts.
3. In the left pane of the Accounts page, click Your Info.
4. In the Your Info page, click Sign In With A Microsoft Account Instead.
5. Enter your Microsoft account user name and password, and then click Sign in. 6. You will be asked to verify your identity to be able to associate the account.
7. After verification, click Switch To Start Using Your Microsoft Account to sign in to Windows. To associate a Microsoft account with a domain account, complete the following steps:
1. When logged in with a domain account, from the Desktop, click the Start button, and then click Settings.
3. On the Accounts page, click Your info.
4. In the Your info box, click Sign In With A Microsoft Account.
5. On the Connect To A Microsoft Account On This PC page, select the PC settings you want to sync with the domain, and then click Next. The options are:
Start Screen App Data Appearance
Language Preferences Desktop Personalization Ease Of Access
Apps
Other Windows Settings Passwords
Web Browser
6. Enter your Microsoft account user name and password, and then click Next. 7. You will be asked to verify your identity to continue associating the account.
8. After verification, click Connect to associate your Microsoft account with your domain account.
Configuring Microsoft account synchronization settings
FIGURE 1-2 The Sync Your Settings section in the Settings app
Configuring Microsoft account settings by using Group Policy
Network administrators can incorporate Microsoft accounts into the workplace to help users transfer what they’ve configured with their domain accounts between computers by using a Microsoft account. Network administrators can also disable the ability to associate Microsoft accounts by setting
limitations in Group Policy. This section looks at the Group Policy options for controlling the association of Microsoft accounts.
NOTE ACCESSING GROUP POLICY
To access Group Policy Object settings, click Start, type gpedit.msc, and then press Enter. Group Policy cannot be configured on Windows 10 Home edition.
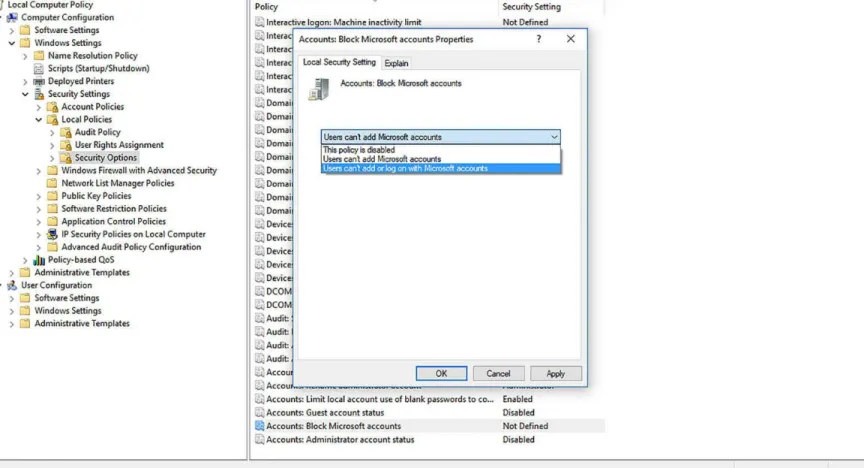
Microsoft Accounts, and the setting is found in Computer Configuration\Windows Settings\Security Settings\Local Policies\Security Options (see Figure 1-3). You can choose from three different settings:
The policy is disabled If you disable or do not configure this policy, users will be able to use Microsoft accounts with Windows.
Users can’t add Microsoft accounts If you select this option, users will not be able to create new Microsoft accounts on this computer, switch a local account to a Microsoft account, or
connect a domain account to a Microsoft account. This is the preferred option if you need to limit the use of Microsoft accounts in your enterprise.
Users can’t add or log on with Microsoft accounts If you select this option, existing Microsoft account users will not be able to log on to Windows. Selecting this option might make it
impossible for an existing administrator on this computer to log on and manage the system.
FIGURE 1-3 The Accounts: Block Microsoft Accounts Properties dialog box in Local Group Policy
Editor
Install and manage software
Although you can install apps using conventional methods, such as choosing Add/Remove Programs in Control Panel, or removable media, you can also perform cloud-based software installation by using Microsoft Store or Microsoft Office 365.
Installing apps by using Microsoft Office 365
Office 365 updates are applied automatically. There’s no need for software maintenance tasks, such as installing updates or upgrading versions, so enterprise administrators don’t need to worry about updating devices manually. However, they’re still in control of updates and can decide how and when these will be provided to users. Administrators can also decide where users’ data should be stored: on the on-premises data servers of a company, in private cloud-based storage, in the public cloud, or a combination of these.
Office 365 is software as a service (SaaS). With SaaS, the user is provided a software product that they can use and consume, on demand. An organization might choose a SaaS product like Office 365 to reduce maintenance and installation workloads, reduce licensing costs, or simplify the organization software portfolio. SaaS products like Office 365 also offer the benefit of access to apps and saved documents from any location or computer, provided an Internet connection is available.
MORE INFO EXPLORING OFFICE 365
This Exam Ref focuses on installing Office 365 components. However, there is much more to Office 365, including conferencing, email, secure file sharing, and website hosting. You can learn more about Office 365 at: https://products.office.com/en-ca/business/explore-office-365-for-business.
CONFIGURING OFFICE 365
You can obtain a free trial subscription to Office 365 Business Premium by visiting the following link:
https://portal.office.com/Signup/Signup.aspx?OfferId=467eab54-127b-42d3-b046-
FIGURE 1-4 The Office 365 Admin Center page
After signing up, you can access the Office 365 Admin Center at: https://portal.microsoftonline.com/admin/default.aspx.
INSTALLING OFFICE FROM THE OFFICE 365 PORTAL
You can configure several settings that control the ability to install Office apps from Office 365 Admin Center. From the User Software page under Service Settings in Office 365 Admin Center, you can select the applications that you will enable users to install, one of the options being Office And Skype For Business. If this option is selected, users can install Office on their computers by
completing the following steps:
1. Open a web browser and navigate to https://login.microsoftonline.com. 2. Sign in with the appropriate user name and password.
3. From the Office 365 Admin Center My account page, click Install Software.
4. Click Run to start the installation, click Yes to continue, and click Next to start the wizard. 5. Select No Thanks to not send updates to Microsoft, and then click Accept.
6. Click Next on the Meet OneDrive page.
7. Click Next to accept defaults, select No Thanks, and then click All Done.
DEPLOYING OFFICE
language(s) to download, which architecture to use, where the software deployment network share is located, how updates are applied after Office is installed, and which version of the software to
install. Deployment methods include Group Policy, startup scripts, or Microsoft System Center Configuration Manager.
Managing software by using Office 365
You can manage all aspects of the Office 365 environment from Office 365 Admin Center. The admin center contains configuration and management pages for all the different features that affect Office app installation:
Home This page links to commonly used administrative components, such as Users, Billing, Domains, and Service health.
Users From this page, you can add, remove, and edit user accounts that are part of the Office 365 environment.
Groups From this page, you can configure groups and shared mailboxes for your organization. Resources From this page, you can configure rooms and equipment, sites, and a public website
for your organization.
Domains From this page, you can manage and add domains used by Office 365.
Settings There are several pages available under the Settings menu, including Services & Add-ins, Security & Privacy, Organization Profile, and Partner Relationships.
Admin centers This provides a link to each of the management portals for each of the Microsoft cloud-based services to which your organization subscribes, including:
Exchange
There are other important features of Office 365 that you need to consider in preparation for the exam. While these topics are not covered in great detail, they might appear as supporting information for a scenario or question on the exam.
Click-to-Run You can configure a click-to-run installation of Office that enables a streamed installation process, which gives almost instant access to Office desktop applications, rather than the traditional installation method that requires the user to wait for the entire installation process to complete before using any Office applications.
https://technet.microsoft.com/library/dn568031.aspx.
Installing apps by using the Microsoft Store
The Microsoft Store is the standard source for Windows 10 apps, and the most common method for installing those apps. The Microsoft Store (Figure 1-5) is installed by default on all Windows 10 computers.
FIGURE 1-5 The Microsoft Store
NOTE NAME CHANGE FOR WINDOWS STORE
Windows Store was changed to Microsoft Store at the time of writing; however, some elements in the user interface still reference the older name.
There are several aspects of the Microsoft Store that you need to be aware of for the exam: The Microsoft Store is the primary repository and source for apps that are created and made
available to the public, as a free trial or paid app.
Users must have a Microsoft account associated with their local or domain account in order to download any apps from the Microsoft Store.
Microsoft Store apps are limited to 10 devices per Microsoft account. A user can install an app on up to 10 devices that are associated with his or her Microsoft account.
Apps designed for non-public use—that is, for a specific organization—can be submitted through the Microsoft Store and be made available only to members of the organization.
MORE INFO MICROSOFT STORE APPS VS. WINDOWS DESKTOP APPS
This Skill domain covers only Microsoft Store apps. Desktop apps, which appear and behave much like traditional Windows programs, are covered in Chapter 8, Managing Apps.
To install a Microsoft Store app, use the following procedure:
1. Open the Microsoft Store while signed in to Windows with a Microsoft account.
2. Navigate the Microsoft Store by browsing the categories provided at the top of the window, or by using the Search toolbar, also at the top of the window.
3. After you’ve located the app you want to install, click Install on the app page. The app installs in the background, and you are notified when the installation is complete.
Installed apps are available from the Start menu, by clicking All Apps, or by typing the name of the app in the Search field. You can also pin apps to the Start menu or taskbar to make them easier to access.
DISABLING ACCESS TO THE MICROSOFT STORE
By default, the Microsoft Store is accessible to all users who have a Microsoft account associated with their local or domain account. Access to the Microsoft Store can be disabled by using Group Policy. You might disable access for a number of reasons, including controlling apps that are
available on certain computers, such as kiosk or terminal computers, satisfying legal or compliance-related requirements, or ensuring that only approved applications of your organization are installed on Windows computers.
To disable access to the Microsoft Store, open either the Local Group Policy Editor, or Group Policy Management on a domain controller for domain policy. Within Group Policy, navigate to the following location: Computer Configuration\Administrative Templates\Windows Components\App Package Deployment. Change the setting for Allow All Trusted Apps To Install to Disabled.
EXAM TIP
Changes to Group Policy do not take place until a Group Policy refresh occurs. By default, this is every 90 minutes. To force a refresh, you can run gpupdate /force from the command prompt.
MICROSOFT STORE FOR BUSINESS AND MICROSOFT STORE FOR EDUCATION
easily manage their LOB apps.
You can use the Microsoft Store for Business or Microsoft Store for Education as a central location for your organization’s LOB apps. By using the Microsoft Store for Business or Microsoft Store for Education, you can provide a single portal for access to these LOB apps. Your users can easily browse the portal, locate the apps they need, and install them.
The Microsoft Store for Business and Microsoft Store for Education both provide public business apps, but also a facility for private LOB apps in a restricted area of the portal. To access the store, users must sign in using credentials from Microsoft Azure.
Sideload apps into offline and online images
Organizations sometimes create their own apps. These apps have the same characteristics as the apps you find in the Microsoft Store (which aren’t desktop apps). As noted earlier, enterprise
administrators can make these apps available publicly if they want to go through the Microsoft Store certification process, or they can make them available to their enterprise users through a process known as sideloading. Universal apps can also be deployed by using provisioning packages created with the Windows Configuration Designer.
Enabling sideloading in Windows 10
By default, the sideloading option in Windows 10 is disabled. To enable sideloading, you need to use a Group Policy setting. To configure Group Policy so that computers can accept and install
sideloaded apps that you created for your organization, navigate to Computer Configuration/
Administrative Templates/ Windows Components/ App Package Deployment. Double-click Allow All Trusted Apps To Install, select Enabled and click OK.
You can also enable sideloading through the Settings app. Click Settings, click Update and
FIGURE 1-6 Enabling sideloading
Sideloading an app
After sideloading is enabled, you can sideload the app using the AppX Windows PowerShell module and the associated cmdlets. To manually sideload an app for the currently logged in user, perform the following steps from a Windows PowerShell prompt:
1. Type import-module appx. Press Enter.
2. Type add-appxpackage “path and name of the app” to add the app. Press Enter. Table 1-1 shows the available AppX cmdlets. If you need to add app dependencies, the command should look more like this: Add-appxpackage C:\MyApp.appx DependencyPath C:\appplus.appx.
TABLE 1-1 Cmdlets in the AppX module for Windows PowerShell
Cmdlet Description
Add-AppxPackage To add a signed app package to a single user account
Get-AppxPackage To view a list of the app packages installed for a user profile Get-AppxPackageManifest To read the manifest of an app package
Remove-AppxPackage To remove an app package from a user account
If you want to sideload the apps to multiple computers, use Deployment Image Servicing and Management (DISM) cmdlets. You can use DISM commands to manage app packages in a Windows image. When you use DISM to provision app packages, those packages are added to a Windows image, and are installed for the desired users when they next log on to their computers.
You need to be familiar with the DISM syntax when servicing a Windows image, whether a computer is offline or online. Table 1-2 lists a few cmdlets to keep in mind.
TABLE 1-2 Cmdlets in the AppX module for Windows PowerShell
Cmdlet Description
DISM.exe {/Image:<path_to_image_directory> | /Online}
[dism_global_options] {servicing_option} [<servicing_argument>] To service a Windows imagewith DISM DISM.exe /Image:<path_to_image_directory> [/Get-The app installs, and is then available to the user. This needs to be done for each user if multiple users share a single computer.
EXAM TIP
Some exam questions require you to solve a problem with more than one Windows component or tool. For example, you might be asked how you would deploy an app to all client computers in a domain and configure the app to access network resources. The answer will likely include applying a specific Group Policy Object (Allow All Trusted Apps To Install) and using a Windows
PowerShell cmdlet (such as add-appxpackage).
The AppX module for Windows PowerShell includes several cmdlets that you can use to install and manage LOB Microsoft Store apps.
Other command-line service options include /Get-ProvisionedAppxPackages, /FolderPath, /PackagePath, /LicensePath, and /Add-ProvisionedAppxPackage. Becoming familiar with these is very important because you’ll likely be tested on them. You can learn about all available commands and options at http://technet.microsoft.com/library/hh824882.aspx. Review this article and make sure that you can make sense of commands you might come across, perhaps one that looks like:
Dism /Online /Add-ProvisionedAppxPackage /FolderPath:C:\Test\Apps\MyUnpackedApp /SkipLicense
Or it looks like this:
Click here to view code image
Dism /Image:C:\test\offline /Add-ProvisionedAppxPackage /FolderPath:c:\Test\Apps\ MyUnpackedApp /CustomDataPath:c:\Test\Apps\CustomData.xml
Sideload apps by using Microsoft Intune
You can use Microsoft Intune to sideload apps via the cloud and make them available to any
authorized, compatible device that’s connected to the Internet. The following list outlines the high-level steps that you need to complete to sideload an app using Microsoft Intune.
1. Add users and create groups, if applicable. 2. Upload the app to Microsoft Intune.
3. Choose the users, groups, computers, and devices that can download the app, and link them (user-to-device).
4. For the self-service model in this example, choose how to deploy the app. It can be available, or available and required.
5. Verify that the app is available in the Windows Intune Company Store, and use the Company Store to install the app on devices.
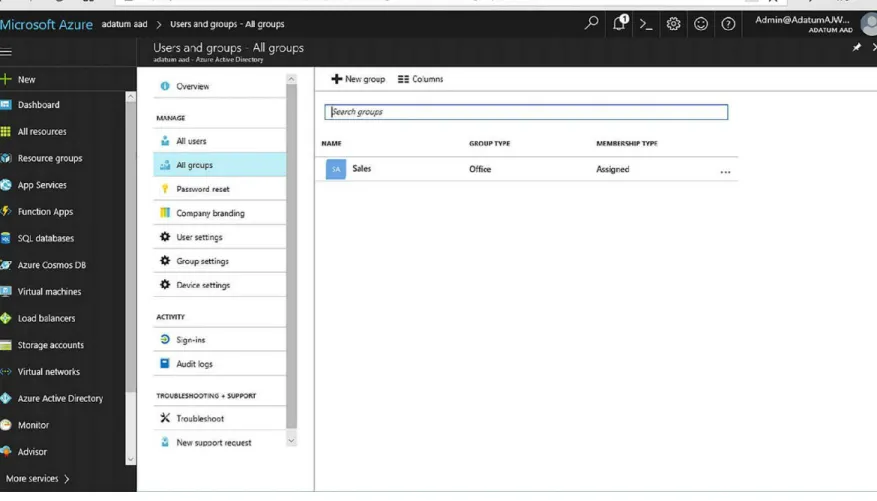
Adding a user and groups
FIGURE 1-7 The Microsoft Intune All Groups page
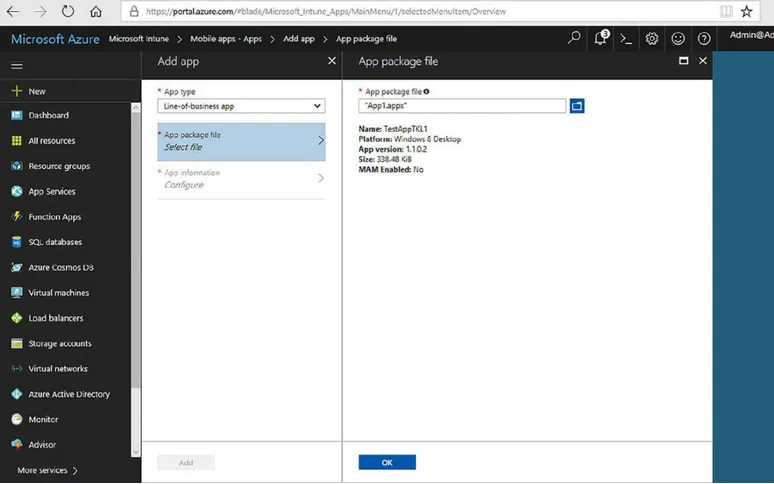
Uploading an app to Microsoft Intune
FIGURE 1-8 The Microsoft Intune Apps page
To upload an app, complete the following steps:
1. Sign in to Microsoft Intune with an administrative account. 2. Click Mobile Apps and then click Apps.
3. Click Add, and then in the Add app blade, in the App type list, select the type of app. You can choose from:
Store app: Android, iOS, Windows Phone 8.1, and Windows Office 365 Suite: Windows 10 and macOS
Other: Web app and line-of-business app 4. In this instance, click Line-Of-Business.
FIGURE 1-9 Adding an .appx package to Microsoft Intune
6. Click Configure. 7. Enter a description.
8. Select a Category for the app. Choose from Business, Photos & Media, Collaboration & Social, and others.
9. If you want the app to feature in the Company Portal, next to Display this as a featured app in the Company Portal, and click Yes.
10. Click OK, and then click Add.
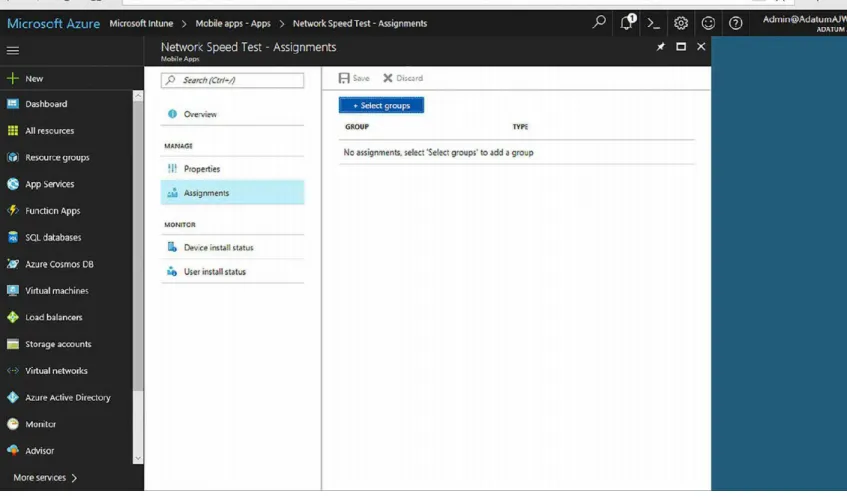
FIGURE 1-10 Assigning apps with the Microsoft Intune console
Choosing the users who can install the app
FIGURE 1-11 Choosing deployment groups
Installing the app from the Company Store
To install the app, your users will navigate to the Company Store page, and select the app from the Company Store page. To add an app to the Company Store, choose that option when configuring the app.
Deep link apps using Microsoft Intune
You can make Microsoft Store apps available to in your company portal by using Microsoft Intune or Configuration Manager. This section focuses on Microsoft Intune. The first part of the process
requires you to obtain the link to the app you want to add to your company portal. To obtain the link for an app, follow these steps:
1. On Windows 10, open Microsoft Edge and navigate to the Microsoft Store website and click Software: https://www.microsoft.com/store/apps/windows?icid=CNavAppsWindowsApps. 2. In the search box, type the name of the app and click Search to locate the app that you want to
deep link.
3. Click the app, and then, copy the URL from your web browser. 4. Paste this link to Notepad for use later.
The second part of the deep-linking process involves adding the app to Windows Intune: 1. Sign in to Microsoft Intune with an administrative account.
Apps.
3. Click Add, and then in the Add app blade, in the App type list, select the type of app. Choose Store App and then click Windows.
4. Click Configure.
5. In the App information blade, complete the following information and then click OK: Name and description for the app
Publisher
Paste in the Appstore URL you copied earlier
Category, such as Business, Photos & Media, Collaboration & Social Click Yes to display the app as a featured app in the Company Portal. 6. Once you have configured the details of the app, click Add.
Skill 1.2: Support authentication and authorization
Users need to be authenticated to access a computer or network before they can be authorized to
access the resources on it. Windows 10 supports several authentication mechanisms and methods, and different ways to manage accounts. This chapter will help you to understand the important concepts needed to support Windows 10 authentication and authorization.
This section covers how to:
Support user authentication, including multi-factor authentication, certificates, virtual smart cards, picture passwords, and biometrics
Support workgroup, homegroup, and domain membership, including Secure Channel, account policies, credential caching, and Credential Manager
Know when to use a local account versus a Microsoft account Connect a Microsoft account to an AD DS domain account Configure Workplace Join
Implement Azure AD Join
Configure Windows Hello and Windows Hello for Business
Support user authentication
User authentication can come in many forms in Windows 10. You need to understand the various methods for authentication as well as the different mechanisms for managing and supporting authentication.
Understanding multifactor authentication
achieving authentication, but this book has covered this topic in various places, and you need to review those entries when you can (for the most part, certificates have been associated with apps, because apps must be signed to ensure that they can be trusted).
A digital certificate is issued by a Certificate Authority (CA), such as Verisign or Active Directory Certificate Services (AD CS) in Windows Server 2016. The certificate can be used to provide proof that the identity asking for authentication is trusted and true, and that the identity offering it is also trusted and authentic. Authentication with certificates involves a public key and a private key that can be matched to provide that authentication. If no match occurs, no authentication is provided. You can learn more about Certificate Authorities at http://technet.microsoft.com/library/cc732368.aspx.
AD CS can issue and manage public key infrastructure (PKI) in a domain, provide public key cryptography and the ability to create digital certificates, and offer digital signature capabilities. For the purposes here, AD CS provides authentication by associating certificate keys with computers, users, and device accounts on a network. This is called binding.
For the exam, you might be asked how to enable users to access a network resource and be given a specific scenario. A scenario that includes AD CS will note that the network has its own PKI
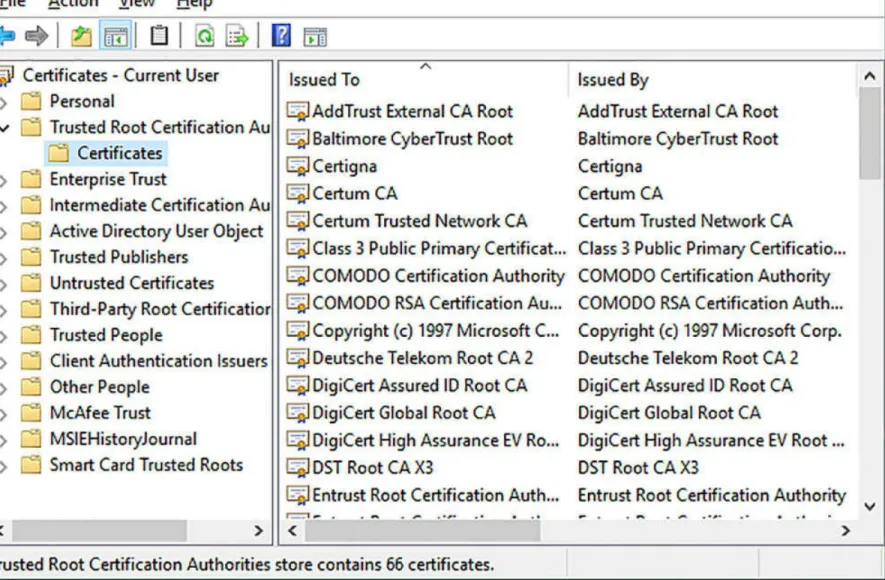
infrastructure. You need to understand that the required certificates must be available to the computer and the user, and they need to be stored in the proper location for authentication to be granted. Client certificates are stored in the Personal certificate store for the applicable user account on the client computer. Computer accounts need trusted root certificates to be stored in the Trusted Root
Certification Authorities store, again on the client computer.
FIGURE 1-12 The Certmgr console
Understanding virtual smart cards
A virtual smart card works in the same general manner as a physical smart card does, but doesn’t require a connected or installed smart card reader. Instead, the virtual smart card works with a
Trusted Platform Module (TPM) chip, which protects the virtual card information through encryption, installed on the computer. As with other more advanced security options, you’ll need a PKI domain infrastructure, complete with certificates and the ability to create and manage them, to incorporate this technology. Virtual smart cards offer the following:
Authentication protection
Confidentiality of the machine and its contents Private keys for security
Encrypted card information that can’t be mined or removed (that is, it can’t be exported) Protection from rogue software that attacks at startup
Multi-factor protection (smart card and PIN)
To use virtual smart cards, you need to meet more requirements than when you opt to use physical ones. These requirements include, but aren’t limited to the following:
A compatible TPM must be installed on those computers that adhere to TPM 1.2 or higher standards.
A limit of ten smart cards (virtual or physical) can be used on a single computer.
The PIN and the PIN Unlock Key must be a minimum of eight characters. These can include numbers, letters, and special characters.
One very important command that you need to understand for the exam is Tpmvscmgr.exe, the command-line tool you use to configure a virtual smart card. You can use the command locally or remotely. Parameters you can use include Create and Delete. Examples include /name (the name of the smart card), /admin key (administrator key), /PIN (the PIN), /generate (to create the files in storage necessary for the card to function), and others listed at
http://technet.microsoft.com/library/dn593707.aspx.
To configure a virtual smart card environment from scratch in a domain, you need to follow these steps:
1. Create a certificate template, a sixteen-step process performed on a Windows server in a domain that’s installed with and running a CA, as outlined at:
http://technet.microsoft.com/library/dn579260.aspx#BKMK_Step1.
2. Create the virtual TPM smart card, a four-step process that uses the Tpmvscmgr.exe command with parameters, as outlined at:
http://technet.microsoft.com/library/dn579260.aspx#BKMK_Step2.
3. tpmvscmgr.exe create /name tpmvsc /pin default /adminkey random /generate.
4. Enroll the certificate on the TPM virtual smart card, a six-step process, by using the Certmgr.msc console to add the certificate to the Personal store, as outlined at
http://technet.microsoft.com/library/dn579260.aspx#BKMK_Step3.
MORE INFO VIRTUAL SMART CARDS
Learn more about virtual smart cards and be sure to explore the additional links on the left side of this page at: http://technet.microsoft.com/library/dn593708.aspx.
To configure a Windows 10 virtual smart card on a stand-alone computer if you have the required technology and credentials available, follow these steps:
1. Open an elevated command prompt. 2. Type tpm.msc.
3. Verify that a compatible TPM can be found that’s at least a TPM 1.2 or later. If you receive an error instead, but are sure a compatible module is available, enable it in the system BIOS before continuing.
4. Close the TPM management console. 5. At the command prompt, enter:
Click here to view code image
To provide a custom PIN value when creating the virtual smart card, use /pin prompt instead.
Configuring a picture password
A picture password is a way to sign in to a computer by using a series of three movements consisting of lines, circles, and/or taps. You can pick any picture you want. Picture passwords can’t be used to sign in to domains; they are used to sign in to stand-alone computers only. Picture password
combinations are limitless because the pictures that can be used are limitless. Although picture passwords are considered more secure for stand-alone computers than typing a PIN or password, a hacker can get into a device by holding the screen up to light to see where most of the gestures are (by following the smudges on the screen). This is especially true if the user touches the screen only to input the password and rarely uses touch for anything else.
You create a picture password (or a four-digit PIN) from the Settings app: 1. Open the Settings app, and then click Accounts.
2. Click Sign-in options.
3. Under Picture password, click Add.
4. Input your current password, and then click Select picture to browse to and select the picture to use.
5. Follow the instructions in the resulting wizard to configure the picture password.
Exploring biometrics
Biometrics, like picture passwords, provides infinite possibilities for securing a computer and can be used as part of a multifactor authentication plan (using it on its own isn’t recommended). Biometric options are generally configured by incorporating a person’s fingerprint and using a fingerprint reader (you “enroll” the user when configuring this), but you can also use a person’s face, the retina of their eye, or even their voice.
FIGURE 1-13 The Biometrics Group Policy settings
Support workgroup, homegroup, and domain membership
In this section, you’ll review the differences between some similar technologies and network configurations, such as workgroup versus homegroup, workgroup versus domain, and credential caching versus Credential Manager.
Homegroups, workgroups, and domains
In almost all instances and scenarios, using a computer to complete tasks involves connecting to a network of some sort, even if it’s just to access the Internet or to back up your work someplace other than your own PC. In homes, networked computers are often configured as homegroups. In a small business, the configuration is generally a workgroup. The purpose of both of these types of networks is frequently to share an Internet connection as well as files, folders, printers, and other resources. Domains are used in larger enterprises, which require more control and good protection of resource access. Domains are the only one of these three that employ AD DS to manage users, computers, and resources.
UNDERSTANDING HOMEGROUPS
local network. This is the simplest kind of network sharing and is limited in what permissions and restrictions can be placed on the data shared. By default, all users that join a homegroup (only one per network) have read-only access to what’s already shared by others. Users can reconfigure this,
however, enabling both read and write access, if desired. When opting for a homegroup, users can: Create or join a homegroup from the prompt offered by Windows, assuming the network is
configured as Private.
Create or join a homegroup from the Network And Sharing Center, assuming the computers that want to join are running Windows 7, Windows 8, or Windows 10. Work through the applicable homegroup wizard to create or join a homegroup. Windows generates a random password other users will need to use to join.
Share files from their original locations and their default libraries. Grant read-only or read/write access to the data they’ve shared.
Limit access to only those network users who also have an account and password on their computers.
Configure the same permissions for all network users, or set different permissions for individual users.
MORE INFO UNABLE TO CREATE A HOMEGROUP?
Creating a homegroup requires IPv6 to be installed on all of the computers in the homegroup. Computers within a homegroup must also be within five minutes of each other’s system time in order for the homegroup to function properly. If you have problems with a homegroup, check for these two potential issues.
Because you can create and join a homegroup using a wizard, detailing the steps in this text isn’t really necessary. However, you need to create a homegroup on your own local network and let other computers join it, just so that you are familiar with the process. Note that users might already be joined to a homegroup because Windows detects and will prompt you to join existing homegroups automatically during setup.
Understanding workgroups
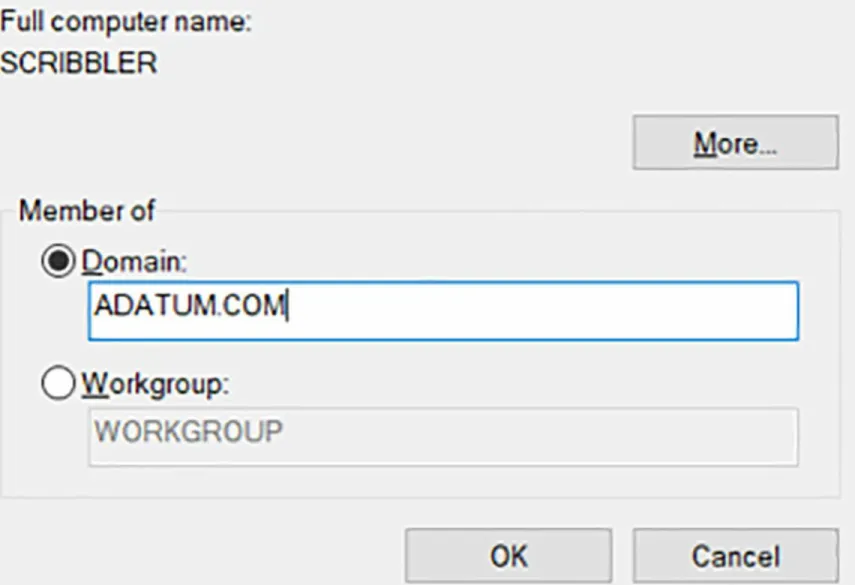
In businesses where a little more control is required and a homegroup isn’t the ideal configuration, a workgroup is used. A workgroup is a manual grouping of computers (almost any operating system will do, including Windows RT) that doesn’t include an Active Directory domain controller, but still offers security options. A workgroup exists on a single network segment. Securing data here is a
distributed concept similar to a homegroup; each user decides what to share, how to share it, and with whom to share. Note that Windows doesn’t create a password for joining the workgroup, nothing is shared automatically by default (except possibly the Public folders), and users join the workgroup from the System Properties dialog box under the Computer Name tab (see Figure 1-14). Click Change in the System Properties dialog box, and then enter the workgroup name in the Computer
FIGURE 1-14 The Computer Name/Domain Changes dialog box
maintains its own local database, users who need to access resources on multiple workgroup
computers must be authenticated on each. The problem with this is that as the network grows, so does the amount of work required to maintain and manage these accounts.
Here is an overview of how authorization works:
1. The first time a user tries to access a shared resource, he or she is asked for a user name and password.
2. The user name and password that are entered must be from an approved account on the sharing computer and must be listed in the SAM database. The user can opt to have Windows remember the password for the next time.
3. The Local Security Authority (LSA) looks to the SAM database to see whether the account that was entered is valid.
4. If the account is valid, the user is granted access.
5. The same user who wants to access another shared resource on the same computer during the same session can do so without re-entering the password.
6. If this same user wants to access a shared resource on another computer in the workgroup, the process must be repeated.
UNDERSTANDING DOMAINS
Companies and enterprises configure networks as domains. You couldn’t successfully manage 100 computers by using a homegroup or workgroup, so a domain is an obvious choice for enterprise networks.
Domains are configured with at least one AD DS domain controller that authenticates users centrally and secures network resources. These larger networks can contain additional servers that manage data storage, email, faxes, and printers; maintain database replications, and so on. Managing all resources as a whole is important to keeping everything secure and available for users, and
enables a simpler management solution for administrators.
A large enterprise can have more than one domain. When multiple domains exist, a Global Catalog is used to locate objects in other domains.
Authentication in a domain is handled by AD DS, a database that contains objects, such as user accounts, computers, groups, and so on. In this case, a network administrator creates user accounts, almost always puts those accounts into groups, and then assigns the desired permissions to the group. This makes managing users simpler than trying to manage users one at a time, and it enables
administrators to deal with newly hired or recently fired employees.
The authentication process includes and uses the Kerberos v5 authentication protocol to identify the user or the host. The Kerberos Key Distribution Center (KDC) uses the domain-specific AD DS as its security account database. AD DS is required for default Kerberos implementations within the domain or forest. If you aren’t familiar with Kerberos v5, the TechNet article “Kerberos
Authentication Overview” at http://technet.microsoft.com/library/hh831553.aspx provides a good explanation of how this works and offers links to additional resources.
UNDERSTANDING COMPUTER AND USER AUTHENTICATION
administrators create these accounts, users input their account credentials to log on to the domain, and authentication is handled by the applicable AD DS server and Kerberos v5. Computers that join
domains acquire a computer account automatically. Like user accounts, computer accounts are used to authenticate the computer to enable it to access network and domain resources. Each computer
account must be unique. A user doesn’t have to do anything to cause the computer to be authenticated. Note that computers have passwords that are automatically managed, and if a computer password on a client is out of sync with AD DS, then the computer can’t authenticate.
Computer accounts are necessary for auditing, for control, and for grouping purposes. You can apply changes to computer accounts that affect whoever logs on to the computer, and not the
individual users. For instance, you can force policies regarding the desktop appearance, how updates are applied, and so on, and those policies will affect the computer and anyone who uses it.
Administrators can manage computer accounts in the same way they can user accounts—by adding, deleting, resetting, and disabling them in the Active Directory Users And Computers snap-in.
UNDERSTANDING SECURE CHANNEL
When applications need network or Internet access, you have to ensure that the connection is secure. This is especially true if you are transmitting data over an untrusted network. You can use Transport Layer Security (TLS)/Secure Sockets Layer (SSL) security to authenticate servers and client
computers, and then use that to encrypt messages between them. These two protocols are included in the Secure Channel set of security protocols. TLS and SSL aren’t interchangeable and SSL is the predecessor to TLS, but both protect against tampering and eavesdropping.
Secure Channel can authenticate an identity as well as provide a secure and private connection to another host by using encryption. It’s also called Schannel and is mostly used for applications that require secure HTTP communications. Schannel is a Security Support Provider (SSP), and the TLS/SSL protocol uses a client/server model that’s based on certificate authentication. This means you need to also have a PKI configured and available.
MORE INFO DISCOVERING SECURE CHANNEL You can learn more about this feature on TechNet at: http://technet.microsoft.com/library/hh831381.aspx.
EXPLORING ACCOUNT POLICIES
You can configure three account lockout policies, and in most instances they must be configured together:
Account Lockout Duration If you’ve configured an account lockout threshold and if that threshold is met, this setting defines how long (in minutes) the user will be locked out of the computer. A setting of 5 to 15 minutes is common.
Account Lockout Threshold You need to configure this to use the other options. This setting defines how many times a user can try to log on to the computer and fail, before being locked out. Reset Account Counter After This setting defines the number of minutes that must pass after a
failed logon attempt before the failed logon attempt counter is reset to zero. If an account lockout threshold is defined, this must be less than or equal to the number of minutes set there.
EXPLORING CREDENTIAL MANAGER
Using user names and passwords is a common way to authenticate users. Windows 10 includes Credential Manager to help manage and maintain those passwords. Credential Manager saves the credentials that users enter when they use their own computers to access network servers and resources on local networks (Windows credentials), and can be used to back up and restore them. When prompted, users have to check the box Remember My Credentials, or else the credentials won’t be saved. Credential Manager also offers Credential Locker, which saves user names and passwords associated with websites and Windows apps (Web Credentials). It saves all of these in an area
called the Windows Vault.
NOTE SAVING CREDENTIALS
Credentials are saved in encrypted folders on the computer under the user’s profile. Applications that support this feature, such as web browsers and Windows apps, can automatically offer up the correct credentials to other computers and websites during the sign-in process.
If the user name or password has been changed since the last time it was saved and access is unsuccessful, the user is prompted to type the new credentials. When access to the resource or website is successful, Credential Manager and Credential Locker overwrite what was there.
FIGURE 1-15 Credential Manager
Here are a few more points to understand about Credential Manager: You can program Microsoft Store apps to use Credential Locker.
Credential roaming requires the Microsoft account for synchronization.
Credential roaming is enabled by default on non-domain joined computers, and it is disabled on domain-joined computers.
Credential Locker supports seamless sign in by using Microsoft Store apps that use Web Authentication Broker and remember passwords for services, such as Twitter and LinkedIn.
Configure local accounts and Microsoft accounts
The Microsoft account enables users to sync settings to the cloud and to other computers that they log on to using that same Microsoft account. With a Microsoft account, users can also access their own cloud storage, called OneDrive. Windows 10 comes with the OneDrive app, which can be accessed from compatible applications, various web browsers, and File Explorer.
without a Microsoft account.
After a Microsoft account is created, users don’t need to be connected to the Internet to log on during subsequent sessions. The account information is cached locally. If an Internet connection isn’t available, the last saved settings are also applied because they are also cached locally. You can switch from a local account to a Microsoft account from the Settings app.
A Microsoft account can be used in a domain, if it isn’t restricted through Group Policy. If possible at your place of business, when connected, users will see the same desktop background, app settings, browser history, and so on that they see on their main computers at home (or in another office). Again, you can make the change through the Settings app. There, you’ll opt to connect your Microsoft account and work through the setup process.
Configure Workplace Join
Personal devices have become part of the enterprise landscape, and if you don’t already, at some point you need to be able to enable users to access network resources from them. This is how Workplace Join came about. Workplace Join enables users to have a SSO experience and enables them to get to the resources they need. You can also manage and secure the devices. In Windows Server 2016, you can use Workplace Join with Windows 8.1, Windows 10, and iOS devices.
Workplace Join uses the Device Registration Service (DRS), part of the Active Directory
Federation Services (ADFS) role in Windows Server 2016, to create a device object in AD DS and use a certificate to identify the device in the future. If you add Web Application Proxy, users can join your enterprise from any Internet-enabled location.
To enable Workplace Join in Azure AD, use the following procedure:
1. In the Azure AD Admin Center, in the navigation pane, click Azure Active Directory. 2. In the Azure Active Directory blade, click Devices.
3. Click Device settings.
4. Next to Users may register their devices with Azure AD, click All and then click Save.
Because enrollment with Microsoft Intune or Mobile Device Management in Office 365 requires Device Registration, if you have configured either of these services, the option for Users may register their devices with Azure AD will already be selected as All. You are also unable to deselect it.
Configure Azure AD Join
Azure Active Directory (Azure AD) is a cloud-based authentication and authorization platform. It enables your users to enjoy the benefits of single sign-on (SSO) for cloud-based applications, such as Office 365. Users can easily join their devices to your organization’s Azure AD once you have
enabled device joining in the Azure admin Center.
and provision your users’ devices.
To enable device registration in Azure AD, in the Azure AD admin Center, use the following procedure:
1. In the navigation pane, click Azure Active Directory. 2. In the Azure Active Directory blade, click Devices. 3. Click Device Settings.
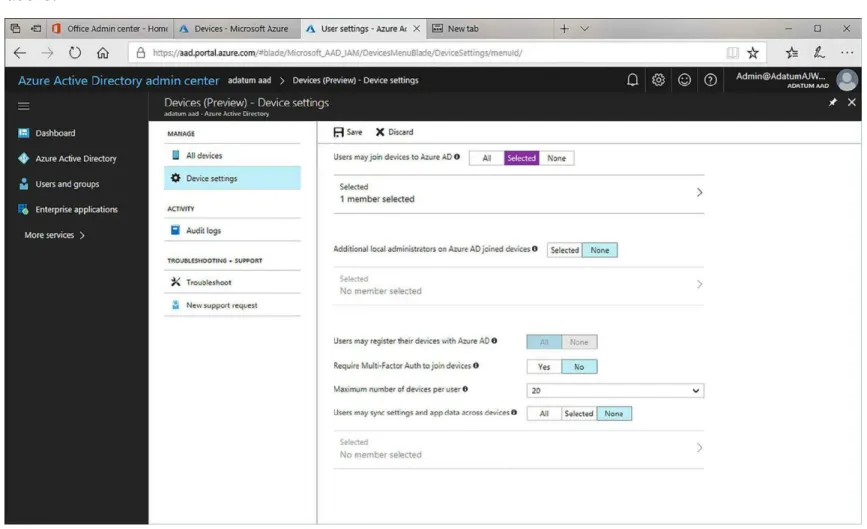
4. In the details pane, next to Users may join devices to Azure AD, click either All or else click Selected, as shown in Figure 1-16. If you choose selected, then click the Selected link and choose those users that can join Azure AD. You can select both individual users and groups of users.
FIGURE 1-16 Enabling Azure AD join
5. Click Save.
After you have enabled Azure AD join, you can let your users add their devices. To do this, they must use the following procedure:
1. Open Settings and select System. 2. In the System window, click About. 3. Click Connect to work or school.
4. On the Access work or school page, click Connect.
5. In the Microsoft Account dialog box, click Join this device to Azure Active Directory.
This user must have permissions to join Azure AD.
7. Enter the Azure AD user’s password, and then click Sign in.
8. In the Make sure this is your organization dialog box, shown in Figure 1-17, click Join and then click Done.
FIGURE 1-17 Joining Azure AD on Windows 10
9. Click Start and click the current user (above the Settings icon). Click Switch Account. 10. Click Other user, and then sign in as the Azure AD user.
11. Depending on organizational settings, your users might be prompted to setup Windows Hello. By default, they will be prompted to setup a PIN. When prompted to setup a PIN, click Set Up PIN.
12. Click Set It Up Now.
13. In the Verify Your Identity dialog box, in the Pick A Verification method list, users can choose a number of methods, including text message. Click Text message and then enter your mobile or cell phone number. Click Next.
14. After receiving the code on your phone, enter it into the Enter Security code box, and then click Next.
15. In the Set Up A PIN dialog box, enter a six digit (by default) PIN in both text boxes and then click OK.
16. Click OK. At this point, the sign on process will complete and you should be presented with the Windows 10 desktop interface.
1. In the Azure AD admin center, click Azure Active Directory. 2. Click Devices, and then click All devices.
FIGURE 1-18 Viewing All devices in Azure AD
Configure Windows Hello
Windows Hello enables your users to sign in by using a biometric authentication system, such as facial recognition or fingerprints. Windows Hello for Business extends this to use a multi-factor authentication to sign in to Windows 10. Users can use a PIN or biometric sign-in system to sign in to a Windows 10 computer. This enables users to authenticate to apps, enterprise content, and online authentication providers.
NOTE WINDOWS HELLO
When Windows 10 first shipped, it included two separate authentication technologies: Microsoft Passport and Windows Hello. These two technologies worked together to provide multi-factor authentication. With Windows 10 Creators Update, Microsoft has combined these two
technologies under the Windows Hello name.
MORE INFO WINDOWS HELLO FOR BUSINESS
You can learn more about Windows Hello for Business at: https://docs.microsoft.com/en-gb/windows/access-protection/hello-for-business/hello-identity-verification.
Thought experiments
In these thought experiments, demonstrate your skills and knowledge of the topics covered in this chapter. You can find the answers to these thought experiments in the next section.
Scenario 1
You manage a small business that has seven employees, and each employee has multiple devices that they use to perform work. You don’t have an Active Directory domain. Sometimes the users are at the company, sometimes at home, and often in a hotel. Users don’t always have Internet access.
Users complain that they can’t always access their work documents and that when they use
Microsoft Office on their devices, they get a different user experience on all of them. Their settings and preferences need to be reset repeatedly for each device as they change them. You want to resolve these problems (and others, including mandating Microsoft Office updates), but you don’t have a lot of money to spend.
1. What should you set up to resolve all these issues, all without incurring a substantial expense? 2. Where would you store the users’ data?
3. If you want to delegate some of the responsibilities for managing your solution, what types of administrator would you create to manage support tickets?
Scenario 2
You’ve been asked to create and configure a multi-factor authentication solution that can be used to validate users in an enterprise domain. You’ve also been instructed to include digital certificates in that solution. Your client doesn’t want to rely on a third party CA, and instead wants to use the Active Directory Certificate Services (AD CS) in Windows Server 2016. Answer the following questions regarding this task.
1. The network currently doesn’t include a PKI infrastructure. Will you need to add it? 2. Where will the client certificates you create be stored?
3. Where will the trusted root certificates you create be stored?
4. What command can you run, from a Run dialog box, on a client computer to view the certificates stored on that machine?
Thought experiment answers
This section provides the solutions for the tasks included in the thought experiment.