Exam Ref
real-world mastery of implementing and configuring Windows•
Install and Configure Servers•
Configure Server Roles and Features•
Configure Hyper-V•
Deploy and Configure Core Network Services•
core Windows Server 2012 infrastructureCertification
Microsoft Certified Solutions
(MCSA) certifications validate
required for the MCSA: Windows Server 2012 certification.
microsoft.com/learning/certification
Craig Zacker
Exam Ref 70-412:
Configuring Advanced
Windows Server 2012 R2
Services
PUBLISHED BY Microsoft Press
A Division of Microsoft Corporation One Microsoft Way
Redmond, Washington 98052-6399
Copyright © 2014 by J.C. Mackin (Content); Orin Thomas (Content)
All rights reserved. No part of the contents of this book may be reproduced or transmitted in any form or by any means without the written permission of the publisher.
Library of Congress Control Number: 2014931891 ISBN: 978-0-7356-7361-8
Printed and bound in the United States of America.
First Printing
Microsoft Press books are available through booksellers and distributors worldwide. If you need support related to this book, email Microsoft Press Book Support at [email protected]. Please tell us what you think of this book at http://www.microsoft.com/learning/booksurvey.
Microsoft and the trademarks listed at http://www.microsoft.com/en-us/legal/intellectualproperty/Trademarks/ EN-US.aspx are trademarks of the Microsoft group of companies. All other marks are property of their respective owners.
The example companies, organizations, products, domain names, email addresses, logos, people, places, and events depicted herein are fictitious. No association with any real company, organization, product, domain name, email address, logo, person, place, or event is intended or should be inferred.
This book expresses the author’s views and opinions. The information contained in this book is provided without any express, statutory, or implied warranties. Neither the authors, Microsoft Corporation, nor its resellers, or distributors will be held liable for any damages caused or alleged to be caused either directly or indirectly by this book.
Acquisitions Editor: Anne Hamilton
Developmental Editor: Karen Szall
Editorial Production: Box Twelve Communications
Technical Reviewer: Brian Svidergol
Contents at a glance
Introduction xi
Preparing for the exam
xiii
CHApTER 1 Configure and manage high availability 1
CHApTER 2 Configure file and storage solutions 83 CHApTER 3 Implement business continuity and disaster recovery 151
CHApTER 4 Configure network services 215
CHApTER 5 Configure the Active Directory infrastructure 267
CHApTER 6 Configure access and information protection solutions 309
v
What do you think of this book? We want to hear from you!
Microsoft is interested in hearing your feedback so we can continually improve our books and learning resources for you. To participate in a brief online survey, please visit:
www.microsoft.com/learning/booksurvey/
Contents
Introduction ix
Microsoft certifications ix
Errata & book support x
We want to hear from you x
Stay in touch x
Preparing for the exam
xi
Chapter 1
Configure and manage high availability
1
Objective 1.1: Configure Network Load Balancing (NLB) . . . 1
Network Load Balancing fundamentals 2
Creating and configuring an NLB cluster 3
Configuring port rules 8
Upgrading an NLB cluster 14
Objective summary 16
Objective review 16
Objective 1.2: Configure failover clustering . . . 17
Understanding failover clustering 18
Creating a failover cluster 20
Configuring cluster networking 23
Using Active Directory Detached Clusters 24
Configuring cluster storage 25
Configuring Quorum 32
Implementing Cluster Aware Updating 34
Migrating a failover cluster 38
Objective summary 40
vi Contents
Objective 1.3: Manage failover clustering roles . . . 42
Configuring roles 42
Assigning role startup priorities 48
Using node drain 49
Monitoring services on clustered virtual machines 50
Objective summary 54
Objective review 55
Objective 1.4: Manage virtual machine (VM) movement . . . 56
Performing a live migration 57
Additional migration considerations 66
Using storage migration 70
Configuring virtual machine network health protection 72
Configuring drain on shutdown 73
Objective summary 74
Objective review 74
Answers . . . 77
Chapter 2
Configure file and storage solutions
83
Objective 2.1: Configure advanced file services . . . 83
What is BranchCache? 84
Configuring BranchCache 87
Using File Server Resource Manager (FSRM) 92
Implementing file access auditing 95
Installing the Server for NFS component 96
vii Contents
Using Features on Demand 136
Installing the Data Deduplication component 139
Using storage tiers 142
Objective summary 144
Objective review 144
Answers . . . 146
Chapter 3 Implement business continuity and disaster recovery 151
Objective 3.1: Configure and manage backups . . . 151 Using the Windows Server Backup feature 152Understanding Backup Operators 160
Using the Shadow Copies feature (Previous Versions) 160
Configuring Windows Azure Backup 162
Objective summary 171
Objective review 172
Objective 3.2: Recover servers . . . 174 Using the Advanced Boot Options menu 174 Recovering servers with the Windows installation media 178
Objective summary 184
Objective review 185
Objective 3.3: Configure site-level fault tolerance . . . 186
Configuring Hyper-V physical host servers 186
Configuring VMs 190
Performing Hyper-V Replica failover 197 Using Hyper-V Replica in a failover cluster 201 Configuring Hyper-V Replica Extended Replication 204
Using Global Update Manager 205
Recovering multi-site failover clusters 206
Objective summary 207
Objective review 208
Answers . . . 210
Chapter 4
Configure network services
215
Objective 4.1: Implement an advanced DHCP solution . . . 215 Creating and configuring superscopes and multicast scopes 216
viii Contents
Configuring high availability for DHCP 222
Configuring DNS registration 223
Configuring DHCP Name Protection 224
Objective summary 226
Objective review 227
Objective 4.2: Implement an advanced DNS solution . . . 228
Implementing DNSSEC 229
Configuring DNS Socket Pool 230
Configuring DNS cache locking 230
Configuring DNS logging 231
Configuring delegated administration 232
Configuring recursion 233
Configuring netmask ordering 234
Configuring a GlobalNames zone 235
Analyzing zone-level statistics 235
Objective summary 237
Objective review 238
Objective 4.3: Deploy and manage IPAM . . . 239
Understanding IPAM 239
Installing and configuring IPAM 240
Managing address space 250
Configuring IPAM database storage 258
Objective summary 260
Objective review 260
Answers . . . 262
Chapter 5 Configure the Active Directory infrastructure
267
Objective 5.1: Configure a forest or a domain . . . 267 Implementing multi-domain Active Directory environments 268 Implementing multi-forest Active Directory environments 269 Configuring interoperability with previous versions ofActive Directory 270
Upgrading existing domains and forests 271 Configuring multiple user principal name (UPN) suffixes 272
Objective summary 274
ix Contents
Objective 5.2: Configure trusts . . . 276
Understanding trust concepts 276
Configuring external trusts and realm trusts 277
Configuring forest trusts 278
Configuring shortcut trusts 279
Configuring trust authentication 280
Configuring Security IDentifier (SID) filtering 280
Configuring name suffix routing 281
Objective summary 282
Objective review 283
Objective 5.3: Configure sites . . . 284
Configuring sites and subnets 284
Creating and configuring site links 287
Managing registration of SRV records 290 Moving domain controllers between sites 291
Objective summary 293
Objective review 293
Objective 5.4: Manage Active Directory and SYSVOL replication . . . 294 Configuring replication to Read-Only Domain Control
-lers (RODCs) 295
Monitoring and managing replication 298 Upgrading SYSVOL replication to Distributed File
Sys-tem Replication (DFSR) 300
Objective summary 301
Objective review 302
Answers . . . 303
Chapter 6 Configure access and information protection
solutions
309
Objective 6.1: Implement Active Directory Federation Services (AD FS) . . .309
x Contents
Objective 6.2: Install and configure Active Directory
Certificate Services (AD CS) . . . 318 Installing an Enterprise Certificate Authority (CA) 318
Configuring CRL Distribution Points (CDP) 322
Installing and configuring online responders 323 Implementing administrative role separation 323
Configuring CA backup and recovery 325
Objective summary 327
Objective review 327
Objective 6.3: Manage certificates . . . 328
Managing certificate templates 328
Implementing and managing certificate validation and
revocation 330
Managing certificate enrollment 331
Managing certificate renewal 332
Configuring and managing key archival and recovery 332 Implementing and managing certificate deployment 334
Objective summary 335
Objective review 336
Objective 6.4: Install and configure Active Directory Rights
Management Services (AD RMS) . . . 337 Installing a licensing or certificate AD RMS server 337 Managing AD RMS Service Connection Point (SCP) 338
Managing RMS templates 339
Configuring exclusion policies 340
Backing up and restoring AD RMS 341
Objective summary 342
Objective review 343
Answers . . . .344
Index 349
What do you think of this book? We want to hear from you!
Microsoft is interested in hearing your feedback so we can continually improve our books and learning resources for you. To participate in a brief online survey, please visit:
xi
Introduction
Unlike other exams in the MCSA track, the Microsoft 70-412 certification exam deals with advanced topics such as Active Directory Rights Management Services and Active Directory Federation Services. Much of the exam comprises topics that even experienced systems ad-ministrators encounter less frequently than they encounter core infrastructure technologies, like Active Directory Domain Services and Windows Deployment Services.
Candidates for this exam are Information Technology (IT) Professionals who want to validate their advanced Windows Server 2012 R2 operating system configuration skills and knowledge. To pass this exam, candidates require strong understanding of how to config -ure and manage Windows Server 2012 R2 high availability, file and storage solutions, busi -ness and disaster recovery, network services, Active Directory infrastructure, and access and information protection solutions. To pass this exam, candidates require a thorough theoreti-cal understanding as well as meaningful practitheoreti-cal experience implementing the technolo-gies involved. If you lack this experience, consider using the Microsoft Press companion title, Training Guide: Configuring Advanced Windows Server 2012 R2 Services, which contains extensive practical lab exercises.
This Exam Reference book covers every exam objective, but it does not cover every exam question. Only the Microsoft exam team has access to the exam questions and Microsoft regularly adds new questions to the exam, making it impossible to cover specific questions. You should consider this book a supplement to your relevant real-world experience and other study materials. If you encounter a topic in this book that you do not feel completely com-fortable with, use the links you’ll find in text to find more information and take the time to research and study the topic. Great information is available on TechNet as well as in product team blogs and online forums.
Microsoft certifications
xii Introduction
MORE INFO ALL MICROSOFT CERTIFICATIONS
For information about Microsoft certifications, including a full list of available certifica
-tions, go to http://www.microsoft.com/learning/en/us/certification/cert-default.aspx.
Errata & book support
We’ve made every effort to ensure the accuracy of this book and its companion content. Any errors that have been reported since this book was published are listed at:
http://aka.ms/ER412R2/errata
If you find an error that is not already listed, you can report it to us through the same page.
If you need additional support, email Microsoft Press Book Support at [email protected].
Please note that product support for Microsoft software is not offered through the ad-dresses above.
We want to hear from you
At Microsoft Press, your satisfaction is our top priority, and your feedback our most valuable asset. Please tell us what you think of this book at:
http://aka.ms/tellpress
The survey is short, and we read every one of your comments and ideas. Thanks in ad-vance for your input!
Stay in touch
xiii
Preparing for the exam
preparing for the exam
1
C H A P T E R 1
Configure and manage
high availability
This domain relates to multi-server features that help selected services and applications remain online and responsive to clients. These features include Network Load Balancing, failover clustering, and the live migration of virtual machines (VMs). Understanding the topics covered in this domain requires a deep understanding of new technologies that you might not have implemented in your own environment. You should supplement the information in this chapter with some hands-on practice so that you can develop an under-standing of how you can use these technologies to address
real-world scenarios and solve problems in an advanced server environment.
Objectives in this chapter:
■ Objective 1.1: Configure Network Load Balancing
(NLB)
■ Objective 1.2: Configure failover clustering
■ Objective 1.3: Manage failover clustering roles
■ Objective 1.4: Manage virtual machine (VM) movement
Objective 1.1: Configure Network Load Balancing
(NLB)
Network Load Balancing (NLB) is a Windows Server feature that lets you make a group of servers appear as one server to external clients. This group of servers joined through NLB is called an NLB cluster or a serverfarm, and each member server in the farm is usually called a host or node. The purpose of NLB is to improve both the availability and scalability of a service hosted on all the individual nodes.
NLB is surprisingly easy to get up and running in a default configuration. However, for the purposes of the 70-412 exam, you need to understand more than the basics about NLB. Make sure you also learn about the advanced configuration choices for the feature, such as priority settings and all port rule settings.
i m p o r t a n t
2 CHAPTER 1 Configure and manage high availability
This objective covers how to:
■ Install NLB nodes
■ Configure NLB prerequisites
■ Configure affinity
■ Configure port rules
■ Configure cluster operation mode
■ Upgrade an NLB cluster
Network Load Balancing fundamentals
NLB improves both the availability and scalability of a service by receiving all client requests and distributing them among two or more servers. To each client, an NLB cluster just looks like a single server assigned one name and one address.
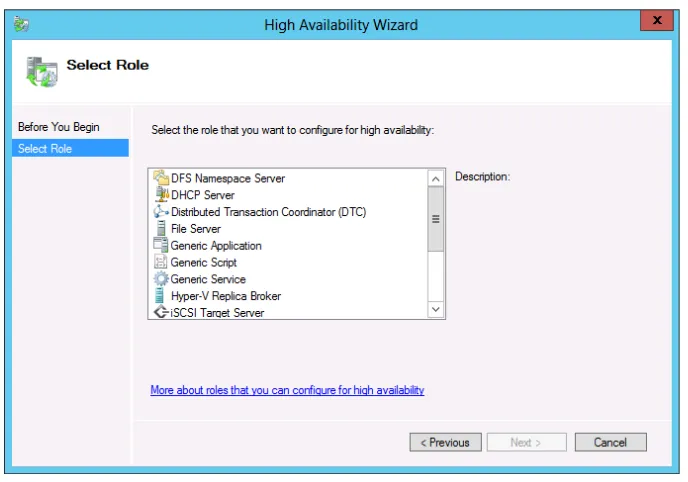
In the most typical scenario, NLB is used to create a web farm—a group of computers running Windows Server and working to support a website or a web application. But you can also use NLB to create other types of server farms: Remote Desktop Server farms, VPN server farms, or proxy server/firewall farms. Figure 1-1 shows a deployment of an NLB cluster of servers running Internet Information Services (IIS) behind an NLB cluster of servers running Forefront Threat Management Gateway (TMG).
Server running Forefront TMG
Servers running IIS
Server running Forefront TMG
Servers running IIS LAN (ethernet)
LAN (ethernet)
To data storage Internet
2-host NLB cluster 4 -host NLB cluster
FIGURE 1-1 Basic diagram for two connected NLB clusters
Objective 1.1: Configure Network Load Balancing (NLB) CHAPTER 1 3 live hosts. Second, NLB supports scalability because a group of servers can handle more client
requests than a single server can. And as the demand for a service such as a website grows, you can keep adding more servers to the farm so that it can handle an even greater workload.
An important point to understand about NLB is that each individual client is directed to exactly one server in the NLB cluster. The client therefore gets just the processing, memory, and storage resources of that one host only. Each node in the NLB cluster works indepen-dently without access to the resources in the other servers, and changes made on one server are not copied to other nodes in the farm. You use NLB to support what are termed state-less applications. You shouldn’t use NLB with stateful applications such as database servers that allow individual clients to update data because such an arrangement would result in an inconsistent experience from client to client.
Creating and configuring an NLB cluster
Next, install the Network Load Balancing feature on the servers. You can install the NLB feature by using the Add Roles and Features Wizard available in Server Manager. On the 70-412 exam, you’re more likely to need to know how to install this feature by using Windows PowerShell. To do that, type the following at an elevated Windows PowerShell prompt:
Install-WindowsFeature NLB -IncludeManagementTools
NOTE ALIASES
Add-WindowsFeature is an alias of Install-WindowsFeature, and Remove-WindowsFeature is an alias of Uninstall-WindowsFeature.
After you install the NLB feature with the management tools, you need to configure the NLB cluster by using either the Network Load Balancing Manager graphical tool or Windows PowerShell. You can access Network Load Balancing Manager from the Tools menu of Server Manager. You can also open Network Load Balancing Manager by typing Nlbmgr at a command prompt.
EXAM TIP
In Windows Server 2012 R2, management tools are not always installed alongside the
associated roles or features as they were in previous versions of Windows Server. A man
4 CHAPTER 1 Configure and manage high availability
To start the New Cluster Wizard, in the Network Load Balancing Manager console tree, right-click Network Load Balancing Clusters and then click New Cluster as shown in Figure 1-2. Note that even though the user interface refers an NLB cluster as simply a “cluster,” on the 70-412 exam, you are much more likely to see such a cluster called specifically an “NLB cluster” or a “farm.”
FIGURE 1-2 Creating a new NLB cluster
Objective 1.1: Configure Network Load Balancing (NLB) CHAPTER 1 5
FIGURE 1-3 Specifying an interface reserved for NLB cluster traffic
The second page of the wizard is the New Cluster: Host Parameters page, shown in Figure 1-4. The settings on this page apply only to the local host (node), not to the entire NLB cluster.
FIGURE 1-4 The second page of the New Cluster Wizard
6 CHAPTER 1 Configure and manage high availability
■ Priority (Unique Host Identifier) The Priority setting is a value from 1 to 32 that is unique to each host in the NLB cluster. The value 1 is given to the host with the high-est priority. This priority value determines which node in the NLB cluster will handle network traffic that is not load balanced (in other words, not covered by the port rules you create later in the wizard). If the host with the highest priority is not available, the host with the next highest priority handles this non-load-balanced traffic. Also known as the Host Priority setting.
■ Dedicated IP Addresses Here you can modify the local IP address or set of
addresses that the host connects to the NLB cluster. You would normally need to adjust the default IP addresses here only if you’ve assigned more than one IP address to the interface you already dedicated to NLB. Remember, the IP addresses we’re talk-ing about on this page aren’t assigned to the cluster as a whole. They’re used for the local host only. These dedicated IP addresses you assign to the individual hosts in an NLB cluster must all be located on one logical subnet and be reachable externally as necessary through a working routed pathway or from the local network segment.
■ Initial Host State Here you can set the default state of the local node within the NLB cluster. The options are Started (the default), Suspended, or Stopped. As you can see in Figure 1-4, you can also enable the option to retain the suspended state after the computer restarts.
Now you get to choose the virtual IP address or addresses that will be assigned to the entire server farm as a whole. The “virtual” cluster address or addresses you choose here must be on the same logical subnet as the “dedicated” host IP address or addresses you just chose on the previous page.
The New Cluster: Cluster IP Addresses page is shown in Figure 1-5.
Objective 1.1: Configure Network Load Balancing (NLB) CHAPTER 1 7 During setup, you use the New Cluster: Cluster Parameters page, shown in Figure 1-6, to
configure the cluster’s IP address, subnet mask, fully qualified domain name, network address, and cluster operation mode. These settings can be modified after the cluster is created.
FIGURE 1-6 The fourth page of the New Cluster Wizard
This page includes a Cluster IP Configuration area at the top and a Cluster Operation Mode at the bottom.
■ Cluster IP Configuration These settings are easy to understand. Here you just verify the virtual IP address and add a Fully Qualified Domain Name (FQDN) for the entire NLB cluster in the Full Internet Name text box. But you should also note the Network Address value: It’s a virtual MAC address assigned to all network adapters that you have dedicated to the NLB cluster.
■ Cluster Operation Mode The meaning of this setting is a bit less obvious. In it you set the new NLB cluster’s operation mode to Unicast, Multicast, or IGMP Multicast. Let’s go over what these mean in this context:
■ Unicast: Unicast mode (the default) allows the NLB cluster’s MAC address to com-pletely replace each host adapter’s MAC address. This setting is technically efficient, but it’s incompatible with some network adapters and in some virtual environments.
■ Multicast: In this setting, each host can keep its original MAC address. The cluster MAC address is used as a multicast address, which each host eventually translates into its own original MAC address.
8 CHAPTER 1 Configure and manage high availability
Configuring port rules
Port rules are the most important part of an NLB cluster’s configuration. These port rules define which traffic will be load balanced in the NLB cluster and how it will be load-balanced. Each port rule matches incoming traffic as defined by a range of destination TCP or UDP ports and (optionally) a destination IP address. You aren’t permitted to create two rules that match the same incoming traffic, so you never have to deal with rule conflicts, rule priority, or rule order. Only one port rule can ever apply to an incoming packet.
One port rule is predefined, which you can see in Figure 1-7. The predefined rule essentially matches all TCP/IP traffic (more precisely, all traffic sent between TCP and UDP ports 0 and 65535). You might want to keep this predefined rule for your NLB cluster in the real world, but it’s not very useful for exam 70-412 preparation.
FIGURE 1-7 The fifth page of the New Cluster Wizard
Objective 1.1: Configure Network Load Balancing (NLB) CHAPTER 1 9
FIGURE 1-8 Adding or editing an NLB port rule
On the Add/Edit Port Rule page, you can edit the following options:
■ Cluster IP Address This area lets you define the matching criteria for a new port rule so that it matches incoming traffic directed at just one of the cluster’s addresses. By default, a new port rule matches all of an NLB cluster’s addresses.
■ Port Range and Protocols These sections let you define the matching criteria for a new port rule so that it matches incoming traffic directed at a contiguous range of one or more TCP ports, UDP ports, or both. The range you define cannot overlap a range defined in another port rule.
■ Filtering Mode This section allows you to specify how requests are distributed. You can choose between Multiple Host, Single Host, and Disable This Port Range.
The Multiple Host filtering mode is the default setting. Multiple Host filtering mode pro-vides both load balancing and fault tolerance for all incoming requests matching the port rule. Client requests matching the port rule are distributed among active nodes in the farm. When you choose the Multiple Host filtering mode, you need to choose an affinity setting, which determines how a client that is interacting with the cluster during a session will re-spond. The options are None, Single and Network and work in the following manner:
10 CHAPTER 1 Configure and manage high availability
■ Single With this setting, if a client named Client1 connects to a node named Host1 on the first connection to an NLB cluster, then Client1 will keep connecting to Host1 in the future. If a client named Client2 connects to an NLB node named Host2, then Client2 will keep connecting to Host2 in the future, and so on. The advantage of this setting is that it allows user state data to be maintained from one session to the next if this data is saved on the local node. This is the default affinity setting.
■ Network With this option, each node in the NLB cluster is responsible for all con-nections that match a given /24 IPv4 network address. For example, if a client named Client1 first connects to the NLB cluster through a proxy server named Proxy1 that is assigned the address 207.46.130.101 and then later connects to the NLB cluster through a proxy server named Proxy 2 that is assigned the address 207.46.130.102, the connection will be returned to the same NLB host because both proxy servers are assigned the same /24 network address. (207.46.130.z).
Be aware that your choice here among these three Affinity settings can be restricted by the application you are hosting in the NLB cluster. For example, some applications support the Affinity-None setting, but others don’t.
The Single Host filtering mode directs all matching traffic toward the host with the highest priority value. If that host fails, then the traffic is directed to the host with the next high -est priority. You might remember that this same service is provided for traffic that does not match any port rule at all. So why bother creating a port rule in Single Host mode? The advantage of configuring a port rule in Single Host mode is that with a port rule you can later define a custom server priority for this particular traffic with the Handling Priority setting in Network Load Balancing Manager.
EXAM TIP
You need to understand the Affinity-None, Affinity-Single, and Affinity-Network settings for the 70-412 exam.
The Timeout setting extends affinity through configuration changes in the NLB cluster up to the number of minutes specified. If, for example, the NLB cluster is used to support a web storefront, a customer might experience the benefit of the Timeout setting by always being able to retain items in a shopping cart for the number of minutes specified. Without extending affinity with the Timeout setting, the items in the shopping cart could theoretically disappear if the customer’s connection is redirected to another host after a configuration change to the server farm. The Disable This Port Range setting allows you to have the NLB cluster drop all traffic on the specified ports.
Objective 1.1: Configure Network Load Balancing (NLB) CHAPTER 1 11
FIGURE 1-9 The host-specific Add/Edit Port Rule dialog box
When editing an existing port rule, you can configure the following settings:
■ Load Weight This setting allows you to assign a disproportionate weight of the workload to the host whose properties you are editing. By default, Equal is selected, which gives the node an average-weighted or proportional distribution of the network load. If you clear the Equal setting (as shown in Figure 1-9), you can assign the host a greater or smaller share of the network traffic directed at the farm. In this case, the proportion handled is determined by the local load weight divided by the total of all the load weights across the NLB cluster. The default weight is 50.
■ Handling Priority This setting is configurable only if you have enabled Single Host filtering mode for the rule. With Single Host filtering mode, the server available with the highest priority always receives the traffic specified in the port rule. The advantage of creating for specific traffic a port rule with Single Host filtering mode enabled, as opposed to creating no port rule at all, is that with a defined port rule you can set cus -tom server priority for that traffic. The Handling Priority is where you set that cus-tom server priority. If this value is not set here, the priority value assigned to the local host is the one set in Host Parameters for the entire cluster.
EXAM TIP
Remember the difference between Host priority and Handling priority. Host Priority
determines which server in an NLB cluster receives traffic that is not covered by a port rule.
Handling Priority is a custom server priority value used for traffic covered by a port rule
12 CHAPTER 1 Configure and manage high availability
Adding hosts in the NLB cluster
To add hosts to an existing NLB cluster, in the Network Load Balancing Manager console tree, right-click the cluster and then select Add Host To Cluster, as shown in Figure 1-10. This step opens the Add Host To Cluster Wizard. You can add up to 16 hosts to an NLB cluster.
FIGURE 1-10 Installing hosts in an NLB cluster after it is created
Understanding NLB cmdlets for Windows powerShell
To show all available cmdlets for NLB, type Get-Command *nlb* or Get-Command -Module NetworkLoadBalancingClusters at a Windows PowerShell prompt.
TABLE 1-1 Network Load Balancing cmdlets in Windows Server 2012 and Windows Server 2012 R2
cmdlet Description
Add-NlbClusterNode Adds a new node to an NLB cluster
Add-NlbClusterNodeDip Adds a dedicated IP address to an NLB cluster
Add-NlbClusterPortRule Adds a new port rule to an NLB cluster
Add-NlbClusterVip Adds a virtual (cluster-wide) IP address to an NLB cluster
Disable-NlbClusterPortRule Disables a port rule on an NLB cluster or on a specific host in the cluster
Enable-NlbClusterPortRule Enables a port rule on an NLB cluster or on a specific node
in the cluster
Objective 1.1: Configure Network Load Balancing (NLB) CHAPTER 1 13
cmdlet Description
Get-NlbClusterNode Retrieves information about an NLB cluster node
Get-NlbClusterNodeDip Retrieves the dedicated IP address
Get-NlbClusterNodeNetworkInterface Retrieves information about interfaces on an NLB host
Get-NlbClusterPortRule Retrieves port rule objects
Get-NlbClusterVip Retrieves virtual IP addresses
New-NlbCluster Creates an NLB cluster on the specified interface that is
defined by the node and network adapter name
Remove-NlbCluster Deletes an NLB cluster
Remove-NlbClusterNode Removes a node from an NLB cluster
Remove-NlbClusterNodeDip Removes a dedicated IP address from an NLB cluster
Remove-NlbClusterPortRule Removes a port rule from an NLB cluster
Remove-NlbClusterVip Removes a virtual IP address from an NLB cluster
Resume-NlbCluster Resumes all nodes in an NLB cluster
Resume-NlbClusterNode Resumes the node in an NLB cluster that was suspended
Set-NlbCluster Edits the configuration of an NLB cluster
Set-NlbClusterNode Edits an NLB cluster’s node settings
Set-NlbClusterNodeDip Edits the dedicated IP address of an NLB cluster
Set-NlbClusterPortRule Edits the port rules for an NLB cluster
Set-NlbClusterPortRuleNodeHandlingPriority Sets the host priority of a port rule for a specific NLB node
Set-NlbClusterPortRuleNodeWeight Sets the load weight of a port rule for a specific NLB node
Set-NlbClusterVip Edits the virtual IP address of an NLB cluster
Start-NlbCluster Starts all nodes in an NLB cluster
Start-NlbClusterNode Starts an NLB cluster
Stop-NlbCluster Stops all nodes of an NLB cluster
Stop-NlbClusterNode Stops a node in an NLB cluster
Suspend-NlbCluster Suspends all nodes of an NLB cluster
14 CHAPTER 1 Configure and manage high availability
Upgrading an NLB cluster
To upgrade an existing NLB cluster to Windows Server 2012 or Windows Server 2012 R2, you always have the option of taking the entire cluster offline, upgrading all the hosts, and then bringing the cluster back online. However, the disadvantage of this procedure is that the cluster naturally cannot service client requests during the period that it is offline.
Objective 1.1: Configure Network Load Balancing (NLB) CHAPTER 1 15
Thought experiment
Configuring Network Load Balancing at Tailspin Toys
In the following thought experiment, apply what you’ve learned about this
objective to predict what steps you need to take. You can find answers to these
questions in the “Answers” section at the end of this chapter.
You are the systems administrator at Tailspin Toys and you are responsible for
man-aging the server infrastructure that hosts the Tailspin Toys website. The traffic to
Tailspin Toys website has been gradually increasing. At present the website design has a single Windows Server 2012 R2 server running IIS as the front end, hosting the site and a single Windows Server 2012 R2 server hosting a SQL Server 2012 instance
hosting customer data. Increased traffic to the website has decreased the speed at which it responds. Additionally, in the last month, the website has been offline
when software updates are applied. In the past, this was considered acceptable by management, but now they want the website to be available to customers even when software updates are being applied.
You have the following objectives:
■ Make the IIS and SQL Servers highly available.
■ Ensure that the website remains online when any single server is restarted to apply software updates.
■ Clients that are browsing the Tailspin Toys website should interact with the same IIS server for the duration of their session and should connect to a different server running IIS only in the event that the one they were initially connected to fails.
■ Ensure that clients who are connected to a server running IIS are disconnected gracefully prior to software updates being applied to the server.
With the preceding information in mind, answer the following questions.
1. Which of the Tailspin Toys servers can you make highly available by deploying
Network Load Balancing?
2. After implementing Network Load Balancing, what function should you use
to ensure that any connections to the highly available servers are terminated gracefully?
3. Which filtering and affinity mode and option would you select to ensure that
16 CHAPTER 1 Configure and manage high availability
Objective summary
■ Network Load Balancing (NLB) lets you configure a group of servers so that they
appear as one server to external clients. Client requests received by the NLB cluster are distributed among all the hosts (also called nodes) when these requests match configured port rules.
■ To best learn what you need to know about NLB for the 70-412 exam, you should learn all of the configuration settings available in the five pages of the New Cluster Wizard and all port rule settings.
■ When no port rule matches a client request, the request is directed to the node with the highest host priority.
■ The Affinity setting determines whether a particular client will continue to be directed back to the same host in the NLB cluster on successive visits. Single Affinity provides client-host affinity on a per-client basis. Network Affinity assigns to one host all clients assigned the same /24 network address.
■ You can override the default host priority for any traffic that you don’t want to be load-balanced among all nodes in the NLB cluster. To set a custom host priority, first create a port rule matching the desired traffic with Single Host filtering mode enabled. Then modify the Handling Priority parameter by editing the port rule in the properties of the node you want to assign the custom priority.
■ You can use the Load Weight setting to modify the relative weight of the client work-load assigned to a particular node in the cluster.
Objective review
Answer the following questions to test your knowledge of the information in this objective. You can find the answers to these questions and explanations of why each answer choice is correct or incorrect in the “Answers” section at the end of the chapter.
1. You have configured an NLB cluster of 10 web servers running Windows Server 2012 R2 and IIS. You discover that web traffic destined for the NLB cluster is distributed very unevenly among the individual NLB cluster members. Port rule settings for each node have not been modified from the defaults.
You want to ensure that client web requests are distributed as evenly as possible among all 10 nodes in the NLB cluster. Which setting should you enable?
A. Affinity-None
B. Affinity-Single
C. Affinity-Network
Objective 1.2: Configure failover clustering CHAPTER 1 17 2. Your network includes an NLB cluster that is used to support an e-commerce site. Use
of the site is growing. Whenever you add a new node to the NLB cluster, you receive complaints from customers that items in their shopping carts disappear. You want to reduce the likelihood that users will experience this problem in the future.
What should you do?
A. Modify the Load Weight settings
B. Enable the Single Host filtering mode
C. Enable the Multiple Host filtering mode
D. Modify the Timeout settings
3. You have configured an NLB cluster. You want to designate a particular server within the NLB cluster to handle all the traffic that is not caught by any port rule. What should you do?
A. Modify the Load Weight setting
B. Enable the Single Host filtering mode
C. Configure the Host Priority settings
D. Configure a Handling Priority
Objective 1.2: Configure failover clustering
Failover clustering is a feature that helps ensure that selected services or applications re-main available even if a server hosting them fails. Unlike NLB, failover clustering is normally used to provide high availability for data that can be frequently updated by clients. Typical services hosted in failover clusters include database servers, mail servers, print servers, virtual machines hosted in Hyper-V (often hosting a critical application), and file servers.
18 CHAPTER 1 Configure and manage high availability
This objective covers how to:
■ Configure Quorum
■ Configure cluster networking
■ Restore single node or cluster configuration
■ Configure cluster storage
■ Implement Cluster Aware Updating
■ Upgrade a cluster
■ Configure and optimize clustered shared volumes
■ Configure clusters without network names
■ Configure storage spaces
Understanding failover clustering
A failover cluster is a group of servers configured in a way that protects chosen services or applications from failure. The services or applications configured for protection in a failover cluster are known alternately as roles, as clustered roles, as clustered services and applications, as highly available services and applications, or as services and applications configured for high availability. The individual servers in a failover cluster are called nodes. In a failover cluster, if a node fails, each role hosted on that failed node will immediately “fail over to” (start on) an-other node specified for that particular role. If just a role fails but the entire node doesn’t fail, that role is attempted to be restarted and eventually failed over to another node, if necessary. Users experience only minimal disruption, if any, as a result of this failover process.
There are important differences between NLB clusters and failover clusters. First of all, in a failover cluster, only one server normally hosts a clustered service at a time. And instead of each node reading from and writing to its own local disk, in a failover cluster the nodes store role data only in volumes that are located on shared storage such as on logical unit numbers (LUNs) located on an iSCSI or Fibre Channel SAN or on a shared Serial SCSI (SAS) disk array. This fact that there is only one source of data for roles in a failover cluster prevents the pos-sibility of data inconsistency for these clustered services from client to client. Consequently, failover clusters are especially useful to help ensure the availability of services for which clients can update data. Typical services you see hosted as roles in a failover cluster include a file server, a database server, a print server, a mail server, and even a virtual machine.
Objective 1.2: Configure failover clustering CHAPTER 1 19
Hosted service or application
Hosted service or application Failover
Shared bus or iSCSI connection
Failover cluster storage
Node 1 Node 2
FIGURE 1-11 In a failover cluster, when one server fails, another takes over and uses the same storage
Understanding the hardware components of a failover cluster
The hardware requirements for failover clusters extend to servers and storage. All compo-nents must meet the qualifications for the Certified for Windows Server 2012 or Windows Server 2012 R2 logo.
■ Server requirements A failover cluster requires at least two networked physical servers, or one physical server for each node you want in the cluster (up to a maximum of 64).
NOTE CONFIGURING VIRTUAL MACHINES FOR TESTING
You can configure a single-node cluster for testing purposes. An even better option for testing and learning about the feature, if you have only one physical server, is to configure two or more virtual machines as your nodes. Naturally, this option doesn’t provide protec-tion from physical server failure or allow you to host virtual machines as a clustered role on these already-virtual nodes.
20 CHAPTER 1 Configure and manage high availability
NOTE MORE ABOUT SANS
Generally, a SAN is special type of high-performance network dedicated to connecting servers to one or more storage arrays. The disk arrays on the SAN can be made to mimic locally-attached storage to the computers connected to the SAN. You “provision” logical disks (often called logical unit numbers, or LUNs) from a disk array to make them appear as local disks to the operating system. If you are new to SANs, you might want to search
for basic tutorials on this technology so you can feel more confident about this topic.
Note also that Objective 2.3 on the 70-412 exam is dedicated to iSCSI-related features in Windows Server 2012 R2, so the next chapter of this book covers iSCSI SAN concepts in more detail.
■ Hardware recommendations Recommendations are less likely to appear in a Microsoft exam than requirements are. Still, to help you understand how Windows Server 2012 or Windows Server 2012 R2 failover clusters are deployed in a production environment, you should know to follow these guidelines:
■ Use identical or nearly identical servers for each node.
■ If you use iSCSI or Fibre Channel over Ethernet (FCoE), each network adapter should be dedicated either to the LAN or the SAN, not both.
■ For fault tolerance, ensure that you assigned teamed network adapters for all connections. Ideally, you should also configure redundant switches, routers, and network paths to the cluster.
Understanding the software requirements of a failover cluster
Windows Server 2012 or Windows Server 2012 R2 failover clusters require either the Standard or Datacenter version of Windows Server 2012 or Windows Server 2012 R2. Failover clusters also require that all nodes be joined to the same Active Directory Domain Services (AD DS) domain. Finally, all nodes must have installed the Failover Clustering feature.
Creating a failover cluster
The questions you’ll see within Objective 1.2 on the 70-412 exam will most likely relate to the settings you can configure within an existing failover cluster. The steps required to create a new failover cluster are less likely to appear. Still, to prepare for the 70-412 exam, you really need to create your own failover cluster in a test network. Failover clusters are best under-stood when you see them in action. You can begin by creating a bare-bones failover cluster with an empty role and then configure all the required components later.
To create a failover cluster, join the servers to the appropriate AD DS domain and connect these servers to shared storage. You also need to install the Failover Clustering feature on all nodes in the cluster. You can use Server Manager or the following Windows PowerShell command:
Objective 1.2: Configure failover clustering CHAPTER 1 21 You also run checks to validate that your nodes meet the hardware and software
pre-requisites for a failover cluster before you create a cluster. You can run the validation tests by using the Validate A Configuration Wizard (by clicking Validate Configuration in the Actions pane of Failover Cluster Manager, as shown in Figure 1-12) or by using the Test-Cluster cmdlet in Windows PowerShell. If you don’t choose to run the validation tests manually, they will be performed automatically when you run the Create Cluster Wizard.
When you run the tests, you simply specify the nodes you will add to the cluster. You can also run the tests later again after you create the cluster by specifying the cluster by name, instead of specifying them according to node.
FIGURE 1-12 Validating failover server prerequisites
After the wizard completes, make any necessary configuration changes and then rerun the test until the configuration is successfully validated. Once the configuration is validated, create the cluster by using the Create Cluster Wizard or the New-Cluster cmdlet in Windows PowerShell. This step installs the software foundation for the cluster, converts the attached storage into cluster disks, and creates a computer account in Active Directory for the cluster.
To launch the Create Cluster Wizard, in Failover Cluster Manager, click Create Cluster in the Actions pane. The procedure is simple. You need to make only the following decisions:
■ The nodes you want to add to the cluster.
■ The name of the new cluster.
22 CHAPTER 1 Configure and manage high availability
■ Whether to keep the default option of adding all eligible storage to the cluster. To override this default behavior in the wizard, you can clear Add All Eligible Storage To The Cluster. With the New-Cluster cmdlet, use the -NoStorage option.
You can use an empty role to test the basic functionality of the failover cluster before you configure any components such as networking, storage, Quorum, or roles. To create an empty role in a failover cluster, select the Roles node in the console tree in Failover Cluster Manager and then click Create Empty Role in the Actions pane, as shown in Figure 1-13.
FIGURE 1-13 Creating an empty role
After you click Create Empty Role, a new role appears in the center pane when the Roles node is selected, as shown in Figure 1-14.
Objective 1.2: Configure failover clustering CHAPTER 1 23 After you create the basic failover cluster and create an empty role, you can test the
failover functionality of the cluster in Failover Cluster Management. To do this, in the center pane of the console, select the role. Then, in the Actions pane, click Move, and then click Best Possible Node, as shown in Figure 1-15. You can observe the status changes in the center pane of the snap-in as the clustered service instance is moved. If the Owner Node value changes successfully from the name of one node to another, the failover is functional in the cluster.
FIGURE 1-15 Testing a failover cluster by moving a role to another node
To really make the failover cluster fully functional, you need to configure other
components after the cluster is created. The following sections provide a brief overview of what you need to need to understand for the exam about configuring cluster networking, storage, and Quorum.
Configuring cluster networking
The cluster networking settings you need to know for the 70-412 exam can be found in the cluster network properties dialog box shown in Figure 1-20. You access these settings by right-clicking a particular network in the console tree of Failover Cluster Manager and then clicking properties.
As shown in Figure 1-16, networks that are detected in Failover Cluster Manager can be assigned to one of three categories:
■ Allow Cluster Network Communication On This Network
■ Allow Cluster Network Communication On This Network and Allow Clients To Connect Through This Network
24 CHAPTER 1 Configure and manage high availability
If you want to reserve a network for intra-cluster or “heartbeat” communication and prevent clients from communicating through the network, clear Allow Clients To Connect Through This Network. (The heartbeat determines whether a service is still available on a given node.) If you are reserving the network for the nodes’ connection to iSCSI storage or some other function, select Do Not Allow Cluster Network Communication On This Network.
FIGURE 1-16 Cluster network settings
Using Active Directory Detached Clusters
Objective 1.2: Configure failover clustering CHAPTER 1 25
MORE INFO ACTIVE DIRECTORY DETACHED CLUSTERS
To learn more about Active Directory Detached Clusters, visit http://technet.microsoft.com/ en-us/library/dn265970.aspx.
Configuring cluster storage
In the real world, configuring cluster storage is a fairly complicated topic. On the 70-412 exam, however, there are only a few concepts you need to focus on: Adding disks to the cluster, understanding and configuring cluster storage pools, and understanding and configuring cluster-shared volumes.
Adding new disks to a cluster
If you want to add disks to an existing failover cluster, begin by provisioning the logical disks from shared storage, such as from an iSCSI target. Once the shared disk appears in Server Manager, initialize the disk and bring it online.
Next, create a volume from this disk, as shown in Figure 1-17.
FIGURE 1-17 Creating a new volume in Server Manager
26 CHAPTER 1 Configure and manage high availability
FIGURE 1-18 Assigning a new volume to a cluster
Alternatively, you can add eligible storage to a cluster by using Failover Cluster Manager. To do so, select the Disks node in the console tree below Storage and then click Add Disk in the Actions pane, as shown in Figure 1-19. The disk you add should already include one or more volumes before you add it. If you have prepared the disk by using Disk Manage-ment instead of Server Manager, make sure you have partitioned the disk by using the GUID Partition Table (GPT) partition style, not the Master Boot Record (MBR) partition style.
Objective 1.2: Configure failover clustering CHAPTER 1 27
FIGURE 1-19 Adding a new disk to a failover cluster
After you add the disk to the cluster, the new disk along with its volumes appears in Failover Cluster Manager, as shown in Figure 1-20.
28 CHAPTER 1 Configure and manage high availability
Creating cluster storage pools
In Windows Server 2012 or Windows Server 2012 R2, you can now draw upon data storage provided by a Serial Attached SCSI (SAS) disk array to create one or more storage pools for a failover cluster. These storage pools are similar to the ones you can create for an individual server by using Storage Spaces (covered in Exam 70-410). As with the Storage Spaces feature, you can use these storage pools in a failover cluster as source from which you can then create virtual disks and finally volumes.
To create a new storage pool, in Failover Cluster Manager, navigate to Failover Cluster Manager\[Cluster Name]\Storage\Pools, right-click Pools, and then select New Storage Pool from the shortcut menu, as shown in Figure 1-21. This step starts the same New Storage Pool Wizard used with Storage Spaces. (In fact, if you have a shared SAS disk array, you can use Server Manager to create the pool and use the Add Storage Pool option to add it to the machine.) After you create the pool, you need to create virtual disks from the new pool and virtual volumes from the new disks before you can use the clustered storage space for host-ing your clustered workloads.
MORE INFO CONFIGURING CLUSTER STORAGE POOLS
For more information about configuring cluster storage pools, visit “How to Configure
a Clustered Storage Space in Windows Server 2012” at http://blogs.msdn.com/b/cluster-ing/archive/2012/06/02/10314262.aspx and “Deploy Clustered Storage Spaces” at http:// technet.microsoft.com/en-us/library/jj822937.aspx.
Objective 1.2: Configure failover clustering CHAPTER 1 29 The availability of storage pools for failover clusters has implications for the 70-412 exam,
especially because these storage pools have a number of requirements and restrictions that could easily serve as the basis for a test question. Note the following requirements for failover cluster storage pools:
■ A minimum of three physical drives, with at least 4 gigabytes (GB) capacity each.
■ Only SAS connected physical disks are allowed. No additional layer of RAID (or any disk subsystem) is supported, whether internal or external.
■ Fixed provisioning only for virtual disks. No thin provisioning.
■ When creating virtual disks from a clustered storage pool, only simple and mirror storage layouts are supported. Parity layouts are not supported.
■ The physical disks used for a clustered pool must be dedicated to that one pool. Boot disks should not be added to a clustered pool.
Using cluster-shared volumes (CSVs)
Cluster-shared volumes (CSVs) are a type of volume that first appeared in Windows Server 2008 R2 and that is used only in failover clusters. The biggest advantage of CSVs is that they can be shared by multiple active cluster nodes at a time. This is not normally possible with shared storage. In fact, two cluster nodes cannot normally use even two separate volumes residing on the same logical disk or LUN.
CSVs achieve this shared access of volumes by separating the data from different nodes into VHD files. Within each shared volume, multiple VHDs are stored, each used as the storage for a particular role for which high availability has been configured. The CSVs containing these VHDs are then mapped to a common namespace on all nodes in the cluster. On every failover cluster configured with CSVs, the CSVs appear on every node as subfolders in the \ClusterStorage folder on the system drive. Example pathnames are C:\ClusterStorage\ Volume1, C:\ClusterStorage\Volume2, and so on.
30 CHAPTER 1 Configure and manage high availability
FIGURE 1-22 A Cluster shared volume
To create a CSV in Failover Cluster Manager, select the disk and click Add To Cluster Shared Volumes in the Actions pane, as shown in Figure 1-23. In Windows PowerShell, use the Add-ClusterSharedVolume cmdlet.
FIGURE 1-23 Adding a volume to cluster-shared volumes
Objective 1.2: Configure failover clustering CHAPTER 1 31 Scale-Out File Server, which is described later in the “Configuring File Server role types” sec
-tion of this chapter. Another important use for CSVs is with live migra-tion in failover clusters (a feature also described later in this chapter). Though CSVs are not required for live migration, they are highly recommended because they optimize the performance of the migration and reduce downtime to almost zero.
How might CSVs appear on the 70-412 exam? If there’s a question about CSVs directly, it could come in the form of a requirement that states you want to “minimize administrative overhead” when designing storage for a highly available virtual machine. More likely, you will simply see CSV mentioned in the setup to a question that isn’t just about CSVs.
REAL WORLD WHY ARE CLUSTER-SHARED VOLUMES USEFUL?
Here is the original problem CSVs were designed to solve: In Windows Server 2008 and earlier versions of Windows Server, only one cluster node could access a LUN at any given time. If an application, service, or virtual machine connected to the same LUN failed and needed to be moved to another node in the failover cluster, every other clustered application or virtual machine on that physical node would also need to be failed over to a new node and potentially experience some downtime. To avoid this problem, each clustered role was typically connected to its own unique LUN as a way to isolate failures. This strategy created another problem, however: a large number of LUNs that complicated setup and administration.
With CSVs, a single LUN can thus be accessed by different nodes at a time, as long as the different nodes are accessing distinct VHDs on the LUN. You can run these roles on any node in the failover cluster, and when the role fails, it can fail over to any other physical node in the cluster without affecting other roles (services or applications) hosted on the
original node. CSVs thus add flexibility and simplify management.
Using shared virtual hard disk
32 CHAPTER 1 Configure and manage high availability
MORE INFO SHARED VIRTUAL HARD DISKS
To learn more about shared virtual hard disks, visit http://technet.microsoft.com/en-us/ library/dn281956.aspx.
Configuring Quorum
The Quorum configuration in a failover cluster determines the number of active, commu -nicative nodes that are required for the cluster to run. In a failover cluster, every node that remains functional and communicative with other nodes submits one vote in favor of the cluster remaining online. If a majority of the nodes added to the cluster are functional and communicative, the cluster is said to “reach Quorum” and is allowed to run.
In the most basic Quorum configuration, calledNode Majority, all votes are cast by the nodes. If the cluster is made up of an even number of nodes, however, it’s recommended you choose a Quorum configuration with a tiebreaker element called a witness. A witness is a shared disk or file share accessible by all nodes in the cluster and that contains a copy of the failover cluster database. When you configure Node and File Share Majority or Node and Disk Majority as your Quorum configuration, the failover cluster can reach Quorum when only half of the nodes remain online (as opposed to a clear majority), as long as they can also commu-nicate with the disk witness or file share witness.
To configure a Quorum witness or to modify the default Quorum settings in a failover cluster in Failover Cluster Manager, right-click the cluster node in the console tree, click More Actions, and then click Configure Cluster Quorum Settings, as shown in Figure 1-24.
NOTE MANAGE QUORUM DYNAMICALLY
Objective 1.2: Configure failover clustering CHAPTER 1 33
FIGURE 1-24 Selecting a Quorum configuration
EXAM TIP
On the 70-412 exam, remember above all that the Quorum configuration determines how many nodes in a cluster can fail before the cluster stops running.
MORE INFO QUORUM SETTINGS
34 CHAPTER 1 Configure and manage high availability
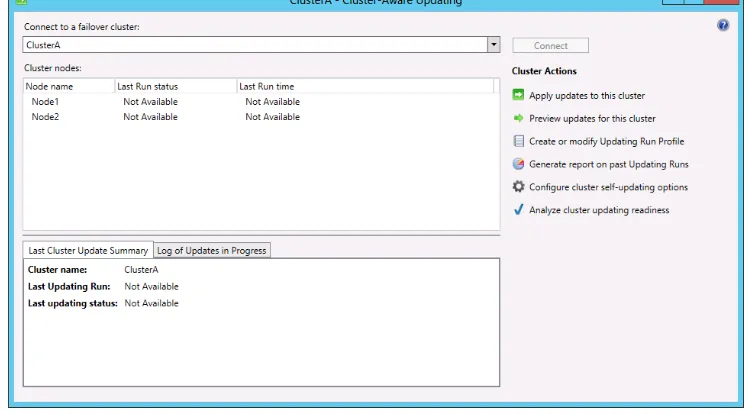
Implementing Cluster Aware Updating
Cluster Aware Updating (CAU) addresses the difficulty of performing software updates on failover cluster nodes. This difficulty stems from the fact that updating software normally requires a system restart. To maintain the availability of services hosted on failover clusters in previous versions of Windows, you needed to move all roles off one node, update the software on that node, restart the node, and then repeat the process on every other node, one at a time. Windows Server 2008 R2 failover clusters could include up to 16 nodes, so this process sometimes had to be repeated as many times. In Windows Server 2012 and Windows Server 2012 R2, failover clusters can scale up to 64 nodes. At this point, the manual method of updating software on failover clusters is simply no longer a practical option.
Instead, CAU automates the process of updating software for you. To initiate the process of updating a failover cluster, right-click the cluster in the list of servers in Server Manager and then click Update Cluster from the shortcut menu, as shown in Figure 1-25.
FIGURE 1-25 Manually updating a cluster
Objective 1.2: Configure failover clustering CHAPTER 1 35
MORE INFO CAU PLUGINS
For more information about how CAU plugins work, see “How CAU Plug-ins Work” at http://technet.microsoft.com/en-us/library/jj134213.
The step just described shows how to trigger an update to a cluster manually, which might be too straightforward a task to appear on the 70-412 exam. More likely, you could see a question about configuring self-updates. You can access these self-update configuration settings in Failover Cluster Manager by right-clicking the cluster name in the console tree, pointing to More Actions, and then selecting Cluster-Aware Updating, as shown in Figure 1-26.
FIGURE 1-26 Opening CAU actions
36 CHAPTER 1 Configure and manage high availability
FIGURE 1-27 CAU actions
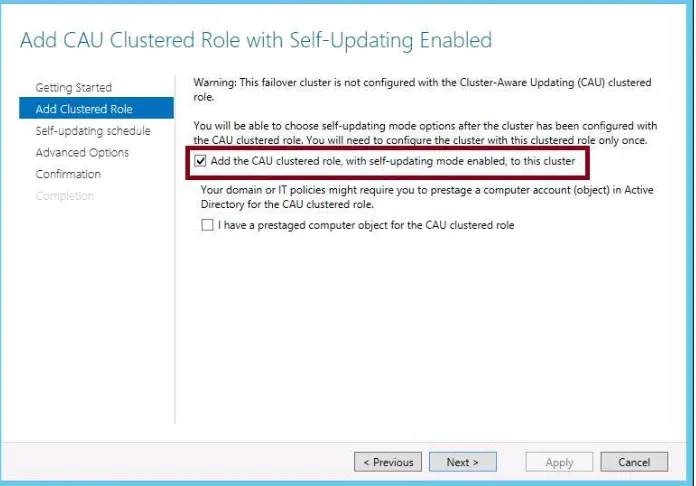
To configure self-updating for the cluster, click Configure Cluster Self-Updating Options beneath Cluster Actions. This step opens the Configure Self-Updating Options Wizard. You can enable self-updating on the cluster on the second (Add Clustered Role) page of the wiz-ard by selecting the option to add the CAU clustered role, with self-updating mode enabled (shown in Figure 1-28).
IMPORTANT ADMINISTRATIVE TASKS
The Cluster-Aware Updating dialog box also allows you to perform the following actions:
■ Apply updates to the cluster
■ Preview updates for this cluster
■ Create or modify Updating Run profile directly (without running a wizard)
■ Generate report on past Updating Runs
Objective 1.2: Configure failover clustering CHAPTER 1 37
FIGURE 1-28 Enabling self-updating mode for Cluster-Aware Updating
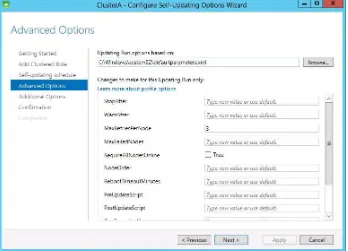
The third (Self-Updating Schedule) page of the wizard lets you specify a schedule for updating. The fourth (Advanced Options) page lets you change profile options, as shown in Figure 1-29. These profile options let you set time boundaries for the update process and other advanced parameters.
MORE INFO PROFILE SETTINGS
38 CHAPTER 1 Configure and manage high availability
FIGURE 1-29 Configuring advanced options for Cluster-Aware Self-Updating
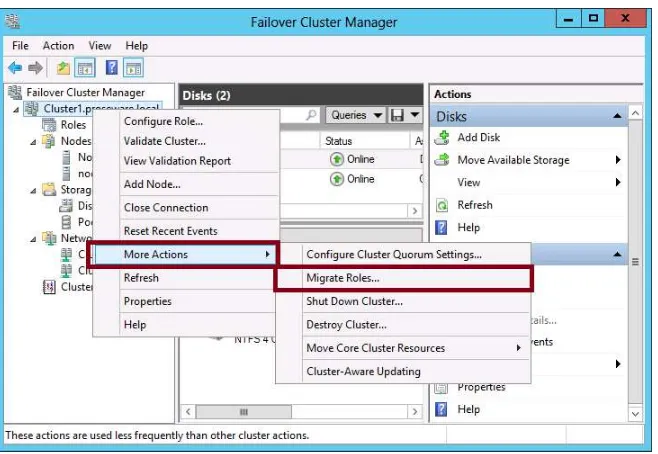
Migrating a failover cluster
Unlike with NLB, you can’t perform a rolling upgrade to a failover cluster. The only way you can upgrade a failover cluster to Windows Server 2012 or Windows Server 2012 R2 is to cre-ate a new cluster with the new operating system and migrcre-ate the roles on the old cluster to it.
Objective 1.2: Configure failover clustering CHAPTER 1 39
FIGURE 1-30 Configuring advanced options for Cluster-Aware Self-Updating
MORE INFO MIGRATING A CLUSTER
40 CHAPTER 1 Configure and manage high availability
Thought experiment
Configuring advanced clustering at Tailspin Toys
In the following thought experiment, apply what you’ve learned about this
objective to predict what steps you need to take. You can find answers to these
questions in the “Answers” section at the end of this chapter.
You are the systems administrator at tailspin toys. You are in the process of preparing a submission to the procurement committee for a seven-node Windows Server 2012 R2 cluster that will have the Hyper-V role installed.
You have the following objectives:
■ Provide guest clusters hosted on the Windows Server 2012 R2 cluster with shared storage to store witness and application data.
■ Avoid using iSCSI and Fibre Channel with guest clusters.
■ Ensure that cluster updating occurs sequentially with only one cluster node applying software updates at a time.
With the preceding information in mind, answer the following questions.
1. Which Quorum model is appropriate for the cluster?
2. Which technology can you implement to ensure that software updates are
applied to cluster host nodes sequentially?
3. What technology could you use to provide shared storage to guest clusters?
Objective summary
■ A failover cluster is a group of servers configured in a special way that protects a
selected service or application from failure. In the failover cluster, servers (called nodes) are connected to each other and to shared storage such as a SAN or a shared SAS disk array. When a service or application configured for high availability fails on one server, the service or application immediately starts up on another.
■ You can create a basic failover cluster and test its functionality by using an empty role.
■ In Windows Server 2012 and Windows Server 2012 R2, you can create storage pools for failover clusters. Cluster storage pools can be configured only from a shared SAS disk array.