Craig Zacker
70 410
Installing and
Configuring
Windows
Server
®2012
Exam Ref
PUBLISHED BY Microsoft Press
A Division of Microsoft Corporation One Microsoft Way
Redmond, Washington 98052-6399 Copyright © 2012 by Craig Zacker
All rights reserved. No part of the contents of this book may be reproduced or transmitted in any form or by any means without the written permission of the publisher.
Library of Congress Control Number: 2012950447 ISBN: 978-0-7356-7316-8
Printed and bound in the United States of America.
Third Printing
Microsoft Press books are available through booksellers and distributors worldwide. If you need support related to this book, email Microsoft Press Book Support at [email protected]. Please tell us what you think of this book at http://www.microsoft.com/learning/booksurvey.
Microsoft and the trademarks listed at http://www.microsoft.com/about/legal/en/us/IntellectualProperty/ Trademarks/EN-US.aspx are trademarks of the Microsoft group of companies. All other marks are property of their respective owners.
The example companies, organizations, products, domain names, email addresses, logos, people, places, and
events depicted herein are fictitious. No association with any real company, organization, product, domain name,
email address, logo, person, place, or event is intended or should be inferred.
This book expresses the author’s views and opinions. The information contained in this book is provided without any express, statutory, or implied warranties. Neither the authors, Microsoft Corporation, nor its resellers, or distributors will be held liable for any damages caused or alleged to be caused either directly or indirectly by this book.
Acquisitions Editor: Anne Hamilton
Developmental Editor: Karen Szall
Project Editor: Valerie Woolley
Editorial Production: nSight, Inc.
Technical Reviewer: Bob Dean and David Coombes; Technical Review services provided by Content Master, a member of CM Group, Ltd.
Copyeditor: Teresa Horton
Indexer: Lucie Haskins
Contents at a glance
Introduction xi
CHAPTER 1 Installing and configuring servers 1 CHAPTER 2 Configure server roles and features 71 CHAPTER 3 Configure Hyper-V 129 CHAPTER 4 Deploying and configuring core network services 189 CHAPTER 5 Install and administer Active Directory 249 CHAPTER 6 Create and manage Group Policy 307
Index 367
v
Contents
Introduction
xi
Microsoft certifications xi
Errata & book support xii
We want to hear from you xii
Stay in touch xii
Preparing for the exam xiii
Chapter 1
Installing and configuring servers
1
Objective 1.1: Install servers . . . 2 Planning for a server installation 2
Choosing installation options 6
Upgrading servers 12
Migrating roles 14
Objective summary 16
Objective review 17
Objective 1.2: Configure servers . . . 18 Completing postinstallation tasks 18
Using Server Manager 26
Configuring services 36
Delegating server administration 37
Objective summary 38
Objective review 39
Objective 1.3: Configure local storage . . . 40
Planning server storage 40
Understanding Windows disk settings 42
What do you think of this book? We want to hear from you! Microsoft is interested in hearing your feedback so we can continually improve our books and learning resources for you. To participate in a brief online survey, please visit:
Working with disks 45
Objective summary 62
Objective review 63
Answers . . . .66
Chapter 2
Configure server roles and features
71
Objective 2.1: Configure file and share access . . . 71
Creating folder shares 72
Assigning permissions 77
Configuring Volume Shadow Copies 86
Configuring NTFS quotas 87
Objective summary 88
Objective review 89
Objective 2.2: Configure print and document services . . . 91
Deploying a print server 91
Sharing a printer 97
Managing documents 101
Managing printers 102
Using the Print and Document Services role 104
Objective summary 109
Objective review 109
Objective 2.3: Configure servers for remote management . . . .111
Using Server Manager for remote management 112 Using Remote Server Administration Tools 119 Working with remote servers 120
Objective summary 120
Objective review 121
Answers . . . 123
Chapter 3
Configure Hyper-V
129
Objective 3.1: Create and configure virtual machine settings . . . 129 Virtualization architectures 130
vii Contents
Using Hyper-V Manager 136
Configuring resource metering 148
Objective summary 149
Objective review 149
Objective 3.2: Create and configure virtual machine storage . . . .151
Virtual disk formats 152
Creating virtual disks 153
Configuring pass-through disks 159
Modifying virtual disks 160
Creating snapshots 161
Connecting to a SAN 162
Objective summary 167
Objective review 168
Objective 3.3: Create and configure virtual networks . . . 169 Creating virtual switches 170 Creating virtual network adapters 176 Creating virtual network configurations 180
Objective summary 181
Objective review 182
Answers . . . .184
Chapter 4
Deploying and configuring core network services
189
Objective 4.1: Configure IPv4 and IPv6 addressing . . . 189
IPv4 addressing 190
IPv6 addressing 197
Planning an IP transition 201
Objective summary 205
Objective review 205
Objective 4.2: Configure servers . . . 207
Understanding DHCP 207
Deploying a DHCP server 214
Deploying a DHCP relay agent 219
Objective summary 222
Objective 4.3: Deploy and configure the DNS service . . . 223 Understanding the DNS architecture 224
Deploying a DNS server 233
Objective summary 240
Objective review 241
Answers . . . 243
Chapter 5
Install and administer Active Directory
249
Objective 5.1: Install domain controllers . . . 249 Deploying Active Directory Domain Services 250
Objective summary 264
Objective review 265
Objective 5.2: Create and manage Active Directory users and
computers . . . 267
Creating user objects 267
Creating computer objects 277 Managing Active Directory objects 280
Objective summary 285
Objective review 285
Objective 5.3: Create and manage Active Directory groups and
organizational units (OUs) . . . 287
Working with groups 292
Objective summary 300
Objective review 301
Answers . . . 303
Chapter 6
Create and manage Group Policy
307
Objective 6.1: Create Group Policy objects (GPOs) . . . 307 Understanding Group Policy objects 308 Configuring a Central Store 309 Using the Group Policy Management console 309
Managing starter GPOs 312
ix Contents
Objective summary 316
Objective review 316
Objective 6.2: Configure security policies . . . 317
Defining local policies 318
Using security templates 322
Configuring local users and groups 325 Configuring User Account Control 329
Objective summary 332
Objective review 332
Objective 6.3: Configure application restriction policies . . . 334 Using software restriction policies 334
Using AppLocker 341
Objective summary 344
Objective review 344
Objective 6.4: Configure Windows Firewall . . . .346 Understanding Windows Firewall settings 346 Working with Windows Firewall 347 Using the Windows Firewall control panel 348 Using the Windows Firewall with Advanced Security console 352
Objective summary 357
Objective review 357
Answers . . . .360
What do you think of this book? We want to hear from you! Microsoft is interested in hearing your feedback so we can continually improve our books and learning resources for you. To participate in a brief online survey, please visit:
xi
Introduction
Most books take a very low-level approach, teaching you how to use basic concepts to accomplish fine-grained tasks. Like the Microsoft 70-410 certification exam, this book takes a high-level approach, building on your existing knowledge of lower-level Microsoft Windows system administration and extending it into higher-level server concepts needed for Windows Server 2012.
Candidates for this exam are information technology (IT) professionals who have Windows Server 2012 operating system knowledge and experience and want to validate the skills and knowledge necessary to implement the Windows Server 2012 core infrastructure services.
The 70-410 exam is the first in a series of three exams which validate the skills and knowl-edge necessary to implement a core Windows Server 2012 Infrastructure into an existing enterprise environment. This book therefore covers the initial implementation and configura-tion of the Windows Server 2012 core services, such as Active Directory and the networking services. This book, along with the remaining two books (covering the 70-411 and 70-412 exams), will collectively illustrate the skills and knowledge necessary for implementing, man-aging, maintaining, and provisioning services and infrastructure in a Windows Server 2012 environment.
This book covers every exam objective, but it does not cover every exam question. Only the Microsoft exam team has access to the exam questions themselves and Microsoft regu-larly adds new questions to the exam, making it impossible to cover specific questions. You should consider this book a supplement to your relevant real-world experience and other study materials. If you encounter a topic in this book with which you do not feel completely comfortable, use the links you’ll find in the text to find more information and take the time to research and study the topic. Great information is available on MSDN, TechNet, and in blogs and forums.
Microsoft certifications
MORE INFO ALL MICROSOFT CERTIFICATIONS
For information about Microsoft certifications, including a full list of available certifica -tions, go to http://www.microsoft.com/learning/en/us/certification/cert-default.aspx.
Errata & book support
We’ve made every effort to ensure the accuracy of this book and its companion content. Any errors that have been reported since this book was published are listed on our Microsoft Press site at Oreilly.com:
http://go.microsoft.com/FWLink/?Linkid=272595
If you find an error that is not already listed, you can report it to us through the same page.
If you need additional support, email Microsoft Press Book Support at
Please note that product support for Microsoft software is not offered through the
addresses above.
We want to hear from you
At Microsoft Press, your satisfaction is our top priority, and your feedback our most valuable asset. Please tell us what you think of this book at:
http://www.microsoft.com/learning/booksurvey
The survey is short, and we read every one of your comments and ideas. Thanks in advance for your input!
Stay in touch
xiii
Introduction
Preparing for the exam
1
C H A P T E R 1
Installing and configuring
servers
I
nstalling new Windows servers on your network is not something to be done casually— you must plan the installation well in advance. Among other things, you must decide whatedition of the operating system to install, whether you are installing the full graphical user
interface (GUI) or the Server Core option, what your virtualization strategy will be, if any, and what roles you intend to implement on the server. If you are installing Windows Server 2012 for the first time, you might also have to decide whether to add the server to your production network or install it on a test network.
This chapter discusses the process of installing Windows
Server 2012, using either a clean install or a server upgrade, and the server configuration tasks you must perform immediately following the installation. Finally, it considers the configuration of various types of hard disk technologies used for local storage and the deployment of roles to servers all over the network.
Objectives in this chapter:
■ Objective 1.1: Install servers ■ Objective 1.2: Configure servers ■ Objective 1.3: Configure local storage
EXAM TIP
Some exam questions are in a multiple-choice format, where answers are either right or wrong. If, in the exam, you have an option where it seems as though two answers could be right but you can only choose one answer, you’ve likely missed a clue in the question text that would enable you to discard one of these answers. When exams are authored, the question writer has to provide not only good reasons why one answer is correct but also reasons why the other answers are incorrect. Although there is a small chance that you’ve come across a bad question that got through proofreading and peer review, it’s more likely that in a stressful exam situation you’ve overlooked a vital bit of evidence that discounts an answer you suspect is correct.
I M P O R T A N T
Objective 1.1: Install servers
Installation is a key topic and has been extensively tested in previous Windows Server exams. There is no reason to believe the 70-410 exam will be different. This objective discusses plan-ning a Windows Server 2012 installation. It looks at the preinstallation requirements and how you can prepare your installation hardware. It also considers the server roles you can imple-ment during installation.
The objective takes you through a clean installation of Windows Server Core 2012 and describes how the Features on Demand function enables you to optimize resources by removing all the files associated with a server role or feature you have chosen to delete. The objective also looks at the options for upgrading a Windows Server 2008 or Windows Server 2008 R2 server to Windows Server 2012 and migrating roles from an existing server to a new one.
This objective covers how to:
■ Plan for a server installation ■ Plan for server roles ■ Plan for a server upgrade ■ Install Server Core
■ Optimize resource utilization using Features on Demand ■ Migrate roles from previous versions of Windows Server
Planning for a server installation
In previous versions of Windows Server, installation planning could become a complex task.
You had to decide from the outset what edition of the operating system to install, whether
to install the 32-bit or 64-bit version, and whether you should perform a Server Core installa-tion or use the full GUI. All these decisions affected the server hardware requirements, and all of them were irrevocable. To change the edition, the platform, or the interface, you have to reinstall the server from the beginning.
Objective 1.1: Install servers CHAPTER 1 3
Selecting a Windows Server 2012 edition
Microsoft releases all its operating systems in multiple editions, which provides consumers with varying price points and feature sets. When planning a server deployment, the operating system edition you choose should be based on multiple factors, including the following:
■ The roles you intend the servers to perform ■ The virtualization strategy you intend to implement ■ The licensing strategy you plan to use
Compared with Windows Server 2008, Microsoft has simplified the process of selecting a
server edition by reducing the available products. As with Windows Server 2008 R2, Windows Server 2012 requires a 64-bit processor architecture. All the 32-bit versions have been
elimi-nated, and for the first time since the Windows NT Server 4.0 release, there will be no build
supporting Itanium processors. This leaves Windows Server 2012 with the following core editions:
■ Windows Server 2012 Datacenter The Datacenter edition is designed for large and
powerful servers with up to 64 processors and fault-tolerance features such as hot add processor support. As a result, this edition is available only through the Microsoft vol-ume licensing program and from original equipment manufacturers (OEMs), bundled with a server.
■ Windows Server 2012 Standard The Standard edition includes the full set of
Windows Server 2012 features and differs from the Datacenter edition only in the number of virtual machine (VM) instances permitted by the license.
■ Windows Server 2012 Essentials The Essentials edition includes nearly all the
features in the Standard and Datacenter editions, except for Server Core, Hyper-V, and Active Directory Federation Services. The edition is limited to one physical or virtual server instance and a maximum of 25 users.
■ Windows Server 2012 Foundation The Foundation edition is a reduced version
of the operating system designed for small businesses that require only basic server
features such as file and print services and application support. The edition includes no
virtualization rights and is limited to 15 users.
These various editions have prices commensurate with their capabilities. Obviously, the goal of administrators planning server deployments is to purchase the most inexpensive edi-tion that meets all their needs. The following secedi-tions examine the primary differences among the Windows Server 2012 editions.
Supporting server roles
are known as roles. After you install the Windows Server 2012 operating system, you can use Server Manager or Windows PowerShell to assign one or more roles to that computer.
Some of the Windows Server 2012 editions include all these roles, whereas others include only some of them. Selecting the appropriate edition of Windows Server has always been a matter of anticipating the roles that the computer must perform. At one time, this was a rela
-tively simple process. You planned your server deployments by deciding which ones would be domain controllers, which ones would be web servers, and so forth. Once you made these decisions, you were done, because server roles were largely static.
With the increased focus on virtualization in Windows Server 2012, however, more admin
-istrators will be forced to consider not only what roles a server must perform at the time of the deployment but also what roles it will perform in the future.
By using virtualized servers, you can modify your network’s server strategy at will to accommodate changing workloads and business requirements or to adapt to unforeseen circumstances. Therefore, the process of anticipating the roles a server will perform must account for the potential expansion of your business and possible emergency needs.
Supporting server virtualization
The Windows Server 2012 Datacenter and Standard editions both include support for Hyper-V, but they vary in the number of VMs permitted by their licenses. Each running instance of the Windows Server 2012 operating system is classified as being in a physi-cal operating system environment (POSE) or a virtual operating system environment (VOSE). When you purchase a Windows Server 2012 license, you can perform a POSE installation of the operating system, as always. After installing the Hyper-V role, you can then create VMs and perform VOSE installations on them. The number of VOSE installations permitted by your license depends on the edition you purchased, as shown in Table 1-1.
TAbLE 1-1 Physical and virtual instances supported by Windows Server 2012 editions
Edition POSE Instances VOSE Instances
Datacenter 1 Unlimited
Standard 1 2
Essentials 1 (POSE or VOSE) 1 (POSE or VOSE)
Foundation 1 0
NOTE LICENSE RESTRICTIONS ARE NOT SOFTWARE RESTRICTIONS
Objective 1.1: Install servers CHAPTER 1 5
Server licensing
Microsoft provides several different sales channels for Windows Server 2012 licenses, and not all of the editions are available through all of the channels. Licensing Windows Server 2012 includes purchasing licenses for both servers and clients, and there are many options for each one.
If you are already involved in a licensing agreement with Microsoft, you should be aware of the server editions that are available to you through that agreement. If you are not, you should investigate the licensing options available to you before you select a server edition.
Table 1-2 lists the sales channels through which you can purchase each of the Windows Server 2012 editions.
TAbLE 1-2 Windows Server sales channel availability by edition
Retail Volume Licensing Original Equipment Manufacturer
Datacenter No Yes Yes
Standard Yes Yes Yes
Essentials Yes Yes Yes
Foundation No No Yes
Installation requirements
If your computer has less than the following hardware specifications, Windows Server 2012
will not install correctly (or possibly at all):
■ 1.4-GHz 64-bit processor ■ 512 MB RAM
■ 32 GB available disk space ■ DVD drive
■ Super VGA (800 × 600) or higher resolution monitor ■ Keyboard and mouse (or other compatible pointing device) ■ Internet access
32 GB of available disk space should be considered an absolute minimum. The system partition will need extra space if you install the system over a network or if your computer has more than 16 GB of RAM installed. The additional disk space is required for paging,
hiber-nation, and dump files. In practice, you are unlikely to come across a computer with 32 GB
of RAM and only 32 GB of disk space. If you do, free more disk space or invest in additional storage hardware.
As part of Microsoft’s increased emphasis on virtualization and cloud computing in its
server products, it has significantly increased the maximum hardware configurations for
TAbLE 1-3 Maximum hardware configurations in Windows Server versions
Windows Server 2012 Windows Server 2008 R2
Logical processors 640 256
RAM 4 TB 2 TB
Failover cluster nodes 64 16
Choosing installation options
Many enterprise networks today use servers that are dedicated to a particular role. When a server is performing a single role, does it make sense to have so many other processes run
-ning on the server that contribute little to that role?
Many IT administrators today are so accustomed to GUIs that they are unaware that there was ever any other way to operate a computer. When the first version of Windows NT Server appeared in 1993, many complained about wasting server resources on graphical displays and other elements that they deemed unnecessary. Until that time, server displays were usually minimal, character-based, and monochrome. In fact, many servers had no display hardware, relying instead on text-based remote administration tools, such as Telnet.
Using Server Core
Windows Server 2012 includes an installation option that addresses those old complaints. When you select the Windows Server Core installation option, you get a stripped-down ver
-sion of the operating system. There is no Start menu, no desktop Explorer shell, no Microsoft Management Console, and virtually no graphical applications. All you see when you start the computer is a single window with a command prompt, as shown in Figure 1-1.
Objective 1.1: Install servers CHAPTER 1 7
NOTE WHAT IS SERVER CORE?
Server Core is not a separate product or edition. It is an installation option included with the Windows Server 2012 Standard and Datacenter editions.
The advantages of running servers using Server Core are several:
■ Hardware resource conservation Server Core eliminates some of the most
mem-ory-intensive and processor-intensive elements of the Windows Server 2012 operating system, thus devoting more of the system hardware to running essential services.
■ Reduced disk space Server Core requires less disk space for the installed operating
system elements and less swap space, which maximizes the utilization of the server’s storage resources.
■ Reduced patch frequency The graphical elements of Windows Server 2012 are
among the most frequently updated, so running Server Core reduces the number of updates that administrators must apply. Fewer updates also mean fewer server restarts and less downtime.
■ Reduced attack surface The less software there is running on the computer, the
fewer entrances there are for attackers to exploit. Server Core reduces the potential openings presented by the operating system, increasing its overall security.
When Microsoft first introduced the Server Core installation option in Windows Server 2008, it was an intriguing idea, but few administrators took advantage of it. The main rea-son for this was that most server administrators were not sufficiently conversant with the command-line interface to manage a Windows server without a GUI.
In Windows Server 2008 and Windows Server 2008 R2, the decision to install the operating system using the Server Core option was irrevocable. Once you installed the operating system using Server Core, there was no way to get the GUI back except to perform a complete rein-stallation. That has all changed in Windows Server 2012. You can now switch a server from the Server Core option to the Server with a GUI option and back again at will by using Windows PowerShell commands.
MORE INFO THERE AND bACK AgAIN
For more information on converting from Server Core to Server with a GUI and back again, see “Objective 1.2: Configure servers,” later in this chapter.
SERvER CoRE dEfAUltS
In Windows Server 2012, Server Core is the default installation option for reasons other than the ability to switch options after installing. In Windows Server 2012, Microsoft is attempting to fundamentally modify the way that administrators work with their servers. Server Core is now the default installation option because in the new way of managing servers, administra
-tors should rarely, if ever, have to work at the server console, either physically or remotely. Windows Server has long been capable of remote administration, but this capability has been piecemeal. Some Microsoft Management Console (MMC) snap-ins enabled adminis
-trators to connect to remote servers, and Windows PowerShell 2.0 provided some remote capabilities from the command line, but Windows Server 2012, for the first time, includes comprehensive remote administration tools that nearly eliminate the need to work at the server console.
The new Server Manager application in Windows Server 2012 enables administrators to add servers from all over the enterprise and create server groups to facilitate the simulta
-neous configuration of multiple systems. The new Windows PowerShell 3.0 environment increases the number of available cmdlets from 230 to more than 2,430.
With tools like these, it is possible for administrators to install their servers using the Server Core option, execute a few commands to join each server to an Active Directory Domain Services domain, and then never touch the server console again. They can perform all sub
-sequent administration tasks, including the deployment of roles and features, using Server Manager and Windows PowerShell from a remote workstation.
SERvER CoRE CApAbIlItIES
In addition to omitting most of the graphical interface, a Server Core installation omits some of the server roles found in a Server with a GUI installation. However, the Server Core option in Windows Server 2012 includes 12 of the 19 roles, plus support for SQL Server 2012, as opposed to only 10 roles in Windows Server 2008 R2 and 9 in Windows Server 2008.
Table 1-4 lists the roles and features that are available and not available in a Windows Server 2012 Server Core installation.
TAbLE 1-4 Windows Server 2012 Server Core roles
Roles Available in Server Core Installation Roles Not Available in Server Core Installation
Active Directory Certificate Services Active Directory Federation Services
Active Directory Domain Services Application Server
Active Directory Lightweight Directory Services Fax Server
Active Directory Rights Management Services Network Policy and Access Services
DHCP Server Remote Desktop Services
Objective 1.1: Install servers CHAPTER 1 9
Roles Available in Server Core Installation Roles Not Available in Server Core Installation
DNS Server Volume Activation Services
File and Storage Services Windows Deployment Services
Hyper-V
Print and Document Services
Remote Access
Web Server (IIS)
Windows Server Update Services
Using the Minimal Server Interface
If the advantages of Server Core sound tempting, but there are traditional server administra-tion tools you don’t want to give up, Windows Server 2012 provides a compromise called the Minimal Server Interface.
The Minimal Server Interface is a setting that removes some of the most hardware- intensive elements from the graphical interface. These elements include Internet Explorer and the components of the Windows shell, including the desktop, File Explorer, and the Windows 8 desktop apps. Also omitted are the Control Panel items implemented as shell extensions, including the following:
■ Programs and Features ■ Network and Sharing Center ■ Devices and Printers Center ■ Display
■ Firewall
■ Windows Update ■ Fonts
■ Storage Spaces
What’s left in the Minimal Server Interface are the Server Manager and MMC applications, Device Manager, and the entire Windows PowerShell interface. This provides administrators with most of the tools they need to manage local and remote servers
To configure a Windows Server 2012 Server with a GUI installation to use the Minimal
Server Interface, complete the following procedure.
2. Click Manage > Remove Roles And Features. The Remove Roles and Features Wizard
starts, showing the Before You Begin page.
3. Click Next to open the Server Selection page.
4. In the Server Pool list, select the server you want to modify and click Next. The Remove
Server Roles page opens.
5. Click Next to open the Remove Features page.
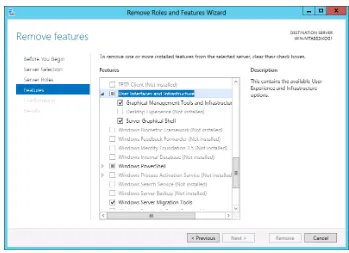
6. Scroll down the Features list and expand the User Interfaces And Infrastructure feature,
as shown in Figure 1-2.
FIGURE 1-2 The User Interfaces And Infrastructure feature in the Remove Roles and Features Wizard.
7. Clear the Server Graphical Shell check box and click Next. The Confirm Removal
Selections page opens.
8. Click Remove to open the Removal Progress page. 9. When the removal is complete, click Close. 10. Restart the server.
Using Features on Demand
During a Windows Server 2012 installation, the Setup program copies the files for all the
operating system components from the installation medium to a directory called WinSxS,
Objective 1.1: Install servers CHAPTER 1 11
The drawback of this arrangement is that the WinSxS directory occupies a significant amount of disk space, much of which is, in many cases, devoted to data that will never be used.
With the increasing use of VMs to distribute server roles, enterprise networks often have more copies of the server operating system than ever before, and therefore more wasted disk space. In addition, the advanced storage technologies often used by today’s server infrastruc-tures, such as storage area networks (SANs) and solid state drives (SSDs), are making that disk space more expensive.
Features on Demand, new to Windows Server 2012, is a third state for operating system features that enables administrators to conserve disk space by removing specific features, not only from operation but also from the WinSxS directory.
This state is intended for features that administrators have no intention of installing on a particular server. If, for example, you want to disable the Server Graphical Shell feature in Windows Server 2012 to prevent Internet Explorer, File Explorer, and the desktop shell from running, and you want to completely remove the files that provide those features from the disk, you can do so by using Features on Demand. By removing all the disk files for all your unused features on all your VMs, you can achieve substantial savings in disk space.
Features on Demand provides a third installation state for each of the features in Windows Server 2012. In previous versions of the operating system, features could be Enabled or Disabled. Windows Server 2012 provides the following three states:
■ Enabled ■ Disabled
■ Disabled with payload removed
To implement this third state, you must use the Windows PowerShell
Uninstall-WindowsFeature cmdlet, which now supports a new –Remove flag. Thus, the Windows PowerShell command to disable the Server Graphical Shell and remove its source files from the WinSxS directory would be as follows:
Uninstall-WindowsFeature Server-Gui-Shell -Remove
Once you delete the source files for a feature from the WinSxS folder, they are not irretrievable. If you attempt to enable that feature again, the system will download it from Windows Update or, alternatively, retrieve it from an image file you specify by using the –Source flag with the Install-WindowsFeature cmdlet. This enables you to retrieve the required files from a removable disk or from an image file on the local network. Administrators can also use Group Policy to specify a list of installation sources.
NOTE FEATURES ON DEMAND
Upgrading servers
An in-place upgrade is the most complicated form of Windows Server 2012 installation. It is also the lengthiest and the most likely to cause problems during its execution. Whenever possible, Microsoft recommends that administrators perform a clean installation, or migrate required roles, applications, and settings instead.
Although in-place upgrades often proceed smoothly, the complexity of the upgrade pro
-cess and the large number of variables involved means that there are many things that can go wrong. To minimize the risks involved, it is important for an administrator to take the upgrade process seriously, prepare the system beforehand, and have the ability to troubleshoot any problems that might arise. The following sections discuss these subjects in greater detail.
Upgrade paths
Upgrade paths for Windows Server 2012 are limited. In fact, it’s easier to specify when you can perform an upgrade than when you can’t. If you have a 64-bit computer running Windows Server 2008 or Windows Server 2008 R2, then you can upgrade it to Windows Server 2012 as long as you use the same operating system edition.
Windows Server 2012 does not support the following:
■ Upgrades from Windows Server versions prior to Windows Server 2008 ■ Upgrades from pre-RTM editions of Windows Server 2012
■ Upgrades from Windows workstation operating systems
■ Cross-platform upgrades, such as 32-bit Windows Server 2008 to 64-bit Windows
Server 2012
■ Upgrades from any Itanium edition
■ Cross-language upgrades, such as from Windows Server 2008, U.S. English to Windows
Server 2012, French
In any of these cases, the Windows Setup program will not permit the upgrade to proceed.
preparing to upgrade
Before you begin an in-place upgrade to Windows Server 2012, you should perform a num
-ber of preliminary procedures to ensure that the process goes smoothly and that the server data is protected.
Consider the following before you perform any upgrade to Windows Server 2012:
■ Check hardware compatibility. Make sure that the server meets the minimum
hardware requirements for Windows Server 2012.
■ Check disk space. Make sure that there is sufficient free disk space on the partition
Objective 1.1: Install servers CHAPTER 1 13
disk space is needed to simultaneously hold both operating systems. After the upgrade is complete, you can remove the old files, freeing up some additional space.
■ Confirm that software is signed. All kernel-mode software on the server,
includ-ing device drivers, must be digitally signed or the software will not load. This can result
in an aborted upgrade process, hardware failures after the upgrade is completed, or
failure of the system to start after the upgrade. If you cannot locate a software update for the application or driver that is signed, then you should uninstall the application or driver before you proceed with the installation.
IMPORTANT DISABLING THE DRIVER SIGNATURE
If an unsigned driver prevents the computer from starting, you can disable the driver signature requirement by pressing F8 during the startup, selecting Advanced Boot Options, and then selecting Disable Driver Signature Enforcement.
■ Save mass storage drivers on removable media. If a manufacturer has sup
-plied a separate driver for a device in your server, save the driver to a CD, a DVD, or a USB flash drive in either the media root directory or the /amd64 folder. To provide the driver during Setup, click Load Driver or press F6 on the disk selection page. You can browse to locate the driver or have Setup search the media.
■ Check application compatibility. The Setup program displays a Compatibility
Report page that can point out possible application compatibility problems. You can sometimes solve these problems by updating or upgrading the applications. Create an inventory of the software products installed on the server and check the manufac-turers’ websites for updates, availability of upgrades, and announcements regarding support for Windows Server 2012. In an enterprise environment, you should test all applications for Windows Server 2012 compatibility, no matter what the manufacturer says, before you perform any operating system upgrades.
■ Ensure computer functionality. Make sure that Windows Server 2008 or Windows
Server 2008 R2 is running properly on the computer before you begin the upgrade process. You must start an in-place upgrade from within the existing operating system, so you cannot count on Windows Server 2012 to correct any problems that prevent the computer from starting or running the Setup program.
■ Perform a full backup. Before you perform any upgrade procedure, you should
■ Disable virus protection software. Virus protection software can make installation
much slower by scanning every file that is copied locally to your computer. If installed, you should disable this software before performing the upgrade.
■ Disconnect the UPS device. If you have an uninterruptible power supply (UPS)
connected to your target computer, disconnect the data cable before performing the upgrade. Setup automatically attempts to detect connected devices, and UPS equip
-ment can cause issues with this process.
■ Purchase Windows Server 2012. Be sure to purchase the appropriate Windows
Server 2012 edition for the upgrade and have the installation disk and product key handy.
During the upgrade process, when the system restarts, the boot menu provides an option to roll back to the previous operating system version. However, once the upgrade is complete, this option is no longer available and it is not possible to uninstall Windows Server 2012 and revert to the old operating system version.
Migrating roles
Migration is the preferred method of replacing an existing server with one running Windows Server 2012. Unlike an in-place upgrade, a migration copies vital information from an existing server to a clean Windows Server 2012 installation.
When migrating, nearly all the restrictions listed earlier in regard to upgrades do not apply. By using the Windows Server Migration Tools and migration guides supplied with Windows Server 2012, you can migrate data between servers under any of the following conditions:
■ between versions You can migrate data from any Windows Server version from
Windows Server 2003 SP2 to Windows Server 2012. This includes migrations from one server running Windows Server 2012 to another.
■ between platforms You can migrate data from an x86-based or x64-based server to
an x64-based server running Windows Server 2012.
■ between editions You can migrate data between servers running different Windows
Server editions.
■ between physical and virtual instances You can migrate data from a physical
server to a virtual one, or the reverse.
■ between installation options You can migrate data from a server running Windows
Objective 1.1: Install servers CHAPTER 1 15
Windows Server 2012 includes a collection of migration guides that provide individual-ized instructions for each of the roles supported by Windows Server 2012. Some of the roles require the use of Windows Server Migration Tools; others do not.
Installing Windows Server Migration Tools
Windows Server Migration Tools is a Windows Server 2012 feature that consists of Windows PowerShell cmdlets and help files that enable administrators to migrate certain roles between servers.
Before you can use the migration tools, however, you must install the Windows Server Migration Tools feature on the destination server running Windows Server 2012, and then copy the appropriate version of the tools to the source server.
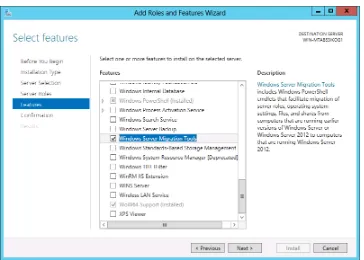
Windows Server Migration Tools is a standard feature that you install on Windows Server 2012 by using the Add Roles and Features Wizard in Server Manager, as shown in Figure 1-3, or the Install-WindowsFeature Windows PowerShell cmdlet.
FIGURE 1-3 The Select Features page of the Add Roles and Features Wizard.
Using migration guides
Once you have installed the Windows Server Migration Tools on both the source and the destination servers, you can proceed to migrate data between the two.
By using the migration tools, administrators can migrate certain roles, features, shares,
running Windows Server 2012. Some roles require the use of the migration tools, whereas others that have their own internal communication capabilities do not.
There is no single procedure for migrating all the Windows Server roles, whether they have their own migration tools or not. Instead, Microsoft provides detailed migration guides for individual roles, and sometimes for individual role services within a role.
MORE INFO MIgRATION gUIDES
Up-to-date migration guides are available at the Windows Server Migration Portal at the Windows Server 2012 TechCenter (http://technet.microsoft.com/en-us/library/jj134039).
Thought experiment
In this thought experiment, apply what you’ve learned about this objective. You can find answers to these questions in the “Answers” section at the end of this chapter.
Ralph recently took delivery of a new server with Windows Server 2012 Datacenter edition already installed with the full GUI option. Ralph wants to configure the system as a web server, using the absolute minimum of hardware resources. His first step is to use Server Manager to install the Web Server (IIS) role.
With this in mind, answer the following questions:
1. What Windows PowerShell command should Ralph use to convert the full GUI
installation to Server Core?
2. What Windows PowerShell command should Ralph use to completely remove
the GUI installation files from the system?
Objective summary
■ Microsoft releases all its operating systems in multiple editions, which provides
con-sumers with varying price points and feature sets.
■ When you select the Windows Server Core installation option, you get a
stripped-down version of the operating system.
■ The Minimal Server Interface is a setting that removes some of the most
hardware-intensive elements from the graphical interface.
■ An in-place upgrade is the most complicated form of Windows Server 2012
Objective 1.1: Install servers CHAPTER 1 17
■ Migration is the preferred method of replacing an existing server with one running
Windows Server 2012. Unlike an in-place upgrade, a migration copies vital information from an existing server to a clean Windows Server 2012 installation.
Objective review
Answer the following questions to test your knowledge of the information in this objective. You can find the answers to these questions and explanations of why each answer choice is correct or incorrect in the “Answers” section at the end of this chapter.
1. Which of the following roles implement what can be classified as infrastructure
services? (Choose all that apply.)
A. DNS
B. Web Server (IIS)
C. DHCP
D. Remote Desktop Services
2. Which of the following is a valid upgrade path to Windows Server 2012? A. Windows Server 2003 Standard to Windows Server 2012 Standard B. Windows Server 2008 Standard to Windows Server 2012 Standard C. Windows Server 2008 R2 32-bit to Windows Server 2012 64-bit D. Windows 7 Ultimate to Windows Server 2012 Essentials
3. Which feature must you add to a Windows Server 2012 Server Core installation to
convert it to the Minimal Server Interface?
A. Graphical Management Tools and Infrastructure B. Server Graphical Shell
C. Windows PowerShell
D. Microsoft Management Console
4. What is the name of the directory where Windows stores all the operating system
modules it might need to install at a later time?
A. Windows B. System32
C. bin
D. WinSxS
5. Which of the following are valid reasons why administrators might want to install their
Windows Server 2012 servers by using the Server Core option? (Choose all that apply.)
A. A Server Core installation can be converted to the full GUI without reinstalling the
operating system.
B. The Windows PowerShell 3.0 interface in Windows Server 2012 includes more than
C. The new Server Manager in Windows Server 2012 makes it far easier to administer
servers remotely.
D. A Windows Server 2012 Server Core license costs significantly less than a full
GUI license.
Objective 1.2: Configure servers
A server is rarely ready to perform all the tasks you have planned for it immediately after installation. Typically some postinstallation configuration is required, and further configura-tion changes might become necessary after the server is in service.
This objective covers how to:
■ Configure Server Core ■ Delegate administration
■ Add and remove features in offline images ■ Deploy roles on remote servers
■ Convert Server Core to and from full GUI ■ Configure services
■ Configure NIC teaming
Completing postinstallation tasks
As part of the new emphasis on cloud-based services in Windows networking, Windows Server 2012 contains a variety of tools that have been overhauled to facilitate remote server management capabilities.
The new Server Manager, for example, is designed to enable administrators to fully man-age Windows servers without ever having to interact directly with the server console, either physically or remotely. However, there are some tasks that administrators might have to perform immediately after the operating system installation that require direct access to the server console. These tasks might include the following:
■ Configure the network connection ■ Set the time zone
Objective 1.2: Configure servers CHAPTER 1 19
Using GUI tools
In Windows Server 2012, the Properties tile in Server Manager, as shown in Figure 1-4, pro-vides the same functionality as the Initial Configuration Tasks window in previous Windows Server versions. To complete any or all of the postinstallation configuration tasks on a GUI Windows Server 2012 installation, you can use the tools in the Properties tile, either by working directly at the server console or by using Remote Desktop to access the server from another computer.
FIGURE 1-4 The Properties tile of the local server in Server Manager.
The Ethernet entry in the Properties tile specifies the current status of the computer’s network interface. If there is an active Dynamic Host Configuration Protocol (DHCP) server on the network, the server will have already retrieved an IP address and other settings and used them to configure the interface. If there is no DHCP server on the network, or if you must configure the computer with a static IP address, click the Ethernet hyperlink to display the Network Connections window from the Control Panel. You can use this to open the Ethernet Properties sheet and the Internet Protocol Version 4 (TCP/IPv4) Properties sheet, where you can configure the TCP/IP client.
Accurate computer clock time is essential for Active Directory Domain Services communi-cation. If the server is located in a time zone other than the default Pacific zone, click the Time Zone hyperlink to open the Date and Time dialog box, where you can correct the setting.
By default, Windows Server 2012 does not allow Remote Desktop connections. To
enable them, click the Remote Desktop hyperlink to open the Remote tab of the System
Properties sheet.
it to a domain, click the Computer Name hyperlink to open the System Properties sheet and click Change to open the Computer Name/Domain Changes dialog box.
If necessary, because of limited physical access to the server, you can confine this proce-dure to configuring the network connection and enabling Remote Desktop. Then, you can use Remote Desktop to connect to the server and configure everything else.
Using command-line tools
If you selected the Server Core option when installing Windows Server 2012, you can perform the same postinstallation tasks from the command line. At the very minimum, you will have to rename the computer and join it to a domain. To do this, you can use the Netdom.exe program.
To rename a computer, run Netdom.exe with the following syntax, as shown in Figure 1-5:
netdom renamecomputer %ComputerName% /NewName: <NewComputerName>
FIGURE 1-5 Renaming a computer from the command line.
To restart the computer as directed, use the following command:
shutdown /r
Then, to join the computer to a domain, use the following syntax:
netdom join %ComputerName% /domain: <DomainName> /userd: <UserName> /passwordd:*
In this command, the asterisk (*) in the /passwordd parameter causes the program to prompt you for the password to the user account you specified.
Objective 1.2: Configure servers CHAPTER 1 21
To enable Remote Desktop connections on the server, use the following cmdlet:
Set-NetFirewallRule -DisplayGroup "Remote Desktop" -Enabled True
Converting between GUI and Server Core
In Windows Server 2012, you can convert a computer installed with the full GUI option to Server Core and add the full GUI to a Server Core computer. This is a major improvement in the usefulness of Server Core over the version in Windows Server 2008 R2, in which you can only change the interface by reinstalling the entire operating system.
With this capability, administrators can install servers with the full GUI, use the graphical tools to perform the initial setup, and then convert them to Server Core to conserve system resources. If it later becomes necessary, it is possible to reinstall the GUI components.
To convert a full GUI installation of Windows Server 2012 to Server Core by using Server Manager, use the following procedure.
1. Log on to the server running Windows Server 2012 using an account with
Administrative privileges. The Server Manager window opens.
2. From the Manage menu, select Remove Roles And Features. The Remove Roles and
Features Wizard starts, displaying the Before You Begin page.
3. Click Next. The Select Destination Server page opens.
4. Select the server you want to convert to Server Core and click Next to open the
Remove Server Roles page.
5. Click Next. The Remove Features page opens.
6. Scroll down in the list and expand the User Interfaces And Infrastructure feature, as
FIGURE 1-6 The Remove Features page in Server Manager.
7. Clear the check boxes for the following components:
■ Graphical Management Tools And Infrastructure ■ Server Graphical Shell
8. The Remove Features That Require Graphical Management Tools And Infrastructure
dialog box opens with a list of dependent features that must be uninstalled. Click Remove Features.
9. Click Next to open the Confirm Removal Selections page.
10. Select the Restart The Destination Server Automatically If Required check box and click
Remove. The Removal Progress page opens as the wizard uninstalls the feature.
11. Click Close. When the removal is completed, the computer restarts.
To add the full GUI to a Server Core computer, you must use Windows PowerShell to install the same features you removed in the previous procedure. To convert a Windows Server 2012 Server Core installation to the full GUI option, use the following Windows PowerShell command:
Install-WindowsFeature Server-Gui-Mgmt-Infra,Server-Gui-Shell –Restart
To convert a full GUI server installation to Server Core, use the following command:
Objective 1.2: Configure servers CHAPTER 1 23
Configuring NIC teaming
NIC teaming is a new feature in Windows Server 2012 that enables administrators to com-bine the bandwidth of multiple network interface adapters, providing increased performance and fault tolerance. Virtualization enables administrators to separate vital network functions on different systems without having to purchase a separate physical computer for each one. However, one of the drawbacks of this practice is that a single server hosting multiple VMs is still a single point of failure for all of them. A single malfunctioning network adapter, a faulty switch, or even an unplugged cable can bring down a host server and all its VMs.
NIC teaming, also called bonding, balancing, and aggregation, is a technology that has
been available for some time, but it was always tied to specific hardware implementations. The NIC teaming capability in Windows Server 2012 is hardware independent, and enables you to combine multiple physical network adapters into a single interface. The results can
include increased performance by combining throughput of the adapters and protection
from adapter failures by dynamically moving all traffic to the functioning NICs. NIC teaming in Windows Server 2012 supports two modes:
■ Switch Independent Mode All the network adapters are connected to different
switches, providing alternative routes through the network.
■ Switch Dependent Mode All the network adapters are connected to the same
switch, providing a single interface with their combined bandwidth.
In Switch Independent Mode, you can choose between two configurations. The active /active configuration leaves all the network adapters functional, providing increased through-put. If one adapter fails, all the traffic is shunted to the remaining adapters. In the active /standby configuration, one adapter is left offline to function as a failover in the event the active adapter fails. In active/active mode, an adapter failure causes a performance reduc-tion; in active/standby mode, the performance remains the same before and after an adapter failure.
In Switch Dependent Mode, you can choose static teaming, a generic mode that balances
the traffic between the adapters in the team, or you can opt to use the Link Aggregation Control Protocol defined in IEEE 802.3ax, assuming that your equipment supports it.
There is one significant limitation to NIC teaming. If your traffic consists of large TCP sequences, such as a Hyper-V live migration, the system will avoid using multiple adapters for those sequences to minimize the number of lost and out-of-order TCP segments. You will therefore not realize any performance increase for large file transfers using TCP.
You can create and manage NIC teams by using Server Manager or Windows PowerShell. To create a NIC team by using Server Manager, follow these steps.
1. Log on to the server running Windows Server 2012 using an account with
Administrative privileges. The Server Manager window opens.
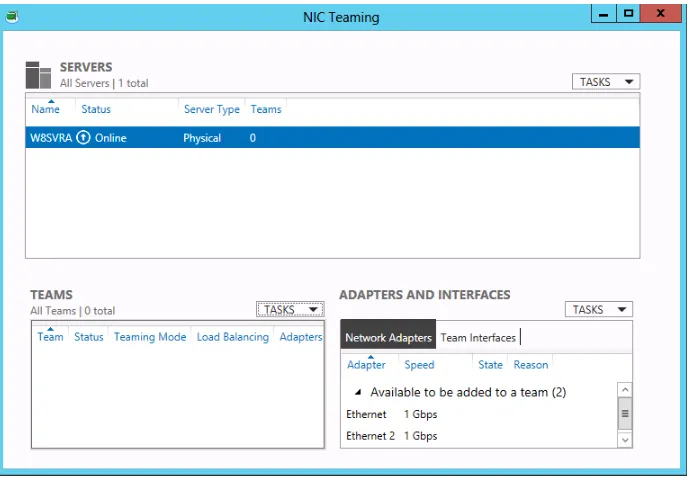
2. In the navigation pane, click Local Server. The Local Server home page appears. 3. In the Properties tile, click NIC Teaming. The NIC Teaming window opens, as shown in
FIGURE 1-7 The NIC Teaming window in Server Manager.
4. In the Teams tile, click Tasks and select New Team to open the New Team page. 5. Click the Additional Properties arrow to expand the window, as shown in Figure 1-8.
Objective 1.2: Configure servers CHAPTER 1 25 6. In the Team Name text box, type the name you want to assign to the team.
7. In the Member Adapters box, select the network adapters you want to add to
the team.
8. In the Teaming Mode drop-down list, select one of the following options:
■ Static Teaming ■ Switch Independent ■ LACP
9. In the Load Balancing Mode drop-down list, select one of the following options:
■ Address Hash ■ Hyper-V Port
10. If you selected Switch Independent for the Teaming Mode value, in the Standby
Adapter drop-down list, select one of the adapters you added to the team to function as the offline standby.
11. Click OK. The new team appears in the Teams tile, as shown in Figure 1-9.
FIGURE 1-9 A new NIC team in the NIC Teaming window in Server Manager.
Once you have created a NIC team, the NIC Teaming window enables you to monitor the status of the team and the team interface you have created. The team itself and the individual adapters all have status indicators that inform you if an adapter goes offline.
If this occurs, the indicator for the faulty adapter immediately switches to disconnected,
FIgURE 1-10 A NIC team with a failed adapter.
Using Server Manager
The Server Manager tool in Windows Server 2012 is a new application that is the first and most obvious evidence of a major paradigm shift in Windows Server administration. In previous versions of Windows Server, an administrator who wanted to install a role by using graphical controls had to work at the server console by either physically sitting at the key
-board or connecting to it by using Remote Desktop Services (formerly Terminal Services). In contrast, the Windows Server 2012 Server Manager can install roles and features to any server on the network.
Adding servers
The primary difference between the Windows Server 2012 Server Manager and previous versions is the ability to add and manage multiple servers at once. When you log on to a GUI installation of Windows Server 2012 with an administrative account, Server Manager loads automatically, displaying the Welcome tile.
The Server Manager interface consists of a navigation pane on the left containing icons representing various views of server resources. Selecting an icon displays a home page in the right pane, which consists of a number of tiles containing information about the resource. The Dashboard page, which appears by default, contains, in addition to the Welcome tile, thumb
Objective 1.2: Configure servers CHAPTER 1 27
FIGURE 1-11 Dashboard thumbnails in Server Manager.
Although only the local server appears in Server Manager when you first run it, you can add other servers, enabling you to manage them together. The servers you add can be physi-cal or virtual and can be running any version of Windows Server since Windows Server 2003. After you add servers to the interface, you can create groups containing collections of servers, such as the servers at a particular location or those performing a particular function. These groups appear in the navigation pane, enabling you to administer them as a single entity.
To add servers in Server Manager, use the following procedure.
1. Log on to the server running Windows Server 2012 using an account with
Administrative privileges. The Server Manager window opens.
2. In the navigation pane, click All Servers. The All Servers home page appears, as shown
FIGURE 1-12 The All Servers home page in Server Manager.
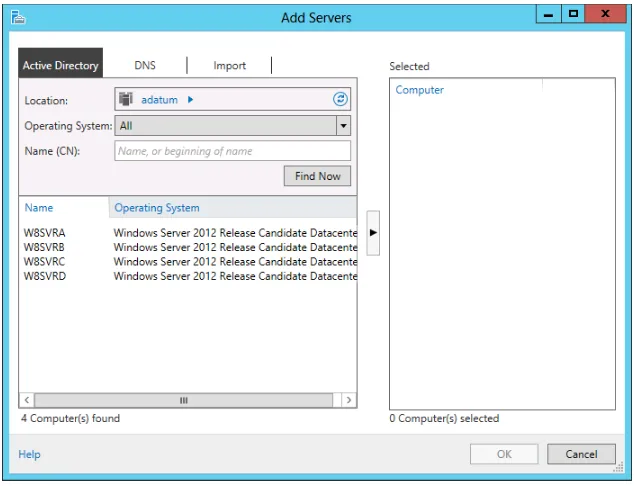
3. From the Manage menu, select Add Servers. The Add Servers dialog box opens, as
shown in Figure 1-13.
Objective 1.2: Configure servers CHAPTER 1 29 4. Select one of the following tabs to specify how you want to locate servers to add:
■ Active Directory Enables you to search for computers running specific operating
systems in specific locations in an Active Directory Domain Services domain
■ DNS Enables you to search for servers in your currently configured Domain Name
System (DNS) server
■ Import Enables you to supply a text file containing the names of the servers you
want to add
5. Initiate a search or upload a text file to display a list of available servers, as shown in
Figure 1-14.
FIGURE 1-14 Searching for servers in Server Manager.
6. Select the servers you want to add and click the right arrow button to add them to the
Selected list.
7. Click OK. The servers you selected are added to the All Servers home page.
Once you have added remote servers to the Server Manager interface, you can access them in a variety of ways, including the standard MMC administrative tools, the Computer Management console, and a remote Windows PowerShell session.
Adding roles and features
The Server Manager program in Windows Server 2012 combines what used to be separate wizards for adding roles and features into one, the Add Roles and Features Wizard. Once you add multiple servers to the Server Manager interface, they are integrated into the Add Roles and Features Wizard, so you can deploy roles and features to any of your servers.
To install roles and features by using Server Manager, use the following procedure.
1. Log on to the server running Windows Server 2012 using an account with
Administrative privileges. The Server Manager window opens.
2. From the Manage menu, select Add Roles And Features. The Add Roles and Features
Wizard starts, displaying the Before You Begin page.
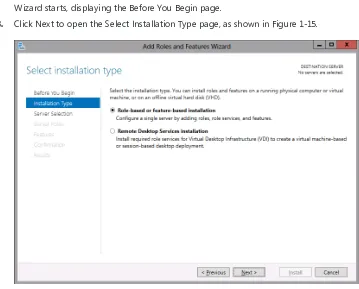
3. Click Next to open the Select Installation Type page, as shown in Figure 1-15.
FIGURE 1-15 The Select Installation Type page in the Add Roles and Features Wizard.
4. Leave the Role-Based Or Feature-Based Installation option selected and click Next. The
Objective 1.2: Configure servers CHAPTER 1 31
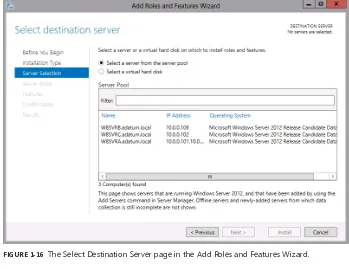
FIGURE 1-16 The Select Destination Server page in the Add Roles and Features Wizard.
5. Select the server on which you want to install the roles or features. If the server pool
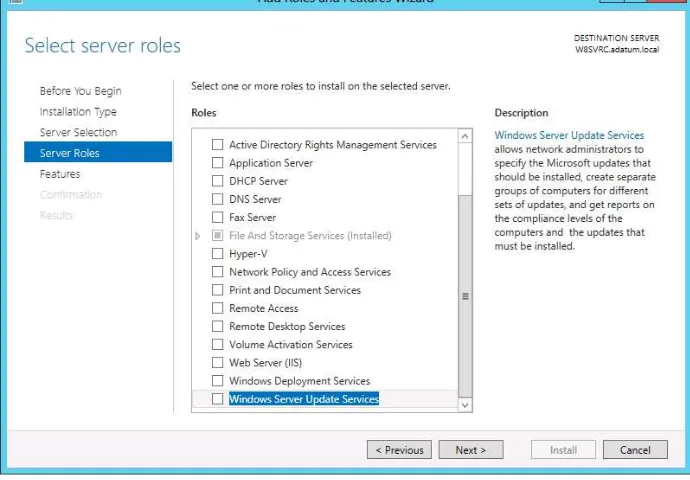
FIGURE 1-17 The Select Server Roles page in the Add Roles and Features Wizard.
NOTE INSTALLING COMPONENTS TO MULTIPLE SERVERS
Although you can use the Add Roles and Features Wizard to install components to any server you have added to Server Manager, you cannot use it to install components to multiple servers at once. You can, however, do this by using Windows PowerShell.
6. Select the role or roles you want to install on the selected server. If the roles you select
have other roles or features as dependencies, an Add Features That Are Required dia-log box appears.
NOTE SELECTINg ALL ROLES AND FEATURES
Unlike previous versions of Server Manager, the Windows Server 2012 version enables you to select all the roles and features for a particular server configuration at once, rather than making you run the wizard multiple times.
7. Click Add Features to accept the dependencies, and then click Next to open the Select
Objective 1.2: Configure servers CHAPTER 1 33
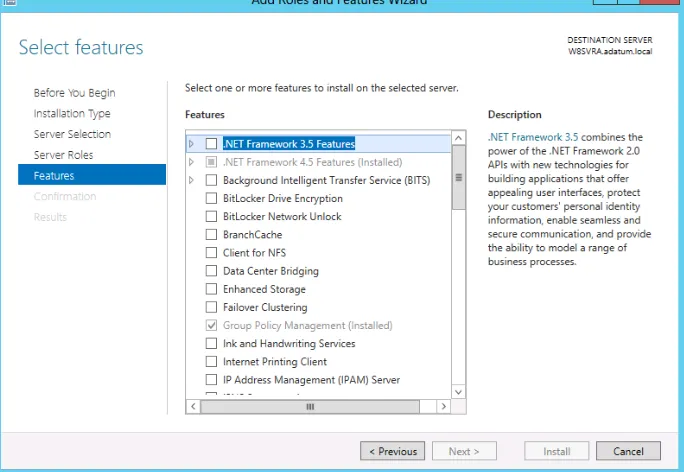
FIGURE 1-18 The Select Features page in the Add Roles and Features Wizard.
8. Select any features you want to install in the selected server and click Next.
Dependencies might appear for your feature selections.
9. The wizard then displays pages specific to the roles or features you have chosen. Most
roles have a Select Role Services page, on which you can select which elements of the role you want to install. Complete each of the role-specific or feature-specific pages and click Next. A Confirm Installation Selections page opens.
10. You can select from the following optional functions:
■ Restart The Destination Server Automatically If Desired Causes the server to
restart automatically when the installation is completed, if the selected roles and
features require it
■ Export Configuration Settings Creates an XML script documenting the proce
-dures performed by the wizard, which you can use to install the same configuration on another server by using Windows PowerShell
■ Specify An Alternate Source Path Specifies the location of an image file
con-taining the software needed to install the selected roles and features
11. Click Install to open the Installation Progress page. Depending on the roles and
NOTE USINg AN EXPORTED CONFIgURATION FILE
To use an exported configuration file to install roles and features on another computer running Windows Server 2012, use the following command in a Windows PowerShell session with elevated privileges:
Install-WindowsFeature –ConfigrationFilePath <ExportedConfig.xml>
Once you install roles on your servers, the roles appear as icons in the navigation pane. These icons actually represent role groups. Each role group contains all the instances of that role found on any of your added servers. You can therefore administer the role across all of the servers on which you have installed it.
Deploying roles to VHDs
In addition to installing roles and features to servers on the network, Server Manager also enables administrators to install them to VMs that are currently in an offline state. For example, you might have an offline web server VM stored on a backup host server, in case the computer hosting your main web server VMs should fail. Server Manager enables you to select a virtual hard disk (VHD) file and install or remove roles and features without having to start the VM.
To install roles or features to an offline VHD file, use the following procedure.
1. Log on to the server running Windows Server 2012 using an account with
Administrative privileges. The Server Manager window opens.
2. From the Manage menu, select Add Roles And Features. The Add Roles and Features
Wizard starts, displaying the Before You Begin page.
3. Click Next to open the Select Installation Type page.
4. Leave the Role-Based Or Feature-Based Installation option selected and click Next. The
Select Destination Server page opens.
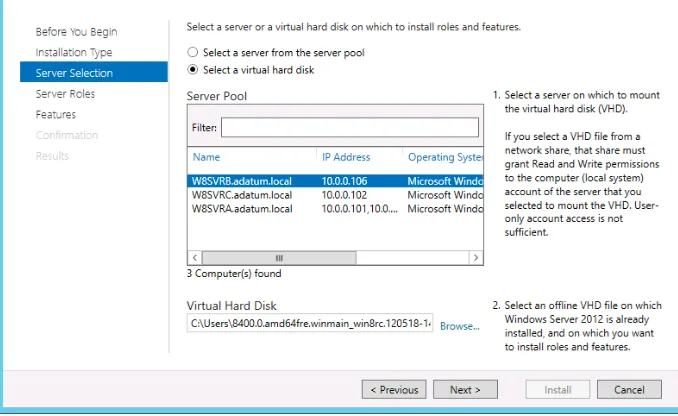
5. Select the Select A Virtual Hard Disk option. A Virtual Hard Disk text box appears at
the bottom of the page.
6. In the Virtual Hard Disk text box, type or browse to the location of the VHD file you
want to modify.
7. In the Server Pool box, select the server that the wizard should use to mount the VHD
Objective 1.2: Configure servers CHAPTER 1 35
FIGURE 1-19 The Select Destination Server page in the Add Roles and Features Wizard.
NOTE WHAT IT MEANS TO MOUNT THE VHD FILE
The wizard must mount the VHD file on the server you select to look inside and deter -mine which roles and features are already installed and which are available for installa -tion. Mounting a VHD file only makes it available through the computer’s file system; it is not the same as starting the VM by using the VHD.
8. Select the role or roles you want to install on the selected server, adding the required
dependencies if necessary, and click Next. The Select Features page opens.
9. Select any features you want to install on the selected server and click Next.
Dependencies might appear for your feature selections.
10. The wizard then displays pages specific to the roles or features you have chosen,
enabling you to select role services and configure other settings. Complete each of the role-specific or feature-specific pages and click Next. A Confirmation page opens.
11. Click Install. The Installation Progress page opens. When the installation is complete,