Microsoft
®SharePoint
®Designer 2010
Step by Step
Microsoft
®SharePoint
®Designer 2010
Step by Step
Sebastopol, California 95472 Copyright © 2010 Penelope Coventry.
Complying with all applicable copyright laws is the responsibility of the user. All rights reserved. Without limiting the rights under copyright, no part of this document may be reproduced, stored in or introduced into a retrieval system, or transmitted in any form or by any means (electronic, mechanical, photocopying, recording, or otherwise), or for any purpose, without express written permission of O’Reilly Media, Inc.
Printed and bound in Canada.
1 2 3 4 5 6 7 8 9 TG 5 4 3 2 1 0
Microsoft Press titles may be purchased for educational, business or sales promotional use. Online editions are also available for most titles (http://my.safaribooksonline.com). For more information, contact our corporate/institutional sales department: (800) 998-9938 or [email protected]. Visit our website at microsoftpress.oreilly.com. Send comments to mspinput@ microsoft.com.
Microsoft, Microsoft Press, ActiveX, Excel, FrontPage, Internet Explorer, PowerPoint, SharePoint, Webdings, Windows, and Windows 7 are either registered trademarks or trademarks of Microsoft Corporation in the United States and/or other countries. Other product and company names mentioned herein may be the trademarks of their respective owners.
Unless otherwise noted, the example companies, organizations, products, domain names, e-mail addresses, logos, people, places, and events depicted herein are fictitious, and no association with any real company, organization, product, domain name, e-mail address, logo, person, place, or event is intended or should be inferred.
This book expresses the author’s views and opinions. The information contained in this book is provided without any express, statutory, or implied warranties. Neither the author, O’Reilly Media, Inc., Microsoft Corporation, nor their respective resellers or distributors, will be held liable for any damages caused or alleged to be caused either directly or indirectly by such information.
Acquisitions and Development Editors: Juliana Aldous and Kenyon Brown
Production Editor: Rachel Monaghan
Copy Editor: John Pierce
Technical Reviewers: Sara Windhorst and Marlene Lanphier
Proofreader: Nancy Sixsmith
Indexer: Ginny Munroe
Cover Designer: Karen Montgomery
Compositor: Nellie McKesson
Illustrator: Robert Romano
This book is dedicated to the memory of my goddaughter, Nia Kate Griffiths, who died at the age of 21. She suffered from cystic fibrosis, and although she was relatively fit all her life, the last four years were tough on her. No matter how ill she was or the number of visits to the hospital she had to endure, she was
What do you think of this book? We want to hear from you!
M crosoft s nterested n hear ng your feedback so we can cont nua y mprove our books and earn ng resources for you. To part c pate n a br ef on ne survey, p ease v s t:
microsoft.com/learning/booksurvey
Contents
Acknowledgments . . . xv
Is This the Right SharePoint Book for You? . . . .xvii
Introduction . . . xix
Using the Practice Files . . . xxiii
Getting Help . . . xxxi
Features and Conventions of This Book . . . xxxiii
Part 1
Getting Started with
Microsoft SharePoint Designer 2010
1
Exploring SharePoint Designer 2010
1
Understanding SharePoint Designer 2010 . . . . 3Using SharePoint Designer to Carry Out Common Tasks . . . . 4
Understanding What’s New in SharePoint Designer 2010 . . . . 6
Creating Sites with SharePoint Designer . . . . 8
Exploring the SharePoint Designer Shell . . . . 13
Using SharePoint Designer to Explore a Web Page . . . . 20
Using Task Panes . . . . 26
Controlling the Use of SharePoint Designer . . . . 32
Key Points . . . . 33
2
Working with SharePoint Sites
37
Changing the Title, Description, and Theme of a Site . . . . 38Managing Site Users and Permissions . . . . 41
Creating a Site Hierarchy . . . . 45
Deleting a SharePoint Site . . . .48
Resetting a Site Template . . . . 49
Navigating a Site’s Components . . . . 56
Saving and Using a Site Template . . . .60
Key Points . . . .64
Part 2
Working with Information
3
Working with Lists and Libraries
69
Creating Lists and Libraries . . . . 70Creating an Issue Tracking List . . . . 74
Importing Data into SharePoint . . . . 76
Working with List Columns . . . .77
Using Calculated Columns . . . .80
Using Column Validation . . . . 81
Creating an XSLT List View Web Part . . . . 83
Customizing an XSLT List View Web Part . . . .86
Securing a List or a Library . . . .88
Adding Custom Actions . . . . 89
Creating Server Ribbon Custom Actions . . . . 93
Creating Site Columns . . . .94
Using Site Columns . . . .96
Creating Content Types . . . .98
Adding a Site Column to a Content Type . . . .100
Adding a Document Template to a Content Type . . . .101
Associating Content Types with Lists and Libraries . . . .103
Deleting SharePoint Objects . . . .105
Key Points . . . .107
4
Creating and Modifying Web Pages
109
Inserting Text, ScreenTips, Hyperlinks, and Images . . . .110Working with Web Parts . . . . 114
Changing the Home Page for a Web Site . . . .119
Modifying a List View Page . . . .121
Creating List View Pages . . . .123
Creating and Modifying a List Form Page . . . .125
Creating an ASP .NET Page . . . .130
Contents ix
Attaching a Master Page . . . .134
Managing Web Pages . . . .137
Key Points . . . .140
5
Working with Data Views
143
Creating a Data View . . . .144Customizing Data Views . . . .149
Inline Editing . . . .152
Applying Conditional Formatting . . . .154
Showing and Hiding Content . . . .157
Using XSLT . . . .160
Using Formula Columns . . . .163
Working with XPath Expressions . . . .165
Deploying Web Parts . . . .168
Key Points . . . . 171
6
Working with Data Sources
173
Using Data Sources . . . . 174Working with XML Data . . . .180
Connecting to an RSS Feed XML File . . . .183
Connecting to an RSS Feed Server-Side Script . . . .185
Connecting to SOAP Services . . . .188
Connecting to REST Services . . . .190
Connecting to a Database . . . .192
Using Linked Sources . . . .197
Connecting Web Parts . . . .202
Key Points . . . .205
7
Using Business Connectivity Services
207
What Is Business Connectivity Services? . . . .208Creating Database External Data Sources . . . .211
Creating External Content Types . . . . 216
Creating Office Application External Content Types . . . .222
Creating and Managing External Lists . . . .225
Working with Office Application External Content Types . . . .228
Creating a Profile Page . . . .233
Using Associations . . . .237
Managing External Content Types . . . . 242
Key Points . . . .244
Part 3
Using Workflow
8
Understanding Workflows
249
Working with Workflows . . . .250Creating Workflows with SharePoint Designer . . . .253
Using Actions and Conditions . . . .258
Modifying a Workflow . . . .264
Deploying Workflows . . . .267
Creating a Multistep Workflow . . . .273
Creating a Site Workflow . . . .275
Using Visio to Map a Workflow . . . .277
Importing a Workflow from Visio . . . .281
Exporting a Workflow to a Visio Drawing . . . .283
Removing and Deleting Workflows . . . .285
Key Points . . . .287
9
Using Reusable Workflows and Workflow Forms
289
Creating and Using Reusable Workflows . . . .290Creating Association Columns . . . .293
Using Workflow Templates . . . .294
Reusing Globally Reusable Workflows . . . .295
Creating Globally Reusable Workflows . . . .298
Creating Initiation and Association Forms . . . .301
Retrieving Values from Initiation Forms . . . .305
Modifying an InfoPath Form . . . .308
Publishing an InfoPath Form . . . .313
Modifying Initiation Form Parameters . . . . 316
Modifying an Association Form . . . . 318
Adding Association Fields to Initiation Forms . . . . 319
Modifying Task Forms . . . .322
Contents xi
Part 4
Advanced Customizations
10
Branding SharePoint Sites
327
Setting the CSS and Color Coding Page Editor Options . . . .32911
Working with Master Pages
367
Understanding Master Pages . . . .36813
Managing Web Content in the SharePoint Server
Environment
429
Creating a Publishing Site . . . . 431
Understanding Web Content Management in SharePoint Server 2010 . . . .433
Understanding the Page Model . . . .438
Creating a Page Layout . . . .442
Modifying a Page Layout . . . .447
Allowing Users to Rate Web Content . . . .449
Approving a Page Layout . . . . 451
Restoring an Earlier Version of a Page Layout . . . .453
Detaching and Reattaching a Page Layout . . . .454
Key Points . . . .456
14
Using Controls in Web Pages
459
Working with the Ribbon and Tag Properties Task Pane . . . .460Using a Standard ASP .NET Server Control . . . .464
Validating User Data Entry . . . .466
Using ASP .NET Validation Controls . . . .468
Using SharePoint Data View Controls . . . .472
Testing an ASP .NET Form . . . . 475
Using SharePoint Server Controls . . . . 476
Key Points . . . . 479
A
SharePoint Designer Workflow Conditions and Actions
481
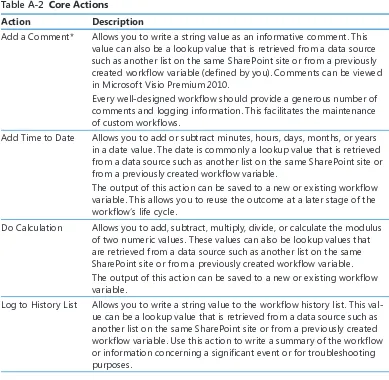
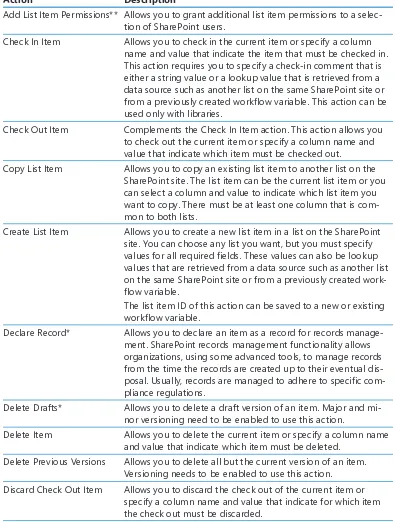
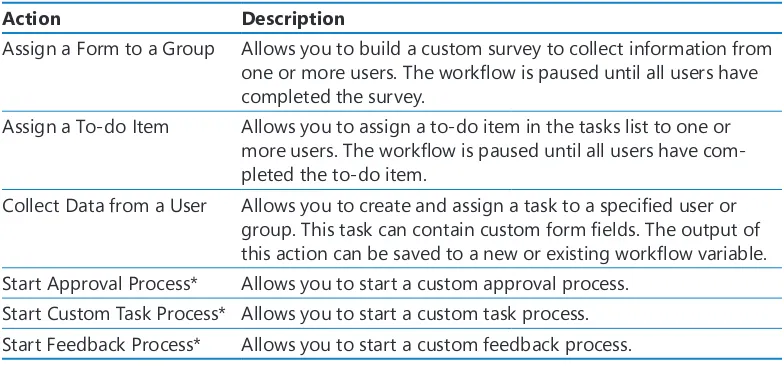
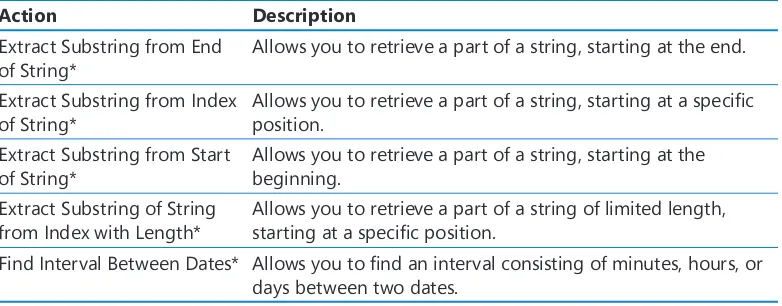
Conditions . . . .481Core Actions . . . .483
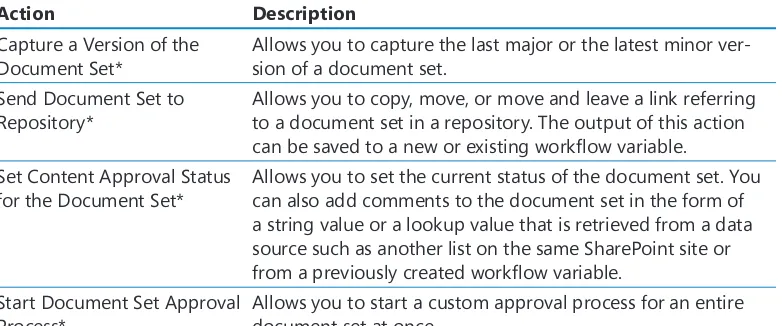
Document Set Actions . . . .485
List Actions . . . .485
Relational Actions . . . .488
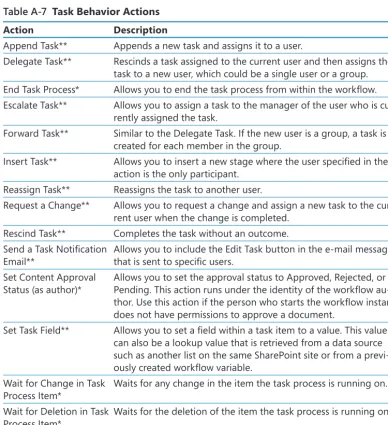
Task Actions . . . .488
Task Behavior Actions . . . .488
Contents xiii
B
Creating a New Approval Process
491
C
Administrative Tasks Using SharePoint 2010
503
Installing SharePoint Foundation 2010 . . . .504Creating a Site Collection . . . .506
Enabling All Site Templates on a SharePoint Server Site . . . .507
Restricting the Use of SharePoint Designer 2010 at the Web-Application Level . . . .508
Configuring Permissions on External Content Types . . . . 510
Configuring the External Content Type Profile Page Host . . . . 511
Enabling or Disabling User-Defined Workflows . . . . 511
Glossary . . . 515
Index. . . 521
About the Author. . . 555
What do you think of this book? We want to hear from you!
Acknowledgments
I want to thank my husband for his continued support while I wrote yet another book . I don’t know why I write books . This one should have been easier; however, they are never easy and place a considerable amount of strain on my personal and professional life . Yet again, I ignored my husband and my dog, Poppy, but they still love me and are pleased to see me in those odd moments when I leave my computer . I don’t understand why I’m so lucky to have both of them in my life .
I’d like to thank Kenyon Brown (O’Reilly Media Senior Content Development Editor), Rachel Monaghan (O’Reilly Media Senior Production Editor), John Pierce (copy editor), Sara Windhorst (technical reviewer), Marlene Lanphier (technical reviewer), and all the other people who kept me on track and provided such excellent suggestions .
I would like to include a special thanks to my contributing authors, Nikander and Margriet Buggeman, Heather Waterman, and Nikki Ashington, whose knowledge added greatly to this book .
Lastly, I would like to thank the members of the SharePoint User Group U .K . and my fel-low SharePoint MVPs . I am truly honored to be part of this unique community, and I have learned much from their blog posts, presentations, books, and discussions . Thank you all!
Is This the Right SharePoint Book for You? xvii
Is This the Right SharePoint
Book for You?
This book is about Microsoft® SharePoint® Designer 2010, but before you buy it, please read the following guidelines to learn why you should or should not be using this book .
Note SharePoint Designer 2010 is not a Web authoring tool. If you want to learn how to
create Web pages on non-SharePoint Web sites, use a different product such as Microsoft Expression Web.
Buy This Book
This book is for you if:
● You have access to Microsoft SharePoint 2010, either Microsoft SharePoint Foundation 2010, Microsoft SharePoint Server 2010, or both products in your organization .
● You want to create and manage SharePoint sites and perform other tasks, such as creating and modifying Web pages and workflows for SharePoint sites .
● You do not know how to program and have little or no experience using SharePoint Designer .
Do Not Buy This Book
This book is NOT right for you if:
● You use Microsoft FrontPage 2003 to build or amend non-SharePoint sites .
● You’re an instructor and use FrontPage 2003 to teach Web page authoring on non-SharePoint sites .
● You’re looking for a general introduction to SharePoint .
● You do not have access to SharePoint 2010 in your organization, school, etc .
● You use SharePoint Designer 2007 to build sites based on Windows SharePoint Services 3 .0 or Microsoft Office SharePoint Server 2007 .
● You want to upgrade to SharePoint Designer 2010 to modify those sites .
Introduction
Welcome to Microsoft® SharePoint® Designer 2010 Step by Step . SharePoint Designer 2010 is a free, powerful tool that together with Microsoft products such as Microsoft InfoPath 2010 Designer and Microsoft Visio 2010 plays a key role in building solutions with Microsoft SharePoint Foundation 2010 and Microsoft SharePoint Server 2010 .
● SharePoint Foundation is a free download that provides a collection of services that you can use to build sites . It is also a platform on which you can build applica-tions . SharePoint Server is such an application, and all the features in SharePoint Foundation are available to SharePoint Server . SharePoint Server comes in a num-ber of editions, all of which you can use with SharePoint Designer .
● SharePoint Server 2010 is used for intranet scenarios, in which either the Enterprise or Standard client-access license edition can be used .
● SharePoint 2010 for Internet Sites is available in the Enterprise or Standard edition . These editions can be used to build extranet Web sites .
● FAST Search Server 2010 for SharePoint is used to design enterprise search solutions .
● Office 365 brings together the 2010 editions of SharePoint Online, Exchange Online, Lync Online, and Office desktop software as a cloud serivce .
Don’t be put off by its name . SharePoint Designer is not aimed just at Web designers . Everyone who has had some training with SharePoint Designer should be able to use it, but it is not necessarily a tool that everyone should use . Some solutions you can develop quickly as no-code solutions; others may take time, and you might need to modify the underlying client-side code . For some users, the experimental and investigative aspects of developing a solution with SharePoint Designer might be new, frustrating, and initially unfriendly compared with tools they might be used to .
How to Access Your Online Edition Hosted by Safari
The voucher bound in to the back of this book gives you access to an online edition of the book . (You can also download the online edition of the book to your own computer; see the next section .)
To access your online edition, do the following:
1. Locate your voucher inside the back cover, and scratch off the metallic foil to reveal your access code .
2. Go to http://microsoftpress.oreilly.com/safarienabled .
3. Enter your 24-character access code in the Coupon Code field under Step 1:
(Please note that the access code in this image is for illustration purposes only .)
4. Click the CONFIRM COUPON button .
A message will appear to let you know that the code was entered correctly . If the code was not entered correctly, you will be prompted to re-enter the code .
5. In this step, you’ll be asked whether you’re a new or existing user of Safari Books Online . Proceed either with Step 5A or Step 5B .
Introduction xxi
5B. If you are a new user, click the NEW USER – FREE ACCOUNT button under Step 2 .
❍ You’ll be taken to the “Register a New Account” page .
❍ This will require filling out a registration form and accepting an End User Agreement .
❍ When complete, click the CONTINUE button .
6. On the Coupon Confirmation page, click the My Safari button .
7. On the My Safari page, look at the Bookshelf area and click the title of the book you want to access .
How to Download the Online Edition to
Your Computer
1. On the page that appears after Step 7 in the previous section, click the Extras tab .
2. Find “Download the complete PDF of this book,” and click the book title:
A new browser window or tab will open, followed by the File Download dialog box:
3. Click Save .
4. Choose Desktop and click Save .
5. Locate the .zip file on your desktop . Right-click the file, click Extract All, and then follow the instructions .
Note If you have a problem with your voucher or access code, please contact
Using the Practice Files
Before you can complete the exercises in this book, you need to copy the book’s practice files to your computer . These practice files can be downloaded from the book’s detail page, which is located at:
www.oreilly.com/catalog/9780735627338/
Display the detail page in your Web browser, and then follow the instructions for down-loading the files .
By using the practice files, you won’t waste time creating your own sample files and sites—instead, you can jump right in and concentrate on learning how to get the most out of SharePoint Designer 2010 .
To complete the exercises, you need a copy of Microsoft SharePoint Designer 2010 in-stalled on your computer and access to a SharePoint site . The SharePoint site can be created using Microsoft SharePoint Foundation 2010 . However, to complete all the exer-cises, Microsoft SharePoint Server 2010 is required .
Tip In many of the chapters, you will use the default SharePoint sites, lists, and libraries, so
those chapters do not include any practice files. For other chapters, you need to use a site created from the solution file SPDSBSPracticeSite Starter.wsp, which is the only solution file for this book. You need to create a site using this solution file only once. You can then use that site to complete all exercises for all chapters that require the solution file site. If you want to, you can also use the solution file site for exercises in other chapters, except for those exercises that require a publishing site.
Important You must have access to a working SharePoint site before using this book. SharePoint Foundation 2010 and SharePoint Designer 2010 can be downloaded from Microsoft’s download Web site at no cost.
What’s on the Web?
The following table lists the practice files and site solution that are supplied on the book’s Web site for each chapter .
Chapter Files and WSP Files
Chapter 1, “Exploring SharePoint Designer” None
Chapter 3, “Working with Lists and Libraries” WideWorldImportsSaleData .xlsx WideWorldImportersExpenses .docx b NewAnn16x16 .gif
b NewAnn32x32 .png b NewTask16x16 .png Chapter 4, “Creating and Modifying Web Pages” SilverlightSPDSBS .xap
Chapter 5, “Working with Data Views” Use solution file site
SPDSBSPracticeSite Starter .wsp sale .png
SPDSBSC05 .xsl .txt
Chapter 6, “Working with Data Sources” Use solution file site
SPDSBSPracticeSite Starter .wsp Shipments .xml
Chapter 7, “Using Business Connectivity Services” None
Chapter 8, “Understanding Workflows” Use solution file site
SPDSBSPracticeSite Starter .wsp Chapter 9, “Reusable Workflows and Workflow Forms” WideWorldImporters .png
Chapter 10, “Branding SharePoint Sites” bg .png
Solution folder contains the resulting MyStyles .css and MyPage .aspx
Chapter 11, “Working with Master Pages” Use solution file site
SPDSBSPracticeSite Starter .wsp Chapter 12, “Understanding Usability and
Accessibility” Index .aspx
Chapter 13, “Managing Web Content in the
SharePoint Server Environment” None
Chapter 14, “Using Controls in Web Pages” ADRotator .xml
LucernePublishing .png WideWorldImporters .png ConsolidatedMessenger .png
Minimum System Requirements
Using the Practice Files xxv
hosts SharePoint for you or your company, or if your company has installed SharePoint on your corporate intranet, the details about the server requirements will be of little in-terest to you . Just ask your company for a SharePoint site that you can use while you are completing the exercises in this book, preferably a top-level site in your own site collec-tion . If you currently have no access to a SharePoint site, the server computer requirements section that follows will help you create or get access to a SharePoint environment .
Tip You can install SharePoint Designer 2010 and SharePoint 2010 on the same computer.
However, this not usual in a production environment.
Client Computer
To use this book, your client computer should meet the following requirements:
● Processor 500 MHz processor or higher .
● Memory 256 megabytes (MB) of RAM or higher .
● Hard disk For the eBooks and downloads, 3 GB of available hard disk space is recommended, with 2 GB on the hard disk where the operating system is installed .
● Operating system Windows 7, Windows Server 2003 R2, Windows Server 2008 R2, Windows Server 2008 with Service Pack 2, Windows Vista with Service Pack 1 or later, Windows XP with Service Pack 3 .
.NET Framework 3 .5 SP1 must be installed on the client machine, which is incorpo-rated in Windows 7 and Windows Server 2008 R2 but not in other operating systems . ● Drive CD or DVD drive .
● Display Monitor with 1024×768 or higher screen resolution and 16-bit or higher color depth . Use of graphics hardware acceleration requires DirectX 9 .0c–compatible graphics card with 64 MB or higher of video memory .
● Software Windows Internet Explorer 7 or later, or one of the supported browsers and Microsoft Silverlight . See the article “Plan browser support (SharePoint Server 2010)” at technet.microsoft.com/en-us/library/cc263526(office.14).aspx .
Tip Actual requirements and product functionality might vary based on your system
configuration and operating system.
Note SharePoint Designer 2010 connects only to SharePoint 2010. To connect to sites based
Client Software
In addition to the hardware, software, and connections required to run SharePoint Designer, you need the following software to successfully complete the exercises in this book:
● SharePoint Designer 2010, which is available at no cost from the Microsoft Web site office.microsoft.com/en-us/sharepointdesigner/
● Microsoft Visio Premium 2010
● Microsoft InfoPath Designer 2010
● Microsoft Outlook 2010
● Microsoft Access 2010
● 20 MB of available hard disk space for the practice files
Server Computer
To use this book, you must have access to a server running Microsoft SharePoint
Foundation 2010 or Microsoft SharePoint Server 2010 . Directions for how to install either of these products, especially for a production environment, is outside the scope of this book . However, if you do not have access to a SharePoint site and your company cannot provide you with one, you have two options:
● Download the 2010 Information Worker Hyper-V virtual machine that includes Office 2010, SharePoint Designer 2010, and SharePoint Server 2010 from Microsoft’s down-load site (www.microsoft.com/downloads) . Use the search keyword 2010 IW .
● Create a temporary SharePoint environment by installing a copy of SharePoint on your computer .
Important To create a permanent installation of either a SharePoint Server or a SharePoint
Foundation environment, refer to one of the following sources of information: Microsoft
SharePoint Server 2010 Administrator’s Companion, by Bill English, Brian Alderman, and Mark
Ferraz (Microsoft Press, 2011) or Microsoft SharePoint 2010 Administrator’s Pocket Consultant,
by Ben Curry (Microsoft Press, 2010). For online assistance, visit the SharePoint 2010 products
site on Microsoft TechNet, which can be found at technet.microsoft.com/en-us/library/
ee428287(office.14).aspx.
Using the Practice Files xxvii
● Operating system One of the following 64-bit operating systems: Windows Server 2008 R2, Windows Server 2008 R2 Enterprise, Windows Server 2008 R2 Standard, or Windows Server 2008 with Service Pack 2 .
● Processor 64-bit; four-cores .
● Memory 8 GB for development or evaluation use .
● Software 80 GB for installation
See Also A full list of hardware and software requirements for SharePoint Foundation 2010
can be found at technet.microsoft.com/en-us/library/cc288751(office.14).aspx.
Tip A temporary installation of SharePoint Server 2010 on a single server with a built-in
database will allow you to complete all but a very few of the exercises in this book, but you need to obtain access to a trial version of SharePoint Server or purchase a copy. More
information can be found at sharepoint.microsoft.com/Pages/Default.aspx. The installation of
SharePoint Server 2010 on a single server with a built-in database is similar to the installation of SharePoint Foundation 2010 on a single server with a built-in database. You can use the installation instructions in Appendix C as a guideline.
Using the Practice Files for the Exercises
While you work through the exercises in this book, you should have access to a SharePoint site, preferably a top-level site in your own site collection . You should be a site owner of this site . In the exercises, you create child sites below this site, and in Chapters 5, 6, 8, and 11, you use a starter solutions .wsp file to create the child site . Please refer to the instructions later in this section for how to create a practice site from the starter solutions .wsp file .
The solution file provided on the Web site contains lists, libraries, files, and pages that you use for the exercises . In chapters that require you to create a site based on the solu-tions file, a SET UP paragraph lists that requirement . The text also explains any prepara-tions you need to take before you start working through the chapter, as shown here:
SET UP Using SharePoint Designer, open the site you created from the SPDSBSPracticeSite Starter.wsp practice file.
Other practice files might need to be uploaded to the Site Assets library . You can use the browser or SharePoint Designer to upload the files to the Site Assets library . To use SharePoint Designer, use the following steps:
1.
In the Navigation pane, click Site Assets, and then on the ribbon, click Import Files in the New group . The Import dialog box opens .2.
Click Add File to display the File Open dialog box .3.
Browse to the folder that contains the practice file . Click Open, and then click OKto close the File Open and Import dialog boxes .
Uploading the Solution WSP File
To create a practice site for a chapter based on the solution .wsp file, you first need to upload the solution .wsp file to the Solutions gallery by following these steps:
SET UP Verify that you have sufficient rights to upload a solutions file to the Solutions gallery for the top-level site of the site collection you are using. Open the top-level SharePoint site in the browser.
1.
Click Site Actions, and click Site Settings to display the site settings page .2.
Under Galleries, click Solutions to display the Solutions page .Note If you see a Go To Top Level Site Settings link under Site Collection Administration,
you are not on the top-level site administration page. A site template can only be uploaded to the Solutions gallery on a top-level site. Click Go To Top Level Site Settings, and then repeat the previous step.
3.
On the ribbon, click the Solutions tab, and then click Upload Solution to display the Solutions Gallery: Upload Solution dialog box .4.
Click the Browse button to display the Choose File to Upload dialog box .5.
Navigate tothe folder that contains the solution .wsp file, click SPD2010SBSPracticeWeb StarterSite.wsp, and then click the Open button .
6.
Click OK .Using the Practice Files xxix
Creating a Site from the Solution WSP File
After you have uploaded the solution .wsp file to the Solutions gallery, you can create a child site based on the solutions file .
SET UP In your browser, display the home page of the SharePoint site where you want to create the child site.
1.
Click Site Actions, and then click New Site .In SharePoint Foundation, the New SharePoint Site page is displayed . In SharePoint Server, a Create page is displayed .
2.
Complete the following step depending the version of SharePoint that is installed:a.
On SharePoint Foundation, on the Custom tab of the Select a template list,select SPD2010SBS PracticeSite Starter .
b.
On SharePoint Server, in the left pane, under Filter By, click Custom, and then select SPD2010SBS PracticeSite Starter .Troubleshooting If you are using SharePoint Server and cannot see the Custom filter or the name of the template you uploaded, contact your site collection administrator. If you are the administrator for the site collection where you are trying to create this team site, follow the procedure in Appendix C on page 503 to display the template and then complete this exercise.
3.
In the Title box, type a logical name for the new site—for example, SPDSBS Practice Site .4.
In the URL name box, type the same name you typed in the Title box .5.
Click Create .The home page of the new practice site is displayed .
CLEAN UP Close the browser.
Removing the Solution Files
To remove the solution .wsp file from the Solutions gallery, follow these steps:
SET UP Verify that you have sufficient rights to delete a solution from the Solutions gallery. Open the top-level SharePoint site where you previously uploaded the solution file.
Note If you see a Go To Top Level Site Settings link under Site Collection Administration, you are not on the top-level site administration page. A site template can only be stored in the Solutions gallery on a top level site. Click Go To Top Level Site Settings and then repeat the previous step.
3.
Point to the site template you want to remove, click the arrow that appears, and then click Deactivate .The Solutions Gallery—Deactivate Solution dialog box appears .
4.
On the View tab, click Deactivate .5.
Point to the site template you want to remove, click the arrow that appears, and then click Delete . You are prompted to confirm your request . Click OK to complete the deletion and display the Solutions gallery .6.
Repeat steps 3 through 5 to remove each site template that you no longer want to be available for creating practice sites .CLEAN UP Close the browser.
Deleting a Practice Site
If you created a practice site that you no longer want, you can delete it . Follow these steps to delete a practice site:
SET UP Verify that you have sufficient rights to delete a site. In the browser, open the SharePoint site you want to delete.
1.
On the Site Actions menu, click Site Settings to display the site settings page .2.
In the Site Actions section, click Delete this site to display the Delete This Siteconfirmation page .
3.
Click the Delete button to delete the site .4.
On the Delete This Site warning page, click Delete .CLEAN UP Close the browser.
Important Microsoft product support services do not provide support for this book or its practice files.
Getting Help
Every effort has been made to ensure the accuracy of this book . If you run into prob-lems, please contact the sources listed in the following sections .
Getting Help with This Book
If your question or issue concerns the content of this book, please first consult the book’s errata page, which can be accessed at:
www.oreilly.com/catalog/errata.csp?isbn 9780735627338
This page provides information about known errors and corrections to the book . If you do not find your answer on the errata page, send your question or comment to O’Reilly Media Customer Service at:
Getting Help with Microsoft SharePoint Designer
If your question is about SharePoint Designer and not about the content of this Microsoft Press book, please search the Microsoft Help and Support Center or the Microsoft Knowledge Base at:
support.microsoft.com
In the United States, Microsoft software product support issues not covered by the Microsoft Knowledge Base are addressed by Microsoft Product Support Services . The Microsoft software support options available from Microsoft Product Support Services are listed at:
www.microsoft.com/services/microsoftservices/srv support.mspx
Outside the United States, for support information specific to your location, please refer to the Worldwide Support menu on the Microsoft Help And Support Web site for the site specific to your country:
Features and Conventions of
This Book
This book has been designed to lead you step by step through all the tasks you are most likely to want to perform in Microsoft SharePoint Designer 2010 . Each chapter of this book includes self-contained topics that teach you about specific program features . Most topics conclude with a step-by-step exercise in which you practice using the program . The following features of this book will help you locate specific information:
● Detailed table of contents Scan this list of the topics and sidebars within each chapter .
● Chapter thumb tabs Easily locate the beginning of each chapter by looking at the colored blocks on the odd-numbered pages .
● Topic-specific running heads Within a chapter, quickly locate the topic you want by looking at the running head on odd-numbered pages .
● Glossary Look up the meaning of a word or the definition of a concept .
● Detailed index Look up specific tasks and features and general concepts in the in-dex, which has been carefully crafted with the reader in mind .
You can save time when you use this book by understanding how the Step by Step series shows special instructions, keys to press, buttons to click, and other information . These conventions are listed in the following table .
Convention Meaning
SET UP This paragraph precedes a step-by-step exercise and indicates the
prac-tice files that you will use when working through the exercise . It also indicates any requirements you should attend to or actions you should take before beginning the exercise .
CLEAN UP This paragraph follows a step-by-step exercise and provides instructions for saving and closing open files or programs before you move on to another topic . It also suggests ways to reverse any changes you made to your computer while working through the exercise .
1
2
Blue numbered steps guide you through hands-on exercises in each topic .1
See Also This paragraph directs you to more information about a given topic in this book or elsewhere .
Troubleshooting This paragraph alerts you to a common problem and provides guidance for fixing it .
Tip This paragraph provides a helpful hint or shortcut that makes working
through a task easier or information about other available options .
Important This paragraph points out information that you need to know to
com-plete a procedure .
Keyboard shortcut This paragraph provides information about an available keyboard short-cut for the preceding task .
Ctrl+Tab A plus sign (+) between two key names means that you must hold
down the first key while you press the second key . For example, “Press
Ctrl+Tab” means “hold down the Ctrl key while you press the Tab key .
Black bold In exercises that begin with SET UP information, the names of program elements, such as buttons, commands, and dialog boxes, as well as files, folders, or text that you interact with in the steps are shown in black bold characters .
Part 1
Getting Started with
Microsoft SharePoint
Designer 2010
Chapter at a G ance
Explore the SharePoint Designer shell, page 13
Use SharePoint Designer
to explore a Web page, page 20 Use task panes,page 26
Control the use of SharePoint Designer, page 32
1
Exploring SharePoint
Designer 2010
In this chapter, you will learn how to ✔ Understand SharePoint Designer .
✔ Use SharePoint Designer to carry out common tasks .
✔ Understand what’s new in SharePoint Designer 2010 .
✔ Create a site with SharePoint Designer .
✔ Explore the SharePoint Designer shell .
✔ Use SharePoint Designer to explore a Web page .
✔ Use task panes .
✔ Control the use of SharePoint Designer .
You may be reading this book because you have Microsoft SharePoint—Microsoft SharePoint Foundation 2010, Microsoft SharePoint Server 2010, or both—in your orga-nization and want to do more with your SharePoint sites than you can achieve with only the browser . You do not know how to program SharePoint, but you want to create more complex solutions than you can achieve by using the browser and have been told that Microsoft SharePoint Designer 2010 is a tool that you can use to do this . What you’ve heard is true; SharePoint Designer is a powerful tool that allows you to create rich and robust applications on top of your SharePoint sites .
To make the best use of this book, you should already be familiar with creating and modifying SharePoint sites in a browser . It is likely that you are a site or site collection owner who has little or no experience using SharePoint Designer . A few of you might be familiar with programming SharePoint solutions in Microsoft Visual Studio 2010; however, coding experience is not necessary to use this book, which focuses on producing no-code solutions . Regardless of your current skill level, the book assumes that every reader wants to learn about the powerful capabilities of SharePoint Designer 2010 . Whether you are an information worker, an IT professional, or a developer, this book is for you .
Most of this book covers the mechanisms of using SharePoint Designer, but you’ll also find advice and guidelines for creating successful solutions for other users . As you read this book and start to learn how to use SharePoint Designer, you’ll find that you can’t do without it .
Soon after you start SharePoint Designer 2010, you’ll notice that the user interface (UI), known as the shell, looks quite different from SharePoint Designer 2007 . SharePoint Designer 2010 uses the Microsoft Office Fluent user interface, which was designed to make it easier for users to use and find features within a product . It incorporates the rib-bon and the companion feature—Backstage view—which can be accessed from the File tab .
Tip If you are unfamiliar with Microsoft SharePoint 2010, read Microsoft SharePoint
Foundation 2010 Step by Step by Olga Londer and Penelope Coventry (Microsoft Press, 2011) before you read this book.
In this chapter you will learn what SharePoint Designer is and what common tasks you can accomplish by using it . You will create, close, and open a team site and explore the new shell in SharePoint Designer 2010 . You will also see how each site has a home page .
Important You should not complete the book’s exercises on a production site. You should have a practice site or, ideally, your own site collection. For more information about setting up your environment and the practice files, see “Using the Practice Files” on page xxiii.
Understanding SharePoint Designer 2010 3
Understanding SharePoint Designer 2010
SharePoint Designer 2010 is a free, powerful Web-editing tool with special capabilities for building solutions with SharePoint Foundation 2010 and SharePoint Server 2010 sites . Once you connect to a SharePoint site, you can use SharePoint Designer to administer the site, create workflows, and customize pages .
Note Unlike with previous versions of SharePoint Designer, which could be used to create
and customize any standards-compliant site, you cannot use SharePoint Designer 2010 to customize sites not based on SharePoint, nor can you use it to customize sites based on previous versions of SharePoint, such as Windows SharePoint Services 3.0 or Microsoft Office SharePoint Server 2007.
SharePoint Designer renders pages, like many other Web editing tools, in a document window so that you can visually amend the content in a “what you see is what you get” (WYSIWYG) environment . Also, like other Office 2010 applications and the browser when you open a SharePoint site, SharePoint Designer uses the Office Fluent user interface, including the ribbon, which displays all the tools you need—and only the tools you need—to complete specific tasks . You can use the tools provided to customize and de-velop business solutions based on Microsoft SharePoint Products and Technologies with-out the need to write code .
Tip SharePoint Foundation, SharePoint Server, and SharePoint Designer are known
collectively as Microsoft SharePoint Products and Technologies.
SharePoint sites work in a different way than non-SharePoint sites you may be familiar with . Instead of using a folder on a Web server, such as c:\inetpub\wwwroot, to store site content, a SharePoint site stores the majority of the content in a set of Microsoft SQL Server databases . SharePoint Designer does not have direct access to the content that is stored in the SQL Server databases . Any modifications you make to a site us-ing SharePoint Designer are saved in the SQL Server content databases via SharePoint Foundation or SharePoint Server . Therefore, before you can use SharePoint Designer, you need access to an environment in which SharePoint is already installed .
Using SharePoint Designer to
Carry Out Common Tasks
Many of the most successful SharePoint sites are built by the users who use them—the users of the site become the designers and the developers . Many of them are cre-ated just with the use of the browser; others are enhanced with the use of SharePoint Designer . SharePoint is wonderful for producing solutions with no code . These solutions are successful because the users know what they want to achieve; they are using a site as they develop it; and they can sort out problems, including problems that can be found only by using the solution . There is no need to provide feedback to others or raise inci-dents with your organization’s help desk .
Initially this is probably how you started building solutions, and I hope this book helps you build more successful SharePoint sites . However, once others in your organization learn of your success, you might be asked to build solutions for other users . Never for-get, however, that the reason for the success of your SharePoint site is that you knew the business requirements and experienced firsthand the issues of your solution . You were also probably very passionate about your own SharePoint solution .
Using SharePoint Designer to Carry Out Common Tasks 5
necessary customizations of a SharePoint site by using a browser; 15 percent require the use of SharePoint Designer, and 10 percent require a developer who is skilled in Visual Studio 2010 .
Whether you are an administrator, a developer, or an information worker, some of the most compelling uses of SharePoint Designer are as follows:
● Using the Data View and Data Form Web Parts to create data-driven solu-tions based on eXtensible Markup Language (XML) and eXtensible Stylesheet Language Transformations (XSLT) technologies, including creating custom views of data from external systems exposed by Business Connectivity Services (BCS) . If you need to use either of these Web Parts on multiple sites, you can export and import the Web Parts or make them part of the Web Part gallery . This lets you produce maintainable solutions, where you store the XSLT in a central document library and point these Web Parts to it . You can then centrally manage changes to the Web Parts you create without visiting every site that uses them .
● Connecting to other data source connections, such as XML Web services, data-bases, and lists and libraries on other SharePoint sites, including the use of external content types (ECT) and external lists .
● Using Web Part connections to pass data from a Web Part on one page to one or more Web Parts on another page . With Web Part connections, you can manage the data displayed on a page in a dynamic and interesting way . Using a Web browser, you can connect only Web Parts that are placed on the same page .
● Creating workflows for lists or libraries, a content type, or a site by using the built-in workflow editor—complemented by busbuilt-iness workflow diagrams produced with Microsoft Visio 2010 and without having to write server-side code . These workflows can be exported and given to a developer with Visual Studio skills .
● Creating solutions to meet the needs of specific business processes or sets of tasks in your organization, and then reusing them as a basis for future SharePoint sites . ● Prototyping a solution to justify business expenditure . Before submitting a proposal
answer all of your questions, so it turns out that the solution cannot be used imme-diately . Essentially, you’ll find that you are using SharePoint Designer as a prototyp-ing tool . Another example of when you will discover that you are usprototyp-ing SharePoint Designer as a prototyping tool is when you have customized a site and then you receive requests to repeat the customization again and again on other SharePoint sites . In this situation, you need to devise a solution that does not distract you from your other tasks .
● Performing one-off site customizations .
At this early stage of the book, do not to worry if this list means little to you . By the end of the book, you will understand what each item means and should review this list of common tasks that you can accomplish using SharePoint Designer .
Understanding What’s New in
SharePoint Designer 2010
SharePoint Designer has historically been a very powerful and useful tool . SharePoint Designer’s modifications can have long-lasting implications, and the previous ver-sion of SharePoint Designer did not make this obvious to an untrained user, nor did it provide an easy method of controlling the level of modifications users could make with SharePoint Designer . Therefore, some organizations restricted the installation of SharePoint Designer to all but a few trained business users .
Microsoft has addressed this limitation by implementing a safe-by-default approach . Site definition pages can be customized (unghosted) only when a page is in advanced edit mode . Also, you can limit what users can or cannot do with SharePoint Designer at the Web-application or site-collection level by using the browser .
See Also Chapter 2, “Working with SharePoint Sites,” for more information on how site collection administrators can control the use of SharePoint Designer, and Appendix C on page 503 for a list of steps that SharePoint farm administrators can use to restrict the use of SharePoint Designer at the Web-application level.
Other new features in SharePoint Designer 2010 are:
Understanding What’s New in SharePoint Designer 2010 7
● Easier management of SharePoint components The new Navigation pane, which replaces the Folder List task pane in SharePoint Designer 2007, focuses on SharePoint artifacts and not where the artifacts are stored . You can now manipu-late major SharePoint components—such as content types, site columns, and exter-nal lists—and modify site and list permissions natively within SharePoint Designer . Using SharePoint Designer to manipulate SharePoint components is now much faster and more efficient than using a Web browser to complete similar tasks .
● New tools to help users create better composites (solutions) Two areas of tool improvement are:
❍ Workflows The challenge in implementing a new workflow is that the person who creates the workflow is usually not the one who defines the require-ments . SharePoint 2010 addresses this challenge by allowing people to cre-ate workflows in Visio 2010 and export them into SharePoint Designer 2010, where business logic and additional rules are added . Workflows developed in SharePoint Designer can be exported from one SharePoint site and imported into another, as well as into Visual Studio 2010 . This enables development and testing of the SharePoint Designer custom workflow to take place in a trusted environment before deployment to the production system . In the previous version of SharePoint, this was available only with workflows created using Visual Studio . More information on workflows can be found in Chapter 8, “Understanding Workflows,” and Chapter 9, “Using Reusable Workflows and Workflow Forms .”
❍ Business Connectivity Services (BCS) Originally called the Business Data Catalog, BCS is now available in the base product, Microsoft SharePoint Foundation 2010 . SharePoint Designer is the major tool for information work-ers and business analysts to define how to access external systems and create dashboards and composite applications based on data from the external sys-tems . The BCS is detailed in Chapter 7, “Using Business Connectivity Services .” ● Performance and stability improvements Until the release of Service Pack 2,
SharePoint Designer 2007 had major performance and stability issues . Some users also complained about the code SharePoint Designer 2007 generated . Microsoft has invested heavily in this area .
● Contributor settings Microsoft received feedback that this feature was too com-plicated and rarely used . Restrictions are now controlled using permissions, the safe-by-default editing mode, and the configuration at the Web-application and site-collection level as described earlier in this section .
● Database-related features This includes the Database Interface Wizard that cre-ates new database-driven Web sites, the database results Web component (also known as a WebBot), and the Database tab of the Site Settings dialog box, which on a SharePoint site displayed the message “Database properties cannot be used with this Web site .”
● Layout tables CSS layout features have replaced the layout tables feature . If any of your upgraded SharePoint sites contains a layout table, SharePoint Designer 2010 displays the layout table functions correctly; however, you will not be able to install any new layout tables .
● Publish, backup, and restore of Web sites; import and export of Web packages
(.fwp), and FTP client Many of these features were useful on non-SharePoint sites and have been removed . Expression Web is the tool to use for these features . Also, SharePoint Designer is not a server administrator’s tool . The Central Administration Web site should be used to complete comparable tasks for SharePoint sites .
Tip To package and deploy SharePoint solutions, save a site as a template or use a solutions
file. You can find more information on solutions at http://social.msdn.microsoft.com/Search/
en-us?query=sharepoint+2010+solutions. There is a 20 minute learning snack on developing
solutions with Microsoft SharePoint Server 2010 at www.microsoft.com/learning/en/us/
training/format-learning-snacks.aspx#SP10.
● The Reports, Navigation, and Hyperlinks options available on the Sites menu
and at the bottom of the Web Site tab The error checking features in SharePoint Designer 2010 let you check for broken links, unused pages, cascading style sheets usage, and master page usage .
See Also More information on changes to SharePoint Designer 2010 can be found at http:// technet.microsoft.com/en-us/library/cc179083(office.14).aspx.
Creating Sites with SharePoint Designer
Creating Sites with SharePoint Designer 9
SharePoint Foundation 2010 has 10 built-in site templates . SharePoint Server includes these 10 site templates plus a number of other site templates . These templates form a good basis on which to create almost any SharePoint site . You should familiarize yourself with the features that sites created from these templates offer so that you know which to use as a blueprint .
When you create a SharePoint site from one of the built-in site templates, you refer to pages and files stored on each Web server . The pages and files are stored in a subfolder, named TEMPLATE, in the root directory, which in a default installation is C:\Program Files\Common Files\Microsoft Shared\web server extensions\14 . When you create a SharePoint site, no files or pages are created . Instead, entries are created in tables in the SQL Server content databases that point to files in the TEMPLATE folder . The files in the TEMPLATE folder on the Web server are known as site definitions. Site definition files are cached in memory on the server at process startup . As a result, when you request a page that points to one of the site definitions files, it is retrieved from the server’s memory . Therefore, a relatively small set of files can support a large number of SharePoint sites with many pages, resulting in improved performance .
To open a SharePoint site with your browser, you type the address of your site, known as a URL—for example, http://wideworldimporters/Human Resources or http://intranet. wideworldimporters.com/sites/teams/IT . The first portion of the URL, such as http://wide-worldimporters or http://intranet.wideworldimporters.com, is known as the Web applica-tion . A Web application can consist of one or more site collections; each site collection always has one top-level site and, optionally, one or more subsites, also called child sites . This hierarchy resembles the hierarchy of folders in file systems in that it is a treelike struc-ture . Using the example mentioned earlier, http://wideworldimporters is the top-level site of a site collection and Human Resources is a subsite of the http://wideworldimporters site collection .
In this exercise, you create a subsite by using the Team Site template .
SET UP You need the URL of a SharePoint site where you can create the new team site as a subsite. It is recommended that you do not complete the book’s exercises on a production site. You should ideally have your own practice site collection. If in doubt, check with your SharePoint administrator.
1.
On the taskbar, click the Start button, point to All Programs, click SharePoint, and then click Microsoft SharePoint Designer 2010 .2.
Under Site Templates, click Team Site . The Team Site dialog box opens .3.
In the Specify the location of the new Web site text box, type the name of your team site: http://<yourwebapplicationname/path>/Human Resources .The yourwebapplicationname/path portion of the URL is the location of the site col-lection that you are using for the exercises in this book . (The path portion might be empty .) Human Resources is the name of the team site .
Important For the exercises in this book, I use a fictitious SharePoint site,
wideworldimporters. Its URL is http://wideworldimporters. However, in your
environment, you will use a different URL, and therefore you need to use your site
location, http://<yourwebapplication/path> in place of http://wideworldimporters.
4.
Click OK .Creating Sites with SharePoint Designer 11
When the last dialog box closes, the new team site is displayed in On Stage view in SharePoint Designer .
CLEAN UP Close SharePoint Designer.
Best Practices for Naming URLs
Note When Microsoft Silverlight is not installed, the error message appears in a dialog box. Microsoft Silverlight is a Web application framework that provides functionalities similar to those in Adobe Flash, integrating multimedia, graphics, animations, and interactivity.
The error message displayed by SharePoint Designer does not point specifically to the illegal character used .
See Also For more information about using these characters in URLs, see the Microsoft
Knowledge Base article at support.microsoft.com/default.aspx?scid=kb;en-us;905231.
Keep a URL’s name short and meaningful, and include terms that are memorable to users and terms that they might enter as search query keywords . The name can tell users about your Web site—its purpose and the type of content it contains—and helps search engines rank your site for targeted keywords . Check the spelling of words you include in the URL name and be consistent in your naming conventions; for example, don’t call a picture library pictures in one site and images in another . For some SharePoint components, such as the URL for a site, you cannot change the URL later .
If your aim is to make the URL readable and the URL consists of several words, use an underscore (“ ”) in place of a space or remove the space and capitalize the first character in each word . For example, replace the three words Wide World Importers, with either Wide World Importers or WideWorldImporters . The under-score is the better of these options because all popular search engines and spiders understand it as a word separator .
See Also More information on SharePoint 2010 Search Engine Optimization (SEO) tips
can be found at
http://blogs.msdn.com/b/opal/archive/2010/04/23/sharepoint-2010-search-engine-optimization-seo-tips.aspx.
Although the space character is a legal URL character, there are several issues with having one or more spaces in the URL, such as the following:
● Readability . A space in the URL name is URL-encoded as %20, so the resulting name is difficult for people to read . A site with a URL of s p f would result in an encoded version of s%20p%20f, six extra characters .
Exploring the SharePoint Designer Shell 13
If the URL for the list or library contains two spaces, it contains six extra char-acters . Then, as the URL is appended for editing, that adds another six extra characters, making 12 extra characters . Therefore, if you consistently use long names, you’ll eventually have problems, which is exaggerated if you use spaces .
● Links in e-mails . If you incorporate a URL in an e-mail message, some e-mail programs truncate the URL at the first space when sending the clickable link to the recipient, resulting in a broken link . When users click the link, they are taken to an invalid location in the browser and won’t understand why they can’t find the document .
Note You might see the use of dashes or hyphens (“-“) to separate words in a URL
name; however, hyphens are used as break points to wrap text on separate lines. URLs that contain hyphens can cause problems similar to spaces with e-mail and text editors.
Exploring the SharePoint Designer Shell
When you open SharePoint Designer (as in the previous exercise), you are presented with Microsoft Office Backstage view, which gives you access to those tasks you need to per-form on the whole site or in configuring SharePoint Designer . The title bar contains the program name or the site name, if one is open .
When you open SharePoint Designer but have not yet opened a SharePoint Web site, Backstage view is divided into five areas:
● The pane at the left includes essential management commands and product options .
● Open SharePoint Site Allows you to open a SharePoint 2010 site and, if you have SharePoint Server 2010 installed, customize your My Site .
● Recent Sites Displays the SharePoint sites that you recently opened with SharePoint Designer .
● New SharePoint Site Allows you to quickly create a blank SharePoint site or a sub-site beneath your My Site .
Once a site is open, On Stage view is displayed, and as in many Microsoft Office applica-tions, it contains a number of elements, as shown here:
Quick Access Toolbar
Log In As Ribbon
Navigation pane
Mini-gallery
Status bar
Breadcrumb Ribbon
group
Workspace Task pane
● Quick Access Toolbar This area can be customized to include favorite or frequent-ly used commands . Commands that cannot be used with the information displayed in the workspace are not available .
● Ribbon The ribbon was introduced in Office 2007 and has been improved in Office 2010 to include some new tools and provide more flexibility . It consists of a number of task-oriented tabs; each tab contains a number of command buttons . The num-ber of tabs shown depends on the information displayed in the workspace .
● Ribbon group A collection of related commands, each command has one or more images and alternative text that appears as a ScreenTip when you hover the mouse over it . The image displayed for the command depends on the size of the SharePoint Designer window . As you resize the window, the ribbon resizes, and the groups and commands expand or collapse dynamically .
Exploring the SharePoint Designer Shell 15
to know where each artifact is stored . By using the Navigation pane, you can quick-ly go to the artifact you need to work with .
● Breadcrumb As with any other breadcrumb on the Web, the breadcrumb in the shell provides a tool that makes it easy to navigate back and forward and keep track of where you are . The SharePoint Designer breadcrumb also allows you to navigate through related components of an artifact .
● Workspace In the workspace, you manipulate SharePoint artifacts, including Web pages . When a site is open, a tab appears above the workspace with the name of the site . The workspace and tab name change as you navigate between artifacts, and new tabs open as you manipulate artifacts . A Refresh button is located at the top left of the workspace, and the workspace can contain its own status bar when you are editing Web pages . The workspace has three page formats, depending on the artifact displayed:
❍ Settings page Used to configure the settings or display information for an artifact such as the open site, lists, libraries, pages, and workflows .
❍ Gallery page Used to display a list of artifacts and helps to obtain a broad view of the contents of the site . For example, if you click Site Columns in the Navigation pane, you see a list of site columns .
❍ Editors Allows you to edit artifacts such as Web pages, content types, and workflows .
● Mini-gallery A list of artifacts; it can be seen below the Navigation pane, similar to the gallery page .
● Task panes These are helper windows that you can open and use to perform cer-tain tasks with files, such as adding ASP .NET controls and managing cascading style sheets . Unlike in SharePoint Designer 2007, task panes do not automatically appear in SharePoint Designer 2010 when you open a Web page .
● Status bar The status bar contains information such as the visual aid setting, style application settings, download statistics, rendering mode, page size, cascading style sheet version, and code errors .
● Log In As This control allows you to sign in as a different user for testing purposes .
Tip You can switch between Backstage and On Stage view by clicking the File tab.
1.
On the taskbar, click the Start button, point to All Programs, click SharePoint, and then click Microsoft SharePoint Designer 2010 .The SharePoint Designer window opens, displaying Backstage view .
2.
In the left pane, click Options .The SharePoint Designer Options dialog box opens .
3.
Click Application Options .Exploring the SharePoint Designer Shell 17
4.
On the General tab, select the Open last Web site automatically when SharePoint Designer starts check box, and then click OK twice to close theApplication Options and then the SharePoint Designer Options dialog boxes .
5.
In the left pane, click Help .Options for getting help and details about SharePoint Designer, including version information and whether you are using the 32-bit or 64-bit version of SharePoint Designer, are displayed .
6.
In the left pane, click Sites, and then under Open SharePoint Site, click Open Site .The Open Site dialog box is displayed .
Tip You can use your browser to open a Web site in SharePoint Designer by clicking Site
7.
In the Site name box, type the URL of your team site, and then click Open . If prompted, type your user name and password, and click OK .Important SharePoint Designer uses Internet Explorer’s security settings to decide whether to prompt for credentials. If you are prompted for credentials when you display the site in the browser, you are prompted for credentials when you open the same site using SharePoint Designer.