Raspberry Pi Cookbook by Simon Monk
Copyright © 2014 Simon Monk. All rights reserved.
Printed in the United States of America.
Published by O’Reilly Media, Inc., 1005 Gravenstein Highway North, Sebastopol, CA 95472.
O’Reilly books may be purchased for educational, business, or sales promotional use. Online editions are also available for most titles (http://my.safaribooksonline.com). For more information, contact our corporate/ institutional sales department: 800-998-9938 or corporate@oreilly.com.
Editor: Rachel Roumeliotis Production Editor: Melanie Yarbrough Copyeditor: Nancy Reinhardt Proofreader: Rachel Monaghan
Indexer: Judy McConville Cover Designer: Karen Montgomery Interior Designer: David Futato Illustrator: Rebecca Demarest
December 2013: First Edition
Revision History for the First Edition: 2013-12-06: First release
See http://oreilly.com/catalog/errata.csp?isbn=9781449365226 for release details.
Nutshell Handbook, the Nutshell Handbook logo, and the O’Reilly logo are registered trademarks of O’Reilly Media, Inc. Raspberry Pi Cookbook, the image of a Eurasian sparrowhawk, and related trade dress are trade‐ marks of O’Reilly Media, Inc.
Many of the designations used by manufacturers and sellers to distinguish their products are claimed as trademarks. Where those designations appear in this book, and O’Reilly Media, Inc., was aware of a trade‐ mark claim, the designations have been printed in caps or initial caps.
While every precaution has been taken in the preparation of this book, the publisher and authors assume no responsibility for errors or omissions, or for damages resulting from the use of the information contained herein.
ISBN: 978-1-449-36522-6
Table of Contents
Preface. . . xi
1. Setup and Management. . . 1
1.1. Selecting a Model of Raspberry Pi 1
1.2. Enclosing a Raspberry Pi 3
1.3. Selecting a Power Supply 4
1.4. Selecting an Operating System Distribution 5
1.5. Writing an SD Card with NOOBS 6
1.6. Writing an SD Card Manually (Mac) 9
1.7. Writing an SD Card Manually (Windows) 10
1.8. Writing an SD Card Manually (Linux) 11
1.9. Connecting the System 13
1.10. Connecting a DVI or VGA Monitor 14
1.11. Using a Composite Video Monitor/TV 14
1.12. Using All the Storage on the SD Card 16
1.13. Adjusting the Picture Size on your Monitor 17
1.14. Maximizing Performance 19
1.15. Changing Your Password 21
1.16. Setting the Pi to Boot Straight into a Windowing System 22
1.17. Shutting Down Your Raspberry Pi 23
1.18. Installing the Raspberry Pi Camera Module 25
2. Networking. . . 31
2.1. Connecting to a Wired Network 31
2.2. Finding Out Your IP Address 33
2.3. Setting a Static IP Address 35
2.4. Setting the Network Name of a Raspberry Pi 36
2.5. Setting Up a Wireless Connection 37
2.6. Connecting with a Console Lead 38
14.9. Controlling a Servo Using PyFirmata 360
14.10. Custom Communication with an Arduino over TTL Serial 362
14.11. Custom Communication with an Arduino over I2C 366
14.12. Using Small Arduinos with a Raspberry Pi 370
14.13. Getting Started with an aLaMode Board and a Raspberry Pi 371
14.14. Using an Arduino Shield with an aLaMode Board and a Raspberry Pi 374
14.15. Using Gertboard as an Arduino Interface 377
A. Parts and Suppliers. . . 379
Index. . . 385
Preface
Since its launch in 2011, the Raspberry Pi has found a role both as a very low-cost Linux-based computer and as a platform for embedded computing. It has proven popular with educators and hobbyists alike, with over 2 million units sold since its release.
In this book, you will find a wide range of recipes using the Raspberry Pi, including recipes for getting started and setting up your Pi; recipes for using the Python pro‐ gramming language; and a large number of recipes about using the Raspberry Pi with sensors, displays, motors, and so on. The book also includes a chapter on using the Raspberry Pi with Arduino boards.
This book is designed in such a way that you can read it linearly, as you would a regular book, or access recipes at random. You can search the table of contents or index for the recipe that you want and then jump right to it. If the recipe requires you to know about other things, then it will refer you to other recipes, rather like a cookbook might refer you to base sauces before showing you how to cook something fancier.
The world of Raspberry Pi is one that moves quickly. With a large active community, new interface boards and software libraries are being developed all the time. So, besides many examples that use specific interface boards or pieces of software, the book also covers basic principles so that you can have a better understanding of how to use new technologies that come along as the Raspberry Pi ecosystem develops.
As you would expect, there is a large body of code (mostly Python programs) that accompanies the book. These programs are all open source and available on GitHub. You’ll find a link to them at the Raspberry Pi Cookbook website.
For most of the software-based recipes, all you need is a Raspberry Pi. I recommend a Raspberry Pi model B. For recipes that involve making your own hardware to interface with the Raspberry Pi, I have tried to make good use of ready-made modules, as well as solderless breadboard and jumper wires to avoid the need for soldering.
For those wishing to make breadboard-based projects more durable, I suggest using protoyping boards with the same layout as a half-sized breadboard, such as those sold by Adafruit, so that the design can easily be transferred to a soldered solution.
Conventions Used in This Book
The following typographical conventions are used in this book:
Italic
Indicates new terms, URLs, email addresses, filenames, and file extensions.
Constant width
Used for program listings, as well as within paragraphs to refer to program elements such as variable or function names, databases, data types, environment variables, statements, and keywords.
Constant width bold
Shows commands or other text that should be typed literally by the user.
Constant width italic
Shows text that should be replaced with user-supplied values or by values deter‐ mined by context.
This icon signifies a tip, suggestion, or general note.
This icon indicates a warning or caution.
This icon points you to the related video for that section.
Using Code Examples
Supplemental material (code examples, exercises, etc.) is available for download at
http://www.raspberrypicookbook.com.
books does require permission. Answering a question by citing this book and quoting example code does not require permission. Incorporating a significant amount of ex‐ ample code from this book into your product’s documentation does require permission. We appreciate, but do not require, attribution. An attribution usually includes the title, author, publisher, and ISBN. For example: “Raspberry Pi Cookbook by Simon Monk (O’Reilly). Copyright 2014 Simon Monk, 978-1-449-36522-6.”
If you feel your use of code examples falls outside fair use or the permission given above, feel free to contact us at permissions@oreilly.com.
Safari® Books Online
Safari Books Online is an on-demand digital library that delivers expert content in both book and video form from the world’s lead‐ ing authors in technology and business.
Technology professionals, software developers, web designers, and business and crea‐ tive professionals use Safari Books Online as their primary resource for research, prob‐ lem solving, learning, and certification training.
Safari Books Online offers a range of product mixes and pricing programs for organi‐ zations, government agencies, and individuals. Subscribers have access to thousands of books, training videos, and prepublication manuscripts in one fully searchable database from publishers like O’Reilly Media, Prentice Hall Professional, Addison-Wesley Pro‐ fessional, Microsoft Press, Sams, Que, Peachpit Press, Focal Press, Cisco Press, John Wiley & Sons, Syngress, Morgan Kaufmann, IBM Redbooks, Packt, Adobe Press, FT Press, Apress, Manning, New Riders, McGraw-Hill, Jones & Bartlett, Course Technol‐ ogy, and dozens more. For more information about Safari Books Online, please visit us
online.
How to Contact Us
Please address comments and questions concerning this book to the publisher:
O’Reilly Media, Inc.
1005 Gravenstein Highway North Sebastopol, CA 95472
800-998-9938 (in the United States or Canada) 707-829-0515 (international or local)
707-829-0104 (fax)
We have a web page for this book, where we list errata, examples, and any additional information. You can access this page at http://oreil.ly/raspberry-pi-cb.
To comment or ask technical questions about this book, send email to bookques tions@oreilly.com.
For more information about our books, courses, conferences, and news, see our website at http://www.oreilly.com.
Find us on Facebook: http://facebook.com/oreilly
Follow us on Twitter: http://twitter.com/oreillymedia
Watch us on YouTube: http://www.youtube.com/oreillymedia
Acknowledgments
As always, I thank Linda for her patience and support.
I also thank the technical reviewers Duncan Amos, Chaim Krause, and Steve Suehring; their comments were very helpful.
Rachel Roumeliotis has done a great job as editor on this project. Her pragmatic ap‐ proach is very easy to work with and has made this a very interesting project to work on.
CHAPTER 1
Setup and Management
1.0. Introduction
When you buy a Raspberry Pi, you are essentially buying an assembled printed circuit board. It does not even include a power supply or operating system.
The recipes in this chapter are concerned with getting your Raspberry Pi set up and ready for use.
Because the Raspberry Pi just uses standard USB keyboards and mice, most of the setup is pretty straightforward, so we will concentrate on those tasks that are specific to the Raspberry Pi.
1.1. Selecting a Model of Raspberry Pi
Problem
There are two models of Raspberry Pi, A and B. You are not sure which to use.
Solution
If you want a Raspberry Pi for general use, then you should buy a model B, revision 2 (the latest). With twice as much memory, it will cope with most tasks much better than the model A.
If, on the other hand, you are embedding a Raspberry Pi in a project for a single purpose, then using a model A and saving a few dollars may well be an option.
Discussion
Figure 1-1 shows model A and model B side by side.
Figure 1-1. Raspberry Pi model A (left) and model B (right)
As you can see from Figure 1-1, both use the same circuit board, but model A has a single USB socket and no RJ45 Ethernet socket. You can also see the bare solder pads behind the USB socket where the Ethernet controller chip should be.
The differences between the models are summarized in Table 1-1. This table also in‐ cludes the original model B, revision 1 board, which was soon updated with revision 2. You can tell if you have a revision 1 board because it has a black audio socket rather than the blue socket of the revision 2 board.
Table 1-1. Raspberry Pi models
Model RAM USB sockets Ethernet port
A 256 MB 1 no
B rev2 512 MB 2 yes
B rev1 256 MB 2 yes
The lack of a network interface on the model A is not a problem because all the Raspberry Pi models will accept a USB WiFi adapter (Recipe 2.5). Since the adapter would use the only USB socket, you would also need a USB hub to increase the number of USB sockets. However, with a model B Raspberry Pi, you can put a USB WiFi adapter in one USB socket and a wireless keyboard/mouse dongle in the other.
See Also
1.2. Enclosing a Raspberry Pi
Problem
You need an enclosure for your Raspberry Pi.
Solution
The Raspberry Pi does not come with an enclosure unless you buy one as part of a kit. This makes it a little vulnerable, as there are bare connections on the underside of the circuit board that could easily short if the Raspberry Pi is placed on something metal. It is a good idea to buy some protection for your Raspberry Pi in the form of a case.
Discussion
There is a vast array of case styles to choose from, including:
• Simple, two-part, click-together plastic boxes
• VESA mountable boxes (for attaching to the back of a monitor or TV) • Lego-style boxes
• 3D printed box designs
• Laser-cut, snap-together acrylic designs
The case you buy is very much a matter of personal taste. However, some of the things you need to consider are:
• Do you need to have access to the GPIO connector? This is important if you plan to attach external electronics to your Raspberry Pi.
• Is the case well ventilated? This is important if you plan to overclock your Raspberry Pi (Recipe 1.14) or run it hard, playing videos or games, as these will all generate more heat.
See Also
Adafruit has a nice range of Raspberry Pi enclosures.
You will also find many styles of cases at other Raspberry Pi suppliers and on eBay.
1.3. Selecting a Power Supply
Problem
You need to select a power supply for your Raspberry Pi.
Solution
The basic electrical specification for a power supply suitable for a Raspberry Pi is that it supplies a regulated 5V DC (direct current) and can supply a current of up to 700mA. It must also have a micro USB plug on the end of the lead.
If you buy your power supply from the same place as the Raspberry Pi, then the seller should be able to tell you if it will work with the Raspberry Pi.
If you are going to be using a WiFi dongle, or other USB peripherals that use significant amounts of power, then I would get a power supply capable of 1.5A or even 2A. Also beware of very low-cost power supplies that may not provide an accurate or reliable 5V.
Discussion
The power supply and connector are actually the same as those found in many smart‐ phone chargers. If they are terminated in a micro USB plug, then they are almost cer‐ tainly 5V (but check). The only question, then, is if they can supply enough current. If they can’t, then a few bad things can happen:
• They may get hot and be a potential fire risk. • They may just fail.
• At times of high load (say, when the Pi is using a WiFi dongle), the voltage may dip, and the Raspberry Pi may reset itself.
So, look for a power supply that says it can supply 700 mA or more. If it specifies a number of watts (W) rather than mA, then divide the number of watts by 5 to get the mA figure. So, a 5V 10W power supply can supply 2A (2,000 mA).
Using a power supply with, say, a maximum current of 2A will not use any more elec‐ tricity than a 700mA power supply. The Raspberry Pi will just take as much current as it needs.
In Figure 1-2, I have measured the current taken by a Raspberry Pi model B, revision 2, as it starts up, with and without a WiFi dongle and HDMI video connection using the Raspian Wheezy distribution.
Figure 1-2. Raspberry Pi current consumption during booting
increase considerably. When it comes to power supplies, it’s usually better to have something in reserve.
See Also
You can buy a module that will turn off the power when the Raspberry Pi shuts down at http://www.pi-supply.com/.
1.4. Selecting an Operating System Distribution
Problem
There are a number of different Raspberry Pi distributions. You are not sure which one to use.
Solution
The answer to this question depends on what you intend to do with your Raspberry Pi. If you plan to build hardware projects with the Raspberry Pi, then use Raspbian or Occidentalis (from Adafruit). Of these, Raspbian is the official and most commonly used distribution for Raspberry Pi, but Occidentalis requires less setup to start hacking hardware.
If you plan to use your Raspberry Pi as a media center, there are a number of distributions specifically for that purpose (see Recipe 4.1).
In this book, we use the Raspbian distribution almost exclusively, although most of the recipes will work with any Debian-based distribution.
Discussion
SD cards—especially a 4 GB SD card, which is recommended for most distributions— are not expensive, so get a few and try out a few distributions. If you do this, it is a good idea to keep your own files on a USB flash drive so that you don’t have to keep copying them onto each SD card.
Note that if you are using one of the upcoming recipes, to write your own SD card, then you need to either have a computer that has an SD card slot (many laptops do) or buy an inexpensive USB SD card reader.
See Also
The official list of Raspberry Pi distributions
See Occidentalis
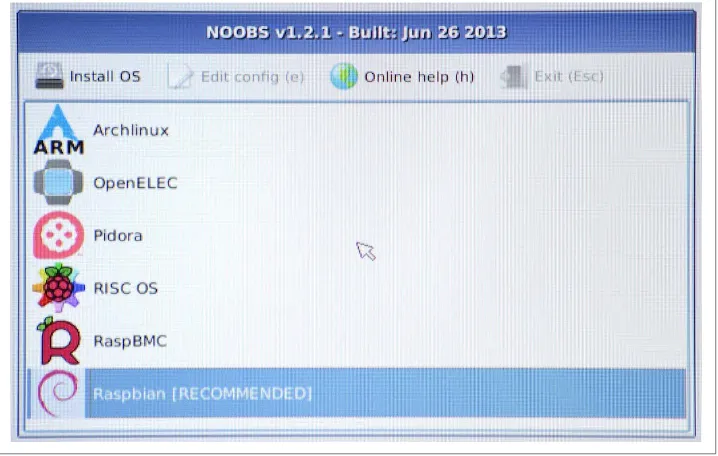
1.5. Writing an SD Card with NOOBS
Problem
You want to write an SD card using NOOBS (New Out of the Box Software).
Solution
NOOBS downloads the software it needs, so if you are using a Rasp‐ berry Pi model A without a network connection, then you may find it best to use one of recipes that installs the whole operating system (Recipes 1.6, 1.7, or 1.8).
Once you have downloaded the NOOBS archive file, extract it and copy the folder contents onto the SD card. Note that if the archive extracts to a folder called
NOOBS_v1_2_1 or similar, it is the contents of the folder that should be copied to the root of the SD card, not the folder itself.
Put the SD card containing the extracted NOOBS files into your Raspberry Pi and then power up your Raspberry Pi. When it boots, the window shown in Figure 1-3 will appear. From this screen, you can select which distribution you want to install. Raspbian will be selected as the default, and this is the best choice to start off with.
Figure 1-3. NOOBS first screen
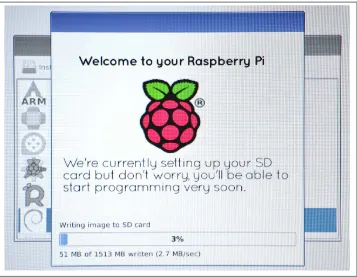
You will get a warning message that the SD card will be overwritten (which is fine) and then as the distribution is installed onto the SD card, you will see a progress screen accompanied by helpful information about the distribution (Figure 1-4).
Figure 1-4. NOOBS overwriting the SD card
Once the file copying is complete, you will get the message Image applied successfully. When you hit return, the Raspberry Pi will reboot and then raspi_config will automat‐ ically run so that you can configure the new installation (Recipe 1.12).
Discussion
For NOOBS to install correctly onto an SD crd, the card must be formatted as FAT. Most SD cards are supplied already formatted in FAT. If you are reusing an old card and need to format it as FAT, then use your operating system’s tool for formatting removeable media.
Alternatively, the Raspberry Pi foundation recommends the SD Association’s formatting tool, which is available for Mac and Windows.
See Also
1.6. Writing an SD Card Manually (Mac)
Problem
The Raspberry Pi is not generally supplied with an operating system. You want to use a Mac to write an operating system distribution onto an SD card.
Solution
Download an iso disk image for the distribution that you have selected (see
Recipe 1.4). Then use a utility script to write it onto an SD card.
There are a number of different utility programs that have been written to help you create an SD card. A popular one is available on GitHub.
1. Download it and extract the folder contained in the zip file to some convenient location.
2. Copy the iso image file you downloaded into this folder. Let’s assume it is something like Occidentalis_v02.iso.
3. Eject any external hard disks or USB flash drives and insert the SD card.
4. Open a Terminal session, change directory (cd command) to the installer folder, and run this command:
sudo ./install Occidentalis_v02.iso
If you are using a different iso image file, then use that filename instead. This command launches the SD installer, and you’ll see something like Figure 1-5.
Figure 1-5. Writing an SD card (Mac)
You now need to enter a number corresponding to the SD card. This is why it’s a good idea to eject all other removable storage media, because if you pick the wrong option, the utility will trash whatever is on that drive. So, before continuing, make sure that you know which number corresponds to your SD card.
After you have made the selection, if all is well, writing will commence. This usually takes a few minutes.
Discussion
You can also buy preformatted SD cards with a distribution already installed on them. However, these are sometimes not the latest version, so it’s a good idea to know how to write your own SD cards.
When selecting an SD card to write to, always select one that is at least 4 GB.
See Also
See also Recipe 1.5 for how to write an SD card image by using NOOBS.
All the (*)Ware has an alternative utility for writing an SD card from a Mac. More details about writing an SD card are available at http://bit.ly/1cqhXym.
1.7. Writing an SD Card Manually (Windows)
Problem
The Raspberry Pi is not generally supplied with an operating system. You want to use a Windows PC to write an operating system distribution onto an SD card.
Solution
Download an iso disk image for the distribution that you have selected (see
Recipe 1.4). Then use the Fedora ARM Installer to put it onto an SD card. Start by downloading the Fedora ARM Installer.
Note that this will only work on Windows Vista and newer.
• Extract the folder contained in the zip file to some convenient location (say, the desktop).
• Eject any external hard disks or USB flash drives and insert the SD card. • Run fedora-arm-installer.exe as a user who has administrator rights.
Figure 1-6. Writing an SD card (Windows)
Simply navigate to wherever you downloaded the iso file in the Source section, select the SD card from the Destination drop-down, and after checking that you have definitely selected the SD card and not some other disk drive, click Install.
Discussion
You can also buy preformatted SD cards with a distribution already installed on them. However, these are sometimes not the latest version, so it is a good idea to know how to write your own SD cards.
When selecting an SD card to write to always select one that is at least 4GB.
See Also
See also Recipe 1.5 for how to write an SD card image by using NOOBS.
More details and options for writing an SD card are available at http://elinux.org/ RPi_Easy_SD_Card_Setup.
1.8. Writing an SD Card Manually (Linux)
Problem
The Raspberry Pi is not generally supplied with an operating system. You want to use a Linux PC to write an operating system distribution onto an SD card.
Solution
Download an iso disk image for the distribution that you have selected (see
Recipe 1.4). Then use the Ubuntu ImageWriter tool to put it onto an SD card. For other Linux distributions, consider using NOOBS (Recipe 1.5).
First, install the ImageWriter tool by opening a Terminal session and entering the fol‐ lowing command:
$ sudo apt-get install usb-imagewriter
This tool has a nice user interface (Figure 1-7).
Figure 1-7. Writing an SD Card (Linux)
Navigate to wherever you downloaded the iso file in the Write Image section, select the SD card from the “to” drop-down, and after checking that you have definitely selected the SD card and not some other disk drive, click “Write to Device.”
Discussion
You can also buy preformatted SD cards with a distribution already installed on them. However, these are sometimes not the latest version, so it is a good idea to know how to write your own SD cards.
When selecting an SD card to write to, always select one that is at least 4 GB.
See Also
See also Recipe 1.5 for how to write an SD card image by using NOOBS.
Figure 1-8. A typical Raspberry Pi system
1.9. Connecting the System
Problem
You have everything that you need for your Raspberry Pi, and you want to connect it all together.
Solution
Unless you are embedding your Raspberry Pi in a project or using it as a media center, you need to attach a keyboard, mouse, monitor, and probably a WiFi dongle. As this adds up to more than three connections, even with a Raspberry Pi model B, you’ll need a USB hub to provide enough USB sockets.
Figure 1-8 shows a typical Raspberry Pi system.
Discussion
If you use a wireless keyboard/mouse combination with a single USB dongle, then the other free USB socket (assuming you have a Raspberry Pi model B) could be used for
a WiFi dongle. However, in all likelihood a USB hub is going to be useful when you want to attach an external USB disk or USB flash drive.
The Raspberry Pi is perfectly happy with pretty much any keyboard or mouse, wired or wireless. The exception to this is Bluetooth wireless keyboards and mice, which will not work with the Raspberry Pi.
See Also
The official Raspberry Pi Quick Start Guide
1.10. Connecting a DVI or VGA Monitor
Problem
Your monitor does not have an HDMI connector, but you want to use it with your Raspberry Pi.
Solution
Many people have been caught out by this problem. Fortunately, it is possible to buy adapters for monitors with a DVI or VGA input, but not HDMI connectors.
DVI adapters are the simplest and cheapest. They can be found for less than $5 if you search for “HDMI male to DVI female converter.”
Discussion
Using VGA adapters is more complex, as they require some electronics to convert the signal from digital to dialog, so beware of leads that do not contain these. The official converter is called Pi-View and is available wherever the Raspberry Pi is sold. Pi-View has the advantage of having been tested and found to work with Raspberry Pi. You may find cheaper alternatives on the Internet, but often these won’t work.
See Also
elinux has tips on what to look for in an converter.
1.11. Using a Composite Video Monitor/TV
Problem
Solution
The Raspberry Pi has two types of video output, HDMI and composite video. Of these, the HDMI is much better quality. So if you’re intending to use a composite video as your main screen, you may want to think again.
If you are using such a screen—say, because you need a really small screen—then you need to make a few adjustments to fit the video output to the screen. You need to make some changes to the file /boot/config.txt. You can edit it on the Raspberry Pi by issuing the following command in a Terminal session:
$ sudo nano /boot/config.txt
If the text is too small to read and you do not have an HDMI monitor, then you can also edit the file by removing the SD card from the Raspberry Pi and inserting it into your computer. The file will then be in the top-level directory on the SD card, so you can use a text editor on your PC to modify it.
You need to know the resolution of your screen. For a lot of small screens, this will be 320 by 240 pixels. Find the two lines in the file that read:
#framebuffer_width=1280 #framebuffer_height=720
Remove the # from the front of each line and change the two numbers to the width and height of your screen. In the following example, these lines have been modified to be 320 by 240:
framebuffer_width=320 framebuffer_height=240
Save the file and restart your Raspberry Pi. You should find that everything has become a lot easier to read. You will probably also find that there is a big thick border around the screen. To adjust this, see Recipe 1.13.
Discussion
There are many low-cost CCTV monitors that can make a great companion for the Raspberry Pi when you’re making something like a retro games console (Recipe 4.6). However, these monitors are often very low resolution.
See Also
For another tutorial on using composite monitors, see this Adafruit’s tutorial.
Also, see Recipe 1.13 and Figure 1-10 to adjust your picture when you’re using the HDMI video output.
Figure 1-9. Adjusting the root partition
1.12. Using All the Storage on the SD Card
Problem
When an operating system is written to a Raspberry Pi’s SD card, the partition size is fixed by the image you install so you cannot use the whole of the SD card. This leaves little room for your own files.
Solution
To fix this, you need to run the raspi-config tool. This program automatically runs the first time that you boot your Raspberry Pi with a new SD card. You can also start it any time you need to adjust the configuration by opening a Terminal session and issuing the command:
$ sudo raspi-config
Scroll down to the option expand_rootfs, and then use the cursor keys to press the Select button (Figure 1-9).
You will see a confirmation message, and then your Raspberry Pi will need to restart for the change to take effect.
Discussion
Adjusting the root partition is definitely worth doing, especially for storing temporary files, but keeping your documents and personal files on a USB flash drive avoids the need to transfer files when you update your operating system.
See Also
You can find much more information about the raspi-config tool at http://elinux.org/ RPi_raspi-config.
1.13. Adjusting the Picture Size on your Monitor
Problem
When you first connect a Raspberry Pi to a monitor, you may find that some of the text cannot be read because it extends off the screen, or the picture isn’t using all the space available on the screen.
Solution
If your text extends off the screen, use the raspi-config tool to turn overscan off. To do this, run raspi-config by opening a Terminal session and issuing the command:
$ sudo raspi-config
Then use the cursor keys to scroll down to the option overscan, and turn overscan off (Figure 1-10).
If your problem is that there is a large black border around the picture, then you can reduce this (and possibly eliminate it entirely) by editing the file /boot/config.txt using the command:
$ sudo nano /boot/config.txt
Look for the section dealing with overscan. The four lines you need to change are shown in the middle of Figure 1-11.
For the lines to take effect, you first need to uncomment them by removing the # char‐ acter from the start of each line.
Then, using trial and error, change the settings until the screen fills as much of the monitor as possible. Note that the four numbers should be negative. Try setting them all to –20 to start with.
Figure 1-10. Turning off overscan
Figure 1-11. Adjusting overscan
Discussion
See Also
You can find much more information about the raspi-config tool at http://elinux.org/ RPi_raspi-config.
1.14. Maximizing Performance
Problem
Your Raspberry Pi seems to be very slow, so you want to overclock it to make it run faster.
Solution
You can increase the clock frequency of a Raspberry Pi to make it run a little faster. This will make it use a bit more power and run a little hotter (see the Discussion next). The method of overclocking described here is called dynamic overclocking because it automatically monitors the temperature of the Raspberry Pi and drops the clock speed back down if things start to get too hot.
To make your Pi overclock, run the raspi_config utility by issuing the following com‐ mand in a Terminal:
$ sudo raspi-config
Select the overclock option in the menu, and you are presented with the options in
Figure 1-12.
Select an option. If you find that your Raspberry Pi starts to become unstable and hangs unexpectedly, then you may need to choose a more conservative option or turn over‐ clocking off by setting it back to None.
Discussion
The performance improvements from overclocking can be quite dramatic. To measure these, I used a Raspberry Pi model B, revision 2, without a case at an ambient room temperature of 15 degrees C.
The test program was the following Python script. This just hammers the processor and is not really representative of the other things that go on in a computer, such as writing to the SD card, graphics, and so on. But it does give a good indication of raw CPU performance if you want to test the effect of overclocking on your Raspberry Pi.
import time
def factorial(n): if n == 0:
Figure 1-12. Overclocking options
return 1 else:
return n * factorial(n-1) before_time = time.clock() for i in range(1, 10000): factorial(200)
after_time = time.clock() print(after_time - before_time)
Check out the results of the test in Table 1-2.
Table 1-2. Overclocking
Speed test Current Temperature (degrees C)
700 MHz 15.8 seconds 360 mA 27
1 GHz 10.5 seconds 420 mA 30
As you can see, the performance has increased by 33%, but at a cost of drawing more current and a slightly higher temperature.
the chip with a thermally conductive compound and are therefore mostly for show. A well-ventilated enclosure (Recipe 1.2) may well be more effective. There have also been some efforts to add water-cooling to the Raspberry Pi. Frankly, this is just silly.
See Also
You can find much more information about the raspi-config tool at http://elinux.org/ RPi_raspi-config.
1.15. Changing Your Password
Problem
By default, the password for a Raspberry Pi will be raspberry. You want to change this.
Solution
You can use the raspi-config tool to change your password. Run the raspi_config
utility by issuing the following command in a Terminal (see Recipe 3.2):
$ sudo raspi-config
Then select the change_pass option in the menu and follow the prompts shown in
Figure 1-13.
Changing your password is one occasion where you do not have to restart your Rasp‐ berry Pi for the changes to take effect.
Discussion
You can also change the password from a Terminal session simply by using the passwd
command as follows:
$ sudo passwd
Changing password for pi. (current) UNIX password: Enter new UNIX password: Retype new UNIX password:
passwd: password updated successfully
See Also
You can find much more information about the raspi-config tool at http://elinux.org/ RPi_raspi-config.
Figure 1-13. Changing the password
1.16. Setting the Pi to Boot Straight into a Windowing
System
Problem
Every time you reboot your Raspberry Pi, you have to log in and then start the desktop manually. You want to make this automatic.
Solution
You can use the raspi-config tool to change the boot behavior so that the Raspberry Pi automatically logs you in and starts the desktop. Run the raspi_config utility by issuing the following command in a Terminal:
$ sudo raspi-config
Then select the boot_behaviour option in the menu and follow the prompts shown in
Figure 1-14. Automatic boot into a desktop
After you change the boot option, you are prompted to restart your Raspberry Pi for the changes to take effect.
Discussion
Clearly there are security implications in allowing the Raspberry Pi to log you in to the windowing environment automatically. But because the Raspberry Pi will generally be used as a personal computer, rather than being shared, the convenience usually out‐ weighs any such disadvantages.
See Also
You can find much more information about the raspi-config tool at http://elinux.org/ RPi_raspi-config.
1.17. Shutting Down Your Raspberry Pi
Problem
You want to shut down your Raspberry Pi.
Figure 1-15. Shutting down your Raspberry Pi
Solution
Click on the red Logout button in the bottom-right corner of the desktop. This will display a number of options (Figure 1-15).
Shutdown
Shuts down the Raspberry Pi. You will need to unplug the power and plug it in again to get the Raspberry Pi to boot up again.
Reboot
Reboots the Raspberry Pi.
Logout
Logs you out and displays a prompt to enter your login credentials so that you can log back in.
Cancel
Allows you to change your mind and continue using the Raspberry Pi. You can also reboot from the command line by issuing the command:
sudo halt
Figure 1-16. Shutting down your Raspberry Pi from the Terminal
Discussion
Unlike shutting down most computers, shutting down a Rasperry Pi does not actually turn off the power. It goes into a low-power mode—and it is a pretty low-power device anyway (but the Raspberry Pi hardware has no control over its power supply).
See Also
You can buy a module that will turn off the power when the Raspberry Pi shuts down here: http://www.pi-supply.com/.
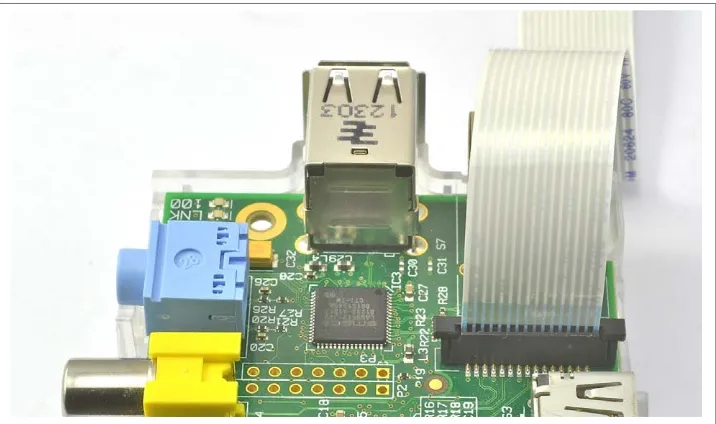
1.18. Installing the Raspberry Pi Camera Module
Problem
You want to use the Raspberry Pi camera module (see “Modules” on page 381).
Solution
The Raspberry Pi camera module (Figure 1-17) is attached to a Raspberry Pi by a ribbon cable.
Figure 1-17. The Raspberry Pi camera module
This cable attaches to a special connector just behind the Ethernet socket. To fit it, pull up the levers on either side of the connector, so that they unlock, and then press the cable into the slot with the connector pads of the cable facing away from the Ethernet socket. Press the two levers of the connector back down to lock the cable in place (Figure 1-18).
The camera module packaging states that it is sensitive to static. So, before handling it, ground yourself by touching something grounded like the metal case of a PC.
The camera module requires some software configuration. The easiest way to configure it is to use raspi_config (Recipe 1.12). To run raspi-config, enter the following com‐ mand into a Terminal session.
$ sudo raspi-config
You will then see a list of options like those shown in Figure 1-19.
Figure 1-19. The raspi-config configuration tool
If the option Camera is not in the list, then you need to update the operating system by running the following commands in a Terminal session (see Recipe 3.2):
$ sudo apt-get update $ sudo apt-get upgrade
You need an Internet connection to do this. The second of these commands may take a few minutes to complete. When they are complete, reboot your Raspberry Pi (Recipe 1.17).
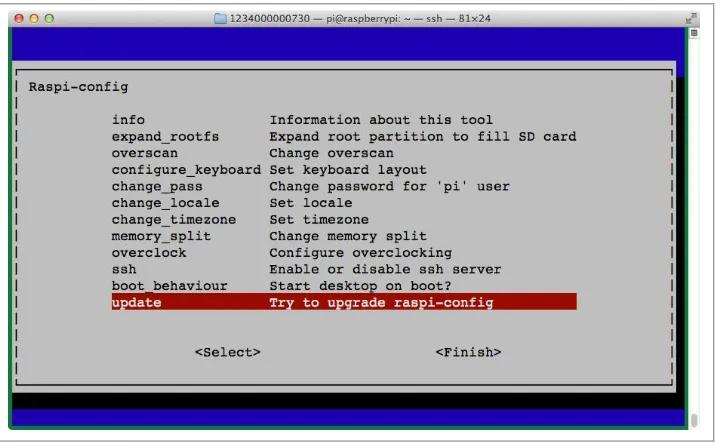
Now, when you run raspi-config you will see the option to enable the camera (Figure 1-20).
Figure 1-20. The updated raspi-config configuration tool
Two commands are available for capturing still images and videos: raspiStill and
raspivid.
To capture a single still image, use the raspiStill command as shown here:
$ raspistill -o image1.jpg
A preview screen displays for about five seconds and then takes a photograph and stores it in the file image1.jpg in the current directory.
To capture video, use the command raspivid:
$ raspivid -o video.h264 -t 10000
The number on the end is the recording duration in milliseconds—in this case, 10 seconds.
Discussion
Both raspstill and raspivid have a large number of options. If you type either com‐ mand without any parameters, help text displays options that are available.
Here are some of the key features of the camera:
• 5-megapixel sensor • Fixed focus f/2 lens
• Still resolution 1,920×1,080 • Video 1080p 30fps
An alternative to the camera module is to use a USB webcam (see Recipe 4.5).
See Also
The RaspiCam documentation includes raspstill and raspivid.
CHAPTER 2
Networking
2.0. Introduction
The Raspberry Pi is designed to be connected to the Internet. Its ability to communicate on the Internet is one of its key features and opens up all sorts of possible uses, including home automation, web serving, network monitoring, and so on.
The connection can be wired through an Ethernet cable (at least in the case of the model B), or the Pi can use a USB WiFi module to provide a network connection.
Having a connected Raspberry Pi also means that you can connect to it remotely from another computer. This is very useful in situations where the Raspberry Pi itself is in‐ accessible and does not have a keyboard, mouse, and monitor attached to it.
This chapter gives you recipes for connecting your Raspberry Pi to the Internet and controlling it remotely over a network.
2.1. Connecting to a Wired Network
Problem
You want to connect your Raspberry Pi to the Internet using a wired network connection.
Solution
First, if you have a Raspberry Pi model A, there is no RJ45 connector for Ethernet. In this case, your best option for Internet access is to use a wireless USB adaptor (see
Recipe 2.5).
If you have a Raspberry Pi model B, plug an Ethernet patch cable into its RJ45 socket and then connect the other end to a spare socket on the back of your home hub/router (Figure 2-1).
Figure 2-1. Connecting Raspberry Pi to a home hub
The network LEDs on your Raspberry Pi should immediately start to flicker as the Raspberry Pi connects to your network.
Discussion
Raspbian and Occidentalis distributions (in fact, pretty much all distributions for the Pi) are preconfigured to connect to any network using DHCP (Dynamic Host Config‐ uration Protocol). They will automatically be assigned an IP address as long as DHCP is enabled on your network.
If the LEDs blink, but you cannot connect to the Internet on your Raspberry Pi using a browser, check that DHCP is enabled on your network management console. Look for an option like that shown in Figure 2-2.
Figure 2-2. Enabling DHCP on your home hub
See Also
To connect to a wireless network, see Recipe 2.5.
2.2. Finding Out Your IP Address
Problem
You want to know the IP address of your Raspberry Pi so that you can communicate with it, whether connecting to it as a web server, exchanging files, or controlling it remotely with SSH (Recipe 2.7) or VNC (Recipe 2.8).
An IP address is a four-part number uniquely identifying a computer’s network interface within a network. Each part is separated by a dot.
Solution
To find the IP address of your Raspberry Pi, you need to issue this command in a Terminal window:
$ sudo ifconfig
eth0 Link encap:Ethernet HWaddr b8:27:eb:d5:f4:8f
inet addr:192.168.1.16 Bcast:192.168.255.255 Mask:255.255.0.0
wlan0 Link encap:Ethernet HWaddr 00:0f:53:a0:04:57
inet addr:192.168.1.13 Bcast:192.168.255.255 Mask:255.255.0.0
Looking at the results of running this ifconfig, you can see that the Pi in question is connected by both a wired connection (eth0) with an IP address of 192.168.1.16, and a wireless one (wlan0) with an IP address of 192.168.1.13.
Discussion
As you can see, a Raspberry Pi can have more than one IP address (i.e., one for each network connection). So if you have both a wired connection and a wireless connection to your Pi, it would have two IP addresses. Normally, however, you would only connect it by one method or the other, not both.
Another way to find your IP address is to connect to the management console of your home hub and find the LAN page and then the IP table. There should be a device listed called raspberrypi with its IP address next to it.
See Also
2.3. Setting a Static IP Address
Problem
You would like to set the IP address of your Raspberry Pi so that it does not change.
Solution
To set the IP address of your Raspberry Pi, whether using a wired or wireless network, you need to edit the configuration file /etc/network/interfaces.
If you view your /etc/network/interfaces file using the following command:
$ more /etc/network/interfaces
it should look something like this:
iface lo inet loopback
iface eth0 inet dhcp
iface wlan0 inet dhcp
wpa-ssid "ssidgoeshere" wpa-psk "passwordgoeshere"
To edit this file, type the following command:
$ sudo nano /etc/network/interfaces
If you are using a wired network, change the section for the adapter eth0; for a wireless network, change the section for wlan.
First, decide on an IP address to use. You need to pick one that is both unused by any other machine on the network and within the allowed range of IP addresses for your home hub.
Modify the contents of the file, changing the word dhcp to static and adding the fol‐ lowing lines:
address 192.168.1.16 netmask 255.255.255.0 gateway 192.168.1.1
With the file changed as shown here, the static IP address of 192.168.1.16 has been assigned to the eth0 interface.
iface wlan0 inet dhcp wpa-ssid "ssidgoeshere" wpa-psk "passwordgoeshere"
For most networks, the netmask setting should be set to 255.255.255.0 and the gateway should be the IP address of your home hub itself. This will be the same as the IP address you use to connect to its admin console.
After you edit and save the file, restart your Pi for the changes to take effect.
Discussion
Internal IP addresses are typically something like 192.168.1.16, where just the last num‐ ber is changed for each of the different computers. Another common format for internal IP addresses is 10.0.0.16.
See Also
Wikipedia has everything you want to know about IP addresses.
2.4. Setting the Network Name of a Raspberry Pi
Problem
You want to change the network name of your Raspberry Pi so that it’s not just called “raspberrypi.”
Solution
Changing the name of your Pi is pretty straightforward. There are just two files that need to be changed.
First, edit the file /etc/hostname. You can do this by opening a Terminal window and typing the command:
$ sudo nano /etc/hostname
Replace “raspberrypi” with a name of your choice. This should remain one word, without any punctuation or unusual characters. This includes the _ character.
Second, open the file /etc/hosts in an editor using the command:
$ sudo nano /etc/hosts
The file will look something like this:
127.0.0.1 localhost
fe00::0 ip6-localnet ff00::0 ip6-mcastprefix ff02::1 ip6-allnodes ff02::2 ip6-allrouters
127.0.1.1 raspberrypi
Change the text at the end that uses the old name (“raspberrypi”) to the new name. Restart the Pi, and you should find that the name has changed when you view it on the network from another computer.
Discussion
Changing the name of your Pi can be very useful, especially if you have more than one Pi connected to your network.
See Also
See also Recipe 2.3 to change the IP address of your Raspberry Pi.
2.5. Setting Up a Wireless Connection
Problem
You want to connect your Raspberry Pi to the Internet using a USB wireless adapter.
Solution
Setting up a wireless connection is very easy if you are using a recent version of the Raspbian distribution, as this includes a WiFi Config utility with a shortcut on the desktop. If you are not using a recent distribution, then you should update to one (see Recipes 1.4 through 1.8).
Simply plug a compatible USB wireless adapter (most are) into one of the USB sockets on your Raspberry Pi, launch the WiFi Config utility (Figure 2-3), and then click the Scan button to search for access points. Double-click on the access point (for your home hub) that you want to join and then enter the password in the PSK field.
Finally, click Connect to join the network.
Discussion
USB WiFi adapters can use quite a lot of power, so if you find your Pi rebooting unex‐ pectedly or not booting properly, then you may need to use a larger power supply for it. Look for a supply that is 1.5A or more.
Figure 2-3. WiFi Config—scanning for networks
If you’re using a keyboard and mouse as well, you may find you’ve run out of USB sockets. In that case, a USB hub is the answer. Choosing a hub with its own power supply will also help with the power problem.
See Also
For wired connections, see also Recipe 2.1. For a list of WiFi adapters that are compatible with the Raspberry Pi, go to http://elinux.org/RPi_VerifiedPeripherals.
2.6. Connecting with a Console Lead
Problem
No network connection is available, but you still want to be able to remotely control your Raspberry Pi from another computer.
Solution
Use a console cable to connect to a Raspberry Pi.
Console cables are great for a Pi that is going to be used headless—that is, without keyboard, mouse, or monitor. The console cable shown in Figure 2-4 is available from
Figure 2-4. A console cable
Connect the lead as follows:
1. Connect the red lead to the bottom-right pin, as shown in Figure 2-4. 2. Leave a gap of one space and connect the black lead to GND.
3. Connect the white lead to the left of the black lead. 4. Connect the green lead to the left of the white lead.
Note that the lead also provides 5V on the red lead, with enough power for the Pi on its own, but not with a lot of devices attached.
If you are a Windows or Mac user, you will need to install drivers for the USB lead, which are available for Windows and for Mac.
To connect to the Pi from your Mac, you will need to run the Terminal and enter the command:
$ screen /dev/cu.PL2303-00001004 115200
The exact device name will be different, but if you press Tab after cu.P, it will auto‐ complete. After connecting, press Enter, and the Raspberry Pi login prompt should appear (Figure 2-5). The default username and password are pi and raspberry, respectively.
If you are trying to connect to your Raspberry Pi from a Windows computer, you need to download the terminal software called Putty.
Figure 2-5. Logging in with the console cable
When you run Putty, change the “Connection type” to Serial and set the speed to 115200. You also need to set the “Serial line” to be the COM port in use by the cable. This may be COM7, but if that does not work, check using the Windows Device manager. When you click Open and press Enter, the Terminal session should start with a login prompt.
Discussion
The console cable can be a very convenient way of using your Pi if you are travelling light, as it provides both power and a way to control the Pi remotely.
See Also
You can find out more about using the serial console at this Adafruit tutorial. Adafruit also sells console cables.
2.7. Controlling the Pi Remotely with SSH
Problem
Figure 2-6. Logging in with SSH
Solution
The easiest way to set up SSH on the Raspberry Pi is to use the raspi_config application, which launches the first time that you boot up your Raspberry Pi with Raspbian. You can also start this at any time by entering the following command in Terminal:
$ sudo raspi-config
Scroll down to the SSH option and enable it.
On newer versions of Raspbian, SSH is automatically en‐ abled and there is no setting to change.
If you are using a Mac or have Linux installed on the computer from which you want to connect your Pi, then all you need to do to connect is open a Terminal window and enter the command:
$ ssh 192.168.1.12 -l pi
where the IP address is the IP address of your Pi (see Recipe 2.2). You will be prompted for your password and then logged in to the Pi (Figure 2-6).
To connect from a Windows computer, you will need to use Putty (Figure 2-5) to start an SSH session.
Discussion
SSH is a very common way of connecting to remote computers; any commands that you could issue on the Pi itself, you can use from the secure shell. It is also, as the name suggests, secure since the communication is encrypted.
Perhaps the only drawback is that it is a command-line rather than graphical environ‐ ment. If you need access to the full Raspberry Pi desktop environment remotely, then you need to use VNC (Recipe 2.8).
See Also
See also this Adafruit tutorial.
2.8. Controlling the Pi Remotely with VNC
Problem
You want access to the full Raspbian graphical desktop of your Pi from a PC or Mac.
Solution
Install a VNC (Virtual Network Connection) server.
Open a Terminal session (or SSH session) on the Pi and run the following commands:
$ sudo apt-get update
$ sudo apt-get install tightvncserver
Having installed the VNC server, run it using the command:
$ vncserver :1
The first time you run this, you will be prompted to create a new password, so anyone connecting remotely has to enter the password before being granted access to the Pi. To connect to the Pi from a remote computer, you will need to install a VNC client.
RealVNC is a popular choice and connects well with tightvnc.
You will then be prompted for the password. Remember, this is the password you set previously after installing tightvncserver (Figure 2-7) and not necessarily the same as your normal Raspberry Pi password.
Figure 2-7. Logging in with VNC
Discussion
Although you can do most things with SSH, sometimes it is useful to have access to the graphical environment of the Pi.
If you want the VNC server to automatically start whenever you restart your Raspberry Pi, follow these steps:
$ cd /home/pi $ cd .config $ mkdir autostart $ cd autostart
$ nano tightvnc.desktop
Paste the following into the editor window:
[Desktop Entry] Type=Application Name=TightVNC Exec=vncserver :1 StartupNotify=false
As long as your Raspberry Pi is set to automatically log in and boot into the windowing environment, then VNC server will automatically start when you reboot.
See Also
See also this Adafruit tutorial.
2.9. File Sharing on a Mac Network
Problem
You want your Raspberry Pi to appear on the list of computers on your Mac’s Finder so that you can connect to it and browse the filesystem using Finder.
Solution
The Mac OS X operating system includes built-in support for file viewing in Finder over the network (Figure 2-8). However, you must make some configuration changes on your Raspberry Pi for the Mac to pick these up.
Figure 2-8. Raspberry Pi on the Mac Finder
You will need to know the IP address of your Raspberry Pi (Recipe 2.2).
Now, on the Raspberry Pi, install netatalk using the command:
$ sudo apt-get install netatalk
Then, back on your Mac, in the Finder menu, select Go→Connect to Server and enter
afp://192.168.1.16 as the server address (but use the IP address for your Raspberry Pi instead of the one shown here). Then click Connect. You will be prompted to log in. I had to reboot my Raspberry Pi before I got the login prompt.
$ sudo apt-get install avahi-daemon $ sudo update-rc.d avahi-daemon defaults
Next type the command:
$ sudo nano /etc/avahi/services/afpd.service
Paste the following code into the file.
<?xml version="1.0" standalone='no'?><!--*-nxml-*--> <!DOCTYPE service-group SYSTEM "avahi-service.dtd"> <service-group>
<name replace-wildcards="yes">%h</name> <service>
<type>_afpovertcp._tcp</type> <port>548</port>
</service> </service-group>
To set the daemon running, type the command:
$ sudo /etc/init.d/avahi-daemon restart
Switch back to your Mac, and you should now see your Raspberry Pi in the Finder.
Discussion
Being able to move files easily between your Mac and your Raspberry Pi is very useful. It means that you can use files on your Pi without having to hook up a separate keyboard, mouse, and monitor.
You can also open files on the Raspberry Pi as if they were on your Mac. This has the advantage that you can edit them with TextMate or your favorite Mac text editor. If you’re using Windows or Linux, you can also share files by configuring your Raspberry Pi to work as NAS (Network Attached Storage); see Recipe 2.11.
See Also
The instructions here were adapted from this tutorial, which credits Matt Richardson and Shawn Wallace’s book Getting Started with Raspberry Pi (O’Reilly) as the original source.
2.10. Sharing the Pi Screen on a Mac
Problem
You have set up VNC, but would like to share the screen on your Raspberry Pi as if it were another Mac on your network.
Solution
First, follow Recipe 2.8 to install VNC. You will also need to complete Recipe 2.9. Then enter the command:
$ sudo nano /etc/avahi/services/rfb.service
and paste the following into the editor:
<?xml version="1.0" standalone='no'?>
<!DOCTYPE service-group SYSTEM "avahi-service.dtd"> <service-group>
<name replace-wildcards="yes">%h</name> <service>
<type>_rfb._tcp</type> <port>5901</port> </service>
</service-group>
Now enter the command:
$ sudo /etc/init.d/avahi-daemon restart
You should now be able to see the Share Screen option shown in Figure 2-9. When prompted for a password, use the password you set up for VNC, not your general Raspberry Pi password.
Discussion
This recipe just adds a little convenience to the process of sharing the screen of your Raspberry Pi.
If you have more than one Raspberry Pi on your network, you need to give them dif‐ ferent names so that you can identify them on the network (Recipe 2.4).
If you are a Windows or Linux user, you can still connect to a Raspberry Pi using VNC (Recipe 2.8).
See Also
The instructions here were adapted from this tutorial, which credits Matt Richardson and Shawn Wallace’s book Getting Started with Raspberry Pi (O’Reilly) as the original source.
2.11. Using a Raspberry Pi for Network Attached Storage
Problem
You want to use your Raspberry Pi as Network Attached Storage (NAS) by accessing a large USB drive attached to your Raspberry Pi from computers on your network.
Solution
The solution to this problem is to install and configure Samba. To do this, issue the commands:
$ sudo apt-get install samba
$ sudo apt-get install samba-common-bin
Now, attach the USB hard drive to the Raspberry Pi. It will automatically mount in your /media folder. To check that it’s there, use the command:
$ cd /media $ ls
The drive should be listed with whatever name you gave it when you formatted it. It will automatically mount itself whenever the Raspberry Pi reboots.
You now need to configure Samba so the drive can be shared on the network. To do this, you first need to add a Samba user (pi). Enter the following command and type in a password:
$ sudo smbpasswd -a pi New SMB password: Retype new SMB password: Added user pi.
You now need to make some changes to the file /etc/samba/smb.conf, so enter the command:
$ sudo nano /etc/samba/smb.conf
The first line you’re looking for is near the top of the file:
workgroup = WORKGROUP
You only need to change this if you plan to connect from a Windows machine. This should be the name of your Windows workgroup. For Windows XP, the default is MSHOME; for newer versions of Windows, it is HOME. (But check on your Windows network.)
The next change to be made is further down the file in the Authentication section. Find the line:
# security = user
Remove the # from the front to turn security on.
Finally, scroll right to the end of the file and add the following lines:
[USB]
path = /media/NAS comment = NAS Drive valid users = pi writeable = yes browseable = yes create mask = 0777 public = yes
Save the file and then restart Samba by entering the command:
$ sudo /etc/init.d/samba restart
If all is well, your USB drive should now be shared on your network.
Discussion
Figure 2-10. Connecting to NAS with the Mac Finder
If you are connecting to the NAS from a Windows machine, then the exact procedure will vary depending on your version of Windows. However, the basic principle is that at some point, you will need to enter the network address, which should be \\raspberrypi \USB (Figure 2-11).
You will then be prompted for the username and password before you can use the NAS disk (Figure 2-12).
If you are a Linux user, this command should mount the NAS drive for you:
$ sudo mkdir /pishare
$ sudo smbmount -o username=pi,password=raspberry //192.168.1.16/USB /pishare
See Also
You may wish to change your Raspberry Pi’s network name to something inappropriate like piNAS (see Recipe 2.4).
2.12. Network Printing
Problem
You want to print to a network printer using your Raspberry Pi.
Solution
Use CUPS (Common Unix Printing System).
Start by entering the following command into a Terminal to install CUPS. This may take some time.
$ sudo apt-get install cups
Figure 2-11. Connecting to NAS from Windows
Give yourself admin privileges for CUPS by entering the following command:
$ sudo usermod -a -G lpadmin pi
CUPS is configured via a web interface. Neither the Midori or Dillo web browsers work very well with the CUPS administration pages, but Iceweasel works just fine. You can install the Iceweasel browser by entering the following command:
$ sudo apt-get install iceweasel
Start Iceweasel from the Internet group of your Start menu and navigate to the address
http://localhost:631.
Go to the Administration tab and choose the Add Printer option. This will display a list of printers that are on the network or connected directly to the Raspberry Pi’s USB port (Figure 2-13).
Figure 2-12. Browsing NAS on Windows
Figure 2-13. Discovering printers with CUPS
Discussion
When you’re finished, you can test out the printer by firing up AbiWord (see
Recipe 4.2). Type some text and when you’re ready to print it, you should see your newly added printer available for printing (Figure 2-14).
Figure 2-14. Printing from AbiWord
See Also
CHAPTER 3
Operating System
3.0. Introduction
This chapter explores many aspects of the Linux operating system used by the Raspberry Pi. A lot of this involves the use of the command line.
3.1. Moving Files Around Graphically
Problem
You want to move files around using a graphical interface like you can on a Mac or PC.
Solution
Use the File Manager.
You can find this program on your Start menu in the Accessories group (Figure 3-1).
Figure 3-1. The File Manager
Discussion
The lefthand side of the File Manager shows the volumes that are mounted, so if you connect a USB flash drive or external USB drive, it will appear here.
Figure 3-2. The File Manager
See Also
See also Recipe 3.4.
3.2. Starting a Terminal Session
Problem
When using a Raspberry Pi, you need to issue text commands in a Terminal.
Solution
Click on the LX Terminal icon on your desktop (Figure 3-3). If there is no shortcut on the desktop, you can also open a LX Terminal from the Start menu in the Accessories group.
Figure 3-3. Opening LX Terminal
Discussion
When the LX Terminal starts, it will be set to your home directory (/home/pi). You can open as many Terminal sessions as you want. It is often useful to have a couple open in different directories so that you don’t have to constantly switch directories using
cd (Recipe 3.3).
See Also
In the next section—Recipe 3.3—we will look at navigating the directory structure using the Terminal.
3.3. Navigating the Filesystem Using a Terminal
Problem
Solution
The main command used for navigating the filesystem is cd (change directory). After
cd you have to specify the directory that you want to change to. This can either be a
relative path to a directory inside your current directory, or an absolute path to some‐ where else on the filesystem. See “Discussion” on page 57.
To see what the current directory is, you can use the command pwd (print working directory).
Discussion
Try out a few examples. Open a Terminal session, and you should see a prompt like this:
pi@raspberrypi ~ $
The prompt that you will see after each command (pi@raspberrypi ~ $) is a reminder of your username (pi) and your computer name (raspberrypi). The ~ character is shorthand for your home directory (/home/pi). So, at any point, you can change your current directory to your home directory as follows:
$ cd ~
Throughout the book, I use a $ at the start of each line where you are expected to type a command. The response from the command line will not be prefixed by anything; it will appear just as it does on the Raspberry Pi’s screen.
You can confirm that the command did indeed set the directory to the home directory using the pwd command:
$ pwd /home/pi
If you want to move up one level in the directory structure, you can use the special value .. (two dots) after the cd command, as shown here:
$ cd .. $ pwd /home
As you may have deduced by now, the path to a particular file or directory is made up of words separated by a /. So the very root of the whole filesystem is /, and to access the home directory within / you would refer to /home/. Then, to find the pi directory within that, you would use /home/pi/. The final / can be omitted from a path.