Windows Store App
Development
C
#
AND
XAML
PETE BROWN
M A N N I N G
www.manning.com. The publisher offers discounts on this book when ordered in quantity. For more information, please contact
Special Sales Department Manning Publications Co. 20 Baldwin Road
PO Box 261
Shelter Island, NY 11964 Email: [email protected]
©2013 by Manning Publications Co. All rights reserved.
No part of this publication may be reproduced, stored in a retrieval system, or transmitted, in any form or by means electronic, mechanical, photocopying, or otherwise, without prior written permission of the publisher.
Many of the designations used by manufacturers and sellers to distinguish their products are claimed as trademarks. Where those designations appear in the book, and Manning
Publications was aware of a trademark claim, the designations have been printed in initial caps or all caps.
Recognizing the importance of preserving what has been written, it is Manning’s policy to have the books we publish printed on acid-free paper, and we exert our best efforts to that end. Recognizing also our responsibility to conserve the resources of our planet, Manning books are printed on paper that is at least 15 percent recycled and processed without elemental chlorine.
Development editor: Jeff Bleiel
Manning Publications Co. Copyeditor: Linda Recktenwald
20 Baldwin Road Technical proofreader: Thomas McKearney
PO Box 261 Proofreader: Elizabeth Martin
Shelter Island, NY 11964 Typesetter: Marija Tudor
Cover designer: Marija Tudor
ISBN: 9781617290947
Printed in the United States of America
v
brief contents
1 ■Hello, Modern Windows 1
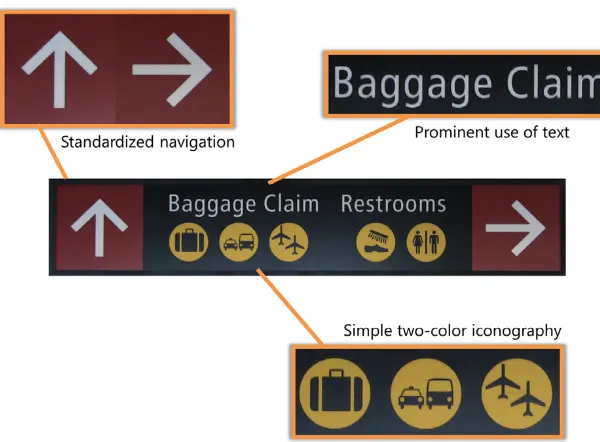
2 ■
The Modern UI 19
3 ■
The Windows Runtime and .NET 35
4 ■
XAML 51
5 ■
Layout 69
6 ■
Panels 86
7 ■
Brushes, graphics, styles, and resources 112
8 ■
Displaying beautiful text 141
9 ■
Controls, binding, and MVVM 170
10 ■
View controls, Semantic Zoom, and navigation 211
11 ■
The app bar 241
12 ■
The splash screen, app tile, and notifications 265
13 ■
View states 300
14 ■
Contracts: playing nicely with others 319
15 ■
Working with files 342
16 ■
Asynchronous everywhere 369
18 ■
A chat app using sockets 423
19 ■
A little UI work: user controls and Blend 465
20 ■
Networking player location 482
21 ■
Keyboards, mice, touch, accelerometers, and
gamepads 500
22 ■
App settings and suspend/resume 537
vii
contents
preface xviiacknowledgments xx about this book xxii about the author xxviii about the cover illustration xxix
1
Hello, Modern Windows
1
1.1
Setting up the development environment 3
1.2
Configuring the project 3
The device pane 5 ■ Template solution items 7
1.3
Create the first Hello World UI 8
1.4
Integrating with Twitter 9
The Tweet class 10 ■ Updated UI 10 ■ Code-behind 11
1.5
Testing on different devices and resolutions 13
Debugging on the Simulator 13 ■ Debugging on a remotedevice 14
1.6
Summary 18
2
The Modern UI
19
2.1
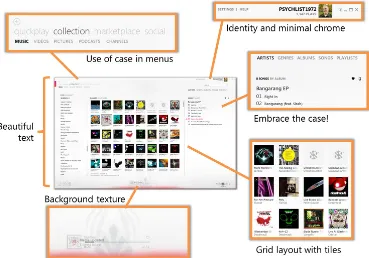
Design inspiration 20
2.2
Governing principles 23
2.3
Typography 25
2.4
The importance of the layout grid 27
2.5
Design for touch but not only for touch 28
2.6
Modern apps on Windows 8 28
Consumer and enterprise apps 29 ■ Key Windows 8 UI
elements and states 31
2.7
Device considerations 33
Desktop or laptop 33 ■ Tablet and smaller devices 33
Hybrid devices 34
2.8
Summary 34
3
The Windows Runtime and .NET
35
3.1
Windows Store app system architecture 36
The sandbox 38 ■ Deployment and the Windows Store 39
The driver model 40
3.2
COM + .NET metadata = WinRT 41
COM: back to the future 42 ■ Metadata 44Projections 46
3.3
Client technologies and languages 47
3.4
A brief tour of WinRT and .NET 4.5 48
3.5
Summary 50
4
XAML
51
4.1
Elements and namespaces 52
Objects as elements 52 ■ Namespaces 54
4.2
Properties 56
Property syntax 56 ■ Dependency properties 58
Attached properties 61 ■ Property paths 62
4.3
Object trees and namescope 62
Object trees 63 ■ Namescope 664.4
Summary 68
5
Layout
69
5.1
Multipass layout—measuring and arranging 70
The measure pass 71 ■ The arrange pass 71CONTENTS ix
5.2
UIElement layout properties 74
Width and Height, plus ActualWidth and ActualHeight 75 Horizontal and vertical alignment 77 ■ Padding 78
Margins 79
5.3
Layout rounding 80
5.4
Performance considerations 82
Keeping the tree shallow 82 ■ Caching 83Virtualization 83 ■ Sizing and positioning 84
5.5
Summary 84
6
Panels
86
6.1
Canvas 87
Positioning in X,Y space 88 ■ Controlling the Z position using
ZIndex 89 ■ Sizing child elements 91
6.2
StackPanel and VirtualizingStackPanel 91
Setting the orientation 92 ■ Sizing children 93Virtualizing for performance 93
6.3
Grid 94
Defining rows and columns 95 ■ Adding and positioning
elements in rows and columns 97 ■ Using alignment and
margins for sizing and positioning 99
6.4
Creating a custom panel 102
Project setup 102 ■ The OrbitPanel class 103 ■ Orbits
dependency property 103 ■ Orbit attached property 105
Custom layout 107
6.5
Summary 111
7
Brushes, graphics, styles, and resources
112
7.1
Brushes 113
Solid-color brushes 113 ■ Gradient brushes 116
Image brushes 118
7.2
Resources 120
Local and page resources 121 ■ Application resources 123
Resource dictionaries 123
7.3
Styles 127
Explicit or keyed styles 127 ■ Style inheritance 128
7.4
Vector graphics 132
Line 132 ■ Polyline 134 ■ Paths 135 ■ Rectangles and
ellipses 137
7.5
Bitmap images 137
7.6
Summary 139
8
Displaying beautiful text
141
8.1
Text basics 143
TextBlock 144 ■ Inlines 146 ■ Wrapping, ellipsis,
and alignment 147 ■ Character spacing 150
Line spacing 151
8.2
Rich and multicolumn text 153
Rich text 154 ■ Multicolumn and linked text 157
8.3
OpenType text 160
Ligatures 160 ■ Stylistic sets 161 ■ Font capitals 163
Fractions and numbers 164 ■ Variants, superscript, and
subscript 166
8.4
Embedding fonts 167
8.5
Summary 168
9
Controls, binding, and MVVM
170
9.1
The Model-View-ViewModel pattern 172
Using an MVVM toolkit like MVVM Light 174 ■ The
model 175 ■ The chat data service 176 ■ The MainViewModel
and CameraViewModel classes 178 ■ The view 180
9.2
Binding primer 183
The source and target 184 ■ Binding mode 185
Change notification 186 ■ DataContext 189
9.3
Entering and displaying text 190
Working with the TextBox 191 ■ Experimenting with the
PasswordBox 192 ■ Spell checking and autocorrect 193
9.4
UI element binding using sliders 194
9.5
Working with lists 197
Observable collections 197 ■ Items controls 198
Data templates 199
9.6
Making things happen with buttons and commands 200
Button and commands 201 ■ HyperlinkButton 203CONTENTS xi
9.7
Converting data with value converters 207
9.8
Summary 209
10
View controls, Semantic Zoom, and navigation
211
10.1
PhotoBrowser demonstration app setup 213
Creating the project 214 ■ Creating the Photo modelclass 215 ■ Loading pictures using a service class 215
Creating the MainViewModel 217 ■ Skeleton UI XAML
and code-behind 218
10.2
ListView and GridView 220
Vertical lists 220 ■ Horizontal lists and grids 223
10.3
Grouping with the GridView 226
Grouping in the model and viewmodel 227 ■ Grouping at the
UI layer 228
10.4
FlipView and navigation 231
Viewmodel 232 ■ Category browser page 232 ■ Updated
MainPage 235
10.5
Semantic Zoom 236
10.6
Summary 239
11
The app bar
241
11.1
Project updates 243
11.2
Controls on the bottom app bar 246
Adding and styling buttons 246 ■ Wiring withcommands 250 ■ Visibility and pinning 258
11.3
Top app bar for navigation 259
11.4
App bar popups and menus 261
11.5
Summary 263
12
The splash screen, app tile, and notifications
265
12.1
Splash screens 267
The static splash screen 267 ■ Extended splash
screens 269
12.2
Default tiles on the start page 275
12.3
Secondary or pinned tiles 276
Creating the tile 277 ■ Activating the app with the
12.4
Tile notifications or live tiles 284
Simple text notifications 285 ■ Images in notifications 288
Queuing multiple tile notifications 291
12.5
Toast notifications 294
Creating the notification service 295 ■ Enabling toast 298
12.6
Summary 299
13
View states
300
13.1
Full, filled, and snapped views 301
13.2
The LayoutAwarePage 303
13.3
The snapped view for the main page 305
13.4
Visual states for view management 307
13.5
Detail pages and app bars 309
Creating an appropriate presentation 310 ■ Fixing up the
app bar 314
13.6
Summary 317
14
Contracts: playing nicely with others
319
14.1
Sharing 320
Sharing your data 321 ■ Letting others share with you 325
14.2
Letting others search your data 332
Declaring your intentions 332 ■ The results page and
viewmodel 333 ■ Responding to in-app search requests 338
Responding to external search requests 339
14.3
Summary 340
15
Working with files
342
15.1
Loading files programmatically 343
New demonstration project 343 ■ File access permissions 347
Storage files and folders 348 ■ Using a data template
selector 351 ■ Using file queries 354 ■ Creating files and
folders 355
15.2
URI formats 359
15.3
Working with file pickers 361
Using the file open picker 361 ■ Implementing the file picker
source contract 363
CONTENTS xiii
16
Asynchronous everywhere
369
16.1
Why asynchronous is important 371
16.2
Working with IAsync* WinRT methods 373
async and await: the simplest approach 374 ■ Long-formasynchronous operations 376 ■ Getting progress
updates 378 ■ Canceling the operation 380
16.3
Working with tasks 381
Basic task operations 382 ■ Canceling the task 384
Converting between WinRT IAsync* and Tasks 385
16.4
Summary 387
17
Networking with SOAP and RESTful services
388
17.1
Networking basics 389
Solution setup 390 ■ Downloading a file with
HttpClient 392
17.2
Sharing your model 393
Create the source class library 395 ■ Create the Modern
app–compatible class library 397
17.3
Consuming SOAP services 398
Creating the service 399 ■ Referencing and using the
service 400
17.4
Structuring your client code using MVVM 401
Creating the viewmodel 402 ■ Creating and wiring up theuser interface 404
17.5
Consuming data from RESTful services 406
Creating the RESTful service 407 ■ Getting data from theservice using the viewmodel 410 ■ Specifying the acceptable
data type 411
17.6
Deserializing JSON and XML data 412
XML deserialization using XmlSerializer 412 ■ JSON
deserialization 413
17.7
Updating data using PUT, POST, DELETE, and more 414
17.8
Summary 421
18
A chat app using sockets
423
18.1
Chat app viewmodel 425
18.2
The user interface 429
XAML skeleton 430 ■ Styles and resources 431
App bar buttons 432 ■ Chat app content 433
18.3
Listening for connections 434
18.4
Connecting to the server and sending data 439
Connecting to an endpoint 440 ■ Sending data 44018.5
Refactoring for better structure and flexibility 441
The updated ChatMessage class 442 ■ The IMessageServiceinterface 444 ■ The TcpStreamMessageService class 447
Updated MainViewModel 454
18.6
Trying out UDP sockets 458
Creating the UdpMessageService class 459 ■ Listening for
connections 460 ■ Connecting to another machine 461
Receiving and parsing messages 462
18.7
Summary 464
19
A little UI work: user controls and Blend
465
19.1
Updated game UI 466
Basic changes 466 ■ Play field area 468 ■ Orientation
and view states 469
19.2
Designing the ship UI 470
Creating the UserControl 471 ■ Creating the ship shape in
Blend 472 ■ Adding a label 475
19.3
Building out the ship user control properties 476
Enabling rotation 477 ■ Setting the color 479Temporarily testing the Ship control 480
19.4
Summary 481
20
Networking player location
482
20.1
Updating the Player model 483
The PlayerLocation class 483 ■ The updated Player
class 484
20.2
The collection of players 485
Initializing the collection 486 ■ Displaying players with an
ItemsControl 488 ■ Testing the collection 489
CONTENTS xv
20.3
Updating the TCP stream message service 491
Updated message service interface 491 ■ Sending locationinformation 493 ■ Reading location information 495
20.4
Testing everything 497
20.5
Summary 498
21
Keyboards, mice, touch, accelerometers,
and gamepads
500
21.1
Making input generic 502
The IInputService interface 502 ■ A little math help 504
Wiring up the viewmodel 505
21.2
Keyboard input 507
The KeyboardInputService 508 ■ Virtual keys 510
Adding from the code-behind 512
21.3
Pointer input: mouse, touch, and pen 513
Some more math 513 ■ A minor modification to the shipuser control 517 ■ The PointerInputService class 517
Adding from the code-behind 519
21.4
Accelerometer input 522
Making sense of the input 523 ■ Implementing the
AccelerometerInputService 524 ■ Adding from the
code-behind 525 ■ Accelerometer events 526 ■ Dealing with
screen autorotation 526
21.5
Xbox 360 gamepad input and a little C++ 527
Creating the C++ project 527 ■ Implementing the Controllerclass 529 ■ Creating the IInputService wrapper 532
Adding from the code-behind 534 ■ Compiling and
deploying 534
21.6
Summary 535
22
App settings and suspend/resume
537
22.1
App settings UI and architecture 538
Creating the settings infrastructure 538 ■ Creating a
settings UI 542
22.2
Persisting and using settings 550
Loading and saving settings values 550 ■ Acting on the
22.3
Suspend and resume 554
Suspending your app 554 ■ Resuming activity 555
22.4
Summary 557
23
Deploying and selling your app
559
23.1
Testing for certification 560
23.2
Sideloading for testing purposes 563
Packaging an app for sideloading 563 ■ Getting a developer
license without Visual Studio 565 ■ Installing the sideload
app package 566
23.3
Enabling trial mode 567
Creating the mock license data for testing 567 ■ Checking
the license state 569
23.4
Listing your app in the Windows Store 570
Getting a Windows Store account 570 ■ Reserving an app
name 570 ■ Submitting the app for review and approval 571
23.5
Summary 573
xvii
preface
I’ve been programming for fun since seventh grade in 1984 and professionally since around 1991/1992. During that time, I’ve see a lot of change. In the ’80s, as the per-sonal computer industry was trying to settle, there were dozens of completely incom-patible (both software- and hardware-wise) computers available to the public. In my small group of friends, some owned Commodore 64s, some Commodore VIC-20s, a couple of Apple II variants, a TRS-80 or two, and a couple of others I can’t recall. My middle school (properly called a junior high school in Massachusetts) was equipped with some DEC VT-102 Robins, a handful of Commodore VIC-20s (with their disk drive on a serial A/B switch to share between different computers), and a number of Com-modore 64 computers. My high school had an Apple IIgs, a couple of Apple IIe com-puters, and several Apple II computers. Later, they got an Apple IIc and several knock-off Apple clones as well as a lone black-and-white Macintosh. The few computer-liter-ate teachers had access to a handful of IBM PCs to do the serious work of tracking stu-dent grades and whatnot. The computer camp I attended in tenth grade used DEC
Rainbows and Commodore PETs. The computer competition I attended in tenth grade required knowing Unix and C.
to use dBase, FoxPro, Borland Delphi, Borland C++, PowerBuilder, Visual Basic 3,
QBasic, QuickBasic, and much more. Oh, and I had to be able to set up the Novel Net-ware 4 network at the office and convert everyone from dumb terminals to DOS and Windows 3.x PCs. The languages were different, the UI layers were different. There was little to no compatibility between any of these packages.
Change was the norm. It was expected.
Fast-forward to today. As developers, we’ve never had more pressure on us to be productive, but at the same time, we’ve never had the longevity of tools, platforms, and languages that we have today. If you started with .NET 1.0 or the alphas/betas (as I did), you’ve been able to use the same programming language and core runtime for almost 13 years. If you’ve been a Java programmer, you can claim an even longer run. The only people who had those kinds of runs in the past were FORTRAN and COBOL
programmers.
Lately, things have begun to change a bit more. To keep up with the demands of users and the heavy competition in the mobile space, we’re seeing programming lan-guages and underlying platforms rev more frequently. A natural consequence of this is deprecation or sunsetting of platforms that don’t fit the new interaction models and the emergence of newer API sets, compilers, and more. The JavaScript space has argu-ably had the most rapid innovation, with new tools and libraries emerging seemingly daily. Many of those have, over the years, completely altered the language in ways that would make modern JavaScript completely foreign to programmers who learned it 10 or even 5 years ago.
On the Windows side, we’ve seen some amazing work in the .NET and XAML space. Interestingly, despite the changes of underlying platforms and the names of the prod-ucts, .NET and XAML have remained far more compatible than many other platforms over the years. If you started learning XAML with WPF (or a year later with Silverlight), modern Windows Store XAML will easily become familiar, much like learning BASIC
on the Commodore 64 and then learning to program the Apple II. Sure, the PEEK
and POKE locations may be different, and there are a few other syntax differences, but there’s far more that’s compatible than incompatible.
As someone who has made a career of .NET since the first time I gave the two-day .NET 1.0 seminars in the .NET 1.0 alpha days, it’s heartening to see that my C# skills are still just as valid today as they were 13 years ago. I’m also happy to see that my invest-ment in XAML starting back in 2006 has served me well across every client platform Microsoft has created. By combining XAML and C#, I can code for the Windows Phone, Windows Store, and the desktop. If I stick to just C#, I can code for everything from tiny ARM microcontrollers on Netduino and Gadgeteer all the way up to massive servers. Through all of this, I’m staying within a tightly focused sphere of develop-ment that centers on Visual Studio and C# (or VB, if you prefer).
That’s a solid return on investment.
PREFACE xix
hobbies that involve close encounters with our mortality. But the very fact that we can focus on those differences shows how compatible these platforms are.
For fun, I like to code on microcontrollers. To varying degrees, I’ve learned ARM
with C, AVR with C and C++, PIC with C, NETMF with C#, and a little Arduino. Each of these used completely different IDEs; each uses completely different toolchains. Each time I try to learn another microcontroller, there’s very little practical knowledge I can port from one to the other. The registers are all different, the libraries are com-pletely different, and, of course, the IDEs are completely different. This means I’ve not been able to ramp up on any one platform (with the exception of NETMF because of C#) in a short amount of time; each has been a huge investment in after-the-kids-go-to-sleep time. Few of the IDEs have usable IntelliSense, and help files are almost never in sync with the APIs. It’s a lot of trial and error—just getting LEDs to blink on a board feels like a huge accomplishment.
When it came time for me to learn how to write Windows Store apps, I found I had far less to learn than I would have had I been a developer using another platform. Despite WinRT replacing some of the features of .NET, it all felt very familiar. C#
worked just as it has all along. Visual Studio was instantly familiar. I can use most of .NET, and the parts that have been replaced by WinRT feel just like .NET.
I’m glad I made the decision, all those years ago, to invest in learning VB3-6 and then C#. I’m also glad I moved from Windows Forms to XAML (WPF and then Silver-light) back in the mid-2000s. Both of these decisions have served me well and will con-tinue to serve me well as Microsoft advances the platforms to better meet the needs of users and to better compete in the marketplace. As a developer, you too should feel confident that although individual products fall out of favor from time to time, your investment in core programming skills, and the higher-level .NET skills beyond that, continues to be just as useful, relevant, and marketable today as it has been over the past decade.
xx
acknowledgments
My name is on the cover, but technical books like this require a whole team to com-plete and publish. I’d like to thank the following:
■ The various Windows and Developer Division product teams who helped with
clarifying just how things work under the covers and who were open to my rather detailed questions.
■ Tom McKearney, who has managed to tech review another entire book, and
who has provided me with someone to blame if there are any problems with the code listings.
■ My friends at Manning Publications: people like Mary Piergies, Linda
Reckten-wald, Elizabeth Martin, and Jeff Bleiel, who all helped ensure this book is as good as possible and written in one grammatically correct voice.
■ The reviewers of the manuscript at various stages of its developent. Your feedback
was much appreciated: Brian T. Young, Daniel Martin, Dave Arkell, Dave Camp-bell, Gordon Mackie (aka Joan Miró), Ian Randall, Krishna Chaitanya Anipindi, Paschal Leloup, Patrick Hastings, Patrick Toohey, Richard Scott-Robinson, Roland Civet, Rupert Wood, and Todd Miranda.
Unique in these thanks is my editor, Jeff Bleiel. This is the third book I’ve worked on with Jeff. He is my editorial interface with Manning and my continued mentor as an author. Jeff made a positive contribution to this book and to my writing in general.
ACKNOWLEDGMENTS xxi
Most importantly, I’d like to acknowledge the contribution of my wife, Melissa, and my children, Ben and Abby. Writing a book takes an enormous amount of time, dur-ing which I’m not helpdur-ing around the house, entertaindur-ing my children, or otherwise being good company. Thank you to my family for continuing to support me through another book when all my friends are telling me, “Dude, you should be writing apps. You’ll make a lot more money.”
xxii
about this book
The goal of this book is to take you, the developer who is at least a little familiar with
C# and .NET, and help you become an awesome Windows Store app developer, regard-less of which version of Windows you use for building Windows Store apps. If you’re already an awesome Windows developer familiar with Windows Store apps, WPF, or Sil-verlight, I’ve included deep topics to help you learn more about the platform and how things work under the covers.
After you’ve read this book, you should be able to confidently design, develop, and deliver Windows Store apps. To facilitate the learning process, I’ve structured the book to get you developing as soon as possible, while providing quality, in-depth con-tent and several functional apps you can learn from or build on.
Within each chapter, I’ve included a collection of devices to help you build a firm understanding of the XAMLUI platform for Windows. The following list explains how each device helps along the journey:
■ Figures—Visual depictions that summarize data and help with the connection of
complex concepts. Most of these are annotated to call out important details.
■ Code snippets—Small, concise pieces of code primarily used for showing
syntacti-cal formats. You’re usually not expected to type these in and compile, because they’re incomplete.
■ Code listings—Code that you can type into your project in Visual Studio. In many
cases, it will take multiple code listings to build a working example.
ABOUTTHISBOOK xxiii
In addition to these learning devices, my personal site, http://10rem.net, comple-ments the information in this book and often goes into deep detail in specific areas.
Audience
This book is intended for developers who want to create great apps for the Windows Store or for sideloading within an enterprise.
Though XAML provides numerous avenues for interactions with designers, this book primarily targets people who live and breathe inside Visual Studio. With the deeper integration of Blend with Visual Studio, I’ve included some developer-focused material on working with Blend later in this book.
In addition, and more important, this book assumes you have a background using the .NET Framework and Microsoft Visual Studio. Although we’ll be using C# as the primary development language, we won’t be reviewing the C# language or explaining basic programming constructs such as classes, methods, and variables.
Experience with Silverlight or WPF will help speed you through the XAML concepts but isn’t a prerequisite for this book.
The bits: what you need
This book provides ample opportunity for hands-on learning. But it also provides a great deal of flexibility by allowing you to learn the material without using the hands-on chands-ontent or optihands-onal tools. You’ll find it equally valuable to read this book at the computer, on the train, or wherever else you happen to read.
If you want to get the greatest value out of this book and sit down and code or design, here’s what you’ll need:
■ A PC with Windows 8 or higher installed. The examples in this book were
origi-nally developed on Windows 8 but will also work with later versions of Windows. You must develop for Windows on Windows. Although it can work, I don’t rec-ommend doing this inside a virtual machine because you will run into issues with the Simulator (which is a remote desktop connection to the same machine), and on lower-end machines, performance will suffer.
■ You can use the latest recommended version of Visual Studio that will compile
for the version of Windows you are using. For Windows 8, here are the recom-mended versions:
■ Microsoft Visual Studio 2012 Pro or better for both Windows Store and web
development, or the free Microsoft Visual Studio 2012 Express for Windows Store apps and, for the networking examples, the free Microsoft Visual Stu-dio 2012 Express for Web.
■ Blend for Visual Studio 2012 or higher. Use the version that’s shipped with
You’ll find links to all of these tools, as well as any information on updates, at http:// dev.windows.com.
Above and beyond your development PC, you may also find the following optional items useful:
■ A Microsoft Surface with Windows Runtime (WinRT) or other ARM-based touch
tablet to test compiling and deploying to other architectures.
■ Any tablet or other PC with a Windows-recognized accelerometer for testing
accelerometer input. If you have a Microsoft Surface, it will serve you well here.
■ A wired Xbox controller for Windows for the C++ integration example.
■ A device with a Windows-recognized touch screen. This will help, of course,
with the touch screen examples. If you have a Microsoft Surface, it will also fill this requirement.
■ A second PC for testing the peer-to-peer networking examples. If you have a
Microsoft Surface or other tablet running Windows 8+, you can use that.
Roadmap
WinRTXAML is a brand-new platform but with strong roots in the XAML + .NET plat-forms that preceded it. I’ve endeavored to arrange the topics in this book in such a way as to start with a simple example, cover all the basics and theory, and then build out some apps while exploring the more complex topics.
There are no formal sections in this book, but if you squint your eyes a little, you can logically group the chapters as follows:
A note on versions
You’ll note a lot of “or the latest version” comments in the software requirements for this book.
The days of waiting three years for an update to Windows and the related development tools have passed. Microsoft recognizes that agility in delivery is as important as in-dividual features. These days, Windows and Visual Studio often update too fast for any publication (or developer, for that matter) to keep up.
For those reasons, the source code for this book will be kept as up to date as much as possible with the latest versions of Windows and tools until the next major revision of this book has been made available. As part of that, if there are any breaking changes in the next version of Windows after Windows 8.1, these will be called out with information made freely available to the purchasers of this book.
ABOUTTHISBOOK xxv
WINDOWS
It’s important to cover the basics up front. Not only are these the technical basics, but they’re also the overall themes of the platform and the reasons we made certain deci-sions. Starting with Windows 8, we have a brand-new set of APIs and design approaches to become familiar with. Chapter 1 introduces Windows and the concepts behind it. Chapter 2 discusses the modern UI, along with its standards and history. Finally, chapter 3 covers the Windows Runtime, what it is, how it has been designed, and why it’s so important for Windows Store apps.
XAML AND BASIC CONTROLS
Next, we dive right into XAML. Chapter 4 covers all the basics of XAML, plus a number of topics of interest to advanced developers. Chapter 5 goes into detail on the layout process. This is an important topic for both beginners and advanced developers because so much performance and functionality are affected by the layout engine. Building on that information, chapter 6 covers the commonly used panels, such as the
Gridand Canvas. Chapter 7 deals with graphics, images, and resource management. One thing you’ll learn early on is the importance of text in Windows Store apps. Chapter 8 goes into depth on text, showing how to create beautiful content using text. Finally, this group wraps up with coverage of binding and controls in chapter 9. I decided to go right into MVVM (Model-View-ViewModel) at this point as well, because it’s a good pattern to get used to.
WINDOWS 8 UI SPECIFICS
Although XAML is common and highly compatible across many platforms, Windows Store apps have access to some controls, layouts, and interaction patterns that are unique to the platform. Chapter 10 covers the most important of these controls and how they fit in with navigation. I also cover the Semantic Zoom pattern and control. Chapter 11 covers the modern analog to the toolbar: the app bar. Chapter 12 covers the app’s tile and the notification system built into Windows. Chapter 13 covers the important view states all apps must support (snapped view, portrait, landscape, and filled mode).
Throughout all of these chapters, we’ll build a PhotoBrowser app that showcases the features.
INTEGRATION WITH THE OS, SERVICES, AND OTHER APPS
Windows Store apps have a set of standardized, user-driven mechanisms for integrat-ing with each other. Collectively, these are called contracts and are what are invoked when you use charms such as Search and Share. Chapter 14 specifically covers how to use searching and sharing in the context of the Photo Viewer app.
NETWORKING AND THE CHAT/GAME PEER-TO-PEER APP
Connected apps are the norm, so several chapters in this book are dedicated to net-working. Before jumping into networking, chapter 16 covers the important async pat-terns used in Windows Store apps. Chapter 17 then starts the coverage of networking by showing how to work with SOAP and RESTful services. This is the type of bread-and-butter stuff any connected app will need. Chapter 18 gets into the more advanced topic of socket communication. As part of the coverage of sockets, we’ll start the sec-ond app of this book: a chat and peer-to-peer game app involving spaceships.
Chapter 19 helps flesh out the socket app by showing how to create a player control using Blend for Visual Studio. Chapter 20 helps glue the ship and sockets together by showing how to send meaningful information across the socket connection.
Then, because games with just one type of input are a bit boring, we’ll implement all the major types of human and device input. In chapter 21, starting with the basics of keyboard input, we’ll make the ship move around on the screen and across the net-work. We’ll get into mice and touch-based interaction. Then, we’ll make the app accelerometer-aware so you can tilt the device to move the ship around. Finally, we’ll implement a C++WinRT extension library to make use of an Xbox gamepad. Lots of fun stuff here!
WRAPPING UP
To wrap up this book and put a nice bow on what you’ve learned, I cover the app life-time, including suspend and resume, and the related app settings in chapter 22. At this point, you’ll have a great foundation for building your own apps.
Then, moving out of the source code and into the Store, in chapter 23 I cover how to prepare your app for Windows Store submission and how to get it into the Windows Store.
Code conventions and downloads
You can find the source code for all the examples in the book at www.manning.com/ WindowsStoreAppDevelopment.
The following conventions are used throughout the book:
■ Italic typeface is used to introduce new terms.
■ Courier typeface is used to denote code samples, as well as elements and
attri-butes, method names, classes, interfaces, and other identifiers.
■ Code annotations accompany many segments of code. ■ Code line continuations use the
➥symbol.
Author Online
ABOUTTHISBOOK xxvii
forum once you are registered, what kind of help is available, and the rules of conduct on the forum.
Manning’s commitment to our readers is to provide a venue where a meaningful dialogue between individual readers and between readers and the author can take place. It is not a commitment to any specific amount of participation on the part of the author, whose contribution to the forum remains voluntary (and unpaid). We sug-gest you try asking the author some challenging questions lest his interest stray!
xxviii
about the author
Pete Brown works for Microsoft as a Technical Evangelist on the Client and Devices team in John Shewchuk’s “deep tech” (http://bit.ly/DeepTech) Developer Platform Evangelism group. His role is helping developers create high-quality apps for all clients, using Microsoft tools and technologies.
Prior to joining Microsoft in 2009, Pete was an architect, engagement manager, and user experience designer at a consulting company in the Washington, DC, area, where he focused on Silverlight and WPF development. During that time he was also an INETA speaker, a Microsoft WPFMVP, and a Microsoft Silverlight MVP.
As one of only a few remote workers in corporate Microsoft, Pete has a lot of Lync/ Skype webcam meetings and enjoys the stunned look he gets whenever people see his home office in the background. If a nuclear submarine and a radio station had a child near an anime convention staffed by modular synth addicts working on Commodore 64s, it would be only slightly less geeky.
xxix
about the cover illustration
The figure on the cover of Windows Store App Development is captioned “A Traveler.” The illustration is taken from a nineteenth-century edition of Sylvain Maréchal’s four-volume compendium of regional dress customs published in France. Each illustration is finely drawn and colored by hand. The rich variety of Maréchal’s collection reminds us vividly of how culturally apart the world’s towns and regions were just 200 years ago. Isolated from each other, people spoke different dialects and languages. On the streets or in the countryside, it was easy to identify where they lived and what their trade or station in life was just by their dress.
Dress codes have changed since then and the diversity by region, so rich at the time, has faded away. It is now hard to tell apart the inhabitants of different conti-nents, let alone different towns or regions. Perhaps we have traded cultural diversity for a more varied personal life—certainly for a more varied and fast-paced technolog-ical life.
1
Hello, Modern Windows
Welcome to the brave new world of Windows Store app development! Getting into a new platform as it first emerges is always exciting. I love learning new things and targeting new platforms. I like being an early adopter. Sure, not everything is quite as fleshed out as you may want when you get in early, and it sometimes feels like the Wild West, but the satisfaction you get from that head start almost always makes it worth it.
Plus, quite frankly, it’s much easier to learn something new while it’s still small enough to be digestible. Looking back at Silverlight, I learned it at version 1.1a when it was just a baby. Had I picked it up at version 4 or 5 when the API surface area was 10 times as large, it would have taken me forever to learn all its ins and outs. Platforms invariably grow in scope and capability. The earlier you learn them, the less you have to take in all at once.
This chapter covers
Because XAML and C# are one of the combinations of technologies you can use to develop for the Windows Store, if you’ve developed applications for the Windows Phone or desktop using Silverlight, you’ll find yourself well positioned to quickly learn Windows app development. The Windows Runtime XAML stack and C#/.NET side of things were both developed by many of the same people who worked on Silverlight and Windows Presentation Foundation (WPF).
Getting into Windows Store app development now will give you that same head start. Using XAML and C# allows you to lean on past experience if you have it and tons of preexisting XAML and C#/.NET content if you don’t.
Microsoft is making a serious attempt at capturing the tablet market currently dominated by the iPad and Android devices. If those platforms have taught app devel-opers anything, it’s that getting in early with a good app can help spell success for an individual or company.
You picked up this book, so I’m going to assume you’re already interested in Win-dows 8 and don’t need encouragement in your selection. Instead, I’d like to take this first chapter and build something right away—just throw you right into the fire. By the end of this chapter, you’ll know how to create a simple app and have a working devel-opment environment you can use as we dive more deeply into the features in the remainder of this book.
In this chapter, you’ll build your very first Windows 8 app using C# and XAML. Nei-ther the application nor the code will be complex. The point here is to acquaint you with a new development and runtime environment and platform rather than produce the mother of all samples.
I’ll start by helping you set up your development environment. Once that’s com-plete, you’ll create a new project and look at the various configuration settings, prop-erty pages, and stock files that are important. Then, I’ll show you how to create a very simple Hello World! application. All that application will do is display “Hello World!” on the screen.
From there, you’ll modify the application to pull data from Twitter and display it onscreen. When run, the completed application will look like figure 1.1. Despite not
3
Configuring the project
being very pretty, this app follows the new design aesthetic, runs full screen, and sup-ports touch. It uses the new WrapGridlayout control and, to many, familiar XAML con-cepts. If you don’t know XAML yourself, don’t worry; you will by the end of this book.
1.1
Setting up the development environment
Windows 8 Modern apps can only be developed on Windows 8, so the first thing you’ll need to do is install Windows 8. Hardware selection is too large a topic for this book, but you’ll want to make sure the screen width is at least 1366 x 768 or larger so you can use snapped views for apps. The machine will need to be based on an x86-compatible processor because Windows RT (ARM) devices can’t run Visual Studio.
The ideal situation is to install on the metal or set up a bootable VHD on a typical developer-class machine. Running in a virtual machine is okay, but you’ll find the experience frustrating at times, especially when it comes to swiping from the edges or activating elements using the hot corners.
YOUR MICROSOFT ACCOUNT When installing Windows, unless you’re using a
domain account, make sure you set up a Microsoft account rather than a local account. Microsoft accounts have much better integration with online ser-vices, and you’ll need one to obtain a developer key. Microsoft account is a new name for Windows Live ID (or Passport, if you can remember back that far)— something almost every .NET developer already has.
To develop Windows apps, you’ll need to have a version of Visual Studio 2012. You can use the free Visual Studio Express for Windows 8 apps, or you can install a higher level and more feature-rich version such as Professional. You can find links to all the impor-tant bits at http://dev.windows.com. All the required SDKs and templates are installed automatically with Visual Studio 2012; even .NET 4.5 and the Windows Runtime are already installed on the Windows 8 machine. No additional downloads are required.
You don’t need a Windows Store account just yet, but you’ll eventually want one of those as well (more on the Windows Store in chapter 23). You can obtain a free devel-oper key automatically the first time you create a Modern Style app in Visual Studio, as you’ll see in a moment.
1.2
Configuring the project
In keeping with the spirit of Hello World, your first Windows app will be a simple one designed to let you see the construction and build process from front to back. Don’t worry about understanding all the parts of the project just yet; that’ll come in the sub-sequent chapters.
In Visual Studio, select the Start page link (or File menu option) to create a new project. This will be a Visual C# project, a Windows Store app, using the Blank App
Notice the other project templates: Grid App (XAML) and Split App (XAML) in partic-ular. Those are feature-rich templates, much like the business application templates and navigation templates in Silverlight. I’ll skip these templates for now, because we’ll dive into them later in this book, and there’s a lot more to them than we want to get into in chapter 1.
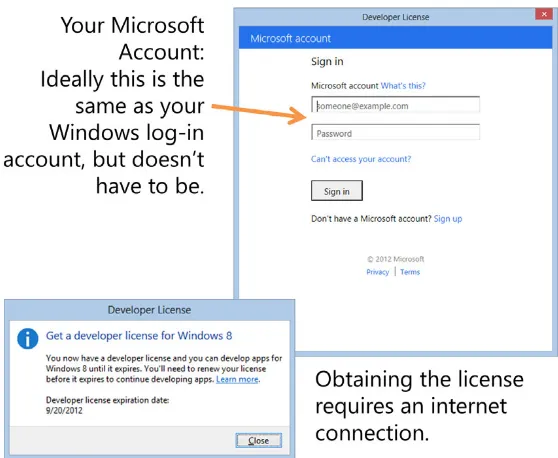
Click OK to create the project. If this is the first time you’ve created a Win-dows 8 app on your machine, you’ll be prompted to create a developer license, as shown in figures 1.3 and 1.4.
When you first run Visual Studio and try to build a Windows 8 app, you’ll have to register for a developer license. This is free and is granted for 30 days for non-store use and 90 days if you have a Windows Store account (these durations are subject to change). Renewing is painless as long as you have an internet connection. It may be a bit annoying to renew every 30 days, but it’s
a necessary step to make sure that people creating malware or otherwise trying to cause havoc can have their keys turned off.
You can renew your developer license through the command prompt or through Visual Studio at any time should you know you’re going to be disconnected from the
Figure 1.2 Creating the Windows XAML app using the Blank App template
5
Configuring the project
internet for a bit. You can find the instructions at http://bit.ly/Win8DevLicense. You may consider automating the renewal to happen every 29 days or some other time period by scheduling a job to do it for you.
TIP I speak at a lot of events. I assume many of you also give demos to poten-tial clients, managers, and others. If it has been a few weeks since you renewed your developer license, do so before you give that important demo. Nothing will tank your presentation faster than being prompted to renew your developer license when there’s no available internet connection. This happened to me on one of the few plane trips I took that didn’t have working Wi-Fi. I read a book instead.
If you want to keep things simple, use a single ID for your machine login and your developer license. This isn’t always possible, especially in the case of domain-joined machines, so consider it a recommendation and not a hard rule.
Once you have the developer license, you’ll be tossed into the IDE with your proj-ect loaded.
1.2.1 The device pane
Once the application template is loaded, you’ll be presented with the solution. Open MainPage.xaml and you’ll see the design surface and the usual developer window
Figure 1.4 You’ll need to be online when you go to obtain the developer
panes. One pane, the Device window panel, shown in figure 1.5, stands out as new, however.
TIP Your design surface will likely be black. If not, compile the solution so the design surface can update.
The Device pane (windows are generally referred to as panes when docked) to the left of the design surface has a number of buttons to let you try out different views for your application: Full, Filled, Snapped, and Portrait. Under the View buttons, there’s the Display selector. This lets you select from common display resolutions. Finally, there are options that control other aspects of the simulated tablet (or touch screen) on the design surface.
TIP If the Device window/pane isn’t visible, go to the DESIGN menu and select Device Window. It’s not on the VIEW menu, unlike most other dockable windows. Yes, the menus are in all caps. Embrace the case.
All of these options are external to your application code and markup; they don’t change anything. They simply let you test your UI layout under a number of different configurations without actually deploying it to a machine of that resolution. Nice!
Feel free to play with the options a bit, but then return them to their defaults when finished. I’m using a test resolution of 1366 x 768 (at 148 dpi), the minimum full-fea-tured Windows 8 resolution, and have the view configured to the full view.
Figure 1.5 Visual Studio 2012 with the blank project template loaded in the Hello World
7
Configuring the project
1.2.2 Template solution items
To the right of the design surface, you’ll see the Solution Explorer. As a .NET devel-oper, you’re almost certainly familiar with this by now. Notice, however, that there are a few more files and folders there than you may be used to.
If you’re a Silverlight or WPF developer, App.xaml should be familiar to you. For those new to the platform, this is where the startup code exists and where you can keep styles, templates, and other resources that are shared throughout the entire application.
The Common folder contains the very important StandardStyles.xaml file. You’ll use this file, or more correctly, the resources in it, when creating the UI for the applications throughout this book. This file is where the Windows 8 Modern app styles reside.
The Assets folder contains the application images. In it, you’ll find the app’s main and small logo as used in the tiles, the splash screen logo, and the logo to be used in the Windows Store.
Right-click the Hello World project (not the solution) and choose Properties. Most of the options here are familiar, but click the Debug tab on the left. In there you’ll see a number of start options. By default, you’ll run on the local machine. But there’s also an option to start the application on a remote machine. This is key if you want to actively test and debug on a sub-developer-class machine or a machine that simply can’t run Visual Studio, like a Windows on ARM tablet. Additionally, there’s the option to start the app in the Simulator, which we’ll explore shortly.
Next, double-click the Package.appxmanifest file. This is where you’ll specify the runtime configuration for your application, including the logos, supported orienta-tions, background color, capabilities (such as needing access to the pictures library), and declarations (such as registering as a picture provider or as a file save picker).
Don’t mess with the standard styles…at first
I mentioned that the StandardStyles.xaml file is important. The note at the top of the file says it all:
“This file contains XAML styles that simplify application development.”
These are not merely convenient but are required by most Visual Studio project and item templates. Removing, renaming, or otherwise modifying the content of these files may result in a project that doesn’t build or that won’t build once additional pages are added. If variations on these styles are desired, it is recommended that you copy the content under a new name and modify your private copy.
This is also where you can specify your start page’s tile background and foreground colors and logos. In short, this is the place where many of the important packaging and deployment details are kept.
1.3
Create the first Hello World UI
The next step is to create a very simple Hello World UI. Open up MainPage.xaml if it isn’t already open. Before you do any real work, turn on Show Grid (this is the 20-pixel grid we’ll cover in chapter 2) and turn on Snap to Grid. Both controls are at the bottom of the design window, as shown in figure 1.6.
Next, you can either drag a TextBlockfrom the Toolbox (pane on the left—you may need to click it or hover over it if it’s not already open) onto the design surface and visually align its left and text baseline with one of the major grid lines, or you can sim-ply paste inside the Gridelement the following XAML:
<TextBlock Text="Hello World!" Height="42" Width="270"
HorizontalAlignment="Left" VerticalAlignment="Top" FontSize="42" Margin="80,40,0,0" />
If you run the application at this point, you should see a nice “Hello World!” message. If you’re running the default themes, it will be white text on a black background. You may be wondering how to get out of the application and back to Visual Studio. You have a few options:
■ On a single-display system, use Alt-Tab to get back to Visual Studio and keep the
app running (you’ll use this often during debugging).
■ Press Alt-F4 to close the app and then hit the Windows key to get back to Visual
Studio.
■ Move the mouse to the top of the app until it turns into a hand, and then drag
down to close it. This gesture also works with touch, of course.
By design, Windows 8 apps don’t have dedicated close buttons; the user uses one of the aforementioned approaches to get out of the app.
Figure 1.6 The Show Grid and Snap to Grid controls
9
Integrating with Twitter
If all you want is a simple Hello World, you can stop here. But if you want to kick it up just a tiny notch and add something meaningful to your Hello World app, read on. It’ll still be simple, but rather than just the “Hello World!” text, we’ll add a little data from our friends at Twitter. I just can’t help myself.
1.4
Integrating with Twitter
Networking is almost always part of a modern application. Windows 8 apps are usually online and always connected (or often connected). Networking in Windows 8 is, therefore, suitably feature rich and central to the platform.
This code is going to call out to Twitter to get a list of Tweets that contain the hashtag1 “#win8” or “#windows8.” It will then deserialize the results into a set of Tweet
objects, which will then be bound to a ListViewin the UI. If you’ve read any of my other books, you’ll know this is a consistent example I follow. It’ll also be interesting for you to see the differences in how the networking code here compares with the code in my Silverlight books. If you haven’t read my Silverlight books, no worries; everything here will be explained.
In this section, you’ll start by creating the Tweetclass to hold the key information about the Tweet. Next, you’ll update the UI using a ListView, a WrapGrid, and an item template to display the Tweets. This is a common approach for displaying data in a
XAML app. Finally, you’ll throw some code in the code-behind to make the network-ing calls and parse the data that’s returned.
Where did the background color come from?
You may have noticed that the root Gridhas its background color bound to a static resource named ApplicationPageBackgroundThemeBrush. If you go hunting around, you won’t find that brush defined anywhere. Where is it, then?
This is one of the standard SDK resources, loaded as part of the platform. You don’t have to use it, but if you want to have a well-behaved Modern Style Windows 8 app, you probably will want to stick with the default resources. Why? They respond to themes picked by the user, including high-contrast and standard themes.
If you create your own controls, you’ll definitely want to support these resources in your default template.
Of course, if you know what you’re doing, by all means, just ignore it and don’t use it or the other stock resources. There are a number of them, but they’re highly optimized so you don’t take a performance hit from unused resources at runtime. If you want to see them, a copy of the resources can be found in \Program Files (x86)\Windows Kits\8.0\Include\winrt\xaml\design.
1 I wonder if the child named Hashtag will have a hard time doing an ego search on the internet? Will they sign
1.4.1 The Tweet class
First, you’ll need to create a class to hold the data that will be returned from your Twit-ter search. Create a folder named Model, and in it create a new class named Tweet. The first listing shows the Tweetclass code.
using System;
namespace HelloWorld.Model {
class Tweet {
public string Message { get; set; } public string Image { get; set; } }
}
A Twitter search returns much more information for each Tweet, but the Messageand
Image are all you’ll use in this example. They are auto-properties (properties with auto-generated getand setaccessors) in order to make binding possible. You’ll learn more about binding in chapter 9.
1.4.2 Updated UI
The next step is to update the UI to provide a nice way to list the Tweets. You’ll use a
WrapGrid as shown in the following listing. Silverlight and WPF developers may remember this as the WrapPanel. They’re conceptually the same, but the WrapGrid
only works inside items controls.
<Grid Background="{StaticResource ApplicationPageBackgroundThemeBrush}"> <TextBlock Text="Twitter Search Results"
HorizontalAlignment="Left" VerticalAlignment="Top" FontSize="42" Margin="80,40,0,0" />
<ListView x:Name="TweetList" Margin="80, 100, 80, 80"> <ListView.ItemsPanel>
<ItemsPanelTemplate>
<WrapGrid /> </ItemsPanelTemplate>
</ListView.ItemsPanel> <ListView.ItemTemplate> <DataTemplate>
<Grid Width="360" Height="80" Background="LightBlue"> <Image Margin="0" Width="80" Height="80" HorizontalAlignment="Left"
Source="{Binding Image}" Stretch="Uniform"/>
<TextBlock Text="{Binding Message}" HorizontalAlignment="Left"
Listing 1.1 Code for the Tweet class in the Model folder
Listing 1.2 Updated UI with the ListBox of Tweets
Heading
ListView control
WrapGrid for items layout
Image
11
Integrating with Twitter
VerticalAlignment="Top" FontSize="15"
Foreground="White" TextWrapping="Wrap" Margin="100,5,5,5"/> </Grid>
</DataTemplate>
</ListView.ItemTemplate> </ListView>
</Grid>
In MainPage.xaml, replace everything inside and including the main Gridwith what you see in this listing, but leave the Page declarations and namespaces alone. This listing sets up the UI so that it lays out all elements on a wrapped grid. Each element is a simple rectangular grid with a blue background, a photo to the left, and text on the right.
The final step is to wire everything in the code-behind.
WHY A LISTVIEW INSTEAD OF A LISTBOX? WPF and Silverlight developers know
that you can do just about anything with a ListBox. In Windows 8 apps, due to plumbing changes for animation and virtualization, the replacement for the ListBoxis the ListView. You can still use the ListBoxfor some scenarios, but you’ll find it no longer works with all the layout grids. When in doubt, reach for the new ListViewcontrol instead.
1.4.3 Code-behind
Later in this book you’ll learn best practices for separating code using ViewModels and varying degrees of the MVVM pattern. For this first example, all the code will remain in the behind as shown in the following listing. This code goes in the code-behind of the main page (MainPage.xaml.cs).
using System;
using System.Collections.ObjectModel; using System.Diagnostics;
using System.Linq; using System.Net.Http; using System.Xml.Linq; using HelloWorld.Model;
using Windows.UI.Xaml.Controls; using Windows.UI.Xaml.Navigation;
namespace HelloWorld {
public sealed partial class MainPage : Page {
public MainPage() {
this.InitializeComponent(); }
private ObservableCollection<Tweet> _tweets = new ObservableCollection<Tweet>() ;
protected override void OnNavigatedTo(NavigationEventArgs e) {
TweetList.ItemsSource = _tweets; LoadTweets();
}
private async void LoadTweets() {
Uri uri = new
Uri("http://search.twitter.com/search.atom?q=win8+OR+windows8");
var client = new HttpClient();
var response = await client.GetAsync(uri);
string content = await response.Content.ReadAsStringAsync();
Debug.WriteLine(content);
var doc = XDocument.Parse(content);
XNamespace ns = "http://www.w3.org/2005/Atom";
var items = from item in doc.Descendants(ns + "entry")
If you haven’t used .NET 4.5 yet (or Silverlight 5 with Visual Studio 2012 and the async targeting pack), the async and await keywords will be new to you. These two key-words help remove a lot of the asynchronous handler code you had to write in the past. Because the Windows Runtime relies so heavily on asynchronous methods, this is a huge boon to Windows 8 developers. What used to take a convoluted set of callbacks can now be reduced to a single awaitstatement. Nice!
13
Testing on different devices and resolutions
But don’t worry if you have no Silverlight experience. Although I’ll bring up differ-ences from time to time to further inform readers coming from similar languages and platforms, I don’t assume any XAML experience in this book.
Run the application, and you should see a list of Tweets complete with text and images similar to those shown in figure 1.1 at the start of this chapter.
1.5
Testing on different devices and resolutions
So far, we’ve run everything directly on the development PC. As you know, developer machines aren’t representative of the typical end-user machine. In a world of touch devices, hybrid laptops, and tablets, this is even truer.
Because the devices can vary so much in capability, and because installing Visual Studio on every device is both impractical and impossible, there has to be a good way to deploy and debug remotely. One of my favorite things about .NET Micro Frame-work development is the ability to deploy code to an external device and step through breakpoints on my development PC. Windows Phone developers and developers who remotely debugged apps on the Mac will also be familiar with this Visual Studio capability.
Sometimes all you need to do is try out different resolutions or simulate touch on your non-touch Windows development machine. For those scenarios, the built-in Sim-ulator is the way to go. The SimSim-ulator makes it simple to deploy and debug inside a simulated machine, where you control resolution and other parameters.
In this section we’ll look at a few different ways to debug the app. First, you’ll run it on the Simulator and then move to debugging on a remote machine. If you don’t have a second Windows 8 machine handy, that’s okay.
1.5.1 Debugging on the Simulator
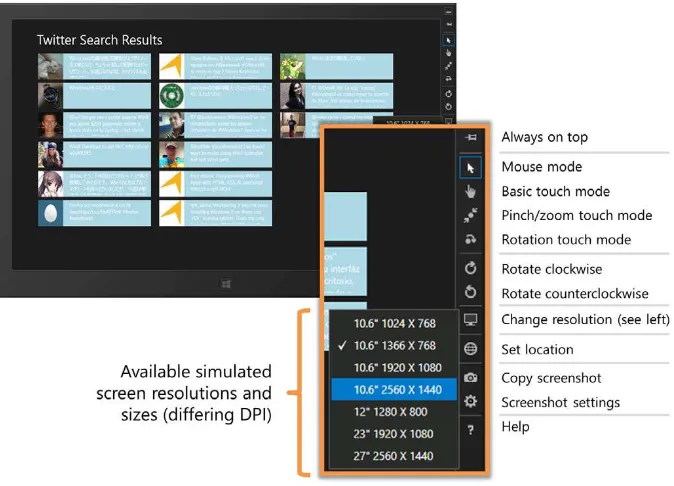
Visual Studio 2012 comes with a Windows 8 Simulator. The Simulator is actually a remote desktop into the same machine Visual Studio is running on, but it abstracts this and provides another layer of UI interaction. This enables you to simulate touch, gestures, rotation, different screen resolutions, orientations, and more.
Continuing from where we left off, exit the app and change the Debug target to be the Simulator rather than the local machine. You can do this from the project proper-ties or, more easily, through the toolbar, as figure 1.7 shows.
Figure 1.7 The menu option to debug