by David Byrnes and Bill Fane
FOR
111 River Street Hoboken, NJ 07030-5774 www.wiley.com
Copyright © 2012 by John Wiley & Sons, Inc., Hoboken, New Jersey Published by John Wiley & Sons, Inc., Hoboken, New Jersey Published simultaneously in Canada
No part of this publication may be reproduced, stored in a retrieval system or transmitted in any form or by any means, electronic, mechanical, photocopying, recording, scanning or otherwise, except as permit-ted under Sections 107 or 108 of the 1976 Unipermit-ted States Copyright Act, without either the prior written permission of the Publisher, or authorization through payment of the appropriate per-copy fee to the Copyright Clearance Center, 222 Rosewood Drive, Danvers, MA 01923, (978) 750-8400, fax (978) 646-8600. Requests to the Publisher for permission should be addressed to the Permissions Department, John Wiley & Sons, Inc., 111 River Street, Hoboken, NJ 07030, (201) 748-6011, fax (201) 748-6008, or online at http:// www.wiley.com/go/permissions.
Trademarks: Wiley, the Wiley logo, For Dummies, the Dummies Man logo, A Reference for the Rest of Us!, The Dummies Way, Dummies Daily, The Fun and Easy Way, Dummies.com, Making Everything Easier,and related trade dress are trademarks or registered trademarks of John Wiley & Sons, Inc. and/or its affiliates in the United States and other countries, and may not be used without written permission. AutoCAD is a registered trademark of Autodesk, Inc. All other trademarks are the property of their respective owners. John Wiley & Sons, Inc., is not associated with any product or vendor mentioned in this book.
LIMIT OF LIABILITY/DISCLAIMER OF WARRANTY: THE PUBLISHER AND THE AUTHOR MAKE NO REPRESENTATIONS OR WARRANTIES WITH RESPECT TO THE ACCURACY OR COMPLETENESS OF THE CONTENTS OF THIS WORK AND SPECIFICALLY DISCLAIM ALL WARRANTIES, INCLUDING WITHOUT LIMITATION WARRANTIES OF FITNESS FOR A PARTICULAR PURPOSE. NO WARRANTY MAY BE CREATED OR EXTENDED BY SALES OR PROMOTIONAL MATERIALS. THE ADVICE AND STRATEGIES CONTAINED HEREIN MAY NOT BE SUITABLE FOR EVERY SITUATION. THIS WORK IS SOLD WITH THE UNDERSTANDING THAT THE PUBLISHER IS NOT ENGAGED IN RENDERING LEGAL, ACCOUNTING, OR OTHER PROFESSIONAL SERVICES. IF PROFESSIONAL ASSISTANCE IS REQUIRED, THE SERVICES OF A COMPETENT PROFESSIONAL PERSON SHOULD BE SOUGHT. NEITHER THE PUBLISHER NOR THE AUTHOR SHALL BE LIABLE FOR DAMAGES ARISING HEREFROM. THE FACT THAT AN ORGANIZATION OR WEBSITE IS REFERRED TO IN THIS WORK AS A CITATION AND/OR A POTENTIAL SOURCE OF FURTHER INFORMATION DOES NOT MEAN THAT THE AUTHOR OR THE PUBLISHER ENDORSES THE INFORMATION THE ORGANIZATION OR WEBSITE MAY PROVIDE OR RECOMMENDATIONS IT MAY MAKE. FURTHER, READERS SHOULD BE AWARE THAT INTERNET WEBSITES LISTED IN THIS WORK MAY HAVE CHANGED OR DISAPPEARED BETWEEN WHEN THIS WORK WAS WRITTEN AND WHEN IT IS READ.
For general information on our other products and services, please contact our Customer Care Department within the U.S. at 877-762-2974, outside the U.S. at 317-572-3993, or fax 317-572-4002. For technical support, please visit www.wiley.com/techsupport.
Wiley also publishes its books in a variety of electronic formats and by print-on-demand. Not all content that is available in standard print versions of this book may appear or be packaged in all book formats. If you have purchased a version of this book that did not include media that is referenced by or accom-panies a standard print version, you may request this media by visiting http://booksupport.wiley. com. For more information about Wiley products, visit us at www.wiley.com.
Library of Congress Control Number: 2012936846
ISBN 978-1-118-28112-3 (pbk); ISBN 978-1-118-33352-5 (ebk); ISBN 978-1-118-33465-2 (ebk); ISBN 978-1-118-39217-1 (ebk)
David Byrnes is one of those grizzled old-timers you’ll find mentioned every so often in AutoCAD 2013 For Dummies. He began his drafting career on the boards in 1979, and first learned AutoCAD with version 1.4. Dave is based in Vancouver, British Columbia, where he works as a civil/structural drafter. He taught AutoCAD for fifteen years at Emily Carr University of Art + Design and British Columbia Institute of Technology in Vancouver. Dave has authored or co-authored over a dozen AutoCAD books and was sole author of this title from AutoCAD 2008 For Dummies to AutoCAD 2012 For Dummies.
Bill Faneis a recovering doorknob designer. He was a product engineer and then product engineering manager for Weiser Lock in Vancouver, Canada for 27 years and holds 12 U.S. patents. He has been using AutoCAD for design work since Version 2.17g (1986), and Inventor since version 1.0 beta (1996). He is a retired professional engineer and an Autodesk Authorized Training Center (ATC) certified instructor.
He began teaching mechanical design in 1996 at the British Columbia Institute of Technology (BCIT) in Vancouver, including such courses as AutoCAD, Mechanical Desktop, Inventor, SolidWorks, machine design, term projects, manufacturing processes, and design procedures. He retired from this posi-tion in 2008.
He has lectured on a wide range of AutoCAD and Inventor subjects at Autodesk University since 1995 and at Destination Desktop since 2003. He is the AUGI CAD Camp National Team instructor for the manufacturing track. He has written over 220 “The Learning Curve” columns for CADalyst magazine since 1986 and claims to be a close personal friend of Captain LearnCurve. He also writes software product reviews for CADalyst, Design Product News, and
Machine Design. He is an active member of the Vancouver AutoCAD Users Society, “the world’s oldest and most dangerous.”
From Dave: I left the bohemian lifestyle of the AutoCAD consultant at the beginning of 2008 and rejoined the engineering company I last worked for in 1988 (luckily they’d forgotten all about that chandelier). Working full-time (oh! the horror!) and keeping up with AutoCAD so I can revise this book has made me somewhat inaccessible for three months a year, and I’m forever grateful to Annie and Delia, still and always the two women in my life, who remind me there are other things besides keyboards and mice (and some-times they have to try really hard).
From Bill: Back in the last millennium I wrote a book about AutoCAD 13, after which my wife Bev swore “Never again!” This time around she was smart enough to go on a two-week South Pacific cruise while I worked on the final author review files, and so our marriage stands a chance of surviving another 46 years.
Authors’ Acknowledgments
Dave thanks former author Mark Middlebrook for bringing him into the
AutoCAD For Dummies world by asking him first to tech edit AutoCAD 2000 For Dummies, then to join him as co-author of AutoCAD 2006 For Dummies, and finally to take over the title altogether.
Bill was both honored and flattered when Dave invited him to co-author this edition of the prestigious AutoCAD For Dummies title, with a view to his taking it over completely next year. Dave’s support and assistance through Bill’s teething period on this project know no bounds, and no matter where the book goes from here, there will always be parts of Dave’s soul lurking in it somewhere.
side the U.S. at 317-572-3993, or fax 317-572-4002.
Some of the people who helped bring this book to market include the following: Acquisitions and Editorial
Sr. Project Editor: Mark Enochs Acquisitions Editor: Kyle Looper
Copy Editors: Heidi Unger, Teresa Artman, Amanda Graham
Technical Editor: Ralph Grabowski Editorial Manager: Leah Michael Editorial Assistant: Amanda Graham Sr. Editorial Assistant: Cherie Case Cover Photo: ©iStockphoto.com/-Vladimir-Cartoons: Rich Tennant (www.the5thwave.com)
Composition Services
Project Coordinator: Sheree Montgomery Layout and Graphics: Claudia Bell, Carl Byers,
Joyce Haughey
Proofreader: Bonnie Mikkelson Indexer: Infodex Indexing Services, Inc.
Publishing and Editorial for Technology Dummies
Richard Swadley, Vice President and Executive Group Publisher Andy Cummings, Vice President and Publisher
Mary Bednarek, Executive Acquisitions Director Mary C. Corder, Editorial Director
Publishing for Consumer Dummies
Kathy Nebenhaus, Vice President and Executive Publisher Composition Services
Introduction ... 1
Part I: AutoCAD 101 ... 11
Chapter 1: Introducing AutoCAD and AutoCAD LT ... 13
Chapter 2: Le Tour de AutoCAD 2013... 23
Chapter 3: A Lap around the CAD Track... 55
Chapter 4: Setup for Success ... 85
Chapter 5: Planning for Paper ... 109
Part II: Let There Be Lines ... 123
Chapter 6: Manage Your Properties ... 125
Chapter 7: Preciseliness Is Next to CADliness ... 147
Chapter 8: Along the Straight and Narrow ... 163
Chapter 9: Dangerous Curves Ahead ... 177
Chapter 10: Get a Grip on Object Selection ... 193
Chapter 11: Edit for Credit ... 215
Chapter 12: A Zoom with a View ... 243
Part III: If Drawings Could Talk ... 261
Chapter 13: Text with Character ... 263
Chapter 14: Entering New Dimensions ... 297
Chapter 15: Down the Hatch! ... 323
Chapter 16: The Plot Thickens ... 337
Part IV: Advancing with AutoCAD ... 367
Chapter 17: The ABCs of Blocks ... 369
Chapter 18: Everything from Arrays to Xrefs ... 387
Chapter 19: Call the Parametrics! ... 421
Chapter 20: Drawing on the Internet ... 449
Part V: On a 3D Spree ... 469
Chapter 21: It’s a 3D World After All ... 471
Chapter 22: From Drawings to Models ... 491
Introduction ... 1
What’s Not (And What Is) in This Book ... 2
Mac attack! ... 3
Who Do We Think You Are? ... 3
How This Book Is Organized ... 4
Part I: AutoCAD 101 ... 4
Part II: Let There Be Lines... 5
Part III: If Drawings Could Talk ... 5
Part IV: Advancing with AutoCAD ... 5
Part V: On a 3D Spree ... 6
Part VI: The Part of Tens ... 6
But wait . . . there’s more! ... 6
Icons Used in This Book ... 7
A Few Conventions — Just in Case ... 8
Commanding from the keyboard ... 8
Tying things up with the Ribbon ... 9
Where to Go from Here ... 9
Part I: AutoCAD 101 ... 11
Chapter 1: Introducing AutoCAD and AutoCAD LT . . . .13
Why AutoCAD? ... 15
The Importance of Being DWG ... 16
Seeing the LT ... 18
Checking System Requirements ... 19
Suddenly, It’s 2013! ... 21
Chapter 2: Le Tour de AutoCAD 2013. . . .23
AutoCAD Does Windows (And Office) ... 24
And They’re Off: AutoCAD’s Opening Screens ... 25
Running with Ribbons ... 28
Getting with the Program ... 35
Looking for Mr. Status Bar ... 36
Let your fingers do the talking: The command window ... 43
Keeping tabs on palettes... 50
Down the main stretch: The drawing area ... 51
Fun with F1 ... 53
Chapter 3: A Lap around the CAD Track. . . .55
A Simple Setup ... 57
Drawing a (Base) Plate ... 61
Drawing rectangles on the right layers ... 61
Circling your plate ... 67
Nuts to you ... 69
Getting a Closer Look with Zoom and Pan ... 71
Modifying to Make It Merrier ... 73
Hip-hip-array! ... 74
Weighing up your scales ... 90
Thinking annotatively... 91
Thinking about paper ... 93
Defending your border ... 96
A Template for Success ... 96
Making the Most of Model Space ... 99
Setting your units ... 99
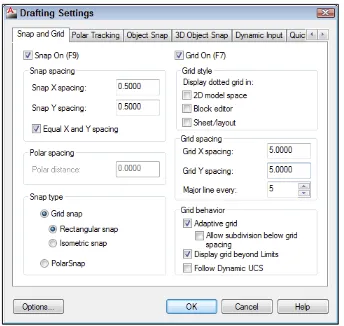
Making the drawing area snap-py (and grid-dy) ... 101
Setting linetype and dimension scales ... 103
Entering drawing properties ... 104
Making Templates Your Own ... 105
Chapter 5: Planning for Paper . . . .109
Setting Up a Layout in Paper Space ... 110
Will that be tabs or buttons? ... 110
View layouts Quick(View)ly ... 111
Creating a layout ... 113
Copying and changing layouts ... 116
Lost in paper space ... 117
Spaced out ... 118
A view(port) for drawing in ... 119
Part II: Let There Be Lines ... 123
Copying layers between drawings ... 144
Chapter 7: Preciseliness Is Next to CADliness. . . .147
Controlling Your Precision ... 147
Keyboard capers: Coordinate input ... 150
Understanding AutoCAD’s coordinate systems ... 150
Grab an object and make it snappy ... 154
Other Practical Precision Procedures ... 159
Chapter 8: Along the Straight and Narrow . . . .163
Introducing the AutoCAD Drawing Commands ... 164
The Straight and Narrow: Lines, Polylines, and Polygons ... 166
Toeing the line ... 167
Connecting the lines with polyline ... 169
Squaring off with rectangles ... 174
Choosing your sides with polygon ... 175
Chapter 9: Dangerous Curves Ahead . . . .177
(Throwing) Curves ... 178
Going full circle ... 179
Arc-y-ology ... 181
Solar ellipses... 183
Splines: The sketchy, sinuous curves ... 185
Donuts: The circles with a difference... 186
Revision clouds on the horizon ... 187
Scoring Points ... 189
Grab It ... 196
One-by-one selection ... 196
Selection boxes left and right ... 197
Perfecting Selecting ... 199
Copy, or a kinder, gentler Move ... 210
A warm-up stretch ... 211
Chapter 11: Edit for Credit . . . .215
Your AutoCAD Toolkit ... 215
The Big Three: Move, Copy, and Stretch ... 219
Base points and displacements ... 219
Move ... 220
Slicing, Dicing, and Splicing ... 233
Trim and Extend... 233
Break ... 235
Fillet and Chamfer and Blend ... 236
Join... 238
When Editing Goes Bad ... 241
Chapter 12: A Zoom with a View . . . .243
Zoom and Pan with Glass and Hand ... 243
The wheel deal ... 244
Navigating your drawing ... 245
Controlling your cube ... 246
Time to zoom ... 248
A View by Any Other Name . . . ... 251
Looking Around in Layout Land ... 254
Part III: If Drawings Could Talk ... 261
Chapter 13: Text with Character . . . .263
Getting Ready to Write ... 264
Simply stylish text ... 266
Taking your text to new heights ... 270
One line or two? ... 271
Your text will be justified ... 272
Using the Same Old Line ... 273
Turning On Your Annotative Objects ... 276
Saying More in Multiline Text ... 279
Making it with Mtext ... 279
It slices; it dices . . . ... 283
Doing a number on your Mtext lists ... 284
Line up in columns — now! ... 286
Modifying Mtext ... 288
Gather Round the Tables ... 288
Tables have style, too ... 289
Creating and editing tables ... 290
Take Me to Your Leader ... 293
Electing a leader ... 293
Multi options for multileaders ... 295
Chapter 14: Entering New Dimensions. . . .297
How Do You Measure Up? ... 298
A Field Guide to Dimensions ... 301
The lazy drafter jumps over to the quick dimension commands ... 303
Dimension associativity ... 304
Where, oh where, do my dimensions go? ... 305
The Latest Styles in Dimensioning ... 306
Creating and managing dimension styles ... 309
Let’s get stylish! ... 311
Adjusting style settings ... 312
Size Matters ... 315
Details at other scales ... 316
Editing Dimensions ... 318
Editing dimension geometry ... 318
Editing dimension text ... 320
Chapter 15: Down the Hatch! . . . .323
Batten Down the Hatches! ... 323
Don’t Count Your Hatches. . . ... 325
Size Matters! ... 329
We can do this the hard way. . . ... 329
. . . or we can do this the easy way ... 329
Annotative versus non-annotative ... 330
Pushing the Boundary (Of) Hatch ... 331
Your hatching has no style! ... 332
Hatch from scratch ... 333
Editing Hatch Objects ... 335
Chapter 16: The Plot Thickens . . . .337
You Say Printing, We Say Plotting ... 338
The Plot Quickens ... 338
Plotting success in 16 steps... 338
Get with the system ... 343
Configure it out ... 343
Preview one, two ... 345
Instead of fit, scale it... 346
Plotting the Layout of the Land ... 348
Plotting Lineweights and Colors ... 350
Plotting with style ... 351
Plotting through thick and thin ... 355
Plotting in color... 358
It’s a (Page) Setup! ... 360
Continuing the Plot Dialog ... 361
The Plot Sickens ... 364
Part IV: Advancing with AutoCAD ... 367
Chapter 17: The ABCs of Blocks . . . .369
Defining blocks that contain attribute definitions ... 382
Inserting blocks that contain attribute definitions ... 382
Edit attribute values ... 383
Extracting data ... 384
Exploding Blocks ... 384
Chapter 18: Everything from Arrays to Xrefs . . . .387
Arraying Associatively ... 389
Comparing the old and new ARRAY commands ... 390
Hip, hip, array! ... 391
Associatively editing ... 397
Going External ... 399
Becoming attached to your xrefs ... 400
Layer-palooza ... 403
Creating and editing an external reference file ... 403
Forging an xref path... 404
Managing xrefs ... 406
Blocks, Xrefs, and Drawing Organization ... 407
Mastering the Raster ... 408
Attaching a raster image ... 409
Maintaining your image... 410
You Say PDF, We Say DWF ... 411
Theme and Variations: Dynamic Blocks ... 413
Now you see it ... 414
Forget about drawing with precision! ... 425
Constrain yourself ... 425
Understanding Geometric Constraints ... 425
Applying a little more constraint ... 427
AutoConstrain yourself! ... 434
Understanding Dimensional Constraints ... 435
Practice a little constraint ... 436
Making your drawing even smarter ... 439
Using the Parameters Manager ... 441
Dimensions or constraints — have it both ways! ... 444
Chapter 20: Drawing on the Internet. . . .449
The Internet and AutoCAD: An Overview ... 449
You send me ... 450
Send it with eTransmit ... 450
Rapid eTransmit ... 451
FTP for you and me... 452
Bad reception? ... 453
Design Web Format — Not Just for the Web ... 455
All about DWF and DWFx ... 455
Autodesk Design Review 2013 ... 456
The Drawing Protection Racket ... 457
Autodesk Weather Forecast: Increasing Cloud ... 457
Working Solidly in the Cloud ... 458
Free AutoCAD! ... 458
Going once, going twice, going 123D ... 462
Your head planted firmly in the cloud ... 463
The pros ... 463
The cons ... 464
Cloudy with a shower of DWGs ... 464
AutoCAD 2013 cloud connectivity ... 465
Tomorrow’s Forecast ... 468
Part V: On a 3D Spree ... 469
Chapter 21: It’s a 3D World After All . . . .471
Understanding 3D Digital Models ... 472
Tools of the Trade ... 473
Warp speed ahead ... 474
Entering the third dimension ... 475
Untying the Ribbon and opening some palettes ... 476
Modeling from Above ... 477
Using 3D coordinate input ... 477
Using point filters ... 478
Object snaps and object snap tracking ... 478
Changing Planes ... 479
Displaying the UCS icon ... 479
Adjusting the UCS ... 480
Navigating the 3D Waters ... 484
Orbit à go-go ... 486
Taking a spin around the cube ... 486
Grabbing the SteeringWheels ... 488
Visualizing 3D Objects ... 488
Chapter 22: From Drawings to Models . . . .491
Is 3D for Me? ... 492
Getting Your 3D Bearings ... 493
Creating a better 3D template ... 493
Seeing the world from new viewpoints ... 498
Drawing basic 3D objects... 500
Gaining a solid foundation ... 502
Drawing solid primitives ... 503
Adding the Third Dimension to 2D Objects ... 504
Creating 3D objects from 2D drawings... 504
Modifying 3D Objects ... 508
Selecting subobjects ... 508
Working with gizmos ... 509
More 3D variants of 2D commands ... 510
Editing solids ... 510
Chapter 23: On a Render Bender . . . .515
Get the 2D Out of Here! ... 516
A different point of view... 520
But wait! There’s more! ... 521
AutoCAD’s top model ... 522
But wait! There’s less!... 523
Do You See What I See? ... 524
Visualizing the Digital World ... 524
Adding Lighting ... 525
Default lighting ... 525
User-defined lights ... 526
Sunlight ... 529
Creating and Applying Materials ... 530
Defining a Background ... 533
Rendering a 3D Model ... 535
Part VI: The Part of Tens ... 537
Chapter 24: Ten Great AutoCAD Resources. . . .539
Autodesk Feedback Community ... 539
Autodesk Discussion Groups ... 539
Autodesk’s Own Bloggers ... 540
Autodesk University ... 540
The Autodesk Channel on YouTube ... 540
The World Wide (CAD) Web ... 540
Your Local ATC ... 541
Your Local User Group ... 541
AUGI ... 541
Chapter 25: Ten (Or So) Differences between
AutoCAD and AutoCAD LT . . . .543
Price ... 543
3D Abilities ... 543
Customization Options ... 544
Network Licensing ... 544
Express Tools ... 544
Parametrics ... 545
Standards Checking ... 545
Data Extraction ... 545
MLINE versus DLINE ... 545
Profiles ... 546
Reference Manager ... 546
And The Good News Is . . . ... 546
Chapter 26: Ten System Variables to Make Your Life Easier. . . .547
APERTURE ... 548
DIMASSOC ... 548
MENUBAR ... 548
MIRRTEXT ... 549
OSNAPZ ... 549
PICKBOX ... 549
REMEMBERFOLDERS ... 550
ROLLOVERTIPS ... 550
TOOLTIPS ... 550
VISRETAIN ... 551
And the Bonus Round ... 551
L
et’s get something straight upfront. You may have heard that AutoCAD is difficult, complex, or hard to learn and use. Well, it has been our observation that the easier any software is to learn and use, the sooner you bump up against the software’s limitations. Yes, AutoCAD is complex, but that’s the secret to its success. Some claim that few people use more than 10 percent of AutoCAD’s capabilities. Closer analysis reveals that pretty much everyone uses the same basic 5 percent, but everyone else uses a different 5 percent after that. The trick is to find your 5 percent, the sweet spot that suits your particular industry.It should also be perfectly clear that if your career path has put you in a posi-tion where you need to learn AutoCAD, then you’re no dummy!
It’s amazing to think that AutoCAD came into being more than a quarter of a
century ago, back in the last millennium, at a time when most people thought that personal computers weren’t capable of industrial-strength tasks like CAD. (The acronym stands for Computer-Aided Drafting, Computer-Aided Design, or both, depending on whom you talk to.) What’s equally amazing is the fact that many of today’s hotshot AutoCAD users weren’t even born when the program first hit the street and the grizzled old-timers writing these words began using it! It’s almost as amazing that, 29 years and counting after its birth in December of 1982, AutoCAD remains the king of the micro-computer CAD hill by a tall margin, making it one of the longest-lived PC programs ever, and it will probably be a year older next year. It’s conceivable that the long-term future of CAD may belong to special-purpose, 3D-based software such as the Autodesk Inventor and Revit programs, or to specialized market-specific variations built on top of AutoCAD. At any rate, AutoCAD’s .DWG file format is the de facto standard, and so AutoCAD will be where the CAD action is for the foreseeable future.
AutoCAD provides the tools for doing all these things, but it’s not always easy to figure out which hammer to pick up or which nail to bang on first. With this book, you have an excellent chance of creating a presentable, usable, printable, and sharable drawing on your first (or at least your second) try without putting a T-square through your computer screen in frustration.
What’s Not (And What Is) in This Book
This book is not Drafting For Dummies, or Engineering For Dummies, or Crash-Testing For Dummies, or anything similar. We cover the basic principles of how to use AutoCAD to create and edit the objects (lines, circles, arcs, and so on) that make up engineering, architectural, and similar technical drawings. We do not cover drafting standards and practices for any particular industry or profession. For example, we teach you how to create dashed lines, but don’t tell you specifically how and when they should be used to indicate hidden edges in solid objects.
Unlike many other For Dummies books, this one often does tell you to consult the official software documentation. AutoCAD is just too big and complicated for a single book to attempt to describe it completely.
AutoCAD is also too big and complicated for a book like this to cover every feature. We don’t address advanced topics, like database connectivity, cus-tomization, or programming, in the interest of bringing you a book of a rea-sonable size — one that you’ll read rather than stick on your shelf with those other 1,000-page tomes! The ultimate book that covered everything to do with AutoCAD would need a fork truck to move it.
Autodesk likes to keep its users (and us authors!) guessing about new fea-tures in future releases of the software. AutoCAD 2009 surprised users and authors alike with a totally revamped user interface, replacing the drop-down menus and toolbars of previous versions with a Microsoft Office 2007–style Ribbon (happily, Autodesk doesn’t force its users to adopt the new look the way Microsoft does — there’s still an “AutoCAD Classic” interface available). AutoCAD’s interface gets some tweaking in each succeeding release, if for no other reason than to include new functionality, so even seasoned users will always find something that’s a little different. This book focuses on AutoCAD 2013 and addresses its slightlyless-capable but much-lower-priced sibling, AutoCAD LT 2013.
the important differences between AutoCAD and AutoCAD LT so you’ll know what you — or your LT-using colleagues — are missing so far as this book is concerned; the major difference is the almost-total absence of 3D capabilities in AutoCAD LT.
This book does not cover the discipline-specific features in AutoCAD-based products such as AutoCAD Architecture or AutoCAD Mechanical (except for some general discussion in Chapter 1), but most of the information in this book applies to the general-purpose AutoCAD features in the AutoCAD-based versions of those programs as well.
Mac attack!
Late in 2010, Autodesk released the first non–Microsoft Windows version of AutoCAD in 20 years. AutoCAD for Mac is out there today, but this book covers the Windows versions only. Although the two versions are file com-patible, there are many differences in how they look and what they can do. If you have AutoCAD for Mac, you should be able to gain some understand-ing of concepts, but you might be better off with a Mac-specific book such as Mastering AutoCAD For Mac by George Omura and Rick Graham (Sybex Publishing).
Who Do We Think You Are?
AutoCAD has a large, loyal, dedicated group of longtime users. This book is not for the sort of people who have been using AutoCAD for a decade or more, who plan their vacation time around Autodesk University, or who con-sider 1,000-page-plus technical tomes about AutoCAD to be pleasure reading. This book is for people who want to get going quickly with AutoCAD but who also know the importance of developing proper CAD techniques from the beginning.
However, you do need to have some idea of how to use your computer system before tackling AutoCAD — and this book. You need to have a com-puter system with AutoCAD or AutoCAD LT (preferably the 2013 version). A printer or plotter and a connection to the Internet will be big helps, too.
How This Book Is Organized
Appearances can be deceptive. For example, had you wandered into our office and seen the apparently random piles of stuff that covered our desks while we were writing this book, you might wonder how we could possibly organize a sentence, let alone an entire book. But — given a suitable degree of concerted thought — Bill knows exactly where to put his hands on that list of new dimension variables, and Dave can always find that bagel and cream cheese he started at coffee break yesterday. In the words of the philosopher, “A tidy desk is the sign of a sick mind.” Boy, are we healthy!
We hope you find that the book also reflects some concerted thought about how to present AutoCAD in a way that’s both easy-to-dip-into and smoothly-flowing-from-beginning-to-end.
The organization of this book into parts — collections of related chapters — is one of the most important, uh, parts of this book. You really can get to know AutoCAD one piece at a time, and each part represents a group of closely related topics. The order of parts also says something about pri-ority; yes, you have our permission to ignore the stuff in later parts until you master most of the stuff in the early ones. This kind of building-block approach can be especially valuable in a program as complex as AutoCAD.
The following sections describe the parts that the book breaks down into.
Part I: AutoCAD 101
Need to know your way around the AutoCAD screen? Why does AutoCAD even exist, anyway? What are all the different AutoCAD-based products that Autodesk sells, and should you be using one of them — for example, AutoCAD LT — instead of AutoCAD? Is everything so slooow because it’s sup-posed to be slow, or do you have too wimpy a machine to use this wonder of modern-day computing? And why do you have to do this stuff in the first place?
Part II: Let There Be Lines
In this part, you discover some essential concepts, including object proper-ties and CAD precision techniques. We know you’re rarin’ to make some drawings, but if you don’t get a handle on this stuff early on, you’ll be termi-nally confused when you try to draw and edit objects. If you want to make drawings that look good, plot good, and are good, read this stuff!
After the concepts preamble, the bulk of this part covers the trio of activi-ties that you’ll probably spend most of your time in AutoCAD doing: drawing objects, editing them, and zooming and panning to see them better on the screen. These are the things that you do in order to create the geometry — that is, the CAD representations of the objects in the real world that you’re designing. By the end of Part II, you should be pretty good at geometry, even if your ninth-grade math teacher told you otherwise.
Part III: If Drawings Could Talk
CAD drawings don’t live on lines alone — most of them require quite a bit of text, dimensioning, and hatching in order to make the design intent clear to the poor chump who has to build your amazing creation. (Whoever said “a picture is worth a thousand words” must not have counted up the number of words on the average architectural drawing!) This part shows you how to add these essential features to your drawings.
After you’ve gussied up your drawing with text, dimensions, and hatching, you’ll probably want to create a snapshot of it to show off to your client, con-tractor, or grandma. Normal people call this process printing, but CAD people call it plotting. Whatever you decide to call it, we show you how to do it.
Part IV: Advancing with AutoCAD
The drawing- and data-sharing features in AutoCAD take you way beyond old-style, pencil-and-paper design and drafting. After you’ve discovered how to apply the techniques in this part, you’ll be well on your way to full CAD nerd-hood. (You may want to warn your family beforehand.)
Part V: On a 3D Spree
In this part, you learn the basics of 3D modeling in AutoCAD 2013. Beginning with the 3D environment — how to change its appearance, how to move around in it, how to examine the model itself in different ways — the chap-ters introduce different modeling techniques, from solid models to generat-ing 2D workgenerat-ing drawgenerat-ings from your 3D models.
Part VI: The Part of Tens
This part contains a concise catalog of differences between AutoCAD and AutoCAD LT, and lists of resources and settings that can make the time you spend in AutoCADland more enjoyable. There’s a lot of meat packed into these three chapters — juicy tidbits from years of drafting, experimentation, and fist-shaking at things that don’t work right — not to mention years of compulsive list-making. We hope that these lists help you get on the right track quickly and stay there.
But wait . . . there’s more!
AutoCAD 2013 For Dummies has a companion website. Point your browser at www.dummies.com/go/autocad2013fd to find many of the drawing files we use to demonstrate commands and procedures in this book. The drawings are posted to the website in Zip format; just download and unzip them and they’re ready to open in AutoCAD. The Zip files are named for the chapters and contain one or more drawing files. For example, afd03.zip contains the versions of the drawing for the base plate exercise in Chapter 3 of the book (refer to the downloadable Read Me file for an explanation of the naming conventions used for the drawing files). Note that not all chapters have associated drawing files.
Most of the drawing files are saved in AutoCAD 2010 format and can be opened in AutoCAD 2010 or any later release.
If you don’t have any AutoCAD release and just want to get a taste of the program before you buy, you can also download a free 30-day trial version of either AutoCAD 2013 or AutoCAD LT 2013. Just browse to
www.autodesk.com/autocad or www.autodesk.com/autocadlt and look for the Product Trial button.
You can also find the cheat sheet that’s mentioned here and there in the book at
www.dummies.com/cheatsheet/autocad2013
Icons Used in This Book
Throughout this book, we point out certain morsels of particularly important or useful information by placing handy little icons in the margin. Naturally, different icons indicate different types of information:
This icon tells you that herein lies a pointed insight that can save you time and trouble as you use AutoCAD. In many cases, Tips act as a funnel on AutoCAD’s impressive but sometimes overwhelming flexibility: After telling you all the ways that you can do something, we tell you the way that you
should do it in most cases.
The Technical Stuff icon points out places where we delve a little more deeply into AutoCAD’s inner workings or point out something that most people don’t need to know most of the time. These paragraphs definitely are not required reading the first time through, so if you come to one at a time when you’ve reached your techie-detail threshold, feel free to skip over it.
This icon points out text that tells you how to stay out of trouble when living close to the edge. Failure to heed its message may have unpleasant conse-quences for you or your drawing — or both.
This icon points to new stuff in AutoCAD 2013 (and sometimes AutoCAD LT 2013). It’s mostly designed for people who are somewhat familiar with a pre-vious version of AutoCAD and want to be alerted to what’s new or different in this release. New AutoCAD users starting out their CAD working lives with AutoCAD 2013 will find this stuff interesting, too — especially when they can show off their new book-learnin’ to the grizzled AutoCAD veterans in the office who don’t yet know about all the cool new features.
This icon highlights text that shows the differences between AutoCAD LT and AutoCAD. If you’re using AutoCAD LT, you’ll find out what you’re missing compared to “full” AutoCAD. If your friend is using LT, you’ll know where to look to find stuff in AutoCAD to brag about.
This icon points out places where you don’t have to draw stuff from scratch. Just visit the book’s companion website at
www.dummies.com/go/autocad2013fd and download the specified file or files.
A Few Conventions — Just in Case
You can probably figure out for yourself all the information in this section, but here are the details just in case.
Commanding from the keyboard
Text you type into the program at the command line, in a dialog box, in a text box, and so on appears in boldface type. Examples of AutoCAD prompts appear in a special typeface, as does any other text in the book that echoes a message, a word, or one or more lines of text that actually appear on-screen. Sequences of prompts that appear in the AutoCAD command-line area have a shaded background, like so:
Specify lower left corner or [ON/OFF] <0.0000,0.0000>:
Many AutoCAD commands have aliases — shortcut (fewer-letter) versions for the benefit of those who like to type commands at the AutoCAD command line, and in the long run, this is the way the real power users work. In this book, we show command names in uppercase letters. Chapters throughout the book include tables listing the most commonly used drawing and edit-ing commands, and for each table we list both the full command name and its alias in parentheses; for example, LINE (L), ARRAY (AR), and so forth. If you’re using the keyboard to enter commands, this means that you can type either LINE or simply L, and then press Enter to execute the command. Command input is not case-sensitive, so LINE, line, Line, liNe, LiNe, and so on will all work. You can view a list of all the command aliases in both AutoCAD and AutoCAD LT by clicking Edit Aliases on the Manage tab’s Customization panel — but just look, and be careful not to change anything!
Tying things up with the Ribbon
As you’ve noticed if you’ve skimmed through the book and looked at a few of the figures, AutoCAD uses an Office 2007–style Application Menu and Ribbon interface. The Ribbon is organized into a series of task-based tabs, and each tab has a number of panels containing specific tool buttons. We tell you where to find each command.
Where to Go from Here
If you read this Introduction, you’re like us — you like to read. (The cut-to-the-chase people tend to flip to the index right away and look up what they need to know at that instant.) If you’re a total AutoCAD newbie, you can read this book in order, from front to back; it follows a straightforward route from setting up your drawing environment, to outputting your masterworks to hard copy, to sharing your work with others.
Whichever route you choose, we hope you enjoy your time with AutoCAD 2013 For Dummies. And . . . you’re off!
Occasionally, we have updates to our technology books. If this book does have technical updates, they will be posted at:
A
ment for drafting and design. So if you’re new to AutoCAD, you need to know several things to get off to a good start — especially how to use the command-line area and how to set up your draw-ing properly. These key techniques are described in this part of the book.
1
Introducing AutoCAD
and AutoCAD LT
In This Chapter
▶ Getting the AutoCAD advantage ▶ Using AutoCAD and DWG files ▶ Meeting the AutoCAD product family ▶ Using AutoCAD LT instead of AutoCAD ▶ Finding out what’s new in 2013
M
aybe you’re one of the few remaining holdouts who continue to practice the ancient art of manual drafting with pencil and vellum. If so, we must tell you that you belong to a dwindling breed. Or maybe you’re completely new to drafting and yearn for the wealth and fame (would we lead you on?) of the drafter’s life. Maybe you’re an engineer or architect who needs to catch up with the young CAD hotshots in your office. Maybe you tried to use AutoCAD a long time ago, but gave up in frustra-tion or just got rusty. Or maybe you currently use an older release, such as AutoCAD 2006 or even (if you’re into antiques) AutoCAD 2000.Whatever your current situation or motivation, we hope that you enjoy the process of becoming proficient with AutoCAD. Drawing with AutoCAD is challenging at first, but it’s a challenge worth meeting. AutoCAD rewards those who think creatively about their work and look for ways to do it better. You can always find out more, discover a new trick, or improve the efficiency and quality of your drawing production.
and even the Apple II and then the Macintosh. By far the most popular of those early versions was for MS-DOS (your dad can tell you about that one). In 1997, Autodesk settled on Microsoft Windows as the sole operating system for AutoCAD, and that was the case for the next 13 years. Then in 2010, Autodesk released its first non-Windows version for many years: AutoCAD for Mac. The last version of AutoCAD to run on the Mac was Release 12, which appeared as long ago as 1992. It’s taken a while, but it looks like the Mac is back!
In this book, we cover only the Windows versions of AutoCAD 2013 and AutoCAD LT 2013. AutoCAD for Mac is different enough — in both capa-bilities and interface — from the Windows versions that we simply can’t cover it all here. If you’re a Mac user with an interest in running AutoCAD, check out Mastering AutoCAD for Mac, by George Omura and Rick Graham (Sybex Publishing), and/or What’s Inside? AutoCAD for Macintosh, by Ralph Grabowski, available as an e-book at www.upfrontezine.com/wiam. AutoCAD 2013 and AutoCAD LT 2013 are supported in the following Windows flavors, including both 32- and 64-bit versions:
✓ Windows 7 and Windows Vista Home Premium
✓ Windows 7 Professional
✓ Windows 7 and Windows Vista Enterprise
✓ Windows 7 and Windows Vista Ultimate
✓ Windows Vista Business
✓ Windows XP Professional
✓ Windows XP Home (32-bit only)
Although not officially supported, AutoCAD 2013 (and AutoCAD LT 2013) can also run in Windows XP Tablet PC 2005 Edition, and make use of the tablet functionality included in Windows Vista and Windows 7. Trying to do pro-duction drafting on a tablet isn’t a great idea because of limitations in the graphics system, but we know it works. In fact, between the two of us, we are also running it on an Acer notebook with only 1024 x 600 resolution. When AutoCAD starts, it complains that it needs a minimum 1024 x 768 resolution but starts running anyway. The secret is to set up the notebook’s graphics in dual-monitor extended-desktop mode and plug it into a higher-resolution monitor or even a digital TV and then drag AutoCAD onto that screen.
and gentler in AutoCAD 2013. This book guides you around the bumps and minimizes the bruises.
Why AutoCAD?
AutoCAD has been around a long time — since 1982, which we suspect, dear readers, is longer than many of you! AutoCAD ushered in the transition from
really expensive mainframe and minicomputer CAD systems costing tens of thousands of dollars to merely somewhat expensive microcomputer CAD pro-grams costing a thousand dollars.
AutoCAD’s 3D capabilities have grown by leaps and bounds over the last several releases, and 3D modeling is becoming a common way of checking designs before they’re drafted. Nevertheless, AutoCAD is, first and foremost, a program for creating two-dimensional technical drawings, drawings in which measurements and precision are important because these kinds of draw-ings are often used to build something. The drawdraw-ings that you create with AutoCAD must adhere to standards established long ago for hand-drafted drawings. The upfront investment to use AutoCAD is certainly more expen-sive than the investment needed to use pencil and paper, and the learn-ing curve is much steeper, too. So why bother? The key reasons for uslearn-ing AutoCAD rather than pencil and paper are
✓ Precision: Creating lines, circles, and other shapes of the exact dimen-sions is easier with AutoCAD than with pencils.
✓ Modifiability: Drawings are much easier to modify on the computer screen than on paper. CAD modifications are a lot cleaner, too.
✓ Efficiency: Creating many kinds of drawings is faster with a CAD pro-gram — especially drawings that involve repetition, such as floor plans in a multistory building. But that efficiency takes skill and practice. If you’re an accomplished pencil-and-paper drafter, don’t expect CAD to be faster at first!
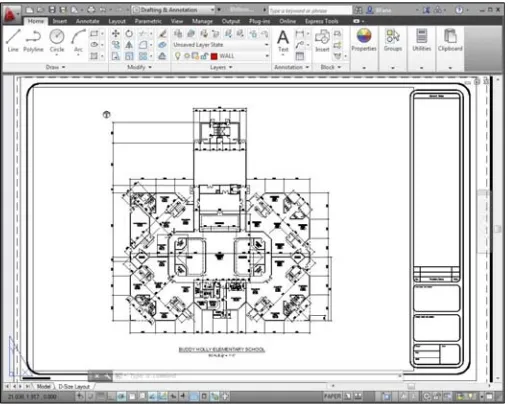
Figure 1-1 shows several kinds of drawings in AutoCAD 2013.
Figure 1-1: Cities, houses, little toy trains — what do you want to draw today?
Here’s one more reason for choosing AutoCAD: You may need to discuss and share your drawings with people who don’t use AutoCAD, such as clients or vendors. Autodesk offers a free service called AutoCAD WS. You simply upload your files to an Autodesk web server and then invite people to access them. Now here’s the cunning part: They don’t need to have AutoCAD or any special plug-ins installed on their computer. Any standard web browser can open your files and perform basic creation, editing, markup, and print-ing functions. Better yet, several people can access the same file at the same time. Everyone can chat, and everyone can see everyone else’s edits and markups at the same time, live, from anywhere in the world. There’s even a free app for iPods and similar portable devices. See Chapter 20 for more details.
The Importance of Being DWG
To take full advantage of AutoCAD in your work environment, you need to be aware of the DWG file format, the format in which AutoCAD saves drawings. Here are some DWG facts to keep in mind:
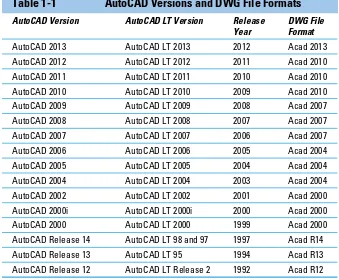
✓ In many cases, an older release of AutoCAD can’t open a DWG file that’s been saved by a newer AutoCAD release. Table 1-1 shows the rela-tionship between AutoCAD versions and their corresponding file formats.
✓ Some previous AutoCAD releases can open files saved by the subse-quent one or two versions. As Table 1-1 shows, the DWG file format changes every three years starting with 2000, so AutoCAD 2013 has a new format.
✓ You can use the Save As option in newer releases to save the file to older DWG formats. In fact, AutoCAD 2013 can save as far back as AutoCAD Release 14, which dates all the way back to 1997! In addition, you can Save As to the simple text-based DXF format back as far as Release 11.
The earlier formats don’t support all the features of the later ones. AutoCAD does its best at translating, but some items may be lost or won’t fully survive a round trip back into a newer release.
Table 1-1 shows which versions (described later in this chapter) use which DWG file formats.
Table 1-1
AutoCAD Versions and DWG File Formats
AutoCAD Version AutoCAD LT Version Release Year
DWG File Format
AutoCAD 2013 AutoCAD LT 2013 2012 Acad 2013
AutoCAD 2012 AutoCAD LT 2012 2011 Acad 2010
AutoCAD 2011 AutoCAD LT 2011 2010 Acad 2010
AutoCAD 2010 AutoCAD LT 2010 2009 Acad 2010
AutoCAD 2009 AutoCAD LT 2009 2008 Acad 2007
AutoCAD 2008 AutoCAD LT 2008 2007 Acad 2007
AutoCAD 2007 AutoCAD LT 2007 2006 Acad 2007
AutoCAD 2006 AutoCAD LT 2006 2005 Acad 2004
AutoCAD 2005 AutoCAD LT 2005 2004 Acad 2004
AutoCAD 2004 AutoCAD LT 2004 2003 Acad 2004
AutoCAD 2002 AutoCAD LT 2002 2001 Acad 2000
AutoCAD 2000i AutoCAD LT 2000i 2000 Acad 2000
AutoCAD 2000 AutoCAD LT 2000 1999 Acad 2000
AutoCAD Release 14 AutoCAD LT 98 and 97 1997 Acad R14
AutoCAD Release 13 AutoCAD LT 95 1994 Acad R13
Working with AutoCAD is easier when your co-workers and colleagues in other companies all use the same release of AutoCAD and AutoCAD-related tools. That way, your DWG files, add-on tools, and even the details of your CAD knowledge can be mixed and matched among your workgroup and part-ners. In the real world, you may work with people, probably from other com-panies, who use AutoCAD releases as old as AutoCAD 2006 — or even older.
Many programs claim to be DWG-compatible — that is, capable of convert-ing data to and from the AutoCAD DWG format. Achievconvert-ing this compatibility is, however, a difficult thing to do well. Even a small error in file conversion can have results ranging in severity from annoying to appalling. Every time you open a drawing file, AutoCAD checks its parentage and warns you if a non-Autodesk program created the drawing. If you exchange DWG files with people who use other CAD programs, you may have to spend time finding and fixing translation problems.
Seeing the LT
AutoCAD LT is one of the best deals around, a shining example of the old 80/20 rule: roughly 80 percent of the capabilities of AutoCAD for roughly 20 percent of the money. (Actually, with recent price creep, it’s now more like a 67/33 rule.) Like AutoCAD, AutoCAD LT runs on mainstream Windows com-puters and doesn’t require any additional hardware devices. With AutoCAD LT, you can be a player in the world of AutoCAD, the world’s leading CAD program, for a comparatively low starting cost.
AutoCAD LT is a very close cousin to AutoCAD. Autodesk creates AutoCAD LT by starting with the AutoCAD program, taking out a few features to justify charging a far lower price, and then adding a couple of features to enhance ease of use versus full AutoCAD. As a result, AutoCAD LT looks and works much like AutoCAD. The drawing areas, the Ribbon, and Application Menu of the two programs are nearly identical. (LT is missing a few Ribbon tabs, panels, and commands.)
In fact, the major difference between the programs has nothing to do with the programs themselves. The major difference is that AutoCAD LT lacks support for most customization and programming languages that are used to develop AutoCAD add-ons. That means that almost none of the add-on programs or utilities offered by Autodesk and others are available to LT users.
Although you may hear claims that AutoCAD LT is easier to master and use than AutoCAD, the truth is that they’re about equally difficult (or easy, depending on your NQ [nerd quotient]). The LT learning curve doesn’t differ significantly from that of AutoCAD, which was originally designed for maxi-mum power and then modified somewhat to improve ease of use. AutoCAD LT shares this same heritage.
Fortunately, the minimal differences between LT and AutoCAD mean that after you climb that learning curve, you have the same great view. You have almost the full range of the AutoCAD 2D drafting tools, and you can exchange DWG files with AutoCAD users without data loss.
This book covers AutoCAD 2013, but most of the information in it (except for the 3D chapters in Part V) applies to AutoCAD LT 2013 as well. The icon that you see to the left of this paragraph highlights significant differences.
Checking System Requirements
If you’re upgrading from AutoCAD 2012 or another recent release and you work mostly or entirely in 2D, you’re probably already current with system requirements. In fact, if your work is mostly or entirely 2D — and therefore, this applies especially for LT users — AutoCAD 2013 will run fine on pretty well any recent computer that will run Windows 7, Vista, or XP.
AutoCAD’s requirements for running in Windows 7 or Vista are substantially higher than for running in XP. This section covers the details.
You should know the following before you upgrade from any older AutoCAD release:
✓ Wash those old Windows: AutoCAD 2013 does not support older ver-sions of Windows, such as Windows 2000, NT, 98, or Me. For AutoCAD 2013, you have three choices of operating system:
• Windows XP (Home or Professional, SP3 or later)
• Windows Vista (Enterprise, Business, Ultimate, or Home Premium, SP2 or later)
• Windows 7 (Enterprise, Ultimate, Professional, or Home Premium) There are 64-bit versions of AutoCAD 2013 and AutoCAD LT 2013 that
✓ Application compatibility: If you use third-party applications with a pre-vious AutoCAD release, they may not work with AutoCAD 2013. AutoCAD applications developed with the .NET or the ObjectARX (AutoCAD Runtime eXtension) interfaces may or may not need to be recompiled. Many LSP (AutoLISP) programs written for the last several versions of AutoCAD should work without change.
Built-in support for VBA (Visual Basic for Applications, a Microsoft pro-gramming language) applications isn’t included in AutoCAD 2013. You can continue to run VBA applications, but you first have to download and install the VBA installer from the Autodesk website. At the time this book went to press, the URL wasn’t finalized; just go to www.autodesk. com and enter VBA installer in the Search box. There are 32- and 64-bit versions, so make sure that you download the right one for your system.
✓ Computer system requirements: For AutoCAD 2013, Autodesk
recom-mends a 1.6 GHz or better Intel or AMD processor with at least 2GB of RAM if it’s running in Windows XP, and a 3.0 GHz or better chip and 2GB of RAM if it’s running in Windows Vista or Windows 7. The recom-mended operating system is Windows 7 (64-bit). Multiple and dual-core processors are supported. You also need a 1024 x 768 or higher display resolution with True Color graphics, 1GB to 2GB of available hard drive space, an Internet connection, and Microsoft Internet Explorer 7 or later.
✓ Additional requirements for working in 3D: AutoCAD recommends
a 3 GHz or better processor; 4GB or more of RAM; a workstation-class, Direct3D-capable graphics card with at least 128MB of memory; and an additional 2GB of hard drive space beyond the 1GB required for installation.
I find even the recommended system requirements to be on the minimal side. For example, between the two of us we run a desktop computer at screen resolutions of 1600 x 1200 and 1280 x 1024 (yes, dual monitors), a tablet com-puter at 1400 x 1050, a desktop at 1280 x 1024, and a laptop at 1920 x 1200. The figures in this book were shot at a resolution of 1024 x 768, and as you can see, things can get pretty crowded at that resolution. The problem is that things like icons and dialog boxes display at a fixed number of pixels, so at lower resolutions, they take up more of the screen.
When you’re running AutoCAD, there is no such thing as too much RAM.
hint at violence and action. For example, the NVIDIA product line contains GeForce and Quadro series. Can you tell which one is the Engineering series? Finally, check the manufacturer’s specifications. They usually spell out quite clearly which is which.
Suddenly, It’s 2013!
There’s been a new release of AutoCAD every spring since AutoCAD 2004 was launched in 2003. That’s not much time for even an army of programmers to deliver a compelling new feature set that’s going to convince all users that they just have to upgrade. What seems to have been happening is a concen-tration on particular areas in recent releases. For example, AutoCAD 2007 was a 3D release; the 3D modeling engine was made much easier to use, but there was relatively little to please the 2D crowd. By contrast, AutoCAD 2008 was deemed to be “the drafter’s release” because of the number of enhance-ments to 2D drawing capabilities — above all, the introduction of annotative documentation objects.
In AutoCAD 2009, the new interface got the lion’s share of development (sud-denly, it’s Office 2007!); major new features were limited to some 3D navi-gation tools, the very useful Quick Properties tool, and a palettized Layer Properties Manager. AutoCAD 2010 offered significant enhancements to both 2D and 3D users, in parametric drafting tools and free-form mesh modeling, and AutoCAD 2011 introduced some workflow changes and a welcome new object property, transparency.
The big news in AutoCAD 2012 was associative arrays. Arrays allow you to very quickly create a repeated pattern of objects, such as building columns or bolt-hole patterns. Previously, they were just multiple copies, but with AutoCAD 2012, they became linked objects. For example, if you edit one item in the array, then all copies of it in the array also update. We cover arrays in more detail in Chapters 11 and 18.
Each new release of AutoCAD typically includes about 200 new or enhanced features. It would take a full chapter just to outline the What’s New guide issued by Autodesk. Rather than listing everything, we just hit the high spots here.
full discussion of this is beyond the scope of this book, but we do introduce 3D in Part V.
Some of the additions, changes, and improvements of interest to us include the following:
✓ Command line: Improvements to displaying and accessing the com-mand history.
✓ Visual previewing: Many editing operations display a preview. For example, you can see what a new color will look like before actually applying the color to the object.
✓ Arrays: Enhancements to the creation and editing of arrays.
2
Le Tour de AutoCAD 2013
In This Chapter
▶ Touring the AutoCAD 2013 screens ▶ Browsing AutoCAD’s menus
▶ Going bar hopping: Title bars, the menu bar, toolbars, and the status bar ▶ Unraveling the Ribbon
▶ Navigating with Bar and Cube ▶ Practicing with palettes ▶ Discovering the drawing area ▶ Using online help
A
utoCAD 2013 is a full-fledged and thoroughly up-to-date member of the Windows world, but if your last kick at the software was AutoCAD 2008, or you’re using Windows XP, or you’ve yet to kick the tires of the Microsoft Office 2007 suite, you may not recognize much in AutoCAD’s newest release. But the title bar says “AutoCAD 2013,” so you must be in the right place!Like the rest of the book, this chapter is written for someone who has used other Windows programs but has little or no experience with AutoCAD. If you
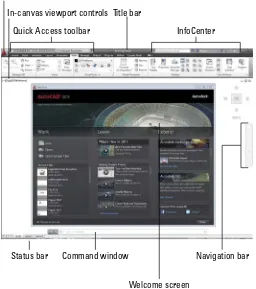
By default, AutoCAD 2013 opens in the Drafting & Annotation workspace, and will continue to do so until you make another workspace current. (We explain workspaces in the section “And They’re Off: AutoCAD’s Opening Screens,” later in this chapter.) If you’ve been away from AutoCAD for a while, right now you may be asking yourself, “Where are my toolbars? Where is my menu bar? Where is the text-only side screen menu (if you have been away for a
long time)?” Unlike older Windows programs, AutoCAD 2013 sports just one toolbar — the Quick Access Toolbar, on the application title bar, right next to the Application button (known informally as the “Big Red A”) — and doesn’t show a menu bar in this environment. Instead, the Drafting & Annotation workspace displays two major interface items:
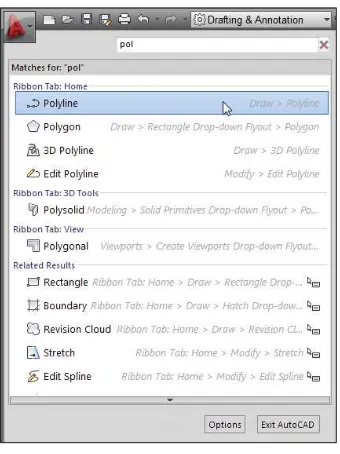
✓ The Application Menu: Clicking the Application button at the top-left corner of the AutoCAD window opens the AutoCAD 2013 Application Menu, which presents file-related commands only; here you can create new drawings, open existing drawings, save files, or print your
masterpieces.
✓ The Ribbon: The Ribbon replaces the menus, toolbars, many of the pal-ettes, and the dashboard of earlier releases. Whereas the Application Menu focuses on file management, the Ribbon is where you find com-mands to create and modify drawing objects. The Autodesk program-mers made a best guess at a task-based approach to drafting and organized the old interface items into panels of related tools.
We discuss both of these items in more detail in the following sections. For the dyed-in-the-wool traditionalists, you can reset the AutoCAD 2013 environ-ment so it looks pretty much like it did in AutoCAD 2008. We show you how in the “Going for that classic look” sidebar, later in this chapter.
AutoCAD Does Windows (And Office)
Whether you’re a total newcomer or an experienced user from a few releases back, we can guarantee that finding your way around AutoCAD 2013 is going to be an interesting experience.
Slick as they are, navigating Ribbon panels and browsing through the Application Menu aren’t always the most efficient way of doing things. When you want to get real work done, you need to combine the Ribbon panels with other methods — especially entering options at the keyboard or choosing them from the right-click menus. We show you how throughout this book.
And They’re Off: AutoCAD’s Opening Screens
In addition to the Drafting & Annotation workspace, a few additional pre-configured workspaces are available from the Workspace Switching button. However, for most of this book, we stick with the out-of-the-box Drafting & Annotation workspace (the exception is Part V, which deals with 3D model-ing), and we recommend you do the same as you read along.
Profiling your display
The illustrations and descriptions in this chap-ter and throughout the book show the default configuration of the AutoCAD 2013 Drafting & Annotation workspace — that is, the way the screen looks if you use the standard version of AutoCAD 2013 (not a flavored version, such as AutoCAD Architecture 2013 or AutoCAD Mechanical 2013) and don’t change any display settings. You can change workspaces by click-ing either the Workspace Switchclick-ing button on the status bar or the Workspace drop-down menu on the Quick Access Toolbar, and then choosing a different workspace from the menu. You can change the appearance of the work-space itself with settings on the Display tab of the Options dialog box (click the Application button, and then click Options at the bottom of the Application Menu) and by dragging toolbars and other screen components.
The main change from AutoCAD’s default set-tings that we make for this book is to config-ure the drawing area background to be white because the figures show up better that way when printed in the book. The default background color in both AutoCAD 2013 and
AutoCAD LT 2013 is dark gray, but many long-time users prefer a pure black background because they believe there’s less glare that way. (This is much less of an issue with LCD flat-panel displays.) You may want to set a black or a white background on your own system or stay with the default gray background — it’s your choice, and there’s no right or wrong way. Some AutoCAD object colors show up better on a light background, and some are better on a black one.
A workspace is a collection of menus, palettes, toolbars, and/or Ribbon panels tailored for specific tasks, such as 3D modeling or 2D drafting.
After you switch workspaces, AutoCAD remembers which one you last used and opens in that one. Four standard workspaces are created when you install AutoCAD 2013 (only two come with AutoCAD LT 2013):
✓ Drafting & Annotation: This workspace (shown in Figure 2-1) is config-ured for a 2D drafting environment, with Ribbon tabs and panels opti-mized for technical drawing in two dimensions.
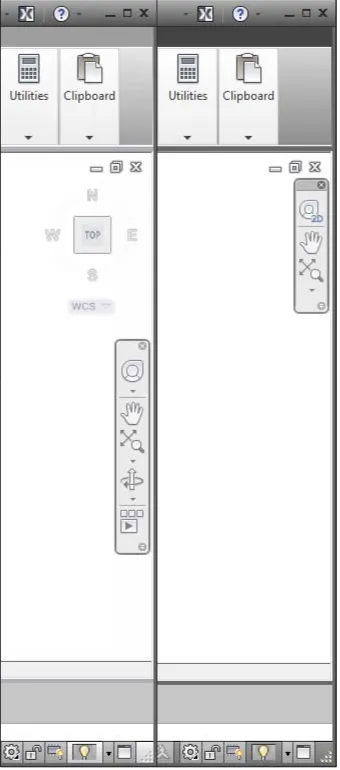
✓ 3D Basics: This workspace is designed to help you get your feet wet with 3D modeling in AutoCAD 2013. It leaves out the Solid, Surface, and Mesh object creation tabs, and provides simplified panels in the other tabs. We cover modeling in 3D in Part V of this book, and there we use (and recommend that you do the same) the full 3D Modeling workspace Ribbon. This workspace isn’t included in AutoCAD LT because LT doesn’t do 3D.
In-canvas viewport controls Application button
Quick Access toolbar
Title bar
Status bar
Welcome screen
Navigation bar Command window
InfoCenter
✓ 3D Modeling: This Ribbon-based workspace is configured for a 3D mod-eling environment, with navigation, visualization, and modmod-eling tools suitable for working in 3D. This workspace isn’t included in AutoCAD LT, either.
✓ AutoCAD Classic: This workspace is configured for a 2D drafting envi-ronment, with toolbars and tool palette arrangements similar to those in AutoCAD 2008 and earlier. In AutoCAD LT, this workspace is called AutoCAD LT Classic.
AutoCAD 2013 added the Welcome screen, as shown in Figure 2-1. It appears when you first launch AutoCAD, and contains a number of quick links to recent drawings, What’s New and Getting Started tutorials, and so on. If (or more likely, when) you begin finding it to be irksome it can be turned off. In fact, if you’re using a computer that belongs to someone else, such as a school or office, you will probably find that it has already been turned off.
Going for that classic look
Like it or not, the Ribbon-based user interface isn’t going away any time soon. We didn’t care for the 2D Drafting & Annotation workspace when it first showed up in AutoCAD 2008, but thanks to the Ribbon, we’re now more or less
sold on it. AutoCAD 2013’s Drafting & Annotation workspace is where we spend most of our time, and that’s what nearly all the figures in this book (including the figure here) show.
Running with Ribbons
Whether you’re running AutoCAD 2013 in Windows 7, Vista, or XP, most of the AutoCAD default screen (refer to Figure 2-1) is pretty different from tradi-tional Windows fare. Yes, you have title bars and a status bar, but the rest of the interface might look foreign. We cover the familiar stuff first.
A hierarchy of title bars
Like most Windows programs, AutoCAD has a title bar at the top of its appli-cation window, which reminds you which program you’re in (not that you’d ever mistake the AutoCAD 2013 window for, say, FreeCell — or even AutoCAD 2008!). After you open a drawing or start a new one, it shows the filename.
✓ On the program’s title bar: At the right side of the program title bar is the standard set of three Windows control buttons: Minimize, Maximize/ Restore, and Close.
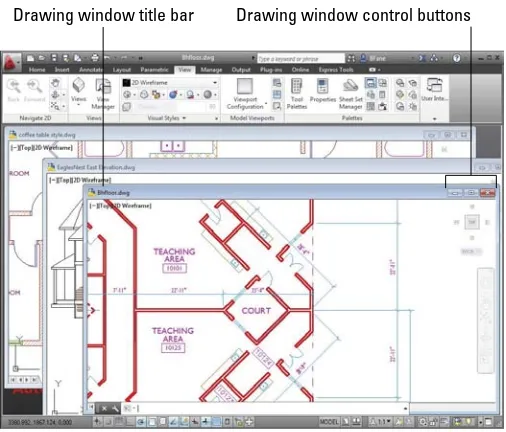
✓ On the file’s title bar: Each nonmaximized drawing window within the AutoCAD program window has its own title bar, as shown in Figure 2-2. You can use the control buttons on a drawing window’s title bar to minimize, maximize/restore, or close that drawing instead of the entire AutoCAD program.
As in other Windows programs, if you maximize a drawing’s window, it expands to fill the entire drawing area. In the AutoCAD 2013 Drafting & Annotation workspace, a maximized drawing window’s control buttons have migrated south, from the menu bar (which isn’t there anymore) to the upper-right corner of the drawing area itself. To un-maximize (restore) the drawing so that you can see any other drawings that you have open, click the lower Restore button.
Unlike the Microsoft Office 2007 suite, which dragged longtime users kicking and screaming into the new Fluent User Interface (except for one of us who went back to Office 2003 with the Microsoft Compatibility Pack), AutoCAD users have the option of staying with the old inter-face. The easiest way to go back to the future is to switch workspaces by using (what else?) the Workspace Switching button on the status bar, or the Workspace drop-down menu on the Quick Access Toolbar. Select AutoCAD Classic, and presto! — this is (almost) your father’s AutoCAD! You end up with a menu bar; some familiar-looking toolbars docked to the top, left,
and right sides of the drawing area; and a float-ing tool palette near the middle of the display.
Drawing window title bar Drawing window control buttons
Figure 2-2: The AutoCAD screen with several windowed drawings in view.
The program title or drawing name is centered in the title bar instead of being off to the left. The AutoCAD title bar also has these couple of devices added to it:
✓ InfoCenter: Located at the right side of the program title bar, this is Information Central for AutoCAD. Type a keyword and then click the binoculars for more information, or sign in to your Autodesk account if you have one. The next two buttons both open the Autodesk Exchange for AutoCAD window. The button that looks like a positive, half-negative X opens the Exchange window home page with links to What’s New videos and the Autodesk Subscription Center (alas, not included in the price of admission). You can download free or inexpensive add-on programs from the Apps page. Clicking the question mark button in the InfoCenter area, as you can probably figure out for yourself, opens the Exchange window Help page.
✓ Quick Access Toolbar: This permanent toolbar (the only one common to all workspaces) contains frequently used commands in an easily accessible location. You can add and remove tool buttons by clicking the down arrow at the right end of the Quick Access Toolbar and select-ing or deselectselect-ing the ones you want to add or remove, respectively. If you’re floundering around looking for the commands you used to be