Sams Teach Yourself Django in 24 Hours by Brad Dayley
Publisher: Sams
Pub Date: February 20, 2008 Print ISBN-10: 0-672-32959-X
Print ISBN-13: 978-0-672-32959-3 eText ISBN-10: 0-7686-8033-6
eText ISBN-13: 978-0-7686-8033-1 Pages: 528
Table of Contents | Index
Overview
In just 24 lessons of one hour or less, you will be able to build full-featured production websites using Django, the powerful web development framework based on Python.
Designed for experienced website developers who have at least some familiarity with the Python programming language, this book uses a straightforward, step-by-step approach. Each lesson builds on the previous ones, enabling you to learn the essentials of implementing the Django framework on a website from the ground up.
Step-by-step instructions carefully walk you through the most common Django tasks.
Q&As, quizzes, and exercises at the end of each lesson help you test your knowledge.
Notes and tips point out shortcuts and solutions. Learn how to…
Cleanly separate data, logic, and view layers
Implement site interfaces with build templates and views Utilize templates and views to store, access, and retrieve data
Use the Django forms library
Define custom tags and filters to minimize coding
Secure sites with registration, authorization, logins, and permissions
Manage sessions and cookies
Implement middleware for request and response handling Create sitemaps to inform search engines of your content Internationalize your site
Optimize performance with caching
Deploy Django in multiple configurations
Maintain sites with Django's administrator interface Introduction 1
Part I: Creating the Website Framework Hour 1: Understanding Django 7
Hour 2: Creating Your First Website 19
Hour 3: Adding Models and Objects to Your Website 37 Hour 4: Creating the Initial Views 63
Hour 7: Implementing Django Templates to Create Custom Views 117
Hour 8: Using Built-in Template Tags to Enhance Views 139 Hour 9: Using Built-in Template Filters to Enhance Views 155 Hour 10: Adding Forms to Views 185
Hour 11: Using Views to Add and Update Data in the Database 209
Hour 12: Utilizing Generic Views 231
Hour 13: Advanced View Configurations 269
Part III: Implementing a Full-Featured Website Hour 14: Managing Site Users 295
Hour 15: Adding Website Security 313
Hour 16: Managing Sessions and Cookies 333
Hour 17: Customizing Models in the Admin Interface 347 Hour 18: Customizing the Admin Interface 365
Part IV: Implementing Advanced Website Components Hour 19: Implementing Middleware 383
Hour 20: Internationalization and Localization 407 Hour 21: Creating Sitemaps 423
Hour 22: Implementing Multiple Websites 437 Hour 23: Configuring Caching 451
Hour 24: Deploying Django 465 Appendixes
Sams Teach Yourself Django in 24 Hours by Brad Dayley
Publisher: Sams
Pub Date: February 20, 2008 Print ISBN-10: 0-672-32959-X
Print ISBN-13: 978-0-672-32959-3 eText ISBN-10: 0-7686-8033-6
eText ISBN-13: 978-0-7686-8033-1 Pages: 528
Table of Contents | Index
Copyright
About the Author Acknowledgments
We Want to Hear from You! Reader Services
Introduction
Who Should Read This Book How This Book Is Organized How to Use This Book
Part I: Creating the Website Framework Hour 1. Understanding Django
What Is Django? Why Use Django? Understanding Models Understanding Views Understanding Templates
Configuring the settings.py File Using the manage.py Utility
Installing Django Summary
Q&A
Workshop Exercises
Hour 2. Creating Your First Website Creating a Django Project
Starting the Development Server Configuring the Database
Installing an Application Adding Data Using the API Setting Up the URLConf File Creating a Simple View Summary
Q&A
Workshop Exercises
Hour 3. Adding Models and Objects to Your Website Installing the Admin Interface Model
Updating the URLconf File to Allow Admin Access Activating the Model in the Admin Interface
Adding, Modifying, and Viewing Objects in the Admin Interface
Hour 4. Creating the Initial Views Setting Up the URLconf File
Configuring the URL Patterns
Adding URL-Based Arguments to the Views Summary
Q&A
Workshop Exercises
Part II: Implementing the Website Interface
Hour 5. Using Data from the Database in Views Adding Data to the Database
Accessing Data in the Database Modifying Data in the Database Performing Queries in the Database Adding Data in a Model to a View Summary
Q&A
Workshop Exercises
Hour 6. Configuring Web Page Views Passing Extra Options to a View Using View Prefixes
Using Additional URLconf Files Calling the View Functions Directly Summary
Q&A
Workshop Exercises
Hour 7. Implementing Django Templates to Create Custom Views
Configuring the Template Directory Creating a Template
Embedding Templates Summary
Q&A
Workshop Exercises
Hour 8. Using Built-in Template Tags to Enhance Views Implementing Loops
Implementing if Logic
Adding Links with the url Tag
Reducing Code Using the with Tag Adding Cycle Logic to Tables
Summary Q&A
Workshop Exercises
Hour 9. Using Built-in Template Filters to Enhance Views Understanding Filters
Hour 10. Adding Forms to Views Creating Form Instances
Rendering Forms as HTML Rendering Forms from Models Customizing Forms
Q&A
Workshop Exercises
Hour 11. Using Views to Add and Update Data in the Database
Handling GET and POST Requests
Validating Data from a POST Against the Model Updating Data in the Database
Adding Data to the Database Summary
Q&A
Workshop Exercises
Hour 12. Utilizing Generic Views Understanding Generic Views Using Simple Generic Views
Displaying an Object List in a Generic View Displaying Object Details in a Generic View
Displaying Date-Based Objects in a Generic View Using Generic Object-Creation Views
Using Generic Object-Update Views Using Generic Object-Deletion Views Summary
Q&A
Workshop Exercises
Hour 13. Advanced View Configurations Loading Templates from Applications Extending the Template System
Understanding How to Use RequestContexts in Templates Summary
Q&A
Workshop Exercises
Part III: Implementing a Full-Featured Website Hour 14. Managing Site Users
Adding Users
Hour 15. Adding Website Security Implementing User Logins Adding Logout Functionality Verifying Authentication Verifying Permissions
Limiting Access to Generic Views Summary
Q&A
Workshop Exercises
Hour 16. Managing Sessions and Cookies
Understanding Django's Session Framework Configuring the Session Manager
Using Django's Test Cookies
Setting and Retrieving Session Data Setting and Retrieving Cookies
Workshop Exercises
Hour 17. Customizing Models in the Admin Interface Customizing the Model Change List
Customizing the Model Form Viewing Multiple Models Inline Summary
Q&A
Workshop Exercises
Hour 18. Customizing the Admin Interface
Overriding Admin Templates at the Site Level Creating Custom Admin Views
Overriding the Admin Templates at the Application or Object Level
Overriding Block Tags in a Custom Admin Template Overriding the Built-in Admin Views in the URLconf File Summary
Q&A
Workshop Exercises
Part IV: Implementing Advanced Website Components Hour 19. Implementing Middleware
Installing Middleware
Implementing Middleware Applications Implementing a Request Preprocessor Implementing a View Preprocessor
Implementing a Response Postprocessor Implementing an Exception Postprocessor Django's Built-in Middleware
Workshop Exercises
Hour 20. Internationalization and Localization Localizing Strings in Python
Localizing Strings in Templates Creating Language Files
Hour 21. Creating Sitemaps Creating a Sitemap
Creating a Sitemap of Generic Views Creating a Sitemap Index
Pinging Google Summary
Q&A
Workshop Exercises
Hour 22. Implementing Multiple Websites Implementing the sites Framework Using the CurrentSiteManager Class Summary
Q&A
Workshop Exercises
Implementing a Per-Object Cache
Hour 24. Deploying Django
Deploying Django to Apache with mod_python Other Deployment Configurations
Appendix A. Django Resources Django
Python
Python Imaging Library (PIL) Apache
Widget Objects
Form Field to Model Field Mapping Appendix C. Formatting Dates and Times Try It Yourself
Copyright
Sams Teach Yourself Django in 24 Hours Copyright © 2008 by Sams Publishing
All rights reserved. No part of this book shall be reproduced, stored in a retrieval system, or transmitted by any means, electronic, mechanical, photocopying, recording, or otherwise, without written permission from the publisher. No patent
liability is assumed with respect to the use of the information contained herein. Although every precaution has been taken in the preparation of this book, the publisher and author assume no responsibility for errors or omissions. Nor is any liability assumed for damages resulting from the use of the information contained herein.
ISBN-13: 978-0-672-32959-3
Library of Congress Cataloging-in-Publication Data: Dayley, Brad.
Sams teach yourself Django in 24 hours / Brad Dayley. p. cm.
ISBN 978-0-672-32959-3 (pbk.)
1. Web site development. 2. Django (Electronic resource) 3. Python (Computer program language) I. Title. TK5105.888.D397 2008
006.7'6—dc22
2008001956 Printed in the United States of America
First Printing January 2008 Editor-in-Chief
Mark Taub
Managing Editor
All terms mentioned in this book that are known to be trademarks or service marks have been appropriately
capitalized. Sams Publishing cannot attest to the accuracy of this information. Use of a term in this book should not be regarded as affecting the validity of any trademark or service mark.
Every effort has been made to make this book as complete and accurate as possible, but no warranty or fitness is implied. The information provided is on an "as is" basis. The author and the publisher shall have neither liability nor responsibility to any person or entity with respect to any loss or damages arising from the information contained in this book or from the use of the CD or programs accompanying it.
Bulk Sales
Sams Publishing offers excellent discounts on this book when ordered in quantity for bulk purchases or special sales. For more information, please contact
U.S. Corporate and Government Sales 1-800-382-3419
For sales outside of the U.S., please contact International Sales
Dedication
About the Author
Brad Dayley is a senior software engineer in Novell's Product Development Group. He has 16 years of experience in
Acknowledgments
My sincere gratitude goes out to the following persons, without whom this book could not have happened:
My wife, who provides the inspiration and strength behind everything I do. Thank you for being everything for me. My friends, who force me to be more intelligent and creative than I necessarily would like to be.
My editors, who made the book readable, technically accurate, and kept me on track. It seems that nothing gets by you.
We Want to Hear from You!
As the reader of this book, you are our most important critic and commentator. We value your opinion, and we want to know what we're doing right, what we could do better, what areas you'd like to see us publish in, and any other words of wisdom you're willing to pass our way.
You can email or write us directly to let us know what you did or didn't like about this book—as well as what we can do to make our books stronger.
Please note that we cannot help you with technical problems related to the topic of this book, and that we might not be able to reply to every message.
When you write, please be sure to include this book's title and author, as well as your name and phone number or email
address.
E-mail: [email protected]
Mail: Sams Publishing 800 East 96th Street
Reader Services
Visit our website and register this book at informit.com/register
Introduction
I have been working with the Django framework for about a year and a half, and I love it. Every so often you run into ideas that make absolute, complete sense, and Django is one of those. The folks at Django seem to be bent on making it the most elegant web framework available, and so far they are doing a great job.
This was a tough book to write. The Django framework is simple to implement, but you can accomplish so much with it. The
format of this book is Teach Yourself in 24 Hours. The idea is that after spending 24 hours with this book and a Django installation, you should have a pretty good idea of how to use Django to build a full-featured production website.
Throughout this book, I use a fictitious website project called iFriends to illustrate the building blocks of a Django-powered website. The book has several "Try It Yourself" sections that take you through specific tasks of building the iFriends website. Actually do the "Try It Yourself" sections. They will help
everything else make a lot more sense. They build on each other, so if you skip one, future "Try It Yourself" sections may not work properly.
When you have finished the "Try It Yourself" sections, you will have a mostly functional website. You should easily have
enough skills by then that you could tweak and finish the
website on your own in only a few hours if you wanted to. There just wasn't enough room in the book to finish every component. I felt it was much more important to cover the topics that I did. I do have one disclaimer: There is absolutely no CSS code in my HTML template examples. I would much rather have used CSS code to format my HTML templates than the classic HTML tags (some of them deprecated) that I used. I chose not to
bit more room, which I didn't have. The second reason is that this book is designed for Python programmers as well as HTML programmers. Using CSS for someone who is not as familiar with it could provide a distraction. This book is about learning to implement the Django framework. CSS programming
techniques belong in a different book.
When designing the content for this book, I tried to come up with the most relevant way to present the Django framework that will actually help programmers develop websites that are pertinent to real-world needs. I know that a few components and concepts have been left out. I welcome your comments and any suggestions on things that you feel need to be added to this book. If I get a chance, I will try to incorporate them into future revisions of the book. You can email any queries or suggestions to [email protected].
I hope you enjoy the Django framework as much as I have and that the concepts in this book prove useful to you.
Who Should Read This Book
This book should be read by anyone who is developing or even considering developing websites. The Django framework saves web developers a lot of time and headaches. This book is
designed for website developers who have at least some
familiarity with the Python programming language. Don't worry if you are not very familiar with Python. You should be able to pick up on what is going on with a few visits to
How This Book Is Organized
This book is organized into four parts that help you quickly navigate the Django framework so that you will have the knowledge necessary to leverage the framework to build
production websites. I tried to design the book to start slowly so that you will be able to build a good foundation for the
Django framework. Then, as the hours (chapters) progress, the book delves deeper into different aspects of the Django
framework.
Part I, "Creating the Website Framework," covers the basics of installing, configuring, and using the Django framework to build basic websites. You are introduced to the model, template, and view concepts that Django uses to implement websites.
Part II, "Implementing the Website Interface," covers building templates and views to build web pages. You will learn how to use templates and views to store, access, and retrieve data that is stored in the website's database.
Part III, "Implementing a Full-Featured Website," covers adding authentication, cookie handling, and other features necessary to implement a full production website. You will learn how to create users and groups and how to assign permissions to specific data.
How to Use This Book
The Teach Yourself in 24 Hours series has several unique elements that will help you as you are trying to learn the Django framework. Throughout the book, I use the following elements to draw attention to specific concepts:
Did you Know?
This element provides information about slightly off-topic tangents that may be beneficial to you but that are not necessarily directly related to the current section.
By the Way
This element provides information that is directly related to the current section but that does not necessarily flow with the text. It discusses what is happening in the background or points that you may not easily pick up on but that are important.
Watch Out!
This element notes important things that you need to know before proceeding through the book. It is
important to read these sections to avoid problems with your website.
practice the concepts.
At the end of each hour, you will find the following sections that are designed to help you solidify what you have read:
The "Q&A" section poses questions and gives answers on concepts that are related to the hour but that fall outside what is covered in the book.
The "Quiz" section provides questions and answers about the topics covered in each hour.
Part I: Creating the Website Framework
HOUR 1 Understanding Django
HOUR 2 Creating Your First Website
HOUR 3 Adding Models and Objects to Your Website
Hour 1. Understanding Django
What You'll Learn in This Hour
What the Django framework is, and why you should use it
How Django uses models to define data
How Django uses Python functions to build views How Django implements templates
Where to configure Django projects How to use the manage.py utility
What views are available in the admin interface How to install Django
Designing and implementing websites can be fun and
rewarding; however, it can also be stressful and demanding. Django is one of the best frameworks available to quickly
develop full-featured production websites. Django is flexible and makes it easy to design a website that can be easily updated and expanded. As soon as you have learned the Django
framework, you will be able to speed up design, implementation, and maintenance of your websites.
The purpose of this hour is to introduce you to the Django framework and give you a basic understanding of the
architecture. The rest of the hours in this book provide the in-depth details you need to implement a full-featured production website using Django.
including models, views, and templates. We will also cover the utilities that you will use to configure and manage your Django projects. Then we will give you a brief overview of the admin interface that you can use to create and modify objects in your Django projects. Finally, we discuss how to install Django.
What Is Django?
Django is a high-level web framework that simplifies website development. As a high-level web framework, Django abstracts much of the web development process, allowing developers to quickly implement database-backed websites using dynamic web pages.
Did you Know?
Django is pronounced "JAN-go" with the "D" silent.
By dynamic, we mean web pages that are built on-the-fly using data from the browser request, URL, and a database. Dynamic pages solve several different problems. The biggest problem they solve is trying to maintain numerous static pages scattered all over a classic website.
Django implements a Model View Controller (MVC) architecture to separate the data, logic, and view layers in website
Why Use Django?
The biggest reason to use Django is that it's easy to set up a production website in no time at all. As soon as you have
learned how to use Django to build websites, you will be able to implement basic websites in a matter of hours.
Understanding Models
Django implements a Python class, django.db.models.Model, to define data models that will be used in a website. A data model is a set of definitions that define the attributes of objects that will be stored in the database. When you build your
website, you create a subclass of the Model class and add
Field members to that class to define specific data. Django's model interface provides a full-featured selection of field types that make it easy to define each model.
Understanding Views
Rendering a view from an URL request is a multistep process in Django. When a Django server receives an URL request, it
parses the URL and, using a set of previously defined patterns, determines which Python code should render the view.
The way it works is that as you design your website, you write Python functions that will build and render web pages. For each Python function, you define at least one URL pattern that will link a specific URL to that view function. The Django framework receives the URL request, handing the request to the view
Understanding Templates
Django also provides a robust template parser that allows you to build templates that the view functions can use to build response web pages. This allows your Python developers to focus on building the data that should be displayed and allows your HTML programmers to focus on designing the web pages. We will discuss templates much more starting in Hour 7,
Configuring the
settings.py
File
Most of the website configuration that you need to implement is done in the settings.py file. When you create a new project, Django automatically adds the settings.py file to the project's root directory. The settings.py file contains the configuration for databases, installed applications, and numerous other
configuration settings. The Django framework relies heavily on the settings.py file to define all kinds of behavior.
You can also use the settings.py file to set your own global settings for the website. You can access this file as an object from within Python code in your projects. To access the
settings.py file, import the settings object, as shown in the following example:
from django.conf import settings.py if settings.MY_CUSTOM_SETTING:
#perform custom work
Watch Out!
Do not try to modify settings in the settings.py file on-the-fly from Python code in your project. This can have unexpected (bad) results.
Throughout this book, we will discuss several different settings that you need to make in the settings.py file. You can find more information about the settings.py options at
Using the
manage.py
Utility
Another file that is automatically installed in each project you create is the manage.py utility. The manage.py utility is actually a wrapper to an application called django-admin.py that needs to be located somewhere in the PYTHONPATH.
The manage.py utility is used to perform all kinds of
development, administration, and testing tasks. The best way to describe the manage.py utility is to list some of the commands you can implement:
startproject creates a new Django project. A directory is created for the project that includes the initial files.
startapp creates a new application in a Django project. A directory is created for the application that includes the initial files.
syncdb synchronizes data from project models to the SQL database.
runserver starts the development server.
shell launches a Python interpreter shell that has access to the Django project, including the database.
dbshell launches an SQL command-line client for the database.
Usually the manage.py utility should be used from the root of your Django project. We will discuss using the manage.py utility for various tasks throughout this book. You can find more
information about the manage.py utility at
Understanding the Django Development
Server
Django comes with a lightweight development HTTP server that you can use to test your website while you are developing it. The great thing about the development server is that it is just there. After you install Django, you don't need to spend time trying to hook it into some other web server to test your code. The development server works well for testing and uses few system resources. It should give you all the functionality you need to test your website.
Start the development server using the following command at the root of your Django project:
python manage.py runserver
By the Way
Understanding the Admin Interface
One of the best features of Django is that it comes with a full-featured, attractive admin interface that you can use to
maintain websites. The admin interface lets you create, view, and modify data in your database models from an administrator perspective.
The three main views that you deal with in the admin interface are the main or model view, the change list view, and the form view. The following sections briefly describe each of these views to give you an initial feel for the admin interface. We will
discuss the admin interface more in Hours 2, 3, 17, and 18.
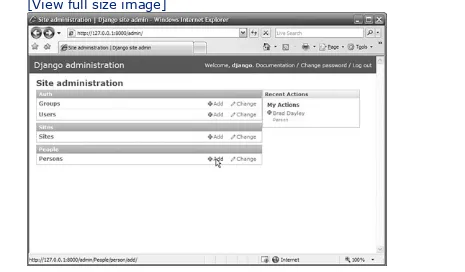
Admin Model View
The admin model view is the main view that is displayed when you access the admin interface. You can see the model view by typing the URL /admin/ into a browser:
http://127.0.0.1:8000/admin/
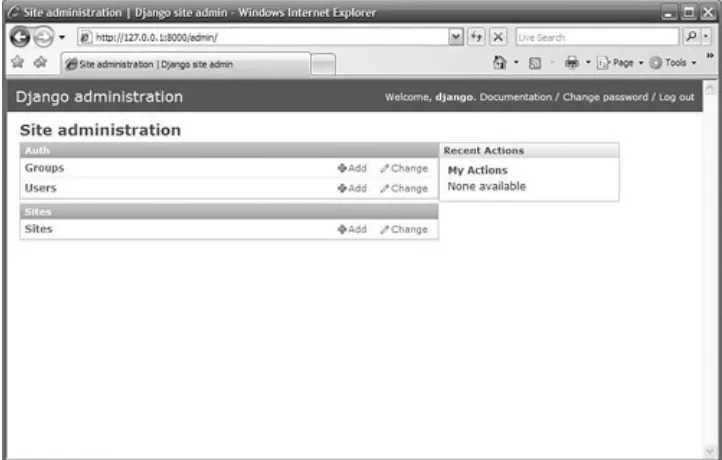
The model view displays a list of the models that are currently installed in the admin interface for the project. From the model view, click the Add or Change link to the right of each model, as shown in Figure 1.1, to access the add form or change list view.
Figure 1.1. The model view in the admin interface.
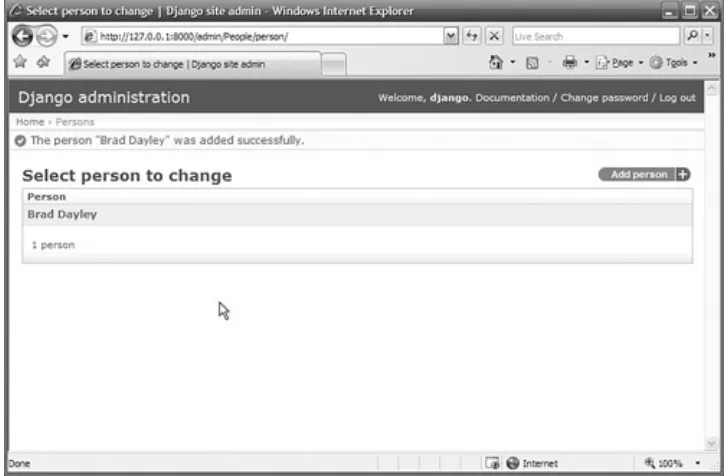
Admin Change List View
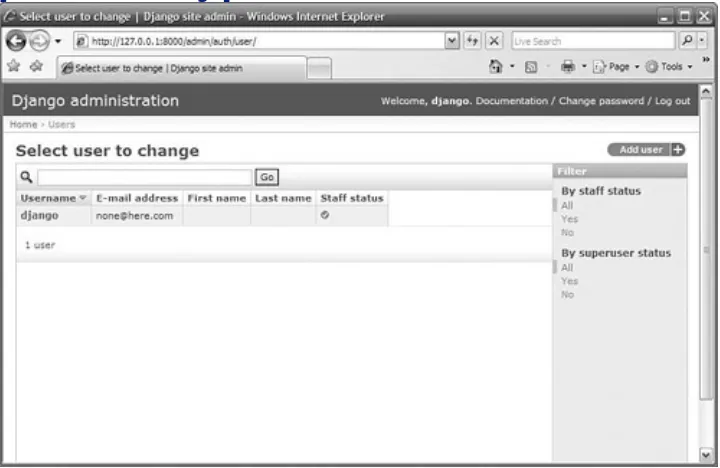
The admin change list view displays a list of objects that
currently exist in a specific model. You can access the change list view for a model by clicking the Change link next to the model in the model view, as shown in Figure 1.1. You can see the change list view by typing the URL
/admin/application/model into a browser:
http://127.0.0.1:8000/admin/auth/user
From the change list view, you can filter the list of objects using items in the filter list or by typing text into the search box. You can also sort the items in the list in ascending or descending order by clicking one of the headings in the list. You can add new objects to the list and, subsequently, the database as well by clicking the Add user link in the upper right corner of the change list view, as shown in Figure 1.2.
[View full size image]
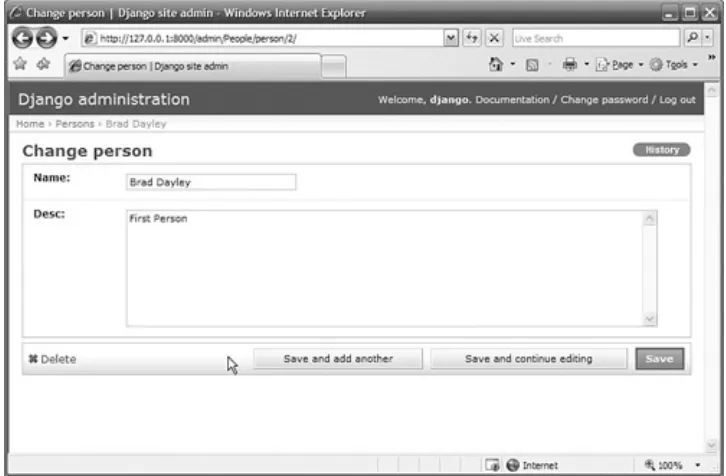
Admin Form View
There are two different admin form views: the change form and the add form. The change form view, shown in Figure 1.3,
displays the details of an object that currently exists in the database. You can access the change form by clicking one of the objects displayed in the change list, shown in Figure 1.2. You can see the change form for a specific object by typing the URL /admin/application/model/object-id into a browser:
http://127.0.0.1:8000/admin/auth/user/1/
Figure 1.3. The change form view in the admin interface.
Any changes you make in the change form are saved to the database when you click the Save button.
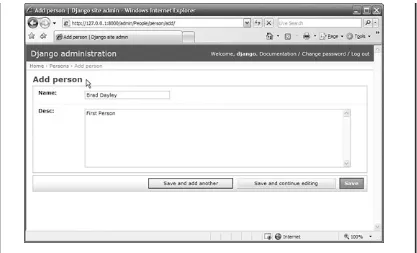
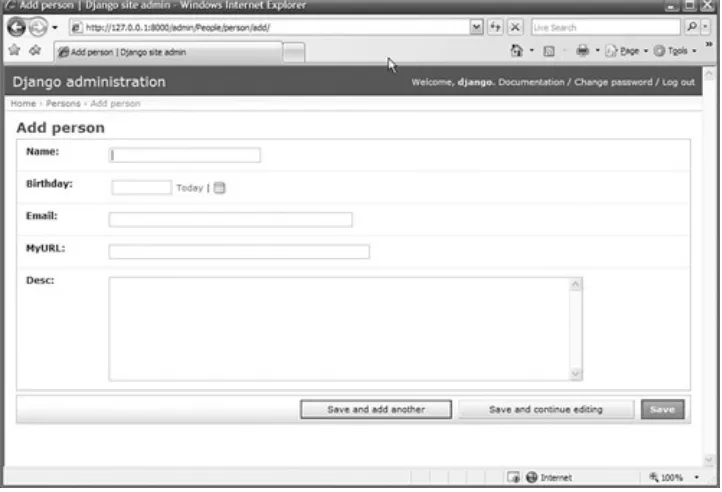
The add form is basically the same as the change form, except that it represents a new object that doesn't exist in the
database. You can add data to the form, and then a new object is created.
You can get to the add form by clicking the Add link in the model view, shown in Figure 1.1, or the Add user link in the change list view, shown in Figure 1.2. You can see the add form for a specific object by typing the URL
/admin/application/model/add in a browser:
Installing Django
Django can easily be installed on a Linux, Mac, or Windows server. The only prerequisite is that Python 2.3 or higher must already be installed. You can find information about installing Python at http://www.python.org/download/.
An SQL database isn't required to install Django. However, you will want to install one before you begin creating Django
projects. You may need to install additional Python modules to support the database, depending on which database you
choose. Django supports the MySQL, Postgre SQL, SQLite3, Oracle, and Microsoft SQL database backends. In this book, the examples will be based on the MySQL database.
At this time, you can install Django in two different ways. You can install an official release, or you can download the
development version. To download the development version, you will need to install the Subversion version control system from the following website:
http://subversion.tigris.org/
The folks at the Django project are making a lot of great
changes all the time, so you may want to use the development version if you want to implement the latest feature set.
However, if you are developing a production website, you will want to use the released version.
Django should typically be installed in the site-packages directory of the Python installation. For example, if Python is installed in /Python25, then Django would be installed in the following location:
/Python25/Lib/site-packages/django
steps of installing Django using each of these methods. By the Way
Some Linux distributions now provide versions of Django integrated with their package management system. You can find a list of those third parties at the following URL:
Try It Yourself: Install the Released Version of
Django
This section describes the steps to install the released version of Django. Follow these steps to download and install the Django tarball file:
1. Install Python 2.3 or later.
2. Download the Django tarball from the following location:
http://www.djangoproject.com/download
3. Use the following command to extract the tarball:
tar xzvf Django-
version
.tar.gz
4. Change the directory to the Django directory created by extracting the tarball:
cd Django-
version
5. Use the following command to install Django (you need to use the sudo command on Linux so that Django gets installed as the super user):
python setup.py install
6. Start a Python interpreter.
7. Use the following command to verify that Django is installed:
Try It Yourself: Install the Development Version of Django
This section describes the steps to install the development version of Django. Follow these steps to download and install the Django tarball file:
1.Install Python 2.3 or later. 2.Install Subversion.
3.Check out the Django trunk using the following Subversion command:
svn co http://code.djangoproject.com/svn/django/trunk django_src
4.Either copy the django_src/django directory, or create a symbolic link to that directory in the Python site-packages directory to place Django in the Python path.
5.Copy django/bin/django-admin.py somewhere in the system path.
By the Way
You don't need to run
setup.py
because it does what was done in
steps 4 and 5.
6.Start a Python interpreter.
7.Use the following command to verify that Django is installed:
Summary
This hour discussed the basic architecture of the Django
framework, including models, views, and templates. Then we discussed configuring Django in the settings.py file and some of the project commands you can run using the manage.py utility.
Q&A
Q.Does Django have to be placed in the site-packages directory?
A.No. It just needs to be somewhere in the Python path. You could also manually add the Django directory to the Python path by editing the
PYTHONPATH environment setting.
Q.Where can I find information about backward-compatibility issues?
A.Go to
Workshop
The workshop consists of a set of questions and answers
designed to solidify your understanding of the material covered in this hour. Try answering the questions before looking at the answers.
Quiz
1.Which file is used to configure Django projects?
2.Which utility would you use to install new applications to a Django project?
3.Where can you go to create new objects in your website?
Quiz Answers
1.The settings.py file.
2.The manage.py utility.
Exercises
1.Install Python 2.3 or higher. Verify that you can access the python interpreter from a console prompt by issuing the following command:
python
2.Install a Django supported SQL database. The examples in this book use the MySQL database, however, Postgre or any of the others will work as well. Appendix A, "Django Resources," lists links that you can use to get download and installation instructions for each database.
3.Download Django and install it. Make certain that you can import the Django framework into a Python interpreter using the following command in the Python interpreter:
Hour 2. Creating Your First Website
What You'll Learn in This Hour
How to begin creating a Django project
How to start and stop the built-in web server The steps to configure Django to access the database
How to create and install an application
The steps to apply a model to an application The steps to activate a model in Django
How to configure Django to accept specific URL requests
How to create a simple view for a web browser
In Hour 1, "Understanding Django," you learned some of the basics about the Django framework. This hour guides you through the steps of creating a functional website called
iFriends. Although this website will be basic, it will be the basis for future hours to build on as you are guided through the
various aspects of the Django framework.
Creating a Django Project
Let's begin the process of creating a working website by creating a Django project. A Django project is a collection of settings that define a specific instance of Django. These settings include things such as database configuration, URL
Try It Yourself: Create Your First Django Project
Creating a Django project is relatively simple to do from the command prompt. In this section, you create a project called iFriends.
1.From a command prompt, change to the directory where you want to store the code for the iFriends project.
2.Create a directory called iFriends. This will be the root directory for the iFriends project.
3.Change to the iFriends directory.
4.Type the following command to create the iFriends project:
python django-admin.py startproject iFriends
Watch Out!
Because the project will act as a Python package, avoid using a project name that conflicts with any existing in Python packages. The documentation for built-in Python packages can be found at
http://www.python.org.
By the Way
There is no need to put your project code in a directory in the web server's document base. The Django
somewhere outside the web server's root. That way your code will be protected from being accessed directly from a web browser.
The startproject command first creates a directory called iFriends, and then it stores the basic set of Python files that are needed to begin the project in the iFriends directory. The
startproject command creates the following files:
__init__.py is an empty file that tells Python that the website directory should be treated as a Python package.
manage.py is the command-line utility that allows the administrator to start and manage the Django project.
settings.py is the configuration file that controls the behavior of the Django project.
urls.py is a Python file that defines the syntax and configures the behavior of the URLs that will be used to access the website.
The basic purpose of these files is to set up a Python package that Django can use to define the website's structure and
Starting the Development Server
After you have created the Django project, you should be able to start the development server to test it. The development server is a lightweight web server that is included with the Django project. It lets you develop and test your website without having to deal with all the configuration and
Try It Yourself: Start the Development Server
In this section, you learn how to start the development server.
1. From a command prompt, change to the root directory for the iFriends project.
2. Enter the following command to start the development server, as shown in Figure 2.1:
python manage.py runserver
Figure 2.1. Starting the development
server from a command line.
[View full size image]
By the Way
earlier in this hour. The manage.py utility first validates the project and reports any errors. If no critical errors are encountered, you are notified that the development sever is running at http://127.0.0.1:8000/.
3.
Verify that the development server is working properly by opening a web browser and entering the following address:
http://127.0.0.1:8000/
If the development server starts properly (and you haven't changed the debug setting), you should see a page similar to the one shown in Figure 2.2.
Figure 2.2. Initial browser view of a Django website.
[View full size image]
By the Way
You can tell the development server to use a different port than 8000 if that port is already being used by adding the port to the command line. The following example shows the syntax for configuring the
manage.py runserver 8008
Did you Know?
Configuring the Database
After you have verified that you can start and stop the development server, it is time to configure access to the database. This section takes you through the process of creating and configuring access to the database that will be used in the sample project.
By the Way
Django can dynamically serve web pages without using a database to store information. However, one of the best aspects of Django is its ability to implement database-backed websites.
Configuring the database involves three major steps. The first is to create the database and assign rights. The second is to
modify the settings.py file to specify the database type, name, location, and access credentials. The third step is to synchronize the Django project with the database to create the initial tables necessary for the Django engine.
Django supports several different types of database engines. The project used in this book uses a MySQL database. This section assumes that you have already installed, configured, and started a database engine and that it is accessible from the development server.
Watch Out!
The MySQL database does not allow you to use case sensitive names when creating tables. If you want to define objects in your project that have uppercase characters, then you will need to turn off case sensitivity in the Django framework by using the following setting in the <django installation
Try It Yourself: Create the Database and Grant Rights
This section takes you through the steps of creating the database, creating an admin user, and granting rights from your SQL database command
console. You will also modify the uses_case_insensitive_names the Django framework so that you can name objects with uppercase characters. This step will be critical for some of the other Try it Yourself sections.
1.From your SQL database command console, enter the following command to create a database called iFriends:
CREATE DATABASE iFriendsDB;
2.Enter the following command to begin using the iFriends database:
USE iFriendsDB;
3.Enter the following command to create an administrative user named dAdmin with a password called test:
CREATE USER 'dAdmin'@'localhost' IDENTIFIED BY 'test';
4.Enter the following command to grant all rights on the iFriends database to the dAdmin user:
By the Way
If your database engine has a graphical interface that
allows you to manage databases and users, you can use
that interface as well to create the database and admin
user and to assign rights.
5.Open the <django installation
path>/django/db/backends/__init__.py file in an editor.
6.Add the following setting to the file to disable case sensitivity for the MySQL database:
uses_case_insensitive_names = True
7.Save the __init__.py file.
Configuring Database Access in
settings.py
After the database has been created and a user account set up for Django, you need to configure the settings.py file in your Django project to access that database. Each Django project has its own settings.py file. The settings.py file is a Python script that configures various project settings.
Django uses the following settings in the settings.py file to control access to the database:
DATABASE_ENGINE is the type of database engine. Django accepts postgresql_psycopg2, postgresql, mysql,
DATABASE_NAME is the name of the database. For SQLite, you need to specify the full path.
DATABASE_USER is the user account to use when connecting to the database. No user is used with SQLite.
DATABASE_PASSWORD is the password for DATABASE_USER. No password is used with SQLite.
DATABASE_HOST is the host on which the database is stored. This can be left empty for localhost. No host is specified with SQLite.
Try It Yourself: Configure Django to Access the
iFriends Database
The following section takes you through the steps to modify the settings in the settings.py file for the database and user created in the preceding section (a MySQL database named iFriendsDB, and a username of dAdmin with a password of test running on the localhost and default port). Open the iFriends\settings.py file in a text editor.
1. Find the DATABASE_ENGINE setting, and change the value to the following:
DATABASE_ENGINE = 'mysql'
By the Way
If you have elected to use an SQL
database other than MySQL, you need
to use that database type here instead
of
mysql
.
2. Change the value of the DATABASE_NAME setting to the following:
DATABASE_NAME = 'iFriendsDB'
DATABASE_USER = 'dAdmin'
4. Change the value of the DATABASE_PASSWORD setting to the following:
DATABASE_PASSWORD = 'test'
5. Verify that the DATABASE_HOST and DATABASE_PORT settings have no value:
DATABASE_HOST = ''
DATABASE_PORT = ''
By the Way
When the
DATABASE_HOST
and
DATABASE_PORT
settings are left blank,
they default to the localhost and
default port. If the database is on a
remote server or is running on a
nondefault port, these options need to
be set accordingly.
After you have configured access to the database in the
settings.py file, you can synchronize your project to the database. Django's synchronization process creates the tables necessary in the database to support your project.
The tables are created based on what applications are specified in the INSTALLED_APPS setting of the settings.py file. The following are the default settings already specified in the
INSTALLED_APPS setting:
INSTALLED_APPS = (
'django.contrib.auth',
'django.contrib.contenttypes', 'django.contrib.sessions',
'django.contrib.sites', )
The following list describes the default applications that get installed in the Django project:
django.contrib.auth is the default authentication system included with Django.
django.contrib.contenttypes is the framework of types of content.
django.contrib.sessions is the framework used to manage sessions.
Try It Yourself: Synchronize the iFriends Project
to the iFriends Database
This section guides you through the steps to synchronize the Django project to the database. During the process, Django creates the default tables and prompts you to input the name, email address, and password for a website administration account. The username and password you specify allow you to access the Django authentication system.
1. Make certain that the development server has stopped by pressing Ctrl+Break from the console prompt.
2. Change to the root directory of the iFriends project. 3. Enter the following command at the console prompt
to begin the synchronization, as shown in Figure 2.3:
python manage.py syncdb
Figure 2.3. Synchronizing the initial
Django project with the database from a
command line.
4.
At the prompt, enter a username for the website administrator's account.
5.
At the prompt, enter a password for the website administrator's account.
Installing an Application
Try It Yourself: Create Your First Application
The first application you will create is an application called People, which will be used to keep track of the individuals who use the website.
1. From a console prompt, change to the root directory of the iFriends project.
2. Enter the following command to create a blank application called People:
python manage.py startapp People
The startapp command creates a People directory within the iFriends directory and then populates it with the following files:
__init__.py is a necessary file for the application to be used as a Python package.
models.py contains the Python code that defines the model.
views.py contains the Python code that defines the views for the model.
The files in the application directory define how information for the application will be stored and accessed in the database. They also define how
Creating a Model
After the application has been created, you need to create a model for the data that will be stored in the application. A model is simply a definition of the classes, attributes, and relationships of objects in the application.
To create a model, you need to modify the models.py file located in the application directory. The models.py file is a
Python script that is used to define the tables that will be added to the database to store objects in the model.
The models.py file initially has only one line, which imports the
Try It Yourself: Create a Model for the People Application
In this section, you create the class Person in the People model by modifying the Python script, models.py, for the People application. Initially, the script is blank. This section takes you through adding the Python code to define classes in the model.
1.Open the iFriends\People\models.py file in an editor.
2.Add the following line of code to the file to import the Django the application:
from django.db import models
3.Add the following code snippet to define the Person class with name, email, headshot, and text attributes:
class Person(models.Model):
name = models.CharField('name', maxlength=200)
email = models.EmailField('Email', blank=True)
headshot = models.ImageField(upload_to='img', blank=True)
text = models.TextField('Desc', maxlength=500, blank=True)
def __str__(self):
return '%s' % (self.name)
4.Save the file.
Listing 2.1 shows the complete code for the iFriends\People\models.py
from django.db import models class Person(models.Model):
name = models.CharField('name', max_length=200)
text = models.TextField('Desc', max_length=500, blank=True) def __str__(self):
return '%s' % (self.name)
By the Way
The definition for __str__ defines a string representation of the object that can be used in views or other Python scripts. Django uses the __str__
Try It Yourself: Activate the
Person
Model
This section takes you through the process of activating the Person model by adding it to the INSTALLED_APPS setting in the settings.py file and then synchronizing the database.
1. Open the iFriends\settings.py file in an editor. 2. Find the INSTALLED_APPS setting, and add the
iFriends.People application to it, as shown in the following snippet:
INSTALLED_APPS = (
'django.contrib.auth',
'django.contrib.contenttypes',
'django.contrib.sessions',
'django.contrib.sites',
'iFriends.People',
)
3. Save the file.
4. Synchronize the People application into the iFriends database by using the following command from the root of the iFriends project, as shown in Figure 2.4:
python manage.py syncdb
application with the database from a
command line.
The syncdb command creates the necessary tables in the
iFriends database for the People application. The model is now active, and data can be added to and retrieved from the
Adding Data Using the API
Try It Yourself: Add a
Person
Object to the iFriends Database
Open the Django shell, and follow these steps to add yourself as a object in the People model of the iFriends database.
1.From a console prompt, change to the root directory of the iFriends project.
2.Enter the following command to invoke the Django shell:
python manage.py shell
3.From the shell prompt, enter the following to import the Person from the People package:
from iFriends.People.models import Person
4.Enter the following command to create a Person object named
p = Person(name="<your name>", email="<your eMail>")
5.Save the Person object you just created using the following command:
p.save()
6.Verify that the object was created by using the
objects, and then print the list:
lst = Person.objects.all()
print lst
Figure 2.5 shows these commands.
Figure 2.5. Using the Python shell to add an object to
the database.
[View full size image]
Setting Up the
URLConf
File
This section discusses configuring the URLConf file to define how installed applications are accessed from the web. The
URLConf file is a Python script that allows you to define specific views that are accessed based on the URL that is sent by the web browser. When the Django server receives an URL request, it parses the request based on the patterns that are contained in the URLConf file. The parsed request is translated into a specific Python function that is executed in the views.py file, discussed in a moment.
By the Way
The location of the URLConf file is defined by the
ROOT_URLCONF setting in the settings.py file. The default location is the name of the project's root
directory. In the case of the iFriends project, the value of ROOT_URLCONF would be set to the following value, where 'iFriends.urls' equates to iFriends/urls.py:
Try It Yourself: Add an URL Pattern to Use for a
People
View
In this example, you set up a simple URL pattern for the People application by modifying the urlpatterns setting in the
iFriends/urls.py file.
1.Open the iFriends\urls.py file in an editor. 2.Find the urlpatterns setting, and add the
iFriends.People.views.index pattern to it:
urlpatterns = patterns('',
(r'^People/$', 'iFriends.People.views.index')
)
3.Save the file.
By the Way
In the preceding code snippet,
iFriends.People.views.index refers to the index()
Creating a Simple View
After you have configured the URLConf file, you need to add the views to the application. The application's views are stored as functions in the views.py file in the application directory. When the Django server receives an URL request, it parses the
request based on the patterns that are contained in the