Advanced Animation with DirectX...1
Introduction...4
Part One: Preparations...7
Chapter 1: Preparing for the Book...8
Overview...8
Installing the DirectX SDK...8
Choosing the Debug or Retail Libraries...10
Configuring Your Compiler...11
Setting the DirectX SDK Directories...11
Linking to the DirectX Libraries...12
Setting the Default char State...14
Using the Book's Helper Code...15
Using the Helper Objects...15
Checking Out the Helper Functions...21
Moving On with the Book...34
Part Two: Animation Basics...36
Chapter 2: Timing in Animation and Movement...37
Using Time−Based Motion...37
Reading Time in Windows...37
Animating with Time...38
Moving with Time...41
Moving along Paths...41
Creating an .X Path Parser...48
Creating In−Game Cinematic Sequences...53
Check Out the Demos...54
TimedAnim...54
TimedMovement...55
Route...55
Cinematic...56
Chapter 3: Using the .X File Format...58
Working with .X Templates and Data Objects...58
Defining Templates...61
Creating Data Objects from Templates...63
Embedding Data Objects and Template Restrictions...64
Working with the DirectX Standard Templates...65
Accessing .X Files...66
Registering Custom and Standard Templates...66
Opening an .X File...67
Enumerating Data Objects...68
Retrieving Data from a Data Object...72
Constructing an .X Parser Class...75
Loading Meshes from .X...79
Loading Meshes Using D3DX...79
Table of Contents
Chapter 3: Using the .X File Format
Loading Skinned Meshes...83
Loading Frame Hierarchies from .X...84
Loading Animations from .X...86
Loading Custom Data from .X...86
Check Out the Demos...88
ParseFrame...88
ParseMesh...88
Part Three: Skeletal Animation...90
Chapter 4: Working with Skeletal Animation...91
Overview...91
Taking on Skeletal Animation...91
Using Skeletal Structures and Bone Hierarchies...92
Loading Hierarchies from .X...93
Modifying Bone Orientation...95
Updating the Hierarchy...96
Working with Skinned Meshes...97
Loading Skinned Meshes from .X...100
Creating a Secondary Mesh Container...101
Mapping Bones to Frames...102
Manipulating the Skinned Mesh...103
Updating the Skinned Mesh...104
Rendering the Skinned Mesh...106
Check Out the Demo...106
Chapter 5: Using Key−Framed Skeletal Animation...108
Using Key−Framed Skeletal Animation Sets...108
Using Keys in Animation...109
Working with the Four Key Types...110
Reading Animation Data from .X Files...112
Matching Animations to Bones...119
Updating Animations...121
Obtaining Skeletal Mesh Data from Alternative Sources...122
Check Out the Demos...123
Chapter 6: Blending Skeletal Animations...125
Overview...125
Blending Skeletal Animations...125
Combining Transformations...126
Enhancing Skeletal Animation Objects...127
Check Out the Demo...132
Chapter 7: Implementing Rag Doll Animation...134
Overview...134
Creating Dolls from Characters...134
Working with Rigid−Body Physics...137
Creating a Rigid Body...138
Chapter 7: Implementing Rag Doll Animation
Processing the Motion of Rigid Bodies...143
Using Forces to Create Motion...150
Connecting Rigid Bodies with Springs...151
Providing Collision Detection and Response...154
Creating a Rag Doll Animation System...160
Defining the Rigid Body State...160
Containing Bones...161
Creating the Rag Doll Controller Class...162
Building Bone Data...165
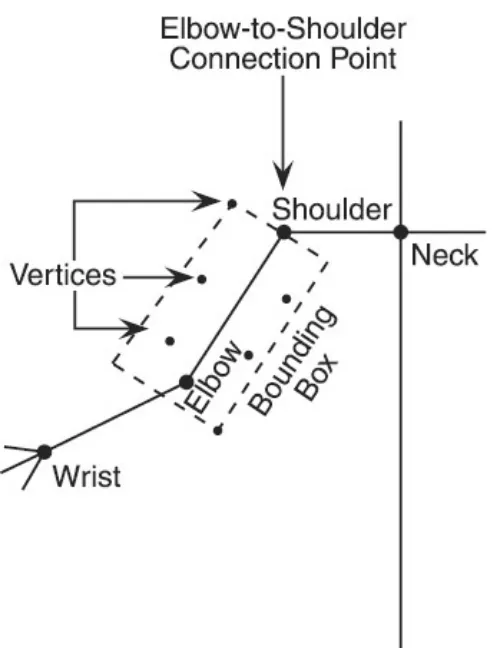
Computing the Bone Bounding Box...166
Setting the Forces...169
Integrating the Bones...170
Processing Collisions...172
Enforcing Bone−to−Bone Connections...174
Rebuilding the Hierarchy...175
Check Out the Demo...176
Part Four: Morphing Animation...178
Chapter 8: Working with Morphing Animation...179
Morphing in Action...179
Defining Source and Target Meshes...180
Morphing the Meshes...180
Building a Morphed Mesh through Manipulation...182
Drawing Morphed Meshes...185
Dissecting the Subsets...185
Creating a Morphing Vertex Shader...187
Check Out the Demos...190
Chapter 9: Using Key−Framed Morphing Animation...192
Using Morphing Animation Sets...192
Creating .X Morphing Animation Templates...192
Loading Morphing Animation Data...194
Rendering the Morphing Mesh...198
Obtaining Morphing Mesh Data from Alternative Sources...201
Check Out the Demos...202
Chapter 10: Blending Morphing Animations...204
Blending Morphing Animations...204
Using a Base Mesh in Blended Morphing Animation...205
Calculating the Differences...205
Blending the Differences...207
Building a Blending Morph Vertex Shader...208
Using the Blending Morph Vertex Shader...213
Check Out the Demos...215
Chapter 11: Morphing Facial Animation...216
The Basics of Facial Animation...216
Table of Contents
Chapter 11: Morphing Facial Animation
Using Phonemes for Speech...218
Building Facial Meshes...220
Creating the Base Mesh...220
Creating Facial Expressions...221
Creating Viseme Meshes...223
Creating Animation Sequences...225
Automating Basic Features...225
Building Phoneme Sequences...226
Using an .X Parser for Sequences...233
Playing Facial Sequences with Sound...237
Using DirectShow for Sound...238
Synchronizing Animation with Sound...239
Looping Sound Playback...240
Check Out the Demo...241
Part Five: Miscellaneous Animation...243
Chapter 12: Using Particles in Animation...244
Working with Particles...244
Starting with the Basics...245
Drawing Particles with Quad Polygons...246
Working with Point Sprites...250
Improving Particle Rendering with Vertex Shaders...253
Bringing Your Particles to Life...260
Moving Particles Using Velocity...261
Using Intelligence in Processing...262
Creating and Destroying Particles...263
Drawing Your Particles...264
Controlling Particles with Class...267
Using the Emitter in Your Project...270
Creating Particle Engines in Vertex Shaders...270
Check Out the Demos...271
Chapter 13: Simulating Cloth and Soft Body Mesh Animation...273
Simulating Cloth in Your Projects...273
Defining Cloth Points and Springs...274
Obtaining Cloth Data from Meshes...275
Applying Force to Create Motion...278
Rebuilding and Rendering the Cloth Mesh...286
Restoring the Original Mesh...287
Adding More Springs...288
Loading Mass and Spring Data from .X...289
Building an .X Parser for Cloth Data...290
Working with Collision Detection and Response...292
Defining Collision Objects...292
Detecting and Responding to Collisions...295
Creating a Cloth Mesh Class...298
Using Soft Body Meshes...307
Chapter 13: Simulating Cloth and Soft Body Mesh Animation
Creating a Soft Body Mesh Class...308
Check Out the Demos...309
Chapter 14: Using Animated Textures...311
Using Texture Animation in Your Project...311
Working with Texture Transformations...311
Creating a Texture Transformation...311
Setting Texture Transformation Matrices...313
Using Texture Transformations in Your Project...314
Using Video Media Files for Textures...314
Importing Video with DirectShow...315
Creating a Custom Filter...316
Working with the Custom Filter...322
Creating an Animated Texture Manager...328
Applying Animated Media Textures...329
Check Out the Demos...331
Wrapping Up Advanced Animation...332
Part Six: Appendixes...333
Appendix A: Web and Book References...334
Web Sites to Check Out...334
Recommended Reading...336
Appendix B: What's on the CD...337
Overview...337
DirectX 9.0 SDK...337
GoldWave Demo...337
Paint Shop Pro Trial Version...337
TrueSpace Demo...338
Microsoft Agent and LISET...338
List of Figures...339
Chapter 1: Preparing for the Book...339
Chapter 2: Timing in Animation and Movement...339
Chapter 3: Using the .X File Format...340
Chapter 4: Working with Skeletal Animation...340
Chapter 5: Using Key−Framed Skeletal Animation...340
Chapter 6: Blending Skeletal Animations...340
Chapter 7: Implementing Rag Doll Animation...340
Chapter 8: Working with Morphing Animation...341
Chapter 9: Using Key−Framed Morphing Animation...341
Chapter 10: Blending Morphing Animations...341
Chapter 11: Morphing Facial Animation...342
Chapter 12: Using Particles in Animation...342
Chapter 13: Simulating Cloth and Soft Body Mesh Animation...342
Table of Contents
List of Tables...344
Chapter 3: Using the .X File Format...344
Chapter 10: Blending Morphing Animations...344
Chapter 11: Morphing Facial Animation...344
List of Sidebars...345
Chapter 1: Preparing for the Book...345
Chapter 2: Timing in Animation and Movement...345
Chapter 3: Using the .X File Format...345
Chapter 4: Working with Skeletal Animation...345
Chapter 5: Using Key−Framed Skeletal Animation...345
Chapter 6: Blending Skeletal Animations...345
Chapter 7: Implementing Rag Doll Animation...345
Chapter 8: Working with Morphing Animation...345
Chapter 9: Using Key−Framed Morphing Animation...346
Chapter 10: Blending Morphing Animations...346
Chapter 11: Morphing Facial Animation...346
Chapter 12: Using Particles in Animation...346
Chapter 13: Simulating Cloth and Soft Body Mesh Animation...346
Jim Adams
PREMIER PRESS
GAME DEVELOPMENT
Copyright © 2003 Premier Press, a division of Course Technology.
All rights reserved. No part of this book may be reproduced or transmitted in any form or by any means, electronic or mechanical, including photocopying, recording, or by any information storage or retrieval system without written permission from Premier Press, except for the inclusion of brief quotations in a review. The Premier Press logo and related trade dress are trademarks of Premier Press and may not be used without written permission.
Publisher: Stacy L. Hiquet
Senior Marketing Manager: Martine Edwards
Marketing Manager: Heather Hurley
Associate Marketing Manager: Kristin Eisenzopf
Manager of Editorial Services: Heather Talbot
Acquisitions Editor: Emi Smith
Project Editor/Copy Editor: Cathleen D. Snyder
Retail Market Coordinator: Sarah Dubois
Interior Layout: Scribe Tribe
Cover Designer: Mike Tanamachi
CD−ROM Producer: Brandon Penticuff
Indexer: Kelly Talbot
Proofreader: Jenny Davidson
DirectDraw, DirectMusic, DirectPlay, DirectSound, DirectX, Microsoft, Visual C++, Visual Studio,
Windows, Xbox, and/or other Microsoft products are either registered trademarks or trademarks of Microsoft Corporation in the U.S. and/or other countries. Gas Powered Games and Dungeon Siege are the exclusive trademarks of Gas Powered Games Corp. All other trademarks are the property of their respective owners. Important: Premier Press cannot provide software support. Please contact the appropriate software
Premier Press and the author have attempted throughout this book to distinguish proprietary trademarks from descriptive terms by following the capitalization style used by the manufacturer.
Information contained in this book has been obtained by Premier Press from sources believed to be reliable. However, because of the possibility of human or mechanical error by our sources, Premier Press, or others, the Publisher does not guarantee the accuracy, adequacy, or completeness of any information and is not responsible for any errors or omissions or the results obtained from use of such information. Readers should be particularly aware of the fact that the Internet is an everchanging entity. Some facts may have changed since this book went to press.
1−59200−037−1
Library of Congress Catalog Card Number: 2002116166 Printed in the United States of America
03 04 05 06 07 BH 10 9 8 7 6 5 4 3 2 1
Premier Press, a division of Course Technology 25 Thomson Place
Boston, MA 02210
To Jeff, my dearly departed and greatly missed brother this one's for you!
And to the rest of my family and friends thanks for being a part of my life!
Acknowledgments
Writing a book is no easy feat. Many hours have gone into the meticulous writing, editing, layout, and printing of this fine book you hold in your hands. The dedication and patience of each and every person involved was greatly appreciated during the book's development. To those people, I'd like to say thank you!
First and foremost, I'd like to thank my family for giving me support. To 2E, my lovely wife, for having the patience to let me write another book (Mrs. T pity the fool that don't let me write my book). To Michael and John, my kids, for being there with me. To my mother, Pam; brothers John, Jeff, and Jason; my sister Jennifer; and my nephew Jordanthanks for your support. To Bill and Doris Fong, thanks for all you have done for me. To my buddy, Jeff Young, for offering to help wrap this baby up and to Richard Young, for providing me with the book's Web space.
To those of you on the publisher sideEmi Smith, Cathleen Snyder, André LaMothe, and Brandon
Penticuffthanks for the chance to work with you again. Emi, your neverending patience on a book that was long overdue is astounding. To Cathleen, I'd like to thank you for keeping the editing process running smoothly. And finally to André, for helping to create such a wonderful series of books. I don't want to forget Brandonthanks for putting together the CDROM so quickly!
To those companies that have helped the gaming community at large with their cool productsto Caligari, for making trueSpace and the ohsocool Facial Animator; to discreet and their 3D Studio Max modeling program; to Curious Labs, with their awesome Poser humanfigure designer; and to Microsoft, for creating the
eversouseful DirectX.
About the Author
JIM ADAMS started his programming career at the ripe young age of 9, when his curiosity and imagination grabbed hold and never let go. Twentyone years later, at the (overripe!) age of 30, Jim still finds himself enthralled in current game−programming techniques such as those in this book. Not one to let anything bog him down, Jim still finds time to raise a family, write a book or two, and help his wife on the rare occasion.
Between his writing and programming, you can find Jim moderating the DirectX forum on the Internet's top gameprogramming Web site, http://www.GameDev.net. Make sure to stop by and give him a ring!
Letter from the Series Editor
Welcome to Advanced Animation with DirectX®. This book is all about 3D animation techniques used to develop highend AAA titles such as Unreal, Doom III, and other games with fully articulated 3D models featuring skeletal and facial animation. The material in this book has never been published before, for the most part. You can find hints of it on the Internet, in articles, and in other books on robotics, but there isn't another game book about advanced animation available. For the author of this book, Jim Adams, and I, the goal of this book was to really show advanced animation techniques along with the fundamental physics needed to implement them. Of course, the second anyone says "physics" or "math," chills may run down your spine, but Jim has tried to use physics models and explanations in a game programmer's language.
There are some amazing things covered in this book about which I am very excited, such as "rag doll" physics. A good example of this technique is found in Unreal Tournament; when you frag an opponent, his body falls limp and the force of the weapon blast throws it like, well, a rag doll!
The book also covers cloth animation and spring modeling. Using these techniques, you can create everything from cloth to soft bodies to springy objects that deform and return to their original shape when forces are applied to them.
Finally, two of the coolest things in the book are facial animation and lipsyncing techniques. This is something that very few games have or will have for quite some time. Again, Jim gets you up and running with the technology in no time.
In conclusion, this is definitely an advanced book, and serious material. If you are new to game programming you will still get something out of it, but I suggest that you should be very comfortable with 3D concepts, math, and some high school physics before you delve into this madness. Nevertheless, after you get through it, you will have an edge on 90% of the game developers out there, who haven't even begun to master these techniques.
Sincerely,
André LaMothe
Introduction
So you're ready to progress beyond the basics. Having already tackled drawing polygons and meshes, blending textures, manipulating vertex buffers, and tinkering with vertex shaders, what's next for an aspiring game programmer like you to learn? Well, you've come to the right place if you're ready to move on beyond the basics.
Welcome to Advanced Animation with DirectX® ! This book is your guide to getting past the basics of DirectX graphics and into the bigger world of advanced animation! Take the information you already know and learn how to expand it into a vast array of various eyepopping graphical effects.
Keep your highschool textbooks at school, however, because this book won't bore you with pages of theories and algorithms. Instead, you'll see realworld examples of some of the hottest animation techniques used today. Jampacked with easy to understand concepts, fully commented code, and cool demos, this book makes
learning the advanced stuff simple and fun!
What This Book Is About
As you can tell from the table of contents (you did check it out, didn't you?), this book has been developed with intermediate to advanced programmers in mind. There are no beginner sections (well, almost no beginner sections)it's all hardcore theory and programming from the get go!
This means there is no room wasted on teaching basic concepts, such as initializing Direct3D or using Windows message pumps, so you need to know a little something about Direct3D in general before you go on. Whoa! Don't put the book down just yet. I'm talking about the extreme basics, such as initializing Direct3D, using materials and textures, and handling vertex buffers. If you know all that, then you are definitely ready to move on to the advanced stuff, and this book is the place to start!
Why You Should Read This Book
That is the milliondollar questionWhy read this book? Let's face it, gaming technologies are evolving faster than most of us can keep up with. Today is one thing, and tomorrow introduces techniques that'll blow your socks off. Within these pages, you'll find information on advanced animation techniques that you can use in your own projects, and then your game will be the one that blows people's socks off!
What type of advanced animation techniques am I discussing? Well, my friend, read on to see what this book has to offer.
What's in This Book?
In this book you'll find 14 chapters full of advanced animation goodies. Each chapter concentrates on a single animation technique; aside from the first few informational chapters, the book is completely modular,
meaning you can skip the chapters that don't interest you and get right to the topics that do.
Of course, I know you're really interested in every chapter in this book, so why don't you take a moment and see what you're about to get yourself into. The following list summarizes each chapter.
library of objects and functions created to hasten your development. This chapter is a mustread before you journey into the rest of the book.
Chapter 2: Timing in Animation and Movement. Timing is an important aspect of animation, and this chapter provides a primer of what to expect throughout the rest of the book. See how to make your meshes animate and move over time.
•
Chapter 3: Using the .X File Format. Getting your mesh data into your project is quite an endeavor. The information in this chapter will give you a firm grasp of using Microsoft's proprietary 3D
graphics storage format, .X, in your game projects. Learn how to store and retrieve 3D mesh information, as well as how to use .X to contain custom data related to your game project. •
Chapter 4: Working with Skeletal Animation. Probably the most technically advanced realtime animation technique used today is skeletal animation. This chapter tackles the subject by showing you how to get started using this popular technique to manipulate meshes based on an underlying set of bones.
•
Chapter 5: Using KeyFramed Skeletal Animation. One of the most popular animation techniques is using keyframed animation sets (created with popular 3D modeling packages such as discreet's 3D Studio Max or Caligari's trueSpace) in your projects. This chapter will show you how o take the key−framed skeletal animation informaion (stored in .X files) and use it to animate your meshes onscreen.
•
Chapter 6: Blending Skeletal Animations. Tired of your key−framed animations being so static? I'm talking about animations that never change! How about mixing things up by blending multiple animation sets to create new and unique animations in your game?
•
Chapter 7: Implementing Rag Doll Animation. Here it is; I know you've been waiting for it. See how to create your very own rag doll animation sequences, with limbs flailing and bodies flyingit's all in this chapter. Leave your physics books at home, kids; this book gives it to you in a straightforward and easytounderstand manner.
•
Chapter 8: Working with Morphing Animation. Skeletal animation be damnedmorphing animation still has a rightful place in the world of advanced animation! See how you can use a simple animation technique to get those meshes morphing in your own projects.
•
Chapter 9: Using KeyFramed Morphing Animation. Even morphing animation needs to be sequenced, right? See how to define and create your own series of keyframed animation objects and apply them to your morphing animation techniques! You'll even get to extend the usefulness of .X by creating your own morphing keyframe templates!
•
Chapter 10: Blending Morphing Animations. Once again, blending rears its eversohelpful head, this time for combining various blending animations together to create new and unique animations during run time!
•
Chapter 11: Morphing Facial Animation. They walk, they jump, and yesthey even talk! Your game's characters really come to life when you use the facial animation techniques shown in this chapter. If you don't know what facial animation can do for you, check out a game such as Electronic Art's Medal of Honor: Frontline or Interplay's Baldur's Gate: Dark Alliance.
•
Chapter 12: Using Particles in Animation. What game nowadays doesn't have flashy, smoking, zinging blobs of graphical pixels that we call particles? Yours, you say? Well, no worriesthis chapter will show you how to effectively add particle animation into your game and get those flashy blobs of particles flying around in no time.
•
Chapter 13: Simulating Cloth and Soft Body Mesh Animation. Close your eyes and imagine your game's hero wearing a silky cape that reaches the ground and flutters with every small gust of wind. Using cloth simulation, you can give your hero a cape, clothes, and much more than you ever
imagined. Top it off with the use of soft body meshes that deform to the slightest touch, and you have yourself some fine advanced animation techniques!
•
Chapter 14: Using Animated Textures. I'm saving the best for last. This chapter will show you how to animate the textures you use to paint your 3D world. Animated fire, flowing water, and so much more is possible using animated textures, and this chapter will show you how!
Whew! There are some major topics in here, all for your eyes only! As I wrote this book, I couldn't help but wonder what type of applications you'll apply these techniques to. I can envision some incredible games using the various techniques, and I can tell that you're just the person for the job. After you read this book (if you're like me, that means reading it at least six times), I believe you'll find some useful ways to apply your
newfound knowledge to your game projects.
I know you're anxious to get going, so let me once again say welcome, and thank you for buying my book. I hope it helps you learn some of the concepts and techniques currently used in 3D animation. Have fun, and enjoy!
Chapter 1: Preparing for the Book
Overview
Alpha and Omega−the beginning and the end. To all things there is a beginning, and in this book, this chapter represents the start of a grand journey into the world of advanced animation. Behind you is the power of Microsoft's DirectX SDK; in front of you lies a long and winding road, filled with uncertainty. Before you set off, however, there are a number of things you need to do to ensure that your experience is a joyous one. This chapter contains information that will help you prepare yourself for the topics and code in the book, from installing the DirectX SDK to understanding how to use a series of helper functions to speed up your
development time. Before you delve into this book, I highly recommend you give this chapter a full read and take your time setting up DirectX and your compiler. After this chapter, you should be ready to start your epic journey!
By the end of this book, you'll have found that the world of advanced animation is only as difficult or as easy as you make it. With the knowledge you already possess and this book at your side, I'm sure it will be easy for you!
Installing the DirectX SDK
Welcome to the grand world of DirectX programming! If you haven't already done so, install the Microsoft DirectX Software Development Kit (DX SDK) before you delve into the text and code in this book. If you're new to the DirectX installation process, don't worry−it's all been streamlined so that you don't need to do much more than click a few buttons. As for you veteran DirectX coders, you should still take a quick gander at the installation guidelines here in case there's something you haven't seen.
At the time of this book's printing, Microsoft's DirectX SDK version 9 has been released. It's always best to remove any past installations of the DirectX SDK before you install the newest one. Don't worry−you're not losing any precious code because each new version of the DirectX SDK comes jam−packed with each previous release's code intact! That's right, with DirectX 9 (and subsequent DirectX releases), you have complete access to every component ever made in DirectX, from the oldest DirectDraw surface object to the newest 3D−accelerated device objects! Don't fret, DirectX 8 users−your version 8 code will still work with version 9, since version 9 contains all previous versions' objects.
For DirectX 8 users, the upgrade from the DirectX 8 SDK to the DirectX 9 SDK may seem a little shocking, but once you get around the fluff, you'll realize that not much has changed. It's just that the DirectX 9 SDK adds a couple of new features over version 8.
Figure 1.1: The DirectX 9 SDK introduction screen gives you a few options−most importantly the installation option for the DirectX 9 SDK.
Figure 1.2: Clicking on Install DirectX 9.0 SDK will eventually lead you to the InstallShield Wizard, where you can decide which of the SDK components to install.
To make things easier, the fine folks at Premier Press have created a menu on the CD interface so you can easily locate programs. It just so happens that one of those programs is the DirectX SDK. To access the menu (if it didn't appear automatically when you inserted the CD−ROM), click on the Start button and select Run. Type D:\start_here.html (where D is your CD−ROM drive letter) in the text box and click the OK button. You will be presented with the Premier Press license agreement. Please read the agreement, and if you agree to the terms, click I Agree to continue. The CD−ROM's main interface will appear, at which point you can locate and click the Install DirectX SDK option.
Choosing the Debug or Retail Libraries
Another important part of using the DirectX SDK is selecting the developer run−time libraries you'll be using. These libraries are different from the end−user run−time libraries; they allow you to choose whether to use the debug or retail libraries.
Developers use the debug run−time libraries to help track bugs in their projects. The debug libraries provide helpful messages during compile time and perform special operations during execution. For instance, DirectSound fills sound buffers with static sound so you can hear it while testing for valid buffers.
When you are developing your game project, it is recommended that you use the debug run−time libraries, switching to the retail run−times to perform the final tests on your games. To switch between the two
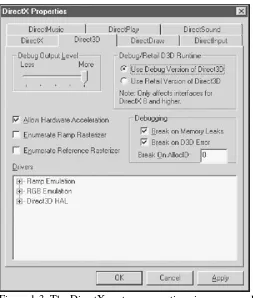
run−time libraries, open the Control Panel and select the DirectX icon. The DirectX Properties dialog box will appear, as shown in Figure 1.3.
Figure 1.3: The DirectX system properties give you a multitude of options. In this case, the Direct3D tab has been selected, and you can see that the debug libraries are in use at the highest debug output level.
In Figure 1.3, you can see that I've clicked on the Direct3D tab. In this tab, you can select a run−time library to use in the Debug/Retail D3D Runtime section. You can choose either Use Debug Version of Direct3D or Use Retail Version of Direct3D. I recommend sticking with Use Debug Version of Direct3D whenever possible.
However, if you decide to use the debug libraries, be warned that your programs may not operate at peak efficiency. The debug libraries are made for debugging your DirectX applications; certain features are put in place that purposely alter the way DirectX works. For example, the debug libraries will spew debug
information about every DirectX interface, how it's used, and how it's freed. Every little nuance is logged, thus slowing down your application's execution.
To adjust the number of these debug messages Direct3D will pass to your debugger, you can adjust the slider bar in the Debug Output Level portion of the Direct3D properties. The higher the debug level, the more messages you'll receive. I recommend sliding the bar all the way to the right so you get every debug message during your project's development. Again, you'll slow down the execution of your program, but in the end you'll get to see everything that is happening behind the scenes. When your project is ready for retail, quickly change the libraries that you're using in the DirectX control panel.
When you have set the run−time library and debug level, click the OK button to close the DirectX Properties dialog box.
Configuring Your Compiler
After you've installed the DirectX SDK, you need to prepare your compiler to work with the book's code and demos. Even though the DirectX SDK installation program does a good job of setting up some of the compiler options for you, I want to go over every setting that you'll need to configure.
Setting the DirectX SDK Directories
The first (and most important) setting is for the DirectX SDK installation directories. Your compiler needs to know where to find the DirectX include and library files. Typically, the DirectX SDK installation program will insert the SDK directories into Microsoft's Visual C/ C++ compiler for you, but you might need to add these directories yourself at some point.
To add the directories in MSVC version 6, open your compiler and click Tools. Select Options from the list and click the Directories tab. The Options dialog box will open, as shown in Figure 1.4.
Figure 1.4: The Options dialog box displays a list of directories that Visual C/C++ searches for header and library files.
Figure 1.5: Selecting VC++ Directories will bring up the directory list on the right side of the dialog box in Visual Studio .NET.
With either compiler, you'll notice the directories listed that your compiler searches for various libraries and include files. Notice the Show Directories For drop−down menu. You should start by setting the header file directory for the DirectX SDK, so select Include Files from the drop−down menu.
Next, click the New button (the little hatched box to the left of the red X). The focus will be shifted to a new line in the Directories section of the dialog box. Click on the ellipsis button to the right of the text cursor to open the Choose Directory dialog box. Locate the DirectX header file installation directory and click OK.
Now you need to set the DirectX SDK library directory, so click on the Show Directories For drop−down menu again and select Library Files. Repeat the process of clicking on the New button and locating the library directory of your DirectX SDK installation directory. When you finish, your compiler will be ready to use the DirectX directories for compiling.
Linking to the DirectX Libraries
After you've set the DirectX installation directories, the next important step is to link the libraries that you'll be using in your project. Note that linking files is project−specific, so make sure you have your game project open before you continue.
For MSVC 6, click on Project and select Settings. Click on the Link tab. The Project Settings Link properties will appear, as shown in Figure 1.6.
Figure 1.6: The Project Settings Link properties allow you to specify exactly which library files to link to your application.
For Visual Studio .NET, open your project and then highlight it in the Solution Explorer (as shown in Figure 1.7). Next, click on Project and then Properties to open the project's Property Pages dialog box. In the folder display, select the Linker folder and click on Input. On the right of the Property Pages dialog box, you'll see your project's link settings (as shown in Figure 1.8).
Figure 1.7: Visual Studio .NET lists all files and projects in use in the Solution Explorer.
among other things.
For this book, I only use the Direct3D, D3DX, and DirectShow libraries, so those are the only libraries you need to add to the link process (aside from the standard application libraries already listed in the
Object/Library Modules box). To add the required libraries, add the following text to the Object/Library Modules text box (for MSVC 6) or the Additional Dependencies text box (for VS.NET):
d3d9.lib d3dx9.lib d3dxof.lib dxguid.lib winmm.lib
If you are using DirectShow to create animated textures, you need to add either strmbasd.lib or strmbase.lib to the Object/Library Modules text box. Consult Chapter 14, "Using Animated Textures," for the specifics on using DirectShow libraries in your projects.
At this point, you're ready to finish up by setting your compiler's default char state.
Setting the Default char State
Being an old−school programmer, I tend to follow the old ways, especially when it comes to dealing with the default state of the char data type. As its default setting, the Visual C/C++ compiler expands all char data types to signed char types. I don't know about you, but I use unsigned char data types more often than signed char types, so setting this default unsigned state is a priority.
To set the default state of the char data type to unsigned char in Visual C/C++ 6, select Project and then Settings. Click on the C/C++ tab (as shown in Figure 1.9), select General from the Category drop−down menu, and append /J to the end of the Project Options text. Click OK and you'll be set to use unsigned char as the default state whenever you specify a char variable.
Figure 1.9: The Project Settings dialog box allows you to add specific compiler commands in the Project Options text box, as well as change a multitude of other compiler options.
Visual Studio .NET users need to select the project in the Solution Explorer and click Project, Properties. In the folder list, select the C/C++ folder and click on Command Line. In the Additional Options text box, type /J
And that wraps it up for setting up DirectX and your compiler! Now for you DirectX pros, I'm sure the installation is a breeze, and once you've gone through the process, you'll be ready to start coding in no time flat.
Whoa, hold it there, partner! Before you move on, let's take a moment to discuss something that is extremely important when it comes to some serious program development−creating a reusable library of helper functions to speed up your development. I've developed an entire set of functions that will help you skip the mundane DirectX work, such as initializing the display modes and loading/rendering meshes.
Let's take a closer look at these helper functions I've created, how they're used throughout the book, and how you can use them in your own projects.
Using the Book's Helper Code
Since this is an advanced book, I assume you are at least proficient with DirectX. I'm talking proficient enough to understand how Direct3D works in relation to the rendering pipeline, using vertex buffers, textures, and regular meshes−you know, the ultimate basics of getting anything done with Direct3D.
To help speed up development time and reduce time spent on the mundane repetitive code, I have created a small set of functions and objects that are used throughout this book. These functions help you deal with those Direct3D features you are likely to use the most, such as initializing Direct3D and loading and rendering meshes.
Along with the functions, I've also created a set of objects that extend the usefulness of certain D3DX objects. These objects are extended versions of the DirectX 9 D3DX objects D3DXFRAME and
D3DXMESHCONTAINER, as well as some that can help you parse .X files in your own projects.
So not to make a short story longer than it has to be, let's get right to the point and see what functions and objects are at your disposal, starting with the helper objects.
Using the Helper Objects
As I previously mentioned, I've created a series of objects that extend the usefulness of the D3DXFRAME and D3DXMESHCONTAINER objects that come as part of the D3DX library. If you are not familiar with those objects, then let me give you a quick overview.
The D3DXFRAME object helps form a hierarchy of reference frames. These reference frames are used to connect a series of meshes together, with each frame having its own transformation to apply to the mesh connected to it. In this way of using frames to point to meshes, you can minimize the number of meshes used because you can reference meshes instead of having to reload them.
For example, imagine you have a car that consists of a body and four wheels. The body and wheel form two meshes. These two meshes are used in conjunction with five frames (one for the body and four for the tires). When rendering, each frame's transformation is used to position and render the mesh that the frame uses. That means one frame transforms and renders the body once, while the other frames transform and render the tire mesh four times.
As for the D3DXMESHCONTAINER object, it is used to contain a mesh as well as to link to a series of other meshes (using a linked list). Why not just use the ID3DXBaseMesh object instead, you ask? Well, there's more to D3DXMESHCONTAINER than you might expect. First, you can store any type of mesh, whether it's regular, skinned, or progressive. Second, the D3DXMESHCONTAINER object holds material and effect data.
(both of which are defined in the \common\Direct3D.h source file of this book's CD−ROM), starting with D3DXFRAME.
Extending D3DXFRAME
By itself, the D3DXFRAME object is very useful, but unfortunately it lacks a few very essential tidbits of information, namely data for containing transformations when animating meshes, functions to handle the animation data, and a default constructor and destructor.
To correct these omissions, I have created an extended version of D3DXFRAME, which I call
D3DXFRAME_EX. This new object adds a total of two D3DXMATRIX objects and six functions to the mix. The two matrix objects contain the original transformation of the frame (before any animation transformations are applied) and the combined transformation from all parent frames to which the frame is connected (in the hierarchy).
Here's how I defined the D3DXFRAME_EX structure along with the two matrix objects:
struct D3DXFRAME_EX : D3DXFRAME {
D3DXMATRIX matCombined; // Combined matrix
D3DXMATRIX matOriginal; // Original transformation
You'll learn about these two matrix objects and how to work with them later on in the book. For now, let's just move on to the functions, starting with the constructor. The constructor has the job of clearing out the structure's data (including the original data from the base D3DXFRAME object).
D3DXFRAME_EX() {
Name = NULL;
pMeshContainer = NULL;
pFrameSibling = pFrameFirstChild = NULL; D3DXMatrixIdentity(&matCombined);
D3DXMatrixIdentity(&matOriginal);
D3DXMatrixIdentity(&TransformationMatrix); }
On the flip side, the destructor has the job of freeing the data used by the D3DXFRAME_EX object.
~D3DXFRAME_EX() {
delete [ ] Name; Name = NULL;
delete pFrameSibling; pFrameSibling = NULL; delete pFrameFirstChild; pFrameFirstChild = NULL; }
As you can see, the constructor and destructor are pretty typical in the way those things normally go−initialize the object's data and free the resources when done. What comes next are a handful of functions that help you search for a specific frame in the hierarchy, reset the animation matrices to their original states, update the hierarchy after modifying a transformation, and count the number of frames in the hierarchy.
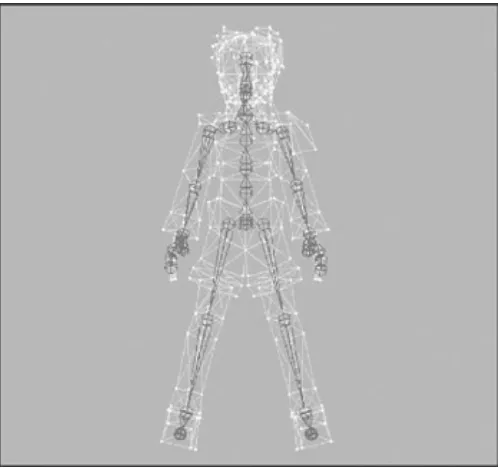
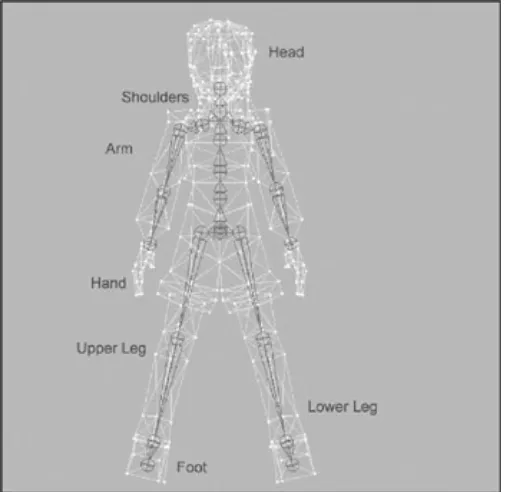
The first function, Find, is used to find a specific frame in the hierarchy and return a pointer to it. If you're not aware of this, each D3DXFRAME object (and the derived D3DXFRAME_EX object) has a Name data buffer, which you're free to fill in with whatever text you find appropriate. Typically, frames are named after bones that define the hierarchy (as I will discuss in Chapter 4, "Working with Skeletal Animation").
To find a specific frame (and retrieve a pointer to the frame's object), just call the Find function, specifying the name of the frame you wish to find as the one and only parameter.
// Function to scan hierarchy for matching frame name D3DXFRAME_EX *Find(const char *FrameName)
{
D3DXFRAME_EX *pFrame, *pFramePtr;
// Return this frame instance if name matched if(Name && FrameName && !strcmp(FrameName, Name)) return this;
// Scan siblings
if((pFramePtr = (D3DXFRAME_EX*)pFrameSibling)){ if((pFrame = pFramePtr−>Find(FrameName))) return pFrame;
}
// Scan children
if((pFramePtr = (D3DXFRAME_EX*)pFrameFirstChild)) { if((pFrame = pFramePtr−>Find(FrameName)))
return pFrame; }
// Return none found return NULL;
}
The Find function compares the name you passed to the current frame's name; if they match, the pointer to the frame is returned. If no match is found, then the linked list is scanned for matches using a recursive call to Find.
Next in the line of added functions is Reset, which scans through the entire frame hierarchy (which, by the way, is a linked list of child and sibling objects). For each frame found, it copies the original transformation to the current transformation. Here's the code:
// Reset transformation matrices to originals void Reset()
{
// Copy original matrix
TransformationMatrix = matOriginal; // Reset sibling frames
D3DXFRAME_EX *pFramePtr;
if((pFramePtr = (D3DXFRAME_EX*)pFrameSibling)) pFramePtr−>Reset();
// Reset child frames
if((pFramePtr = (D3DXFRAME_EX*)pFrameFirstChild)) pFramePtr−>Reset();
}
Rebuilding the hierarchy is essential to making sure the mesh is rebuilt or rendered correctly after you have updated an animation. Again, skeletal animation stuff here−just consult Chapter 4 for more information. For now, let's just check out the code, which takes an optional transformation matrix to apply to the root frame of the hierarchy.
// Function to combine matrices in frame hiearchy
void UpdateHierarchy(D3DXMATRIX *matTransformation = NULL) {
D3DXFRAME_EX *pFramePtr; D3DXMATRIX matIdentity;
// Use an identity matrix if none passed if(!matTransformation) {
D3DXMatrixIdentity(&matIdentity); matTransformation = &matIdentity; }
// Combine matrices w/supplied transformation matrix matCombined = TransformationMatrix * (*matTransformation); // Combine w/sibling frames
if((pFramePtr = (D3DXFRAME_EX*)pFrameSibling)) pFramePtr−>UpdateHierarchy(matTransformation); // Combine w/child frames
if((pFramePtr = (D3DXFRAME_EX*)pFrameFirstChild)) pFramePtr−>UpdateHierarchy(&matCombined); }
The simplicity of the UpdateHierarchy code is pretty neat when you think about it. Explained better in later chapters, the UpdateHierarchy function transforms the frames by their own transformation matrix (stored in matTransformation) by a matrix that is passed as the optional parameter of the function. This way, a frame inherits the transformation of its parent frame in the hierarchy, meaning that each transformation applied winds its way down the entire hierarchy.
Last, with the D3DXFRAME_EX object you have the Count function, which helps you by counting the number of frames contained within the hierarchy. This is accomplished using a recursive call of the Count function for each frame contained in the linked list. For each frame found in the list, a counter variable (that you provide as the parameter) is incremented. Check out the Count code to see what I mean.
void Count(DWORD *Num) {
// Error checking if(!Num)
return;
// Increase count of frames (*Num)+=1;
// Process sibling frames D3DXFRAME_EX *pFrame;
if((pFrame=(D3DXFRAME_EX*)pFrameSibling)) pFrame−>Count(Num);
// Process child frames
if((pFrame=(D3DXFRAME_EX*)pFrameFirstChild)) pFrame−>Count(Num);
}
};
And that pretty much wraps up the D3DXFRAME_EX object. If you're used to using the D3DXFRAME object (and you should be if you're a DX9 user), then everything I've just shown you should be pretty easy to understand.
Moving on, let me now introduce you to the next helper object that I've created to extend the usefulness of the D3DXMESHCONTAINER object.
Extending D3DXMESHCONTAINER
Whereas you might be used to using the ID3DXMesh object to contain your mesh data, you may have found it a pain to store the mesh's material and effects data separately. Not only that, but what about using the other D3DX mesh objects, such as ID3DXPMesh and ID3DXSkinMesh? Why not just create a single mesh object that represents all mesh types and contains all material data along with it?
In fact, there is such an object−it's called D3DXMESHCONTAINER! The D3DXMESHCONTAINER object stores a pointer to your mesh data (regardless of the mesh type used) and all material and effects data. It also contains pointers to your mesh's adjacency buffer and skinned mesh data object. And as if that wasn't enough, the D3DXMESHCONTAINER contains pointers to form a linked list of mesh objects.
What could I possibly do to extend the usefulness of the already nifty D3DXMESHCONTAINER, you ask? Well, for one thing, D3DXMESHCONTAINER has no default constructor or destructor. Also, textures data is missing−there's only a buffer that contains the names of the textures to use for the mesh. Last, there's no support for storing skinned mesh animation data.
No problem, because extending the D3DXMESHCONTAINER is simple! The new version, which I call D3DXMESHCONTAINER_EX, adds a total of four data objects and three functions. The data objects include an array of texture objects, a skinned mesh object (to store an animated skinned mesh), and two arrays of matrix objects.
Here's how I defined the D3DXMESHCONTAINER_EX object, as well as declaring the four variables I mentioned:
struct D3DXMESHCONTAINER_EX : D3DXMESHCONTAINER {
IDirect3DTexture9 **pTextures; ID3DXMesh *pSkinMesh; D3DXMATRIX **ppFrameMatrices; D3DXMATRIX *pBoneMatrices;
The pTextures array of pointers contains the texture objects used to render the mesh. I build the pTextures array up by first loading a mesh and then querying the texture buffer
(D3DXMESHCONTAINER::pMaterials) for the file names of the textures to use.
As for pSkinMesh, you only use it when you are using a skinned mesh (which I will discuss in Chapter 4 through 7). You see, when loading a skinned mesh, the actual mesh data is stored in
Last, you'll find ppFrameMatrices and pBoneMatrices. Not to drag it out, but these are also used for skinned meshes, and these matrix objects are explained in Chapter 4. Just so it makes sense at this point, a skinned mesh animates by attaching the vertices of the mesh to an underlying hierarchy of bones. As the bones move, so do the vertices. ppFrameMatrices and pBoneMatrices are used to map the vertices to the bones.
Aside from the variables in D3DXMESHCONTAINER_EX, there are also a few functions. The first two are the constructor and destructor:
D3DXMESHCONTAINER_EX() {
Name = NULL; MeshData.pMesh = NULL; pMaterials = NULL; pEffects = NULL; NumMaterials = 0; pAdjacency = NULL; pSkinInfo = NULL; pNextMeshContainer = NULL; pTextures = NULL; pSkinMesh = NULL; ppFrameMatrices = NULL; pBoneMatrices = NULL; }
~D3DXMESHCONTAINER_EX() {
if(pTextures && NumMaterials) { for(DWORD i=0;i<NumMaterials;i++)
ReleaseCOM(pTextures[i]); }
delete [] pTextures; pTextures = NULL; NumMaterials = 0;
delete [] Name; Name = NULL; delete [] pMaterials; pMaterials = NULL; delete pEffects; pEffects = NULL; delete [] pAdjacency; pAdjacency = NULL; delete [] ppFrameMatrices; ppFrameMatrices = NULL; delete [] pBoneMatrices; pBoneMatrices = NULL; ReleaseCOM(MeshData.pMesh);
ReleaseCOM(pSkinInfo); ReleaseCOM(pSkinMesh);
delete pNextMeshContainer; pNextMeshContainer = NULL; }
The constructor and destructor have the task of initializing the data to a known state and releasing the data used by the object, respectively. You'll notice the use of the ReleaseCOM macro, which I'll describe to you in the upcoming section, "Checking Out the Helper Functions." Basically, ReleaseCOM is a macro that safely releases a COM interface and sets the interface pointer to NULL.
The third function in D3DXMESHCONTAINER_EX is Find, which lets you scan the linked list of meshes for a specifically named mesh, much like D3DXFRAME_EX::Find. A quick string compare is used to check the names, and a recursive call to Find is used to scan the entire linked list.
D3DXMESHCONTAINER_EX *Find(char *MeshName) {
D3DXMESHCONTAINER_EX *pMesh, *pMeshPtr; // Return this mesh instance if name matched if(Name && MeshName && !strcmp(MeshName, Name)) return this;
// Scan next in list
if((pMeshPtr = (D3DXMESHCONTAINER_EX*)pNextMeshContainer)) { if((pMesh = pMeshPtr−>Find(MeshName)))
return pMesh; }
// Return none found return NULL;
} };
And that does it for the helper objects! The D3DXFRAME_EX and D3DXMESHCONTAINER_EX objects are extremely helpful when it comes to dealing with Direct3D; as such, you should spend as much time as you can getting used to these two objects. I think you'll find them very useful in your own projects.
Aside from the helper objects, there are a number of helper functions that I'd like to introduce to you, which should help you alleviate the mundane tasks common to most Direct3D−related projects.
Checking Out the Helper Functions
The helper functions that I decided to implement for this book are few in number, but they represent the majority of code that you're likely to use in all your projects. These functions perform tasks including
releasing COM interfaces, initializing Direct3D, loading meshes and vertex shaders, updating skinned meshes, and rendering meshes using standard methods and vertex shaders.
Let me start at the top of the list with a function (or rather, a macro) that you can use to safely release your COM interfaces.
Releasing COM Interfaces
Starting off the batch of helper functions (which are stored in the \common\Direct3D.cpp file of this book's CD−ROM) is the macro ReleaseCOM, which you can use to safely release COM interfaces in your project, even if those objects are not valid (NULL pointers).
#define ReleaseCOM(x) { if(x!=NULL) x−>Release(); x=NULL; }
ReleaseCOM takes one parameter, which is the pointer to the COM interface you want to safely release. For example, the following bit of code demonstrates how to load and release a texture object using the
ReleaseCOM macro:
IDirect3DTexture9 *pTexture = NULL;
D3DXCreateTextureFromFile(pDevice, "texture.bmp", &pTexture); ReleaseCOM(pTexture);
ReleaseCOM has no adverse effects.
Going along, the next helper function aids you by initializing Direct3D. Initializing Direct3D
Next in line for the helper functions is InitD3D, which you use to initialize Direct3D and create a 3D device and display window. I tried to keep the code as simple as possible, performing the typical initialization code you would use in any Direct3D application, but in order to make the function work with all the demos in this book, I had to add a couple little extras.
To start with, the InitD3D function uses five parameters (and a standard COM HRESULT return code), as shown here in the function prototype:
HRESULT InitD3D(IDirect3D9 **ppD3D,
IDirect3DDevice9 **ppD3DDevice, HWND hWnd,
BOOL ForceWindowed = FALSE, BOOL MultiThreaded = FALSE);
As I show you the function's code, you'll gain an understanding of what each parameter does. Starting off, there are a few variables that are used throughout the InitD3D function:
HRESULT InitD3D(IDirect3D9 **ppD3D,
IDirect3DDevice9 **ppD3DDevice, HWND hWnd,
BOOL ForceWindowed, BOOL MultiThreaded) {
IDirect3D9 *pD3D = NULL; IDirect3DDevice9 *pD3DDevice = NULL; HRESULT hr;
In this code bit you see the local IDirect3D9 and IDirect3DDevice9 objects used to initialize Direct3D and the 3D device. These variables later are stored in the ppD3D and ppD3DDevice objects you pass to the InitD3D function. Finally, there is an HRESULT variable that contains the return code of any Direct3D calls made. If any call returns an error (as determined by the FAILED macro), the result code is returned to the caller of the InitD3D function.
The very first thing the InitD3D function does is make sure you have passed valid pointers to your Direct3D object, 3D device object, and window handle. Failing to do so forces InitD3D to return an error code. From there, Direct3DCreate9 is called to create the Direct3D interface and store the resulting pointer in the ppD3D pointer (supplied by you when you called InitD3D).
// Error checking
if(!ppD3D || !ppD3DDevice || !hWnd) return E_FAIL;
// Initialize Direct3D
if((pD3D = Direct3DCreate9(D3D_SDK_VERSION)) == NULL) return E_FAIL;
*ppD3D = pD3D;
programs on this book's CD−ROM give you the option of running in a window or full−screen. Sometimes programs must run in a window, so to make sure the demo runs in a window, there is a ForceWindowed flag in the InitD3D prototype. When the flag is set to FALSE, the user is asked if he would like to use a full−screen video mode. If ForceWindowed is set to TRUE, the user is not asked to run in full−screen mode, and the InitD3D function assumes windowed mode was selected.
The following bit of code will examine the ForceWindowed flag; if it is set to FALSE, the function will display a message and wait for the user to select whether or not they want to use full−screen mode. If the ForceWindowed flag is set to TRUE, or if the user chooses to use windowed mode, Mode is set to IDNO; otherwise, Mode is set to IDYES, meaning that the application is to run in full−screen mode.
// Ask if user wants to run windowed or fullscreen // or force windowed if flagged to do such
int Mode;
if(ForceWindowed == TRUE) Mode = IDNO;
else
Mode = MessageBox(hWnd, \ "Use fullscreen mode? (640x480x16)", \ "Initialize D3D", \ MB_YESNO | MB_ICONQUESTION);
Now, if the user chooses to use a full−screen video mode (I use 640×480×16), then the appropriate presentation parameters are set using the standard methods, as seen in the DX SDK samples.
// Set the video (depending on windowed mode or fullscreen) D3DPRESENT_PARAMETERS d3dpp;
ZeroMemory(&d3dpp, sizeof(d3dpp));
// Setup video settings based on choice of fullscreen or not if(Mode == IDYES) {
////////////////////////////////////////////////////////// // Setup fullscreen format (set to your own if you prefer) ////////////////////////////////////////////////////////// DWORD Width = 640;
DWORD Height = 480;
D3DFORMAT Format = D3DFMT_R5G6B5;
// Set the presentation parameters (use fullscreen) d3dpp.BackBufferWidth = Width;
d3dpp.BackBufferHeight = Height; d3dpp.BackBufferFormat = Format;
d3dpp.SwapEffect = D3DSWAPEFFECT_FLIP; d3dpp.Windowed = FALSE;
d3dpp.EnableAutoDepthStencil = TRUE; d3dpp.AutoDepthStencilFormat = D3DFMT_D16;
d3dpp.FullScreen_RefreshRateInHz = D3DPRESENT_RATE_DEFAULT; d3dpp.PresentationInterval = D3DPRESENT_INTERVAL_DEFAULT; } else {
If the user chooses to use the windowed video mode, or if the ForceWindowed flag was set to TRUE, then a windowed mode is used instead of full−screen. Before setting up the appropriate presentation data as you did in full−screen mode, the client area of the window is resized to 640×480. From there, you set up the presentation parameters as you normally do for a windowed mode application.
// Setup windowed format (set to your own dimensions below) ////////////////////////////////////////////////////////// // Get the client and window dimensions
RECT ClientRect, WndRect;
GetClientRect(hWnd, &ClientRect); GetWindowRect(hWnd, &WndRect);
// Set the width and height (set your dimensions here) DWORD DesiredWidth = 640;
DWORD DesiredHeight = 480;
DWORD Width = (WndRect.right − WndRect.left) + \ (DesiredWidth − ClientRect.right); DWORD Height = (WndRect.bottom − WndRect.top) + \ (DesiredHeight − ClientRect.bottom); // Set the window's dimensions
MoveWindow(hWnd, WndRect.left, WndRect.top, \ Width, Height, TRUE);
// Get the desktop format D3DDISPLAYMODE d3ddm;
pD3D−>GetAdapterDisplayMode(D3DADAPTER_DEFAULT, &d3ddm); // Set the presentation parameters (use windowed)
d3dpp.BackBufferWidth = DesiredWidth; d3dpp.BackBufferHeight = DesiredHeight; d3dpp.BackBufferFormat = d3ddm.Format;
d3dpp.SwapEffect = D3DSWAPEFFECT_DISCARD; d3dpp.Windowed = TRUE;
d3dpp.EnableAutoDepthStencil = TRUE; d3dpp.AutoDepthStencilFormat = D3DFMT_D16;
d3dpp.FullScreen_RefreshRateInHz = D3DPRESENT_RATE_DEFAULT; d3dpp.PresentationInterval = D3DPRESENT_INTERVAL_DEFAULT; }
At this point, you're ready to initialize the 3D device using the IDirect3D::CreateDevice function. In the following code, CreateDevice is called, specifying the
D3DCREATE_MIXED_VERTEXPROCESSING flag, as well as the D3DCREATE_MULTITHREADED flag if you set MultiThreaded to TRUE in your call to InitD3D.
// Create the 3−D device
DWORD Flags= D3DCREATE_MIXED_VERTEXPROCESSING; if(MultiThreaded == TRUE)
Flags |= D3DCREATE_MULTITHREADED; if(FAILED(hr = pD3D−>CreateDevice( D3DADAPTER_DEFAULT,
D3DDEVTYPE_HAL, hWnd, Flags, &d3dpp, &pD3DDevice))) return hr;
// Store the 3−D device object pointer *ppD3DDevice = pD3DDevice;
At the end of the last code bit, you can see that I've stored the resulting 3D device pointer in ppD3DDevice, which you passed to InitD3D. From here on out, things are pretty simple−you set your projection
transformation matrix using D3DXMatrixPerspectiveFovLH to compute the transformations and IDirect3DDevice9::SetTransform to set it.
// Set the perspective projection
float Aspect = (float)d3dpp.BackBufferWidth / (float)d3dpp.BackBufferHeight; D3DXMATRIX matProjection;
D3DXMatrixPerspectiveFovLH(&matProjection, D3DX_PI/4.0f, Aspect, 1.0f, 10000.0f); pD3DDevice−>SetTransform(D3DTS_PROJECTION, &matProjection);
Finally, in the InitD3D function, you set your default lighting, z−buffer, and alpha states. Here I'm disabling lighting, alpha blending, and alpha testing, while enabling z−buffering. Also, the default texture states are set to use modulation, and the texture samplings are set to linear min/magnification.
// Set the default render states
pD3DDevice−>SetRenderState(D3DRS_LIGHTING, FALSE); pD3DDevice−>SetRenderState(D3DRS_ZENABLE, D3DZB_TRUE); pD3DDevice−>SetRenderState(D3DRS_ALPHABLENDENABLE, FALSE); pD3DDevice−>SetRenderState(D3DRS_ALPHATESTENABLE, FALSE); // Set the default texture stage states
pD3DDevice−>SetTextureStageState(0, D3DTSS_COLORARG1, D3DTA_TEXTURE); pD3DDevice−>etTextureStageState(0, D3DTSS_COLORARG2, D3DTA_DIFFUSE); pD3DDevice−>etTextureStageState(0, D3DTSS_COLOROP, D3DTOP_MODULATE); // Set the default texture filters
pD3DDevice−>SetSamplerState(0, D3DSAMP_MAGFILTER, D3DTEXF_LINEAR); pD3DDevice−>SetSamplerState(0, D3DSAMP_MINFILTER, D3DTEXF_LINEAR); return S_OK;
}
Now that you've seen the code, how about learning how to put the InitD3D function to use? I tried to make InitD3D as easy as possible to use, so the following bit of code should work for the majority of your programs.
// Declare the 3−D device and Direct3D objects you'll be using IDirect3D9 *pD3D = NULL;
IDirect3DDevice9 *pD3DDevice = NULL;
// Initialize the video mode, asking the user if they wish // to use fullscreen or not.
InitD3D(&pD3D, &pD3DDevice, hWnd);
As you go through the code for the demos in this book, you'll see how the majority of them use the previously shown code to initialize Direct3D. Only one application uses multi−threading, and another forces windowed mode. You'll get a feel for using InitD3D fairly quickly.
Let's move on to the next helper function, one that helps you load your vertex shaders and set up your vertex declaration.
Loading Vertex Shaders
Moving on in the list of helper functions, you'll find LoadVertexShader. That's right, with all the vertex shader action going on in this book, you'll use this function to help you load your vertex shaders, as well as prepare your vertex shader declarations.
Take a peek at the LoadVertexShader function prototype:
IDirect3DVertexShader9 **ppShader, IDirect3DDevice9 *pDevice,
char *Filename,
D3DVERTEXELEMENT9 *pElements = NULL,
IDirect3DVertexDeclaration9 **ppDecl = NULL);
The actual code to the LoadVertexShader function is short, so instead of breaking it up to explain it, I'll give it to you all at once.
HRESULT LoadVertexShader(IDirect3DVertexShader9 **ppShader, IDirect3DDevice9 *pDevice,
char *Filename,
D3DVERTEXELEMENT9 *pElements,
IDirect3DVertexDeclaration9 **ppDecl) {
HRESULT hr;
// Error checking
if(!ppShader || !pDevice || !Filename) return E_FAIL;
// Load and assemble the shader ID3DXBuffer *pCode;
if(FAILED(hr=D3DXAssembleShaderFromFile(Filename, NULL, \ NULL, 0, \ &pCode, NULL))) return hr;
if(FAILED(hr=pDevice−>CreateVertexShader( \ (DWORD*)pCode−>GetBufferPointer(), ppShader))) return hr;
pCode−>Release();
// Create the declaration interface if needed if(pElements && ppDecl)
pDevice−>CreateVertexDeclaration(pElements, ppDecl); // Return success
return S_OK; }
After first checking to make sure the parameters you have passed to the LoadVertexShader function are valid, execution continues by loading and assembling the vertex shader via a call to
D3DXAssembleShaderFromFile. Using the D3DXBUFFER object returned from that function call, you then use the IDirect3DDevice::CreateVertexShader function to create your vertex shader object (to which the pointer is stored in the ppShader object you passed to LoadVertexShader).
Finishing up LoadVertexShader, you'll see the call to CreateVertexDeclaration, which you use to create an IDirect3DVertexDeclaration9 interface from the supplied array of vertex elements (pElements in the LoadVertexShader prototype). The vertex declaration object pointer is then stored in the ppDecl pointer you provide.
To use LoadVertexShader, pass it a pointer to an IDirect3DVertexShader9 object you want to create, along with a valid IDirect3DDevice9 object and file name of the vertex shader file. The last two parameters (pElements and ppDecl) are optional. By passing a valid D3DVERTEXELEMENT9 array and the IDirect3DVertexDeclaration9 object pointer, you can prepare your vertex declarations for use with the vertex shader being loaded.
Here's a small example of using LoadVertexShader. First, I declare an array of vertex elements that are used to create the vertex declaration object.
// Declare the vertex shader declaration elements D3DVERTEXELEMENT9 Elements[] =
{
{ 0, 0, D3DDECLTYPE_FLOAT3, D3DDECLMETHOD_DEFAULT, \ D3DDECLUSAGE_POSITION, 0 },
{ 0, 12, D3DDECLTYPE_FLOAT3, D3DDECLMETHOD_DEFAULT, \ D3DDECLUSAGE_NORMAL, 0 },
{ 0, 24, D3DDECLTYPE_FLOAT2, D3DDECLMETHOD_DEFAULT, \ D3DDECLUSAGE_TEXCOORD, 0 },
D3DDECL_END() };
Then I instance the vertex shader and vertex declaration objects and call LoadVertexShader.
// Instance objects
IDirect3DVertexShader9 *pShader = NULL; IDirect3DVertexDeclaration9 *pDecl = NULL;
// Load the vertex shader and create declaration interface LoadVertexShader(&pShader, pDevice, \ "Shader.vsh", \ &Elements, &pDecl);
As you can see, it's a quick and simple function that gets the job done. From here on out, you can set the vertex shader (represented by pShader) using the IDirect3DDevice9::SetVertexShader function. To set the vertex declaration (represented by pDecl), you would call
IDirect3DDevice9::SetVertexDeclaration.
pD3DDevice−>SetFVF(NULL); // Clear FVF usages pD3DDevice−>SetVertexShader(pShader);
pD3DDevice−>SetVertexDeclaration(pDecl);
Okay, enough of initializing and loading vertex shaders, let's move on to the cool stuff, like loading and rendering meshes.
Loading Meshes
The first of the mesh−related helper functions is LoadMesh. Actually there are three versions of the LoadMesh function. The first version is used to load a mesh from an .X file using the
D3DXLoadMeshFromX function. That means all meshes contained within the .X file are compressed into a single mesh object, which is subsequently stored in a D3DXMESHCONTAINER_EX object.
All iterations of the LoadMesh function contain pointers to a valid 3D device object, the directory path to where your meshes' textures are stored, and the mesh loading flags and optional flexible vertex format that the LoadMesh functions use to clone the meshes after loading. That means you can force your loaded meshes to use specific vertex formats!
Here's the prototype of the first LoadMesh function:
char *TexturePath = ".\\", DWORD NewFVF = 0,
DWORD LoadFlags = D3DXMESH_SYSTEMMEM);
The first LoadMesh function takes a pointer to a D3DXMESHCONTAINER_EX object pointer that you want to use for storing the loaded mesh data. Notice I said pointer to a pointer. The LoadMesh function will allocate the appropriate objects for you and store the pointers in the pointer you pass to LoadMesh. This is similar to the way the InitD3D function stores the Direct3D and 3D device object pointers.
Also, you must pass a valid 3D device object to the LoadMesh function (as the pDevice pointer)−you use this device object to create the mesh container and texture buffers. The mesh that you want to load is specified as Filename, and the directory in which your textures are located is specified in TexturePath. This texture directory path is prefixed to any texture file names as they are loaded.
Finally, there are NewFVF and LoadFlags. You use the NewFVF parameter to force the mesh being loaded to use a specific FVF. For instance, if you only wanted to use 3D coordinates and normals, then you would set NewFVF to (D3DFVF_XYZ|D3DFVF_NORMAL). The LoadMesh function will use CloneMeshFVF to clone the mesh using the specific FVF you specified.
The LoadFlags parameter is used to set the mesh loading flags as specified by the D3DXLoadMeshFromX function in the DX SDK documents. The default value for this parameter is D3DXMESH_SYSTEMMEM, meaning that the mesh is loaded into system memory (as opposed to hardware memory).
Instead of showing you the entire code for the LoadMesh function, I'll just skim over the most important parts. For the full code, consult the code from the book−look in Direct3D.cpp for the first LoadMesh function listed.
Typical of most mesh−loading functions that you may already be using, the first LoadMesh function uses the D3DXLoadMeshFromX function, as shown here:
// Load the mesh using D3DX routines
ID3DXBuffer *MaterialBuffer = NULL, *AdjacencyBuffer = NULL; DWORD NumMaterials;
if(FAILED(hr=D3DXLoadMeshFromX(Filename, TempLoadFlags, \ pDevice, &AdjacencyBuffer, \ &MaterialBuffer, NULL, \ &NumMaterials, &pLoadMesh))) return hr;
A couple of notes on the parameters for D3DXLoadMeshFromX: Filename specifies the file name of the .X file to load. ♦
pDevice is your 3D device object. ♦
AdjacencyBuffer is the ID3DXBUFFER object that will contain the face adjacency data. ♦
MaterialBuffer stores the material data (with NumMaterials holding the number of meshes loaded).
♦
pLoadMesh will store the ID3DXMesh object loaded. ♦
Not mentioned in the previous list is TempLoadFlags, which are the flags used to load the mesh. If you are using a new FVF (as specified in NewFVF), then the mesh is forced into system memory using the
D3DXMESH_SYSMEMORY flag (to allow the cloning to succeed); otherwise, the mesh is loaded using the flags you specify in the LoadFlags parameters of the call to LoadMesh.
Speaking of cloning the mesh, if you do specify a non−zero value in NewFVF, the LoadMesh function will attempt to clone the mesh using the FVF specified. If successful, it will replace the pLoadMesh pointer with the newly cloned mesh. Here's a small code snippet that demonstrates this cloning feature:
// Convert to new FVF first as needed if(NewFVF) {
ID3DXMesh *pTempMesh;
// Use CloneMeshFVF to convert mesh
if(FAILED(hr=pLoadMesh−>CloneMeshFVF(LoadFlags, NewFVF, pDevice, &pTempMesh))) { ReleaseCOM(AdjacencyBuffer);
ReleaseCOM(MaterialBuffer); Rel