Adobe
®
by Michael Rohde
Adobe
®
111 River Street Hoboken, NJ 07030-5774
www.wiley.com
Copyright © 2013 by John Wiley & Sons, Inc., Hoboken, New Jersey Published by John Wiley & Sons, Inc., Hoboken, New Jersey Published simultaneously in Canada
No part of this publication may be reproduced, stored in a retrieval system or transmitted in any form or by any means, electronic, mechanical, photocopying, recording, scanning or otherwise, except as permit-ted under Sections 107 or 108 of the 1976 Unipermit-ted States Copyright Act, without either the prior written permission of the Publisher, or authorization through payment of the appropriate per-copy fee to the Copyright Clearance Center, 222 Rosewood Drive, Danvers, MA 01923, (978) 750-8400, fax (978) 646-8600. Requests to the Publisher for permission should be addressed to the Permissions Department, John Wiley & Sons, Inc., 111 River Street, Hoboken, NJ 07030, (201) 748-6011, fax (201) 748-6008, or online at http:// www.wiley.com/go/permissions.
Trademarks: Wiley, the Wiley logo, For Dummies, the Dummies Man logo, A Reference for the Rest of Us!, The Dummies Way, Dummies Daily, The Fun and Easy Way, Dummies.com, Making Everything Easier, and related trade dress are trademarks or registered trademarks of John Wiley & Sons, Inc. and/or its affiliates in the United States and other countries, and may not be used without written permission. Adobe is a regis-tered trademark of Adobe Systems Incorporated. All other trademarks are the property of their respective owners. John Wiley & Sons, Inc. is not associated with any product or vendor mentioned in this book.
LIMIT OF LIABILITY/DISCLAIMER OF WARRANTY: THE PUBLISHER AND THE AUTHOR MAKE NO REPRESENTATIONS OR WARRANTIES WITH RESPECT TO THE ACCURACY OR COMPLETENESS OF THE CONTENTS OF THIS WORK AND SPECIFICALLY DISCLAIM ALL WARRANTIES, INCLUDING WITH-OUT LIMITATION WARRANTIES OF FITNESS FOR A PARTICULAR PURPOSE. NO WARRANTY MAY BE CREATED OR EXTENDED BY SALES OR PROMOTIONAL MATERIALS. THE ADVICE AND STRATEGIES CONTAINED HEREIN MAY NOT BE SUITABLE FOR EVERY SITUATION. THIS WORK IS SOLD WITH THE UNDERSTANDING THAT THE PUBLISHER IS NOT ENGAGED IN RENDERING LEGAL, ACCOUNTING, OR OTHER PROFESSIONAL SERVICES. IF PROFESSIONAL ASSISTANCE IS REQUIRED, THE SERVICES OF A COMPETENT PROFESSIONAL PERSON SHOULD BE SOUGHT. NEITHER THE PUBLISHER NOR THE AUTHOR SHALL BE LIABLE FOR DAMAGES ARISING HEREFROM. THE FACT THAT AN ORGANIZATION OR WEBSITE IS REFERRED TO IN THIS WORK AS A CITATION AND/OR A POTENTIAL SOURCE OF FUR-THER INFORMATION DOES NOT MEAN THAT THE AUTHOR OR THE PUBLISHER ENDORSES THE INFOR-MATION THE ORGANIZATION OR WEBSITE MAY PROVIDE OR RECOMMENDATIONS IT MAY MAKE. FURTHER, READERS SHOULD BE AWARE THAT INTERNET WEBSITES LISTED IN THIS WORK MAY HAVE CHANGED OR DISAPPEARED BETWEEN WHEN THIS WORK WAS WRITTEN AND WHEN IT IS READ.
For general information on our other products and services, please contact our Customer Care Department within the U.S. at 877-762-2974, outside the U.S. at 317-572-3993, or fax 317-572-4002. For technical support, please visit www.wiley.com/techsupport.
Wiley publishes in a variety of print and electronic formats and by print-on-demand. Some material included with standard print versions of this book may not be included in e-books or in print-on-demand. If this book refers to media such as a CD or DVD that is not included in the version you purchased, you may download this material at http://booksupport.wiley.com. For more information about Wiley products, visit www.wiley.com.
Library of Congress Control Number: 2013933947
ISBN 978-1-118-33592-5 (pbk); ISBN 978-1-118-46204-1 (ebk); ISBN 978-1-118-64411-9 (ebk); ISBN 978-1-118-64415-7 (ebk)
About the Author
Dedication
Author’s Acknowledgments
side the U.S. at 317-572-3993, or fax 317-572-4002.
Some of the people who helped bring this book to market include the following:
Acquisitions, Editorial, and Vertical Websites
Project Editor: Pat O’Brien
Senior Copy Editor: Barry Childs-Helton
Technical Editor: Corrinna Rainwater
Editorial Manager: Kevin Kirschner
Editorial Assistant: Annie Sullivan
Sr. Editorial Assistant: Cherie Case
Cover Photo: © iStockphoto.com/Cary Westfall
Composition Services
Project Coordinator: Katie Crocker
Layout and Graphics: Jennifer Creasey, Joyce Haughey
Proofreader: Toni Settle
Indexer: Potomac Indexing, LLC
Publishing and Editorial for Technology Dummies
Richard Swadley, Vice President and Executive Group Publisher
Andy Cummings, Vice President and Publisher
Mary Bednarek, Executive Acquisitions Director
Mary C. Corder, Editorial Director
Publishing for Consumer Dummies
Kathleen Nebenhaus, Vice President and Executive Publisher
Composition Services
Contents at a Glance
Introduction ... 1
Part I: Getting Started with Adobe Edge Animate ... 7
Chapter 1: Introducing Adobe Edge Animate CC ... 9
Chapter 2: Discovering Awesome Features and Tools ... 23
Chapter 3: Working with a New Composition ... 37
Part II: Adopting Tools and Techniques ... 53
Chapter 4: Using the Timeline for the First Time ... 55
Chapter 5: Working with Triggers, Actions, Labels, and Cursors ... 77
Chapter 6: Embracing the Workspace... 91
Part III: Formatting and Animating ... 111
Chapter 7: Animating with the Transform Tool and Properties Panel ... 113
Chapter 8: Formatting Element Visibility, Positioning, and Sizing ... 131
Chapter 9: Animating Background Color, Borders, Corners, Shadows, and Clipping ... 149
Chapter 10: Animating and Formatting Text Boxes ... 171
Chapter 11: Using the Elements Panel ... 183
Chapter 12: Using the Library Panel ... 193
Part IV: Putting Your Animation to Use ... 209
Chapter 13: Creating a Project Structure ... 211
Chapter 14: Preparing Your Animation for Publication ... 223
Chapter 15: Putting Your Project on the Web... 239
Part V: Creating Sample Projects ... 247
Chapter 16: Creating an Interactive Slideshow Animation ... 249
Chapter 17: Synchronizing Elements in an Animation ... 259
Chapter 18: Building an Interactive Tutorial ... 269
Chapter 19: Animating an Interactive Children’s Book ... 281
Chapter 20: Animating Navigation Menus ... 297
Chapter 23: Ten Online Resources ... 329 Chapter 24: Ten Web Design Trends ... 335
Table of Contents
Introduction ... 1
Foolish Assumptions ... 1
How This Book Is Organized ... 2
Part I: Getting Started with Edge Animate ... 2
Part II: Adopting Tools and Techniques ... 3
Part III: Formatting and Animating... 3
Part IV: Putting Your Animation to Use ... 3
Part V: Creating Sample Projects ... 4
Part VI: The Part of Tens ... 4
Icons Used in This Book ... 4
Where to Go From Here ... 5
Part I: Getting Started with Adobe Edge Animate ... 7
Chapter 1: Introducing Adobe Edge Animate CC . . . .9
Adobe Wants You to Create the Web ... 10
Introducing the Edge suite... 10
Your tools are in the cloud ... 11
Creating animated web content ... 11
Collaborating with other publishing tools... 12
Highlighting the Critical Features ... 13
Maintaining Browser Compatibility ... 13
A brief history of HTML ... 14
Concerns with HTML5 and older browsers ... 14
Desktop browser compatibility ... 15
What to do for Internet Explorer 8 and older versions ... 15
Compatibility with tablet and mobile browsers ... 17
Creating an Edge Animate Composition ... 17
Gathering your assets ... 18
Creating an outlined approach to your animation ... 18
Making symbols for frequently used elements ... 18
Animators, start your animating ... 19
Saving and exporting your animation ... 19
Finishing the process ... 21
Chapter 2: Discovering Awesome Features and Tools . . . .23
Meeting Your Most-Used Animation Tools ... 23
Putting a spotlight on the Stage ... 24
Engaging the intuitive, accurate, and flexible Timeline ... 25
Drawing with familiar tools ... 26
Exploiting Features That Interact and Adapt ... 27
Implementing interactivity intelligently ... 27
Using Symbols to make reusable objects ... 28
Incorporating responsive web design ... 29
Counting your multiple publishing options ... 29
Putting your best font forward... 30
Working in your language of choice ... 31
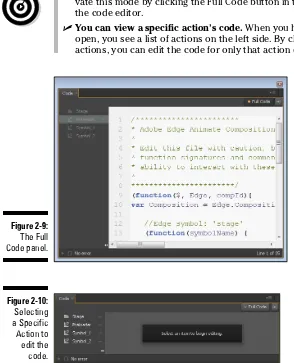
Digging into the Code ... 32
Working in native HTML ... 32
Coding easily with the persistent code panel ... 34
Pulling in the JavaScript API ... 35
Chapter 3: Working with a New Composition . . . .37
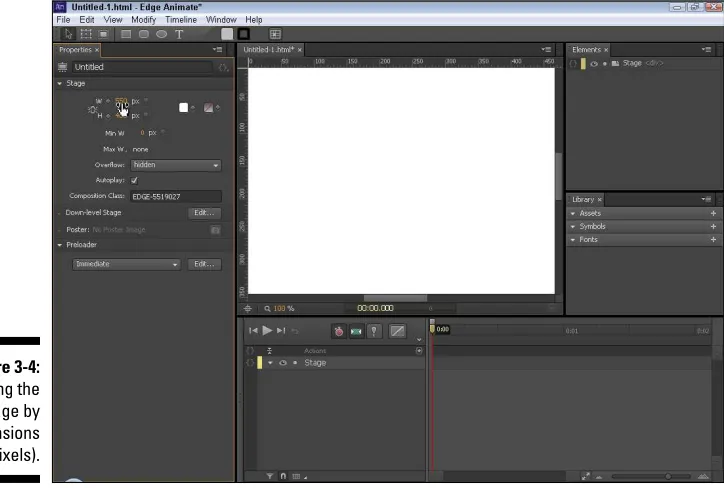
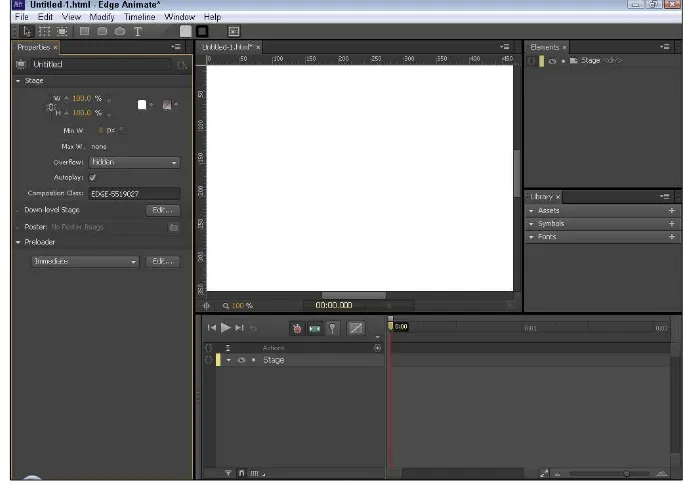
Starting a New Composition ... 37
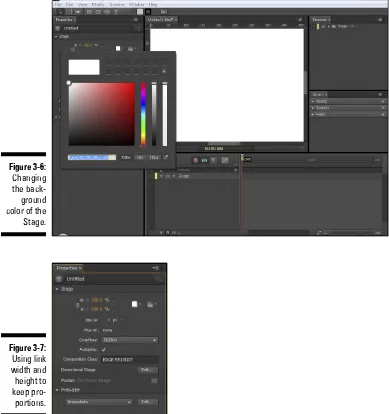
Resizing the Stage ... 40
Importing HTML ... 43
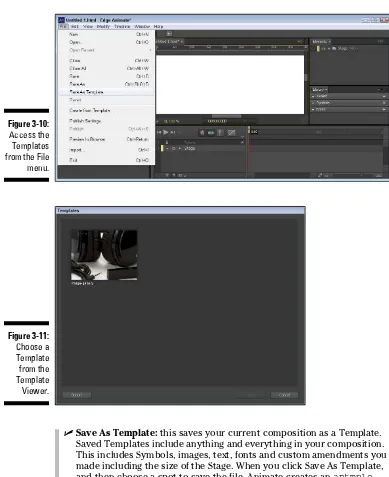
Working with Templates ... 45
Drawing and Editing Elements, Importing Images, and Writing Text ... 48
Drawing rectangles ... 48
Creating rounded rectangles ... 49
Drawing ellipses ... 49
Editing the Corners of Elements ... 50
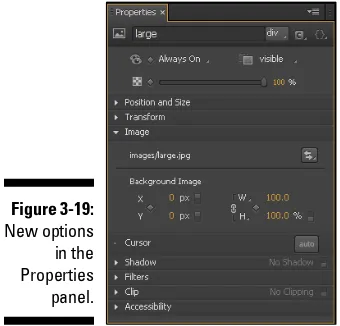
Importing images ... 51
Writing text ... 52
Part II: Adopting Tools and Techniques ... 53
Chapter 4: Using the Timeline for the First Time . . . .55
Controlling the Timeline ... 55
Play, Rewind, and Fast Forward ... 56
Return to Last Play Position ... 56
Toggling the Timeline Modes ... 57
Keyframes modes ... 58
Auto-Transition mode ... 59
Toggling the Pin ... 60
Easing tool ... 61
The Playhead and the Pin ... 61
Working with Keyframes and Animation Sequences ... 62
Creating sequences ... 62
xv
Table of Contents
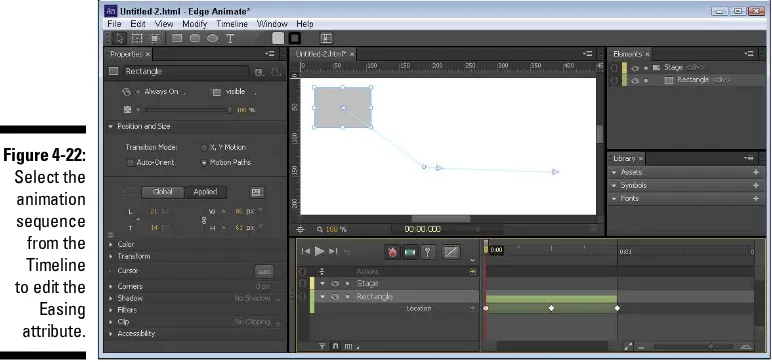
Selecting sequences ... 70
Editing sequences ... 71
Copying and pasting keyframes and sequences ... 72
Finer Details of the Timeline and Stage Controls ... 72
Stage controls ... 73
Timeline controls ... 74
Chapter 5: Working with Triggers, Actions, Labels, and Cursors . . . .77
Inserting Stage Triggers ... 78
Adding triggers to the Stage ... 78
Labeling Key Points ... 81
Creating labels ... 81
Associating labels with actions and triggers ... 82
Inserting Element Actions ... 83
Adding actions to elements ... 85
Using focus as an action ... 87
Adding Cursor Attributes ... 88
Cursor attribute types ... 89
Adding cursor attributes ... 89
Chapter 6: Embracing the Workspace . . . .91
Clicking and Dragging the Panels ... 91
Creating a stacked view ... 92
Creating a tabbed view... 93
Moving a panel back to its original position ... 94
Stacking panels side by side ... 95
Manipulating the Panels and Frames ... 95
Undocking panels... 96
Undocking frames ... 97
Maximizing the frame ... 98
Saving a custom workspace view ... 98
Reverting to the default view ... 100
The Constantly Changing Properties Panel ... 101
Specific properties for the Stage ... 101
Consistent properties for all elements ... 103
Specific properties for specific elements... 105
Part III: Formatting and Animating ... 111
Chapter 7: Animating with the Transform Tool
and Properties Panel . . . .113
Transforming with the Transform Tool and Properties Panel ... 114
Turning a selected element into a transform selection ... 114
Understanding the Center Transform Origin ... 116
Positioning the center point ... 116
Animating with the center point ... 117
Creating Animations with the Transform Tool ... 119
Animating the border radius ... 119
Animating the location of an element ... 121
Spinning elements ... 121
Animating with the Transform Tool or the Properties Panel ... 124
Skewing elements ... 124
Scaling elements ... 126
Rotating elements ... 128
Chapter 8: Formatting Element Visibility, Positioning, and Sizing . . . 131
Setting the Visibility of Elements ... 131
Element Visibility on the Stage ... 132
Animating the visibility of elements ... 132
Adding scroll bars, hidden, visible, or auto ... 135
Visible Overflow property ... 136
Scroll Overflow property ... 137
Auto Overflow property ... 138
Animating with Opacity ... 138
Configuring Positioning and Sizing ... 139
Setting the relative position ... 140
Global or Applied settings ... 141
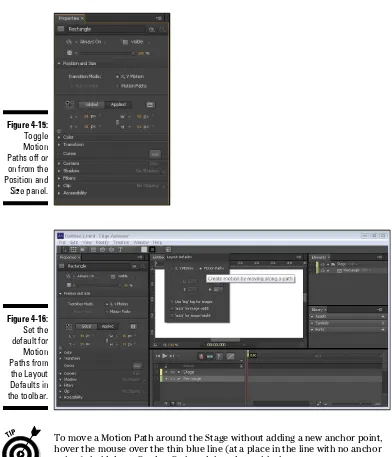
Layout presets ... 144
Minimum and maximum sizing ... 146
Chapter 9: Animating Background Color, Borders, Corners,
Shadows, and Clipping . . . .149
Applying Color ... 149
Using the color graph ... 151
Using the color gradients ... 153
Choosing a border style ... 158
Rounding Corners ... 158
One, four, or eight different points ... 159
Animating rounded corners ... 160
Adding Shadows ... 161
Shadow properties... 161
Animating shadows ... 163
Using Filters ... 164
Unveiling the Clipping Tool ... 165
Selecting the area ... 165
xvii
Table of Contents
Chapter 10: Animating and Formatting Text Boxes . . . .171
Applying Text Properties ... 172
Basic text formatting ... 172
Using HTML tags ... 176
Advanced Text Formatting ... 178
Animating Text ... 179
Built-in animation properties ... 179
Other animation effects ... 180
Chapter 11: Using the Elements Panel . . . .183
Operating in the Elements Panel ... 183
Managing Stage actions ... 184
Setting visibility... 187
Locking elements ... 188
Nesting elements ... 188
Coordinating with the Timeline ... 189
Copying and pasting ... 190
Naming elements... 191
Chapter 12: Using the Library Panel . . . .193
Positioning Images ... 193
Adding images ... 194
Deleting and renaming images ... 195
Administering Symbols ... 196
Creating Symbols ... 196
Editing Symbols... 198
Adding features ... 200
Exporting and importing Symbols ... 203
Managing Fonts ... 204
Selecting fonts ... 204
Adding Google web fonts ... 206
Part IV: Putting Your Animation to Use ... 209
Chapter 13: Creating a Project Structure . . . .211
Understanding the Files Edge Animate Creates ... 211
Saving your composition ... 212
Image folders ... 217
Creating Edge Animate Files for Use with Other Software Tools ... 218
Edge Animate package ... 220
iBooks folder ... 220
Web folder ... 222
Chapter 14: Preparing Your Animation for Publication. . . .223
Guarding Against Internet Explorer 8 and Older ... 223
Using the poster ... 224
Using the down-level Stage ... 226
Using the Preloader ... 228
Choosing either the Immediate or Polite option ... 229
Choosing the preloader art ... 230
Using the Publishing Settings and Publish ... 233
Using the web options ... 234
Using the Edge Animate Deployment Package ... 236
Publishing as iBooks / OSX ... 237
Chapter 15: Putting Your Project on the Web . . . .239
Posting Your Composition as a Standalone Page ... 240
Uploading your animation through your own hosted site ... 240
Uploading to your hosted site through FTP ... 241
Creating a new directory for your composition ... 241
Adding Your Project into an Existing Web Page ... 242
Putting Your Composition into a Joomla! Site ... 243
Part V: Creating Sample Projects ... 247
Chapter 16: Creating an Interactive Slideshow Animation . . . .249
Overall Steps for Creating a Slideshow ... 249
Setting Up Images and the Stage ... 250
Animating the First Slide ... 251
Animating the Second Slide ... 253
Adding the Finishing Touches ... 254
Adding a loop ... 255
Adding Play and Stop buttons ... 256
Adding the Cursor attributes ... 257
Chapter 17: Synchronizing Elements in an Animation. . . .259
Drawing Elements onto the Stage ... 259
Rotating an Element ... 261
Synchronizing More than One Element ... 262
Using Easing ... 264
xix
Table of Contents
Chapter 18: Building an Interactive Tutorial . . . .269
Placing the Navigation Bar ... 271
Animating the First Step of the Tutorial ... 272
Using clipping for the callout lines ... 272
Create segments in the Timeline for each step... 274
Using Stage triggers to stop the tutorial from advancing ... 274
Adding the Interactivity ... 275
Creating the forward and back arrows ... 276
Creating the quick tip ... 277
Chapter 19: Animating an Interactive Children’s Book . . . .281
Overview Planning ... 281
Formatting the Text Boxes ... 283
Creating a different text box for each element ... 283
Using shadow on text appropriately ... 284
Creating a Segmented Timeline ... 285
Navigating the Story ... 286
Placing the next and back navigation... 286
Building the table of contents ... 288
Chapter 20: Animating Navigation Menus. . . .297
Creating a One-Page Website ... 297
Creating the top-level menu items ... 298
Creating the sub-level menu items ... 299
Navigating to new content ... 303
Navigating with Mouseovers and Open URL Actions ... 305
Placing the artwork and the text... 305
Adding the mouseover text ... 306
Adding the mouseover and open URL actions ... 307
Adding text links ... 308
Chapter 21: Building a Responsive Web Design . . . .311
Starting at the Stage ... 311
Setting the Layouts ... 313
Using the layout defaults for responsive design... 314
Using the layout preferences for a responsive web design... 315
Testing Your Animation’s Responsiveness ... 317
Part VI: The Part of Tens ... 321
Chapter 22: Ten Users of Edge Animate . . . .323
Animating with Edge Animate ... 323
Designing with Edge Animate ... 323
Learning from Edge Animate Projects ... 324 Working with Edge Animate as a Professional ... 324 Animating as a Hobby ... 325 Selling with Edge Animate ... 326 Specializing Your Content ... 326 Gaming with Edge Animate ... 327 Using the Responsive Web Design Tools ... 327
Chapter 23: Ten Online Resources . . . .329
Adobe Links to the Creative Cloud ... 329 Online Font Resources ... 330 Referencing the APIs ... 331 The W3C ... 332 Adobe Fireworks ... 332 Browser Usage ... 332 FTP Recommendation ... 333 Web Hosts ... 333 Content Management Systems ... 333 Adobe Edge Animate CC For Dummies Online ... 334
Chapter 24: Ten Web Design Trends. . . .335
More Imagery and Illustration ... 335 Horizontal Scrolling ... 336 Vertical Scrolling ... 336 Fixed Headers ... 336 Creative Navigation ... 337 Storytelling ... 337 Navigating within One Page ... 337 Moving Away from Flash ... 338 HTML5, CSS3, and JavaScript ... 338 Responsive Web Design ... 339
Introduction
M
y interest in Edge Animate started when my editor at HTMLgoodies. com sent me an e-mail asking if I was interested in covering a couple of new software titles that Adobe was working on. The first title was Adobe Muse, a website creation tool aimed primarily at designers. The other title was Adobe Edge, which was later renamed as Adobe Edge Animate CC. As a person who prides himself on always wanting to learn new things, I took up my editor’s offer, and I downloaded a free preview of Edge. From there, I wrote several articles for HTMLgoodies on how to use Edge and what it could do. My interest became so deep that I wanted to pursue writing a book on the topic. Now, more than a year later, you’re holding that book in your hands. I was lucky enough to be involved with the Adobe developers who created Edge Animate. I attended the Customer Advisory Board meetings online and took careful notes for each new preview release. I had to keep my mouth shut under terms of an NDA, and it was tough to not start writing articles right away on new features that were about to be announced. It was very exciting watching the software develop over the months. I saw new features added, then removed, then implemented back in. I provided some of my own input on what features I would like to see added and how the tool could be used. Hopefully, through this book, I can convey everything I learned over the past year to you in a simple, easy-to-understand format that even the most inexpe-rienced designer, animator, developer, or hobbyist can learn from and appre-ciate. It is my sincere wish that you learn how to use Adobe Edge Animate CC so that you can use it effectively in your day-to-day work. You can find me on both Facebook (www.facebook.com/AdobeEdgeAnimateForDummies) and Twitter (https://twitter.com/AnimateDummies).Foolish Assumptions
If you picked up this book looking for a replacement for Adobe Flash, then you may want to keep searching. Although it may be true that Edge Animate may eventually replace Flash, that isn’t going to happen now or in the next year or two. I wrote this book assuming that you’ve never worked in Flash or even know the first thing about Flash. In fact, just forget about Flash altogether. You will never read a sentence that begins with, “Just like in Flash, you can. . . .”
Adobe Edge Animate CC For Dummies is focused on the future, and there is very little discussion on the past.
How This Book Is Organized
This book was painstakingly organized, then torn apart, then put together again. The end result is a highly polished, extremely well put together book that will have you jumping from one chapter to the next. The editors did an excellent job of trying to make me, as the author, look good. Here’s what we wound up with.
Part I: Getting Started with Edge Animate
In the first part of this book, I walk you through the background of the Edge suite of tools that Adobe has put together as a means for web developers to help create the web. I also discuss browser concerns and compatibility, which, I hope, becomes an obsolete chapter in the coming years.
I also go into detail on how you can design interactive and adaptive presen-tations using Edge Animate. This includes the ability to reuse symbols for multiple projects, incorporating a responsive web design, figuring out the multi-featured publishing options, and more.
Also included in the first part is a process for creating an animation project with ideas on how to present your project online. After all, what good is an animation that lives only on your desktop — put it online and let the world see your creation!
3
Introduction
Part II: Adopting Tools and Techniques
The second part of this book dives in to a discussion on the tools and fea-tures of Adobe Edge Animate CC. I go into detail on using the Timeline, work-ing with keyframes, and understandwork-ing how the Stage works.
I also start discussions on working with triggers, actions, labels, and adding attributes to cursors. All these features enable you to make animations that your audience can interact with.
Part II finishes with details on using the workspace and customizing it as you prefer. You can manipulate all of the frames and panels to appear to your liking. What’s more, you can save your own custom layout for use with future projects.
Part III: Formatting and Animating
The third part of this book is all about the formatting and animating. At this point, you really get to the meat of the Edge Animate software. I go into detail on the Transform tool, setting visibility, positioning, and sizing. In addition, there are whole chapters on animating color, borders, corners, shadows, and more. This includes animating and formatting text boxes.
This part concludes with chapters on using the Elements panel, the Library panel, and even more on fonts. There’s a ton you can do with Edge Animate, and these chapters are geared to make it all the more user-friendly.
Part IV: Putting Your Animation to Use
All the formatting and animating in the world would be pointless if you couldn’t put your animation to use. That’s where Part IV comes into play. I devote pages of text to explaining about the Edge Animate project structure and the files that Edge Animate generates, including files for use with Apple iBooks and Adobe’s InDesign.
Part V: Creating Sample Projects
Part V was my favorite to write. This is where I could put to practical use everything taught in all of the proceeding chapters. While writing these sec-tions, I tried to go as step-by-step as possible, but I also assumed that you took the time to become familiar with the basics. After all, you have to crawl before you can walk, and you have to walk before you can run.
After you start running through this part, you will be creating slideshows, interactive tutorials, and even animated children’s books. You also find out how to synchronize elements and how to use easing and rotating effectively. In addition, I present examples on how to create navigation for one-page sites such as infographics or even a restaurant site. I even include how to incorpo-rate your slideshow as a symbol into another site. I found it very cool to tie so many different aspects together for a cohesive project.
The last chapter in this part may prove the most beneficial in terms of dis-covering some very cutting-edge web techniques in terms of developing a responsive web design. Creating animations that can respond to screen size is a growing trend in web development, and the very first version of Adobe Edge Animate CC has you covered.
Part VI: The Part of Tens
The “Part of Tens” rounds this book out with a couple of top-ten lists. What
For Dummies book would be complete without this section? Here, I present one list of the top ten users of Adobe Edge Animate CC and follow that up with a list of resources that are sprinkled throughout this book.
Icons Used in This Book
I use several icons throughout this book as a way to draw your attention to special information. Depending on the icon, this information is the type of stuff you can skip right over or give a quick glance, or in some really special cases, it’s the type of information that you may want to study closely.
5
Introduction
This entire book is full of Tip icons, ranging from special shortcut keys to per-forming tasks a different way than presented in the main text. Some tips con-tain useful information that doesn’t quite fit with the other text but that I still want to get across to you.
Ahhh, the dreaded Warning icon. This icon lets you know when pirates are about to attack. Whoops. Nope, that was for my other For Dummies book about sailing the high seas (that book doesn’t exist, at least, not yet). The Warning icon mostly denotes when things may not work or when you could be in danger of losing your project. I recommend reading the warnings.
The Remember icon presents information that’s useful keep in mind for other times. You own the book, so you don’t actually need to remember most of the stuff that’s in it. Just open the book and follow the instructions when you need to.
Where to Go From Here
This book works a couple of ways. If you want to comprehend the capabili-ties of Edge Animate and make projects with it, simply start at the beginning and follow through, page by page, until you reach the Index at the back. It’s worth the trip.
If you have a question about a feature, find it in the Index and jump straight to that page.
Occasionally, we have updates to our technology books. If this book does have technical updates, they’ll be posted at www.dummies.com/go/ edgenaimatefdupdates.
I can’t promise that every word will have you riveted to your seat with hands trembling in anticipation as you turn the page, but I can sincerely tell you that I wrote this book to show you, in the best possible way that I could, how to use Adobe Edge Animate CC.
Part I
Getting Started with
Adobe Edge Animate
✓ Cruising the Adobe Creative Cloud
✓ Applying Edge Animate as a solution
✓ Exploring options
✓ Creating a composition
Chapter 1
Introducing Adobe Edge Animate CC
In This Chapter
▶ Cruising the Adobe Creative Cloud and where Edge Animate fits in
▶ Using Edge Animate compatibly with Adobe software, tools, and services
▶ Spotting where Edge Animate projects work and don’t work and how Adobe addresses those concerns
▶ Introducing the Edge Animate animation process
▶ Noting how Edge Animate just may eventually replace Flash
I
n this chapter, I show you the Adobe Creative Cloud and all the tools, services, apps, and software titles available; this includes Adobe Edge Animate CC. Adobe has fully embraced the cloud; now you can get the latest updates and features without having to wait for the next full version. A sub-scription to the Creative Cloud means access to all the latest developments. What’s even better is that Edge Animate is fully compatible with many of the titles in the Creative Cloud — with more features added regularly.Edge Animate uses HTML5, which (even now) not all browsers support. Fortunately, Adobe provides features that help you when your audience isn’t using modern browsers. Most likely you’ll find there’s more support for HTML5 these days than for Flash; the jury is still out on what this means for the future of Flash.
Adobe Wants You to Create the Web
As part of introducing Edge Animate, Adobe also announced
✓ Edge Suite: An entire set of tools to help you create your part of the web.
✓ Creative Cloud: Everything you need to use Edge Animate is in the cloud.
✓ Design and development features: Edge Animate is great for both
designers and developers.
✓ Compatibility: Edge Animate works with many different software tools.
✓ Web-friendly animation features: Adobe Edge Animate CC comes with a
long list of features for creating modern web animations.
Introducing the Edge suite
In late September 2012, at the Create the Web event in downtown San Francisco, Adobe announced its entire suite of Edge tools and software. Through this event, Adobe reaffirmed its commitment to providing the best services for creative artists, web designers, and animators. It also cranked up support for HTML5 as the future of the World Wide Web. Flash animation is fading into the history books.
The Adobe Edge Suite is one part of the Creative Cloud that Adobe
announced (as shown in Figure 1-1 and featured in its own sidebar later in the chapter) consists of these tools:
✓ Edge Animate: The main tool for turning static graphics and text into modern web animations.
✓ Reflow (planned for release after the publication of this book): Geared toward helping designers to create a responsive web design.
✓ Code: You can use Code to preview CSS, edit code, and integrate other code for design work.
✓ Inspect: An excellent app that allows you to synch your desktop to your mobile device so you can install updates as they happen.
✓ Web Fonts: Free fonts that you can use with Edge Animate.
✓ Typekit: Another source of fonts that you can use with Edge Animate.
✓ PhoneGap Build: A tool for creating mobile apps with HTML, CSS, and
11
Chapter 1: Introducing Adobe Edge Animate CC
Figure 1-1:
The Adobe Edge Suite is avail-able in the
Creative Cloud.
Your tools are in the cloud
All these tools and services are available through Adobe’s Creative Cloud — a one-stop shop for the majority of Adobe’s creative software (including Photoshop, After Effects, InDesign, Illustrator, Fireworks, Muse, and Dreamweaver). Most tools for most of these software products are compatible with Edge Animate. You can get started with the Creative Cloud with a free membership for 30 days that includes 2GB of cloud storage and limited access to services. You can find more about the Creative Cloud online at http://html.adobe.com.
Creating animated web content
Adobe Edge Animate CC is a brand new software tool that allows everyone from beginners to expert web designers to create animated web content. What separates Edge Animate from other animation tools is that it uses the most advanced standards and methodology in its code. This rampant moder-nity includes the use of HTML5 and JavaScript — in particular, jQuery. Adobe is providing the best of both worlds to accommodate all types of animators:
✓ If working with jQuery sounds scary, even if that’s a good kind of scary, it shouldn’t. Edge Animate does all the coding for you. All you have to do is conjure up the creative aspects of your design.
Collaborating with other publishing tools
While Edge Animate is a terrific tool for creating online content, it doesn’t actually publish your animation online. Fortunately, Edge Animate is compat-ible with several publishing tools, applications, and platforms. Here’s a quick look at each tool and application.
iBook Files
If you weren’t already aware, iBooks is one of the most popular and most downloaded apps for Apple devices, including iPhones and iPads.
By using Edge Animate to create your compositions, you can feel confident that your audience will see your animation play flawlessly on some of the most popular phones and tablets around. Even better, you can export your Edge Animate composition in formats that are compatible for use with Apple’s iBook Author.
Adobe InDesign
InDesign is desktop publishing software that is also made by Adobe. It allows you to create pages for print, tablets, and other platforms and devices. InDesign is also part of Adobe’s Creative Cloud and works well with Edge Animate. Exporting files from Edge Animate is a matter of clicking a few menu items and then it’s only a matter of placing the files into InDesign.
InDesign outputs ePUB documents that work on the Apple iPad. The iBook app for the iPad uses the ePUB format. Through these tools, you are provided another way to incorporate your animation compositions into iBooks.
Adobe Dreamweaver
Adobe Dreamweaver has been helping budding web developers create websites since 2005, which is when Adobe acquired Dreamweaver from Macromedia. Using Dreamweaver, a web designer can whip up HTML websites and mobile apps with cross-platform compatibility, loads of features, and multiscreen previews. Now, with the release of Edge Animate 1.0, Adobe has updated Dreamweaver to include support for your animation projects: You can con-tinue building websites in Dreamweaver and import your projects from Edge Animate.
Adobe Fireworks
13
Chapter 1: Introducing Adobe Edge Animate CC
Adobe Muse
Adobe Muse is another tool for the website builder, aimed directly at design artists with little or no coding skill. Muse is brand new; a preview was released in 2012.
If you’re a designer who’s comfortable with creating print layouts, then work-ing with Muse should come naturally. Plus, if you want your design site to feature a composition made in Edge Animate, such projects are easy to add to your Muse site.
Adobe Inspect
Adobe Shadow was renamed Inspect in late 2012.
Presently, Flash won’t work on several types of devices — but Edge Animate will — and you’ll want to preview your work on as many different screen sizes as you can. That’s where Inspect comes into play. This tool allows you to view updates that you make to your animation on a variety of devices instantly.
Highlighting the Critical Features
Adobe Edge Animate CC is about more than just web animation. Some
advanced web designers have already created entire sites using Edge Animate; don’t be surprised if Edge Animate replaces Flash in the near future. The rea-son’s a no-brainer: Because Edge Animate uses HTML5 and JavaScript, this expands your potential audience by making your content available to view on modern browsers and a wider range of devices — even those that block Flash. The Edge Animate features that are most vital to web development include links, loops, interactivity, and a responsive web design. The limits on what you can do with Edge Animate rest mainly within the confines of your imagi-nation. With Edge Animate, you’ll create slide shows, logos, and sites; animated or not, with or without links, all text, all images, or a combination of text and images.
If you have a passion, or just have a passing interest in creating web anima-tion, then you at the very least owe it to yourself to check out Adobe Edge Animate CC — and to continue reading this book.
Maintaining Browser Compatibility
It also works on all tablets and smart phones that have modern browsers installed. For audiences that don’t use modern browsers, Edge Animate does provide a fallback option that you can use so that your animation does not appear broken. This fallback option is discussed later in this section.
Compatibility is important for web content; if a browser doesn’t support your code, then your animation won’t work. No wonder Adobe Edge Animate CC creates code that works in all modern browsers.
A brief history of HTML
HTML5 is the slowly evolving next iteration of HTML (HyperText Markup Language), the coding language that developers use to create web pages. The very first version of HTML was introduced in the early 1990s. HTML2 was released in 1995. In 1997, HTML3 came out and was closely followed by HTML4 — the version that most web developers are familiar with — which is presently the predominant markup language.
Over the past few years, enterprising developers have turned their attention to creating web content with HTML5, even though it isn’t the new standard for everyone — at least not yet. Modern web browsers, however, are already utilizing HTML5 functionality, and HTML5 will most likely become the norm for web development in the near future. Using and learning HTML5 now will put you ahead of the pack as the future of web development unfolds.
Concerns with HTML5 and older browsers
Many web developers are concerned that not all parts of HTML5 are compat-ible with all browsers. This is especially true with Internet Explorer. Where many features of HTML5 will work in browsers such as Chrome and Firefox, they will not always work in Internet Explorer. This leaves many web devel-opers questioning how widely they should start using HTML5. It isn’t in a web developer’s best interest to create web pages that don’t work in all browsers — but the future is still a bit murky, and lots of folks are content to use old browsers.
15
Chapter 1: Introducing Adobe Edge Animate CC
You don’t need to know HTML5, or even HTML, to use Edge Animate. But the more you know, the better off you’ll be if you need to use the code to help implement it for viewing. The Edge Animate software creates the code for you while you build your web animation.
When you save your Edge Animate file, the software creates several different files. One of those files has the .html filename extension. The HTML5 code is within the .html file. You can view this file with any plain text editor such as Notepad. After you’re done creating your composition, you can view the animation in a web browser — either from within the software, or by double-clicking the .html file, which opens and plays your animation in your default browser.
Desktop browser compatibility
Compatibility with the Microsoft Internet Explorer web browser is an issue that web developers have to contend with when developing sites. Microsoft has been slow to update Internet Explorer to be compatible with HTML5 — and code that works perfectly fine in Chrome, Safari, and Firefox doesn’t behave well in earlier versions of Internet Explorer.
For example, if you code a border to have rounded edges, then your corners will appear rounded off in Chrome and Firefox; but view that same site in IE and suddenly your rounded edges appear square. Issues like this can ruin a website’s design.
Browsers such as Firefox, Chrome, Safari, and Opera already support many aspects of HTML5. There are no concerns with Adobe Edge Animate CC com-positions working perfectly in these browsers. These browsers also have built-in automatic updates for their users. Because of that, web designers and developers can feel certain that their users are most likely using the most current version of that browser.
What to do for Internet Explorer 8
and older versions
use versions 7 and 8 — and (to many designers’ horror and dismay) IE 6 is still in use by many people.
Adobe Edge Animate CC compositions will not work in Internet Explorer 8 and older versions, just as HTML5 doesn’t work in IE6.
However, the good news is that more and more web users are upgrading their browsers, and usage of IE6 is slowly dwindling. With that said, though, Edge Animate works in all modern portable browsers. If your main goal is to create animated applications for use on smart phones and tablets, then you’re very much in luck.
If you’re creating web animations for an audience who still uses IE8 and older browsers, that lurking obsolescence can be a concern when you’re using Adobe Edge Animate CC. Say that you spend countless hours developing the perfect web animation and then put it online. You tested it in Firefox and IE 9, and it works perfectly. Then you walk across the hall to show it to your boss — and to your horror, it doesn’t work because your boss is using IE 6. Well, in the real world, there’s a good chance many of your clients and customers are also using an earlier version of IE that isn’t compatible with Edge Animate. Fortunately, Edge Animate has you covered with at least two options: You can (a) use Google Chrome Frame support or (b) use down-levelbrowser support — a feature that enables you to create a poster (a static image), or to use static HTML, to replace the animation — which keeps your website from appearing “broken.” Your audience sees an image that looks the way it’s supposed to look, even though it’s not animated. (Chapter 14 details down-level support.)
Google Chrome Frame support
Edge Animate has a feature that enables you to use Google Chrome Frame support for browsers that don’t support animation. As a next step to down-level browser support, you can publish Edge Animate content so that your audience can view it on IE 6, 7, or 8 using Google Chrome Frame. For the user who doesn’t already have Google Chrome Frame, you can also control the experience of installing it.
Edge Animate has down-level Stages
The down-level Stages in Edge Animate are versions of the Stage that you can use to create and publish a down-level version of your composition that will be compatible with browsers that don’t support HTML5 animation. (I go into detail on down-level Stage usage in Chapter 14.) The down-level Stages offer only minimal creation tools, but you can
✓ Import graphics and create text elements.
17
Chapter 1: Introducing Adobe Edge Animate CC
Basically, the animations that you create and place online can detect the browsers your audience is using. If the code detects that someone is using a non-compatible browser for your animation, then it reverts to showing a poster image instead of the animation. This saves your website from appear-ing broken. Instead of seeappear-ing an animation that doesn’t work, the audience sees a poster — a still frame — that you create from the animation.
Again, you don’t have to know code for the down-level Stage support to work. Although coding for browser detection can be tricky, Edge Animate has that capability built in — and it’s an option you can choose when you’re ready to publish.
Compatibility with tablet
and mobile browsers
Where Adobe Flash fails, Adobe Edge Animate CC works. It’s well known that Apple doesn’t allow Adobe Flash animation to work in its portable devices — and that includes the iPhone, iPod touch, and iPad. Steve Jobs, before his passing, stated that Flash had too many security vulnerabilities and other negative aspects for Apple to allow Flash to work with iOS.
Edge Animate, on the other hand, doesn’t suffer from those issues. Your Edge Animate compositions will work just fine on Apple products — and on Android devices — whether tablets of all types, smart phones, and other devices that use modern mobile browsers.
Creating an Edge Animate Composition
The process for creating an Edge Animate CC composition isn’t too different from creating any other type of content. When starting, you should consider what, where, and how you want your animation to appear. Will your animation be part of an existing website? Are you adding an animation to complement a book? Is your client requesting a brand new animated logo? Perhaps you want to create an advertisement to appear on the web? You can create all these projects using Edge Animate.
3. Write an outline.
4. Create and save commonly used elements such as buttons for re-use later.
5. Start animating.
6. Save and export your finished animation.
Before you start animating, consider whether your animation will be viewed in an e-reader, in the browser, in iBooks, or be an app for use on both iOS and Android devices.
No matter the device, if it supports HTML5 and JavaScript, your Edge Animate project will run smoothly.
Gathering your assets
After you know what you want to create and where you want it to appear, it’s time to start gathering your assets — electronically drawn images, photographs, paragraphs of text, or a combination of all three — that will make up the final animation. Edge Animate makes it easy to import or create these assets.
Creating an outlined approach
to your animation
At this point you have defined the purpose of your animation and the art to make it beautiful. Now you need to create a wireframe, essentially an outline of how you want your animation to play. Sure, you can wing it and make it up as you go along, but an excellent idea is to picture your animation in your head, and then put down on paper how you imagine your animation will play from start to finish. This outline provides a base from which you can work.
Making symbols for frequently
used elements
19
Chapter 1: Introducing Adobe Edge Animate CC
An element that you may want to reuse can be a button, or an asset that you re-use throughout the animation, or any type of navigation the audience can use.
After you create this element and have it behaving the way you want, you can then save it as a symbol. You can then export this symbol for use in other projects. That way, if this animation becomes a part of a series of animations and you want to re-use the same symbols, you’ll be ahead of the game by having some assets already saved and ready to go when you create the actual animation.
You can even save an entire animation project as a symbol. For example, if you create a slideshow animation, you can save that entire slide show as a symbol, which you can then export from Edge Animate — and then import into a different Edge Animate project. (Chapter 12 has the details on creating and working with symbols.)
Animators, start your animating
When you have a purpose for your animation, all of your assets are lined up and ready to go, and you’ve saved your multi-use elements as symbols, it’s time to start animating.
To start animating, you import your assets onto the Stage. Then you use the Timeline to create keyframes. A keyframe represents an animation sequence. For example, if you animate a box moving from one side of the Stage to the other, that animation is represented in the Timeline as a keyframe. (I go into the details of working with keyframes and the Timeline in Chapter 4.) From there, you add actions to your elements for interactivity. As you create your animation, you can preview it to make sure the animation is behaving as you expect it to behave.
Saving and exporting your animation
Adobe Edge Animate CC and the Creative Cloud
Adobe has embraced the cloud in a big way. Over the past few years, the term “cloud” has become a popular buzzword among the digerati (the tech gurus and their disciples) to mean all the documents, software, apps, pictures, and such that are stored online — which you can access through the Internet. When someone says, “it’s in the cloud,” the translation is, “it’s available online.”
Adobe’s answer to the cloud comes in the form of a feature called the Creative Cloud — an online location where you can find the latest versions of the vast majority of Adobe creative software titles. No longer do you need to wait for new features to sprout and full-version cycles to run their course before you can receive software updates. By placing everything in the cloud, Adobe can update your software as needed — that’s one of the main benefits of paying a subscription.
The software in the Creative Cloud includes Photoshop, InDesign, Flash, and much more. Brand new titles, as of 2013, include the Edge suite of tools.
The Edge suite of tools includes Edge Animate, Code, Inspect, Web Fonts, Typekit, PhoneGap Build, and an upcoming title currently called Reflow. Each of these tools serves a unique purpose, and they all tie in nicely together:
✓ Edge Code is all about coding the web. Currently in preview, you can use Code to preview CSS, edit code and integrate other code for design work. Code is based on an understanding of how HTML5, CSS3, and JavaScript work together and continually evolve. Adobe states that, “if you have the skills to use Edge Code, you also have the skills to customize the editor and contribute new features.” You can find more informa-tion here: http://html.adobe.com/ edge/code
✓ Edge Inspect is all about previewing the creative content that you create. Adobe knows that just because you might create your content on a desktop, that doesn’t mean your audience will view it on a desk-top monitor. Rather, your audience may view your content on a tablet, or a phone, or any other number of devices. Inspect allows you to wirelessly pair several differ-ent types of devices to the machine where you create the content. When you do this, you can then view the changes you make update instantly as you work. More infor-mation here: http://html.adobe. com/edge/inspect
✓ Edge Web Fonts is all about free web fonts. This large collection of fonts was gath-ered from sources such as Adobe, Google, and independent designers. Web Fonts is already available for use with Edge Code — and will eventually become a part of Edge Reflow as well. The fonts are served by Typekit, which leads us to . . . (More infor-mation here: http://html.adobe. com/edge/webfonts)
✓ Typekit is all about commercial fonts. Launched in September 2009 by Small Batch, Inc. (the folks behind Google Analytics), it was acquired by Adobe in October 2011. You can find over 700 fonts in Typekit and can search for them by clas-sification, properties, or recommended use. Adobe makes it very easy to add these fonts into your websites by copying and pasting a couple of lines of code into the head tag of your HTML. More information here: http://html.adobe.com/edge/ typekit
21
Chapter 1: Introducing Adobe Edge Animate CC
Finishing the process
Eventually, through this process, you’ve created an animation using HTML5 and jQuery — without typing a single line of code. Your audience may never know the technologies that made the animation they watch and interact with possible (for that matter, you may not fully understand the advanced coding techniques that make it possible — or ever have to). But that’s the beauty of Adobe Edge Animate CC: It does all the heavy lifting behind the scenes, which allows you to sit back and do what you do best — create beautiful animated and interactive content that can respond to fit and form with any number of screen sizes and devices.
Presenting Your Project Online
After pouring your blood, sweat, and tears going through the process of cre-ating your animation, you most likely want to put it online so that the world can enjoy your magnificent creation. There are many ways you can put your Edge Animate composition online or embed it in another tool for presentation, such as an iBook. Your animation can be a standalone web page, occupy part of a website as its own page, or be embedded in an existing page. You can add Edge Animate projects to content management systems (CMS) such as
With this tool, you build your app in the cloud, and Adobe keeps you current with the latest SDK (software development kit). Probably the most impressive feature to PhoneGap Build is that you can create iOS, Android, Windows Phone, Blackberry, webOS, and Symbian technologies, all from this one tool. More information here: http://html.adobe.com/edge/ phonegap-build
✓ Reflow is all about responsive web design, an upcoming trend in web design that content developers are paying attention to. A responsive web design allows you to design once and have your creation look great no matter the screen size your audi-ence is using. To get notified when a pre-view of Reflow becomes available, you can sign up here: http://html.adobe. com/edge/reflow
WordPress, Joomla!, or Blogger. See Chapters 13 through 16 for more infor-mation on posting your aniinfor-mation online.
When you save your Edge Animate project, the software creates many differ-ent files for you. One of those files is written in HTML5. You can upload this HTML file, along with the other files that Edge Animate creates, to the web via FTP to your site or your client’s site. Doing it that way allows you to create a single web page for your animation or make it part of a larger site.
It is also possible to embed your animation into an existing web page. If you want to do that, then you must still upload the files that Edge Animate creates for you to the folder structure of the site where the page lives. Then, you grab a snippet of code from the HTML file that Edge Animate created for you and place that snippet of code into the HTML file of the page where you want the animation to appear.
The snippet of code that you want to copy and paste from the Edge Animate HTML file to the HTML file of the page you want to embed your animation looks like this:
<!--Adobe Edge Runtime-->
<script type=”text/javascript” charset=”utf-8” src=”Untitled-1_edgePreload. js”></script>
<style>
.edgeLoad-EDGE-15449885 { visibility:hidden; } </style>
<!--Adobe Edge Runtime End-->
You also have to place a line of code such as this into the body tag of the page:
<div id=”Stage” class=”EDGE-13887483”>
For more about this requirement, see Chapter 15.
Chapter 2
Discovering Awesome
Features and Tools
In This Chapter
▶ Getting to know the essential animation tools
▶ Creating interactive, responsive animations
▶ Exploring font, language, and publishing options
▶ Seeing how Edge Animate supports your coding habit
A
dobe Edge Animate CC is a powerful, flexible program for creating and publishing animations for the web. In this chapter, I introduce you to many features of Adobe Edge Animate CC, including essentials such as the Stage, the Timeline, and familiar drawing tools. And I tell you about the options that Edge Animate provides for publishing and saving files, as well as choices it offers for your interface language and for web-friendly fonts. For those who like to dive below the surface, I describe the framework of the JavaScript API and working with native HTML in the code panels that Edge Animate places at your disposal. And — probably most important in this day and age of multiple screen sizes — you find out about creating a responsive web design that resizes itself to fit various devices.Meeting Your Most-Used Animation Tools
Building even a basic animation in Adobe Edge Animate CC involves using three primary tools:
✓ Timeline: This part of the screen is where you add keyframes and ani-mation sequences that make your composition come alive. From the Timeline you can edit where, when, and for how long an animation sequence takes place.
✓ Drawing toolbar: You can draw rectangles, rounded rectangles, and
even ellipses, including perfect circles, using the drawing tools. Also included is a Text tool so you can write text within your animation. Adding elements to your animation is one of the first steps in creating a composition in Edge Animate.
These three tools — the Stage, Timeline, and Drawing toolbar — are essential to creating an animation. The Stage is where your composition comes alive; the Timeline is where you plot your animation sequences; and the drawing tools help you create the elements that become the assets of your animation.
Putting a spotlight on the Stage
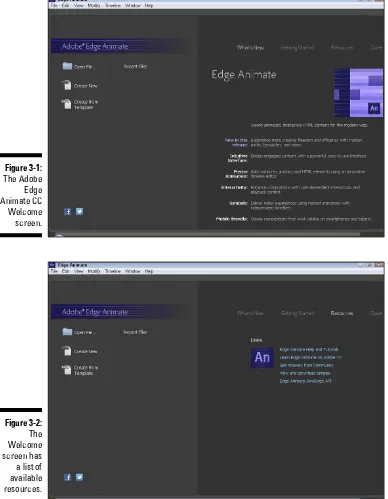
The majority of the Adobe Edge Animate CC interface consists of the Stage. The Stage is where you build your animations. When you first open Edge Animate, and you choose to create a new file, you’re presented with a crisp, white, blank Stage from which you can start to build your project (see Figure 2-1).
Figure 2-1: A blank Stage to get you started.
The Stage is located at the top center of the interface and has the following handy characteristics for creating your animations:
25
Chapter 2: Discovering Awesome Features and Tools
✓ It has rules and guides: Two additional features to the Stage are the rules and guides shown in Figure 2-2:
• One ruler runs along both the top of the Stage; another runs down
the length of the Stage on the left side. You can use these rulers to help place your assets (such as images and text) on the Stage.
• The guides are thin purple lines that stretch from the ruler across the Stage and to the opposite side of the screen. You can use these guides to help position your elements on the Stage. (Elements can be anything from drawn circles and rectangles to images to text boxes and other parts that make up the animation.)
Figure 2-2: The Stage, with hori-zontal and
vertical guides shown.
To place a guide on the Stage, place the cursor over the ruler, and then click and drag. The purple guide then appears. To move the guide around the Stage, click it and drag it.
After you place guides on the Stage, any elements (images, text boxes, and such) then snap to the guides. This helps you place elements exactly where you want them.
Engaging the intuitive, accurate,
and flexible Timeline
Besides the Stage, the Timeline is probably the feature you use most often with Edge Animate. You find the Timeline at the bottom of the screen, and it contains many features, as follows:
✓ Mode toggles: The Timeline also allows you to toggle different modes, such as Auto-Keyframes, Auto-Transitions, and the Pin, and you can choose different Easing attributes.
✓ Animation enhancements: From the Timeline, you can tweak your
anima-tion in multiple ways — for example, by adding acanima-tions (see Chapter 5), specifying filter elements (see Chapter 4), and enabling Timeline snapping (also Chapter 4).
Figure 2-3: The Timeline.
Drawing with familiar tools
If you’ve ever used other drawing or image editing software, then you most likely recognize the drawing tools available in Edge Animate. If Edge Animate is the first artistic software you’ve used, then just relax as you discover that drawing elements such as rectangles and circles is as easy as clicking and dragging.
You can locate the drawing tools at the top of the screen, directly underneath the menu, as shown in Figure 2-4.
Figure 2-4:
The drawing tools.
27
Chapter 2: Discovering Awesome Features and Tools
Exploiting Features That
Interact and Adapt
Adobe Edge Animate CC is about much more than moving elements around the screen. You can use many of its features to create interactivity for your audience — and fine-tune many more to configure the software to suit your preferences:
✓ Interactivity: You can build fully interactive animations with such controls and actions as buttons, links, and loops.
✓ Symbols: You can save elements you create (such as buttons) and use them again in a different animation.
✓ Responsive web design: Edge Animate enables you to build a composition that responds to browser and device window sizes.
✓ Multiple publishing options: Edge Animate offers numerous ways to
publish your animation for use in different applications — such as dif-ferent web browsers and iBooks — or you can import your Adobe Edge Animation into different Adobe products such as InDesign or Muse.
✓ Font choices: Edge Animate provides a multitude of font choices. If you’re fussy about particular fonts, the good news is that if you can find a font on the web, you can most likely use it in your animation.
✓ Choose your language: If English is not your native language and you prefer to work in (say) German, Spanish, French, or Japanese, then Edge Animate has you covered.
Implementing interactivity intelligently
Adobe Edge Animate CC enables you to do much more than just draw and ani-mate elements. You can also make those elements interactive, which allows your audience to click on items to make different actions happen. For example, you can make Stop, Play, and Pause buttons for an interactive slideshow. You can also create a menu by adding links that allow your audience to navigate to different parts of your animations — or to entirely different web pages.
Using Symbols to make reusable objects
At first, using Symbols may prove a bit daunting, but after you gain experi-ence working with them, they become indispensable.
So, what exactly is a Symbol? It’s essentially a nested animation you create that has its own independent Timeline and interactive capabilities. For example, say that you find yourself creating the same element with the same actions over and over for many different projects. By saving that recurring element as a Symbol, you can reuse it and its associated actions for any proj-ect. A prime example of a Symbol is a button. If you find yourself recreating the same button — say, a Play button for a slide show — you may want to save that Play button as a Symbol for reuse later.
You can find your Symbols in the Library panel, as shown in Figure 2-5.
Figure 2-5: How Symbols appear in the Library panel.
Edge Animate allows you to export and import Symbols. You can also copy and paste Symbols from one project to another for ease of use. You can even copy and paste Symbols that contain other Symbols. In addition, you can export a Symbol as a separate .ansym project and import it into another proj-ect. See Chapter 12 for information on creating and using Symbols.
29
Chapter 2: Discovering Awesome Features and Tools
Incorporating responsive web design
Right along with HTML5, responsive web design is the latest buzzword termi-nology when it comes to web development. A responsive web design allows your animation to resize appropriately depending on the size of the browser window. This can mean many things. Say, for example, someone is viewing your animation on a desktop computer. If the user resizes the browser window to make it bigger or smaller, the elements within your animation resize themselves appropriately, with the new sizes based on percentages. For example, if the browser window is maximized at 100%, the images and so forth in your animation appear at 100%. If the browser window is shrunk to 50% of its size, then your images also shrink to 50% of their normal size. This is a very powerful feature because there is such a wide variety of screen sizes these days. You never know whether your audience is viewing your animation on a 60-inch display, a 4-inch iPhone, or anything in between. Tablets add to the diversity of screen sizes.
Adobe Edge Animate CC handles responsive design by using percentages instead of hard coded pixels. This enables you to concentrate on your anima-tion and not have to worry about how it appears on a myriad of screen sizes.
Counting your multiple publishing options
You have more than one way to publish animations these days — and Adobe Edge Animate CC has you covered, offering a multitude of options (as shown in Figure 2-6). You can publish your animation as a standalone web page or you can embed it in an existing web page. You also find options that allow you to export your animation for use in an iBook. You can even publish your animation as a static HTML page for use on older web browsers that don’t support HTML5 or animations.
Figure 2-6:
The static HTML files are still written with HTML5, and the animations still play. The difference is that the elements are not created via JavaScript when Edge Animate generates the static file. Instead, they exist in the HTML file. This arrangement is good for search engine optimization (SEO): Some search engines, when they find elements created dynamically with JavaScript, don’t interpret those elements correctly.
Putting your best font forward
You can use a multitude of fonts on the web, and Adobe Edge Animate CC has you covered. In addition to a standard default list of fonts that are available to you (see Figure 2-7), Edge Animate also enables you to import fonts from around the web.
Figure 2-7:
Default font list.
If none of these fonts satisfy your needs, you can import fonts from many dif-ferent sources — including Google Web Fonts. You can also use Adobe Edge Web Fonts, which is built into Animate. And if you’re familiar with Typekit (another free font tool), you can celebrate knowing that tool also works with Edge Animate.
Keep in mind that Typekit is a tool for the very experienced user: You can also use your own font, or one that you purchased, but you have to host the font on your web server. To do so, you have to create a style sheet with an
31
Chapter 2: Discovering Awesome Features and Tools
1. In Edge Animate, in the Web Font dialog box, type this line:
<link href=”mystyle.css” rel=”stylesheet” type=”text/css”>
Another dialog box appears.
2. In this second dialog box, input the name of the font as specified in the style sheet.
If you need more information on how to write the Cascading Style Sheet (CSS) code for a custom font in the style sheet, you can find it here:
http://blog.freelancer-id.com/2010/06/02/custom-font-for-all-browsers/
I discuss fonts in more detail in Chapter 12.
Working in your language of choice
Adobe Edge Animate CC is global in many regards — including the language you see on menus and panels. If you feel more comfortable working in a lan-guage other than English, Edge Animate makes it easy for you to change the language used in the software to one of many popular languages.
From the Help menu, as shown in Figure 2-8, you can choose from several different languages. When you choose a language from the Help menu, that language appears in the software. The languages that you can choose from include German, English, Spanish, French, and Japanese.
Figure 2-8:
The Change Language option from the Help menu.