Advanced
Photoshop
Elements 6
For Digital Photographers
Focal Press is an imprint of Elsevier
Linacre House, Jordan Hill, Oxford OX2 8DP, UK
30 Corporate Drive, Suite 400, Burlington, MA 01803, USA
First edition 2008
Copyright © 2008, Philip Andrews. Published by Elsevier Ltd. All rights reserved
The right of Philip Andrews to be identified as the author of this work has been asserted in accordance with the Copyright, Designs and Patents Act 1988
No part of this publication may be reproduced, stored in a retrieval system or transmitted in any form or by any means electronic, mechanical, photocopying, recording or otherwise without the prior written permission of the publisher
Permissions may be sought directly from Elsevier’s Science & Technology Rights Department in Oxford, UK: phone (+44) (0) 1865 843830; fax (+44) (0) 1865 853333; email: [email protected]. Alternatively you can submit your request online by visiting the Elsevier website at http://elsevier.com/locate/permissions, and selecting Obtaining permission to use Elsevier material
Notice
No responsibility is assumed by the publisher for any injury and/or damage to persons or property as a matter of products liability, negligence or otherwise, or from any use or operation of any methods, products, instructions or ideas contained in the material herein.
British Library Cataloguing in Publication Data
A catalogue record for this book is available from the British Library
Library of Congress Cataloging-in-Publication Data
A catalog record for this book is available from the Library of Congress
ISBN: 978-0-240-52097-1
For information on all Focal Press publications visit our website at www.focalpress.com
Printed and bound in Canada
Layout and design by Karen and Philip Andrews in Adobe InDesign CS2 08 09 10 11 11 10 9 8 7 6 5 4 3 2 1
Acknowledgements
Karen for your support, love and patience always and Adrian and Ellena for keeping me balanced. And as always, my thanks goes to the great team at Focal Press, especially Marie Hooper, Emma Baxter, Stephanie Barrett, Debbie Clark and Margaret Denley – you always make me look good. Cheers to Richard Coencas and Don Day for their technical comments and direction and to the supportive staff at Adobe in the UK, Australia and USA offices. Much appreciation to Mike Leavy, Adobe Engineering Manager for Elements products and Nigel Atherton, editor of What Digital Camera and Better Digital Photography magazines for your kind words of introduction to this text.
Picture credits
CONTENTS
Contents
Foreword vi
Introduction viii
1
The Next Level 1The comprehensive Photoshop Elements workflow 4
Elements basics 6
Basic Elements workflow 10
2
Scanner and Camera Techniques 13The basics – resolution 14
2.01 How many pixels do I need? 16
The basics – color depth 18
2.02 More colors equal better quality 20
Digital shooting technique 22
2.03 Exposure compensation 24
Frame-by-frame control 25
2.04 Contrast 26
2.05 Color saturation 27
2.06 Image sharpness 28
2.07 White balance control 29
2.08 Applying fine-tuning automatically 33 2.09 Customizing your white balance 34 2.10 Shooting Raw for ultimate control 35
So what is in a Raw file? 37
The Raw advantage 39
2.11 Shooting workflows 40
Film and print scanners 41
2.12 Scanning resolution – ‘Know where you are going
before you start the journey’ 42
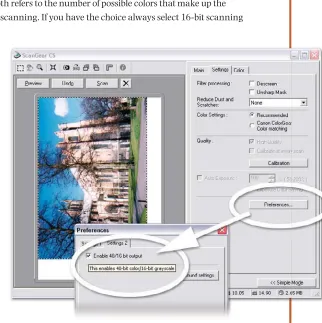
2.13 Color depth 43
2.14 Multi-sample 44
2.15 Highlight and shadow capture 45
2.16 Color cast correction 46
2.17 Dust and scratches 47
2.18 Noise Reduction technologies 48 2.19 Color regeneration features 49
2.20 Scanning workflow 50
Fixing common shooting problems 51 Fixing common scanning problems 53
3
Processing Raw files 55The Photoshop Elements approach to Raw processing 56
3.01 Enabling your Raw camera 57
3.02 Modifying your capture workflow for Raw 59 3.03 Using the Adobe Photo Downloader 61 3.04 The Adobe Camera Raw interface 64
3.05 The Conversion process 83
3.06 Keeping ACR up to date 88
3.07 Other Raw plug-ins 88
4
Photo Organization and Management 89 4.01 Add picture details in-camera 904.02 Organize photos whilst downloading 90
4.03 Captioning 92
4.04 Naming and renaming 92
4.05 Tagging your photos 93
4.06 Auto Face Tagging 94
4.07 Albums and how to group photos 95
4.08 Using Smart Albums 96
4.09 Changing your view 98
4.10 Locating files 100
4.11 Creating a backup 103
4.12 Versioning your edits 105
4.13 Creating Image Stacks 107
5
Pathways to Editing in Elements 109Auto editing summary 110
Automatic editing 110
Editing Options: 110
5.01 Auto Smart Fix 111
5.02 Auto Red Eye Fix 111
5.03 New auto options for version 6 111 Automating editing of several pictures at once 113 5.04 Processing multiple files 113 5.05 Multi-selection editing 114
5.06 Bulk Red Eye fixing 114
Semi-automatic editing 115
5.07 Using the Quick Fix Editor 115
Semi-auto editing summary 115
5.08 Adjust Smart Fix 116
Manual editing 117
5.09 The Full Edit workspace 117
Manual editing summary 117
New editing options in Photoshop Elements 6 119
5.10 Guided Edits 119
Non Destructive editing, the professional’s choice 120
5.11 Adjustment Layers 121
5.12 ‘All Layers’ tool options 122
5.13 Blend Modes 123
5.14 Layer Masking 124
5.15 Duplicate layers 125
Giving Elements a helping hand 127 5.16 Borrowing Photoshop features 127
5.17 Advanced layer masks 129
6
Image Changes – Beyond the Basics 131 Advanced selection techniques 132 6.01 Adding to and subtracting from selections 132 6.02 Using the Selection Brush 132 6.03 The Quick Selection Tool 134 6.04 Advanced refining of selection edges 135 6.05 Saving and loading selections 1376.06 Modifying selections 138
6.07 Transforming a selection 139
6.08 Precise control of selection size 141
Understanding layers 142
The magic of Frame layers 143
CONTENTS
6.09 Painting masks with the Selection Brush 147 6.10 Fill and adjustment layer masks 148 6.11 Using selections with layer masks 149 6.12 ‘Group with Previous’ masks 149 6.13 Changing the mode to grayscale 150 6.14 Desaturate the color file 151 6.15 A more sophisticated approach 153 6.16 The Convert to Black and White feature 154 6.17 Custom entries in Convert to Black and White 156 6.18 The Gradient Map conversions 157 6.19 Borrowing Photoshop’s Black and White 158 Advanced dodging and burning-in 159 6.20 Using selections to change tone 159 6.21 Erase back through tonal layers 161 6.22 Paint on dodging and burning-in 163 6.23 Blend mode Dodge and Burn 164 Enhance your poorly exposed pictures 165 6.24 Screening image layers to enhance tones 165 6.25 Adding detail to highlights and shadows 168
Tinted monochromes 169
6.26 Using Hue and Saturation to tone your pictures 170 6.27 Tinting borrowed from Photoshop 172
Split toning 173
6.28 Select and tone 173
6.29 Two-layer erase 175
6.30 Color Variations based split toning 176 6.31 Photoshop’s Color Balance split toning in Elements
176
Black and white and color 178
6.32 Layer mask and gradient map 178
Border techniques 179
6.33 Simple borders 179
6.34 Sophisticated edges using grayscale masks 180 6.35 Creating frames with Frame layers 181
6.36 Add Noise filter 183
6.37 Grain filter 184
6.38 Non-destructive textures 185
Advanced sharpening secrets 186
6.39 Unsharp Masking to the rescue 187 6.40 Adjust Sharpness for the ultimate control 189
6.41 Another approach 190
7
Darkroom Techniques on the Desktop 1917.01 Diffusion printing 192
7.02 Instant film transfer effect 194 7.03 Using the Unsharp Mask filter to add contrast 198 7.04 Lith printing technique 200 7.05 Correcting perspective problems 202 7.06 Add emphasis with saturation 204
7.08 Cross-processing effects 206
7.09 Digital hand coloring 208
7.10 Realistic depth of field effects 211 7.11 Beyond the humble drop shadow 215
7.12 Ring flash shadow 219
7.13 Elements’ Curves features 220 7.14 Using Photoshop’s Curves in Elements 223 7.15 Combining images seamlessly 224
7.16 Believable montages – a step further 226 7.17 Producing high-key pictures 229
7.18 Correcting lens problems 231
7.19 Change to old 233
7.20 Painterly photos 235
8
Professional Retouching 2398.01 Adding a dreamy effect 242
8.02 Softening freckles 243
8.03 Eliminating blemishes 244
Clone Stamp tool 244
Healing Brush tool 244
Spot Healing Brush 245
Clone Stamp tool step-by-step 246
Healing Brush tool step-by-step 247 Spot Healing Brush tool step-by-step 247
8.04 Removing the Red 248
8.06 Brighten Eyes 250
8.07 Tone down skin highlights and shadows 251
Sample all layers 252
Retouch duplicate layer 252
8.08 Retouching non-destructively 252
Mask editing adjustments 252
Use Adjustment layers 252
9
Photo Restoration 2539.01 Restoration basics 256
9.02 Dust and scratches be gone 258
9.03 Uncovering the faded 260
9.04 Levels based color restoration 262 9.05 Working with a scanned print 264
9.06 Extra correction help 266
9.10 Adjusting shadow tones 267
9.11 Recreating missing content 268
9.12 Removing stains 269
ACR and JPEG/TIFF files 269
10
Making Better Panoramas 271Advanced shooting techniques 279
10.01 Positioning the camera 279
10.02 Camera support 280
Other capture methods 283
10.03 Exposure 284
10.04 Focus and zoom 285
10.05 Depth of field 285
10.06 White balance 287
10.07 Timing 288
10.08 Ensuring consistent overlap 289 10.09 Dealing with the moving subject 290 10.10 Advanced panorama editing in
Photoshop Elements 6 292
CONTENTS
10.13 Creating artificially increased DOF 298 10.14 Correcting exposure differences 299 10.15 Adjusting for changes in color balance 300
10.16 Vertical panoramas 302
10.17 High-resolution mosaics 303
10.18 Panoramic printing 304
10.19 Spinning panorama movies 306
10.20 Panorama workflow 310
11
Extending Your Web Abilities 311Building websites – the basics 313
11.01 Elements’ Online Galleries websites 315 Creating individual web assets using Photoshop Elements 318 11.02 Optimizing photos for the web 319 11.03 Making seamless backgrounds 321 11.04 Using background matting 322
12
Free Form Photo Collages 323Before you start – edit then layout 325 12.01 Basic steps for layout creation 326 12.02 The new super Project Bin 328 12.03 Editing existing Photo Collages 330 12.04 Adding, removing and replacing photos 332 12.05 Adding, moving and deleting pages 334 12.06 Using the Content and Effects palettes 336 12.07 Align, arrange and distribute your frames 340 12.08 Printing your Photo Collages and Photo Books 342 Order a Kodak Photo Book or Kodak Prints 343
13
Finely Crafted Output 345Printing basics 346
The inkjet printer 348
Laser 350
Dye Sublimation 350
Other printing processes 351
Image resolution vs printer resolution 352
13.01 Basic steps 353
13.02 Creating contact sheets 356 13.03 Multiple prints on a page 357 Ensuring color consistency between devices 358 13.04 Setting up a color-managed workflow 361 13.05 Calibrating your screen – ColorVision Spyder 366 Getting intimate with your printer 368
13.06 Calibrating your printer – resolution, color, tone
and sharpness tests 368
13.07 Calibrating your printer – ColorVision PrintFIX 372 13.08 Making great black and white prints 374 13.09 What about permanence? 377 13.10 Preparing your images for professional outsourcing 381 13.11 Shoot small print big 383
13.12 Printing workflow 386
Appendices 387
Blend modes 388
Faster Elements at no extra cost 390 Plug-ins 392
Jargon buster 394
Keyboard shortcuts 399
Elements/Photoshop feature equivalents 402
Foreword
Nearly without exception, human beings the world over are fascinated by the photograph. A photograph is a timeless, compelling, emotive and honest representation of our world; of the places we’ve been, the events we’ve witnessed, the people we’ve met and loved. The photograph is a refl ection of our world and ourselves; our mind’s eye projected onto cotton vellum or computer screen. The persistence of vision ex machina. Indeed, the photographic image is the true iconography of the modern world.
For the photography enthusiast, these are very exciting times. In the span of less than 10 years, we have witnessed the evolution of photography from a mostly silver halide fi lm-based process to a completely digital process. The individual photographer now has the capability to shoot, ‘develop’, and create prints using an entirely digital workfl ow, and completely within the comfortable confi nes of his or her own study.
This new-found freedom from fi lm and the complicated processing thereof is largely due (of course) to the ready availability of affordable digital cameras and photo-quality printers; but it is due also, in no small part, to the efforts of the people at Adobe Systems. Adobe is committed to empowering the digital photographer by providing the most powerful and excellent tools available for rendering, manipulating and printing digital images. Among the most popular and successful of these tools is Adobe Photoshop Elements.
Although one of the original design intents behind Photoshop Elements was to make many of the most common image enhancement tools more readily available and noticeable to the novice
user, there is still much depth behind this initial surface. Fortunately for both Adobe and its customers, talented writers such as Philip Andrews have resolved to explore this depth and, in easy-to-understand language and step-by-step guidance, provide access to you, the reader.
Advanced Photoshop Elements for Digital Photographers is a beautifully rendered and compellingly written exploration of the advanced features and techniques that can be accomplished with Photoshop Elements. Through the use of many sample photographs, screen shots and clearly illustrated examples, Mr Andrews provides us with the tools to turn our images into exciting and compelling works of art.
From careful and thoughtful descriptions of the basics of tonal adjustments and camera and scanner settings to detailed explanations for creating traditional photographic effects such as lith print style reproductions, Advanced Photoshop Elements 6 for Digital Photographers will provide you with an entire arsenal of tools for adding emphasis, detail, and clarity to your images and for exposing and enhancing their inherent beauty.
If you love photography as much as I do, you are in luck with this book. Enjoy.
Mike Leavy
Engineering Manager for Elements products Adobe Systems, Inc.
INTRODUCTION
Introduction
When Photoshop Elements came out it was assumed by many that, because it was so inexpensive, it would be the sort of program that you could master in a couple of hours – it certainly wouldn’t require a huge learning curve and probably, let’s face it, a chunky manual to get to grips with it, as its professional sibling, Photoshop, does. But how wrong we were. Budget certainly doesn’t mean basic in this case, and Adobe has packed so much into Photoshop’s little brother that you really do need an expert guide to get the best out of it, to lead you through all those nooks and crannies and show you all the cool tricks that are not obvious to the casual user.
But who to choose to be that guide? Well for me there’s only one person, and luckily for you it’s the one whose name is on the cover of this book. Philip Andrews is an enigma. As editor of the UK’s leading digital photography magazine I require two main qualities from my contributors: they have to be real experts who possess a truly in-depth knowledge of their subject, and they have to be able to communicate that knowledge in simple layman’s terms that anyone can understand. (They also have to be reliable and hand their copy in on time, but that’s another story!) Well there are plenty of experts and plenty of communicators, but you’d be amazed at how rare it is to find someone who is both, as Philip is.
Philip Andrews knows Elements better than anyone else I know. He also writes in a friendly, entertaining and non-academic style – despite the fact that he is a senior lecturer in
photography. He has a great understanding of the needs of the end user and his knowledge and enthusiasm for digital imaging (and photography in general) shine from every sentence. He’s an accomplished photographer too, so he not only talks the talk but walks the walk, and uses many of his own excellent images to illustrate his points.
Having already covered the fundamentals of Elements in his last book Philip now moves on to more complex themes and ideas, things which you might (wrongly) have considered a bit ambitious for Elements. As before he puts the software into the wider context of digital imaging in general and explains the why as well as the how. Once again there’s a great linked website that allows you to download some of the images used in the book and try the techniques out for yourself.
With Philip as your guide you’ll be using Elements like a pro and making great images in no time.
Good luck.
Nigel Atherton
THE NEXT
LEVEL
Book resources at: www.adv-elements.com
ADVANCED PHOTOSHOP ELEMENTS 6 FOR 1
The Next
Level
THE NEXT
LEVEL
Book resources at: www.adv-elements.com
T
here is no doubt that when Adobe decided to release Photoshop Elements photographers the world over rejoiced. Not content with their offerings for entry and intermediate users in the past and ever conscious of the growing digital camera user base, the Adobe boffi ns created the new package with you, the digital photographer, fi rmly in their mind. Despite the rumors spread by the ‘Photoshop Snobs’ that the product was just a cut down version of Adobe’s professional package and that any serious editing will need to be completed in Photoshop, users the world over are realizing just how well Photoshop Elements fi ts their needs.A true photographer’s tool
Adobe had fi nally heard the cries of the mortals and produced an image manipulation package that has the strength of Photoshop with the price tag more equal to most budgets. Elements gives desktop image-makers top quality image editing and management tools that can be easily used for preparing pictures for printing or sharing via the web or CD. Features like the panoramic stitching option, called Photomerge, and the Photo Browser are fi rm favorites and were featured in this package before they ever appeared in Photoshop. The color management and vector text and shape tools are the same robust technology that drives Photoshop itself, but Adobe has cleverly simplifi ed the learning process by providing an easier-to-use interface and options like step-by-step interactive recipes for common image manipulation tasks. These, coupled with features like Quick Selection tool, Adjust Color Curves and the Convert to Black and White feature, make the package a digital photographer’s delight.
As a photographer, teacher and author I was captivated by the simplicity and strength that Adobe has crammed into the package and knew that this was just the sort of image editing program that would satisfy the demands of the digital camera users I met every day. So to accompany Elements version 1.0, I released a new book which was an introduction to the package and digital imaging in general. TitledAdobe Photoshop Elements – A visual introduction to digital imaging it quickly became a best-seller and was followed up with a series of new and revised editions to accompany ongoing versions of the program.
As Elements users became more familiar with the concepts and tools used in the program it wasn’t long before I started to receive requests for more advanced techniques than those presented in this introductory text. These were quickly followed by queries about how to position Elements as the key ‘image editing component’ in a high quality photographic workfl ow that encompassed capture, management, manipulation and output activities. Beyond the companion introduction title >> This
THE NEXT
LEVEL
Book resources at: www.adv-elements.com This book is my answer to these requests. With well over
140 new techniques it provides professional tips aimed at advancing your Elements skills beyond the basics. It is presented in a series of highly illustrated step-by-step color tutorials that show you what can be achieved. The techniques are discussed in the greater context of professional quality workfl ows that cover camera and scanner capture, raw processing, picture management, panorama production and quality print and web production.
Each technique is cross-referenced with related skills and ideas in the book and there are on-line resources and tutorials at the book’s website –
www.adv-elements.com
Here you can download and practise with many of the example images, video tutorials and resources used in the production of the book. Key settings for important dialog boxes are presented along with the illustrated steps needed for you to complete each technique. By working side by side with this text, your favorite image editing program and the associated web resources, you will quickly build both your Elements skills and your general understanding of the processes involved in creating quality photographic images.
Step-by-step >> The techniques in the book are presented in a highly illustrated step-by-step fashion that will progressively build your Elements skills.
(a) Cross-referenced techniques. (b) Step-by-step illustrations. Elements is central >>
Photoshop Elements is the pivot point for all editing and enhancement tasks involved in the production of quality photographic images. The digital production process involves four distinct steps –
THE NEXT
LEVEL
The comprehensive Photoshop Elements workfl ow
Over the past few versions of the program Adobe has made massive changes to the way that users work in Elements. These changes have converted Photoshop Elements from simply being a photo editing program into a complete digital photography system.Now in its sixth revision, Elements provides a total workfl ow solution from the moment you download your fi les from camera, phone, scanner or the net, through organization and manipulation phases and then onto printing or outputting the pictures electronically (online gallery, email attachments) or as print. Understanding how the various components in the system fi t together will help you make the most of the software and its powerful features.
IMPORT
ORGANIZE
The Adobe Photo Downloader feature and
Get Photos command allow you to preview, select and download fi les from a variety of different sources.
The Organizer component (a) of Elements works like a ‘super’ fi le browser allowing you to import and organize pictures straight from your camera, scanner, the net or your hard drive.
You can view the photographs via the Photo Browser or Date Viewoptions. Pictures can be grouped into Albums (previously called Collections) and you can fi nd specifi c images via the unique ‘keyword tags’ that you attach to the
fi les.
THE NEXT
LEVEL
EDIT & ENHANCE
CREATE
& SHARE
The Quick Fix editor provides a series of one-click or semi-automatic fi xes for common problems with lighting, contrast, color and sharpness. All the controls are contained in the one screen for speed and you can confi gure the display to show before and after versions of the photo.
The new Guided Edit mode combines step-by-step instructions with controls and tools embedded into the instructions. This is a good place to learn new techniques or get up to speed on how to use new tools and features. The Full Edit workspace contains all the familiar editing and enhancement tools that Elements users have come to expect. It is here that you can take full control over the manipulation and fi ne-tuning of your pictures. You can also add text, play with layers, create multi-picture composites and combine all manner of special effects with your original photo.
In version 6, the photo projects options have been split into two different categories. Now you can select the various project options from either the Create or Share panels on the right of the Organizer or Editor workspaces. Entries found here use a step-by-step approach to create such projects as slide shows, VCD presentations, photo album pages, and greetings cards, calendars and photo galleries.
The Print options in Elements 6 are a little different from earlier versions of the program. Now you can choose to print individual photos or multiple pictures on a single sheet of paper. You can also preview and print individual pages of the new multi-page .PSE document.
As an added bonus, when printing from the Organizer workspace, decorative frames can be added to the images right from the Print Multiple Photos dialog box.
QUICK
EDITS
THE NEXT
LEVEL
Book resources at: www.adv-elements.com
Elements basics
Most digital image-makers fi nd that there are several enhancing steps that they always perform on a newly acquired picture. These changes are often among the fi rst skills that the new Elements user learns. Despite the fact that this book is designed to build upon such basic techniques I thought that it would be best to revisit them briefl y to ensure that we are all working from the same game plan.
For the most part these changes follow a predictable sequence:
Import, Organize, Orientate or Straighten, Crop, Adjust Tones, Alter Color, Apply Sharpness and Save.
These basic alterations take an image captured by a camera or scanner and tweak the pixels so that the resultant picture is cast-free, sharp and displays a good spread of tones. Importing photos
When opening Elements the user is confronted with the Welcome screen containing a variety of options. From this screen you can choose to organize, edit or share your pictures. The fi rst step for most Elements users is to import their photos from a digital camera or scanner. This task is generally handled by the Adobe Photo Downloader which will automatically start when a camera or card reader is attached to the computer. The fi les are downloaded and cataloged in Elements with the utility.
Alternatively you can import fi les from other sources or activate the downloader manually from inside the Organizer workspace, which is accessed via the View and Organize selection in the Welcome screen. See Step 1. This feature provides a visual index of your pictures and can be customized to display the images in Browser, Date or Folder mode and thumbnails can be sorted by keyword tags, title, media, metadata or collection.
To start your fi rst catalog simply select the Organizer: File > Get Photos and Videos menu option. Choose one of the
Step 1 >> The Welcome screen provides simple and easy access to different parts of the Photoshop Elements system.
Step 2 >> Choose the location of the fi les to import from the list in the File > Get Photos and Videos menu or shortcut.
THE NEXT
LEVEL
Book resources at: www.adv-elements.com listed sources of pictures provided and follow the steps
and prompts in the dialogs that follow. See Step 2. Basic organization
When using the Photo Downloader you can add naming, destination folder and deletion details and in the Advanced dialog you can also apply metadata, auto stack, fi x red eye and add group tags to photos automatically. See Step 3. After downloading, or importing, the fi les are previewed as thumbnails in the Organizer workspace. At this time it is a good idea to make use of some of Elements’ brilliant organizational features to help manage the fi les before jumping into editing and enhancement activities. Add keyword tags, to you photos by click-dragging existing entries from the Keyword Tags pane onto your photos. See Step 4. Alternatively, add your own Keyword Tag entries using the new option (+ button) at the top of the pane. See Step 5. Adding Keyword Tags to your photos means that you can search for and locate individual fi les based on this association.
Along with Keyword Tags you can also group your images into Albums (previously called Collections) and in version 6 you have the added option of using Smart Albums that automatically update each time you add pictures to Elements.
Changing a picture’s orientation
Turning your camera to shoot images in Portrait mode will generally produce pictures that need to be rotated to be viewed correctly. Elements provides a series of dedicated rotate options that are available from inside the Photo Browser workspace. Simply right-click the thumbnail and select an option from the pop-up list. See Step 6. While organizational tasks and some simple automatic enhancement changes are handled in the new Fix pane of the Photo Browser workspace, more controllable edits are applied in either the Quick, Guided or Full Edit workspaces. So for the next set of changes the picture is passed to the Editing workspace. Do this by selecting the Go to Standard Edit option from the right-click thumbnail menu. See Step 7.
Step 6 >> Orientate the photo using one of the options in the right-click menu of the Photo Browser workspace.
Step 5 >> Add a different Tag entry by clicking the New button and adding details in the Create Keyword Tag dialog.
THE NEXT
LEVEL
Book resources at: www.adv-elements.com Cropping and straightening
Most editing programs provide tools that enable the user to crop the size and shape of their images. Elements provides two such methods. The fi rst is to select the Rectangular Marquee tool and draw a selection on the image the size and shape of the required crop. Next choose Image > Crop from the menu bar. The area outside of the marquee is removed and the area inside becomes the new image. The second method uses the dedicated Crop tool that is located just below the Magic Selection Brush in the tool box. Just as with the Marquee tool, a rectangle is drawn around the section of the image that you want to retain. The selection area can be resized at any time by click-dragging any of the handles positioned in the corners of the box. To crop the image click the Tick button at the bottom of the crop marquee or double-click inside the selected area. See Step 8. An added benefi t to using the Crop tool is to not only pre-visualize the crop but also rotate the selection by click-dragging the mouse when it is positioned outside the box. To complete the crop click the Tick button at the bottom of the crop marquee, but this time the image is also straightened based on the amount that the selection area was rotated.
Spreading your image tones
When photographers produce their own monochrome prints they aim to spread the image tones between maximum black and white. So too should the digital image-maker ensure that their pixels are spread across the whole of the possible tonal range. In a 24-bit image (8 bits per color channel – red, green and blue), this means from a value of 0 (black) to 255 (white). Elements provides both manual and automatic techniques for adjusting tones.
The Auto Contrast and Auto Levels options are both positioned under the Enhance menu. Both features will spread the tones of your image automatically, the difference being that the Auto Levels function adjusts the tones of each of the color channels individually whereas the Auto Contrast command ignores differences between
Step 9 >> The Auto Levels and Auto Contrast functions spread the tones of your image automatically.
THE NEXT
LEVEL
Book resources at: www.adv-elements.com Step 10 >> The Levels feature provides manual control of the position of white, mid and black tones in your image.
Step 11 >> The Color Cast tool uses an Eyedropper feature to neutralize color casts in your images.
Step 12 >> The Variations control provides a ‘ring around’ approach to cast removal.
the spread of the red, green and blue components. If your image has a dominant cast then using Auto Levels can sometimes neutralize this problem. The results can be unpredictable though, so if after using the feature the colors in your image are still a little wayward, undo the changes and use the Auto Contrast feature instead. See Step 9.
If you want a little more control over the placement of your pixel tones then Adobe has also included the slider- based Contrast/Brightness and Levels features used in Photoshop in their entry-level software. Both these features, plus the new Adjust Color Curves feature, take back the control for the adjustment from the program and place it squarely in the hands of the user. See Step 10. Jump to the end of the chapter for more details on manual control of tones.
Ridding your pictures of unwanted color casts Despite the quality of modern digital camera’s White Balance systems, images shot under mixed lighting conditions often contain strange color casts. The regularity of this problem led Adobe to include the specialized Color Cast tool (Enhance > Adjust Color > Remove Color Cast) in Elements. Simply click the eyedropper on a section of your image that is meant to be gray (an area that contains equal amounts of red, green and blue) and the program will adjust all the colors accordingly. See Step 11. This process is very easy and accurate, if you have a gray section in your picture. For those images without the convenience of this reference, the Variations feature (Enhance > Adjust Color > Variations) provides a visual ‘ring around’ guide to cast removal. See Step 12.
Applying some sharpening
THE NEXT
LEVEL
Book resources at: www.adv-elements.com
The Auto Sharpen feature found in the Enhance menu provides automatic techniques for improving the clarity of your images. The effect is achieved by altering the contrast of adjacent pixels and pixel groups. Elements also includes the Unsharp Mask fi lter and the Adjust Sharpness feature, which provides the user with manual control over which pixels will be changed and how strong the effect will be. The key to using these features is to make sure that the changes made by the fi lter are previewed in both the thumbnail and full image at 100 percent magnifi cation. This will help to ensure that your pictures will not be noticeably over-sharpened. See Step 13.
Saving your images
The fi nal step in the process is to save all your hard work. The format you choose determines a lot of the functional-ity of the fi le. If you are unsure of your needs always use the native PSD or Photoshop format. These fi les maintain layers and features such as editable text and saved selec-tions, and do not lose any picture details due to compres-sion. If space is a premium, and you want to maintain the best quality in your pictures, then you may decide to use a compressed version of TIF or Tagged Image File Format. JPEG and GIF should only be used for web work or when you need to squeeze you fi les down to the smallest possible size. Both these formats lose image quality in the reduction process, so keep a PSD or TIF version as a
quality backup. See Step 14.
Step 13 >> Adjust Sharpness improves the overall appearance of sharpness in the image by increasing the contrast of adjacent pixels.
Step 14 >> Elements provides a range of fi le formats that can be used to save your images.
Basic Elements Adjustments Workfl ow Download
Tag photos (Right-click > Attach Tag)
Rotate picture (Image > Rotate menu)
Straighten picture (Crop or Straighten tool or Image > Rotate menu)
Crop picture (Crop tool or Marquee then Image > Crop)
Adjust brightness (Enhance > Adjust Brightness/Contrast menu)
Alter contrast (Enhance > Adjust Lighting menu)
Remove color casts (Enhance > Adjust Lighting menu)
Apply sharpening (Enhance menu)
Save fi le (File > Save As)
Basic Elements workfl ow
THE NEXT
LEVEL
Book resources at: www.adv-elements.com
Take manual control of your tones >>
One of the most basic, yet critical, tasks for any digital photographer involves adjusting the contrast and brightness of their images. This action is often one of the first undertaken by novices and professionals alike when enhancing newly shot pictures. Well-executed contrast and brightness adjustments can take an ‘okay’ image and turn it into a dramatic picture.
Though at first glance making these changes seems like a simple task, don’t be too eager to play with the Brightness/Contrast sliders. These controls though upgraded in version 6 are often too coarse for quality work. Careful manipulation of the pixels is the key to making quality images and these features don’t allow the subtlety of adjustment that is necessary to achieve good results. Instead, employ the aid of either the Levels feature (Enhance > Adjust Lighting > Levels) or the new Adjust Color Curves feature (Enhance > Adjust Color > Adjust Color Curves) when making these changes. Professional digital photographers prefer to use tools like these as they not only provide sliders to alter brightness and contrast but also show a visual representation of the spread of the pixels or preview of the image changes.
Levels adjustments >> The Levels and Adjust Color Curves features provide fi ne manual control over the contrast and brightness of your pictures. (a) Before. (b) After. (c) The Levels adjustment used to correct contrast and brightness.
Advanced tonal control
The first step in taking charge of your pixels is to become aware of where they are situated in your image and how they are distributed between black and white points. The Histogram palette (Window > Histogram) displays the same graph of your picture’s pixels as the Levels feature. Viewing the histogram can be one of the quickest ways to diagnose the source of brightness and contrast problems in your pictures. The left-hand side represents the black values, the right the white end of the spectrum and the center area the midtones (see Levels feature illustrations on page 12). As you may be already aware, in a 24-bit image (8 bits per color channel) there are a total of 256 levels of tone possible from black to white – each of these values are represented on the graph. The number of pixels in the image with a particular brightness or tone value is displayed on the graph by height. Where the graph is high there are many pixels of this tone present in the image. In contrast, low areas of the graph mean that few pixels of this tone can be found in the picture.
Knowing your images
After a little while of viewing the histograms of your images you will begin to see a pattern in the way that certain styles of photographs are represented. Overexposed pictures will display a large grouping of pixels to the right end of the graph, whereas underexposure will be represented by most pixels bunched to the left. Flat images or those taken on an overcast day will show all pixels grouped around the middle tones and contrasty pictures will display many pixels at the pure white and black ends of the spectrum.
These tonal problems can be fixed automatically by applying one of the standard correction features, such as Auto Contrast or Auto Levels, found in Elements. Both these commands re-map the pixels so that they sit more evenly across the whole of the tonal range of the picture. Viewing the histogram of a corrected picture will show you how the pixels have been redistributed. If you want to take more control of the process than is possible with the auto solutions, open the Levels dialog.
Using the Levels control
Looking very similar to the histogram this feature allows you to interact directly with the pixels in your image. As well as a graph, the dialog contains two slider bars. The one directly beneath the graph has three triangle controls for black, midtones and white and represents the input values of the picture. The slider at the bottom of the box shows output settings and contains black and white controls only.
THE NEXT
LEVEL
Book resources at: www.adv-elements.com
beyond the first pixels in the graph will convert these tones to straight black, losing any shadow detail that was present. Similarly, dragging the white point too far towards the middle will change delicate highlight details to pure white. Moving the midtone slider will change the brightness of the middle values of the image without changing the black and white points in the image. Altering the output black and white points will flatten, or decrease, the picture’s contrast.
Basic changes >> (a) To add contrast drag white and black input sliders inwards. (b) To reduce contrast drag white and black output sliders inwards. (c) To darken midtones drag mid input slider to the right.
(d) To lighten midtones drag mid input slider to the left.
The Adjust Color Curves control The Adjust Color Curves option provides another way that you can alter brightness and contrast in your photo. Unlike the very basic Brightness/Contrast control, Adjust Color Curves provides separate controls for altering the brightness of highlights, shadows and midtones as well as a single slide for changing midtone contrast.
The feature is divided into two different sections – Style and Adjust Sliders. The Styles section contains several preset adjustments. Selecting one of these entries will apply the adjustment to your photo. The After image shows the enhancement changes. The Adjust Sliders section contains four controls plus a curves graph that plots the tonal relationships in the picture. Whereas the Styles presets provide a one-click image adjustment, the controls contained here allow multiple, additive, fi ne-tuning changes. The best approach is to select a Styles preset that matches the change that you are requiring fi rst, e.g. Lighten Shadows, and then fi ne-tune the results with the Adjust Sliders controls. Pressing the Reset button restores the dialog’s control to the default ‘Increase Midtones’ values.
Pro’s Tip:
Hold down the Alt key whilst moving the black or white input slider and you will see a reversed version of the image showing the pixels that are being converted to black or white by the action.
SCANNER AND
CAMERA
TECHNIQUES
Book resources at: www.adv-elements.com
2
ADVANCED PHOTOSHOP ELEMENTS 6 FOR 13
Scanner and
Camera
SCANNER AND
CAMERA
TECHNIQUES
Digital photography basics >> All digital photographs are constructed of a grid of colored pixels which when seen at a distance combine to form the appearance of a continuous color and tone picture.
T
here is no way to get around the fact that the quality of your fi nal digital pictures is dependent on how well they were captured initially. Poorly photographed or badly scanned images take their problems with them throughout the whole production process and end up as poor quality prints. One of the best ways to increase the level of your work is to ensure that you have the skills and knowledge necessary to create the best digital fi le possible at the time of capture. This is true for the majority of you who now shoot with a digital camera as well as those who are converting existing photographic images to digital with a scanner. To help gain this level of control let’s go back to the basics and see how factors like resolution and numbers of colours affect the quality of image capture.The basics – resolution
Most of us, no matter how new to digital photography, are aware that resolution has a direct link with picture quality. It is true that this factor, along with the numbers of colors (bit depth) saved in the fi le, or captured by the camera, helps determine the overall quality of the image.
SCANNER AND
CAMERA
TECHNIQUES
Image capture – input resolution
Computers can only work with digital fi les. The world as we view it, and as we capture it in silver-based photographs, is not in a digital format. Tones and colors merge gradually from one extreme to another. For the computer to be able to work with such images they must be changed from this ‘analog’ or continuous tone format to a digital one. Scanners and digital cameras make this change as part of the capturing process.
The scene or print is tested, or sampled, at regular intervals and a specifi c color and brightness allocated for each sample area. The testing continues in a grid pattern all over the scene, gradually building a pattern of the image which is made up of discrete areas of specifi c color/ brightness. Each of these areas, or samples, becomes a pixel in the resultant digital fi le. Resolution at this capturing stage refers to the frequency that samples are made of the image. Generally this measurement is represented as the number of samples taken in a one inch space; for this reason it is sometimes called Samples Per Inch or spi. Unfortunately most scanner software does not use this terminology but prefers to refer to this setting as Dots per inch (dpi). This is a hangover from language used in the printing industry and does more to confuse than clarify the situation.
If you are using a digital camera to capture your image then the resolution will be determined by the sensor, which has a specifi c number of CCDs set into a grid that is used to digitize the image. Scanner users, on the other hand, are able to control the sampling rate by changing the settings ‘in the scanners dialog box’.
A high sampling rate will result in a higher quality image with a much greater fi le size. A low SPI will provide a smaller fi le of less quality. These facts lead a lot of new users to a situation where all images are scanned at the highest resolution possible. Do this and your hard drive will soon be completely used up. High-resolution scans require huge amounts of storage space.
SCANNER AND
CAMERA
TECHNIQUES
Input resolutions should be decided on the basis of what the images final use will be. If the image is to be printed the size of a postage stamp then there is no point scanning at a resolution that will result in a file large enough to print an A2 poster. Remember the end usage determines the scanning resolution, or to put it in a way more easily remembered, ‘Know where you are going before you start the journey’.
2.01 How many pixels do I need?
Suitable for Elements – 6, 5.0, 4.0, 3.0, 2.0, 1.0 | Difficulty level – Intermediate Related techniques – 2.02, 2.12, 2.13, 13.07
The trick to knowing how many pixels you require is to think carefully about the end product you want to create. As an example, if you want to produce a 10 x 8 inch photographic quality print and you know that the lab you will use to output the image suggests a resolution of 250 dpi, then you have all the information to determine the number of pixels you will need to capture. Essentially the lab is saying that to produce photographic quality they need 250 pixels for every inch of the print. For the photograph to be 10 inches high then your file must contain a minimum of 2500 pixels for this dimension and to ensure the 8 inch width, you will need 2000 pixels. With this knowledge you can adjust the settings on you scanner so that you will end up with a picture file that contains the minimum pixel dimensions of 2500 x 2000.
For digital camera shooters understanding this concept will not only give you an indication of the maximum print size available from your camera’s sensor, but will also allow you to accurately select the correct resolution, or more precisely the correct pixel dimension, setting on your camera for specific tasks. The table below will give you a good starting point.
Chip pixel dimensions: Chip resolution:
(1 million = 1 megapixel)
Print size at 200 dpi:
(e.g. photo print)
Image size at 72 dpi:
(e.g. web use)
640 x 480 pixels 0.30 million 3.2 x 2.4 inches 8.8 x 6.6 inches 1440 x 960 pixels 1.38 million 7.4 x 4.8 inches 20.0 x 13.2 inches 1600 x 1200 pixels 1.90 million 8.0 x 6.0 inches 22.0 x 16.0 inches 2048 x 1536 pixels 3.15 million 10.2 x .7.6 inches 28.4 x 21.3 inches 2304 x 1536 pixels 3.40 million 11.5 x 7.5 inches 32.0 x 21.3 inches 2560 x 1920 pixels 4.92 million 12.8 x 9.6 inches 35.5 x 26.6 inches 2000 x 3000 pixels 6.0 million 10 x 15 inches 27.7 x 41.6 inches 2336 x 3504 pixels 8.2 million 11.6 x 17.5 inches 32.4 x 48.6 inches 2592 x 3888 pixels 10.2 million 12.9 x 19.44 inches 36 x 54 inches
Proposed use Suggested image resolution
Screen or web use 72 dpi
Draft quality inkjet 150 dpi Photo-quality inkjet 200-300 dpi Photo lab output (min) 250 dpi Photo lab output (max) 400 dpi
Offset printing (good quality)
300 dpi
Pro’s Tips:
tKnow where you are going before you start the journey – your scanner resolution should be based on the end use of the digital fi le. A poster will need a higher resolution initial scan, and a bigger fi le, than a postcard.
tBalance print quality with practical fi le sizes – test your printer to see at what image resolution increases in print quality cease to be perceived. Make this your base image resolution and scan your fi les according to this setting.
Once you know the image resolution needed for the printer, the fi nal size of the print and the size of your original you can easily calculate the scanning resolution and the total pixel dimensions you need for your digital fi le. Use the formula in the table below to give yourself an indication of the number of pixels you need for any size print job.
Pro’s Scanning Resolution Formulae
1. Final image dimensions (pixels)
= Original image dimensions (inches)
x Scanning resolution (samples per inch)
3000 x 2400 pixels = 10 x 8 inch print x 300 samples per inch 6000 x 4000 pixels = 1.5 x 1 inch (135 mm fi lm) x 4000 samples per inch
2. Print size (inches) = Image dimensions (pixels) / Image resolution (pixels per inch)
15 x 12 inches = 3000 x 2400 pixels / 200 pixels per inch 20 x 13.33 inches = 6000 x 4000 pixels / 300 pixels per inch
SCANNER AND
CAMERA
TECHNIQUES
Spreading the pixels >> In the example, the digital fi le has dimensions of 800 x 1200 pixels. Though the number of pixels remains the same, each of the prints ranges in size because of the numbers of pixels used to print each inch.
(a) 16 x 24 inch printed at 50 pixels per inch (ppi). (b) 8 x 12 inch printed at 100 ppi.
SCANNER AND
CAMERA
TECHNIQUES
Analog to digital >> In the capture process, via digital camera or scanner, a continuous tone original or scene is converted into discrete colors that can be represented by a series of numbers. (a) Analog original containing continuous tones. (b) Digital version containing discrete colors.
The basics – color depth
This growing understanding of how important resolution is to high quality imaging underpins the continual push by digital consumers for higher pixel output from their cameras. In the last couple of years sensor sizes have pole-vaulted from the diminutive 1.5 mega pixels to the more commonplace 8.0 and even 10.0 megapixel models that now fi ll the shelves of many photographic suppliers. The power to create truly photographic quality output up to A3 size is well within our grasp.
But high resolution is only half the ‘image quality’ story. The number of colors in an image is also a factor that contributes to the overall quality of the photograph.
Discrete colors (or levels)
Photographs in either print or negative (or slide) form contain a range of subtle tones and colors that blend smoothly into each other. These are referred to as ‘continuous tone images’. For instance, in a traditional black and white print it is diffi cult to see where one shade of gray starts and another one fi nishes. The effect is a smooth transition from the deepest shadows through to the most delicate highlights.
SCANNER AND
CAMERA
TECHNIQUES
Comparing bits
Each digital fi le you create (capture or scan) is capable of representing a specifi c number of colors. This capability, usually referred to as the ‘mode’ or ‘color depth’ of the picture, is expressed in terms of the number of ‘bits’. Most images these days are created in 24-bit mode. This means that each of the three color channels (red, green and blue) is capable of displaying 256 levels of color (or 8 bits) each. When the three channels are combined, a 24-bit image (8 + 8 + 8) can contain a staggering 16.7 million discrete tones/hues.
This is a vast amount of colors and would be seemingly more than we could ever need, see, or print, but many modern cameras and scanners are now capable of capturing 16 bits per channel or ‘high-bit’ capture. This means that each of the three colors can have 65,536 different levels and the image itself a whooping 281,474,976 million colors (last time I counted!). But why would we need to capture so many colors?
8-bit versus 16-bit >> Digital photographs captured in 16-bit per channel mode contain a greater number of colors than those captured with 8 bits.
12-bit capture
Many cameras capture 12 rather than 16 bits per channel. These fi les contain 4096 tones per channel. as opposed to the 65,536 possible with
SCANNER AND
CAMERA
TECHNIQUES
Capture commandment >> If you want the best quality pictures always make sure that your scanner or camera captures in 16-bit per channel or 48-bit mode.
On most cameras this is referred to as the ‘Tiff’ or ‘Raw’ setting. See technique 2.10 for more details on Raw fi les.
In these recent versions of the program the Rectangular and Elliptical Marquee and Lasso, Eyedropper, Move and Zoom tools all function in 16-bit mode. In addition, you can rotate, resize, apply auto levels, auto contrast or auto color correct, or use more manual controls such as Levels, Shadow/Highlights and Brightness/Contrast features. The Sharpen, Noise, Blur and Adjustment fi lter groups also work here as well.
Does this mean that making enhancement changes in 16-bit mode is unworkable? No, you just need to use a different approach. Read on.
Global versus local enhancement
Because of the limitations when working with a 16-bits per channel fi le in Elements some digital photographers break their enhancement tasks into two different sections – global and local. Global, or those changes that are applied at the beginning of the process to the whole picture. These include general brightness and contrast changes, some color correction and the application of a little sharpening.
2.02 More colors equal better quality
Suitable for Elements – 6, 5.0, 4.0, 3.0, 2.0, 1.0 | Diffi culty level – Intermediate Related techniques – 2.13
Most readers would already have a vague feeling that a high-bit fi le is ‘better’ than a low-bit alternative, but understanding why is critical for ensuring the best quality in your own work. The main advantage is that capturing images in high-bit mode provides a larger number of colors for your camera or scanner to construct your image with. This in turn leads to better color and tone in the digital version of the continuous tone original or scene.
‘Fantastic!’ you say, ‘No more 8-bit capture for me, I’m a 16-bit fanatic from here on in’. But there is a catch (you knew there had to be).
SCANNER AND
CAMERA
TECHNIQUES
Local changes are those that are more specific and are sometimes only applied to certain sections of the picture. They may include dodging and burning-in, removal of unwanted dust and scratches, the addition of some text and the application of special effects filters.
This separation of enhancement tasks fits neatly with the way that the 16-bit support works in Photoshop Elements. Global changes can be applied to the photograph whilst it is still in 16-bit mode; the file can then be converted to 8 bits per channel (Image > Mode > 8 Bits/channel) and the local alterations applied. This is the process that the professionals have been using for years and now Elements gives you the power to follow suit.
The advantages of 16-bit or high-bit capture Here are the main advantages in a nutshell:
1. Capturing images in high-bit mode provides a larger number of colors for your camera or scanner to construct your image with. This in turn leads to better color and tone in the digital version of the continuous tone original or scene.
2. Global editing and enhancement changes made to a high-bit file will always yield a better quality result than when the same changes are applied to a low-bit image.
3. Major enhancement of the shadow and highlight areas in a high-bit image is less likely to produce posterized tones than if the same actions were applied to a low-bit version.
4. More gradual changes and subtle variations are possible when adjusting the tones of a high-bit photograph using tools like Levels than is possible with low-bit images.
Common high-bit misconceptions
1. Elements can’t handle high-bit images. Not true. Previous versions of the program couldn’t handle high-bit pictures, but since Elements 3.0 the program has contained a reduced feature set that can be used with 16-bits per channel images. And even with this limitation there are enough tools available to ensure quality enhancement of your images.
2. High-bit images are too big for me to handle and store. Yes, high-bit images are twice the file size of 8-bit images and this does slow down machines with limited resources, but if this is
16-bit Workflow
Set camera orscanner to 16 bits per channel or
48-bit mode
Set camera to Raw file format
Photograph scene
Download or import file to the Elements’ Organizer workspace with Perform basic cropping and orientation
changes with the Crop tool Alter contrast with the Levels or
Shadows/Highlights features Adjust brightness using the Levels or
Shadows/Highlights features Remove color casts by adjusting Levels
settings in individual color channels Apply basic sharpening using the Unsharp
Mask filter
Save a 16-bit archive version of the file
Convert to 8 bits per channel
Remove dust and scratches with Spot Healing Brush
Dodge and burn specific picture parts
Apply filter changes
Add text
Add image or adjustment layers
SCANNER AND
CAMERA
TECHNIQUES
a concern put up with the inconvenience of a slow machine whilst you make tonal and color changes then convert to a speedier 8-bit fi le for local changes.
3. I can’t use my favorite tools and features in high-bit mode so I don’t use high-bit images at all. You are losing quality in your images needlessly. Perform your global edits in 16-bit mode and then convert to 8-bit mode for the application of your favorite low-bit techniques.
Ensure quality capture and enhancement with 16-bit and Raw fi les 1. Unless space is an issue capture all images in the highest color depth
possible. This will help to ensure the best possible detail, tone and color in your pictures.
2. If you have a camera that can capture Raw fi les then ensure that this feature is activated as well, as it provides the best quality fi les to work with.
Digital shooting technique
With the basics out of the way let’s now look at how to manipulate some of your camera’s technology in order to create the best digital fi les possible.
Exposure
Good exposure is one of the cornerstones of great imaging. Whether it be traditional silver-based photography, or the new pixel-centered picture making, getting your exposure right will ensure that you capture the most information possible.
Photographs that result from the sensor receiving too much light are said to be ‘overexposed’. They typically have little or no details in the highlight portions of the image and the midtone regions are far too bright. In contrast, pictures that have been captured with too little light are referred to as being ‘underexposed’. In these images it is the shadow areas that lose details and in this scenario the midtones are too dark.
The perfect exposure will produce a picture that contains:
t "HPPETQSFBEPGUPOFTGSPNMJHIUUPEBSL t %FUBJMTJOUIFTIBEPXBSFBTBOE
t %FUBJMTJOUIFIJHIMJHIUBSFBT
SCANNER AND
CAMERA
TECHNIQUES
Generally speaking, letting the camera do the work produces great results, but in some
circumstances where the lighting is a little tricky, the ‘auto’ exposure route can result in images that are either ‘under’ or ‘over’ exposed. It’s here that the photographer needs to ‘step in’ and make some adjustments to the exposure settings. Modern cameras have a range of features designed to override the camera’s auto exposure settings.
Over- and underexposure >> The cornerstone of all good photography is accurate exposure. (a) Overexposed images are too light and lose details in the highlights and mid tone areas. (b) Well-exposed pictures have a good distribution of tones over a range from dark to light. (c) Underexposed images have little or no shadow detail as these areas are converted to pure black.
Shadows Midtones Highlights
Exposure control
Two devices – the shutter and the aperture – control the amount of light that hits your camera’s sensor.
The shutter is either an electrical or mechanical device that controls the length of time that the light falls upon the sensor. The longer the shutter is ‘open’ the more exposure the sensor will receive and, conversely, the shorter the shutter speed the less exposure is received. Shutter speeds have traditionally been measured in fractions of a second and are represented by a number sequence of halves and doubles. With some cameras, one step either way in the sequence is referred to as a change of a ‘full stop’, other modes step in 1/2 or 1/3 stops, and so multiple steps will be needed to make a full stop change in exposure.
SCANNER AND
CAMERA
TECHNIQUES
Mechanics of exposure >> Aperture and shutter in combination control the amount of light that hits the sensor. (a) The aperture opens to allow more light into the camera and closes to reduce exposure.
(b) The length of time the shutter is opened is displayed in fractions of a second.
In addition to these mechanisms controlling exposure they also change the way that the photo looks. The aperture also controls the depth of fi eld or zone of focus in the photo and the shutter manipulates how motion or movement is recorded.
This sequence is called F-stops and causes some confusion with new camera users as the scale equates the biggest aperture hole with the smallest F-stop number.
By varying the combination of aperture and shutter speed the camera, or photographer, can adjust the amount of light entering the camera to suit the sensitivity of the sensor. In bright conditions it is normal to use a fast shutter speed coupled with a large aperture number (small hole). Conversely, in low light situations a slow shutter speed and small aperture number (large hole) would be selected.
2.03 Exposure compensation
Suitable for Elements – 6, 5.0, 4.0, 3.0, 2.0, 1.0 | Diffi culty level – Intermediate Related techniques – 2.02
One of the real advantages of photographing digitally is the ability to review your efforts immediately after shooting via the built-in screen on the back of the camera. With this tool it is easy to determine the times when the auto exposure system is producing images that are not quite the perfect exposure. When this occurs you can increase or decrease the amount of light reaching the sensor by using the Exposure Compensation feature.
SCANNER AND
CAMERA
TECHNIQUES
or minus, 3 stops. In tricky lighting scenarios I generally shoot a test image, review the results, adjust my exposure compensation settings and shoot again. I continue this process of shooting and reviewing until I am satisfi ed with the exposure.
A more precise way to determine over- or underexposure is to consult the histogram display of your camera. The histogram can be accessed from your camera’s playback menu and it visually graphs the spread of the pixels in the image. This feature takes the guesswork out of determining whether your image has exposure problems.
A bunching of pixels to the left-hand end of the graph usually indicates underexposure and the need for more light, whereas a grouping to the right signals overexposure and requires a reduction in either the aperture or shutter speed setting.
Exposure compensation >> Many digital cameras contain a special feature that can be used to modify your exposure settings without altering the aperture or shutter speed values directly. This Exposure Compensation control allows you to increase or decrease the overall exposure of the picture.
Frame-by-frame control
SCANNER AND
CAMERA
TECHNIQUES
In-camera contrast adjustment >> Altering the way that your camera records the contrast or the extremes of brightness in a scene can help to ensure that you capture important highlight and shadow details.
(a) Less contrast setting. (b) Normal contrast setting. (c) More contrast setting. Some of these features include:
t $POUSBTUDPOUSPM
t 4BUVSBUJPOBEKVTUNFOUBOE t *OCVJMU4IBSQOFTTDPOUSPM
These controls are now found on all but the most basic entry-level models and provide a level of fl exibility that was never possible in the days when ‘fi lm was king’.
2.04 Contrast
Suitable for Elements – 6, 5.0, 4.0, 3.0, 2.0, 1.0 | Diffi culty level – Basic
The contrast control is one of the most useful features for the digital camera owner. When you are faced with shooting a beach, or snow scene, on a sunny day the range of brightness between the lightest and darkest areas can be extremely wide. Set to normal your camera’s sensor will probably lose detail in both the highlight and shadow areas of the scene. Delicate tones will either be converted to white or black. Changing the setting to ‘less contrast’ will increase your camera’s ability to capture the extremes of the scene and preserve otherwise lost light and dark details.