Ruby on Rails
™
Noel Rappin
Ruby on Rails
™
Chapter 1: Building Resources ... 1
Chapter 2: Rails Source Control with Subversion... 39
Chapter 3: Adding Users ... 59
Chapter 4: Build Tools and Automation ... 103
Chapter 5: Navigation and Social Networking ... 125
Chapter 6: The Care and Feeding of Databases ... 155
Chapter 7: Testing Tools ... 181
Chapter 8: Rails - Driven JavaScript ... 211
Chapter 9: Talking to the Web ... 241
Chapter 10: Internationalizing Your Application ... 261
Chapter 11: The Graphic Arts ... 285
Chapter 12: Deploying Your Application ... 313
Chapter 13: Performance ... 337
Chapter 14: Going Meta ... 367
Chapter 15: Extending Rails with Plugins ... 391
Chapter 16: Replacing Ruby Tools ... 417
Appendix A: Things You Should Download ... 441
Appendix B: Web Frameworks Inspired by Rails ... 445
Ruby on Rails
™
Noel Rappin
Published by
Wiley Publishing, Inc.
10475 Crosspoint Boulevard Indianapolis, IN 46256
www.wiley.com
Copyright © 2008 by Wiley Publishing, Inc., Indianapolis, Indiana ISBN: 978-0-470-22388-8
Manufactured in the United States of America 10 9 8 7 6 5 4 3 2 1
Library of Congress Cataloging-in-Publication Data is available from the publisher.
No part of this publication may be reproduced, stored in a retrieval system or transmitted in any form or by any means, electronic, mechanical, photocopying, recording, scanning or otherwise, except as permitted under Sections 107 or 108 of the 1976 United States Copyright Act, without either the prior written permis-sion of the Publisher, or authorization through payment of the appropriate per-copy fee to the Copyright Clearance Center, 222 Rosewood Drive, Danvers, MA 01923, (978) 750-8400, fax (978) 646-8600. Requests to the Publisher for permission should be addressed to the Legal Department, Wiley Publishing, Inc., 10475 Crosspoint Blvd., Indianapolis, IN 46256, (317) 572-3447, fax (317) 572-4355, or online at www.wiley .com/go/permissions.
Limit of Liability/Disclaimer of Warranty: The publisher and the author make no representations or warran-ties with respect to the accuracy or completeness of the contents of this work and specifically disclaim all warranties, including without limitation warranties of fitness for a particular purpose. No warranty may be created or extended by sales or promotional materials. The advice and strategies contained herein may not be suitable for every situation. This work is sold with the understanding that the publisher is not engaged in rendering legal, accounting, or other professional services. If professional assistance is required, the services of a competent professional person should be sought. Neither the publisher nor the author shall be liable for damages arising herefrom. The fact that an organization or Website is referred to in this work as a citation and/or a potential source of further information does not mean that the author or the publisher endorses the information the organization or Website may provide or recommendations it may make. Further, readers should be aware that Internet Websites listed in this work may have changed or disappeared between when this work was written and when it is read.
For general information on our other products and services please contact our Customer Care Department within the United States at (800) 762-2974, outside the United States at (317) 572-3993 or fax (317) 572-4002.
Trademarks: Wiley, the Wiley logo, Wrox, the Wrox logo, Wrox Programmer to Programmer, and related trade dress are trademarks or registered trademarks of John Wiley & Sons, Inc. and/or its affiliates, in the United States and other countries, and may not be used without written permission. Ruby on Rails is a trademark of David Heinemeier Hansson. All other trademarks are the property of their respective owners. Wiley Publishing, Inc., is not associated with any product or vendor mentioned in this book.
Noel Rappin is the Director of Rails Practice at Pathfinder Associates ( www.pathfinderagile.com ), and has nearly a decade of experience with web application programming. Noel has a Ph.D. from the Georgia Institute of Technology, where he studied how to teach object - oriented design concepts. He is the co - author of Jython Essentials and wxPython in Action. You can read more of Noel ’ s writing at both the Pathfinder Agile Ajax blog ( http://blogs.pathf.com/agileajax ) and his own blog
Acquisitions Editor
Jenny Watson
Development Editor
Maryann Steinhart
Technical Editor
Raymond Budd
Production Editor
Martine Dardignac
Copy Editor
Kathryn Duggan
Editorial Manager
Mary Beth Wakefield
Production Manager
Tim Tate
Vice President and Executive Group Publisher
Richard Swadley
Vice President and Executive Publisher
Joseph B. Wikert
Project Coordinator, Cover
Lynsey Stanford
Proofreader
Sossity Smith
Indexer
Many different people helped make this book possible. Thanks to my agent Neil Salkind for getting this project off the ground, and to Jenny Watson and Maryann Steinhart at Wiley for helping turn it from a proposal into a book. Thanks to the technical editor, Raymond Budd, for his attention to detail in verifying the source code for this book, and the copyeditor, Kathryn Duggan, for her attention to matters of style and clarity.
Without the Rails community as a whole, this book would have been a lot less interesting and more difficult. Thanks to David Heinemeier Hansson for creating Rails in the first place, and the entire core team for the ongoing implementation. Also thanks to people like Dave Thomas and Chad Fowler for their part in popularizing Rails. The Rails community is enlivened by a fantastic ongoing conversation of ideas, tutorials, and arguments online. I ’ ve tried to acknowledge individual developers and bloggers in each chapter, and there are too many to list here, but thanks to you all.
At Motorola, a number of managers and co - workers were supportive of my initial attempts to build Rails projects as well as the beginnings of this book. Special thanks to Greg Bell, Anne - Marie Jolie, MaryAnn Marks, Jay Marusich, Staszek Salik, Mike Wagner, and Michal Wieja.
Pathfinder has been amazingly supportive of this book, both in concept and in the amount of time spent. Thanks to Dietrich Kappe and Bernhard Kappe for the opportunity. Anthony Caliendo, Michael King, Jason Sendlebach, Alice Toth, and Lydia Tripp are all team members who have been supportive of me and this book. Thanks to all of you.
I ’ d like to acknowledge and thank Wally Dodge, who was my AP Computer Science instructor, and is as responsible as anybody for my choice of career.
I ’ m lucky to be part of an amazing and loving family, both immediate and extended. At the risk of angering everybody else, I ’ d like to especially acknowledge my godparents, Nancy and Richard Sher, and my cousin Dan Sher.
My parents, Donna and Donnie Rappin, have always enthusiastically supported me, no matter where I chose to go.
My wife, Erin, still and always the best part of my life, made it through this project with grace and humor. Thank you for everything.
Acknowledgments viii
Introduction xvii
Chapter 1: Building Resources
1
A Good Place to Start
1
A Recipe for Recipes
2
The REST of the Story
4
What Is REST?
4
Why REST?
6
Building Your First Resources
6
Migrations
7
Routes
8
Controllers
11
Views
15
Route Display
16
Building Ingredients
16
Setting Up Your Database
17
Aligning Your Tests to the Nested Resource
17
Building a Recipe Editor
22
Adding Ingredients
22
Asserting HTML
23
Parsing Ingredients
25
Adding a Coat of Paint
29
Asserting Creation
30
Adding a Little Ajax
34
Resources 38
Summary
38
Chapter 2: Rails Source Control with Subversion
39
Subversive Control
39
Creating a Repository
42
Populating the New Repository
43
Checking Out and Adding Files
43
What to Ignore
44
Marking Executable Files
46
Commiting Changes
46
The Repository Life Cycle
47
Committing Normal Code Changes
47
Updates and Conflicts
48
File-Level Changes
50
Setting Up a Subversion Server with svnserve
50
Living on the Edge
52
Using a Specific Version of Rails
53
Living on the Edge With Rake
55
What’s Up, RDoc?
56
Resources 58
Summary
58
Chapter 3: Adding Users
59
Creating Users
59
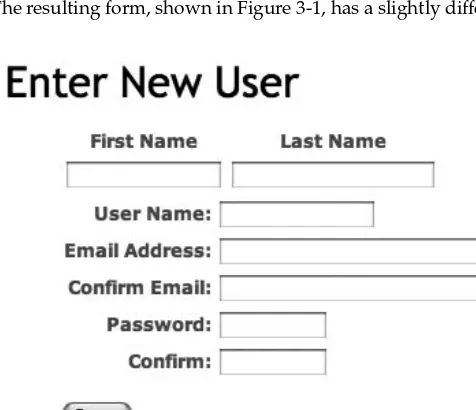
User Creation Form
60
Refactoring Forms Using A FormBuilder
64
Storing Encrypted Passwords
67
Authentication 71
The Routes
71
The Tests
71
The Controller
72
The Views
74
Using Authentication
76
Adding User Roles
78
Bot Protection via Authorization Email
80
Generating the Model and Migration
80
Test First
81
Controller Logic
83
Sending the Email
84
CAPTCHA
86
Creating a Test-Driven CAPTCHA Object
86
CAPTCHA Object Implementation
88
Deploying the CAPTCHA
90
Sessions and Cookies
94
Persistent Login Cookie Strategies
94
Persistent Login Mechanism — Test First
95
Cookie Life Cycle
97
Validating Login Cookies
98
Chapter 4: Build Tools and Automation
103
What Rake Can Do for You
104
Rake Database Tasks
104
Rake Documentation Tasks
107
Rake Testing Tasks
107
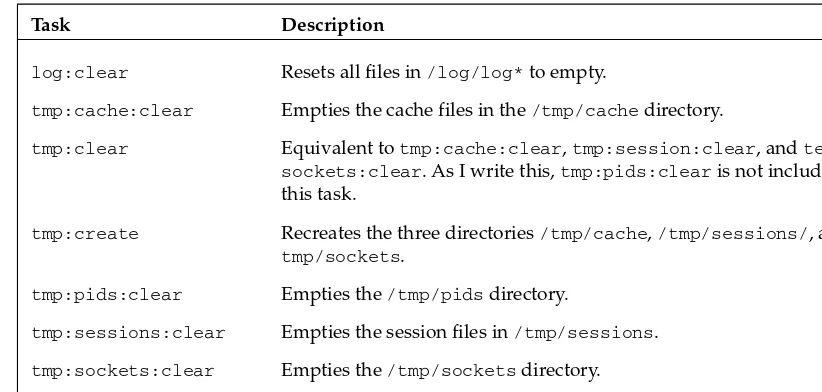
Rake Cleanup Tasks
108
Rake Rails Tasks
109
Other Rake Tasks
110
What You Can Do for Rake
111
A Simple Rake Task
111
Tasks with Dependencies
113
File Tasks
115
Using Rails in Rake
116
Testing Rake Tasks
117
Continuous Integration
119
ZenTest
119
CruiseControl.rb 120
Resources 123
Summary 123
Chapter 5: Navigation and Social Networking
125
Menus and Sidebars
125
Single-Level Menus
125
Object Cache
130
Tagging
132
Installing the Acts As Taggable Plugin
132
Applying Tags to a Model
133
Tags and the User Interface
135
Searching 144
Searching with SQL
144
Searching with Ferret
146
Pagination 152
will_ paginate
152
paginating_find
153
Chapter 6: The Care and Feeding of Databases
155
Plugging In to Your Legacy
156
Naming Unconventionally
158
Testing a Legacy Database with Fixtures
160
Building a Relationship across Multiple Databases
165
Defining the Functionality
165
Creating the Proxy Model
167
Making Connections
167
Alternate Data Access Mechanism
168
Why Be Normal?
170
A Little Bit of Theory
170
A Little Bit of Practice
171
ActiveRecord Callbacks
173
A Common Case
174
Polymorphic Associations
175
Database Refresher
176
Preventing SQL Injection with the Power of Find
176
Using Transactions
177
Preventing Data Hijacking with Associations
178
Resources 179
Summary 179
Chapter 7: Testing Tools
181
Test Driven
181
Covering It All
183
Installing rcov
183
Using rcov and Rails
184
Mock Testing
187
Using FlexMock
187
Specifying Stubs
189
Mock Expectations
191
Behavior-Driven Design
193
Loading RSpec
193
Writing RSpec Specs
194
How to Get RSpec-Like Features
202
Testing Views
202
More Natural Test Syntax
205
Improving Fixtures
206
Testing Helpers
207
Chapter 8: Rails-Driven JavaScript
211
Revisiting the Past
211
Fixing JavaScript DRY Violations
213
Being Graceful
217
Easy JavaScript Integration
222
Tooltips
222
In-Place Editing
226
Autocomplete
228
Writing JavaScript in Ruby
230
An RJS Example
230
Other RJS Methods
233
Using RJS for Lightboxing
234
Testing RJS
235
Cross-Site Scripting Security
237
Resources 238
Summary 238
Chapter 9: Talking to the Web
241
ActiveResource 241
The Client Side of REST
242
Activating Your Resources
243
Producing Web Service Data
246
Producing XML
246
Builder Templates
248
Producing Feeds
249
Producing JSON and YAML
256
Consuming Web Services
257
Resources 259
Summary 259
Chapter 10: Internationalizing Your Application
261
Does Anybody Really Care About Time?
261
Dates and Times
262
Timestamps and Time Zones
263
Inputting Dates
266
Date Arithmetic and Outputting Dates
271
Internationalization with Globalize
273
Using The Globalize Plugin
274
Translations
276
Tracking Routes
281
References 282
Summary 283
Chapter 11: The Graphic Arts
285
Getting Started
285
Graphics Packages
286
Installing for Windows
286
Installing for Mac OS X
287
Installing for Linux
288
Uploading Files to Rails
288
Setting Up attachment_fu Data
289
Creating an attachment_fu Model
290
Testing attachment_fu
291
Adding an attachment_fu Form
293
Displaying attachment_fu Images
294
Using Your Graphics Library
296
ImageScience
296
RMagick
297
MiniMagick
303
Charts
306
Gruff
306
Sparklines
309
Resources 311
Summary 312
Chapter 12: Deploying Your Application
313
Capistrano 313
Starting with Capistrano
314
Basic Capistrano Tasks
316
Customizing Capistrano
320
Multistage Deployment
325
Mongrel
326
Getting Started
326
Basic Deployment
328
Clustered Deployment
329
Mongrel, Apache, and You
333
Chapter 13: Performance
337
Measurement 337
Railsbench
338
Performance Profiling
345
Logs — The Quick Way
345
Profiling Method Timings with ruby-prof
346
Fixing Performance Problems
352
Managing Sessions
353
ActiveRecord and Database Issues
356
Caching
360
Page Caching
361
Action Caching
362
Fragment Caching
362
Cache Expiring
364
Cache Storage
364
References 365
Summary 365
Chapter 14: Going Meta
367
Eval and Bindings
368
Introspection Tools
370
Classes, Metaclasses, and Singletons
373
Classes and Objects
373
Singletons
375
Monkey Patching and Duck Punching
378
Monkey Patching Without Slipping On a Banana Peel
379
Alias
380
Plugging In
382
Acts As Reviewable
383
The Case of the Missing Method
386
Defining Methods Dynamically
387
References 390
Summary 390
Chapter 15: Extending Rails with Plugins
391
Using Plugins
391
Installing Plugins
391
Creating a Plugin
394
Writing a Generator
396
Basic Generator Functionality
396
The Generator Class
398
The Generator Manifest
398
Testing Generators
400
Writing the Generator Test
402
GeneratorTestHelper 404
The Migration that Passes the Tests
406
Writing the Plugin
407
ActiveRecord Test Setup
407
Acts_As_Reviewable Structure
410
Distributing Plugins
414
References 414
Summary 415
Chapter 16: Replacing Ruby Tools
417
ERB Replacements
417
Markaby
418
Haml
422
Liquid
427
JRuby on JRails
431
Getting Started
432
Crossing the Boundary
433
Running JRails
435
Deployment via WAR
437
GlassFish
439
References 439
Summary 440
Appendix A: Things You Should Download
441
Appendix B: Web Frameworks Inspired by Rails
445
First released to the public in 2004 after being developed to support the Basecamp project management application, Ruby on Rails promised nothing less than a revolution in the way web applications are constructed. With a strong grounding in the pragmatic ethic of avoiding repetition, the Rails way of supporting common conventions instead of complex options showed that there was a simpler way to build for the Web, and “ my code is shorter than your configuration file ” became the boast of the day. In the intervening years. Rails has made friends and enemies, has been used to build some of the hottest web applications going, and has undergone several internal revolutions as the notion of what comprises Rails best practices continues to evolve. This book attempts to use the current best practices to show how to build a web application.
Who Should Read This Book
This book is intended for intermediate to advanced Rails programmers. It assumes that you already know Ruby, and have either read one of the many wonderful introductory books on Rails or have otherwise consumed some form of a Rails tutorial. In either case, you don ’ t need me to tell you how to create a basic Rails application.
The focus of this book is on the step that comes after just being able to make Rails work. You ’ ve read the basic book, and now you ’ ve been asked to implement a real, live, web application. Suddenly you have all sorts of questions that weren ’ t covered in the introductory material. How do I manage users and security? Is there an easy way to manage time zones or other internationalization issues? How does Rails expect me to organize a team of programmers and manage source issues? How do I automate common build tasks, and how do I deploy to a production server? What do I need to do to secure my site? How can I extend Rails to take advantage of the many wonderful things being done by the Rails programming community?
If you ’ re interested in learning the answer to any of these questions, then this book is for you.
How This Book Is Str uctured
Over the course of this book, you ’ ll build a single web application, and the ordering of the chapters is based on the growing needs of that application. However, the book has been structured so that individual chapters are as orthogonal as possible, and unless otherwise noted, you should not need to read the entire book to understand the concepts in a particular chapter.
The Rails online community is an awesome and wonderful thing, full of enthusiastic developers sharing their knowledge and expertise with the community. Each chapter in this book includes a list of blogs, plugins, and/or other Rails web sites that are related to the topic at hand.
The book is organized into the following sixteen chapters and two appendixes:
Chapter 1, Building Resources — This chapter covers setting up the project and its initial resources using REST.
Chapter 2, Rails Source Control with Subversion — After a project is set up, it should be placed under source control immediately. Subversion is the Rails source control tool of choice and is the topic of this chapter.
Chapter 3, Adding Users — This chapter covers placing the concept of a user into the application, managing secure logins, performing e - mail authorization, and implementing CAPTCHA.
Chapter 4, Build Tools and Automation — Rake is a very handy tool for automating commonly performed actions. With those actions defined, it ’ s a small step to create an environment where automated tests or metrics can be performed continually, as you learn in this chapter.
Chapter 5, Navigation and Social Networking — This chapter covers the basic elements of web application navigation, menus, tagging, search, and pagination.
Chapter 6, The Care and Feeding of Databases — This chapter discusses the use of other database tools besides the MySQL default, and adding more complex database relationships to the application. It also explores issues of database security.
Chapter 7, Testing Tools — This chapter introduces you to several different tools to improve your testing, including the use of RCov to measure testing, RSpec to specify behavior more directly, and methods for testing views and helpers.
Chapter 8, Rails - Driven JavaScript — This chapter describes how you can use Ruby and Rails to add Ajax and JavaScript to your application, including using RJS to create more complex JavaScript behavior and testing RJS output.
Chapter 9, Talking to the Web — This chapter shows you how to turn your application into a web services data producer, including how to create RSS feeds. It also describes how ActiveRecords turns a Rails application into a web services data consumer.
Chapter 10, Internationalizing Your Application — The World Wide Web encompasses many time zones and languages. This chapter covers managing time in Rails and using the Globalize plugin for internationalization.
Chapter 12, Deploying Your Application — This chapter discusses the current state - of - the - art in deploying Ruby applications using Capistrano to automate deployment tasks. It also covers the use of the Mongrel and other server tools to serve the application.
Chapter 13, Performance — This chapter shows you how to measure performance to find bottlenecks in your Rails application, and what to do when you find them.
Chapter 14, Going Meta — Metaprogramming, or writing code that writes or modifies code, is a nifty trick that Ruby handles deftly, and which is used to support some of the most dynamic features in Rails. Adding metaprogramming to an application can reduce duplicated code dramatically, as you learn in this chapter.
Chapter 15, Extending Rails with Plugins — This chapter gives you even more information on using Rails plugins, including how to create, test, and deploy a Rails plugin and use generators.
Chapter 16, Replacing Ruby Tools — This chapter covers using ERB replacements to define output and using JRuby to deploy your application in a Java Web Application server.
Appendix A, Things You Should Download — This appendix explains everything you should download to work with Ruby on Rails, including Ruby, Gems, Rails, and Subversion.
Appendix B, Web Frameworks Inspired by Rails — This appendix briefly describes web frameworks that have been influenced by Rails.
What You Need to Use This Book
This book assumes you are using Ruby version 1.8.6 and Rails 2.0.2. The examples in this book run against a MySQL database, and use the Mongrel web server. Instructions on installing the necessary software on Linux, Mac OS X, or Windows are contained in Appendix A.
Conventions
To help you get the most from the text and keep track of what ’ s happening, a number of conventions are used throughout the book.
Boxes like this one hold important, not - to - be forgotten information that is directly relevant to the surrounding text.
As for styles in the text:
New terms and important words are highlighted when they ’ re introduced. Keyboard combinations are shown like this: Ctrl+A.
Filenames, URLs, and code within the text looks like this: persistence.properties . Code is presented in two ways:
This is how most code in the book appears.
To call your attention to a specific line within code, it is highlighted like this.
Source Code
As you work through the examples in this book, you may choose either to type in all the code manually or to use the source code files that accompany the book. All of the source code used in this book is available for download at www.wrox.com . From this site, you can simply locate the book ’ s title by using the Search box or by using one of the title lists, and then click the Download Code link on the book ’ s detail page to obtain all the source code for the book.
Because many books have similar titles, you may find it easiest to search by ISBN. This book ’ s ISBN is 978 - 0 - 470 - 22388 - 8.
After you download the code, just decompress it with your favorite compression tool. Alternately, you can go to the main Wrox code download page at www.wrox.com/dynamic/books/download.aspx to see the code available for this book and all other Wrox books.
Errata
We make every effort to ensure that there are no errors in the text or in the code. However, no one is perfect, and mistakes do occur. If you find an error in one of our books, such as a spelling mistake or faulty piece of code, we would be very grateful for your feedback. By sending in errata, you may save another reader hours of frustration and help us provide even higher - quality information.
To find the errata page for this book, go to www.wrox.com and locate the title using the Search box or one of the title lists. Then, on the book details page, click the Book Errata link. On this page, you can view all errata that has been submitted for this book and posted by Wrox editors. A complete book list, including links to each book ’ s errata, is also available at www.wrox.com/misc - pages/booklist.shtml .
If you don ’ t spot “ your ” error on the Book Errata page, go to www.wrox.com/contact/techsupport .shtml and complete the form there to send us the error you have found. We ’ ll check the information and, if appropriate, post a message to the book ’ s errata page and fix the problem in subsequent editions of the book.
p2p.wrox.com
For author and peer discussion, join the P2P forums at p2p.wrox.com . The forums are a Web - based system for you to post messages relating to Wrox books and related technologies, as well as to interact with other readers and technology users. The forums offer a subscription feature to e - mail you topics of interest of your choosing when new posts are made to the forums. Wrox authors, editors, other industry experts, and your fellow readers are present on these forums.
At http://p2p.wrox.com , you will find a number of different forums that will help you not only as you read this book, but also as you develop your own applications. To join the forums, just follow these steps:
1.
Go to p2p.wrox.com and click the Register link.2.
Read the terms of use and click Agree.3.
Complete the required information to join as well as any optional information you wish to provide and click Submit.4.
You will receive an e - mail with information describing how to verify your account and complete the joining process.You can read messages in the forums without joining P2P, but in order to post your own messages, you must join.
Ruby on Rails is opinionated software. This doesn ’ t mean that it ’ s going to make fun of your haircut, or tell you what kind of car to drive. It does mean that Rails has definite ideas about how your web project should be structured, how it should interact with a database, how you should test, and even what kinds of tools you should use. Tasks that Rails feels that you should do often are easy, and tasks that Rails thinks should be rare are (usually) possible but more complicated. This works because the Rails team has done an exceptionally good job of deciding how web projects should work, and how they should not work.
Two important principles that Rails favors are especially useful when starting a new Rails project:
Representational State Transfer (REST) is a relatively new mechanism for structuring a Rails application by organizing the application around resources, rather than pages.
Test Driven Development (TDD) is an important part of ensuring the correctness and design of any software project, but Rails does a particularly good job of providing the developer with the tools needed for easy and powerful automated testing.
In this chapter, you will begin the construction of the Rails project that will carry you throughout the book. This will enable you to review the basic Rails functionality you should already be familiar with, but with an added emphasis on REST and TDD. At the end of this chapter, your Rails knowledge should be refreshed, state - of - the - art, and ready to go.
To run the examples throughout this book, a standard suite of applications is assumed to already be installed on your computer. The suite includes Ruby, Rails, MySQL, and Subversion. See Appendix A , “ Things You Should Download, ” for details on how to install these tools.
A Good Place to Star t
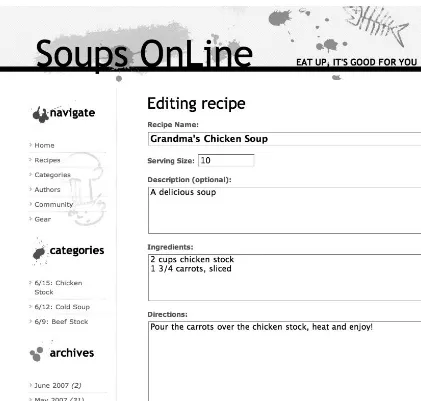
The sample application that drives this book is called Soups OnLine, your Web 2.0 guide to all things hot and broth - y. As the site develops, it will have all sorts of modern web goodness, including an Ajax interface, social networking and content development, RSS syndication, and
❑
fancy graphics. For the moment, though, all it has is the standard Rails application structure, which you should see in your command window after you execute the following command:
rails -d mysql soupsonline
If you leave off the -d mysql, then your application will be created to use SQLite3, which is the new Rails default. The database can be changed later in developemnt. In response, Rails will create a standard application structure:
create
create app/controllers create app/helpers create app/models
[... several creations skipped ...]
create log/server.log create log/production.log create log/development.log create log/test.log
The examples in this book were written and tested against Ruby 1.8.6 and Rails 2.0.2. Ruby 1.9 has not been released as of this writing, but is expected shortly.
A Recipe for Recipes
There are two useful places to start when planning a Rails application:
You can start from the front - end and move backwards by thinking about what actions or activities your users will perform in the site.
You can start from the back - end and move forwards by thinking about what kind of data you will need to be storing.
The two directions feed back and forth on each other, of course, and there ’ s no particularly correct way to go about site design. Rails is extremely good at supporting incremental development, so starting in one small place and gradually increasing functionality is a perfectly valid design process.
For the purposes of the book, I ’ d like to start with a brief description of user activities, but work in earnest with the initial data structure and administrative side, catching up with the user activities in future chapters. For me, at least, since Rails is so good at quick - and - easy data creation support, it feels more direct to start with that part, get some quick success under my belt, and then start designing the front end with some actual data to look at.
So, here ’ s a quick description of user activities. Soups OnLine is intended to start as a recipe repository, where users can upload recipes, find recipes that match various categories or criteria, and comment on recipes. More advanced uses might include the capability to make and receive recommendations, information about various techniques or ingredients, and the capability to purchase equipment, ingredients, or even premade soup.
❑
From the data perspective, the place to start is the recipe — that ’ s the main unit of data that the users will be looking at. What ’ s the data for a recipe? Pulling out my handy - dandy Joy of Cooking (Simon & Schuster), I see that a recipe consists of a title ( “ Cream of Cauliflower Soup ” ), a resulting amount ( “ About 6 cups ” ), a description ( “ This recipe is the blueprint for a multitude of vegetable soups . . . ” ), some ingredients ( “ ¼ cup water or stock, 1 tablespoon unsalted butter ” ), and some directions ( “ Heat in a soup pot over medium - low heat . . . ” ).
There are some interesting data representation questions right off the bat. To wit:
Should the directions be a single text blob, or should each step have a separate entry? Should each ingredient be a single text string, or should the ingredients be structured with a quantity and the actual ingredient name?
Is the ingredient list ordered?
The Joy of Cooking is unusual in that it actually interpolates ingredients and directions, which is perhaps easier to read, and also enables lovely recipe visualizations such as the ones at the website www.cookingforengineers.com . Should you try to allow for that?
Sometimes an ingredient may itself have a recipe. Many soup recipes start with a standard base stock, for example. How can you allow for that?
I find these decisions a lot easier to make with the understanding that they aren ’ t permanent, and that the code base is quite malleable. Eventually, of course, there ’ ll be the problem of potentially having to deal with a lot of data to migrate, but until then, here ’ s how I think the site should start:
Directions are a single text blob. There isn ’ t really any data to them other than the text itself, and if you have a convention in data entry of using newlines to separate steps, it ’ ll be easy enough to migrate should you choose to.
There will be structured and ordered ingredient lists. Usually ingredients are given in a particular order for a reason. Adding the structure doesn ’ t cost much at this point, and will enable some nice features later on (such as English - to - metric conversion). I also think that this one would be harder to migrate to the structured data if you don ’ t start there — you ’ d have to write a simple parser to manage that.
Interpolating ingredients and directions could be managed by adding directions to the ingredient data, but doing so adds some complexity to the user display, and I ’ m not ready to start with that. The idea of being able to do those shiny table visualizations is tempting, though. This is a possibility for change later on, although I suspect that it would be nearly impossible to extrapolate data from preexisting recipes.
Having ingredients themselves have recipes is a complication you don ’ t need at this point. In case it ’ s not clear, I should point out that I ’ m doing this planning in real time. As I write the draft of this, I haven ’ t started the code yet, so I could yet turn out to be dead wrong on one of these assumptions, in which case you ’ ll really see how suited Rails is for agile development.
Having done at least a minimum of design work, it ’ s time to instantiate the data into the database. You ’ re going to do that using the new - style REST resources with Rails.
❑ ❑
❑ ❑
❑
❑
❑
The REST of the Stor y
I pledge right now that will be the only REST - related pun in the whole book (unless I think of a really good one later on).
REST is another one of those tortured software acronyms — it stands for REpresentational State Transfer. The basic idea dates back to the doctoral dissertation of Ray Fielding, written in 2000, although it only started gaining traction in the Rails world in early 2006, when a couple of different plugins allowed for a RESTful style within Rails. The functionality was rapidly moved to the Rails core and has just as quickly become a very commonly used practice, especially for standard Create, Read, Update, Delete (CRUD) style functionality.
What Is REST?
There are three different ways of thinking about REST as compared to a traditional Rails application: Pages versus resources
Network protocols Rails features
You ’ ll explore each of these in the following sections.
Pages versus Resources
The traditional view of data on the Web is action - oriented. A user performs an action on a page, usually by just accessing the page, but sometimes by sending data as well. The server responds with data, usually in HTML, but a pure web service is likely to send XML or JSON.
A RESTful application, in contrast, is viewed as a set of resources, each of which contains some data and exposes a set of functions to the Web. The core of these functions is made up of the standard CRUD actions, and the application programming interface (API) for the standard functions is supposed to be completely consistent between resources. A resource can also define additional actions for itself. If this reminds you of the distinction between procedural programming and object - oriented
programming (OOP), with REST resources playing the part of objects, well then you ’ ve got the gist. One difference is that using REST in Rails primarily changes the way in which the user accesses your data because it changes the URL structure of your site, but the data itself will be largely unaffected, whereas an object - oriented design does affect the way your data itself is structured.
Network Protocols
The signature feature of a REST - based web application is the use of HTTP access methods as critical data when determining what to do in response to a request. HTTP defines four different methods for
requesting data (and eight methods overall). Many of us learned this fact in a beginning HTTP book or network course and promptly filed the information under “ trivia that might win a bet someday, in a bizarre set of circumstances. ” Only two of these methods are in general use — nearly every server since the days of Mosaic has only used GET for getting information out of the server and POST for putting
information into the server. In addition, most web applications used separate URLs for their GET and
POST operations, even where it was technically feasible to share URLs. For example, the Java Servlet specification allows the same servlet to respond differently to a GET or POST , but all of the servlets I ’ ve written either defined one of the methods as a clone of the other, or only respond to one method, ignoring or failing if the other is invoked.
It turns out, though, that the HTTP protocol also defines PUT and DELETE . It ’ s easy to understand DELETE , but it ’ s not immediately clear what the original intention was for the distinction between PUT and POST — you ’ ll see in a second the distinction REST and Rails make between them. A RESTful application uses all of these methods (often called verbs ) as a meaningful part of the Web action. In other words, when confronted with a URL like http://www.soupsonline.com/recipes/1 , a RESTful Rails application cannot determine what controller action to perform without knowing whether the request was a GET ,
DELETE , or PUT . A GET request would result in a show action, the DELETE request triggers the delete action, and the PUT request triggers the update action. In contrast, a traditional Rails application would have the controller action explicitly specified in the URL, ignoring the HTTP verb. The traditional URL might look like http://www.soupsonline.com/recipes/show/1 or http://www.soupsonline .com/recipes/update/1 . (I realize that it ’ s slightly absurd to refer to anything in Rails as traditional, but there isn ’ t a better retronym for the non - REST applications.)
By now, you may have realized a contradiction that I ’ ve hand - waved my way past. If all the browsers handle only GET and POST , then how does a RESTful Rails application use PUT and DELETE ? The Rails core team, like geniuses since time immemorial, is not going to let a little thing like the imperfection of the current state of browsers get in the way of a conceptually nifty idea like REST. When you ask Rails to create a PUT or DELETE link, it actually wraps the request inside a small POST form with a hidden field that Rails then decodes on the server end. In the happier RESTful future, servers will implement the complete HTTP specification, and Rails can dispense with the disguise and display its PUT s and
DELETE s proudly.
Rails Features
Within Rails, you do not explicitly define a class called a Resource in the same way that you explicitly define Controller or Model classes — at least, not for resources controlled by the local Rails application (see Chapter 9 for how you might access resources from a remote server). A resource emerges from the interaction of a Controller and a Model , with some magic in the route - mapping gluing them together. Although Rails provides a REST resource generator that creates a tightly coupled Controller and
Model , you could easily have two separate resources managing different facets of a model. Each resource would have a separate controller. For instance, if you had some kind of employee database, you could manage contact information and say, vacation days as separate resources with separate controllers, even though they are in the same model. As you ’ ll see in just a few moments, you can also nest resources, designating one resource as the parent of another.
A RESTful view can also use some logically named methods to generate the URL that you might use inside a link_to call in your view. Rather than fussing around with action parameters, or passing the object or ID you want to control, Rails will automatically respond to methods such as recipe_path or
edit_recipe_path — assuming, of course, that you ’ ve defined a resource for recipes.
Why REST?
REST is elegant, and I think it ’ s a logical progression of where the best - practices design of Rails
applications has been heading since Rails was released. There ’ s been a continual motion towards having more controllers, having thinner controllers with the real work done in the model, and enforcing consistency between controllers. REST provides a framework for moving that design style to the next level: lots of controllers, lots of activity possible with very little controller code, and absolute consistency for CRUD - style controllers. If you are the kind of web designer who likes to have the URL interface to your application be extremely crisp and concise — and many of us are — then REST will feel quite nice. That said, you ’ re going to see the biggest benefits from REST if your application is either implementing or consuming web services. The consistency of interfaces to REST resources, coupled with the almost trivial nature of converting an ActiveRecord object to an XML representation and back turns every Rails application into a potential web service, but if you aren ’ t thinking of your application in those terms, it may not feel like that big of a win. Although you might try to think of your application as a potential service, it may open avenues of functionality that you haven ’ t thought of before.
Even if you aren ’ t providing a web service, pretty much every Rails application has to do some set of CRUD actions on its data. REST is a powerful mechanism for making that process even simpler. Again, though, REST isn ’ t necessarily going to be much assistance in creating the fancy front - end of your application, but it will make the wiring easier to install, which will leave you more time to make that front - end even fancier.
Building Your F irst Resources
Earlier, you saw the initial design for Soups OnLine where two resources, recipe and ingredient, were described. It ’ s time to put them in your application, using the Rails generate script. The action for the script is scaffold . (In versions of Rails prior to 2.0, it was called scaffold_resource .) The syntax is simple: the singular name of the resource, followed by pairs of the form attribute:datatype for each attribute you want initially placed in the resource.
The data - type portion of each pair can be any type available for use as a data type in a Rails migration:
binary , boolean , date , datetime , decimal , float , integer , string , text , time , and timestamp . There ’ s no expectation that you have to have the attribute list correct up front (it can always be changed), but it should just be an easy place to start. The commands and responses look like this (for clarity, I ’ ve removed lines where Rails shows that a directory already exists):
$ ruby script/generate scaffold recipe title:string servings:string description:string directions:string
create app/views/recipes
create app/views/recipes/show.html.erb create app/views/recipes/new.html.erb create app/views/recipes/edit.html.erb create app/views/layouts/recipes.html.erb create public/stylesheets/scaffold.css create app/models/recipe.rb
create test/unit/recipe_test.rb create test/fixtures/recipes.yml create db/migrate
create db/migrate/001_create_recipes.rb create app/controllers/recipes_controller.rb create test/functional/recipes_controller_test.rb create app/helpers/recipes_helper.rb
route map.resources :recipes
$ ruby script/generate scaffold ingredient recipe_id:integer order_of:integer amount:float ingredient:string instruction:string unit:string
create app/views/ingredients
create app/views/ingredients/index.html.erb create app/views/ingredients/show.html.erb create app/views/ingredients/new.html.erb create app/views/ingredients/edit.html.erb create app/views/layouts/ingredients.html.erb create app/models/ingredient.rb
create test/unit/ingredient_test.rb create test/fixtures/ingredients.yml create db/migrate/002_create_ingredients.rb create app/controllers/ingredients_controller.rb create test/functional/ingredients_controller_test.rb create app/helpers/ingredients_helper.rb
route map.resources :ingredients
That ’ s a lot of files for each scaffold, many of which will be familiar to you from traditional Rails code generation. You ’ ve got your controller object, views, the model class, a fixture file, and unit and functional tests. I ’ d like to focus some attention on items that are new or different.
Migrations
The generator script uses the attribute information provided to create Rails migration objects. Here ’ s the one for Recipe, which you ’ ll find in db/migrate/001_create_recipes.rb :
class CreateRecipes < ActiveRecord::Migration def self.up
create_table :recipes do |t| t.string :title
t.string :servings t.string :description t.string :directions t.timestamps
end end
def self.down
drop_table :recipes end
end
The t.string syntax is a Rails 2.0 method for spelling what would previously have been written
t.column :string . The timestamps method adds the special Rails columns created_at and
updated_at . The creation of the ingredient resource generates a similar migration at db/migrate/002_ create_ingredients.rb .
Routes
The most important additions are the new routes added to the routes.rb file, which are the source of all the RESTful magic. As created by your two generators, the routes look like this:
map.resources :ingredients map.resources :recipes
Standard Routes
The purpose of the routes.rb file is to control the conversion from an HTTP request to a Rails method call. Each of these map.resources lines causes Rails to associate URLs that start with the resource name to the resource for that controller, in this case /recipes would invoke the recipe controller. So far, it sounds similar to a traditional Rails route in :controller/:action/:id format. The difference is that the REST routes infer the action to call in the controller based on the HTTP method invoked. There are seven standard actions in a REST controller. The following table shows the standard interpretation of URLs and the HTTP methods that are used to describe the corresponding controller actions. Each controller action also has a path method, to be called inside views for link_to and form actions, as well as a URL method, which is called inside the controller when you need to redirect to a different action.
(continued)
URL Called HTTP Method
Controller
Action Path Method URL Method
/recipes/1 GET show recipe_path(1) recipe_url(1)
/recipes/1 PUT update recipe_path(1) recipe_url(1) /recipes/1 DELETE destroy recipe_path(1) recipe_url(1)
/recipes GET index recipes_path recipes_url
/recipes POST create recipes_path recipes_path
/recipes/new GET new new_recipe_path new_recipe_url /recipes/1/edit GET edit edit_recipe_
path(1)
When you call one of these path or URL methods with a PUT or DELETE HTTP method, you must make sure that the link_to or redirect call also contains the option :method = > :delete or :method = > :put to ensure that the URL is properly sent by Rails ( link_to assumes GET ; the form methods and
link_to_remote assume POST ). If you are using the standard HTTP method, there ’ s a shortcut, where you just specify the object that is the target of the link:
link_to @recipe
You ’ ll see examples of those calls when you examine the standard views that the generator has created. Also, the methods that take an argument can take either an integer argument, in which case it ’ s assumed to be the ID of the resource you are interested in, or they can take the resource object itself, in which case, the ID is extracted for use in the URL or path. They can also take the usual key/value pairs, which are converted to a query string for the request.
Nested Routes
You need to do a slight tweak of the routes to allow for the relationship between a recipe and its ingredients. As the design currently stands, there ’ s a strict one - to - many relationship between recipes and ingredients, with an ingredient only being meaningful inside its specific recipe. To make your Rails routes reflect that relationship more accurately, the routes can be nested in routes.rb . Change your
routes.rb file so that the resource lines are as follows:
map.resources :recipes do |recipes| recipes.resources :ingredients end
With this nesting in place, Rails will generate similar routes for ingredients, but only with a recipe attached at the beginning of the URL. For example, the URL to call the index method for the ingredients in a recipe will be as follows:
/recipe/1/ingredients
And the URL for showing, updating, and deleting would look like this:
/recipe/1/ingredient/1
The named methods for a nested resource are similar to the parent - level methods listed previously, but they contain the parent resource name in the method, such as the following:
recipe_ingredient_url(@recipe, @ingredient)
edit_recipe_ingredient_url(@recipe, @ingredient)
are well named. But if you get into things like user_address_street_house_room_url(x, y, z, a, b) , it could get a little hairy. There are a couple of ways to clean those long method names up:
The arguments to the URL or path method can be entered as key/value pairs:
recipe_ingredient_url(:recipe_id = > @recipe, :id = > @ingredient)
For URLs, the url_for method can be used (remember to specify the HTTP method if needed):
url_for(@recipe, @ingredient)
Either choice should help tame unclear route method calls.
Customizing Resource Routes
The resources call in the routes.rb file can also be customized to adjust the behavior of the routes. The most common reason for doing this is to add your own actions to the resource. Each resource call provides three options for specifying custom actions. The :member option is for actions that apply to a specific resource, the :collection option is for actions on the entire list (like index ), and the :new option applies to resources that have not yet been saved to the database. In each case, the value for each option is itself a hash. The keys of that hash are the method names, and the values are the HTTP verbs to be used when calling that method. So, if you wanted to add a print action to your recipes, it would look like this:
map.resources :recipes, :method = > {:print = > :get } do |recipes| recipes.resources :ingredients
end
The addition here of :method = > {:print = > :get } creates the new print action, and tells Rails that this action will be defined on a specific resource called via GET . The URL of this new action will be / recipes/1/print . (This is a change from older versions of Rails, where this used to be spelled / recipes/1;print — nobody really liked the semicolon syntax, and it tended to interfere with caching, so it was changed for Rails 2.0.)
The URL for a collection - based action would look like /recipes/ < action > , and the URL for a new based action would be /recipes/new/ < action > .
What ’ s more, you also get a URL and path method for the new action. In this case, they would be
print_recipe_path(@recipe) and print_recipe_url(@recipe) .
The tricky thing about these custom routes is remembering to specify them. Unlike nearly everything else in Rails, a custom resource route needs to be specified twice: once in the controller itself, and then again in routes.rb . This is arguably a violation of one of Rails core design principles, namely Don ’ t Repeat Yourself (DRY), and it ’ s entirely possible that somebody clever will come along and clean this up at sometime in the future.
Like most of Rails, the standard names can be overridden if you like. In the case of a resource routing call, there are a few options to change standard naming. You can specify an arbitrary controller class to be the target of the resource with the :controller option. You can change the name of the controller within the URL (the recipe in /recipe/1 ) using the :singular option, and you can require a prefix to the URL with the :path_prefix option. The prefix passed to that option works just the same way as a
❑
traditional rails route — parts of the prefix specified as a Ruby symbol are converted to variables when the path is dereferenced. For example, if you wanted all recipes to be attached to a chef, you could add the option :path_prefix = > “ /chef/:chef_name ” , and the show recipe URL, for example, would change to /chef/juliachild/recipe/1 . Within the controller, the variable params[:chef_name] would be set to juliachild .
Controllers
The controller for each new resource contains seven actions, shown earlier in the table of standard routes. Each action is helpfully commented with the URLs that cause that action to be invoked. Each action is also set up by default to respond to both HTML and XML requests. Following are sections about the default controllers for the recipe resource with some comments.
Index
First up, the index method, which displays a list of all the recipes:
# GET /recipes # GET /recipes.xml def index
@recipes = Recipe.find(:all) respond_to do |format|
format.html # index.html.erb
format.xml { render :xml = > @recipes } end
end
If you ’ re familiar with traditional Rails, than the only new part here is the respond_to method, which is the REST mechanism that allows the same controller action to return different data based on the
requested format.
Functionally what happens here is similar to a case expression — each potential format that the action might respond to is listed in the body of the respond_to block, and exactly one of them is performed based on the MIME type of the user request. In this case, if the URL request is /recipes or /recipes. html , then the format.html line is chosen. If the URL is /recipes.xml , then the format.xml line is chosen. Each type can have a block associated with it, which is executed when that type matches the user request. If there is no block associated with the type, then the Rails default action for dealing with that type is triggered. In the case of the html action, that would be the rendering of the matching html.erb view, index.html.erb . It has become customary to explicitly note that the format is being handled in a default manner with a comment naming the view file to be rendered.
Since this is one of those Ruby metaprogramming magic things, where it ’ s not immediately clear what ’ s happening behind the scenes, it ’ s worth breaking the method down a little bit. The respond_to method comes in two forms. The one shown previously takes a block. Alternately, you could just pass a list of symbols corresponding to types (:html, :js) . You would use the list version if every type on the list was handled via the default action for that type.
When the respond_to method is called, the outer block is invoked. Each format method is called, and does nothing unless the format method name matches the type of the request. (Metaprogramming fans should note that this is elegantly implemented using method_missing .) If the types match, then behavior associated with that type is invoked — either the block if one is explicitly passed or the default behavior if not.
The convention is to have nothing in your respond_to block except for the format calls, and nothing in the format calling blocks except the actual rendering call being made. This goes along with the general idea in Rails design that the controller should be as thin as possible, and that complex data processing should be handled in the model object.
The respond_to method adds a lot of flexibility to your Rails controller — adding XML data serialization or RSS feeds is nearly trivial. The syntax, I think, may still have some tweaking ahead of it — I ’ m not sure there ’ s a lot of love for the way default behaviors are specified, and if the rendering is complex, the nested blocks can become hard to read.
Rails defines eight formats for you: atom , html , ics , js , rss , text , xml , and yaml . Just to be clear on this, html is used for ordinary browser output, atom and rss should be used for feeds, xml and yaml are used for object syndication, ics is the standard iCalendar format for calendar data, text is often used for simple serialization, and js is used either to serialize data via the JSON format or as the target of an Ajax call that would trigger JavaScript.
Adding your own formats is simple, assuming that the format has a MIME type. Suppose you wanted to allow a URL like /recipes.png to return some kind of graphical display of your recipe list. All you need to do is go into the config/environment.rb file and add the following line:
Mime::Type.register “image.png”, :png
Now any respond_to block in your application will enable you to use format.png as a method.
Show
The default show method is nearly identical to the index method, except that it only takes a single recipe from the database, and renders the show.html.erb file.
# GET /recipes/1 # GET /recipes/1.xml def show
@recipe = Recipe.find(params[:id]) respond_to do |format|
format.html # show.html.erb
format.xml { render :xml = > @recipe } end
end
New
The default new method is similar to show , except a new recipe object is created:
# GET /recipes/new # GET /recipes/new.xml def new
@recipe = Recipe.new respond_to do |format| format.html # new.html.erb
format.xml { render :xml = > @recipe } end
end
Edit
The default edit method is extremely simple because it does not have an XML representation defined, so the traditional Rails default behavior happens automatically, and a respond_to method is not needed. Here ’ s an example:
# GET /recipes/1/edit def edit
@recipe = Recipe.find(params[:id]) end
Create
The create method is more complicated because it needs to output different information depending on whether the creation is successful. The new recipe object is created based on the incoming parameters, and then it is saved to the database. For example:
# POST /recipes # POST /recipes.xml def create
@recipe = Recipe.new(params[:recipe]) respond_to do |format|
if @recipe.save
flash[:notice] = ‘Recipe was successfully created.’ format.html { redirect_to(@recipe) }
format.xml { render :xml = > @recipe, :status = > :created, :location = > @recipe } else
format.html { render :action = > “new” } format.xml { render :xml = > @recipe.errors,
:status = > :unprocessable_entity } end
I mentioned earlier that you could have code other than the format methods inside the respond_to block, and this example shows one reason why you might want to do that. The actual saving of the recipe takes place inside that block. If the save is successful, then the HTML response simply redirects to the show method. Rails infers that you want to show the object because the only argument to redirect_ to is the object itself, and it uses REST routing to determine the unique URL for that object. The XML response returns the object as XML with a couple of extra headers containing additional information. If the save is not successful, the HTML response is to show the new form again, and the XML response is to send the errors and status via XML.
In case you are wondering why the create method needs to support an XML format, the answer is to allow new objects to be created remotely via a separate web services client that might be dealing with your recipe server via XML.
Update
The update method is nearly identical to the create method, except that instead of creating a new recipe, it finds the existing recipe with the expected ID, and instead of calling save , it calls update_ attributes . Oh, and the XML output is slightly different. The update method is as follows:
# PUT /recipes/1 # PUT /recipes/1.xml def update
@recipe = Recipe.find(params[:id]) respond_to do |format|
if @recipe.update_attributes(params[:recipe])
flash[:notice] = ‘Recipe was successfully updated.’ format.html { redirect_to(@recipe) }
format.xml { head :ok } else
format.html { render :action = > “edit” } format.xml { render :xml = > @recipe.errors, :status = > :unprocessable_entity } end
end end
Delete
Finally, delete . The default method doesn ’ t check for success or failure of delete ; for an HTML request, it redirects to the index page via the recipes_url helper. An XML request gets a header signaling success. Here ’ s an example of the delete method:
# DELETE /recipes/1 # DELETE /recipes/1.xml def destroy
respond_to do |format|
format.html { redirect_to(recipes_url) } format.xml { head :ok }
end end
Views
The views that are created by the generated script are largely similar to their non - REST counterparts, but I would like show the differences that come from using the RESTful URL features. In the edit.html.erb file, the form accesses its URL as follows
< % form_for(@recipe) do |f| % >
The form_for method merely takes the argument and automatically converts that to a PUT call to / recipes/1 (or whatever the id of the recipe is), which translates in the HTML source to this:
< form action=”/recipes/1” class=”edit_recipe” id=”edit_recipe_1” method=”post” >
< div style=”margin:0;padding:0” >
< input name=”_method” type=”hidden” value=”put” / >
Although this is implemented as a POST from the server point of view, Rails inserts the hidden field for
_method with the value put to tell the Rails application to treat it as a PUT request and redirect to the update action.
At the bottom of the edit page, the link_to method for show uses the GET version of the default URL for the object, while the back link uses the named method for getting to the index action, as follows:
< %= link_to ‘Show’, @recipe % > | < %= link_to ‘Back’, recipes_path % >
Similarly, from index.html.erb , it does this:
< %= link_to ‘New recipe’, new_recipe_path % >
And from show.html.erb , it does this:
< %= link_to ‘Edit’, edit_recipe_path(@recipe) % > | < %= link_to ‘Back’, recipes_path % >
To clear up one quick issue, the .html.erb file - ending is a Rails 2.0 change. It was felt that .rhtml was not accurate because the file is actually an erb file, and the .html is there to denote what kind of file the
Route Display
If you find yourself becoming confused by all the RESTful routing magic, as of Version 2.0, Rails provides a rake command, routes , that gives you a complete list of the routes that have been defined in your application (output has been truncated). For example:
$ rake routes
recipes GET /recipes {:controller= > ”recipes”, :action= > ”index”}
formatted_recipes GET /recipes.:format {:controller= > ”recipes”, :action= > ”index”}
POST /recipes {:controller= > ”recipes”, :action= > ”create”}
POST /recipes.:format {:controller= > ”recipes”, :action= > ”create”}
new_recipe GET /recipes/new {:controller= > ”recipes”, :action= > ”new”}
formatted_new_recipe GET /recipes/new.:format {:controller= > ”recipes”, :action= > ”new”}
edit_recipe GET /recipes/:id/edit {:controller= > ”recipes”, :action= > ”edit”}
formatted_edit_recipe GET /recipes/:id/edit.:format {:controller= > ”recipes”, :action= > ”edit”}
It ’ s a little tricky to see — you need some pretty long lines to lay this out, but the output is in four columns: the named method stem that is used to access the route (for example, edit_recipe , which can be the stem to edit_recipe_path or edit_recipe_url ), the HTTP verb that triggers this call, the actual URL with symbols inserted, and then the controller and action called by the route.
Building Ingredients
Having now gotten a thorough tour of the new mechanisms that RESTful Rails provides by default, it ’ s time for you to start writing some code and making this site come to life. The first task is to enable simple entry of a recipe, and allow the most recently entered recipes to be displayed on the user - centered front page, blog - style.
The following problems stand between you and that goal:
The database schema and sample code as generated do not associate recipes and ingredients, so the forms that were created by the scaffold do not have a place to enter ingredient information.
You changed the default routing after the scaffolds were generated, and therefore the ingredient forms, as generated, use invalid methods to create URLs.
The basic index listing of recipes is useful from an administrative point of view, but it is not what you want to present to a user. In addition to the functional changes, you ’ ll need it to be much nicer looking.
That list will take you through the end of this chapter. Time to build a webapp!
Setting Up Your Database
Most of the work of setting up the initial database was already done when you created the resources and generated migrations, but you still need to actually create the database instances. You ’ ll need to go to the
database.yml file first and adjust the database information for all three database environments — development, test, and production. If you are using MySQL (version 5.x, please) and the database is on your local development box, then you probably only need to put your root password into the file. (More