Essential SharePoint
Table of Contents | Index
Want to work more efficiently and effectively? Want to improve productivity? Microsoft is betting that you do. That's why it created Windows SharePoint Services--a set of
collaboration tools that helps organizations increase individual and team productivity by enabling them to create web sites for information sharing and document collaboration.
Through these team-oriented web sites, users capture and share ideas, and work together on documents, tasks, contacts, etc.--either among themselves or with partners and
customers. And if you have Windows 2003 Server, then you already have SharePoint, since it's built right in. But before you can enjoy the benefits of SharePoint, you need to know how to turn it on, set it up, and get your applications working with it.
Essential Sharepoint will help you do just that. It's not only the most complete guide for setting up and using these increasingly popular sites, but it also explains in detail the integration that makes SharePoint exciting. Everything you need to know about SharePoint is covered, including:
when to use SharePoint portal server
Essential SharePoint
Table of Contents | Index
Section 1.14. Trying Out SharePoint
Section 2.8. Installing SharePoint Services
Section 2.9. Adding Members Quickly
Section 2.10. Allowing Anonymous Access
Section 2.11. Maintaining Server Security
Section 2.12. Enabling Self-Service Site Creation
Section 2.13. Resources
Section 5.1. Getting Started with Excel and SharePoint
Section 5.2. Sharing Workbooks
Section 5.3. Sharing Lists
Section 5.4. Publishing as a Web Page
Section 5.5. Using the Spreadsheet Web Part
Chapter 6. Using Document Libraries with Word
Section 6.8. Linking and Publishing Custom Properties
Section 6.9. Discussing a Document
Section 6.10. Enabling Emailed Submissions
Section 6.11. Approving/Rejecting Documents
Section 10.4. Using URL Commands
Section 10.5. Using FrontPage RPC
Appendix A. Upgrading
Upgrading to SQL 2000
Upgrading to Portal Server
Recording Settings
Installing and Configuring Portal Server
Re-Extending Existing Sites
Connecting Sites to the Portal
Adding Links to the Portal
Upgrading from Team Services
Resources
Appendix B. Reference Tables
Office Versions
StsAdm Commands
SetupSts Commands
Server Files and Locations
Content Not Stored in Database
Colophon
About the Author
Colophon
Essential SharePoint
by Jeff Webb
Copyright © 2005 O'Reilly Media, Inc. All rights reserved.
Printed in the United States of America.
Published by O'Reilly Media, Inc., 1005 Gravenstein Highway North, Sebastopol, CA 95472.
O'Reilly books may be purchased for educational, business, or sales promotional use. Online editions are also available for most titles (safari.oreilly.com). For more information, contact our corporate/institutional sales department: (800) 998-9938 or
Editor: Simon St.Laurent
Production Editor: Jamie Peppard
Cover Designer: Emma Colby
Interior Designer: David Futato
Printing History:
May 2005: First Edition.
Nutshell Handbook, the Nutshell Handbook logo, and the
O'Reilly logo are registered trademarks of O'Reilly Media, Inc.
Essential SharePoint, the image of a wombat, and related trade
Many of the designations used by manufacturers and sellers to distinguish their products are claimed as trademarks. Where those designations appear in this book, and O'Reilly Media, Inc. was aware of a trademark claim, the designations have been printed in caps or initial caps.
While every precaution has been taken in the preparation of this book, the publisher and author assume no responsibility for
errors or omissions, or for damages resulting from the use of the information contained herein.
ISBN: 0-596-00880-5
Dedication
Preface
If you don't have SharePoint Services, you need it. Even if you work alone from your home office as I do, SharePoint is too useful to pass upand it's free (well, kind of). SharePoint Services is part of Windows 2003, so if you already have
Windows Server 2003, you can download the installation from Microsoft and install it fairly easily.
If you don't have Windows Server 2003, you can sign up for a free 30-day trial through one of the SharePoint hosting
Who Should Read This Book
SharePoint is a server product that is used by a wide range of people. This book was written to serve readers based on their varying roles in your company. The following table identifies these roles and recommends specific chapters that may be of interest.
Role Responsibilities Read these
chapters
Administrator Installs server software, configures web sites,manages security. 1, 2, 3
Designer Designs pages on site, creates site templates. 1, 3, 8
Contributor Adds documents, lists, tasks, announcements, andother content. 1, 4, 5, 6
Contributor with
data entry Completes InfoPath forms. 1, 4, 5, 6, 7
Reader Views sites and documents but makes no changes. 1, 4, 6
Programmer Creates custom web parts. 1, 3, 8, 9, 10
Because I cover the full range of things you can do with
SharePoint in this book, certain sections may be too technical for some readers. For example, you won't want to read Chapter 9 if you're not a programmer! Still, I wanted to provide a book that gives readers room to grow and that does more than
Navigating in SharePoint
Many SharePoint tasks involve navigating through several web pages. I provide the navigation path based on the links on each page. For example, "choose Site Settings Go to Site
Administration Delete this site" means click Site Settings
on the navigation bar, click Site Administration on the next page, and finally click Delete this site. Each of these links takes you to a new page, and sometimes you have to search a bit to find the next link. I use this abbreviated style because I think the alternatives are more wordy, but not much clearer.
If you get lost trying to follow the path, you can enter the
address of the page directly in your browser's Address bar. The figures that accompany tasks show the addresses of most
important pages. For example, this is the address of the page used to delete a site:
http://wombat1/newsite/_layouts/1033/deleteweb.aspx
In this case, you'd want to replace //wombat1/newsite/ with the
Getting the Code Examples
The code examples are available on my web site at
http://www.usingsharepoint.com/Samples. You may want to bookmark that site in your browser so you can see the
examples in action while you're reading. In addition, there is a version of code samples that can be installed on your own server as a template at
http://www.oreilly.com/catalog/essentialsp.
Although installing the samples yourself is a little complicated, it gives you complete access to the source and lets you make
changes. You don't need to install the samples right away, though: get comfortable with SharePoint first.
If You Need Help
In addition to the help that can be found through my web site and those of O'Reilly, Microsoft, and Google, here are some otherSharePoint resources:
The newsgroups
microsoft.public.windows.sharepointservices and
microsoft.public.windows.sharepointservices.development
are actively supported by the SharePoint community.
The FAQ at http://wss.collutions.com answers a lot of specific questions.
The site at http://www.wssdemo.com provides excellent examples of ways to handle content in SharePoint.
A Resources section at the end of each chapter cites
Font Conventions
This book follows certain conventions for font usage.
Understanding these conventions up front makes it easier to use this book.
Plain text
Indicates menu titles, menu options, menu buttons, and keyboard accelerators (such as Alt and Ctrl).
Italic
Indicates new terms, URLs, email addresses, filenames, program names, file extensions, pathnames, directories, and new terms where they are defined.
Constant width
Is used for all code listings, commands, options, variables, attributes, properties, parameters, values, XML tags, HTML tags, the contents of files, the output of commands, and anything that appears literally in a SharePoint page.
Constant width italic
Constant width bold
Indicates additions in the code examples.
Constant width strikethrough
Shows deletions from the code examples.
This icon indicates a tip, suggestion, or general note.
How to Contact Us
Please address comments and questions concerning this book to the publisher:
O'Reilly Media, Inc.
1005 Gravenstein Highway North Sebastopol, CA 95472
(800) 998-9938 (in the United States or Canada) (707) 829-0515 (international or local)
(707) 829-0104 (fax)
We have a web page for this book, where we list errata, examples, or any additional information. You can access this page at:
http://www.oreilly.com/catalog/essentialsp
To comment or ask technical questions about this book, send email to:
For more information about our books, conferences, Resource Centers, and the O'Reilly Network, see our web site at:
Safari Enabled
When you see a Safari® Enabled icon on the cover of your favorite technology book, that means the book is available online through the O'Reilly Network Safari Bookshelf.
Acknowledgments
John Craig reviewed this book for me and his help is more than a pleasure. Years ago I joined John in writing two editions of his brainchild Visual Basic Developer's Workshop. I'm still proud to have worked on that book, and I hope we continue to work together for a long time.
Simon St.Laurent is my editor. He's right about everything, which saves me a great deal of time arguing and keeps me from crossing the line of good taste. This is my second book with Simon and, as with John, I hope one of many.
The only other team members who've been with me longer than John and Simon are my family: Trish, Dorian, and Sophia.
They've been patient with my programming jokes, take me to the beach on weekends, and find me when I'm lost.
Finally, I must thank everyone in the SharePoint community. No individual can do as much as those working together, and the newsgroups and sites mentioned earlier help all of us. I
Chapter 1. Why Use SharePoint?
1.1. Solving Problems
SharePoint solves four problems:
It's difficult to keep track of all the documents in even a small office.
Email isn't a great way to share files.
We work all over the place.
It's hard to create and maintain web sites on your own.
Most offices have addressed these problems using a
combination of tools or work procedures. For instance, the boss says, "Route your proposal to me, Ed, and Jane for approval," and you email the file to each of them, asking for comments with change-tracking enabled. You set a deadline, keep copies of each reviewer's response, and reconcile conflicting
comments.
That approach works because your boss, Ed, and Jane are great coworkers, check their email often, and communicate well with each other, and because the proposal is well-suited for this
approach. It's pretty easy to throw a wrench into that machine, however. Say, for instance, your proposal isn't a Word
document, but rather a set of drawings, a spreadsheet of test results, and a list of links to related products. How do you route that? How do you collect comments?
Or say your project has multiple authors and multiple files. Each of these complications increases the vulnerability of the
archived, out-of-date drawings are included, deadlines are missed.
SharePoint helps solve all these problems using the Office system. Instead of routing the files by email, you set up a workspace for project documents on a SharePoint web site. Email alerts notify reviewers when files are available; reviewers can discuss changes online, read each other's comments, and assign tasks and deadlinesand all changes are recorded in version history.
SharePoint is a big improvement over improvised solutions, but the degree of improvement is affected by two conditions:
SharePoint affects work processes, so you need to think about how to influence process effectively before it can help.
SharePoint is closely tied to Office 2003; although you can use earlier Office versions or even other applications, the latest Microsoft suite provides the greatest benefit.
If you can live with those two caveats, then we can get started. Otherwise, you'd probably better put this book back on the shelf so someone else can buy it.
1.2. Storing and Sharing
Documents store and share information, but there are two
aspects that documents sometimes ignore: content modification and change tracking. To see this handled well in a web-based document library, visit the W3C web site, which indicates change using formatting as shown in Figure 1-1.
If you want to find the reason for a change, you can visit a discussion at the link to the HTML working group. You have to be a member of the group to see the discussion, but that
restriction is appropriate since reading and participating in discussions are key benefits of joining the W3C.
The W3C put a lot of thought and effort into designing and maintaining their site, which does an excellent job of storing and sharing knowledge about web standards. It's a library of current standards, the history of those standards, discussions, and lists of related work.
SharePoint lets you create the same type of document libraries, histories, discussions, and lists by gathering the work from
around your office and making it available from a web page.
Figure 1-2 shows the SharePoint workspace I used to create this book.
I didn't put as much thought or effort into my site as the W3C did, but the two sites have a lot in common. They both:
Contain a library of documents.
Record change history for those documents.
Provide a forum for online discussions.
List links to related information.
Permit members different levels of access.
Allow access from any location via the Internet.
1.3. Improving Collaboration
The main difference between my site and the W3C site is that mine contains mostly Word documents, while their site is mostly HTML files. That means my users must have Word to view the files in Figure 1-2, but it also means that those users can open those files directly from the web site and make changes if they have permission.
In fact, my editors don't even need to open my site to make changes. They can open the Word files listed in Figure 1-2 and save them to their own computers as linked documents; then whenever they open their local copy, it is automatically
refreshed with changes from the SharePoint site. Similarly, any changes they make to the files are sent to SharePoint when they close their local copy, as shown in Figure 1-3.
Figure 1-3 illustrates a distributed file system where O'Reilly (my publisher) can share access to the files I am working on, even though I live in Florida, and they are in Massachusetts and California (and sometimes in between).
The files are synchronized over the Internet whenever the file is opened or closed. If Simon (my editor) finds himself somewhere without a good network connection, however, he can cancel the updates but still work on the fileas long as he promises to
synchronize it later!
animal 1-3. Local copies can be linked to
SharePoint documents
SharePoint provides several types of collaboration tools, as shown in Figure 1-4:
Announcements
Use to keep teammates informed.
Alerts
Task lists
Assign work to team members.
Events
Use to schedule meetings, deadlines, and get-togethers.
Discussions
Allow online discourse between members.
Contact lists
1.4. Going Public
SharePoint creates web sites. That means your documents can be made public over the Internet, shared within a private
intranet, or both. My site is public, but access to certain areas is restricted so that no one steals my chapters.
I assigned different permissions to different members of my site. As site administrator, I have full control; Simon and John are contributors and can make changes; my technical reviewers can read files; and so on. Once the chapters are complete, I move
selected excerpts to a public area that allows everyone to read them. I maintain these levels of access from a web page within the SharePoint site as shown in Figure 1-5.
Membership is a key aspect of SharePoint. In most
organizations, individuals may belong to many different teams. Some teams are organizational (company, division, department, etc.) while other teams span organization lines (project teams, task forces, and so on). SharePoint accommodates both
1.5. Organizing Sites
SharePoint sites are organized into folders, just like any other web site, but there are some terms SharePoint uses that should be explained up front:
Virtual server
The root location for one or more web sites. SharePoint can host multiple virtual servers on a single server. Each virtual server can have its own domain name. For example,
www.usingsharepoint.com and www.mstrainingkits.com are hosted on the same SharePoint server.
Site collection
A group of top-level sites on one virtual server. Site
collections allow separate administration of related sites.
Top-level site
The primary web site for a domain. Each virtual server can host many different top-level web sites, which in turn
contain subsites. If SharePoint is set up to allow self-service site creation, other top-level sites may also exist in the
//domain/sites/ folder.
Subsite
A site within a top-level web site. Subsites are used to control access and organize the content within a site;
members of the top-level site may or may not have access to a specific subsite.
Page
Sites contain web pages that present their content. Most SharePoint pages are web part pages (.aspx), but you can also add HTML pages or other content to SharePoint sites as document libraries.
A table of related data. Lists are used throughout
SharePoint: announcements, contacts, discussions, and other types of content are implemented through lists. Users can also create lists using Excel and link the contents of those shared lists to other documents in Word and Excel.
View
The way a list is displayed. The default view of a list is to display the data in columns that can be sorted or filtered, but you can also display lists in calendar form or as a spreadsheet-like data grid. Views can include criteria to display only certain columns or rows and may group items to create expandable tree-views.
Virtual servers, top-level sites, subsites, and lists create a hierarchy that is illustrated in Figure 1-6.
1.6. Types of Sites
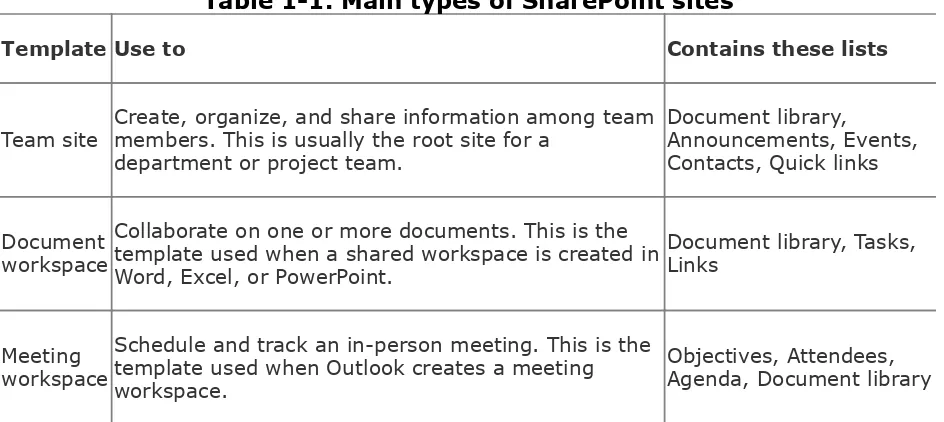
Authorized team members can create new sites in SharePoint very easilyin fact, just a few clicks in Word creates a new document workspace site almost instantly. To help impose a unified look, SharePoint includes site templates that influence the type of site created. SharePoint comes with eight different templates, but there are only three types you need to worry about for now, as shown in Table 1-1.
Table 1-1. Main types of SharePoint sites
Template Use to Contains these lists
Team site Create, organize, and share information among teammembers. This is usually the root site for a department or project team.
Collaborate on one or more documents. This is the template used when a shared workspace is created in Word, Excel, or PowerPoint.
Document library, Tasks, Links
Meeting workspace
Schedule and track an in-person meeting. This is the template used when Outlook creates a meeting workspace.
Objectives, Attendees, Agenda, Document library
Most groups or departments will have a team site as their main top-level site, then use document workspaces and meeting
workspaces to organize projects and meetings within the group.
Figure 1-7 shows the default sites created by the three main site templates.
Quick launch area
Located on the left of page; links take members to content within the site. When you create a new list or library in a site, SharePoint asks whether to include it in Quick launch.
Links list
Located on the right of page; navigates down to document and meeting workspace sites within a team site. You can also add links to external sites or other locations in the Links list.
Navigation bar
1.7. Parts of a Page
Each SharePoint site has a home page named default.aspx. Different site templates create different home pages, as shown in Figure 1-7. These pages are made up of web partsa web part
is a type of custom control that contains a title bar, a frame, and content. Figure 1-9 indicates the web parts included in a document workspace.
animal 1-8. Navigating between team and
workspace sites
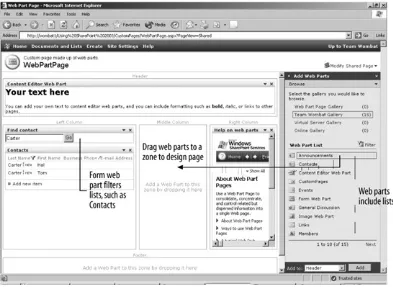
Web parts appear on a web part page, which is a special type of page that contains zones where you can drag and drop web parts. The home page of each site is a web part page. Web parts often present data from lists within the site. In fact, all of the lists in a site show up as web parts when you create a new web part page, as shown in Figure 1-10.
I said that lists are tables of related data, but that doesn't really convey the importance of lists within SharePoint. Lists are used to organize and store Office documents, links, members,
discussions, images, and all other types of content in
SharePoint. For the most common tables, SharePoint includes a set of list templates, which are categorized and described by task in Table 1-2.
Table 1-2. Types of lists
Category List template Use to
Team projects Announcements Post messages on the home page of your site.
Contacts Share information about people your team works with.
Document
Events Keep informed of upcoming meetings, deadlines, and other important events.
Form library Share InfoPath forms with the team.
General
discussion Get answers and share opinions within the team.
Links Share links to web pages relevant to team members.
Survey Get quantifiable feedback from the team.
Tasks Track work that you or your team needs to complete.
Picture library Share images.
Problem report Track customer complaints and feature request. Assignitems and record resolution.
Meetings Agenda Outline meeting topics, who will cover them, and howmuch time each presenter is allotted.
Attendees Invite members to the meeting.
Decisions Enter, review, and track decisions made at the meeting.
Issues Manage a prioritized set of problems meeting will address.
Meeting series Handle recurring meetings, such as monthly statusreviews.
Things to bring List things that attendees should bring to be prepared forthe meeting, such as notebooks, handouts, or lunch.
Objectives List goals for the meeting.
Workspace
pages Link to other pages in a multipage meeting workspace.
Site
Site template
gallery Add or remove custom site templates.
Web part
gallery Add or remove custom web parts.
In addition to displaying lists, there are also web parts that perform specific tasks, as shown in Table 1-3.
Table 1-3. Other web parts included with SharePoint
Web part Use to
Content
editor Display HTML text that can be edited within a frame.
Image Include an image on a page.
Members Display a list of site members and status.
Page viewer Include a view of another web page in a frame.
Form Filter a list displayed in another web part.
XML Transform an XML data source using XSL and display the result in a frame onthe page.
1.8. Where Are the Files?
If you install SharePoint, create a few sites, then search your server's file system, you might be surprised that you can't find the web pages you just created. That's because SharePoint stores content in a SQL Server database, not in conventional files and folders.
1.9. Putting SharePoint to Work
Once SharePoint is installed and your group or department has set up a team site, authorized members of the team can create document workspace sites from their desktops using Word, Excel, or PowerPoint. Members create document workspaces when they want to get input from others. Workspaces are intended for works-in-progress rather than for completed documents.
To create workspaces over the Internet from Office, you must first add the SharePoint site address to the Trusted Sites list in Internet Explorer. Choose Tools Internet Options Security Trusted Sites Sites. Be sure to clear the Require server verification (https:) checkbox before entering the address.
The 2003 versions of Word, Excel, and PowerPoint all include a Shared Workspace task pane, as shown in Figure 1-11, that you use to create and maintain workspaces. The following example illustrates how to use a workspace to develop a project:
1. Start Word 2003 and write a draft of the project plan.
2. Once you are happy with your first draft, save the
document on your PC, then choose View Task Pane Shared Workspace.
3. On the Shared Workspace task pane, name the workspace, elect the location of the team site, and choose Create.
4. Use the Shared Workspace task pane to add the names of the teammates you want input from; then choose Send email to all members to let them know a draft is ready for review.
5. Reviewers can open the draft from the SharePoint site, make comments or changes in the document, and then save those changes to share them with other members.
6. As the project moves forward, members can open the project plan document, then add other documents to the workspace using the Shared Workspace task pane as shown in Figure 1-12.
The Shared Workspace task pane can perform almost all of the tasks that can be done while viewing the SharePoint site in a browser, but you can always choose Open site in browser to view the shared workspace site as shown in Figure 1-13.
1.10. Holding Meetings
Similarly, you can create meeting workspaces from within Outlook by following these steps:
1. In the Outlook Calendar, select a date and time for the meeting and choose Actions New Meeting Request or Actions New Recurring Meeting. Outlook displays the Meeting dialog box.
2. Choose Meeting Workspace. Outlook displays the Meeting Workspace task pane as shown in Figure 1-14.
3. Choose Create in the task pane and Outlook creates a meeting workspace site in SharePoint.
Meeting workspaces aren't meant to host meetings online, but rather to provide a way to track objectives, agendas, and
1.11. Building Libraries
Because the names are similar, it's easy to confuse document workspaces and document libraries, but they are very different.
A document workspace is a special type of subsite that contains works-in-progress. Workspaces often contain only one
document (perhaps a large report or spreadsheet) that a team is working on. Document workspaces have special features that are covered more in Chapter 5.
A document library is used to store multiple documents within a site. Completed documents should be stored in document
libraries that are part of the team site. Document libraries are a special type of list (not a type of site), and are covered
extensively in Chapter 6. Libraries collect related documents and share them with all members of the site. Documents can be organized into folders within the library, allowing you to
categorize documents as shown in Figure 1-15.
Every document workspace site actually includes a document library for the work-in-progress, but because document
workspaces are subsites of the team site, not everyone has access to those files. Storing completed documents in a library at the team site makes those documents more widely available.
You can't create document libraries from the Shared Workspace task paneyou do it by viewing the SharePoint site in a browser and choosing Create Document Library and completing the New Document Library form. Of course, there's always an exception: you can create picture libraries using the task pane in Office Picture Manager, as shown in Figure 1-16.
1.12. Creating Internet Sites
SharePoint's default site template is kind of boring-looking in my opinion. If you are creating a site for public view, you'll probably want to customize the look by applying a theme,
modifying the home page, and/or adding your own pages to the site.
Themes control the color scheme of a site. To choose a theme
for a SharePoint site, choose Site Settings Apply a Theme. SharePoint lets you choose from a list of themes and preview the result, as shown in Figure 1-17.
You can modify any SharePoint page by choosing Modify Shared Page Design This Page, but you have more control over
changes if you open the site in FrontPage 2003. FrontPage can open SharePoint sites right from their server location, make changes, and save the new pages right back to SharePointyou will never even notice you're writing to a database (see Figure 1-18).
Finally, you can upload pages from existing web sites using FrontPage or by creating a document library in SharePoint. Document libraries can contain any type of content, including HTML and ASPX pages.
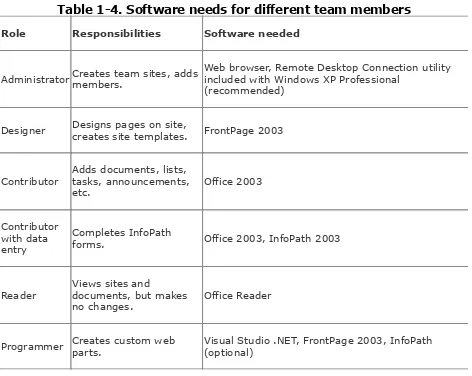
1.13. What Software Do You Need?
Because SharePoint is designed to be used by different
members with different responsibilities, the software needs for each team member vary depending on their role, as shown in
Table 1-4.
Table 1-4. Software needs for different team members
Role Responsibilities Software needed
Administrator Creates team sites, addsmembers. Web browser, Remote Desktop Connection utilityincluded with Windows XP Professional (recommended)
Designer Designs pages on site,creates site templates. FrontPage 2003
Contributor Adds documents, lists,tasks, announcements,
etc. Office 2003
Contributor with data entry
Completes InfoPath
forms. Office 2003, InfoPath 2003
Reader Views sites anddocuments, but makes
no changes. Office Reader
Programmer Creates custom webparts. Visual Studio .NET, FrontPage 2003, InfoPath(optional)
Where's the server software? You don't need actual physical
PC by viewing one of the administrative web pages in the browser. However, you do need access to a SharePoint server, and here, listed from least to most expensive, are your access options:
You can purchase SharePoint services on a monthly basis from an Internet Service Provider (ISP). This is a simple and inexpensive way to try SharePointin fact, Apptix offers a free 30-day trial at
http://www.sharepointtrial.com/welcome.aspx.
You can purchase a Windows 2003 server. SharePoint is part of Windows 2003, so you can configure the machine as a SharePoint server using the Windows setup procedure.
You can purchase multiple servers and buy a SharePoint Portal Server license from Microsoft if you plan to create an enterprise-wide web portal based on SharePoint.
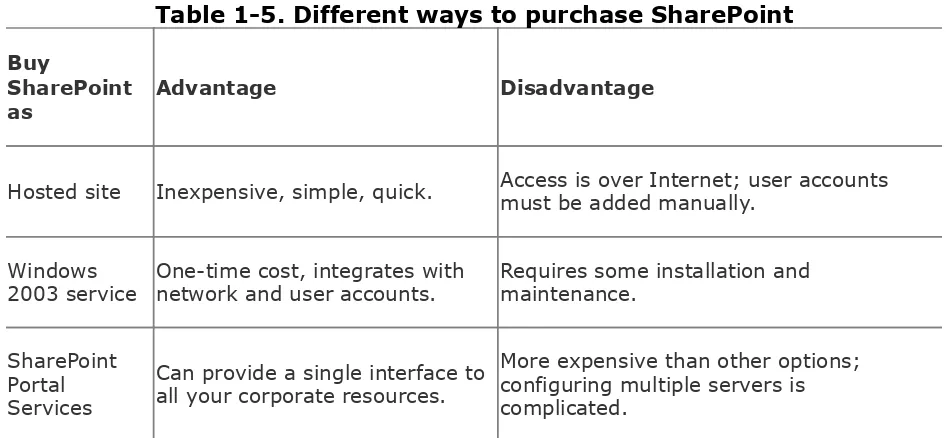
Table 1-5 lists the relative advantages of each approach.
Table 1-5. Different ways to purchase SharePoint
Buy
SharePoint
as Advantage Disadvantage
Hosted site Inexpensive, simple, quick. Access is over Internet; user accountsmust be added manually.
Windows
2003 service One-time cost, integrates withnetwork and user accounts. Requires some installation andmaintenance.
SharePoint Portal Services
Can provide a single interface to all your corporate resources.
SharePoint Portal Server lets you integrate multiple sites across physical servers and provides single-sign-on access through the web portal to corporate databases and other secured resources. However, the price of Portal Server ranges from about $4,000 to $30,000 per physical server, depending on the number of users.
1.14. Trying Out SharePoint
I recommend using the 30-day free trial of SharePoint before installing it on Windows 2003. There are three good reasons for this: it's free, it's painless, and it's quick. Then, if you like it go ahead and put it on your server.
To get a free SharePoint site, go to
http://www.sharepointtrial.com/default.aspx. Follow the signup instructions and wait for email confirming your site has been created. If everything goes correctly, you'll get a new
SharePoint site that looks something like Figure 1-19.
animal 1-19. Creating a free trial site before
installing SharePoint
you can just mess around with your new SharePoint site for a while, changing the home page, adding users (choose Site Settings Manage Users), adding a welcome announcement (choose Add new announcement), or posting your vacation pictures (choose Pictures Create Picture Library). Get a feel for what it can do.
SharePoint is a foundation for building sites that solve specific problems. The general site types Microsoft includes (team sites and workspaces) are a starting point, not an end point. If you have more specific needs, look for SharePoint add-ons
(sometimes called accelerators). Some accelerators, such as workflow management systems, are already available from
1.15. What's SharePoint Not Good For?
SharePoint is an excellent way to create data-driven web sites, in my opinion, but there are other times where I don't think it's the best choice. For example, SharePoint isn't a substitute for a code management library, such as SourceSafe. (Microsoft is working on this for Visual Studio 2005, however, so watch out!) Also, SharePoint's integration with Microsoft Office, Windows, and .NET means that users of other operating platforms (Mac, Linux) or non-Microsoft browsers may have problems using the sites.
1.16. Resources
To get Look here
Free trial versions of
SharePoint http://www.microsoft.com/sharepoint/
SharePoint Portal
Server pricing http://www.microsoft.com/office/sharepoint/howtobuy/default.mspx
Online SharePoint
tutorial http://www.usingsharepoint.com/SPTraining/
A great SharePoint
FAQ http://wss.collutions.com/
A great SharePoint
demo site http://www.wssdemo.com/
SharePoint
Chapter 2. Getting Started
There are several ways to get SharePoint Services. The biggest choice is whether to host SharePoint on your own server or whether to buy the services from a hosting provider. The
primary advantage of hosted services is that you don't need to wrangle with installing and maintaining SharePoint yourself. The main disadvantage is that you lose some of the flexibility and control you get from using your own server.
In this chapter, I show you how to get started using a hosted site; then I explain how to install SharePoint on your own server. These two tasks build on each other: if you create a hosted site first, you'll be better prepared when you install SharePoint. Even if you don't intend to host your own site, you can still develop some advanced skills by completing the
2.1. Before You Begin
It's easy to create new web sites using SharePointin fact, perhaps it's too easy. Before you begin, it's important to understand how SharePoint structures sites and how those structures affect what you can do later.
The simplest site structure is a single top-level site located on a single server. In that scenario, members of the site have one set of permissions, and those permissions determine which lists and libraries they can see, as well as what actions they can take on those lists and libraries.
Lists and libraries in this simple site are stored in subfolders (for example, http://www.mysite.com/Lists/Announcements), but those subfolders exist within the site's boundaries. The concept of site boundaries is important for the following reasons:
Member permissions may or may not be inherited across site boundaries.
Lists and libraries cannot be easily shared across site boundaries.
Searches do not cross site boundaries (unless you purchase SharePoint Portal Server, which provides cross-site
searching).
Notice that I haven't mentioned workspaces. That's because workspaces are a type of site and so establish new boundaries.
workspace.
The new workspace site is named after the document
(http://www.mysite.com/ProjectPlan, for example) and has only one member: you. That's because new workspaces use unique permissions, and by default you have to add members
manually. To change the default permissions so that all members from the parent site automatically have access:
1. Open the workspace in the browser.
2. Choose Site Settings Go to Site Administration Manage Permission Inheritance, select Use the same permissions as the parent site, and click OK.
3. Close the Word document; open it again in Word; the Shared Workspace task pane will include all the members inherited from the parent site.
This is still a very simple structure: a root site with one subsite (the workspace) and members have access to both sites.
However, you can quickly go wild, adding subsites and workspaces to create very deep structures (for example:
http://www.mysite.com/ProjectPlan/NewSite/Subsite1/Subsite2/etc
Don't do that! Creating deep, nested structures makes Search almost useless, and it prevents you from sharing content
effectively. Instead, try to follow these guidelines:
Use sites to manage membership, not content.
Create broad, rather than deep, site structures.
Use document libraries or lists to store different categories of content.
workspaces).
The wisdom of these recommendations will be revealed in the following chapters. For now, please take them on faith, but also remember that they are recommendations, not
2.2. Creating Hosted Sites
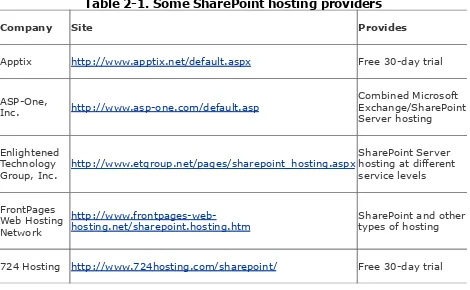
Hosted solutions are a great way to try out SharePoint without committing a lot of resources up front. Table 2-1 lists some of the hosting providers currently available; several offer a free trial period.
Table 2-1. Some SharePoint hosting providers
Company Site Provides
Apptix http://www.apptix.net/default.aspx Free 30-day trial
ASP-One,
hosting.net/sharepoint.hosting.htm SharePoint and othertypes of hosting
724 Hosting http://www.724hosting.com/sharepoint/ Free 30-day trial
Setting up a hosted account is as easy as navigating to one of the sites in Table 2-1 and completing the registration process. After you've done that, you'll want to:
Add members to the site.
Add content to the site.
2.3. Adding Members
To add members to a SharePoint site:
1. From the home page navigation bar, click Site Settings Manage users Add users. The results are displayed in
Figure 2-1.
2. Enter the usernames to add and select a group for the new members. Groups determine what privileges members have on the site as listed in Table 2-2. When you click Next,
SharePoint displays Figure 2-2.
3. Type a greeting to send the new SharePoint members and click Finish to complete the task. New members will receive email including their user name and an automatically
generated password for the site.
Adding members by site group lets you add new members in batches, rather than one at a time. Table 2-2 lists SharePoint's built-in groups in ascending order of access privileges.
Table 2-2. Built-in SharePoint member groups
Group Allows
Guest No access by default, but can be granted access to specific items.
Reader Read-only access to the site.
Contributor Add content to existing document libraries and lists.
Web designer Create lists and document libraries and customize pages in the site.
Administrator Full control of the site.
it is only used when granting access to specific lists or
document libraries in the site. You can also create new custom groups or modify the built-in groups for your site. To create a new group:
1. From the home page navigation bar, click Site Settings Go to site administration Manage site groups Add a site group. SharePoint displays Figure 2-3.
2. Enter a name and description for the group, select the
rights to grant members of the group, and click Create Site Group to complete the task.
animal 2-3. Creating new member groups
to users. This technique is sometimes called role-based
security. Table 2-3 lists the rights assigned to each of the built-in groups by default.
Table 2-3. Rights for built-in groups
Group Right
Guest None (set at list level)
Reader
All Web designer rights, plus:
Create subsites
Administrator Manage site groups
Manage web site
View usage data
When a new member visits the SharePoint site, he is prompted for his user name and password as shown in Figure 2-4. If he tries to perform a task beyond his rights, SharePoint displays the dialog again so he can sign on as a different member with more rights.
2.4. Changing Pages
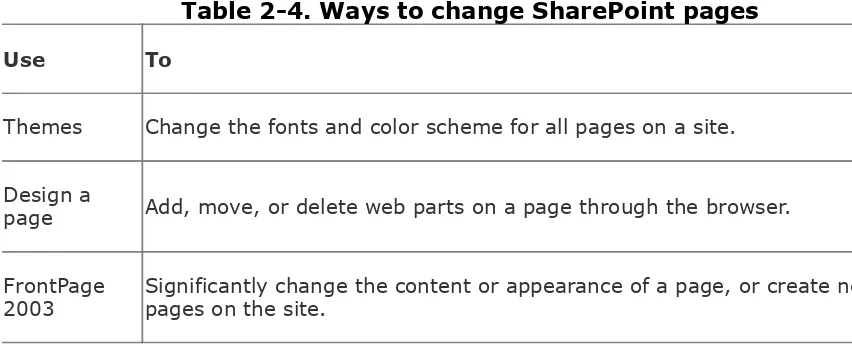
Administrators and web designers can change the appearance of pages on the SharePoint site by applying themes, designing an existing page, or by using FrontPage. Table 2-4 summarizes those different techniques.
Table 2-4. Ways to change SharePoint pages
Use To
Themes Change the fonts and color scheme for all pages on a site.
Design a
page Add, move, or delete web parts on a page through the browser.
FrontPage
2003 Significantly change the content or appearance of a page, or create newpages on the site.
To apply a theme, click Site Settings Apply Theme to site, and choose a theme. Themes affect only the current site:
subsites and workspaces subordinate to the site are unaffected.
To design a page, click Modify Shared Page Design this page in the upper right-hand corner (Figure 2-5). SharePoint displays the page in edit mode, showing the web part zones. You can drag web parts from one zone to another, or you can select Modify shared web parts to change a web part Changing a page in this way is handy for minor changes such as changing the text in a title bar of a web part.
For example, to change the "Announcements" titlebar shown in
Figure 2-5 to "Quote of the day":
1. Click Modify Shared Page Modify Shared Web Parts Announcements. SharePoint displays the Announcements web part in edit mode.
2. In the task pane, click Appearance and change the title to "Quote of the day"; then click OK. SharePoint makes the change.
Some elements on the home page can't be changed through the browser. The navigation bar, Quick Launch, page title, and
search box aren static web parts. The easiest way to change those items is by editing the page in FrontPage.
With FrontPage, you can directly edit text on the SharePoint home page, add or remove links, and edit web parts, although the web part tasks are a little hard to locate (they are found on the Data menu). For example, to add a web part to the
SharePoint page in FrontPage:
1. Choose Data Add Web Part. FrontPage displays the Web Parts task pane.
2. Drag web parts from the task pane to web part zones on the SharePoint page as shown in Figure 2-6.
animal 2-6. Use the Data menu to get at web part
tasks in FrontPage
select Web Part Properties. FrontPage displays the part's properties in a new window as shown in Figure 2-7.
2.5. Adding Content
There are many ways to add content to a SharePoint site depending on the type of content you want to add. The
following sections describe different ways to add lists, libraries, pages, and workspaces to a SharePoint site and explain when to use each approach.
2.5.1. Adding Lists
At the simplest level, you can add content to the home page by clicking Add new announcement, Add new event, or Add new link. Clicking on any of these displays a form view for adding items to the SharePoint list, as shown in Figure 2-8. When you click Save and Close, SharePoint adds the announcement to the list which appears on the home page in the Announcements web part.
To create your own lists from the browser:
1. Click Documents and Lists Create Custom List. SharePoint displays the New List page.
2. Enter the list information and click Create. SharePoint displays the new list in its default view.
3. Click Modify settings and columns Add new column to add columns to the list. SharePoint displays Figure 2-9.
4. Add column information and click OK.
5. Repeat steps 3 and 4 for each column in the list.
To display the new list on the home page:
1. From the home page, click Modify Shared Page Add Web Parts Browse. SharePoint displays the page in edit mode and shows the new list as a web part in the task pane.
2. Drag the new list from the task pane to a web part zone on the home page.
3. Click Modify Shared Page Modify Shared Web Parts list name to change the properties of the displayed list. For example, select Toolbar Type Summary toolbar and click OK.
4. You can now add items to the list by clicking Add new item on the list's web part as shown in Figure 2-10.
To close a web part on the home page:
1. Choose Modify Shared Page Modify Shared Web Parts web part name. SharePoint selects the list and places a dashed border around it (Figure 2-11).
2. Click the X in the upper right-hand corner to close the web part.
Closing hides the web part, but does not remove it from the page. Instead, the web part is moved to the Web Part Page Gallery in the web parts task pane. You can drag web parts from the Web Part List back onto the page to restore them.
To delete a web part from a page:
Parts Browse.
2. Click the down-arrow in the upper right-hand corner of the web part and choose Delete.
animal 2-11. Closing or deleting a web part
2.5.2. Building Libraries
A library is a type of list that includes documents and version histories. Team sites include one built-in library named Shared Documents. To add documents to that library:
1. From the home page, click Shared Documents Upload document.
3. Click Save and Close. SharePoint uploads the documents and adds them to the library as shown in Figure 2-12.
animal 2-12. Adding documents to a library
The Shared Documents library doesn't keep track of version history by default. You can change that by clicking Modify settings and columns Change general settings Create a version each time you edit a file in this document library? Yes. You can also require approval before documents are accepted to the list, as shown in Figure 2-13.
animal 2-13. Changing the library's general
settings to require approval and keep version
Once documents are uploaded to a library, you can perform a variety of tasks by clicking the down arrow next to the
document name, as shown in Figure 2-14.
animal 2-14. Using the context menu to perform
document tasks
To create a new library in a SharePoint site:
2. Enter the library name, description, navigation, versioning, and template information and click Create.
The template list in step 2 includes the options shown in Figure 2-15. In other words, libraries provide a way to add web pages to a site.
animal 2-15. Libraries can include Office
documents or new web pages
Use views, not folders, to organize content in a document library. Folders are best used for supporting files, such as images. If you want to categorize documents, add Category or Product columns to the library, then create a custom view that filters or groups the library based on those columns. See Chapter 7 for details on adding fields and filtering/grouping items.
2.5.3. Constructing New Pages
animal 2-16. Creating a web page library in
Explorer View
Libraries are stored as folders within the site. To navigate to a particular web page, use the address where that page is stored. For example, enter
http://myoreillydemosite.sharepoint.apptix.net/Demo%20library/SampleSite1/default.aspx
into the address bar. (You can even omit default.aspx since IIS automatically looks for a default page if you omit the file
name.)
There are a couple of things you can't include in a library, however:
Executable components (.exe, .dll, .com, etc.) are rejected as a security precaution.
scripts aren't allowed to run.
Libraries provide a browser-based interface for adding and editing web pages. In some cases, you may want to add the pages directly to the site rather than going through a library. To add web pages directly to the site:
1. Open the SharePoint site in FrontPage.
2. Click File New. FrontPage displays the New page task pane, as shown in Figure 2-17.
3. Select one of the page types or click More page templates to see a list of templates that include web part pages.
FrontPage is the most flexible way to add or edit pages in the site; however, pages won't have a revision history unless they are part of a document library.
2.5.4. Creating Workspaces
A workspace is a type of subsite within a team site. You create a workspace to give multiple members input into one or more related documents. You can create a workspace from within a document library, an Office application, or the home page of a site. To create a workspace from Word, Excel, or PowerPoint:
1. Open the document.
2. Choose Tools Shared Workspace. The application displays the Shared Workspace task pane.
3. Enter the name and location of the workspace and click Create. The application connects to the SharePoint site and creates a workspace for the open document.
Creating a workspace in this way links the local copy of your document to the copy stored in the SharePoint workspace. The next time you open the local copy, the application checks for updates from the SharePoint site. Similarly, changes you make are automatically sent to the SharePoint site. To create a
workspace from a document stored in a SharePoint library:
1. Select the document and choose Create Document
Workspace from the context menu shown in Figure 2-14.
2. SharePoint displays a confirmation page. Click OK to create the workspace.
1. Click Create Sites and Workspaces. SharePoint displays the New SharePoint Site page.
2. Enter the workspace name and description and click Create. SharePoint displays the Template Selection page.
3. Choose Document Workspace and click OK. SharePoint creates an empty workspace and displays its home page.
Creating workspaces from a home page is handy if your site restricts who can create new workspaces. In that case,
members may need to ask an Administrator or Web Designer to set up a workspace for them.
If you open a document from a workspace and save it to your local computer, you will be asked if you want to be able to update the workspace copy. Choose Yes if you want to link your local copy to the workspace copy.
It might seem strange that workspaces created from an Office application or from a library contain only a single document. Why create a whole web site for a single Word or Excel file? I'm not sure I know the answer to that, but you can add documents to the workspace from an Office application fairly easily by
doing the following:
1. Open a document that is part of the workspace.
2. From the Shared Workspace task pane, click the Documents icon and click Add new document.
2.5.5. Workspaces Versus Libraries
Document workspaces and libraries may seem similar. That's because a document workspace actually contains a Shared Documents list, which is a library. Since workspaces are a type of subsite, however, they let you restrict who has access. Table 2-5 may help you understand the differences.
Table 2-5. Workspace features compared with Library features
Feature Workspaces Libraries
Boundaries Establish new site boundaries. Do not establish new site boundaries.
MembershipMay have a unique set ofmembers, or they may inherit members from the parent site.
Do not have their own sets of members, although a library may be restricted so that only some members can view or change it.
Searching Not included in searches on theparent site. Included in searches on the parent site.
Best used
for Documents under developmentor with a restricted audience. Documents available to everyone.
2.6. Setting Client Security
You'll encounter two security issues when first using a SharePoint site over the Internet:
Opening files from a library or workspace displays a security warning, as shown in Figure 2-18.
You can't create workspaces from Office applications.
You can't get rid of the security warning: Internet Explorer always warns you when you open files, such as Word or Excel files, that might contain viruses. However, if you open the file using the Office application or open a local file linked to the SharePoint site, you won't see the warning in Figure 2-18.
animal 2-18. Security warning when opening
Office files from the Internet
application, choose Tools Macro Security.
You can solve the second issue by adding your SharePoint site to the list of trusted sites in Internet Explorer:
1. Choose Tools Internet Options Security Trusted Sites Sites. Internet Explorer displays a list of the trusted sites for your local computer (Figure 2-19).
2. Type the address of your site and click Add OK OK to close the dialog.
Once the SharePoint site is trusted, Office applications can
2.7. Creating Self-Hosted Sites
All of the tasks in the preceding sections also apply to sites you create on your own server. The major differences between
hosted and self-hosted sites are that:
You usually access self-hosted sites over an intranet rather than the Internet, so those sites are automatically trusted, and you have fewer client security issues to worry about.
Since self-hosted sites are usually part of your network, you can quickly grant all network users access to the site (see the section "Adding Members Quickly" later in this chapter).
You must install and maintain SharePoint yourself, which requires more knowledge about tools like IIS, SQL, and Windows security than you need when using hosted sites.
You have direct access to the server, so you have both more control and more responsibility (for backups, etc.) than in a hosted environment.
The rest of this chapter explores installing SharePoint and
creating SharePoint sites on your own server. If you've already decided to stick with a hosted site, you can skip ahead to the section "Allowing Anonymous Access," because the next
2.8. Installing SharePoint Services
SharePoint Services is a component in Windows Server 2003. To install those services on an existing server you'll need the
following:
An account with Administrative privileges for the server
Physical access to the server or access through the Windows XP Professional Remote Desktop utility
Access to a dedicated SQL Server or SQL Server installed on the target server (recommended)
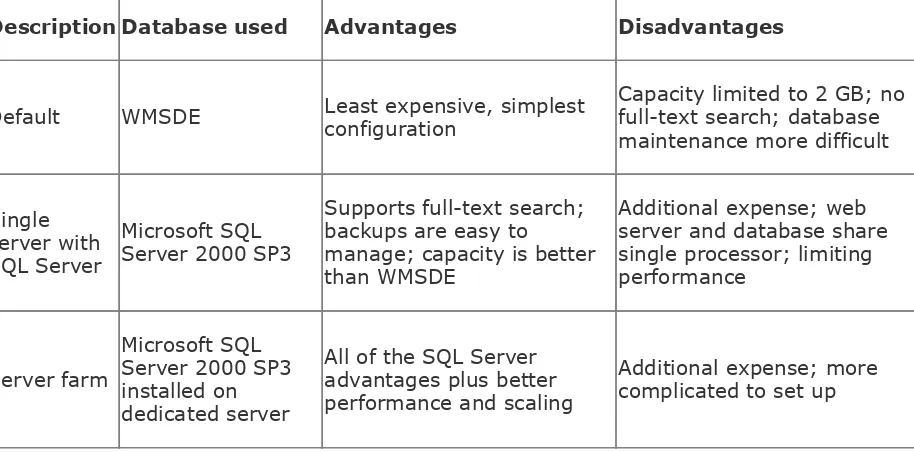
There are three configuration options for installing SharePoint Services, and you should choose your target configuration
before proceeding. The main difference among configurations is where data is stored, as described in Table 2-6.
Table 2-6. Possible SharePoint Services database configurations
Description Database used Advantages Disadvantages
Default WMSDE Least expensive, simplestconfiguration Capacity limited to 2 GB; nofull-text search; database maintenance more difficult
All of the SQL Server advantages plus better performance and scaling
For anything more than a personal or small-office site, I
recommend using one of the SQL Server configurations because otherwise you just won't get the capacity you may need. Once you've met the prerequisites and chosen a configuration,
installing SharePoint follows these major steps:
1. Answer key questions (listed in Table 2-7).
2. Check your SQL Server installation and gather connection information. (Skip this step if you are using WMSDE.)
3. Prepare your server.
4. Install SharePoint Services.
5. Create a virtual server for new SharePoint sites.
6. Integrate web sites that the server was hosting before install.
The following sections examine these steps in more detail.
2.8.1. Questions to Ask Before You Install
Before installing SharePoint Services, you should have answers to the questions in Table 2-7, because the answers affect how you install and set up your SharePoint site. Note that these questions may require discussion with managers or team members.
Table 2-7. Installation checklist
Question Choices Comments
What database server will you use?
Do you want to enable full-text searches?
Yes
No If yes, requires SQL Server.
Should all network users have read access?
Yes
No If yes, see "Adding Members Quickly."
Do you want members to be able to create their own personal sites?
Yes
No
If yes, see "Enabling Self-Service Site Creation."
Will you allow anonymous access from the Internet?
Yes
No If yes, see "Allowing Anonymous Access."
Will you allow users to
automatically create accounts on your network for use with
SharePoint?
Yes
No
If yes, requires Active Directory. This is an advanced setting, usually used by ISPs, that can't be changed without reinstalling.
Does the server host other web applications?
Yes
No If yes, see "Re-Enabling Existing Sites."
2.8.2. Checking SQL Server
If SharePoint is to use SQL Server, before you begin your
The full-text search component must be installed before the service pack to enable SharePoint's full-text search feature. Full-text search increases the amount of space required to store a database, and you may choose not to use it, but if you don't install it first you won't have that option later in SharePoint.
To install full-text search in SQL Server:
1. Run setup from your SQL Server 2000 installation disk.
2. Choose SQL Server 2000 Components Install Database Server Next and choose the server to modify.
3. Choose Next Upgrade, remove, or add components to an existing instance of SQL server Next Next Add components to your existing installation Next. Setup displays the Select Components dialog box.
4. Select Full-Text Search from the Sub-Components list and choose Next. Setup installs the Microsoft Search
component.
After installing full-text search, you need to install SP3 or later to enable SharePoint to use it. It doesn't matter if you installed the service pack prior to installing full-text searchyou have to do it again. To install the SP3:
1. Download SP3 from Microsoft. Search
http://www.microsoft.com/downloads for "SQL SP3" and download sql2ksp3.exe.
2. Run sql2ksp3.exe to unpack the files.
The version number of SQL Server 2000 SP3 is 8.0.760 (SP3). To verify that a SQL Server is running SP3:
1. Start SQL Server Enterprise Manager.
2. Select the server and choose Action Properties
General. The version information appears on the dialog box.
If SQL Server is running on a dedicated server, get the
connection settings SharePoint needs during the installation process:
Server name.
Authentication type (Windows integrated or SQL).
If using Windows integrated authentication, record the account the SharePoint server will use to connect to the SQL server.
If using SQL authentication, record the SQL user name and password SharePoint will use to connect.
2.8.3. Preparing Your Host Server
If you are installing SharePoint on a server that is already hosting other web sites, be aware that installing SharePoint makes those sites unavailable at times during the installation. Before installing you should:
Check for integration, upgrade, and compatibility issues with existing sites.
Notify users that sites will be unavailable during installation.
Consider moving existing sites to another server during installation.
Create a full backup of the server (of course).
The following sections outline some of the integration, upgrade, and compatibility issues you may encounter.
2.8.3.1 Integrating existing sites
If you have existing web sites on the server, you need to figure out how your new SharePoint sites fit in the organization of your sites. You may make the SharePoint site the new top-level site for your server, make it subordinate to your existing top-level site, or set up separate host headers or port numbers for your existing site and new SharePoint site.
Changing the structure of an existing site affects current users and breaks links they have established to your site, but it may be the best option if you are rolling out new capabilities. In general, it is best to roll out features gradually, so you may want to do some of both. See the section "Re-Enabling Existing Sites" later in this chapter for more information.
2.8.3.2 Upgrading from SharePoint Team Services
If you're upgrading a previous installation of SharePoint Team Services V1.0, Microsoft provides a migration tool
(smigrate.exe). Extensive instructions can be found in the
2.8.3.3 Coexisting with Exchange Server
If your host server is also hosting Microsoft Exchange Server, you'll need to change the authentication method used by SharePoint in IIS after SharePoint is installed (see
http://support.microsoft.com/default.aspx?scid=kb;en-us;823265). Note that you can't host Portal Server and Microsoft Exchange on the same machine.
2.8.4. Installing SharePoint
I hope the preceding sections didn't scare you off. Installing SharePoint Services is actually very simple, but I wanted you to be prepared because it's critical to choose your data source before you begin. Changing a live web server is serious
business, and you don't want your support line to ring off the hook. Life is a lot easier if you are starting with a new, clean server.
To start installing SharePoint:
1. Download the SharePoint Services installation (STSV2.EXE). Search http://www.microsoft.com/downloads for
"SharePoint Services."
2. Run STSV2.EXE. The download extracts the installation files and starts the SharePoint setup program. The first step is to select your database configuration, as shown in Figure 2-20.
If you choose the Typical Installation option, Setup installs SharePoint, configures it to use WMSDE, and creates an SQL instance named machinename/SHAREPOINT which is used to
contain the SharePoint configuration and content databases.
To use a local installation of SQL Server, rather than WMSDE, choose Typical Installation, then upgrade the WMSDE database to SQL Server after installation is complete.
To use a SQL Server instance on a dedicated server, choose the Server Farm option. As mentioned earlier, setting up a
dedicated SQL Server is more complex than using