T O O L B O X
1000+ Commands for FreeBSD
®
, OpenBSD,
and NetBSD
®
Power Users
T O O L B O X
1000+ Commands for FreeBSD
®
, OpenBSD,
and NetBSD
®
Power Users
1000+ Commands for FreeBSD®, OpenBSD, and NetBSD®
Power Users
Published by
Wiley Publishing, Inc.
10475 Crosspoint Boulevard Indianapolis, IN 46256
www.wiley.com
Copyright © 2008 by Wiley Publishing, Inc., Indianapolis, Indiana Published simultaneously in Canada
ISBN: 978-0-470-37603-4
Manufactured in the United States of America 10 9 8 7 6 5 4 3 2 1
Library of Congress Cataloging-in-Publication Data is available from the publisher.
No part of this publication may be reproduced, stored in a retrieval system or transmitted in any form or by any means, electronic, mechanical, photocopying, recording, scanning or otherwise, except as permitted under Sections 107 or 108 of the 1976 United States Copyright Act, without either the prior written permission of the Publisher, or authorization through payment of the appropriate per-copy fee to the Copyright Clearance Center, 222 Rosewood Drive, Danvers, MA 01923, (978) 750-8400, fax (978) 646-8600. Requests to the Publisher for permis-sion should be addressed to the Legal Department, Wiley Publishing, Inc., 10475 Crosspoint Blvd., Indianapolis, IN 46256, (317) 572-3447, fax (317) 572-4355, or online at http://www.wiley.com/go/permissions.
Limit of Liability/Disclaimer of Warranty: The publisher and the author make no representations or warranties with respect to the accuracy or completeness of the contents of this work and specifically disclaim all warranties, including without limitation warranties of fitness for a particular purpose. No warranty may be created or extended by sales or promotional materials. The advice and strategies contained herein may not be suitable for every situation. This work is sold with the understanding that the publisher is not engaged in rendering legal, accounting, or other professional services. If professional assistance is required, the services of a competent pro-fessional person should be sought. Neither the publisher nor the author shall be liable for damages arising here-from. The fact that an organization or Website is referred to in this work as a citation and/or a potential source of further information does not mean that the author or the publisher endorses the information the organization or Website may provide or recommendations it may make. Further, readers should be aware that Internet Websites listed in this work may have changed or disappeared between when this work was written and when it is read.
For general information on our other products and services please contact our Customer Care Department within the United States at (800) 762-2974, outside the United States at (317) 572-3993 or fax (317) 572-4002.
Trademarks:Wiley, the Wiley logo, and related trade dress are trademarks or registered trademarks of John Wiley & Sons, Inc. and/or its affiliates, in the United States and other countries, and may not be used without written permission. UNIX is a registered trademark of X/Open Company. FreeBSD is a registered trademark of FreeBSD Foundation. NetBSD is a registered trademark of NetBSD Foundation. All other trademarks are the property of their respective owners. Wiley Publishing, Inc. is not associated with any product or vendor men-tioned in this book.
—
Christopher Negus
Christopher Negus is the author of the best-selling Fedoraand Red Hat Linux Bibles,
Linux Toys, Linux Troubleshooting Bible, and Linux Bible 2008 Edition. He is a member of the Madison Linux Users Group. Before becoming a full-time writer, Chris served for eight years on development teams for the UNIX operating system at AT&T, where UNIX was created and developed. He also worked with Novell on Linux development and Caldera Linux.
François Caen, through his company Turbosphere LLC, hosts and manages business application infrastructures, with 95 percent running on Linux systems. As an open source advocate, he has lectured on OSS network management and Internet services and served as president of the Tacoma Linux Users Group. François is a Red Hat Certified Engineer (RHCE). In his spare time, he enjoys managing enterprise Cisco networks.
About the Technical Editor
Acquisitions Editor
Jenny Watson
Development Editor
William Bridges
Technical Editor
Thomas Blader
Production Editor
Daniel Scribner
Copy Editor
Michael Koch
Editorial Manager
Mary Beth Wakefield
Production Manager
Tim Tate
Vice President and Executive Group Publisher
Richard Swadley
Vice President and Executive Publisher
Joseph B. Wikert
Project Coordinator, Cover
Lynsey Osborn
Compositor
Laurie Stewart,
Happenstance Type-O-Rama
Proofreader
David Parise, Word One
Indexer
Chapter 1: Starting with BSD Systems . . . .1
Chapter 2: Installing FreeBSD and Adding Software . . . .13
Chapter 3: Using the Shell . . . .33
Chapter 4: Working with Files . . . .51
Chapter 5: Manipulating Text . . . .71
Chapter 6: Playing with Multimedia . . . .89
Chapter 7: Administering File Systems . . . .103
Chapter 8: Backups and Removable Media . . . .127
Chapter 9: Checking and Managing Running Processes . . . .143
Chapter 10: Managing the System . . . .161
Chapter 11: Managing Network Connections . . . .185
Chapter 12: Accessing Network Resources . . . .205
Chapter 13: Doing Remote System Administration . . . .225
Chapter 14: Locking Down Security . . . .243
Appendix A: Using vi or Vim Editors . . . .263
Appendix B: Shell Special Characters and Variables . . . .271
Appendix C: Personal Configuration Files . . . .277
Contents
Acknowledgments
xix
Introduction xxi
Chapter 1: Starting with BSD Systems
1
About FreeBSD, NetBSD, and OpenBSD
2
Finding BSD Resources
4
Focusing on BSD Commands
6
Finding Commands
7
Command Reference Information in BSD
8
Summary
11
Chapter 2: Installing FreeBSD and Adding Software
13
Before Installing FreeBSD
13
Installing FreeBSD
14
Booting the Install Disc
14
Starting the Install Process
15
Adding, Deleting, and Managing Software
19
Finding Software
19
Installing Software Packages (binary)
21
Removing Software Packages (binary)
22
Installing Software Using Ports (source code)
23
Getting and Installing Applications with Ports
25
Checking Packages and Ports
28
Checking Installed Packages Against Ports
28
Upgrading Ports
28
Auditing Installed Packages
29
Cleaning Up the Ports Collection
30
Summary
31
Chapter 3: Using the Shell
33
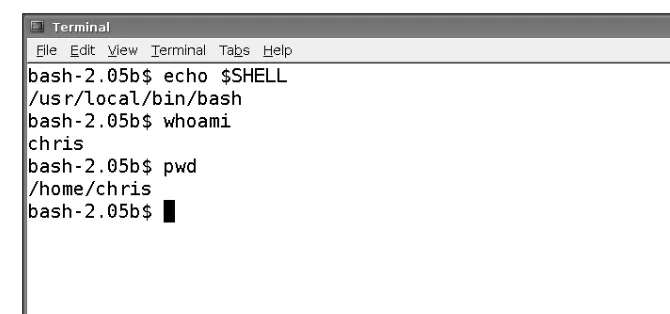
Terminal Windows and Shell Access
33
Using the Shell
36
Using Bash History
36
Using Command Line Completion
38
Redirecting stdin and stdout
38
Using aliases
41
Tailing Files
41
Acquiring Super-User Power
41
Using the su Command
42
Delegating Power with sudo
43
Using Environment Variables
44
Creating Simple Shell Scripts
45
Editing and Running a Script
45
Adding Content to Your Script
46
Summary
50
Chapter 4: Working with Files
51
Understanding File Types
51
Using Regular Files
51
Using Directories
52
Using Symbolic and Hard Links
53
Using Device Files
54
Using Named Pipes and Sockets
54
Setting File and Directory Permissions
55
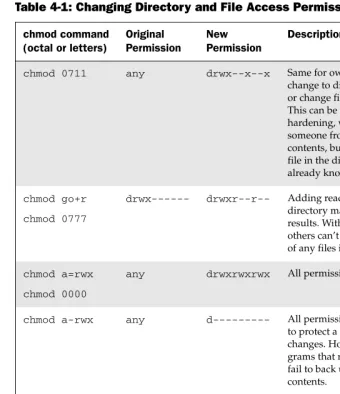
Changing Permissions with chmod
56
Setting the umask
58
Changing Ownership
58
Traversing the File System
59
Copying Files
60
Changing File Attributes
62
Searching for Files
63
Generating the locate Database
63
Finding Files with locate
64
Locating Files with find
65
Using Other Commands to Find Files
67
Finding Out More About Files
67
Listing Files
67
Verifying Files
68
Chapter 5: Manipulating Text
71
Matching Text with Regular Expressions
71
Editing Text Files
72
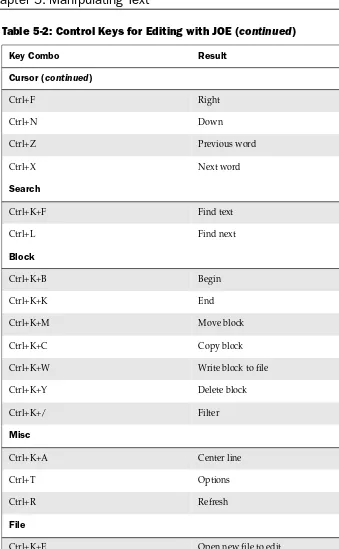
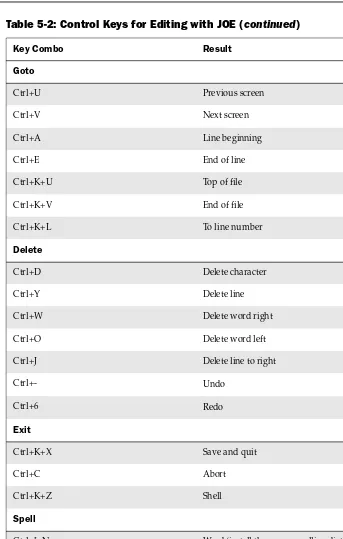
Using the JOE Editor
73
Using the Pico and Nano Editors
76
Graphical Text Editors
78
Listing, Sorting, and Changing Text
78
Listing Text Files
78
Paging Through Text
79
Paginating Text Files with pr
80
Searching for Text with grep
81
Replacing Text with sed
83
Translate or Remove Characters with tr
84
Checking Differences Between Two Files with diff
85
Using awk and cut to Process Columns
87
Converting Text Files to Different Formats
88
Summary
88
Chapter 6: Playing with Multimedia
89
Working with Audio
89
Starting with Audio
89
Playing Music
90
Adjusting Audio Levels
91
Ripping CD Music
92
Encoding Music
93
Converting Audio Files
96
Transforming Images
97
Getting Information about Images
97
Converting Images
98
Converting Images in Batches
100
Summary
101
Chapter 7: Administering File Systems
103
Understanding File System Basics
103
Creating and Managing File Systems
107
Slicing and Partitioning Hard Disks
107
Working with Linux-Compatible File Systems
114
Creating a Memory Disk File System
116
Creating and Using Swap Partitions
117
Mounting and Unmounting File Systems
118
Mounting File Systems from the fstab File
118
Mounting File Systems with the mount Command
120
Unmounting File Systems with umount
121
Checking File Systems
122
Finding Out About File System Use
124
Summary
126
Chapter 8: Backups and Removable Media
127
Backing Up Data to Compressed Archives
127
Creating Backup Archives with tar
127
Using Compression Tools
129
Listing, Joining, and Adding Files to tar Archives
132
Backing Up Over Networks
133
Backing Up tar Archives Over ssh
133
Backing Up Files with rsync
134
Backing Up with unison
136
Backing Up to Removable Media
137
Creating Backup Images with mkisofs
137
Burning Backup Images with cdrecord
140
Making and Burning DVDs with growisofs
141
Summary
142
Chapter 9: Checking and Managing Running Processes
143
Listing Active Processes
144
Viewing Active Processes with ps
144
Watching Active Processes with top
150
Finding and Controlling Processes
151
Using pgrep to Find Processes
152
Using fuser to Find Processes
152
Chapter 10: Managing the System
161
Monitoring Resources
161
Monitoring Memory Use
162
Monitoring CPU Usage
164
Monitoring Storage Devices
166
Mastering Time
168
Changing Time Zone
169
Displaying and Setting Your Time and Date
169
Using Network Time Protocol to Set Date/Time
170
Checking Uptime
172
Managing the Boot Process
172
Using the boot0 Boot Loader
173
Using bsdlabel to Check Out Partitions
176
Changing to the GRUB boot loader
176
Controlling System Services
178
Starting and Stopping Your System
179
Straight to the Kernel
179
Poking at the Hardware
182
Summary
183
Chapter 11: Managing Network Connections
185
Configuring Network Interfaces Using sysinstall
185
Managing Network Interface Cards
186
Managing Network Connections
190
Starting and Stopping Ethernet Connections
190
Starting and Stopping Network Services
191
Using Wireless Connections
192
Getting Wireless Driver
192
Configuring Wireless Interfaces
193
Checking Name Resolution
194
Troubleshooting Network Problems
196
Checking Connectivity to a Host
196
Checking Address Resolution Protocol (ARP)
197
Tracing Routes to Hosts
198
Displaying netstat Connections and Statistics
200
Other Useful Network Tools
202
Chapter 12: Accessing Network Resources
205
Running Commands to Browse the Web
205
Transferring Files
207
Downloading Files with wget
207
Transferring Files with cURL
208
Transferring Files with FTP Commands
209
Using SSH Tools to Transfer Files
211
Using Windows File Transfer Tools
213
Sharing Remote Directories
213
Sharing Remote Directories with NFS
213
Sharing Remote Directories with Samba
215
Sharing Remote Directories with SSHFS
218
Chatting with Friends in IRC
219
Using Text-Based e-mail Clients
220
Managing e-mail with mail
221
Managing e-mail with mutt
222
Summary
223
Chapter 13: Doing Remote System Administration
225
Doing Remote Login and Tunneling with SSH
225
Configuring SSH
227
Logging in Remotely with ssh
228
Using screen: A Rich Remote Shell
233
Using a Remote Windows Desktop
236
Connecting to a Windows Desktop with tsclient
236
Connecting to a Windows Desktop with rdesktop
237
Using Remote BSD Desktop and Applications
238
Sharing Desktops Using VNC
239
Setting Up the VNC Server
239
Starting Up the VNC Client
240
Using VNC on Untrusted Networks with SSH
241
Sharing a VNC Desktop with Vino
241
Summary
242
Chapter 14: Locking Down Security
243
Working with Users and Groups
244
Adding Batches of Users
245
Setting User Account Defaults
247
Using Options When Adding Users
248
Using Login Classes
249
Modifying User Accounts
250
Deleting User Accounts
251
Managing Passwords
252
Adding Groups
252
Checking on Users
253
Securing Network Services
255
Configuring the Built-In Firewall
258
Working with System Logs
261
Using Advanced Security Features
261
Summary
262
Appendix A: Using vi or Vim Editors
263
Starting and Quitting the vi Editor
264
Moving Around in vi
265
Changing and Deleting Text in vi
266
Using Miscellaneous Commands
268
Modifying Commands with Numbers
268
Using Ex Commands
269
Working in Visual Mode
270
Summary
270
Appendix B: Shell Special Characters and Variables
271
Using Special Shell Characters
271
Using Shell Variables
272
Appendix C: Personal Configuration Files
277
Acknowledgments
I would like to acknowledge the FreeBSD, OpenBSD, and NetBSD development com-munities, who have continued the noble tradition begun by the Berkeley Software Distribution decades ago. Their efforts have led to some of the most secure and stable computer operating systems in or out of the free and open source software world.
Special thanks to François Caen for giving up most of his free time over the past year as we developed and wrote the books in our Toolbox series. Thomas Blader did his usual excellent job tech editing this book. At Wiley, I’d like to thank Jenny Watson for sticking with us through the development of the book. Special thanks to Bill Bridges, who kept us on track during a challenging development schedule.
—Christopher Negus
I would like to thank Chris Negus for giving me the opportunity to co-author this book with him. We had wanted to write together for the last couple of years, and this Toolbox series was the perfect fit for our collaboration.
I couldn’t have worked on this book without the unrelenting support from my wife, Tonya. Thank you for emptying the dishwasher all those times even though we both know it’s my job.
Thanks to Thomas Blader for his detailed tech editing. Having done some tech editing in the past, I know what a tough job it can be. Thanks to Sara Shlaer and Jenny Watson at Wiley for being the most patient cat-herders out there. Special thanks to Wayne Tucker and Jesse Keating for all the knowledge they’ve shared with me during and before this project.
Introduction
BSD UNIX Toolboxprovides you with more than 1,000 specific command lines to help you become a BSD power user. Whether you are a systems administrator or desktop user, the book will show you commands to create file systems, troubleshoot networks, lock down security, and dig out almost anything you care to know about your BSD system.
This book’s focus for your BSD command line journey is FreeBSD, one of the most popular BSD derivatives in the world. Tapping into the skills needed to run those systems can help you to work with your own BSD systems and to learn what you need as a BSD professional.
Who Should Read This Book
This book is for anyone who wants to access the power of a BSD system as a systems administrator or user. You may be a free and open source software (FOSS) enthusiast, a BSD professional, or possibly a computer professional who is increasingly finding the Windows systems in your data center supplanted by BSD and Linux boxes.
The bottom line is that you want to find quick and efficient ways of getting FreeBSD, NetBSD, and OpenBSD systems working at peak performance. Those systems may be a few desktop systems at work, a file and print server at your school, or a home web server that you’re doing just for fun.
In the best case, you should already have some experience with BSD, Linux or other UNIX-like systems. However, if you are a computer professional with skills manag-ing other types of operatmanag-ing systems, such as Windows, you should be able to easily adapt your knowledge to be able to use the specific commands we cover in the book.
What This Book Covers
This is not a beginner’s BSD UNIX book. Before you jump in, it would be best if you have a basic working knowledge of what BSD and other UNIX systems are, how the shell works, and what processes, file systems, and network interfaces are. The book will then supplement that knowledge with information you need to do the following activities:
source code. With tools such as pkg_info, pkg_add, and pkg_delete, you’ll learn the best ways to find, download, install, and otherwise manage software from the command line.
❑ Access applications— Find what’s available from the FreeBSD distribution, then select and install the ones you want using the sysinstallutility.
❑ Use the shell— Find neat techniques and tips for using the shell.
❑ Play with multimedia— Play and work with multimedia content from your com-puter. You can also modify audio and image files, and then convert the content of those files to different formats.
❑ Work with files— Use, manipulate, convert, and secure a wide range of file types in BSD systems.
❑ Administer file systems— Access, format, partition, and monitor your file stor-age hardware (hard disks, CD/DVD drives, floppy disks, USB flash drives, and so on). Then create, format, and check the file systems that exist on those hard-ware devices.
❑ Back up and restore data— Use simple commands to gather, archive, and com-press your files into efficient backup archives. Then store those archives locally or on remote computers.
❑ Work with processes— List running processes in a variety of ways, such as by CPU use, processor use, or process ID. Then change running processes to have them run in the background or foreground. Send signals to processes to have them re-read configuration files, stop and resume processing, or stop completely (abort).
❑ Manage the system— Run commands to check system resources, such as memory usage, boot loaders, and kernel modules.
❑ Monitor networks— Bring wired, wireless, and dial-up network connections up and down. Check routing, DNS, and host information. Keep an eye on network traffic.
❑ Get network resources— Connect to BSD and Windows remote file systems using FTP, NFS, and Samba facilities. Use shell-based commands to browse the Web.
❑ Do remote administration— Access and administer other computers using remote login (ssh, telnet, and so on), and screen. Learn about remote administration inter-faces, such as SWAT and CUPS.
❑ Lock down security— Set up firewalls and system logging to secure your BSD systems.
Hopefully, if we have done it right, it will be easier to use this book than to Google for the command lines or GUI tools you need.
After you have mastered many of the features described in this book, you’ll have gained the following advantages:
❑ Hundreds of commands— By compressing a lot of information into a small space, you will have access to hundreds of useful commands, in over 1,000 command lines, in a handy form to carry with you.
❑ Critical BSD information— This book lists connections to the most critical infor-mation on the Web for succeeding with BSD systems in general and FreeBSD in particular.
❑ Transferable knowledge— Most of the same commands and options you use in BSD systems will work exactly the same way on other UNIX-like systems. Different UNIX systems, on the other hand, offer different graphical administration tools. And even within a particular distribution, graphical tools change more often than commands do.
❑ Quick problem solving— By the time others have started up a desktop and launched a graphical administration tool, you will have already run a half dozen commands and solved the problem.
❑ Enduring value— Many of the commands described in this book were used in early UNIX systems. So you are gaining tools that reflect the experience of thou-sands of computer experts for more than 30 years.
Because the full documentation for commands used in BSD systems consists of thou-sands of man pages, info text, and help messages, you will surely want to reach beyond the pages of this book from time to time. Luckily, FreeBSD and other UNIX systems include helpful information installed on the system itself. Chapter 1 contains descriptions of how to access that information that is probably already installed, or can be easily installed, on your BSD system.
How This Book Is Structured
This book is neither a pure reference book (with alphabetically listed components) nor a guide (with step-by-step procedures for doing tasks). Instead, the book is organized by topics and aimed at including as many useful commands and options as we could fit in.
provides a quick overview of installation and then describes useful commands such as pkg_infoand pkg_addfor getting and managing your BSD software.
Chapters 3, 4, 5, and 6 describe commands that a regular user may find useful on BSD systems. Chapter 3 describes tools for using the shell, Chapter 4 covers commands for working with files, and Chapter 5 describes how to manipulate text. Chapter 6 tells how to work with music and image files.
Starting with Chapter 7, we get into topics relating to system administration. Creating and checking file systems is covered in Chapter 7, while commands for doing data backups are described in Chapter 8. Chapter 9 describes how to manipulate running processes, and Chapter 10 describes administrative tools for managing basic compo-nents, such as hardware modules, CPU use, and memory use.
Chapter 11 begins the chapters devoted to managing network resources by describ-ing how to set up and work with wired, wireless, and dial-up network interfaces. Chapter 12 covers text-based commands for web browsing, file transfer, file sharing, chats, and e-mail. Tools for doing remote system administration are included in Chapter 13.
Chapter 14 covers how to lock down security using features such as firewalls and logging. After that there are three appendices that provide reference information for text editing, shell features (metacharacters and variables), and personal configura-tion files.
What You Need to Use This Book
Although we hope you enjoy the beauty of our prose, this is not meant to be a book you curl up with in front of a nice fire with a glass of wine. We expect you will be sit-ting in front of a computer screen trying to connect to a network, fix a file system, or add a user. The wine is optional.
In other words, the book is meant to be a companion as you work on a FreeBSD, NetBSD, or OpenBSD operating system. All those systems are available for the x86 and x86_64 computer architectures. Some specific versions of those systems are also available for IBM PowerPC, SPARC, Intel ia64 (Itanium), and Alpha. If you don’t already have one of those systems installed, refer to Chapter 2 for information on getting and installing those systems.
Many of the commands described in this book will work on other UNIX and Linux systems as well. Because this book focuses on FreeBSD and other BSD-based distribu-tions, descriptions will differ from other UNIX-like systems most prominently in the areas of packaging, installation, and GUI administration tools.
Conventions
To help you get the most from the text and keep track of what’s happening, we’ve used a number of conventions throughout the book. In particular, we have created styles for showing commands that allow us to fit as many command lines as possible in the book.
With command examples, computer output (shell prompts and messages) is shown in regular monospace font, computer input (the stuff you type) is shown in bold mono-space font, and a short description (if included) appears in italics. Here is an example:
$ ls *jpg List all JPEG files in the current directory hat.jpg
dog.jpg ...
To save space, output is sometimes truncated (or skipped altogether). Three dots (...) are sometimes used to indicate that additional output was cut. If a command is particularly long, backslashes will appear at the end of each line to indicate that input is continuing to the next line. Here is an example:
# oggenc NewSong.wav -o NewSong.ogg \ -a Bernstein -G Classical \ -d 06/15/1972 -t “Simple Song” \ -l “Bernsteins Mass” \ -c info=”From Kennedy Center”
In the example just shown, you can type the backslashes to have all that information included in the single command. Or, you can simply put all the information on a sin-gle line (excluding the backslashes). Note that command prompts are shown in one of two ways:
$ Indicates a regular user prompt # Indicates the root prompt
As noted, when a dollar sign prompt ($) appears, any user can run the command. With a pound sign prompt (#), you probably need to be the root user for the command to work.
Notes and warnings appear as follows:
As for styles in the text:
❑ We highlightnew terms and important words with italics when we introduce them. ❑ We show keyboard strokes like this: Ctrl+A. If the command requires you to type
an uppercase letter, the combination will show this: Ctrl+Shift+A.
❑ We show file names, URLs, and code within the text like so: persistence.properties.
Starting with BSD
Systems
Whether you use BSD systems every day or just tweak one once in a while, a book that presents effi-cient ways to use, check, fix, secure, and enhance your system can be an invaluable resource.
BSD UNIX Toolboxis that resource.
BSD UNIX Toolboxis aimed primarily at BSD power users and systems administrators. To give you what you need, we tell you how to quickly locate and get software, monitor the health and security of your systems, and access network resources. In short, we cut to the most efficient ways of using BSD systems.
Our goal with BSD UNIX Toolboxis to pack a lot of useful information for using BSD systems into a small package that you can carry around with you. To that end, we describe:
❑ Commands— Tons of command line examples to use BSD systems in helpful and clever ways
❑ GUI Tools— Quick pointers to graphical administration tools to configure your system
❑ Software packages— Short procedures to find and download tons of applications
❑ Online resources— Listings of the best locations to find BSD forums, mailing lists, IRC channels, and other online resources
❑ Local documentation— Tools for gathering more information from man pages, doc directories, help commands, and other resources on your BSD system
Because you’re not a beginner with BSD systems, you won’t see a lot of screenshots of windows, icons, and menus. What you will see, however,
IN THIS CHAPTER
Find BSD resourcesLearn quick and powerful commands
Have a handy refer-ence to many useful utilities
is the quickest path to getting the information you need to use your BSD system to its fullest extent.
If this sounds useful to you, please read on.
About FreeBSD, NetBSD, and OpenBSD
In the early 1970s, AT&T released the UNIX source code to several colleges and uni-versities, allowing them to begin changing, adapting, and improving that code as they pleased. That decision has led to the development of every major free and open source software operating system today, not least of which are the systems based on the Berkeley Software Distribution (BSD).
The twisty history of BSD is easy to Google for, if you care to learn the details. For our purposes, let’s just say that:
❑ BSD began as a set of software add-ons to AT&T’s Sixth Edition UNIX.
❑ Over the years, BSD developers split off on their own development path, rewriting software with the intention of replacing all AT&T copyrighted code.
❑ In the early 1990s, AT&T’s UNIX System Laboratories sued BSD developers (Berkeley Software Design, Inc.) for copyright infringement.
❑ Although the lawsuit was eventually settled (with only a few files needing to be changed from the BSD code), the Linux operating system was able to become a leader of open source software development while questions surrounding free BSD were being threshed out.
❑ In 1995, the final version of BSD from Berkeley was released under the name 4.4BSD-Lite, release 2. Today’s BSD operating systems, including FreeBSD, NetBSD, and OpenBSD, are all based to some extent on 4.4BSD-Lite.
Operating systems derived from BSD have a well-earned reputation for stability and security. BSD was developed at a time when computing resources (disk space, network bandwidth, and memory) were meager by today’s standards. So BSD systems were operated by efficient commands, instead of the bloated applications and dumbed-down graphical interfaces often seen today.
If you are someone who has used Linux before, transitioning to a BSD system shouldn’t be too hard. However, BSD systems tend to behave a bit more like older UNIX systems than they do like Linux. Many interfaces are text-based, offering lots of power if you know what you are doing. Despite that fact, however, all the major desktop components that, for example, you get with the GNOME desktop environment are available with BSD systems. So you don’t have to live on the command line.
Here is a list of popular BSD-based operating systems that are still being developed today:
❑ FreeBSD(www.freebsd.org) is the most popular of the BSD operating system distributions. It can be operated as a server, workstation, or desktop system, but has also been used in network appliances and special-purpose embedded systems. It has a reputation for maximum performance.
❑ NetBSD(www.netbsd.org) has a reputation for being very portable, with versions of NetBSD running as an embedded system on a variety of hardware. NetBSD can run on anything from 32-bit and 64-bit PCs to personal digital assistants (PDAs) to VAX minicomputers.
❑ OpenBSD(www.netbsd.org) is a popular system for network servers, although it can operate as a workstation or network appliance as well. The goal of OpenBSD is to attain maximum security. Unlike FreeBSD and NetBSD, which are covered under the BSD license, OpenBSD is covered primarily under the more-permissive Internet Systems Consortium (ISC) license.
❑ DragonFly BSD(www.dragonflybsd.org) was originally based on FreeBSD. Its goal was to develop technologies different from FreeBSD in such areas as symmet-ric multiprocessing and concurrency. So the focus has been on expanding features in the kernel.
Other free (as in no cost, as well as freedom to do what you like with the code) operating systems based on BSD include Darwin (on which Mac OS X is based) and desktop-oriented systems such as PC-BSD and DesktopBSD. FreeSBIE is a live CD BSD system. Proprietary operating systems that have been derived from BSD include:
❑ Mac OS X(www.apple.com/macosx) is produced by Apple, Inc. and focuses on adding an easy-to-use graphical interface to sell with its line of computers. There is also a Mac OS X Server product available. Although Mac OS X was originally based on Darwin, it is considered a closed-source operating system with open source components.
There is a larger list of BSD distributions that you can find at the DistroWatch site (http://distrowatch.com/search.php?category=BSD). Besides offering descrip-tions of those BSD distribudescrip-tions, you can also find links to where you can purchase or download the software.
Finding BSD Resources
Although there is still a BSD web site (www.bsd.org), it largely acts as a pointer to BSD resources related to particular BSD distributions. The following sections contain useful links related to the FreeBSD, NetBSD, and OpenBSD sites.
FreeBSD Resources
Here are links to useful resources from the FreeBSD site (www.freebsd.org):
❑ Support for FreeBSD(freebsd.org/support.html) — You can find connections to both community and commercial support for FreeBSD.
❑ Getting FreeBSD software(freebsd.org/where.html) — Links to information for downloading or purchasing FreeBSD installation CDs or DVDs are listed on this site. This includes links to software for different architectures (i386, amd64, powerpc, and so on).
❑ FreeBSD features list(freebsd.org/about.html) — Describes the key features of FreeBSD.
❑ News on FreeBSD(freebsd.org/news/) — This is a gathering point for news about FreeBSD. There are links to news flashes, press releases, articles, and devel-opment status. You can also find links here to develdevel-opment sites and forums related to FreeBSD and BSD in general.
❑ FreeBSD projects (freebsd.org/projects/) — Provides information about FreeBSD development projects. Besides basic development projects for FreeBSD, you can also find links to special projects (such as Google Summer of Code) and FreeBSD initiatives associated with established open source projects (such as Java, GNOME, KDE, and OpenOffice.org).
NetBSD Resources
Here are links to useful resources from the NetBSD site (www.netbsd.org):
❑ NetBSD support(netbsd.org/support) — Provides information about commu-nity and professional support, supported hardware, bug submissions, and security.
❑ Getting NetBSD software(netbsd.org/releases) — Links to information for downloading NetBSD CDs or DVDs are listed on this site. There are bittorrent, FTP, and HTTP methods for downloading software.
❑ NetBSD news(netbsd.org/changes/) — Contains the latest news about NetBSD. This includes ongoing lists of development changes to NetBSD.
❑ Software packages(netbsd.org/docs/software/packages.html) — Find information about the NetBSD Packages Colledction (pkgsrc). This includes infor-mation on available packages, documentation, and supported platforms.
OpenBSD Resources
Here are links to useful resources from the OpenBSD site (www.openbsd.org):
❑ OpenBSD support(openbsd.org/support.html) — Provides information on commercial support and consulting available for OpenBSD around the world.
❑ Getting OpenBSD software(openbsd.org/ftp.html) — Links to information for downloading OpenBSD CDs or DVDs are listed on this site. Software mirrors are available via FTP, HTTP, ASF, and RSYNC.
❑ Goals of OpenBSD project(openbsd.org/goals.html) — Describes the goals of the OpenBSD project.
❑ OpenBSD News(openbsd.org/press.html/) — Contains links to press cover-age of OpenBSD.
❑ Frequently asked questions(cvs.openbsd.org/faq) — Contains the Frequently Asked Questions (FAQ) list for OpenBSD.
BSD Community Connections
If you want to communicate with the FreeBSD, OpenBSD, or NetBSD communities, Table 1-1 shows a quick list of links to the most useful communications venues related to those projects.
Table 1-1: Online Resources to Connect to BSD Communities
BSD Activities Internet Sites
Mailing lists lists.freebsd.org/mailman/listinfo
www.openbsd.org/mail.html www.netbsd.org/mailinglists
IRC chats www.netbsd.org/community/#chat
www.freebsd.org/community/irc.html
Forums www.bsdforums.org
www.bsdnexus.com www.freebsdwiki.net
Table 1-1: Online Resources to Connect to BSD Communities (
continued
)
Focusing on BSD Commands
These days, many important tasks in BSD can be done from both graphical interfaces and from commands. However, the command line has always been, and still remains, the interface of choice for BSD power users.
Graphical user interfaces (GUIs) are meant to be intuitive. With some computer expe-rience, you can probably figure out, for example, how to add a user, change the time and date, and configure a sound card from a GUI. For these cases, we’ll mention which graphical tool you could use for the job. For the following cases, however, you will probably need to rely on the command line:
❑ Almost any time something goes wrong— Ask a question at an online forum to solve some BSD problem you are having and the help you get will almost always come in the form of commands to run. Also, command line tools typically offer much more feedback if there is a problem configuring a device or accessing files and directories.
❑ Remote systems administration— If you are administering a remote server, you may not have graphical tools available. Although remote GUI access (using X appli-cations or VNC) and web-based administration tools may be available, they usually run more slowly than what you can do from the command line.
❑ Features not supported by GUI— GUI administration tools tend to present the most basic ways of performing a task. More complex operations often require options that are only available from the command line.
BSD Activities Internet Sites
Community Wikis wiki.netbsd.se
Usenet Newsgroups News:comp.unix.bsd.freebsd.misc News:comp.unix.bsd.freebsd.announce News:comp.unix.bsd.netbsd.announce News:comp.unix.bsd.netbsd.misc News:comp.unix.bsd.misc
Documentation www.freebsd.org/docs.html
www.openbsd.org/cgi-bin/man.cgi netbsd.org/docs
❑ GUI is broken or not installed— If no graphical interface is available, or if the installed GUI isn’t working properly, you may be forced to work from the com-mand line. Broken GUIs can happen for lots of reasons, such as when you use a third-party, binary-only driver from NVIDIA or ATI and a kernel upgrade makes the driver incompatible. Also, many BSD servers don’t even have GUIs installed.
The bottom line is that to unlock the full power of your BSD system, you must be able to use shell commands. Thousands of commands are available for BSD to monitor and manage every aspect of your BSD system.
But whether you are a BSD guru or novice, one challenge looms large. How do you remember the most critical commands and options you need, when a command shell might only show you this:
$
BSD UNIX Toolboxis not just another command reference or rehash of man pages. Instead, this book presents commands in BSD systems by the way you use them. In other words, instead of listing commands alphabetically, we group together commands for working with file systems, connecting to networks, and managing processes in their own sections, so you can access commands by what you want to do, not only by how they’re named.
Likewise, we won’t just give you a listing of every option available for every command. Instead, we’ll show you working examples of the most important and useful options to use with each command. From there, we’ll tell you quick ways to find more options, if you need them, from man pages, the info facility, and help options.
Finding Commands
All the commands described in this book may not be installed when you go to run them. You might type a command and see a message similar to:
mycommand: command not found
This might happen for the following reasons:
❑ You mistyped the command name.
❑ The command is not in your PATH.
❑ You may need to be the root user for the command to be in your PATH.
❑ The command is not installed on your computer.
Table 1-2: Finding Commands
If you suspect that the command you want is not installed, you can search the ports database for the package that it is in. If you find the right package (for example, bzflag) and it isn’t installed, install it from the Internet as root by typing the following:
# find /usr/ports | grep ImageMagick
/usr/ports/gtraphics/ImageMagick
...
# pkg_add -r ImageMagick
The command just shown grabs the ImageMagick binary package (in tar bzip2 format) from a BSD software repository and installs it from the local system. Refer to Chapter 2 for information on other methods of installing software, such as using the ports system.
Command Reference Information in BSD
Original BSD, Linux and UNIX documentation was all done on manual pages, gener-ally referred to as man pages. A slightly more sophisticated documentation effort came a bit later with the infofacility. Within each command itself, help messages are almost always available.
This reference information is component oriented — in other words, there are separate man pages for nearly every command, file format, system call, device, and other com-ponent of a BSD system. Documentation more closely aligned to whole software pack-ages is typically stored in a subdirectory of the /usr/local/share/docdirectory.
Command and Sample Output Description
$ type mount
mount is /sbin/mount
Show the first mountcommand in PATH.
$ whereis mount mount: /sbin/mount
/usr/share/man/man8/mount.8.gz
Show binary and man page for mount.
$ locate xrdb.1.gz
/usr/local/man/man1/xrdb.1.gz
Find xrdb.1.gzanywhere in file system.
$ which umount /sbin/umount
Find umountcommand anywhere in your PATH or aliases.
$ pkg_info -W convert /usr/local/bin/convert was installed by package ImageMagick-6.3.6.9
Using help Messages
The -hor --helpoptions are often used to display help messagesfor a command. The following example illustrates how to display help for the ogg123 command:
$ ogg123 --help | less
ogg123 from vorbis-tools 1.1.1
by the Xiph.org Foundation (http://www.xiph.org/)
Usage: ogg123 [<options>] <input file> ...
-h, --help this help
-V, --version display Ogg123 version -d, --device=d uses ‘d’ as an output device
Possible devices are (‘*’=live, ‘@’=file): oss* null* wav@ raw@ au@
-f, --file=filename Set the output filename for a previously specified file device (with -d).
...
The preceding output shows how the ogg123command line is used and lists available options. Piping the output to the lesscommand lets you page through it.
Using man Pages
Suppose you want to find man pages for commands related to a certain word. Use the apropos command to search the man page database. This shows man pages that have crontab in the man page NAME line:
$ apropos crontab
crontab(1) - maintain crontab files for individual users (V3) crontab(5) - tables for driving cron
The aproposoutput here shows each man page NAME line that contains crontab. The number shows the man page section in which the man page appears. (We discuss sec-tions shortly.)
The whatiscommand is a way to show NAME lines alone for commands that contain the word you enter:
$ whatis cat
cat (1) - concatenate files and print on the standard output
The easiest way to display the man page for a termis with the mancommand and the com-mand name. For example:
$ man find
FIND(1) FreeBSD General Commands Manual FIND(1) NAME
SYNOPSIS
find [-H | -L | -P] [-EXdsx] [-f pathname] [pathname ...] expression ...
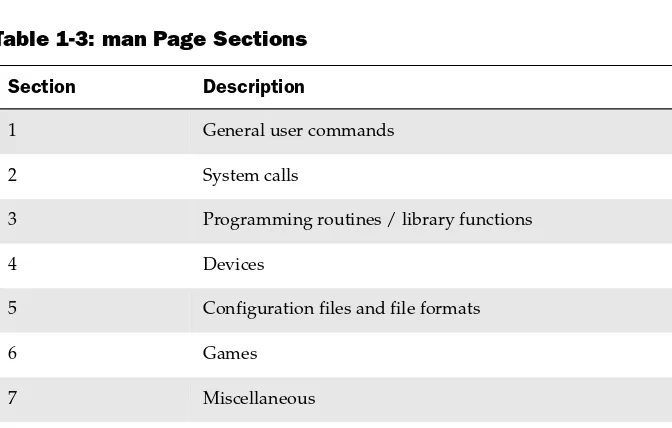
The preceding command displays the first man page found for the findcommand. As you saw in the earlier example, some terms have multiple man pages. For example, there is a man page for the crontabcommand and one for the crontabfiles. Man pages are organized into sections, as shown in Table 1-3.
Table 1-3: man Page Sections
The following code shows some other examples of useful options with the man command.
$ man -a mount Shows all man pages related to component $ man 5 crontab Shows section 5 man page for component $ man mount -P more Use more, not less to page through $ man -f mount Same as the whatis command $ man -k mount Same as the apropos command
Man pages are also available on the Internet. Here are some nice sites for finding BSD man pages:
http://www.freebsd.org/cgi/man.cgi http://www.openbsd.org/cgi-bin/man.cgi
http://netbsd.gw.com/cgi-bin/man-cgi?++NetBSD-current Section Description
1 General user commands
2 System calls
3 Programming routines / library functions
4 Devices
5 Configuration files and file formats
6 Games
7 Miscellaneous
8 Administrative commands and daemons
Using info Documents
In some cases, developers have put more complete descriptions of commands, file formats, devices, or other BSD components in the info database. You can enter the info database by simply typing the infocommand or by opening a particular component:
$ info ls
The previous command shows information on the lscommand. Use up, down, left, and right arrows and Page Up and Page Down to move around the screen. Home and End keys go to the beginning and end of a node, respectively. When you are displaying info screen, you can get around using the keystrokes shown in Table 1-4.
Table 1-4: Moving Through the Info Screen
Software packages that have particularly extensive text available in the info database include gimp, festival, libc, automake, zsh, sed, tar, and bash. Files used by the info database are stored in the /usr/share/infodirectory.
Summary
Although you certainly can read this book from cover to cover if you like, the book is designed to be a reference to hundreds of features in BSD systems that are most use-ful to power users and systems administrators. Because information is organized by topic, instead of alphabetically, you don’t have to know the commands in advance to find what you need to get the job done.
Keystroke Movement
? Display the basic commands to use in info windows.
L Go back to the previous node you were viewing.
n, p, u Go to the node that is next, previous, or up.
Tab Go to the next hyperlink that is in this node.
Enter Go to the hyperlink that is under the cursor.
R Follow a cross-reference.
Most of the features described in this book will work equally well in FreeBSD, NetBSD, OpenBSD, and other BSD systems. In fact, many of the commands described here are in such widespread use that you could use them exactly as described here on most Linux and UNIX systems as well.
Installing FreeBSD
and Adding Software
In the tradition of the first UNIX systems, FreeBSD offers a text-based installation facility that includes a utility called sysinstall. The installer is aimed at professionals, who are more interested in power and flexibility than fancy graphical screens and hand-holding. After initialization you can run sysinstallagain, to add more software pack-ages and configure some network settings.
Despite its simplicity, the installer offers many of the same powerful features that you can find in
more refined Linux and UNIX installers. It can configure your hard disks and install from different local media (CD, DVD, or hard disk) or remote servers (FTP, HTTP or NFS servers). It also leads you through the initial configuration of users, mice, network services, and other important start-up features.
After installation, FreeBSD offers tools such as pkg_info, pkg_add, pkg_delete, and pkg_checkto add and otherwise work with software packages in FreeBSD. You can also run the sysinstallutility again to install more packages after your initial FreeBSD install. To install pack-ages from source code, FreeBSD offers the ports collection, along with tools such as portsnapand portupgrade.
This chapter highlights critical issues you need to know during the initial FreeBSD installation. It also provides detailed examples of commands just mentioned for managing software after installation.
Before Installing FreeBSD
You can get FreeBSD installation software from the Getting FreeBSD
web page at www.freebsd.org/where.html. From that page, you can find where to purchase FreeBSD CDs or DVDs. For example, you can purchase a four-CD set or single DVD from the FreeBSD Mall
IN THIS CHAPTER
Installing FreeBSDGetting software pack-ages with pkg_add
You can also learn where to download free ISO images for supported FreeBSD archi-tectures from the Getting FreeBSDpage. Supported architectures include: Intel i386, Alpha/AXP, AMD 64-bit (Athalon64, Athlon64-FX or Opteron), ia64, PowerPC, and Sparc64. For example, available downloads of several FreeBSD releases can be obtained from: ftp.freebsd.org/pub/FreeBSD/ISO-IMAGES-i386
From the http://FreeBSD.org/docs.htmlpage, you can access FreeBSD documen-tation that can help you if you hit any snags during installation. For example, select the FAQ for installation tips, supported hardware, bootloaders, and other topics you need to get started.
To simply erase everything on your computer’s hard disk to install FreeBSD, you don’t have to prepare your hard disks in advance. If you want to keep any data from your hard disk, back up that data before proceeding. To keep existing data on your hard disk and add FreeBSD, you may need to resize existing disk partitions and repartition your disk. Refer to Chapter 7 for information on disk resizing and partitioning commands.
NOTE If you are booting multiple operating systems from the same computer, the order in which those systems are installed is important. If you want Windows on the machine, install it first, because it will overwrite your boot manager and make FreeBSD temporarily unbootable. Linux system installers usually ask whether or not you want to install a boot loader, and may even let you configure that boot loader to boot FreeBSD as well. If the boot manager is erased, access the FreeBSD file system and run bootinst.exe boot.binfrom the toolsdirectory on the CD to reinstall the FreeBSD boot manager.
Installing FreeBSD
The FreeBSD installation procedure described in this section uses the three-CD FreeBSD installation set. The computer described has an x86 architecture and an available Ethernet connection to the Internet (to add software that is not on the CDs). This procedure was tested on FreeBSD 7 and 6.3.
Booting the Install Disc
Insert the first install CD into your drive and reboot. When the following FreeBSD boot screen appears, follow the procedure below to install FreeBSD on your computer:
Welcome to FreeBSD!
1. Boot FreeBSD [default]
2. Boot FreeBSD with ACPI disabled 3. Boot FreeBSD in Safe Mode 4. Boot FreeBSD in single user mode 5. Boot FreeBSD with verbose logging 6. Escape to loader prompt
Press the spacebar (to pause the timer) or let the default install begin (by pressing Enter or letting the timer time out). If you want to view or change boot settings, type 6. When you see the OK prompt, type ?to view available commands. Here are somecommands you can run from the boot prompt:
boot Starts install process
show List available boot variables
set xx=?? Set boot variables (for example, set acpi_load=NO to turn off ACPI during the install)
unset xx Unset a selected boot variable
lsdev List potential boot device names
lsmod List modules that are loaded
ls List files
load Load a selected kernel or module
smap View BIOS SMAP
more Page through a file (for example, more README.txt)
To disable or enable features in the kernel, add them to the kernel_options=variable. When you are ready to continue on to the install process, type boot.
Starting the Install Process
FreeBSD offers a text-/menu-based install procedure. Throughout the install proce-dure, use these keys: Space (select or toggle item) or Enter (to finish with an item). Also, use Up Arrow (previous item), Down Arrow (next item), Right Arrow (next item or group), or Left Arrow (previous item or group). To scroll text, select Page Up (scroll text boxes up one page), Page Down (scroll text boxes down one page), or F1 (display help text).
1.
Select Country. The default country is the United States. The sysinstallMain Menu appears, displaying a list of install types and other options.2.
Select Install Type. To install, select Standard (recommended), Express (quick install for experts), or Custom (custom install for experts). This procedure describes the Standard install. If you are presented with a screen to partition your hard disk(s), proceed to the next step.3.
Disk Partitioning. The installer provides you with a screen-oriented FDISK to partition your hard drive. (See Chapter 7 for more details on partitioning with FDISK.) Here are your options:A = Entire Disk G= set Drive Geometry C= Create Slice F = ‘DD’ Mode D = Delete Slice Z= Toggle Size Units S= Set Bootable | = Wizard m. T = Change Type U = Undo All Changes Q= Finish
Assuming you want to use the whole hard disk to install FreeBSD, use arrow keys to highlight any old slice and type Dto delete it. Then you can select one of the fol-lowing ways of partitioning the disk:
computer, adding a boot manager (such as LILO or GRUB) will let you do that. Use this on multi-boot and home PCs.
❑ F: To dedicate the computer completely to FreeBSD, select Fand select No when asked if you want to keep the disk able to be compatible with other operating systems. This approach assigns the entire disk to FreeBSD (starting at absolute sector 0), so there is no space for a boot manager. The FreeBSD disk label is used as the disk’s boot manager. Use this only on dedicated FreeBSD systems, in par-ticular Internet servers.
❑ C: Highlight any unused space and type Cto create a new slice. You can create several slices in this way.
In most cases where you are using FreeBSD for the whole disk, select A (to have the most flexibility going forward). Then select Q to continue.
NOTE If you are used to partitioning hard disks in Linux, the term slice may be new to you. In FreeBSD, you can assign part or all of a hard disk to a slice, then divide that slice into smaller areas (multiple file systems and swap areas) within that slice. You can do this using the Label Editor.
4.
Select Boot Manager. Select BootMgr (FreeBSD Boot Manager), Standard (install standard MBR without a boot manager), or None (to not change the MBR).5.
Create BSD Partitions: Within the BSD slice you created with FDISK, you can use the FreeBSD Disklabel Editor to partition the parts of your FreeBSD system. If you are dedicating the whole disk to FreeBSD, you can select A (auto defaults) to have the editor divide up your disk automatically. Or you can create individual partitions by selecting C (Create). Here is the list of options:C = Create D = Delete M = Mount pt.
N = Newfs Opts Q = Finish S = Toggle SoftUpdates Z = Custom Newfs T = Toggle Newfs U = Undo A = Auto Defaults R = Delete+Merge
Here are some tips for partitioning your disk:
❑ The UFS2 file system is the default for FreeBSD 5.1 and later.
❑ Root file system must be less than 1.5TB.
❑ Set Soft Updates policy to cause metadata and data blocks to be written asyn-chronously to disk (with extra state information).
Here’s what was automatically assigned for the 40GB hard disk dedicated to FreeBSD:
6.
Choose distributions. FreeBSD calls pre-set groups of software distributions. You can choose the distributions that are most useful to you as the basis for the sys-tem you are installing (such as X-User for a desktop syssys-tem or Minimal for a minimal installation). Or, you can choose Custom to select the exact software you want.7.
FreeBSD Ports Collection. You are asked if you want to install the FreeBSD ports collection (except not with a minimal install). If you have the required 400MB of space available, say yes. It will help you add software in the future.8.
Choose install media. Options include CD/DVD, FTP server, FTP Passive (server though a firewall), HTTP (FTP via an HTTP proxy), DOS partition, NFS (network file system), File System (local hard disk partition), Floppy (set of floppies), and Tape (SCSI or QIC).9.
Confirm to start installing. This is the last chance to exit before your hard disk contents are overwritten.10.
Configuration questions. When the FreeBSD system is installed, you are asked a set of questions about how you want your system configured. Here is a quick list of those questions and the default answers:Configure Ethernet or SLIP/PPP network devices? Yes
If you answered yes, you can configure an Ethernet card, parallel Port IP, SLIP, or PPP connection. You can set your IP addresses manually or use DHCP. You can also configure IPv6 networking, if appropriate for your network.
Machine a network gateway? No
With at least two network interfaces, you can have your computer act as a network gateway. For example, your FreeBSD system could provide other computers on your LAN with Internet access.
Configure inetd and network services it provides? No
The inetd daemon provides access to a variety of services, particularly legacy UNIX services including finger and telnet. More modern equivalent services are now used more often.
Would you like to enable SSH login? No
The SSH daemon is the most common method for providing secure remote login and remote execution service to your computer. Most will choose Yes to enable this service if they plan to remotely administer their system.
Anonymous FTP access? No
Enabling anonymous FTP access allows users who don’t have a valid login to your machine to access files from your machine that are configured in public FTP directories.
Enabling the system as an NFS server allows you to share local directories, so other computers on your network can mount them.
NFS Client? Yes
Enabling the system as an NFS client lets you mount shared directories from other computers on your network.
Customize system console settings? No
You can change system console settings, such as fonts, keymaps, and terminal type.
Set timezone? Yes
Set the timezone for the machine.
Linux binary compatibility? Yes
Allows you to run Linux software on FreeBSD by installing the components that Linux applications need to run.
PS/2, serial or bus mouse? No
Select Yes if your computer has a mouse and you want to enable it. You can then choose to test and run the mouse daemon, to make sure it is working.
Browse software collection now? Yes
Use arrow keys to highlight a package you want to install and press Enter. When you see the list of applications associated with each package, highlight each pack-age you want (arrow keys) and press the space bar to mark each application for installation. Review the applications you have chosen and select OK.
Add initial user accounts? Yes
Add a regular user account for every day use of the system. You can also add new groups to the system.
Add root user password
Assign a password to the root user.
Visit configuration menu for last options? No
This takes you to the FreeBSD Configuration Menu where you can change settings (packages, partitioning, time zone, mouse, and so on) chosen during installation.
Return to sysinstall screen (exit when done) No
Reboot? Yes
Remove the installation media and reboot the system to run the newly installed system from hard disk.
When the system reboots, you can log in using the user name and password you set during installation.
Adding, Deleting,
and Managing Software
After installing FreeBSD, you can install additional software using either Portsor
Packages. The FreeBSD ports collection approach lets you install software from source code. The Packages approach lets you install applications that are pre-built into bina-ries. Experts tend to use the ports system to get the latest software. New users might be more comfortable with Packages provided that bugs have been worked out in the build process.
For installing binaries, the sysinstallutility lets you select where to install from (CD, DVD, FTP, and so on), then choose which packages to install. If a package is already on your computer, you can use commands such as pkg_add, pkg_delete, and pkg_infoto work with that package. For building packages using the ports system, you use the makecommand.
Finding Software
At any time, you can find out what software is available with FreeBSD using the FreeBSD Ports Search page (www.freebsd.org/ports). If you know a component (command, system call, file format, and so on), but don’t know what package it is in, you can search man pages from the FreeBSD site (www.freebsd.org/cgi/man.cgi). You can also use pkg_infoto get information about software that is already installed.
To search the FreeBSD Ports systemfor a particular software package, go to the search page www.freebsd.org/ports. Type the term(s) to search for, the description area to search, and the particular category of software. You will see a listing of results by category and package name. The following searches everything for md5sum:
Search for: md5sum All All Sections Submit Category security
cfv-1.18.1
Utility to both test and create .sfv, csv and md5sum files Long description : Sources : Changes : Download
Maintained by: [email protected]
To read about available commands, file formats and other things before you install them, use the FreeBSD Hypertext Man Pages page (www.freebsd.org/cgi/man.cgi). Search by man page name or keyword. This example searches for the pkg_info man page:
Man Page or Keyword Search: pkg_info | Submit | | Reset | ? Man | All Sections | | FreeBSD Ports |
o Apropos Keyword Search (all sections) | html | Output format home | help
PKG_INFO(1) FreeBSD General Commands Manual PKG_INFO(1)
NAME
pkg_info -- a utility for displaying information on software packages
You can check whether a package is already installedand list information about installed packages
using the pkg_infocommand. (Depending on your shell, you may need to wrap wildcard characters in quotes, as in: pkginfo "cdrtools*".) Here are examples:
# pkg_info | less Show name/index line for all packages # pkg_info -I gnome* | less Show name/index line for matching packages # pkg_info cdrtools* | less Show info for installed package cdrtools # pkg_info -d cdrtools* | less Show long description of package # pkg_info -c cdrtools* | less Show comment line of package # pkg_info -f cdrtools* | less Show list of files in package
# pkg_info -L cdrtools* | less Show list of full paths to files in package # pkg_info -i gnome-games* | less Show install script for package (if any) # pkg_info -k kdebase* | less Show de-install script for package (if any)
You can find out about package dependenciesusing the pkg_infocommand. Here are examples:
# pkg_info -R cdrtools* | less Show packages required by installed package # pkg_info -r cdrtools* | less Show packages requested package depends on
Before you install the packages that interest you, there are other ways to get informa-tion about packages and categories as well. If you installed the ports database, you could simply search the /usr/ports directory, since packages are organized by directories named after each category and package name. For example:
# find /usr/ports -type d | grep quake | less Show ports with quake in the name
If you want to search your entire system for any sign of a particular package, command or file, you can use the locatecommand to search the entire file system. That is, provided that you configured the locate database to include the entire contents of your file system. Chapter 4 contains information on how to create a locate database.
Installing Software Packages (binary)
You can install precompiled, binary packages that are that are ready to run using either a menu interface (sysinstall) or a command-line interface (pkg_add). Both sysinstalland pkg_addwill try to get and install the packages you request, along with any dependent packages your selected packages need to run.
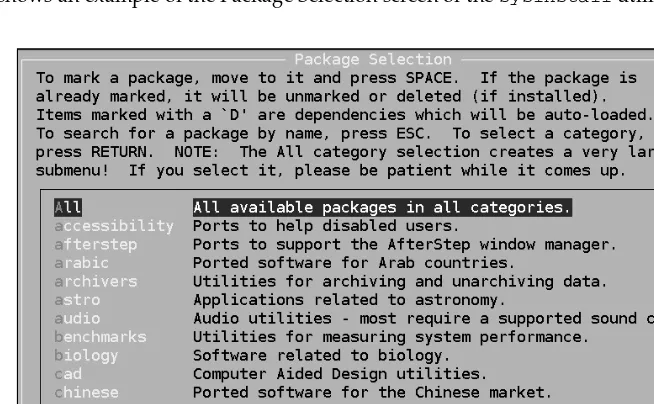
After you have installed FreeBSD, you can run the sysinstall utility again to add more software packages. As root user, type /usr/sbin/sysinstall to display the sysinstall Main Menu. Then select Configure➪Packages, and choose the medium you want to install from (CD/DVD, FTP, HTTP, and so on). You may have to select the location and network interface to reach your chosen online software site as well. Figure 2-1 shows an example of the Package Selection screen of the sysinstallutility.
Figure 2-1: Install software packages using the sysinstall utility.
Use keystrokes described during installation to move among the categories and pack-ages to select what you want to install. If any of the packpack-ages you select are dependent on other packages that are not already installed, those dependent packages will be marked with a D and automatically installed with your selections. After you have made your selections, tab to the OK button, then select Install to begin installing the packages.
If you prefer the command line to a menu interface, you can use the pkg_add command to add packagesto your BSD system. The packages you request can be either in a local direc-tory or in a BSD software reposidirec-tory. Here are examples:
# pkg_add -r freebsd-games Download/install freebsd-games from network
# pkg_add -r -K xmines Download/install xmines, save pkg to local dir
# pkg_add -v lsof-4.79D.tbz Install lsof in verbose mode Requested space: 455200 bytes, free space: 1155635200 bytes
in /var/tmp/instmp.09jSIz extract: Package name is lsof-4.79D extract: CWD to /usr/local
extract /usr/local/sbin/lsof ...
To verify the contents of a packagebefore installing it, you can use the -M(Master) option to pkg_add. With -M, instead of installing a package, the contents of the package are copied to a subdirectory of /var/tmp, where you can inspect them before installing. For example, with memdump-1.01.tbzin the local directory, type this:
# pkg_add -M memdump-1.01.tbz Put package contents in /var/tmp to check
With the package extracted to the /var/tmpdirectory, you can now examine the con-tents of the package. Look for directories with names such as instmp.??????, where
each ?is replaced by a letter or number. The -Moption can be used in conjunction with the -S(Slave) mode.
Removing Software Packages (binary)
To remove previously installed software packages, you can use the pkg_delete com-mand. Here are some examples of pkg_deletefor deleting a package:
# pkg_delete -n dbus-0.93_3 Check what would happen before deleting package