ios programming
foreword . . . .
xix
introduction . . . .
xxi
▶
part i
developing a professional ui
chapter 1
Creating a Personal Library . . . 3
chapter 2
Advancing with Tableviews . . . 29
chapter 3
Advancing with Map Kit . . . 79
chapter 4
Understanding Action Views and Alerts . . . 119
chapter 5
Internationalization: Building Apps for the World . . . 141
chapter 6
Using Multimedia . . . 165
▶
part ii networking–data processing
chapter 7
Using Web Services and Parsing . . . 213
chapter 8
Using FTP . . . 271
chapter 9
Implementing Core Data . . . 299
▶
part iii integrating Your app
chapter 10
Notifications . . . 335
chapter 11
Sending E-Mail, SMS, and Dialing a Phone . . . 355
chapter 12
Understanding the Address Book . . . 363
chapter 13
Event Programming . . . 385
chapter 14
Integrating with Social Media . . . 403
▶
part iv taking Your application to production
chapter 15
Analyzing Your Application . . . 435
chapter 16
Monetize Your App . . . 447
chapter 17
Understanding iTunes Connect . . . 481
chapter 18
Building and Distribution . . . 505
appendix a
Audio Codes . . . 523
appendix B
Artwork Dimensions . . . 527
professional
ios programming
www.wiley.com
Copyright © 2014 by John Wiley & Sons, Inc., Indianapolis, Indiana
Published simultaneously in Canada
ISBN: 978-1-118-66113-0 ISBN: 978-1-118-66110-9 (ebk) ISBN: 978-1-118-84425-0 (ebk)
Manufactured in the United States of America
10 9 8 7 6 5 4 3 2 1
No part of this publication may be reproduced, stored in a retrieval system or transmitted in any form or by any means, electronic, mechanical, photocopying, recording, scanning or otherwise, except as permitted under Sections 107 or 108 of the 1976 United States Copyright Act, without either the prior written permission of the Publisher, or authorization through payment of the appropriate per-copy fee to the Copyright Clearance Center, 222 Rosewood Drive, Danvers, MA 01923, (978) 750-8400, fax (978) 646-8600. Requests to the Publisher for permission should be addressed to the Permissions Department, John Wiley & Sons, Inc., 111 River Street, Hoboken, NJ 07030, (201) 748-6011, fax (201) 748-6008, or online at http://www.wiley.com/go/permissions.
Limit of Liability/Disclaimer of Warranty: The publisher and the author make no representations or warranties with respect to the accuracy or completeness of the contents of this work and specifically disclaim all warranties, including without limitation warranties of fitness for a particular purpose. No warranty may be created or extended by sales or promotional materials. The advice and strategies contained herein may not be suitable for every situation. This work is sold with the understanding that the publisher is not engaged in rendering legal, accounting, or other professional services. If professional assistance is required, the services of a competent professional person should be sought. Neither the publisher nor the author shall be liable for damages arising herefrom. The fact that an organization or Web site is referred to in this work as a citation and/or a potential source of further information does not mean that the author or the publisher endorses the information the organization or Web site may provide or recommendations it may make. Further, readers should be aware that Internet Web sites listed in this work may have changed or disappeared between when this work was written and when it is read.
For general information on our other products and services please contact our Customer Care Department within the United States at (877) 762-2974, outside the United States at (317) 572-3993 or fax (317) 572-4002.
Wiley publishes in a variety of print and electronic formats and by print-on-demand. Some material included with standard print versions of this book may not be included in e-books or in print-on-demand. If this book refers to media such as a CD or DVD that is not included in the version you purchased, you may download this material at
http://booksupport.wiley.com. For more information about Wiley products, visit www.wiley.com.
Library of Congress Control Number: 2013949552
acquisitions editor Mary James
project editor Ed Connor
technical editor Abhishek Mishra
production editor Christine Mugnolo
copY editor Kim Cofer
editorial manager Mary Beth Wakefield
freelancer editorial manager Rosemarie Graham
associate director of marketing David Mayhew
marketing manager Ashley Zurcher
Business manager Amy Knies
vice president and
executive group puBlisher Richard Swadley
associate puBlisher Jim Minatel
project coordinator, cover Katie Crocker
compositor
Cody Gates, Happenstance Type-O-Rama
proofreaders
Daniel Aull, Word One New York Sarah Kaikini, Word One New York
indexer John Sleeva
cover designer Ryan Sneed
cover image
aBout the author
peter van de put
is CEO and lead developer of YourDeveloper, a global software development
company based in France. He began developing software in 1980 and delivered high-end software
solutions for companies like Fuji Photo Film, Shell, Unilever, Bridgestone, Alcatel, Ricoh and many
others. In 2006, he started a software company that focuses on developing iOS applications and
backend software solutions and has developed applications for global clients such as banks,
govern-ment agencies, telecommunications and utilities. In tandem with his software developgovern-ment career,
he also trained hundreds of developers and co-founded several service companies and worked as a
project manager and business consultant. By owning and directing a consultancy firm, he has seen
all aspects of projects from planning to design to deployment to maintenance.
As an experienced trainer, he is also available to provide training classes for your iOS developers in
countries all over the world.
aBout the technical editor
acknowledgments
i would like to start BY thanking
my wife Miranda and my daughter Anique for their
con-tinuous support and encouragement during the writing process.
To Andre Smits, my closest friend, who’s supported and encouraged me and who has done all the
proofreading and provided very useful feedback.
To all my clients, who made it possible to obtain the experience level I’ve reached during the
realiza-tion of their project.
contents
FOREWORD
xix
INTRODUCTION
xxi
part i: developing a professional ui
chapter 1: creating a personal liBrarY
3
Creating Your Personal Library
4
Understanding Project Basics
4
Starting a New Project
5
Configuring Your Project
6
Defining Constants
8
Using the Configuration
8
Importing the Header File
10
Registration—Login 11
Creating Registration Logic
12
Initializing Data
15
Initializing Application Defaults
15
Creating Login Logic
16
Securing Passwords
18
Storing the Password in a Keychain
20
Crash Management
20
Understanding Crashes
21
Implementing a Crash Handler
21
Summary 28
chapter 2: advancing with taBleviews
29
Understanding the UITableView
29
datasource and delegate
30
Scrolling 34
Building a Chat View Controller
38
Building a datasource
39
Building a Chat Data Object
39
Building a Custom UITableView
42
Flexible Cell Height
45
Putting It All Together
50
Drilling Down with UITableView
56
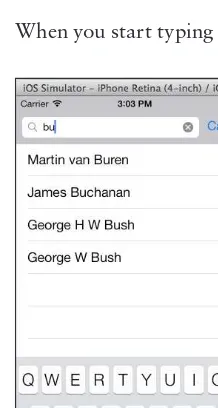
Implementing a UISearchBar
66
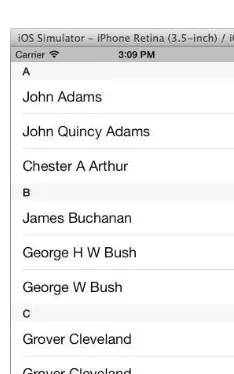
Adding an Alphabet Index
72
Summary 77
chapter 3: advancing with map kit
79
Simulating iOS Device Movement
80
Why You Need a GPS Simulator
80
Creating the Simulator
80
Creating a GPS Route File with Google Maps
84
Implementing the YDLocationSimulator
87
Working with Annotations
90
Creating Custom Annotations
90
Responding to Annotation Call-Outs
95
Clustering Annotations
100
Summary 118
chapter 4: understanding action views and alerts
119
Asking for User Input
119
Creating a UIActionSheet with Multiple Options
120
Presenting the UIActionSheet
125
Responding to User Input
133
Processing the User Selection
133
Extending the UIAlertView
136
Adding a UITextField to a UIAlertView
136
Summary 140
chapter 5: internationalization: Building apps
for the world
141
Localizing Your Application
141
Setting Up Localization
143
Localizing Interface Builder Files
144
Localizing Strings
145
Localizing Images
148
Localize the Name of Your Application
150
Working with Date Formats
151
What Is a Locale?
151
Understanding Calendars
155
CONTENTS
Working with Numbers
160
Introducing Number Formatters
160
Summary 164
chapter 6: using multimedia
165
Portable Document Format
165
Displaying a PDF Document with a UIWebView
166
Displaying a PDF Document using QuickLook
170
Creating a Thumbnail from a PDF Document
173
Creating a PDF Document
177
Playing and Recording Audio
181
Introduction to the Frameworks
182
Playing an Audio File from the Bundle
182
Playing Audio from Your iTunes Library
187
Playing Streaming Audio
191
Recording Audio
193
Playing and Recording Video
198
Playing a Video File from the Bundle
199
Playing a Video from Your iTunes Library
202
Playing a YouTube Video
205
Recording Video
207
Summary 210
part ii: networking–data processing
chapter 7: using weB services and parsing
213
Why Would You Need to Use a Web Service?
213
Understanding Basic Networking
214
Understanding Protocols
214
Understanding Operations
215
Understanding Response Codes
215
Introduction to Web Services
216
Calling an HTTP Service
216
Requesting a Website
216
Downloading an Image from an HTTP URL
219
Requesting a Secure Website Using HTTPS
225
Using Blocks
228
Calling a REST Service
232
Constructing Your Request
232
Processing the Response
236
Preparing Your Request
250
Passing Values to an Operation
252
Understanding Secure SOAP Requests
258
More Parsing
260
What about Comma-Separated Value Files?
260
Transforming XML to an NSDictionary
266
Summary 270
chapter 8: using ftp
271
Developing an FTP Client
272
Writing a Simple FTP Client
272
Downloading a Remote File
277
Creating a Remote Directory
279
Listing a Remote Directory
280
Uploading a File
283
Reading from an NSStream
284
Writing to an NSStream
285
Writing a Complex FTP Client
288
Working with an FTP Client
297
Summary 297
chapter 9: implementing core data
299
Introduction to Core Data
299
Why Should You Use Core Data?
300
Introducing Managed Object Context
300
Introducing the Managed Object Model
300
Introducing Managed Objects
301
Introducing Persistent Stores
301
Introducing Fetch Requests
301
Using Core Data in Your Application
302
Creating a Managed Object Model
302
Creating Managed Objects
305
Creating Persistent Stores
306
Setting Up Your Appdelegate
307
Using Core Data in Your Application
309
Using Managed Objects
309
Fetching Managed Objects
311
Using Relationships
316
Understanding Model Changes
320
CONTENTS
Concurrency with Core Data
331
Summary 332
part iii: integrating Your app
chapter 10: notifications
335
Implementing Local Notifications
336
Understanding Local Notifications
336
Creating a Notification
337
Receiving a Notification
340
Understanding Push Notifications
341
Configuring the Developer Portal
343
Obtaining Certificates
346
Implementation with Urban Airship
349
External Notifications
352
Defining a Custom URL Scheme
352
Responding to the URL Request
353
Summary 354
chapter 11: sending e‑mail, sms, and dialing a phone
355
Sending E-Mail
355
Composing an E-Mail
356
Working with Attachments
358
Sending SMS (Text Message)
359
Verifying if SMS Is Available
359
Composing a Text Message
359
Dialing a Phone Number
360
Verifying Dialing Capability
360
Summary 361
chapter 12: understanding the address Book
363
Introduction to the Address Book Framework
363
Accessing the Address Book
364
Selecting a Contact
364
Requesting Access Permission
367
Displaying and Editing a Contact
370
Creating a Contact
373
Deleting a Contact
375
Programmatically Accessing the Address Book
375
Understanding Address Books
376
Creating a Contact Programmatically
381
Deleting a Contact Programmatically
384
Summary 384
chapter 13: event programming
385
Introduction to the Event Kit Framework
385
Using the EventKitUI Framework
386
Requesting Access Permission
386
Accessing a Calendar
388
Creating and Editing a Calendar Event
390
Programmatically Accessing the Calendar Database
391
Creating an Event
392
Editing an Event
396
Deleting an Event
397
Stay Synchronized
397
Working with Reminders
397
Creating a Reminder
398
Editing a Reminder
399
Deleting a Reminder
399
Working with Alarms
399
Summary 401
chapter 14: integrating with social media
403
Introduction to Social Media Integration
403
Understanding the Accounts Framework
404
Understanding the Social Framework
408
Making a Post
409
Retrieving Tweets
418
Integrating with Facebook
419
Creating a Single Sign-In Application
426
Summary 431
part iv: taking Your application to production
chapter 15: analYzing Your application
435
Performing a Technical Analysis
435
Application Crashes
436
Blocking the Main Thread
436
CONTENTS
Using Synchronized HTTP Requests
438
Extensive Bandwidth Usage
438
Battery Drainage
442
Bad User Interface
444
Performing a Commercial Analysis
444
Introducing Flurry Analytics
445
Summary 446
chapter 16: monetize Your app
447
Introduction to Monetizing
447
Paid Application
448
Advertising 448
In-App Purchases
448
Subscriptions 448
Lead Generation
449
Affiliate Sales
449
Developing In-App Purchases
449
Introduction to In-App Purchase
449
Registering Products
450
Choosing the Product Type
450
Understanding the In-App Purchase Process
451
Implementing an In-App Purchase
452
Monetizing with Advertisements
473
Introducing the iAd Framework
473
Implementing the AdMob Network
476
Summary 479
chapter 17: understanding itunes connect
481
IOS Developer Member Center
482
Obtaining a Developer Certificate
482
Managing Devices
486
Managing Apps
489
Creating a Development Provisioning Profile
496
Creating a Distribution Provisioning Profile
499
Summary 503
chapter 18: Building and distriBution
505
App Store Review
505
Understanding the Review Guidelines
506
Avoiding Common Pitfalls
509
Building for Ad Hoc Distribution
510
Building Your Application
510
Distribute for Testing
512
Building for App Store Distribution
514
Summary 521
appendix a: audio codes
523
appendix B: artwork dimensions
527
Device Dimensions
527
iTunes Connect Artwork Dimensions
529
foreword
Since the introduction of the App Store in 2008, more than 900,000 applications have been
avail-able with a total of 50 billion downloads (as of June 2013).
The effect of this phenomenon is simple: there is money to be made in the emerging market of
mobile applications.
There was global media coverage when Steve Jobs unveiled the first iPhone with iOS in January
2007 at the Macworld Conference and Expo, and the release of the first iOS version in June 2007
generated a huge interest from traditional Apple fans. Developers were also interested in this new
operating system with this amazing-looking smartphone built around the concept of user interaction
using touches and gestures.
As more and more programming “how-to” videos became available on the Internet, people started
copying and pasting bits and pieces of them to make their own applications without really
know-ing what they were doknow-ing. When their applications required functionality beyond the obvious, they
started to run into problems.
Professional iOS Programming has been written with those developers in mind. It explains in great
detail how to build professional iOS applications, step by step, by making use of available iOS
frameworks using modern Objective-C programming principles. The 70 real-world sample
pro-grams included in the book (and available for download) are used to explain the functionalities, and
you are free to use them as a starting point for your applications.
Peter van de Put, the author of this book, started his programming career in 1980 on the Sinclair
ZX-81, a machine with a total memory of 16 KB that could be programmed in Assembler. In the
years following, Peter learned many other programming languages, and moved from register-based
programming in Assembler to object-oriented programming in Delphi, Java, C#, and C++.
In 2009, Peter began to study the technology behind iOS and the iPhone device, and mastered the
Objective-C language.
Since then, he and his professional team have developed iPhone and iPad applications for clients in
Australia, Europe, and the United States, where they deliver end-to-end solutions, from back-end
management systems to iOS applications, using the latest modern programming practices and SDKs.
If you are an iOS developer with some experience and want to improve and extend your skills to be
able to develop real-life iOS applications, or if you are a less experienced developer and frequently
need to Google for answers on “How to …” in relation to Objective-C or one of the iOS
frame-works, this book is certainly worth adding to your library. Reading it will save you precious time.
“Professional iOS Programming will be mandatory literature for all our developers and we think it
should also be for yours.”
—Pertti Karjlainen
Product Manager, Northern Lights Software
introduction
mY first experience
with a computer was at the age of 15 at a technical high school in the
Netherlands where I was introduced to the Sinclair ZX-81. It was a little computer with only 16 KB
of memory, but it was amazing and I started programming on it from day one.
In 1981 when the hardware and software revolution started, I moved on to an Exidy Sourcer and
the Commodore 64, soon followed by my first XT personal computer. I was intrigued by the fact
that you could program these machines to do exactly what you wanted them to do, and I wanted to
be able to develop programs for these systems.
I started programming in Assembler, and in time I learned to program in C, Basic, QuickBasic,
Delphi, Pascal, Turbo Pascal, C++, Java, Microsoft VB.NET, Microsoft C#, and Objective-C.
Programming became my profession, and I liked it.
However, because of the skills and knowledge I had gained, like many programmers I moved on to
work as an analyst, software engineer, and consultant, and eventually ended up in a management
position. I was doing less and less programming, which was the thing I liked the most.
In my professional career I’ve managed and co-founded several IT service companies and worked
as a project manager, business consultant, and director, but always was able to find the time to do
some software development during these projects.
During these years, I’ve delivered high-end software solutions for companies like Fuji Photo Film,
Shell, Unilever, Bridgestone, Alcatel, Ricoh, and many others on all continents. I’m not a graphical
designer, and designing an application’s look is not my strongest point. My focus is always on
opti-mization of code and exploring new technologies. Developing a high level of object-oriented code
design with the lowest memory footprint is still a challenge.
In 2006, I decided to leave the hectic life of the Netherlands behind, and moved to France where
I started a software company that focused on developing back-end software solutions and, a little
later, on iOS application development.
who this Book is for
This book is written for both experienced and novice iOS developers who want to improve and
extend their Objective-C programming skills.
A basic knowledge of the Xcode environment and the basics of Objective-C programming are
required to understand the detailed, in-depth explanations and 70 programming samples.
This book is valuable to each and every iOS developer who wants to get a deeper understanding of
the technologies involved in developing professional iOS applications. It can be used as a reference
book to understand the details of the iOS SDK.
The detailed explanations of the programming techniques and the 70 sample applications also make
this an ideal textbook for college professors and trainers.
what this Book covers
This book covers all the subjects required to develop professional iOS applications. All the
explana-tions and code samples have been tested with and applied for the latest iOS 7 SDK.
The following subject areas are covered in this book:
➤
Creating a Personal Library
➤
Advancing UITableView
➤
Advancing with the Map Kit framework
➤
Understanding Actions and Alerts
➤
Internationalization
➤
Using Multimedia in your applications
➤
Using web services and XML-JSON parsing
➤
Developing an FTP client
➤
Implementing the Core Data framework
➤
Using notifications
➤
Implementing e-mail, SMS, and dialing functionality
➤
Understanding and integrating with the Address Book framework
➤
Programming the Event Kit framework
➤
Integrating the Social and Accounts framework
INTRODUCTION
➤
Monetizing your application and implementing the Store Kit framework
➤
Understanding certificates and profiles
➤
Building and distributing your application
the use of interface Builder, storYBoards, and user
interface design examples
Each iOS programmer has a personal preference on how to create the user interface elements in their
applications—one is not necessarily better than the other. In my own work, I create all user
inter-face elements in code, as I appreciate the control and scalability it provides. Therefore, in most
les-sons in this book you will find Interface Builder files. Some developers prefer using Storyboards, for
instance, and they can be used for any project in place of Interface Builder, should you so choose.
The book should be of use to developers in either case.
how this Book is structured
This book is divided into four parts:
➤
Part I:
Developing a Professional User Interface
➤
Part II:
Networking and Data Processing
➤
Part III:
Integrating Your App
➤
Part IV:
Taking Your App into Production
Part I: Developing a Professional User Interface
consists of the following chapters:
➤
Chapter 1: Creating a Personal Library
➤
Chapter 2: Advancing with Table Views
➤
Chapter 3: Advancing with Map Kit
➤
Chapter 4: Understanding Actions Views and Alerts
➤
Chapter 5: Internationalization, Building Apps for the World
➤
Chapter 6: Using Multimedia
Chapter 1 starts with the development of a Personal Library class containing reusable code that you
can use as the basis for each of your applications. During the chapters that follow, you extend the
Personal Library class with more functionality.
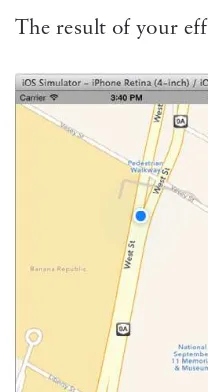
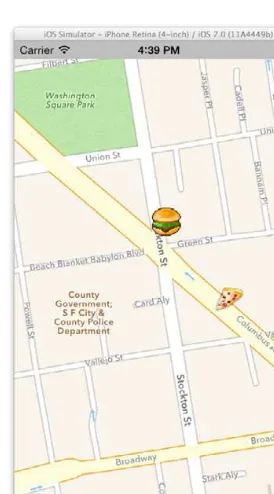
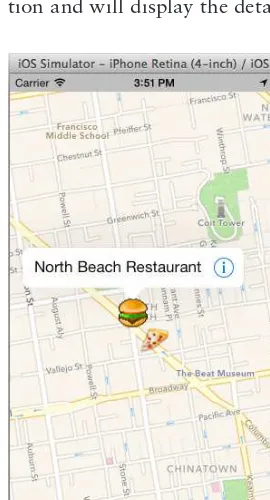
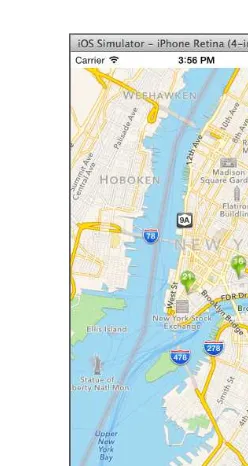
Chapter 3 is all about the Map Kit framework. You will learn the concepts of the location manager
and develop a GPS simulator for development purposes. You will develop clustered map views with
custom annotations.
Action views and Alerts are the subject in Chapter 4. You will learn how to implement action views
and alert views in your application to interact with the user of your application.
Chapter 5 will teach you how to internationalize your applications for the world by explaining
localization techniques and explaining how to work with international dates and number formats.
Chapter 6 is all about multimedia. You will learn efficient techniques to display and create PDF
documents, how to play and record audio and video using the different frameworks available.
Part II: Networking and Data Processing
consists of the following chapters:
➤
Chapter 7: Using Web Services and Parsing
➤
Chapter 8: Using FTP
➤
Chapter 9: Implementing Core Data
Chapter 7 will teach you how to consume web services by REST or SOAP and how to GET and
POST data to these web services. Parsing the response in XML and JSON is explained in detail to
complete this chapter.
Chapter 8 will teach you how the File Transfer Protocol (FTP) fits in an iOS application architecture
and how you can write a simple FTP client in Objective-C. For most advanced requirements this
chapter also teaches you how to write an FTP command based on Objective-C class.
Chapter 9 will teach you all about the Core Data framework. It explains the Core Data concept,
storage techniques, entities, relationships and the techniques to fetch data.
Part III: Integrating Your App
consists of the following chapters:
➤
Chapter 10: Notifications
➤
Chapter 11: Sending E-Mail, SMS and Dialing a Phone
➤
Chapter 12: Understanding the Address Book
➤
Chapter 13: Event Programming
➤
Chapter 14: Integrating Social Media
Chapter 10 will teach you how to implement internal notification and external push notifications.
Chapter 11 will teach you how to send e-mail and text messages from within your application and
how to dial phone numbers.
INTRODUCTION
Chapter 13 will teach you how to create and manage events and reminders from within your application.
Chapter 14 will teach you how to natively integrate your application with Facebook and Twitter.
Learn how to present a user’s Tweets and Facebook wall posts and how to post to a Facebook wall
and send a Tweet.
Part IV: Taking Your App into Production
consists of the following chapters:
➤
Chapter 15: Analyzing your Application
➤
Chapter 16: Monetize your Application
➤
Chapter 17: Understanding iTunes Connect
➤
Chapter 18: Building and Distribution
Chapter 15 will teach you how to implement usage analysis in your application.
Chapter 16 will teach you how to monetize your application. This chapter contains an in-depth
explanation and a helper class for In-App Purchase. Also the implementation of Advertisement
frameworks like iAd and AdMob are covered in this chapter.
Chapter 17 will teach you how to work with iTunes Connect to prepare for your application’s
sub-mission. Understanding provisioning profiles, certificates and devices is essential to be able to
pub-lish your application.
Chapter 18, the final chapter, will teach you how to build and distribute your application for either
Ad-Hoc distribution or App Store distribution.
what You need to use this Book
To program iOS applications you need to download the latest version of Xcode with the latest iOS
SDK included. You can download this at
http://developer.apple.com.
conventions
To help you get the most from the text and keep track of what’s happening, we’ve used a number of
conventions throughout the book.
warning
Boxes like this one hold important, not-to-be forgotten information
that is directly relevant to the surrounding text.
As for styles in the text:
➤
We
highlight
new terms and important words when we introduce them.
➤
We show keyboard strokes like this: Ctrl+A.
➤
We show filenames, URLs, and code within the text like so:
persistence.properties.
➤We present code in two different ways:
We use a monofont type with no highlighting for most code examples.
We use bold to emphasize code that’s particularly important in the present context.
source code
As you work through the examples in this book, you may choose either to type in all the code
manu-ally or to use the source code files that accompany the book. All of the source code used in this book
is available for download at
http://www.wrox.com.
Specifically for this book, the code download is on the Download Code tab at:
www.wrox.com/go/proiosprog
You can also search for the book at
www.wrox.comby ISBN (the ISBN for this book is
978-1-118-66113-0 to find the code. And a complete list of code downloads for all current Wrox books is
available at
www.wrox.com/dynamic/books/download.aspx.
Throughout each chapter, you’ll find references to the names of code files as needed in listing titles
and text.
Most of the code on
www.wrox.comis compressed in a .ZIP, .RAR archive or similar archive format
appropriate to the platform. Once you download the code, just decompress it with an appropriate
compression tool.
Once you download the code, just decompress it with your favorite compression tool. Alternately, you
can go to the main Wrox code download page at
www.wrox.com/dynamic/books/download.aspxto
see the code available for this book and all other Wrox books.
errata
INTRODUCTION
To find the errata page for this book, go to
http://www.wrox.comand locate the title using the
Search box or one of the title lists. Then, on the book details page, click the Book Errata link. On
this page you can view all errata that has been submitted for this book and posted by Wrox editors.
A complete book list including links to each book’s errata is also available at
www.wrox.com/ misc-pages/booklist.shtml.
If you don’t spot “your” error on the Book Errata page, go to
www.wrox.com/contact/techsupport.shtml
and complete the form there to send us the error you have found. We’ll check
the information and, if appropriate, post a message to the book’s errata page and fix the problem in
subsequent editions of the book.
p2p .wrox .com
For author and peer discussion, join the P2P forums at
p2p.wrox.com. The forums are a web-based
system for you to post messages relating to Wrox books and related technologies and interact with
other readers and technology users. The forums offer a subscription feature to e-mail you topics
of interest of your choosing when new posts are made to the forums. Wrox authors, editors, other
industry experts, and your fellow readers are present on these forums.
At
http://p2p.wrox.comyou will find a number of different forums that will help you not only as you
read this book, but also as you develop your own applications. To join the forums, just follow these steps:
1 .
Go to
p2p.wrox.comand click the Register link.
2 .
Read the terms of use and click Agree.
3 .
Complete the required information to join as well as any optional information you wish to
provide and click Submit.
4 .
You will receive an e-mail with information describing how to verify your account and
com-plete the joining process.
note
You can read messages in the forums without joining P2P but in order to
post your own messages, you must join.
Once you join, you can post new messages and respond to messages other users post. You can read
messages at any time on the web. If you would like to have new messages from a particular forum
e-mailed to you, click the Subscribe to this Forum icon by the forum name in the forum listing.
PART I
developing a professional ui
▶
chapter 1:
Creating a Personal Library
▶
chapter 2:
Advancing with Tableviews
▶
chapter 3:
Advancing with Map Kit
▶
chapter 4:
Understanding Action Views and Alerts
▶
chapter 5:
Internationalization: Building Apps for the World
Creating a Personal Library
what’s in this chapter?
➤
Creating registering and login logic
➤
Configuring application settings
➤
Storing settings and securing password
➤
Handling crashes in your application
wrox .com code downloads for this chapter
The wrox.com code downloads for this chapter are found at
www.wrox.com/go/proiosprogon the Download Code tab. The code is in the Chapter 1 download and individually named
according to the names throughout the chapter.
In this chapter you learn how to develop a Personal Library, which is a series of classes and
techniques you can use to give you a head start on your projects. Creating a Personal Library
will save you time during future projects. The Personal Library you will create during this
chapter will teach you how to implement the logic for user registration, user login, and
secur-ing password storage.
If you’ve developed software before, you’ve likely noticed a lot of repetitive tasks in each
application you’ve worked on.
This is no different when developing applications for iOS, and for that reason Xcode, the
Apple Developer Platform, comes with different so-called project templates. The problem with
these project templates is that they provide you only with some main object containers and
don’t provide out-of-the-box configurable features that you require in each application. In this
chapter you develop your own configurable Personal Library that you can use for all your
sub-sequent applications. Throughout the different chapters in this book, you extend the Personal
Library with additional functionalities.
creating Your personal liBrarY
The Personal Library you are about to create is basically a project skeleton containing
differ-ent classes and functionalities to implemdiffer-ent repetitive tasks in a flexible and organized way.
Functionalities in the Personal Library are:
➤
Managing configuration settings
➤
Creating a user registration process with a
UIViewController➤
Implementing a user login process with a
UIViewController➤
Storing user values and secured password storage in a
KeychainIn your future development projects, you can just drag and drop the files of the Personal Library you
require.
understanding project Basics
When you develop iOS applications, you have to make some basic choices when you create a new
project. Two important choices are:
➤
Whether to use Automatic Reference Counting (ARC)
➤
Whether to use Interface Builder for the UI composition, or to code the UI components in
your controller classes
Automatic Reference Counting
ARC is a technology introduced in iOS 5.x and higher that automatically manages your memory
allocations. As the name suggests, it counts the references to objects and retains or releases objects
automatically when required. The main advantages of using ARC are:
➤
No need to send
releaseor
autoreleasemessages to your objects
➤Less chance for memory leaks in case you forget to
releaseobjects
➤
Less code to write because you can skip the release for your objects and also skip the
deallocmethod in most cases
The only reason for keeping a
deallocmethod around is when you need to free resources that don’t
fall under the ARC umbrella, such as:
➤
Calling
CFReleaseon Core Foundation objects
➤
Calling
free()on memory you allocated with
malloc()➤
Invalidating a timer
Creating Your Personal Library
❘
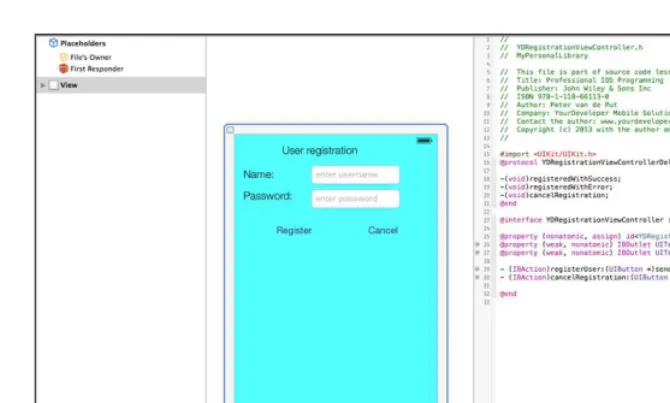
5figure 1‑1
Interface Builder
Because you are an experienced programmer, you know that Interface Builder is a part of Xcode that
enables you to create and configure the UI elements of your project. Personally, I don’t like working
with Interface Builder because I like to have complete control over all aspects of the UI by means
of code. The side effect, however, is that a large amount of my code is UI-related code. To keep the
source code listings focused on the subject in most of the examples, Interface Builder is used to create
the user interface and the Assistant Editor is used to create the
IBActionand
IBOutlets.
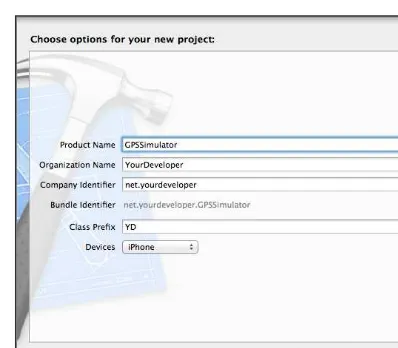
starting a new project
Start Xcode, create a new project using the Single View Application Project template, and name it
MyPersonalLibrary
using the configuration settings as shown in Figure 1-2.
The Class Prefix field will help you to follow Apple’s coding guidelines because each class within your
project needs to have a unique name. When you create the project you can use this field to define your
default class prefix, which will be used when you are creating a new class. Although Apple’s
guide-lines advise using a three-character prefix, I always use a two-character prefix—the abbreviation of
my company name,
YourDeveloper—so I choose YD as a default prefix for my classes.
When you click the Next button, you will be asked to select a file location to store the project, and
at the bottom of the screen you will see a checkbox that says Create Local git Repository for This
Project, as shown in Figure 1-3. Check the option to create the local git repository and click the
Create button to create the project with the chosen configuration.
figure 1‑3
using a local git repositorY
When you select the option to create a local git repository, Xcode creates this
reposi-tory for you automatically, which enables you to use version control on your project.
With version control, Xcode keeps track of changes in your source code, enabling you
to revert to a version, commit changes, compare versions, and so on. If you are using a
server based subversion system (SVN) to manage your source control you don’t require
a local git repository since you will be using an SVN client or SVN commands to
man-age your sources. If you don’t use a server based subversion system I strongly
recom-mend to check the Create Local git Repository option when creating a new project.
After the project is created, you’ll see two classes in the project: the
YDAppDelegateclass and the
YDViewControllerclass. Both classes are created by default by Xcode.
You also see a
YDViewController.xibfile, which is an Interface Builder file.
configuring Your project
It’s good practice to use groups in your project structure to organize different elements like
images, sounds, classes, views, helpers, and so on, so start by creating some groups under the
MyPersonalLibrary
node. Create the following groups:
➤Externals
➤
Categories
➤
CrashHandler
Creating Your Personal Library
❘
7➤
Definitions
➤
Images
➤
VC
Because a group is only a container and not a physical folder on your filesystem, you should also
cre-ate these folders on the filesystem under your project root folder.
Because there will be a lot of repetitive tasks in all the applications you develop, and you still need
the flexibility to switch functionalities on and off without recoding and copying and pasting parts of
code, create a configuration file as follows:
In the Project Explorer, navigate to the Definitions group and select New File from the context
menu. Create a C header file called
YDConstants.has shown in Figures 1-4 and 1-5.
figure 1‑4
defining constants
The Personal Library you are developing contains functionality for registration of a user, login of a
user, and a settings controller. In addition to that you’ll be implementing a crash handler.
Implement the code as shown in Listing 1-1 in your
YDConstants.hfile.
listing 1‑1:
Chapter1/MyPersonalLibrary/YDConstants.h
#import <Foundation/Foundation.h>
// My application switches
#define bYDActivateGPSOnStartUp YES #define bYDRegistrationRequired YES #define bYDLoginRequired NO #define bYDShowLoginAfterRegistration YES #define bYDInstallCrashHandler YES //keys that are used to store data
#define bYDRegistered @"bYDRegistered" #define bYDAuthenticated @"bYDAuthenticated" #define bYDFirstLaunch @"bYDFirstLaunch" #define bYDVibrate @"bYDVibrate"
using the configuration
You can store settings using the
NSUserDefaultsclass. Because you can store or change individual
settings in many different places in your application, it’s important to first synchronize the object to
make sure modifications are presented with the correct value.
Next, create a helper class that will give you some static methods to read and write values using the
NSUserDefaults
class.
In the Project Explorer, navigate to the Helpers group and select File
➪
New from the context menu.
Create a new Objective-C class named
YDConfigurationHelperthat inherits from
NSObject, as
shown in Listing 1-2.
listing 1‑2:
Chapter1/MyPersonalLibrary/YDConfigurationHelper.h
#import <Foundation/Foundation.h>
@interface YDConfigurationHelper : NSObject
+(void)setApplicationStartupDefaults;
+(BOOL)getBoolValueForConfigurationKey:(NSString *)_objectkey;
+(NSString *)getStringValueForConfigurationKey:(NSString *)_objectkey;
Creating Your Personal Library
❘
9+(void)setStringValueForConfigurationKey:(NSString *) _objectkey withValue:(NSString *)_value;
@end
The
YDConfigurationHelperclass in Listing 1-3 contains a few static methods to help you access
the
NSUserDefaultsobject. It contains get and set methods for
NSStringvalues and
BOOLvalues to
make life a lot easier.
listing 1‑3:
Chapter1/MyPersonalLibrary/YDConfigurationHelper.m
#import "YDConfigurationHelper.h"
@implementation YDConfigurationHelper +(void)setApplicationStartupDefaults {
NSUserDefaults *defaults = [NSUserDefaults standardUserDefaults]; [defaults synchronize];
[defaults setBool:NO forKey:bYDFirstLaunch]; [defaults setBool:NO forKey:bYDAuthenticated]; [defaults synchronize];
}
+(BOOL)getBoolValueForConfigurationKey:(NSString *)_objectkey {
//create an instance of NSUserDefaults
NSUserDefaults *defaults = [NSUserDefaults standardUserDefaults]; [defaults synchronize]; //let's make sure the object is synchronized return [defaults boolForKey:_objectkey];
}
+(NSString *)getStringValueForConfigurationKey:(NSString *)_objectkey {
//create an instance of NSUserDefaults
NSUserDefaults *defaults = [NSUserDefaults standardUserDefaults]; [defaults synchronize]; //let's make sure the object is synchronized if ([defaults stringForKey:_objectkey] == nil )
{
return [defaults stringForKey:_objectkey]; }
}
+(void)setBoolValueForConfigurationKey:(NSString *) _objectkey withValue:(BOOL)_boolvalue
{
NSUserDefaults *defaults = [NSUserDefaults standardUserDefaults]; [defaults synchronize]; //let's make sure the object is synchronized
[defaults setBool:_boolvalue forKey:_objectkey];
[defaults synchronize];//make sure you're synchronized again }
+(void)setStringValueForConfigurationKey:(NSString *) _objectkey withValue:(NSString *)_value
{
NSUserDefaults *defaults = [NSUserDefaults standardUserDefaults]; [defaults synchronize]; //let's make sure the object is synchronized [defaults setValue:_value forKey:_objectkey];
[defaults synchronize];//make sure you're synchronized again }
@end
The
getStringValueForConfigurationKey:method is testing for a null value and returns an empty
NSString
instead of the null value. The reason is that in case you want to retrieve a value and assign it
to the text property of a
UILabel, you don’t want to display (null).
importing the header file
As you know, when you want to use a header definition file in your application you need to import it
using the
#import"YDConstants.h"statement.
This is not really convenient to repeat in each of your subsequent classes and ViewControllers.
Each application, however, also has a precompiled header file that is applicable for the complete
application. You can find this under the Supporting Files group in the Project Explorer; it is called
MyPersonalLibrary-Prefix.pch
.
If you import a header file here, it’s globally available. Add the import statements here for the
YDConstants
and
YDConfigurationHelperheader files, as shown in Listing 1-4.
listing 1‑4:
Chapter1/MyPersonalLibrary/MyPersonalLibrary-Prefix.pch
#import <Availability.h> #ifdef __OBJC__
#import "YDConstants.h"
#import"YDConfigurationHelper.h" #import <UIKit/UIKit.h>
#import <Foundation/Foundation.h> #endif
In the next section, you create a login, a registration, and a setting ViewController.
Registration—Login
❘
11registration—login
Many applications require the user to register and log in, or log in only. If the user management is
handled externally, you can ask a user to register in different ways. You can either ask for
creden-tials like an e-mail address or a username and a password, or—what you see a lot nowadays—you
can ask the user to register via Facebook.
Facebook registration is covered in depth in Chapter 14, “Social Media Integration,” and in that
chapter, you will extend your Personal Library.
Introducing the iOS Keychain Services
The iOS Keychain Services provide you with a secure storage solution for passwords, keys,
certifi-cates, notes, and custom data on the user’s device.
In your Personal Library you’ll be using the iOS Keychain Services to store the password the user
enters during the registration process you’ll develop later.
To make interaction with the iOS Keychain Services more accessible, Apple has released a
KeyChainItemWrapper
class that will provide you with a higher-level API to work with the
keychain.
You can download a sample project including the
KeyChainItemWrapperclass that you need
in your Personal Library from
http://developer.apple.com/library/ios/#samplecode/ GenericKeychain/Listings/Classes_KeychainItemWrapper_h.html.
Download the sample project from the URL and navigate to its files using Finder. In your Xcode
project use the Project Explorer to navigate to the Externals group, select New Group from the
con-text menu, and name it
KeyChain. Create a folder named
keychainunder the
externalsfolder on
your filesystem. Copy the
KeychainItemWrapper.hand
KeychainItemWrapper.mfiles from the
download folder to your projects folder by using drag-and-drop. Xcode will prompt you to choose
the options for adding these files. Make the same choices as shown in Figure 1-6.
This
KeychainItemWrapperclass has not been developed for ARC, and for that reason you must set the
–fno –objc –arc
compiler flag for the
KeyChainItemWrapper.mfile as already shown in Figure 1-1.
For more information about KeyChain Services programming, please visit
https://developer .apple.com/library/ios/#documentation/security/Conceptual/keychainServConcepts/ 01introduction/introduction.html.
To be able to work with the Keychain Services using the
KeychainItemWrapperclass, you also need
to add a reference to the
Security.framework.
creating registration logic
Your user registration screen may look different in each application because the design of each
appli-cation will be different; nevertheless, you can standardize a part of the registration logic because
you’ll always have to follow certain steps:
➤
Verify if the user has registered before so you don’t need to present the registration view again.
➤
If the user has registered before, define what subsequent processes are required; for
exam-ple, present a login view or load data from a web service.
You already have defined a constant called
bYDRegistrationRequiredin the
YDConstantsheader
file, which you can use in your application delegate to check if you need to present a ViewController
to capture the registration credentials.
Using the Project Explorer, navigate to the VC group and select New File from the context menu to
create a
UIViewControllersubclass called
YDRegistrationViewControlleras shown in Figure 1-7.
figure 1‑7
Registration—Login
❘
13figure 1‑8
The
YDRegistrationViewController.hcode is shown in Listing 1-5.
listing 1‑5:
Chapter1/MyPersonalLibrary/YDRegistrationViewController.h
#import <UIKit/UIKit.h>
@protocol YDRegistrationViewControllerDelegate <NSObject>
-(void)registeredWithSuccess; -(void)registeredWithError; -(void)cancelRegistration; @end
@interface YDRegistrationViewController : UIViewController
@property (nonatomic, assign) id<YDRegistrationViewControllerDelegate> delegate; @property (weak, nonatomic) IBOutlet UITextField *nameField;
@property (weak, nonatomic) IBOutlet UITextField *passwordField;
- (IBAction)registerUser:(UIButton *)sender; - (IBAction)cancelRegistration:(UIButton *)sender;
@end
In
YDRegistrationViewController.m, implement the
registerUser:and
cancelRegistration:methods as shown in Listing 1-6.
listing 1‑6:
Chapter1/MyPersonalLibrary/YDRegistrationViewController.m
- (id)initWithNibName:(NSString *)nibNameOrNil bundle:(NSBundle *)nibBundleOrNil {
self = [super initWithNibName:nibNameOrNil bundle:nibBundleOrNil]; if (self) {
// Do any additional setup after loading the view from its nib. }
- (void)didReceiveMemoryWarning {
[super didReceiveMemoryWarning];
// Dispose of any resources that can be recreated. }
UIAlertView *alert = [[UIAlertView alloc] initWithTitle: @"Error" message:@"Both fields are mandatory"
KeychainItemWrapper* keychain = [[KeychainItemWrapper alloc] initWithIdentifier:@"YDAPPNAME" accessGroup:nil];
[keychain setObject:self.nameField.text forKey:(__bridge id)kSecAttrAccount]; [keychain setObject:[self.passwordField.text MD5] forKey:(__bridge id)kSecValueData];
//reading back a value from the keychain for comparison
Registration—Login
❘
15[YDConfigurationHelper setBoolValueForConfigurationKey: bYDRegistered withValue:YES]; [self.delegate registeredWithSuccess];
//or
//[self.delegate registeredWithError]; }
}
- (IBAction)cancelRegistration:(UIButton *)sender {
[self.delegate cancelRegistration]; }
@end
initializing data
Each application requires some default settings that are applicable during the launch of the
applica-tion. For that reason, in this section you learn how to initialize application defaults.
initializing application defaults
So far you’ve been working on creating a Personal Library that contains reusable and configurable
code so you don’t have to write the same code in each of your applications. You’ve been using the
NSUserDefaults
class via the
YDConfigurationHelperclass you defined to store settings and
results of operations.
The first time your application launches, none of these values are set. To support the initialization
of your defaults, the
YDConfigurationHelperclass has a static method called
setApplication-StartupDefaults. In the implementation, you set the initial value of each property to control your
application’s logic at the first launch of an application, as in this example:
+(void)setApplicationStartupDefaults {
NSUserDefaults *defaults = [NSUserDefaults standardUserDefaults]; [defaults synchronize];
[defaults setBool:NO forKey:bYDFirstLaunch]; [defaults setBool:NO forKey:bYDAuthenticated]; [defaults synchronize];
}
You also may want to delete keychain items if they are left over from a previous install. This is also
an ideal place if you need to create, for example, some special directories outside the bundle, so
dur-ing further processdur-ing in your application you don’t have to test each time if a directory exists.
The purpose of the
bYDFirstLaunchkey is to support the fact that this initialization code is being
called only once.
The following code snippet explains how you should call this method in the
YDAppDelegate application: didFinishWithLaunchingOptions:method. It tests if the stored value returns
YES, and in that case it calls
setApplicationStartupDefaults, which sets the value to NO.
creating login logic
It is nice that a user can now register, but you also need to support the fact that a registered user can
log in.
As a first step, create a new ViewController that serves as the ViewController for entering a
user-name and a password. Create a new
YDLoginViewControllerthat inherits from
UIViewControllerand code it like in Listing 1-7. Like in the
YDRegistrationViewController, you define a protocol
that can be used by your delegate so your
delegateobject will be notified with the result of the login
process. Three methods are called depending on the result of the login process.
listing 1‑7:
Chapter1/MyPersonalLibrary/YDLoginViewController.h
#import <UIKit/UIKit.h>
@protocol YDLoginViewControllerDelegate <NSObject>
-(void)loginWithSuccess; -(void)loginWithError; -(void)loginCancelled; @end
@interface YDLoginViewController : UIViewController
@property (weak, nonatomic) IBOutlet UITextField *nameField; @property (weak, nonatomic) IBOutlet UITextField *passwordField;
@property (nonatomic, assign) id<YDLoginViewControllerDelegate> delegate;
- (IBAction)loginUser:(UIButton *)sender; - (IBAction)cancelLogin:(UIButton *)sender;
@end
The implementation of the
YDLoginViewControlleris shown in Listing 1-8.
listing 1‑8:
Chapter1/MyPersonalLibrary/YDLoginViewController.m
#import "YDLoginViewController.h" #import "YDLoginViewController.h" #import "NSString+MD5.h"
#import "KeychainItemWrapper.h" @interface YDLoginViewController ()
@end
@implementation YDLoginViewController @synthesize delegate;
- (id)initWithNibName:(NSString *)nibNameOrNil bundle:(NSBundle *)nibBundleOrNil {
Registration—Login
❘
17// Do any additional setup after loading the view from its nib. }
- (void)didReceiveMemoryWarning {
[super didReceiveMemoryWarning];
// Dispose of any resources that can be recreated. }
[self showErrorWithMessage:@"Both fields are mandatory!"]; }
else {
KeychainItemWrapper* keychain = [[KeychainItemWrapper alloc] initWithIdentifier:@"YDAPPNAME" accessGroup:nil]; if ([self.nameField.text isEqualToString:
[keychain objectForKey:(__bridge id)kSecAttrAccount]])
UIAlertView *alert = [[UIAlertView alloc] initWithTitle:@"Error"
message:msg delegate:self cancelButtonTitle:@"Ok" otherButtonTitles:nil, nil]; [alert show];
} @end
In the
loginUser:method you see that the first check performed is if both fields have been entered
with data. Next, the logic checks if the username is stored and, if so, if the password stored in the
keychain is equal to the one that has been entered.
The
YDLoginViewController.xibfile should look something like Figure 1-9.
figure 1‑9
securing passwords
In your
YDRegistrationViewController, you accept a value for the username and for the
word and store it in the keychain of the device. Many developers still store the username and
pass-word using the
NSUserDefaultsclass, which is not a secure solution.
This is not a very secure solution because the password is stored in plaintext, and the
NSUserDefaults
object is not 100 percent safe and can be hacked.
To make your Personal Library more secure, implement a category of
NSStringthat creates an
MD5hashed value of the password and store it in the
keychain; the only safe place on the device to store
critical data.
In the Project Explorer, navigate to the Categories group and select New File from the context menu.
Select Objective-C Category from the template list as shown in Figure 1-10.
Registration—Login
❘
19figure 1‑10
Click the Next button, and in the next screen enter
MD5
as the name of the category you are
creat-ing. From the Category On drop-down list, select
NSStringas shown in Figure 1-11.
figure 1‑11
The header file is shown in Listing 1-9.
listing 1‑9:
Chapter1/MyPersonalLibrary/NSString+MD5 header
#import <Foundation/Foundation.h>
The implementation of your category is shown in Listing 1-10 and the explanation is in the code.
listing 1‑10:
Chapter1/MyPersonalLibrary /NSString+MD5 implementation
#import "NSString+MD5.h"
#import <CommonCrypto/CommonDigest.h> @implementation NSString (MD5) - (NSString*)MD5
{
// Create pointer to the string as UTF8 const char *ptr = [self UTF8String];
// Create byte array of unsigned chars unsigned char md5Buffer[CC_MD5_DIGEST_LENGTH];
// Create 16 bytes MD5 hash value, store in buffer CC_MD5(ptr, strlen(ptr), md5Buffer);
// Convert unsigned char buffer to NSString of hex values NSMutableString *output = [NSMutableString
stringWithCapacity:CC_MD5_DIGEST_LENGTH * 2]; for(int i = 0; i < CC_MD5_DIGEST_LENGTH; i++) [output appendFormat:@"%02x",md5Buffer[i]];
return output; }
@end
In this category you import the
<CommonCrypto/CommonDigest.h>header file. To do this, you must
add the
Security.frameworkto your project if you haven’t already done that when adding the
KeychainItemWrapper
class.
storing the password in a keychain
Apple has developed a keychain wrapper class that makes it easy for you to work with the keychain.
The
KeychainItemWrapperclasses are part of the download of this book and are taken
directly from Apple’s developer portal. This
KeychainItemWrapperclass has not been
devel-oped for ARC, and for that reason you must set the
–fno –objc –arccompiler flag for the
KeyChainItemWrapper.m
file as shown earlier in Figure 1-1.
crash management
Crash Management
❘
21The two main reasons for a crash are:
➤
Memory leaks
➤
Over-releasing objects
Memory leaks are most often caused by not releasing your objects.
UIImageView,
UIImage, and
UIWebView
are consuming a lot of memory; they definitely need to be released at the right time.
Over-releasing happens when you try to access an object that is already released.
using instruments
Instruments is a performance, analysis, and testing tool for dynamically tracing
and profiling iOS and OS X code. It’s important to have a good understanding
of Instruments and how it will help you in improving the quality of your code,
by identifying memory leaks, giving you insight into memory consumption, and
many other performance-relevant measures. Please visit
http://developer. apple.com/library/ios/#documentation/DeveloperTools/Conceptual/ InstrumentsUserGuide/Introduction/Introduction.htmlfor the complete
documentation on Instruments.
You can use Instruments and profile your application to identify memory leaks. You should use the
Zombie instrument to identify access to an object that is already released (also known as a zombie).
understanding crashes
At run time, the application’s signal handling can, by default, launch six different standard signals
in case an application crashes. These signals are:
➤
SIGABRT:
An abnormal termination
➤
SIGFPE:
A floating-point exception
➤
SIGILL:
An invalid instruction
➤
SIGINT:
An interactive attention request sent to the application
➤
SIGSEGV:
Access to an invalid memory address
➤
SIGTERM:
Termination request sent to the application
In the next section, you build a global exception handler that captures the signal and presents a
UIAlertView