Early praise for
Node.js the Right Way
Node.js the Right Way really is the right way to get a fast start with modern server-side JavaScript programming. It goes far beyond the basic mechanics of JavaScript and Node and shows you what really goes into making a quality server-side application.
➤ Allen Wirfs-Brock
Project editor, ECMAScript Language Specification
If you’re just getting started with Node, skip everything else––this is the only book you’ll need.
➤ Rick Waldron
Software engineer, Bocoup, LLC
Finally, a book that teaches that Node.js is much more than a bare-bones web-scale application server for hipsters.
➤ Eric Redmond
Coauthor of Seven Databases in Seven Weeks
Node.js the Right Way is a great read that quickly demonstrates Node’s flexibility and power. It’s perfect for any JavaScript developer who’s interested in exploring the world of server infrastructure.
detailed yet engaging. ➤ Daniel Renfro
Lead software engineer at Vistaprint
This book is a fantastic way to explain Node. I even used some of Jim’s example code in a personal project (especially Chapter 7).
➤ Mitchell Foley
Node.js the Right Way
Practical, Server-Side JavaScript That Scales
Jim R. Wilson
The Pragmatic Bookshelf
Programmers, LLC was aware of a trademark claim, the designations have been printed in initial capital letters or in all capitals. The Pragmatic Starter Kit, The Pragmatic Programmer, Pragmatic Programming, Pragmatic Bookshelf, PragProg and the linking g device are trade-marks of The Pragmatic Programmers, LLC.
Every precaution was taken in the preparation of this book. However, the publisher assumes no responsibility for errors or omissions, or for damages that may result from the use of information (including program listings) contained herein.
Our Pragmatic courses, workshops, and other products can help you and your team create better software and have more fun. For more information, as well as the latest Pragmatic titles, please visit us at http://pragprog.com.
The team that produced this book includes:
Jacquelyn Carter (editor)
Candace Cunningham (copyeditor) David J Kelly (typesetter)
Janet Furlow (producer) Juliet Benda (rights) Ellie Callahan (support)
Copyright © 2013 The Pragmatic Programmers, LLC.
All rights reserved.
No part of this publication may be reproduced, stored in a retrieval system, or transmitted, in any form, or by any means, electronic, mechanical, photocopying, recording, or otherwise, without the prior consent of the publisher.
Printed in the United States of America. ISBN-13: 978-1-937785-73-4
Contents
Acknowledgments . . . vii
Preface . . . ix
1. Getting Started . . . 1
Node’s Niche 2
How Node Applications Work 3
Aspects of Node.js Development 5
Get Node.js 7
2. Wrangling the File System . . . 9
Programming for the Node.js Event Loop 10
Spawning a Child Process 13
Capturing Data from an EventEmitter 15
Reading and Writing Files Asynchronously 17
The Two Phases of a Node Program 20
Wrapping Up 20
3. Networking with Sockets . . . 23
Listening for Socket Connections 24
Implementing a Messaging Protocol 28
Creating Socket Client Connections 31
Testing Network Application Functionality 32
Extending Core Classes in Custom Modules 35
Wrapping Up 39
4. Robust Messaging Services . . . 41
Advantages of ØMQ 42
Importing External Modules with npm 42
Message-Publishing and -Subscribing 44
Responding to Requests 48
Clustering Node.js Processes 54
Pushing and Pulling Messages 59
Wrapping Up 62
5. Accessing Databases . . . 65
Advantages of CouchDB 66
Creating a Package 67
Making RESTful Requests 68
Importing Real Data 70
Unit Testing with Nodeunit 73
Throttling Node.js 75
Querying Data with Mapreduce Views 81
Wrapping Up 85
6. Scalable Web Services . . . 87
Advantages of Express 88
Serving APIs with Express 88
Writing Modular Express Services 91
RESTful APIs with Promises 94
Yielding Control with Generators 99
Using Generators with Promises 101
Wrapping Up 104
7. Web Apps . . . 107
Storing Express Sessions in Redis 108
Creating a Single-Page Web Application 110
Authenticating with Passport 113
Authorizing APIs with Custom Middleware 116
Creating Authenticated APIs 118
Client-Side MVC 120
Wrapping Up 125
Acknowledgments
This was a surprisingly difficult book to write, and I couldn’t have done it without a lot of help. I’m especially thankful for my editor, Jackie Carter—your thoughtful feedback made this book what it is today.
I’d also sincerely like to thank the whole team at The Pragmatic Bookshelf. Thanks for your kind patience while I figured out how to write this book. And thanks to the entire team, who worked so hard to polish this book and find all of my mistakes.
I’d like to thank all my reviewers. Your keen observations have helped make this book even more technically correct (the best kind of correct). In no par-ticular order:
Xavi Ramirez Gary Katsevman
Daniel Rinehart
Mitch Foley David LaPalomento
Daniel Renfro
Trevor Burnham Jarrett Cruger
Jesse Streb
Eric Redmond
And I want to thank my wonderful family, too. Ruthy, you are my inspiration; with your quiet perseverance, you can achieve anything. Emma and Jimmy, even though you’re both growing up too fast, I can’t wait to see all the great things you’ll do.
Preface
Two big shifts are happening right now in the practice of writing software, and Node.js is at the forefront of both.
First, software is becoming increasingly asynchronous. Whether you’re waiting for a Big Data job, interacting with end users, or simply responding to an API call, chances are you’ll need asynchronous programming techniques.
Second, JavaScript has quietly become the world’s standard virtual machine—in web browsers, modern NoSQL databases, and now on the server as well.
Node.js is right at the intersection of these trends, and it’s ready to take off in a big way.
Why Node.js the Right Way
In March of 2010, I gave a lightning talk titled “Full-Stack JavaScript” at the NoSQL Boston conference. Back then, and even more so now, I knew that using JavaScript for every layer of the application stack was not only possible, but a great way to reduce software complexity.
The Right Way in this book’s title refers to both the process of learning Node and the practice of writing Node.
Learning Node.js
As for any growing technology, there are lots of resources available for learning Node.js. Many are intently focused on serving up web resources. The web is great, but it’s not enough, and it’s not the whole story of Node.
Ruby is more than Rails, and Python is more than Django. Node.js is more than serving web content, and this book treats it that way.
Writing Node.js
One thing I love about JavaScript is that there are seven ways to do anything. There’s breathing room, where developers can explore and experiment and find better approaches to everything.
The community of Node developers, conventions in Node.js development, and even the semantics of the JavaScript language itself are all rapidly evolving. With eyes to the near future, the code examples and recommendations in this book reflect current best practices and standards.
What’s in This Book
This book is for developers who want to learn how to write asynchronous JavaScript for the server using Node.js. Some prior JavaScript experience will help, but you don’t have to be an expert.
Chapter 1, Getting Started, on page 1, introduces the Node.js event loop, explaining how it empowers Node to be highly parallel and single-threaded at the same time. This chapter also outlines the five aspects of Node.js development that frame each subsequent chapter and has some brief instructions on getting Node installed on your machine.
The remaining chapters each deal with a specific practical programming area.
Wrangling the File System
In Chapter 2, Wrangling the File System, on page 9, we’ll get our first look at writing Node.js programs. If you’ve done any server-side programming in the past, chances are you’ve had to access a file system along the way. We’ll start in this familiar domain, using Node’s file-system tools to create
asyn-chronous, nonblocking file utilities. You’ll use Node’s ubiquitous EventEmitter
and Stream classes to pipe data, and you’ll spawn and interact with child processes.
Networking with Sockets
We’ll expand on those concepts while exploring Node’s network I/O capabilities in Chapter 3, Networking with Sockets, on page 23. We’ll create TCP servers and client programs to access them. We’ll also develop a simple JSON-based protocol and a custom module for working with these messages. This will offer insight into Node application design and provide experience creating testable and fault-tolerant systems.
Robust Message-Passing
Then, in Chapter 4, Robust Messaging Services, on page 41, we’ll branch away
from the Node core and into the realm of third-party libraries. You’ll use npm to import and build ØMQ (pronounced “Zero-M-Q”)—a high-efficiency, low-latency library for developing networked applications. With ØMQ, we’ll develop programs that communicate using several important patterns, such as publish/subscribe and request/response. We’ll create suites of programs that work together in concert, and you’ll learn the clustering tools to manage them.
Accessing Databases
Chapter 5, Accessing Databases, on page 65, introduces databases and how to interact with them asynchronously in Node. In particular, we’ll work with CouchDB—a RESTful, JSON document database. You’ll learn how to parse XML documents, throttle Node using a worker queue, and develop and run unit tests. The database we create in this chapter is the foundation for RESTful APIs you’ll develop in later chapters.
Scalable Web Services
Node has fantastic support for writing HTTP servers, and in Chapter 6,
Scal-able Web Services, on page 87, we’ll do exactly that. You’ll use Express, a popular Node.js web framework for routing requests. We’ll dive deeper into REST semantics, and you’ll use objects called promises for managing asyn-chronous code flows. You’ll also learn about a bleeding-edge feature of ECMAScript called generator functions, and how they couple with promises in interesting ways.
Web Apps
Finally, in Chapter 7, Web Apps, on page 107, we’ll build a front end for our
web services. We’ll use a Node module called Passport for implementing authenticated APIs that use Google account credentials. And we’ll serialize our session data in Redis—a very fast key/value datastore. You’ll learn the basics of writing a static single-page web application that uses RESTful APIs, including how to pull in dependencies using a front-end package manager called Bower.
What This Book Is Not
Everything About Everything
At the time of this writing, npm houses more than 43,000 modules, with an
average growth rate of 100-plus new modules per day.1 Since the ecosystem
and community around Node.js is growing and changing so rapidly, this book does not attempt to cover everything. Instead, this short book teaches you the essentials you need to get out there and start coding.
The book also stays close to the topic of Node.js. You’ll learn a lot about clustering Node processes and how to write scalable web services, but little about front-end concerns like HTML, CSS, and browser JavaScript.
JavaScript Beginner’s Guide
The JavaScript language is one of the most misunderstood languages in wide use today. Although this book does discuss language syntax from time to time (especially where it’s brand-new), this is not a beginner’s guide to JavaScript.
A Note to Windows Users
The examples in this book assume you’re using a Unix-like operating system. We’ll make use of standard input and output streams, and pipe data between processes. The shell session examples have been tested with Bash, but other shells may work as well.
If you run Windows, I recommend setting up Cygwin.2 This will give you the
best shot at running the example code successfully, or you could run a Linux virtual machine.
Code Examples and Conventions
The code examples in this book contain JavaScript, shell sessions, and a few HTML/XML excerpts. For the most part, code listings are provided in full—ready to be run at your leisure.
Samples and snippets are syntax-highlighted according to the rules of the language. Shell commands are prefixed by $.
When you write Node.js code, you should always handle errors and exceptions, even if you just rethrow them. You’ll learn how to do this throughout the book. However, some of the code examples lack error handling. This is to aid readability and save space only—you should always handle your errors.
1. http://www.modulecounts.com/ 2. http://cygwin.com/
Online Resources
The Pragmatic Bookshelf’s page for this book is a great resource.3 You’ll find
downloads for all the source code presented in this book, and feedback tools, including a community forum and an errata-submission form.
Thanks for choosing this book to show you Node.js the right way.
Jim R. Wilson (jimbojw, hexlib)
November 2013
CHAPTER
1
Getting Started
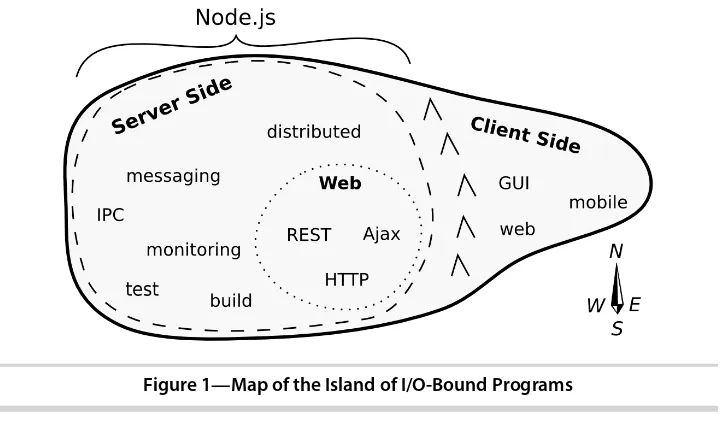
A lot of the buzz around Node.js is focused on the Web. In truth, Node serves a bigger purpose that people often miss. Let’s see where Node fits in the broader scheme of things by making a map.
Imagine the universe of all possible programs as an immense sea. Programs that have similar purposes are near to each other, and programs that differ are further apart. With that picture in mind, take a look at the following figure. It shows a close-up of one particular outcrop in this sea, the Island of I/O-Bound Programs.
Figure 1—Map of the Island of I/O-Bound Programs
East of the mountain range, we find the client-side programs. These include GUI tools of all stripes, consumer applications, mobile apps, and web apps. Client-side programs interact directly with human beings, often by waiting patiently for their input.
West of the mountains are the server-side programs. This vast expanse is
Node.js territory.
Deep within the server-side region lies the Web—that old guard of HTTP, Ajax, REST, and JSON. The websites, apps, and APIs that consume so much of our collective mental energy live here.
Because we spend so much time thinking about the Web, we overemphasize Node’s use in developing web applications. People ask, “How is Node better for making web apps?” or, “How can I make a REST service with Node?”
These are good questions, but they miss the point. Node is great for a wider range of things, and this book explores that larger world.
Node’s Niche
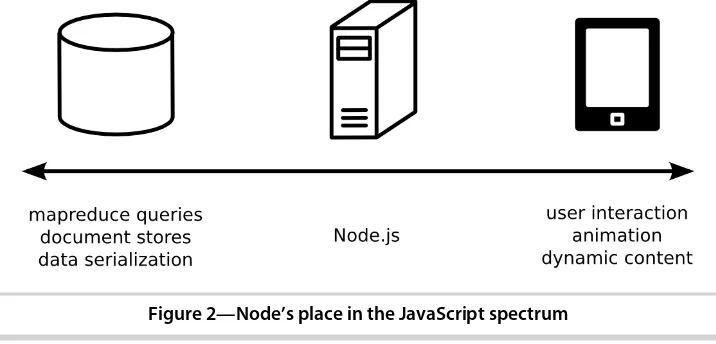
Since JavaScript’s first appearance in 1995, it has been solving problems all along the front-end/back-end spectrum. The following figure shows this spectrum and where Node.js fits within it.
Figure 2—Node’s place in the JavaScript spectrum
On the left, back-end databases are investing heavily in JavaScript. Document-oriented databases like MongoDB and CouchDB use JavaScript extensively —from modifying records to ad-hoc queries and mapreduce jobs. Other datastores, like Neo4j and Elasticsearch, present data in JavaScript Object Notation (JSON). These days, you can even write SQL functions for Postgres in JavaScript with the right plug-in.
Many middleware tasks are I/O-bound, just like client-side scripting and databases. These server-side programs often have to wait for things like a database result, feedback from a third-party web service, or incoming connec-tion requests. Node.js is designed for exactly these kinds of applicaconnec-tions.
How Node Applications Work
Node.js couples JavaScript with an event loop for quickly dispatching
opera-tions when events occur. Many JavaScript environments use an event loop, but it is a core feature of Node.js.
Node’s philosophy is to give you low-level access to the event loop and to system resources. Or, in the words of core committer Felix Geisendörfer, in
Node “everything runs in parallel except your code.”1
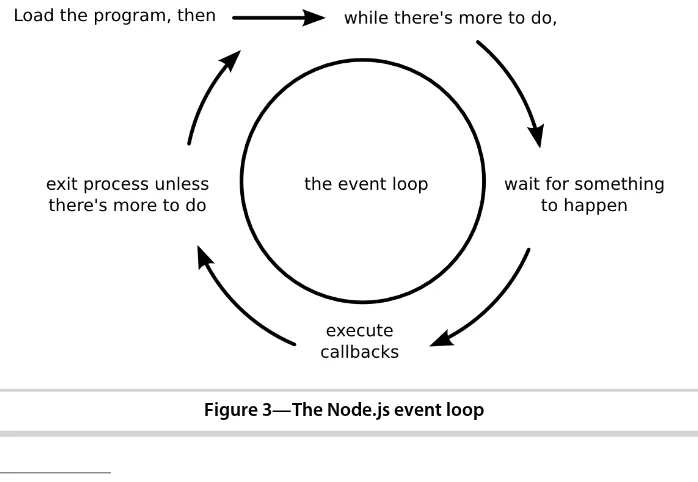
If this seems a little backwards to you, don’t worry. The following figure shows how the event loop works.
Figure 3—The Node.js event loop
1. http://www.debuggable.com/posts/understanding-node-js:4bd98440-45e4-4a9a-8ef7-0f7ecbdd56cb
As long as there’s something left to do, Node’s event loop will keep spinning.
Whenever an event occurs, Node invokes any callbacks (event handlers) that
are listening for that event.
As a Node developer, your job is to create the callback functions that get executed in response to events. Any number of callbacks can respond to any event, but only one callback function will ever be executing at any time.
Everything else your program might do—like waiting for data from a file or an incoming HTTP request—is handled by Node, in parallel, behind the scenes. Your application code will never be executed at the same time as anything else. It will always have the full attention of Node’s JavaScript engine while it’s running.
Single-Threaded and Highly Parallel
Other systems try to gain parallelism by running lots of code at the same time, typically by spawning many threads. But not Node.js. For JavaScript, Node is a single-threaded environment. At most, only one line of your code will ever be executing at any time.
Node gets away with this by doing most I/O tasks using nonblocking
techniques. Rather than waiting line-by-line for an operation to finish, you create a callback function that will be invoked when the operation eventually succeeds or fails.
Your code should do what it needs to do, then quickly hand control back over to the event loop so Node can work on something else. We’ll develop practical
examples of this throughout the book, starting in Chapter 2, Wrangling the
File System, on page 9.
If it seems strange to you that Node achieves parallelism by running only one piece of code at a time, that’s because it is. It’s an example of something I call a backwardism.
Backwardisms in Node.js
A backwardism is a concept that’s so bizarre that at first it seems completely backwards. You’ve probably experienced many backwardisms while learning to program, whether you noticed them or not.
Take the concept of a variable. In algebra it’s common to see equations like
Then when you start learning how to program, you quickly run into statements
like “x = x + 7.” Now x is still called a variable, but it can have any value that
you assign to it. It can even have different values at different times.
From algebra’s perspective, this is a backwardism. The equation “x = x + 7”
makes no sense at all. The notion of a variable in programming is not just a little different—it’s 100 percent backwards. But once you understand the
concept of assignment, the programming variable makes perfect sense.
So it is with Node’s single-threaded event loop. From a multithreaded perspec-tive, running just one piece of code at a time seems silly. But once you understand event-driven programming—with nonblocking APIs—it becomes clear.
Programming is chock-full of backwardisms like these, and Node.js is no exception. Starting out, you’ll frequently run into code that looks like it should work one way, but it actually does something quite different.
That’s OK! With this book, you’ll learn Node by making compact programs that interact in useful ways. As we run into more of Node’s backwardisms, we’ll dive in and explore them.
Aspects of Node.js Development
Node.js is a surprisingly big subject, so let’s break it down into different
aspects. There are many aspects of Node.js development we might talk about, ranging from basic JavaScript syntax to revision control. This book focuses on five in particular:
• Practical programming • Architecture and core • Patterns
• JavaScriptisms • Supporting code
Let’s explore each of these briefly.
Practical Programming
Practical programming is all about producing real code that does something useful. Interacting with a file system, establishing socket connections, or serving web applications are all examples of practical programming.
Each of the remaining chapters of this book focuses on one particular practical domain. Through code examples specific to each domain, you’ll learn Node’s architecture, patterns, JavaScriptisms, and supporting code.
Architecture and Core
Understanding Node’s architecture will help you to harness its features while avoiding performance-crushing pitfalls. For example, Node uses an event loop written in C for scheduling work. But it executes application code in a Java-Script environment. How information is shuttled between these layers is the kind of impactful architectural detail you’ll learn.
Patterns
Like any successful codebase with a healthy ecosystem, Node.js has a number of repeating patterns. Some of these patterns are baked into the core while others mostly appear in third-party libraries. Examples include the use of
callbacks, error-handling techniques, and classes like EventEmitter and Stream,
which are used liberally for event dispatching.
As we progress through different practical programming domains, we’ll natu-rally encounter these and other patterns. When we do, you’ll discover why they’re useful and how to use them effectively.
JavaScriptisms
JavaScript is the language of Node programs, so you’ll be seeing quite a lot of it. The code examples in this book make use of the latest available Java-Script features. Some of these features may be unfamiliar to you, even if you’ve done JavaScript development before.
JavaScriptisms discussed in this book include things like the nature of functions and object inheritance. ECMAScript Harmony—the code name for the next version of the JavaScript spec—packs some new features we’ll use, too.
Supporting Code
Code does not live in isolation; it takes a village to support any individual program. Supporting code covers lots of things, from unit testing to perfor-mance benchmarks to deployment scripts. We’ll use supporting code throughout the book to make our programs more robust, more scalable, and more manageable.
Get Node.js
To install Node.js, you have several choices based on your operating system and your comfort with building from source code.
This book assumes you’re using the latest stable version of Node.js. If you install a different version—for example, by building from the latest source code—the code examples in this book may not work. From the command line
you can run node --version to see what version you have installed if you’re not
sure.
$ node --version v0.10.20
The easiest way to get Node is to download an installer from nodejs.org.2
Another popular option is Node Version Manager (nvm).3 If you’re using a
Unix-like OS (like Mac OS X or Linux), you can install nvm like so:
$ curl https://raw.github.com/creationix/nvm/master/install.sh | sh
Then install a specific version:
$ nvm install v0.10.20
If you have trouble, you can get help on the Node mailing lists and IRC
channel, both linked from the Node.js community page.4
We’ve got a lot of ground to cover, and we don’t have many pages to do it. So if you’re ready, let’s begin in the oh-so-familiar domain of file-system access.
2. http://nodejs.org/download/ 3. https://github.com/creationix/nvm 4. http://nodejs.org/community/
Wrangling the File System
As a programmer, chances are you’ve had to access a file system at some point: reading files, writing files, renaming and deleting files. We’ll start our Node.js journey in this familiar area, creating useful, asynchronous file utili-ties. Along the way we’ll explore the following aspects of Node development.
Architecture and Core
On the architecture front, you’ll see how the event loop shapes a program’s flow. We’ll use buffers for transporting data between Node’s JavaScript engine and its native core, and we’ll use Node’s module system to bring in core libraries.
Patterns
Inside our programs, we’ll use common Node patterns like callbacks for
handling asynchronous events. We’ll harness Node’s EventEmitter and Stream
classes to pipe data around.
JavaScriptisms
We’ll take a look at some JavaScript features and best practices like “functions as first-class citizens” and block scoping.
Supporting Code
You’ll learn how to spawn and interact with child processes, capture their output, and detect state changes.
Programming for the Node.js Event Loop
Let’s get started by developing a couple of simple programs that watch files for changes and read arguments from the command line. Even though they’re short, these applications offer insights into Node’s event-based architecture.
Watching a File for Changes
Watching files for changes is a convenient problem to start with because it demands asynchronous coding while demonstrating important Node concepts. Taking action whenever a file changes is just plain useful in a number of cases, ranging from automated deployments to running unit tests.
Open a terminal to begin. On the command line, navigate to an empty direc-tory. You’ll use this directory for all of the code examples in this chapter.
Once there, use the touch command to create a file called target.txt.
$ touch target.txt
This file will be the target for our watcher program. Now open your favorite text editor and enter the following:
file-system/watcher.js
const fs = require('fs');
fs.watch('target.txt', function() {
console.log("File 'target.txt' just changed!"); });
console.log("Now watching target.txt for changes...");
Save this file as watcher.js in the same directory as target.txt. Let’s see how this program works.
First, notice the const keyword at the top. This JavaScriptism (part of
ECMAScript Harmony) sets up a variable with a constant value. The require()
function pulls in a Node module and returns it. In our case, we’re calling
require('fs') to incorporate Node’s built-in file-system module.1
In Node.js, a module is a self-contained bit of JavaScript that provides
func-tionality to be used elsewhere. The output of require() is usually a plain old
JavaScript object. There’s nothing particularly special about it, aside from the functionality provided by the module.
Node’s module implementation is based on the CommonJS module
specifica-tion.2 Modules can depend on other modules, much like libraries in other
1. http://nodejs.org/api/fs.html
2. http://wiki.commonjs.org/wiki/Modules/1.1
programming environments, which import or #include other libraries. In Chapter 3, Networking with Sockets, on page 23, you’ll learn how to create your own modules.
Next we call the fs module’s watch() method, which polls the target file for changes and invokes the supplied callback function whenever it does.
In JavaScript, functions are first-class citizens. This means they can be assigned to variables and passed as parameters to other functions. Our
call-back function is an anonymous function; it doesn’t have a name.
The callback function calls console.log() to echo a message to standard output
whenever the file changes. Let’s try it out.
Return to the command line and launch the watcher program using node, like so:
$ node --harmony watcher.js
Now watching target.txt for changes...
The --harmony parameter tells Node to use the latest ECMAScript Harmony features available. ECMAScript Harmony is the code name for the next version of ECMAScript, the standard behind the JavaScript language. Not all Harmony features are ready for prime time, but the ones we’ll use in this book are OK (except where noted).
After the program starts, Node will patiently wait until the target file is changed. To trigger a change, open another terminal to the same directory and touch the file again:
$ touch target.txt
The terminal running watcher.js will output the string File ’target.txt’ just changed!, and then the program will go back to waiting.
Visualizing the Event Loop
The program we wrote in the last section is a good example of the Node event
loop at work. Recall the event-loop figure from How Node Applications Work,
on page 3. Our simple file-watcher program causes Node to go through each of these steps, one by one.
To run the program, Node does the following.
1. It loads the script, running all the way through to the last line, which
produces the Now watching message in the console.
3. It waits for something to happen, namely for the fs module to observe a change to the file.
4. It executes our callback function when the change is detected.
5. It determines that the program still has not finished, and resumes waiting.
Node.js programs go through these steps, then the event loop spins until either there’s nothing left to do or the program exits by some other means. For example, if an exception is thrown and not caught, the process will exit. We’ll see how this works next.
Reading Command-Line Arguments
Now let’s make our program more useful by taking in the file to watch as a
command-line argument. This will introduce the process global object and how
Node deals with exceptions.
Open your editor and enter this:
file-system/watcher-argv.js
const
fs = require('fs'),
filename = process.argv[2]; if (!filename) {
throw Error("A file to watch must be specified!"); }
fs.watch(filename, function() {
console.log("File " + filename + " just changed!"); });
console.log("Now watching " + filename + " for changes...");
Save the file as watcher-argv.js. You can run it like so (note the target.txt argument at the end):
$ node --harmony watcher-argv.js target.txt Now watching target.txt for changes...
You should see the same output and behavior as the first watcher.js program.
After outputting Now watching target.txt for changes... the script will diligently
wait for changes to the target file.
This program uses process.argv to access the incoming command-line arguments.
argv stands for argument vector; it’s an array containing node and the full path
to the watcher-argv.js as its first two elements. The third element (that is, at index 2) is target.txt, the name of our target file.
Notice that if a target file name is not provided the program will throw an
exception. You can try that by simply omitting the target.txt parameter:
$ node --harmony watcher-argv.js
/full/path/to/script/watcher-argv.js:7
throw Error("A file to watch must be specified!"); ^
Error: A file to watch must be specified!
Any unhandled exception thrown in Node will halt the process. The exception output shows the offending file, and the line number and position of the exception.
Processes are important in Node. It’s pretty common in Node development to spawn separate processes as a way of breaking up work, rather than putting everything into one big Node program. In the next section, you’ll learn how to spawn a process in Node.
Spawning a Child Process
Let’s enhance our file-watching example program even further by having it spawn a child process in response to a change. To do this, we’ll bring in Node’s
child-process module and dive into some Node patterns and classes. You’ll also learn how to use streams to pipe data around.
To keep things simple, we’ll make our script invoke the ls command with the
-lh options. This will give us some information about the target file whenever
it changes. You can use the same technique to spawn other kinds of processes, as well.
Open your editor and enter this:
file-system/watcher-spawn.js
"use strict"; const
fs = require('fs'),
spawn = require('child_process').spawn, filename = process.argv[2];
if (!filename) {
throw Error("A file to watch must be specified!"); }
fs.watch(filename, function() {
let ls = spawn('ls', ['-lh', filename]); ls.stdout.pipe(process.stdout);
});
console.log("Now watching " + filename + " for changes...");
$ node --harmony watcher-spawn.js target.txt Now watching target.txt for changes...
If you go to a different console and touch the target file, your Node program
will produce something like this:
-rw-r--r-- 1 jimbo staff 0B Dec 19 22:45 target.txt
The username, group, and other aspects of the file will be different from the preceding output, but the format should be the same.
The program we just made begins with the string "use strict" at the top. Strict mode was introduced in ECMAScript version 5—it disables certain problem-atic JavaScript language features and makes others throw exceptions. Generally speaking, it’s a good idea to use strict mode.
Strict mode is also required to use certain ECMAScript Harmony features in Node, such as the let keyword. Like const, let declares a variable, but a variable
declared with let can be assigned a value more than once.
Keep in mind that by using Harmony features (like let), your code will require
the --harmony flag until these features become enabled by default. For example,
const is already available without the --harmony flag, but not so for let.
Next, notice that we added a new require() at the beginning of the program.
Calling require('child_process') returns the child process module. We’re only
interested in the spawn() method, so we save that to a constant with the same
name and ignore the rest of the module.
spawn = require('child_process').spawn,
Remember, functions are first-class citizens in JavaScript, so we’re free to assign them directly to variables like we did here.
Next, take a look at the callback function we passed to fs.watch().
function() {
let ls = spawn('ls', ['-lh', filename]); ls.stdout.pipe(process.stdout);
}
The first parameter to spawn() is the name of the program we wish to execute;
in our case it’s ls. The second parameter is an array of command-line
argu-ments. It contains the flags and the target file name.
The object returned by spawn() is a ChildProcess.3 Its stdin, stdout, and stderr
proper-ties are Streams that can be used to read or write data. We want to send the
3. http://nodejs.org/api/child_process.html
standard output from the child process directly to our own standard output
stream. This is what the pipe() method does.
Sometimes you’ll want to capture data from a stream, rather than just piping it forward. Let’s see how to do that.
Capturing Data from an
EventEmitter
EventEmitter is a very important class in Node.4 It provides a channel for events
to be dispatched and listeners notified. Many objects you’ll encounter in Node inherit from EventEmitter, like the Streams we saw in the last section.
Now let’s modify our previous program to capture the child process’s output
by listening for events on the stream. Open an editor to the watcher-spawn.js file
from the previous section, then find the call to fs.watch(). Replace it with this:
file-system/watcher-spawn-parse.js
fs.watch(filename, function() { let
ls = spawn('ls', ['-lh', filename]), output = '';
ls.stdout.on('data', function(chunk){ output += chunk.toString();
});
ls.on('close', function(){
let parts = output.split(/\s+/);
console.dir([parts[0], parts[4], parts[8]]); });
});
Save this updated file as watcher-spawn-parse.js. Run it as usual, then touch the
target file in a separate terminal. You should see output something like this:
$ node --harmony watcher-spawn-parse.js target.txt Now watching target.txt for changes...
[ '-rw-r--r--', '0B', 'target.txt' ]
The new callback starts out the same as before, creating a child process and assigning it to a variable called ls. It also creates an output variable, which will buffer the output coming from the child process.
Next we add event listeners. An event listener is a callback function that is
invoked when an event of a specified type is dispatched. Since the Stream class
inherits from EventEmitter, we can listen for events from the child process’s standard output stream.
ls.stdout.on('data', function(chunk){ output += chunk.toString();
});
The on() method adds a listener for the specified event type. We listen for data
events because we’re interested in data coming out of the stream.
Events can send along extra information, which arrives in the form of parameters to the callbacks. Data events in particular pass along a buffer
object.5 Each time we get a chunk of data, we append it to our output.
A Buffer is Node’s way of representing binary data. It points to a blob of memory allocated by Node’s native core, outside of the JavaScript engine. Buffers can’t be resized and they require encoding and decoding to convert to and from JavaScript strings.
Calling toString() explicitly converts the buffer’s contents to a JavaScript string
using Node’s default encoding (UTF-8). This means copying the content into Node’s heap, which can be a slow operation, relatively speaking. If you can, it’s better to work with buffers directly, but strings are more convenient.
Like Stream, the ChildProcess class extends EventEmitter, so we can add listeners to it, as well.
ls.on('close', function(){
let parts = output.split(/\s+/);
console.dir([parts[0], parts[4], parts[8]]); });
After a child process has exited and all its streams have been flushed, it emits a close event. When the callback printed here is invoked, we parse the output data by splitting on sequences of one or more whitespace characters (using the regular expression /\s+/). Finally, we use console.dir() to report on the first, fifth, and ninth fields (indexes 0, 4, and 8), which correspond to the permis-sions, size, and file name, respectively.
We’ve seen a lot of Node’s features in this small problem space of file-watching.
You now know how to use key Node classes, including EventEmitter, Stream,
ChildProcess, and Buffer. You also have firsthand experience writing asynchronous call-back functions and coding for the event loop.
Let’s expand on these concepts in the next phase of our file-system journey: reading and writing files.
5. http://nodejs.org/api/buffer.html
Reading and Writing Files Asynchronously
Earlier in this chapter, we wrote a series of Node programs that could watch files for changes. Now let’s explore Node’s methods for reading and writing files. Along the way we’ll see two common error-handling patterns in Node:
error events on EventEmitters and err callback arguments.
There are a few different approaches to reading and writing files in Node. The simplest way is to read in or write out the entire file at once. This technique
works well for small files. Other approaches read and write by creating Streams
or staging content in a buffer. Here’s an example of the whole-file-at-once approach:
file-system/read-simple.js
const fs = require('fs');
fs.readFile('target.txt', function (err, data) { if (err) {
throw err; }
console.log(data.toString()); });
Save this file as read-simple.js and run it as usual with node --harmony:
$ node --harmony read-simple.js
You’ll see the contents of target.txt echoed to the command line. If the file is
empty, all you’ll see is a blank line.
Notice how the first parameter to the readFile() callback handler is err. If readFile()
is successful, then err will be false. Otherwise the err parameter will contain
an Error object. This is a common error-reporting pattern in Node, especially
for built-in modules. In our example’s case, we throw the error if there was
one. Recall that an uncaught exception in Node will halt the program by escaping the event loop.
The second parameter to our callback, data, is a buffer; the same kind that
was passed to our various callbacks in previous sections.
Writing a file using the whole-file approach is similar. Here’s an example:
file-system/write-simple.js
const fs = require('fs');
fs.writeFile('target.txt', 'a witty message', function (err) { if (err) {
throw err; }
This program writes “a witty message” to target.txt (creating it if it doesn’t exist, or overwriting it if it does). If for any reason the file couldn’t be written, then the err parameter will contain an Error object.
Creating Read and Write Streams
You create a read stream or a write stream by using fs.createReadStream() and
fs.createWriteStream(), respectively. For example, here’s a very short program
called cat.js. It uses a file stream to pipe a file’s data to standard output:
file-system/cat.js
#!/usr/bin/env node --harmony
require('fs').createReadStream(process.argv[2]).pipe(process.stdout);
Because the first line starts with #!, you can execute this program directly in
Unix-like systems. It doesn’t need to be passed into the node program.
Use chmod to make it executable:
$ chmod +x cat.js
Then, to run it, send the name of the chosen file as an additional argument:
$ ./cat.js <file_name>
The code in cat.js does not bother assigning the fs module to a variable. The
require() function returns a module object, so we can call methods on it directly.
You can also listen for data events from the file stream instead of calling pipe().
The following program called read-stream.js does this:
file-system/read-stream.js
const
fs = require('fs'),
stream = fs.createReadStream(process.argv[2]); stream.on('data', function(chunk) {
process.stdout.write(chunk); });
stream.on('error', function(err) {
process.stderr.write("ERROR: " + err.message + "\n"); });
Here we use process.stdout.write() to echo data, rather than console.log(). The incoming data chunks already contain any newline characters from the input
file. We don’t need the extra line that console.log() would add.
When working with an EventEmitter, the way to handle errors is to listen for
error events. Let’s trigger an error to see what happens. Run the program, but specify a file that doesn’t exist:
$ node --harmony read-stream.js no-such-file ERROR: ENOENT, open 'no-such-file'
Since we’re listening for error events, Node invokes our handler (and then
proceeds to exit normally). If you don’t listen for error events, but one happens anyway, Node will throw an exception. And as we saw before, an uncaught exception will cause the process to terminate.
Blocking the Event Loop with Synchronous File Access
The file-access methods we’ve discussed in this chapter so far are
asyn-chronous. They perform their I/O duties—waiting as necessary—completely in the background, only to invoke callbacks later. This is by far the preferred way to do I/O in Node.
Even so, many of the methods in the fs module have synchronous versions
as well. These end in *Sync, like readFileSync, for example. Doing synchronous
file access might look familiar to you if you haven’t done a lot of async devel-opment in the past. However, it comes at a substantial cost.
When you use the *Sync methods, the Node.js process will block until the
I/O finishes. This means Node won’t execute any other code, won’t trigger any callbacks, won’t process any events, won’t accept any connections—noth-ing. It’ll just sit there indefinitely waiting for the operation to complete.
However, synchronous methods are simpler to use since they lack the callback step. They either return successfully or throw an exception, without the need for a callback function. There actually are cases where this style of access is OK; we’ll discuss them in the next section.
Here’s an example of how to read a file using the readFileSync() method:
const
fs = require('fs'),
data = fs.readFileSync('target.txt'); process.stdout.write(data.toString());
The return value of readFileSync() is a buffer—the same as the parameter passed
to callbacks of the asynchronous readFile() method we saw before.
Performing Other File-System Operations
Node’s fs module has many other methods that map nicely onto POSIX
con-ventions. (POSIX is a family of standards for interoperability between operating systems—including file-system utilities.) To name a few examples, you can
These functions rely on the same kinds of callback parameters we’ve used in this chapter. They’re all asynchronous by default, but many come with equivalent *Sync versions.
The Two Phases of a Node Program
Given the cost that blocking has on the Node event loop, you might think it’s always bad to use synchronous file-access methods. To understand when it’s OK, you can think of Node programs as having two phases.
In the initialization phase, the program is getting set up, bringing in libraries, reading configuration parameters, and doing other mission-critical tasks. If something goes wrong at this early stage, not much can be done, and it’s best to fail fast. The only time you should consider synchronous file access is during the initialization phase of your program.
The second phase is the operation phase, when the program churns through the event loop. Since many Node programs are networked, this means accepting connections, making requests, and waiting on other kinds of I/O.
You should never use synchronous file-access methods during this phase.
The require() function is an example of this principle in action—it synchronously evaluates the target module’s code and returns the module object. Either the module will successfully load, or the program will fail right away.
As a rule of thumb, if your program couldn’t possibly succeed without the file, then it’s OK to use synchronous file access. If your program could con-ceivably continue about its business, then it’s better to take the safe route and stick to asynchronous I/O.
Wrapping Up
In this chapter we’ve used Node to perform file operations in Node’s evented, asynchronous, callback-oriented way. You learned how to watch files for changes, and read and write files. You also learned how to spawn child pro-cesses and access command-line arguments.
Along the way, we covered the EventEmitter class. We used the on() method to
listen for events and handle them in our callback functions. And we used
Streams—which are a special kind of EventEmitter—to process data in buffered chunks or pipe it directly to other streams.
Oh, and let’s not forget about errors. You learned Node’s convention of passing
an err argument to callbacks, and how error events can be captured from an
EventEmitter.
Keep these patterns in mind as you continue through the book. Third-party libraries sometimes have different styles, but the concepts you’ve learned here reappear throughout the Node ecosystem.
In the next chapter we’ll dig into the other form of server-side I/O: network connections. We’ll explore the domain of networked services, building on the concepts and practices developed here.
Here are some bonus questions for you to try out your newly gained Node knowledge.
Fortifying Code
The various example programs we developed in this chapter lack many safety checks. Consider the following questions, and how you’d change the code to address them:
• In the file-watching examples, what happens if the target file doesn’t exist? • What happens if a file being watched gets deleted?
Expanding Functionality
In an early example of our file-watcher program, we pulled the filename to
watch from process.argv. Consider these questions:
• Instead, how would you take the process to spawn from process.argv?
• How would you pass an arbitrary number of additional parameters from
CHAPTER
3
Networking with Sockets
Node.js is built from the ground up to do networked programming. In this chapter, we’ll explore Node’s built-in support for low-level socket connections. TCP sockets form the backbone of modern networked applications, and understanding them will serve you well as we do more complex networking through the rest of the book.
As you develop socket-based servers and clients, you’ll learn about the follow-ing Node.js aspects.
Architecture and Core
The asynchronous programming techniques we explored in the last chapter will be even more important here. You’ll learn how to extend
Node.js classes like EventEmitter. You’ll create custom modules to house
reusable code.
Patterns
A network connection has two endpoints. A common pattern is for one endpoint to act as the server while the other is the client. We’ll develop both kinds of endpoints in this chapter, as well as a JavaScript Object Notation (JSON)-based protocol for client/server communication.
JavaScriptisms
The JavaScript language has an interesting inheritance model. You’ll learn about Node’s utilities for creating class-like relationships between objects.
Supporting Code
To begin, we’ll develop a simple and complete TCP server program. Then we’ll iteratively improve the server as we address concerns such as robustness, modularity, and testability.
Listening for Socket Connections
Networked services exist to do two things: connect endpoints and transmit information between them. No matter what kind of information is transmitted, a connection must first be made.
In this section, you’ll learn how to create socket-based services using Node.js. We’ll develop an example application that sends data to connected clients, then we’ll connect to this service using standard command-line tools. By the end, you’ll have a good idea of how Node does the client/server pattern.
Binding a Server to a TCP Port
TCP socket connections consist of two endpoints. One endpoint binds to a
numbered port while the other endpoint connects to a port.
This is a lot like a telephone system. One phone binds a given phone number for a long time. A second phone places a call—it connects to the bound number. Once the call is answered, information (sound) can travel both ways.
In Node.js, the bind and connect operations are provided by the net module.
Binding a TCP port to listen for connections looks like this:
"use strict"; const
net = require('net'),
server = net.createServer(function(connection) {
// use connection object for data transfer
});
server.listen(5432);
The net.createServer() method takes a callback function and returns a Server object. Node invokes the callback function whenever another endpoint
con-nects. The connection parameter is a Socket object that you can use to send or
receive data.
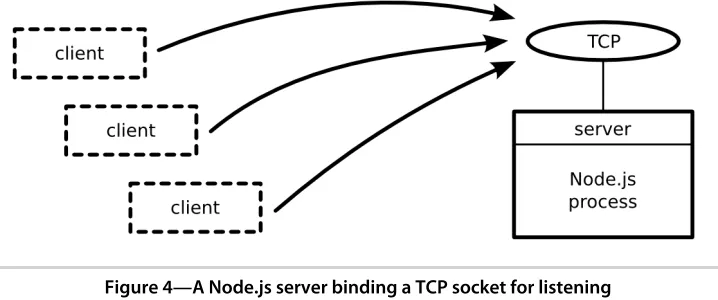
Calling server.listen() binds the specified port. In this case, we’re binding TCP
port number 5432. Figure 4, A Node.js server binding a TCP socket for listening,
on page 25 shows this basic setup. The figure shows our one Node.js process
whose server binds a TCP port. Any number of clients—which may or may not
Figure 4—A Node.js server binding a TCP socket for listening
Our server program doesn’t do anything with the connection yet. Let’s fix that by using it to send some useful information to the client.
Writing Data to a Socket
In Chapter 2, Wrangling the File System, on page 9, we developed some simple file utilities that would take action whenever a target file changed. Let’s reuse the file changes as a source of information for our example net-worked service. This will give us something to code against as we dig into aspects of Node.js development.
Open your favorite text editor and enter this:
networking/net-watcher.js
'use strict'; const
fs = require('fs'), net = require('net'),
filename = process.argv[2],
server = net.createServer(function(connection) {
// reporting
console.log('Subscriber connected.');
connection.write("Now watching '" + filename + "' for changes...\n");
// watcher setup
let watcher = fs.watch(filename, function() {
connection.write("File '" + filename + "' changed: " + Date.now() + "\n"); });
// cleanup
connection.on('close', function() { console.log('Subscriber disconnected.'); watcher.close();
});
});
if (!filename) {
throw Error('No target filename was specified.'); }
server.listen(5432, function() {
console.log('Listening for subscribers...'); });
Save the file as net-watcher.js. Most of the code here is taken from previous examples in the book, so it should look pretty familiar. The novel parts to the
net-watcher program begin inside the callback function given to createServer().
This callback function does three things:
• It reports that the connection has been established (both to the client with connection.write and to the console).
• It begins listening for changes to the target file, saving the returned
watcher object. This callback sends change information to the client using
connection.write.
• It listens for the connection’s close event so it can report that the subscriber
has disconnected and stop watching the file, with watcher.close().
Finally, notice the callback passed into server.listen() at the end. Node invokes
this function after it has successfully bound port 5432 and is ready to start receiving connections.
Connecting to a TCP Socket Server with Telnet
Now let’s run the net-watcher program and confirm that it behaves the way we expect. This will require a little terminal juggling.
To run and test the net-watcher program, you’ll need three terminal sessions: one for the service itself, one for the client, and one to trigger changes to the watched file. In the first terminal, run the net-watcher program:
$ node --harmony net-watcher.js target.txt Listening for subscribers...
This program creates a service listening on TCP port 5432. To connect to it,
$ telnet localhost 5432 Trying 127.0.0.1... Connected to localhost. Escape character is '^]'.
Now watching target.txt for changes...
Back in the first terminal, you should see this:
Subscriber connected.
Finally, to trigger a change to the watched file, open a third terminal and touch
the file target.txt:
$ touch target.txt
In the telnet terminal, after a moment you should see a line like this:
File 'target.txt' changed: Sat Jan 12 2013 12:35:52 GMT-0500 (EST)
You can kill the telnet session by typing Ctrl-] and then Ctrl-C. If you do, you’ll see the following line appear in the first terminal:
Subscriber disconnected.
To terminate the net-watcher service, type Ctrl-C from its terminal.
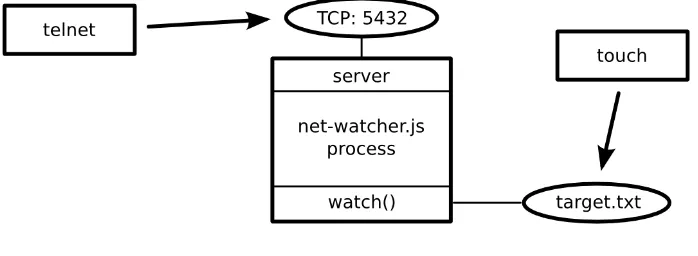
The following figure outlines the setup we just created. The net-watcher pro-cess (box) binds a TCP port and watches a file—both resources are shown as ovals.
Figure 5—A Node.js program watching a file and reporting changes to connected TCP clients
More than one subscriber can connect and receive updates simultaneously. If you open additional terminals and connect to port 5432 with telnet, they’ll
all receive updates when you touch the target file.
TCP sockets are useful for communicating between networked computers. But if you need processes on the same computer to communicate, Unix
sockets offer a more efficient alternative. The net module can create this kind
of socket as well, which we’ll look at next.
Listening on Unix Sockets
To see how the net module uses Unix sockets, let’s modify the net-watcher
program to use this kind of communication channel. Keep in mind that Unix sockets work only on Unix-like environments.
Open the net-watcher.js program and change the server.listen() section to this:
server.listen('/tmp/watcher.sock', function() { console.log('Listening for subscribers...'); });
Save the file as net-watcher-unix.js, then run the program as before:
$ node --harmony net-watcher-unix.js target.txt Listening for subscribers...
To connect a client, we now need nc instead of telnet. nc is short for netcat, a
TCP/UDP socket utility program that also supports Unix sockets.
$ nc -U /tmp/watcher.sock
Now watching target.txt for changes...
Unix sockets can be faster than TCP sockets because they don’t require invoking network hardware. However, they’re local to the machine.
That concludes the basics of creating network socket servers in Node. We discovered how to create socket servers and connect to them using common client utility programs like telnet and nc. This framework will supply the backdrop for the rest of the examples in the chapter.
Next, we’ll beef up our service by transforming the data into a parsable format. This will put us in position to develop custom client applications.
Implementing a Messaging Protocol
We’ve just explored how to create socket servers that listen for incoming connections in Node. So far, our example programs have sent plain-text messages that are meant to be read by a human. In this section, we’ll design and implement a better protocol.
with one or more protocols. Here we’ll create a protocol based on passing
JSON encoded messages over TCP.1
JSON is incredibly prevalent in Node.js programming and in JavaScript programming generally. We’ll use it extensively for data serialization and configuration throughout the book. JSON is significantly easier to program clients against than plain text, and it’s still human-readable.
We’ll implement client and server endpoints that use our new JSON-based protocol. This will give us opportunities to develop test cases and refactor our code into reusable modules.
Serializing Messages with JSON
Let’s develop the message-passing protocol that uses JSON to serialize mes-sages. Each message is a JSON-serialized object, which is a hash of key-value pairs. Here’s an example JSON object with two key-value pairs:
{"key":"value","anotherKey":"anotherValue"}
The net-watcher service we’ve been developing in this chapter sends two kinds of messages that we need to convert to JSON:
• When the connection is first established, the client receives the string
Now watching target.txt for changes...
• Whenever the target file changes, the client receives a string like this: File
’target.txt’ changed: Sat Jan 12 2013 12:35:52 GMT-0500 (EST)
We’ll encode the first kind of message this way:
{"type":"watching","file":"target.txt"}
The type field indicates that this is a watching message—the specified file is now being watched.
The second type of message is encoded this way:
{"type":"changed","file":"target.txt","timestamp":1358175733785}
Here the type field announces that the target file has changed. The timestamp
field contains an integer value representing the number of milliseconds since midnight, January 1, 1970. This happens to be an easy time format to work with in JavaScript. For example, you can get the current time in this format with Date.now().
1. http://json.org/
Notice that there are no line breaks in our JSON messages. Although JSON is whitespace agnostic—it ignores whitespace outside of string values—our protocol will use newlines to separate messages. We’ll call this protocol Line-Delimited JSON (LDJ).
Switching to JSON Messages
Now that we’ve defined an improved, computer-accessible protocol, let’s modify the net-watcher service to use it. Then we’ll create client programs that receive and interpret these messages.
Our task is to use JSON.stringify() to encode message objects and send them out
through connection.write(). Open your editor to the net-watcher.js program. Find the following line:
connection.write("Now watching '" + filename + "' for changes...\n");
And replace it with this:
connection.write(JSON.stringify({ type: 'watching',
file: filename }) + '\n');
Next, find the call to connection.write() inside the watcher:
connection.write("File '" + filename + "' changed: " + Date.now() + "\n");
And replace it with this:
connection.write(JSON.stringify({ type: 'changed',
file: filename, timestamp: Date.now() }) + '\n');
Save this updated file as net-watcher-json-service.js. Run the new program with
node --harmony as always, remembering to specify a target file. Then connect using telnet from a second terminal:
$ telnet localhost 5432 Trying 127.0.0.1... Connected to localhost. Escape character is '^]'.
{"type":"watching","file":"target.txt"}
When you touch the target.txt file, you’ll see output like this from your client:
{"type":"changed","file":"target.txt","timestamp":1367038720325}
Creating Socket Client Connections
So far in this chapter, we’ve explored the server side of Node sockets. Here we’ll write a client program in Node to receive JSON messages from our
net-watcher-json-service program. We’ll start with a naive implementation, and then improve upon it through the rest of the chapter.
Open an editor and insert this:
networking/net-watcher-json-client.js
"use strict"; const
net = require('net'),
client = net.connect({port: 5432}); client.on('data', function(data) {
let message = JSON.parse(data); if (message.type === 'watching') {
console.log("Now watching: " + message.file); } else if (message.type === 'changed') {
let date = new Date(message.timestamp);
console.log("File '" + message.file + "' changed at " + date); } else {
throw Error("Unrecognized message type: " + message.type); }
});
Save this program as net-watcher-json-client.js.
This short program uses net.connect() to create a client connection to localhost
port 5432, then waits for data. The client object is a Socket, just like the
incoming connection we saw on the server side.
Whenever a data event happens, our callback function takes the incoming
buffer object, parses the JSON message, and then logs an appropriate message to the console.
To run the program, first make sure the net-watcher-json-service is running. Then,
in another terminal, run the client:
$ node --harmony net-watcher-json-client.js Now watching: target.txt
If you touch the target file, you’ll see output like this:
File 'target.txt' changed at Mon Jan 14 2013 19:35:14 GMT-0500 (EST)
Success! This program works, but it’s far from perfect. Consider what happens when the connection ends or if it fails to connect in the first place. This pro-gram only listens for data events, not end events or error events. We could listen for these events and take appropriate action when they happen.
But there’s actually a deeper problem lurking in our code—caused by assumptions we’ve made about message boundaries. In the next section we’ll develop a test that exposes this bug so we can fix it.
Testing Network Application Functionality
Functional tests assure us that our code does what we expect it to do. In this section, we’ll develop a test for our networked file-watching server and client programs. We’ll create a mock server that conforms to our LDJ protocol while exposing flaws in the client.
After we write the test, we’ll fix the client code so that it passes. This will bring up many Node concepts, include extending core classes, creating and using
custom modules, and developing on top of EventEmitters. But first we need to
understand a problem lurking in our client/server programs as currently written.
Understanding the Message-Boundary Problem
When you develop networked programs in Node, they’ll often communicate by passing messages. In the best case, a message will arrive all at once. But
sometimes messages will arrive in pieces, split into distinct data events. To
develop networked applications, you’ll need to deal with these splits when they happen.
The LDJ protocol we developed earlier separates messages with newline
characters. Each newline character is the boundary between two messages.
Here’s an example of a series of messages, with newline characters specifically called out:
{"type":"watching","file":"target.txt"}\n
{"type":"changed","file":"target.txt","timestamp":1358175758495}\n {"type":"changed","file":"target.txt","timestamp":1358175779021}\n
Recall the service we’ve been developing so far in this chapter. Whenever a change happens, it encodes and sends a message to the connection, including
the trailing newline. Each line of output corresponds to a single data event in
the connected client. Or, to put it another way, the data event boundaries exactly match up with the message boundaries.
Our client program currently relies on this behavior. It parses each message
by sending the contents of the data buffer directly into JSON.parse():
client.on('data', function(data) { let message = JSON.parse(data);
// ...
But consider what would happen if a message were split down the middle,
and arrived as two separate data events. Such a split could easily happen in
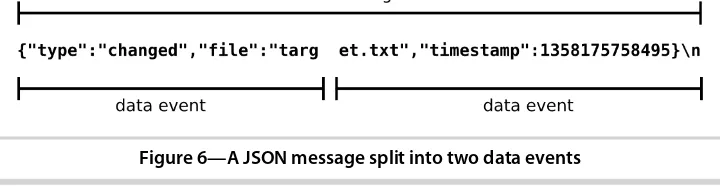
the wild, especially for large messages. The following figure shows an example of a split message.
Figure 6—A JSON message split into two data events
Let’s create a test service that sends a split message like this one and find out how the client responds.
Implementing a Test Service
Writing robust Node applications means gracefully handling network problems like split inputs, broken connections, and bad data. Here we’ll implement a test service that purposefully splits a message into multiple chunks.
Open your editor and enter this:
networking/net-watcher-json-test-service.js
"use strict"; const
net = require('net'),
server = net.createServer(function(connection) {
console.log('Subscriber connected');
// send the first chunk immediately
connection.write(
'{"type":"changed","file":"targ'
);
// after a one second delay, send the other chunk
let timer = setTimeout(function(){
connection.write('et.txt","timestamp":1358175758495}' + "\n"); connection.end();
}, 1000);
// clear timer when the connection ends
connection.on('end', function(){
clearTimeout(timer);
console.log('Subscriber disconnected'); });
});
server.listen(5432, function() {
console.log('Test server listening for subscribers...'); });
Save this file as net-watcher-json-test-service.js and run it:
$ node --harmony net-watcher-json-test-service.js Test server listening for subscribers...
This test service differs from our previous net-watcher-json-service in a few ways.
Rather than setting up a file-system watcher, as we did for the real service, here we just return the first predetermined chunk immediately.
Then we set up a timer to send the second chunk after a one-second delay.
The JavaScript function setTimeout() takes two parameters: a function to invoke
and an amount of time in milliseconds. After the specified amount of time, the function will be called.
Finally, whenever the connection ends, we use clearTimeout() to unschedule the
callback. Unscheduling the callback is necessary since it would fail if it were to execute. After the connection has closed, any calls to connection.write() will trigger error events.
At last, let’s