Kubernetes
Scheduling the Future at Cloud Scale
Kubernetes
by David Rensin
Copyright © 2015 O’Reilly Media, Inc. All rights reserved. Printed in the United States of America.
Published by O’Reilly Media, Inc., 1005 Gravenstein Highway North, Sebastopol, CA 95472.
O’Reilly books may be purchased for educational, business, or sales promotional use. Online editions are also available for most titles ( http://safaribooksonline.com ). For more information, contact our corporate/institutional sales department: 800-998-9938 or
[email protected] . Editor: Brian Anderson
Production Editor: Matt Hacker
Interior Designer: David Futato
Cover Designer: Karen Montgomery
Illustrator: Rebecca Demarest
Revision History for the First Edition
2015-06-19: First Release
2015-09-25: Second Release
The O’Reilly logo is a registered trademark of O’Reilly Media, Inc. The cover image, and related trade dress are trademarks of O’Reilly Media, Inc. While the publisher and the author(s) have used good faith efforts to ensure that the information and instructions contained in this work are accurate, the publisher and the author(s) disclaim all responsibility for errors or omissions, including without limitation responsibility for damages resulting from the use of or reliance on this work. Use of the information and instructions contained in this work is at your own risk. If any code samples or other technology this work contains or describes is subject to open source licenses or the
intellectual property rights of others, it is your responsibility to ensure that your use thereof complies with such licenses and/or rights.
Chapter 1. In The Beginning…
Cloud computing has come a long way.
Introduction
In the “early days” (three years ago), managing a web-scale application meant doing a lot of tooling on your own. You had to manage your own VM images, instance fleets, load balancers, and more. It got complicated fast. Then, orchestration tools like Chef, Puppet, Ansible, and Salt caught up to the problem and things got a little bit easier.
A little later (approximately two years ago) people started to really feel the pain of managing their applications at the VM layer. Even under the best circumstances it takes a brand new virtual machine at least a couple of minutes to spin up, get recognized by a load balancer, and begin handling traffic. That’s a lot faster than ordering and installing new hardware, but not quite as fast as we expect our systems to respond.
Just In Case…
If you have no idea what containers are or how Docker helped make them popular, you should stop reading this paper right now and go here.
So now the problem of VM spin-up times and image versioning has been seriously mitigated. All should be right with the world, right? Wrong. Containers are lightweight and awesome, but they aren’t full VMs. That means that they need a lot of orchestration to run efficiently and resiliently. Their execution needs to be scheduled and managed. When they die (and they do), they need to be seamlessly replaced and re-balanced.
This is a non-trivial problem.
Who I Am
Full disclosure: I work for Google.
Specifically, I am the Director of Global Cloud Support and Services. As you might imagine, I very definitely have a bias towards the things my employer uses and/or invented, and it would be pretty silly for me to pretend otherwise. That said, I used to work at their biggest competitor — AWS — and before that, I wrote a book for O’Reilly on Cloud Computing, so I do have some perspective.
I’ll do my best to write in an evenhanded way, but it’s unlikely I’ll be able to completely stamp out my biases for the sake of perfectly objective prose. I promise to keep the preachy bits to a minimum and keep the text as non-denominational as I can muster.
If you’re so inclined, you can see my full bio here.
Finally, you should know that the words you read are completely my own. This paper does not reflect the views of Google, my family, friends, pets, or anyone I now know or might meet in the future. I speak for myself and nobody else. I own these words.
Who I Think You Are
For you to get the most out of this book, I need you to have accomplished the following basic things:
1. Spun up at least three instances in somebody’s public cloud
infrastructure — it doesn’t matter whose. (Bonus points points if you’ve deployed behind a load balancer.)
2. Have read and digested the basics about Docker and containers.
3. Have created at least one local container — just to play with.
The Problem
Containers are really lightweight. That makes them super flexible and fast. However, they are designed to be short-lived and fragile. I know it seems odd to talk about system components that are designed to not be particularly
resilient, but there’s a good reason for it.
Instead of making each small computing component of a system bullet-proof, you can actually make the whole system a lot more stable by assuming each compute unit is going to fail and designing your overall process to handle it. All the scheduling and orchestration systems gaining mindshare now — Kubernetes or others — are designed first and foremost with this principle in mind. They will kill and re-deploy a container in a cluster if it even thinks about misbehaving!
This is probably the thing people have the hardest time with when they make the jump from VM-backed instances to containers. You just can’t have the same expectation for isolation or resiliency with a container as you do for a full-fledged virtual machine.
The comparison I like to make is between a commercial passenger airplane and the Apollo Lunar Module (LM).
An airplane is meant to fly multiple times a day and ferry hundreds of people long distances. It’s made to withstand big changes in altitude, the failure of at least one of its engines, and seriously violent winds. Discovery Channel
documentaries notwithstanding, it takes a lot to make a properly maintained commercial passenger jet fail.
The LM, on the other hand, was basically made of tin foil and balsa wood. It was optimized for weight and not much else. Little things could (and did during design and construction) easily destroy the thing. That was OK, though. It was meant to operate in a near vacuum and under very specific conditions. It could afford to be lightweight and fragile because it only operated under very orchestrated conditions.
VMs are a lot like commercial passenger jets. They contain full operating systems — including firewalls and other protective systems — and can be super resilient. Containers, on the other hand, are like the LM. They’re optimized for weight and therefore are a lot less forgiving.
In the real world, individual containers fail a lot more than individual virtual machines. To compensate for this, containers have to be run in managed clusters that are heavily scheduled and orchestrated. The environment has to detect a container failure and be prepared to replace it immediately. The environment has to make sure that containers are spread reasonably evenly across physical machines (so as to lessen the effect of a machine failure on the system) and manage overall network and memory resources for the cluster.
Chapter 2. Go Big or Go Home!
If having to manage virtual machines gets cumbersome at scale, it probably won’t come as a surprise to you that it was a problem Google hit pretty early on — nearly ten years ago, in fact. If you’ve ever had to manage more than a few dozen VMs, this will be familiar to you. Now imagine the problems when managing and coordinating millions of VMs.
At that scale, you start to re-think the problem entirely, and that’s exactly what happened. If your plan for scale was to have a staggeringly large fleet of identical things that could be interchanged at a moment’s notice, then did it really matter if any one of them failed? Just mark it as bad, clean it up, and replace it.
Introducing Kubernetes — Scaling through
Scheduling
Pretty early on, engineers working at companies with similar scaling problems started playing around with smaller units of deployment using cgroups and kernel namespaces to create process separation. The net result of these efforts over time became what we commonly refer to as containers. Google necessarily had to create a lot of orchestration and scheduling software to handle isolation, load balancing, and placement. That system is called Borg, and it schedules and launches approximately 7,000 containers a second on any given day.
With the initial release of Docker in March of 2013, Google decided it was finally time to take the most useful (and externalizable) bits of the Borg cluster management system, package them up and publish them via Open Source.
Applications vs. Services
Danger — Religion Ahead!
To begin with, I need to acknowledge that the line between the two concepts can
sometimes get blurry, and people occasionally get religious in the way they argue over it. I’m not trying to pick a fight over philosophy, but it’s important to give a newcomer some frame of reference. If you happen to be a more experienced developer and already have well-formed opinions that differ from mine, please know that I’m not trying to provoke you.
A service is a process that:
1. is designed to do a small number of things (often just one).
2. has no user interface and is invoked solely via some kind of API.
An application, on the other hand, is pretty much the opposite of that. It has a user interface (even if it’s just a command line) and often performs lots of different tasks. It can also expose an API, but that’s just bonus points in my book.
It has become increasingly common for applications to call several services behind the scenes. The web UI you interact with at https://www.google.com
actually calls several services behind the scenes.
Where it starts to go off the rails is when people refer to the web page you open in your browser as a web application. That’s not necessarily wrong so much as it’s just too confusing. Let me try to be more precise.
Your web browser is an application. It has a user interface and does lots of different things. When you tell it to open a web page it connects to a web server. It then asks the web server to do some stuff via the HTTP protocol. The web server has no user interface, only does a limited number of things, and can only be interacted with via an API (HTTP in this example).
This may seem a little too pedantic for this conversation, but it’s actually kind of important. A Kubernetes cluster does not manage a fleet of
applications. It manages a cluster of services. You might run an application (often your web browser) that communicates with these services, but the two concepts should not be confused.
A service running in a container managed by Kubernetes is designed to do a very small number of discrete things. As you design your overall system, you should keep that in mind. I’ve seen a lot of well meaning websites fall over because they made their services do too much. That stems from not keeping this distinction in mind when they designed things.
If your services are small and of limited purpose, then they can more easily be scheduled and re-arranged as your load demands. Otherwise, the
The Master and Its Minions
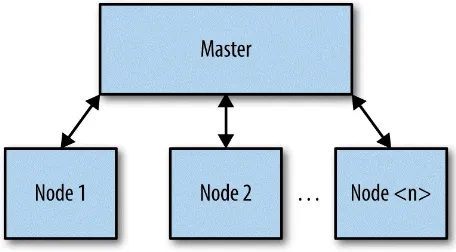
At the end of the day, all cloud infrastructures resolve down to physical machines — lots and lots of machines that sit in lots and lots of data centers scattered all around the world. For the sake of explanation, here’s a simplified (but still useful) view of the basic Kubernetes layout.
Bunches of machines sit networked together in lots of data centers. Each of those machines is hosting one or more Docker containers. Those worker machines are called nodes.
NOTE
Nodes used to be called minions and you will sometimes still see them referred to in this way. I happen to think they should have kept that name because I like whimsical things, but I digress…
Figure 2-1. The Basic Kubernetes Layout
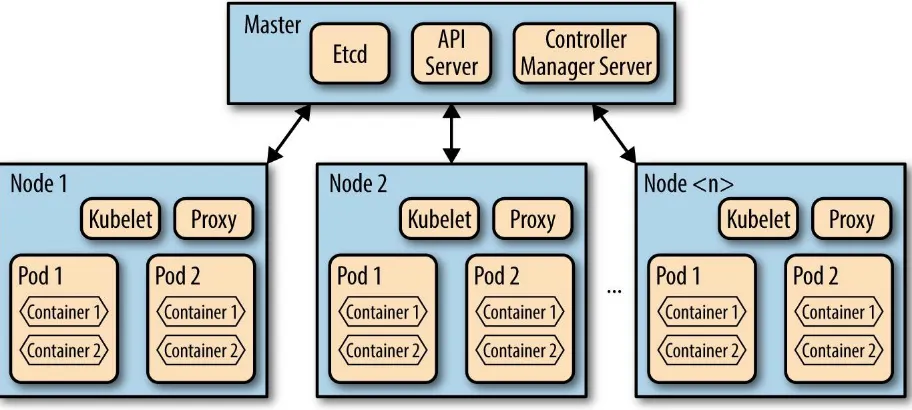
That’s the simple view. Now let me get a little more specific.
Masters and nodes are defined by which software components they run. The Master runs three main items:
1. API Server — nearly all the components on the master and nodes accomplish their respective tasks by making API calls. These are handled by the API Server running on the master.
2. Etcd — Etcd is a service whose job is to keep and replicate the current configuration and run state of the cluster. It is implemented as a
lightweight distributed key-value store and was developed inside the CoreOS project.
3. Scheduler and Controller Manager — These processes schedule containers (actually, pods — but more on them later) onto target nodes. They also make sure that the correct numbers of these things are
running at all times.
1. Kubelet — A special background process (daemon that runs on each node whose job is to respond to commands from the master to create, destroy, and monitor the containers on that host.
2. Proxy — This is a simple network proxy that’s used to separate the IP address of a target container from the name of the service it provides. (I’ll cover this in depth a little later.)
3. cAdvisor (optional) — http://bit.ly/1izYGLi[Container Advisor
(cAdvisor)] is a special daemon that collects, aggregates, processes, and exports information about running containers. This information includes information about resource isolation, historical usage, and key network statistics.
These various parts can be distributed across different machines for scale or all run on the same host for simplicity. The key difference between a master and a node comes down to who’s running which set of processes.
Figure 2-2. The Expanded Kubernetes Layout
If you’ve read ahead in the Kubernetes documentation, you might be tempted to point out that I glossed over some bits — particularly on the master.
later.
At this point in your reading I am assuming you have some basic familiarity with containers and have created a least one simple one with Docker. If that’s
not the case, you should stop here and head over to the main Docker site and run through the basic tutorial.
NOTE
I have taken great care to keep this text “code free.” As a developer, I love program code, but the purpose of this book is to introduce the concepts and structure of Kubernetes. It’s
not meant to be a how-to guide to setting up a cluster.
For a good introduction to the kinds of configuration files used for this, you should look here.
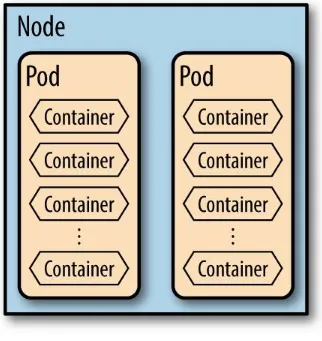
Pods
A pod is a collection of containers and volumes that are bundled and scheduled together because they share a common resource — usually a filesystem or IP address.
Figure 2-3. How Pods Fit in the Picture
This is a very important optimization. Kubernetes schedules and orchestrates things at the pod level, not the container level. That means if you have several containers running in the same pod they have to be managed together. This concept — known as shared fate — is a key underpinning of any clustering system.
At this point you might be thinking that things would be easier if you just ran processes that need to talk to each other in the same container.
You can do it, but I really wouldn’t. It’s a bad idea.
If you do, you undercut a lot of what Kubernetes has to offer. Specifically: 1. Management Transparency — If you are running more than one
process in a container, then you are responsible for monitoring and managing the resources each uses. It is entirely possible that one misbehaved process can starve the others within the container, and it will be up to you to detect and fix that. On the other hand, if you
separate your logical units of work into separate containers, Kubernetes can manage that for you, which will make things easier to debug and fix.
2. Deployment and Maintenance — Individual containers can be rebuilt and redeployed by you whenever you make a software change. That decoupling of deployment dependencies will make your development and testing faster. It also makes it super easy to rollback in case there’s a problem.
3. Focus — If Kubernetes is handling your process and resource management, then your containers can be lighter. You can focus on your code instead of your overhead.
You are responsible for preserving the state of your application.
That’s not as hard as it may seem. It just takes a small adjustment to your planning. Instead of storing your state in memory in some non-durable way, you should think about using a shared data store like Redis, Memcached, Cassandra, etc.
That’s the architecture cloud vendors have been preaching for years to people trying to build super-scalable systems — even with more long-lived things like VMs — so this ought not come as a huge surprise.
There is some discussion in the Kubernetes community about trying to add migration to the system. In that case, the current running state (including memory) would be saved and moved from one node to another when an eviction occurs. Google introduced something similar recently called live migration to its managed VM offering (Google Compute Engine), but at the time of this writing, no such mechanism exists in Kubernetes.
Volumes
Those of you who have played with more than the basics of Docker will already be familiar with Docker volumes. In Docker, a volume is a virtual filesystem that your container can see and use.
An easy example of when to use a volume is if you are running a web server that has to have ready access to some static content. The easy way to do that is to create a volume for the container and pre-populate it with the needed content. That way, every time a new container is started it has access to a local copy of the content.
So far, that seems pretty straightforward.
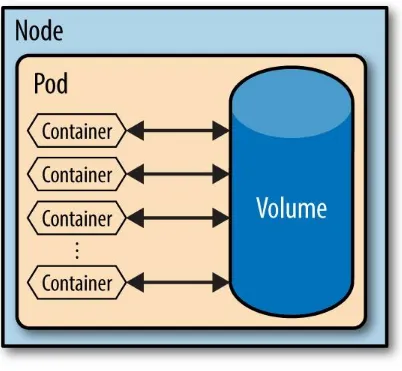
Kubernetes also has volumes, but they behave differently. A Kubernetes volume is defined at the pod level — not the container level. This solves a couple of key problems.
1. Durability — Containers die and are reborn all the time. If a volume is tied to a container, it will also go away when the container dies. If you’ve been using that space to write temporary files, you’re out of luck. If the volume is bound to the pod, on the other hand, then the data will survive the death and rebirth of any container in that pod. That solves one headache.
Figure 2-4. Containers Sharing Storage
Because they share the same generic name — volume — it’s important to always be clear when discussing storage. Instead of saying “I have a volume that has…,” be sure to say something like “I have a container volume,” or “I have a pod volume.” That will make talking to other people (and getting help) a little easier.
EmptyDir
The most commonly used type is EmptyDir.
This type of volume is bound to the pod and is initially always empty when it’s first created. (Hence the name!) Since the volume is bound to the pod, it only exists for the life of the pod. When the pod is evicted, the contents of the volume are lost.
For the life of the pod, every container in the pod can read and write to this volume — which makes sharing temporary data really easy. As you can imagine, however, it’s important to be diligent and store data that needs to live more permanently some other way.
Network File System (NFS)
GCEPersistentDisk (PD)
From Bricks to House
Chapter 3. Organize, Grow, and
Go
Better Living through Labels, Annotations,
and Selectors
Labels
A label is a key/value pair that you assign to a Kubernetes object (a pod in this case). You can use pretty well any name you like for your label, as long as you follow some basic naming rules. In this case, the label will decorate a pod and will be part of the pod.yaml file you might create to define your pods and containers.
Let’s use an easy example to demonstrate. Suppose you wanted to identify a pod as being part of the front-end tier of your application. You might create a label named tier and assign it a value of frontend — like so:
“labels”: {
“tier”: “frontend”
}
The text “tier” is the key, and the text “frontend” is the value.
Keys are a combination of zero or more prefixes followed by a “/” character followed by a name string. The prefix and slash are optional. Two examples:
“application.game.awesome-game/tier”
“tier”
In the first case, “application.game.awesome-game” is the prefix, and “tier” is the name. In the second example there is no prefix.
You have to make sure that your labels conform to the same rules as regular DNS entries — known as DNS Labels.
The prefix part of the key can be one or more DNS Labels separated by “.” characters. The total length of the prefix (including dots) cannot exceed 253 characters.
Um…That Seems a Little “In the Weeds”
Label Selectors
Heads Up!
You will live and die by your label selectors. Pay close attention here!
A label selector is a string that identifies which labels you are trying to match.
There are two kinds of label selectors — equality-based and set-based. An equality-based test is just a “IS/IS NOT” test. For example:
tier = frontend
will return all pods that have a label with the key “tier” and the value
“frontend”. On the other hand, if we wanted to get all the pods that were not
in the frontend tier, we would say:
tier != frontend
You can also combine requirements with commas like so:
tier != frontend, game = super-shooter-2
This would return all pods that were part of the game named “super-shooter-2” but were not in its front end tier.
Set-based tests, on the other hand, are of the “IN/NOT IN” variety. For example:
environment in (production, qa) tier notin (frontend, backend) partition
either “production” or “qa”. The next test returns all the pods not in the front end or back end tiers. Finally, the third test will return all pods that have the “partition” label — no matter what value it contains.
Like equality-based tests, these can also be combined with commas to perform an AND operation like so:
environment in (production, qa), tier notin (frontend, backend), partition
Annotations
Annotations are bits of useful information you might want to store about a pod (or cluster, node, etc.) that you will not have to query against. They are also key/value pairs and have the same rules as labels.
Examples of things you might put there are the pager contact, the build date, or a pointer to more information someplace else — like a URL.
Labels are used to store identifying information about a thing that you might need to query against. Annotations are used to store other arbitrary
information that would be handy to have close but won’t need to be filtered or searched.
It Might Be Boring, but…
I know that labeling and annotating bits of cluster infrastructure is nobody’s idea of a hootenanny. You need to do it, though. Really. Label selectors are the central means of routing and orchestration, so you need to have good labeling hygiene to make things work well.
If you don’t, your requests will probably never get routed correctly to your pods!
Replication Controllers
If you’re building an application that needs to handle a lot of load or have a lot of availability, you clearly are going to want more than one pod running at a time. This is no different than having multiple data centers (back in the days when we all ran our own hardware) or having multiple VMs running behind some kind of load-balancing service. It’s just simple common sense.
Multiple copies of a pod are called replicas. They exist to provide scale and fault-tolerance to your cluster.
The process that manages these replicas is the replication controller. Specifically, the job of the replication controller is to make sure that the correct number of replicas are running at all times. That’s its prime directive. Anything else it may do is to serve that end.
This means that the controller will create or destroy replicas as it needs to in order to maintain that objective.
The Gestalt of a Replication Controller
The whole replication scheme in Kubernetes is designed to be loosely
coupled. What I mean by that is that you don’t actually tell a controller which pods you want it to control. Instead, you define the label selector it will use. Pods that match that query will be managed by the controller.
In addition, if you kill a replication controller it will not delete the replicas it has under management. (For that, you have to explicitly set the controller’s replicas field to 0.)
This design has a number of interesting benefits:
First, if you want to remove a pod from service for debugging — but not delete it — you just need to change its label so that it no longer matches the label selector used by the controller. That will lower the number of replicas managed by the controller by 1, so it will automatically start a new replica to compensate.
Next, you can change the label selector used by the controller to cause it to assume control over an entirely different fleet in real-time.
Nothing Lasts Forever
Replication controllers will die. Count on it. So plan accordingly!
You can usually count on a replication controller to be more long-lived than any one pod (and certainly more than any one container), but you should not think of them as invincible. They aren’t. A well-designed cluster has at least two controllers running at all times so that they can avoid any single points of failure (SPOF).
Scheduling != Scaling
Since replication controllers are concerned only with making sure that the correct numbers of pods are running at any one time, they are great for availability. All your replication controllers and clusters would have to fail (or be unreachable owing to network failure) for your service to be
unavailable. That sounds pretty good, right?
What you may have noticed, however, is that we haven’t talked about how you dynamically size your cluster as your load increases or decreases. With just the components we’ve discussed so far, you will always have a fixed-size cluster. That might be highly available, but it won’t be very cost effective during off-peak hours.
For that, you will need something sitting in front of your cluster that understands your business logic for scaling — usually a load balancer or traffic shaper. The basic idea is that requests coming from your users will hit a front end load balancer and be directed to your cluster. As the traffic
The Best Time to Use a Replication Controller Is…
Always! (Really).
Replication controllers are always a good idea — even for the simplest configurations.
Even if you have a situation where you only need to run one container in one pod, it’s still a good idea to use a replication controller because when that pod unexpectedly dies (and it will from time to time) you want a new one to
automatically take its place. It’s a pretty simple matter to create a controller with a replica count of 1 and then just let it run.
Replication controllers also make zero-downtime rolling updates much easier. Once upon a time, nearly every system went down for at least a few minutes once and a while for “scheduled maintenance.” That’s completely unacceptable now.
We expect our services to be available 24/7/365. Realistically, every service goes down at least a little bit every year so most really rock solid services aim for “five 9s” of uptime — 99.999%. That means a service can only be
unavailable .001% of the time — a mere 5.26 minutes a year. Good luck scheduling your maintenance in that window!
Replication controllers let us do cost-effective rolling updates. We start by bringing up a new controller with 1 updated replica and then removing 1 replica from the old controller. We keep doing this +1/-1 dance until the new controller has the number of replicas we need and the old controller is empty. Then we just delete the old controller.
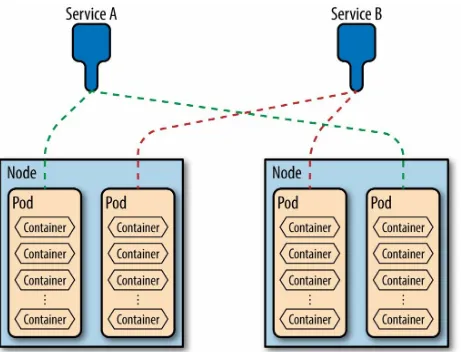
Services
Now you have a bunch of pods running your code in a distributed cluster. You have a couple of replication controllers alive to manage things, so life should be good.
Well…Almost…
The replication controller is only concerned about making sure the right number of replicas is constantly running. Everything else is up to you.
Particularly, it doesn’t care if your public-facing application is easily findable by your users. Since it will evict and create pods as it sees fit, there’s no
guarantee that the IP addresses of your pods will stay constant — in fact, they almost certainly will not.
That’s going to break a lot of things.
For example, if you’re application is multi-tiered, then unplanned IP address changes in your backend may make it impossible for your frontend to
connect. Similarly, a load balancer sitting in front of your frontend tier won’t know where to route new traffic as your pods die and get new IP addresses. The way Kubernetes solves this is through services.
Figure 3-1. Services Hide Orchestration
The service is exposed via a small proxy process. When a request comes in for an endpoint you want to expose, the service proxy decides which pod to route it to via a label selector. Just like with a replication controller, the use of a label selector lets us keep fluid which pods will service which request.
The Life of a Client Request
There are enough moving parts to this diagram that now’s a good time to talk about how they work together. Let’s suppose you have a mobile device that is going to connect to some application API running in your cluster via REST over HTTPS. Here’s how that goes:
1. The client looks up your endpoint via DNS and attempts a connection
2. More likely than not, that endpoint is some kind of frontend load balancer. This load balancer figures out which cluster it wants to route the request to and then sends the request along to the portal IP for the requested service.
3. The proxy service uses a label selector to decide which pods are available to send the request to and then forwards the query on to be serviced.
It’s a pretty straightforward workflow, but its design has some interesting and useful features.
First, there’s no guarantee that the pod that serviced one request will service the next one — even if it’s very close in time or from the same client. The consequence of that is that you have to make sure your pods don’t keep state ephemerally.
Second, there’s no guarantee that the pod that serviced the request will even exist when the next request comes in. It’s entirely possible that it will be evicted for some reason and replaced by the replication controller. That’s completely invisible to your user because when that change happens the evicted pod will no longer match the service label selector and the new one will.
minutes.
Lastly, you can tinker with which pods service which requests just by playing with the label selector or changing labels on individual pods. If you’re
wondering why you’d want to do that, imagine trying to A/B test a new version of your web service in real-time using simple DNS.
You also might be wondering how a service proxy decides which pod is
going to service the request if more than one matches the label selector. As of this writing, the answer is that it uses simple round-robin routing. There are efforts in progress in the community to have pods expose other run-state information to the service proxy and for the proxy to use that information to make business-based routing decisions, but that’s still a little ways off. Of course, these advantages don’t just benefit your end clients. Your pods will benefit as well. Suppose you have a frontend pod that needs to connect to a backend pod. Knowing that the IP address of your backend pod can change pretty much anytime, it’s a good idea to have your backend expose itself as a service to which only your frontend can connect.
The analogy is having frontend VMs connect to backend VMs via DNS instead of fixed IPs.
A Few of the Finer Points about Integration with Legacy
Stuff
Everything you just read is always true if you use the defaults. Like most systems, however, Kubernetes lets you tweak things for your specific edge cases. The most common of these edge cases is when you need your cluster to talk to some legacy backend like an older production database.
To do that, we have to talk a little bit about how different services find one another — from static IP address maps all the way to fully clustered DNS.
Selector-less Services
It is possible to have services that do not use label selectors. When you define your service you can just give it a set of static IPs for the backend processes you want it to represent. Of course, that removes one of the key advantages of using services in the first place, so you’re probably wondering why you would ever do such a thing.
Sometimes you will have non-Kubernetes backend things you need your pods to know about and connect to. Perhaps you will need your pods to connect to some legacy backend database that is running in some other infrastructure. In that case you have a choice. You could:
1. Put the IP address (or DNS name) of the legacy backend in each pod, or
2. Create a service that doesn’t route to a Kubernetes pod, but to your other legacy service.
Far and away, (2) is your better choice.
1. It fits seamlessly into your regular architecture — which makes change management easier. If the IP address of the legacy backend changes, you don’t have to re-deploy pods. You just change the service
configuration.
In certain high-availability (HA) situations, you might need to do this as a fallback until you get things working correctly with your primary backend tier.
3. DNS is slow (minutes), so relying on it will seriously degrade your responsiveness. Lots of software caches DNS entries, so the problem gets even worse.
Service Discovery with Environment Variables
When a pod wants to consume another service, it needs a way to do a lookup and figure out how to connect.
Kubernetes provides two such mechanisms — environment variable and DNS.
When a pod exposes a service on a node, Kubernetes creates a set of
environment variables on that node to describe the new service. That way, other pods on the same node can consume it easily.
As you can imagine, managing discovery via environment variables is not super scalable, so Kubernetes gives us a second way to do it: Cluster DNS.
Cluster DNS
In a perfect world, there would be a resilient service that could let any pod discover all the services in the cluster. That way, different tiers could talk to each other without having to worry about IP addresses and other fragile schemes.
That’s where cluster DNS comes in.
You can configure your cluster to schedule a pod and service that expose DNS. When new pods are created, they are told about this service and will use it for lookups — which is pretty handy.
These DNS pods contains three special containers:
1. Etcd — Which will store all the actual lookup information
3. Kube2sky — A Kubernetes-specific program that watches the master for any changes to the list of services and then publishes the
information into etcd. SkyDns will then pick it up.
Exposing Your Services to the World
OK!
Now your services can find each other. At some point, however, you will probably want to expose some of the services in your cluster to the rest of the world. For this, you have three basic choices: Direct Access, DIY Load
Balancing, and Managed Hosting.
Option #1: Direct Access
The simplest thing for you to do is to configure your firewall to pass traffic from the outside world to the portal IP of your service. The proxy on that node will then pick which container should service the request.
The problem, of course, is that this strategy is not particularly fault tolerant. You are limited to just one pod to service the request.
Option #2: DIY Load Balancing
The next thing you might try is to put a load balancer in front of your cluster and populate it with the portal IPs of your service. That way, you can have multiple pods available to service requests. A common way to do this is to just setup instances of the super popular HAProxy software to handle this. That’s better, to be sure, but there’s still a fair amount of configuration and maintenance you will need to do — especially if you want to dynamically size your load balancer fleet under load.
A really good getting-started tutorial on doing this with HAProxy can be found here. If you’re planning on deploying Kubernetes on bare metal (as opposed to in a public cloud) and want to roll your own load balancing, then I would definitely read that doc.
Option #3: Managed Hosting
When you do this, the cloud provider will automatically add the portal IPs for your service to a fleet of load balancers that it creates on your behalf. The mechanics of this will vary from provider to provider.
Health Checking
Do you write perfect code? Yeah. Me neither.
One of the great things about Kubernetes is that it will evict degraded pods and replace them so that it can make sure you always have a system
Low-Level Process Checking
You get this for free in Kubernetes. The Kubelet running on each node will talk to the Docker runtime to make sure that the containers in your pods are responding. If they aren’t, they will be killed and replaced.
Automatic Application Level Checking
The next level of sophistication we can employ to test the health of our deployment is automatic health checking. Kubernetes supports some simple probes that it will run on your behalf to determine the health of your pods. When you configure the Kubelet for your nodes, you can ask it to perform one of three types of health checks.
TCP Socket
For this check you tell the Kubelet which TCP port you want to probe and how long it should take to connect. If the Kubelet cannot open a socket to that port on your pod in the allotted time period, it will restart the pod.
HTTP GET
If your pod is serving HTTP traffic, a simple health check you can configure is to ask the Kubelet to periodically attempt an HTTP GET from a specific URL. For the pod to register as healthy, that URL fetch must:
1. Return a status code between 200 and 399
2. Return before the timeout interval expires Container Exec
Finally, your pod might not already be serving HTTP, and perhaps a simple socket probe is not enough. In that case, you can configure the Kubelet to periodically launch a command line inside the containers in your pod. If that command exits with a status code of 0 (the normal “OK” code for a Unix process) then the pod will be marked as healthy.
Configuring Automatic Health Checks
The following is a snippet from a pod configuration that enables a simple HTTP health check. The Kubelet will periodically probe the URL
livenessProbe:
# turn on application health checking
enabled: true
type: http
# length of time to wait for a pod to initialize
# after pod startup, before applying health checking
initialDelaySeconds: 30
# an http probe
httpGet:
path: /_status/healthz
port: 8080
Health check configuration is set in the livenessProbe section.
Manual Application Level Checking
As your business logic grows in scope, so will the complexity of what you might consider “healthy” or “unhealthy.” It won’t be long before you won’t be able to simply use the automatic health checks to maintain availability and performance.
For that, you’re going to want to implement some business rule driven manual health checks.
The basic idea is this:
1. You run a special pod in your cluster designed to probe your other pods and take the results they give you and decide if they’re operating
correctly.
2. If a pod looks unhealthy, you change one of its labels so that it no longer matches the label selector the replication controller is testing against.
3. The controller will detect that the number of required pods is less than the value it requires and will start a replacement pod.
4. Your health check code can then decide whether or not it wants to delete the malfunctioning pod or simply keep it out of service for further debugging.
Moving On
Chapter 4. Here, There, and
Everywhere
So here we are, 30 pages or so later, and you now have a solid understanding of what Kubernetes is and how it works. By this point in your reading I hope you’ve started to form an opinion about whether or not Kubernetes is a
technology that makes sense to you right now.
In my opinion, it’s clearly the direction the world is heading, but you might think it’s a little too bleeding edge to invest in right this second. That is only the first of two important decisions you have to make.
Once you’ve decided to keep going, the next question you have to answer is this: do I roll my own or use someone’s managed offering?
You have three basic choices:
1. Use physical servers you own (or will buy/rent) and install Kubernetes from scratch. Let’s call this option the bare metal option. You can take this route if you have these servers in your office or you rent them in a CoLo. It doesn’t matter. The key thing is that you will be dealing with physical machines.
2. Use virtual machines from a public cloud provider and install
Kubernetes on them from scratch. This has the obvious advantage of not needing to buy physical hardware, but is very different than the bare metal option, because there are important changes to your configuration and operation. Let’s call this the virtual metal option.
Starting Small with Your Local Machine
Linux
If you’re running Linux locally — or in a VM you can easily access — then it’s pretty easy to get started.
1. Install Docker and make sure it’s in your path. If you already have Docker installed, then make sure it’s at least version 1.3 by running the docker --version command.
2. Install etcd, and make sure it’s in your path.
3. Make sure go is installed and also in your path. Check to make sure your version is also at least 1.3 by running go version.
Windows/Mac
If you’re on Windows or a Mac, on the other hand, the process is a little (but not much) more complicated. There are a few different ways to do it, but the one I’m going to recommend is to use a tool called Vagrant.
Vagrant is an application that automatically sets up and manages self-contained runtime environments. It was created so that different software developers could be certain that each of them was running an identical configuration on their local machines.
Bare Metal
After you’ve experimented a little and have gotten the feel for installing and configuring Kubernetes on your local machine, you might get the itch to deploy a more realistic configuration on some spare servers you have lying around. (Who among us doesn’t have a few servers sitting in a closet
someplace?)
This setup — a fully bare metal setup — is definitely the most difficult path you can choose, but it does have the advantage of keeping absolutely
everything under your control.
The first question you should ask yourself is do you prefer one Linux distribution over another? Some people are really familiar with Fedora or RHEL, while others are more in the Ubuntu or Debian camps. You don’t need to have a preference — but some people do.
Here are my recommendations for soup-to-nuts getting-started guides for some of the more popular distributions:
1. Fedora, RHEL — There are many such tutorials, but I think the easiest one is here. If you’re looking for something that goes into some of the grittier details, then this might be more to your liking.
2. Ubuntu — Another popular choice. I prefer this guide, but a quick Google search shows many others.
3. CentOS — I’ve used this guide and found it to be very helpful.
Virtual Metal (IaaS on a Public Cloud)
So maybe you don’t have a bunch of spare servers lying around in a closet like I do — or maybe you just don’t want to have to worry about cabling, power, cooling, etc. In that case, it’s a pretty straightforward exercise to build your own Kubernetes cluster from scratch using VMs you spin up on one of the major public clouds.
NOTE
This is a different process than installing on bare metal because your choice of network layout and configuration is governed by your choice of provider. Whichever bare metal guides you may have read in the previous section will only be mostly helpful in a public cloud.
Here are some quick resources to get you started.
1. AWS — The easiest way is to use this guide, though it also points you to some other resources if you’re looking for a little more configuration control.
2. Azure — Are you a fan of Microsoft Azure? Then this is the guide for you.
3. Google Cloud Platform (GCP) — I’ll bet it won’t surprise you to find out that far and away the most documented way to run Kubernetes in the virtual metal configuration is for GCP. I found hundreds of pages of tips and setup scripts and guides, but the easiest one to start with is this guide.
Other Configurations
The previous two sections are by no means an exhaustive list of
configuration options or getting-started guides. If you’re interested in other possible configurations, then I recommend two things:
1. Start with this list. It’s continuously maintained at the main Kubernetes Github site and contains lots of really useful pointers.
Fully Managed
By far, your easiest path into the world of clusters and global scaling will be to use a fully managed service provided by one of the large public cloud providers (AWS, Google, and Microsoft). Strictly speaking, however, only one of them is actually Kubernetes.
Let me explain.
Amazon recently announced a brand new managed offering named Elastic Container Service (ECS). It’s designed to manage Docker containers and shares many of the same organizing principles as Kubernetes. It does not, however, appear to actually use Kubernetes under the hood. AWS doesn’t say what the underlying technology is, but there are enough configuration and deployment differences that it appears they have rolled their own solution. (If you know differently, please feel free to email me and I’ll update this text accordingly.)
A Word about Multi-Cloud Deployments
What if you could create a service that seamlessly spanned your bare metal and several public cloud infrastructures? I think we can agree that would be pretty handy. It certainly would make it hard for your service to go offline under any circumstances short of a large meteor strike or nuclear war. Unfortunately, that’s still a little bit of a fairy tale in the clustering world. People are thinking hard about the problem, and a few are even taking some tentative steps to create the frameworks necessary to achieve it.
Getting Started with Some Examples
The main Kubernetes GitHub page keeps a running list of example
deployments you can try. Two of the more popular ones are the WordPress and Guestbook examples.
The WordPress example will walk you through how to set up the popular WordPress publishing platform with a MySQL backend whose data will survive the loss of a container or a system reboot. It assumes you are
deploying on GKE, though you can pretty easily adapt the example to run on bare/virtual metal.
Where to Go for More
There are a number of good places you can go on the Web to continue your learning about Kubernetes.
The main Kubernetes homepage is here and has all the official documentation.
The project GitHub page is here and contains all the source code plus a wealth of other configuration and design documentation.
If you’ve decided that you want to use the GKE-managed offering, then you’ll want to head over here.
When I have thorny questions about a cluster I’m building, I often head to Stack Overflow and grab all the Kubernetes discussion here.
You can also learn a lot by reading bug reports at the official Kubernetes issues tracker.
Finally, if you want to contribute to the Kubernetes project, you will want to start here.
These are exciting days for cloud computing. Some of the key technologies that we will all be using to build and deploy our future applications and services are being created and tested right around us. For those of us old enough to remember it, this feels a lot like the early days of personal
About the Author
Acknowledgments
Everytime I finish a book I solemnly swear on a stack of bibles that I’ll never do it again. Writing is hard.
I know. This isn’t Hemingway, but a blank page is a blank page, and it will torture you equally whether you’re writing a poem, a polemic, or a program. Helping you through all your self-imposed (and mostly ridiculous) angst is an editor — equal parts psychiatrist, tactician, and task master.
I’d like to thank Brian Anderson for both convincing me to do this and for being a fine editor. He cajoled when he had to, reassured when he needed to, and provided constant and solid advice on both clarity and composition. My employer — Google — encourages us to write and to generally
contribute knowledge to the world. I’ve worked at other places where that was not true, and I really appreciate the difference that makes.
In addition, I’d like to thank my colleagues Henry Robertson and Daz Wilkins for providing valuable advice on this text as I was writing it.
I’d very much like to hear your opinions about this work — good or bad — so please feel free to contribute them liberally via O’Reilly or to me directly at [email protected].
1. In The Beginning…
Introducing Kubernetes — Scaling through Scheduling
Applications vs. Services
Better Living through Labels, Annotations, and Selectors Labels
Label Selectors
Annotations
Replication Controllers
Scheduling != Scaling
The Best Time to Use a Replication Controller Is…
Services
The Life of a Client Request
A Few of the Finer Points about Integration with Legacy Stuff
Exposing Your Services to the World
Health Checking
Starting Small with Your Local Machine Linux
Windows/Mac
Bare Metal
Virtual Metal (IaaS on a Public Cloud)
Other Configurations
Fully Managed
A Word about Multi-Cloud Deployments