Beginning Oracle
Application
Express 5
Your ticket to easy and robust
web-application development using
Oracle’s powerful toolset for
power-users, programmers, and
database administrators
—
Doug Gault
•
• Provides fully documented and explained example code
Beginning Oracle
Application Express 5
Copyright © 2015 by Doug Gault
This work is subject to copyright. All rights are reserved by the Publisher, whether the whole or part of the material is concerned, specifically the rights of translation, reprinting, reuse of illustrations, recitation, broadcasting, reproduction on microfilms or in any other physical way, and transmission or information storage and retrieval, electronic adaptation, computer software, or by similar or dissimilar methodology now known or hereafter developed. Exempted from this legal reservation are brief excerpts in connection with reviews or scholarly analysis or material supplied specifically for the purpose of being entered and executed on a computer system, for exclusive use by the purchaser of the work. Duplication of this publication or parts thereof is permitted only under the provisions of the Copyright Law of the Publisher’s location, in its current version, and permission for use must always be obtained from Springer. Permissions for use may be obtained through RightsLink at the Copyright Clearance Center. Violations are liable to prosecution under the respective Copyright Law.
ISBN-13 (pbk): 978-1-4842-0467-2
ISBN-13 (electronic): 978-1-4842-0466-5
Trademarked names, logos, and images may appear in this book. Rather than use a trademark symbol with every occurrence of a trademarked name, logo, or image we use the names, logos, and images only in an editorial fashion and to the benefit of the trademark owner, with no intention of infringement of the trademark.
The use in this publication of trade names, trademarks, service marks, and similar terms, even if they are not identified as such, is not to be taken as an expression of opinion as to whether or not they are subject to proprietary rights.
While the advice and information in this book are believed to be true and accurate at the date of publication, neither the authors nor the editors nor the publisher can accept any legal responsibility for any errors or omissions that may be made. The publisher makes no warranty, express or implied, with respect to the material contained herein.
Managing Director: Welmoed Spahr Lead Editor: Jonathan Gennick Technical Reviewer: Warren Capps
Editorial Board: Steve Anglin, Louise Corrigan, Jonathan Gennick, Robert Hutchinson, Michelle Lowman, James Markham, Matthew Moodie, Jeffrey Pepper, Douglas Pundick, Ben Renow-Clarke, Gwenan Spearing
Distributed to the book trade worldwide by Springer Science+Business Media New York,
233 Spring Street, 6th Floor, New York, NY 10013. Phone 1-800-SPRINGER, fax (201) 348-4505, email
[email protected], or visit www.springeronline.com. Apress Media, LLC is a California LLC and the sole member (owner) is Springer Science + Business Media Finance Inc (SSBM Finance Inc). SSBM Finance Inc is a Delaware corporation.
For information on translations, please e-mail [email protected], or visit www.apress.com.
Apress and friends of ED books may be purchased in bulk for academic, corporate, or promotional use. eBook versions and licenses are also available for most titles. For more information, reference our Special Bulk Sales–eBook Licensing web page at www.apress.com/bulk-sales.
To those in search of knowledge and better understanding,
I dedicate this effort. Hopefully, as your skills grow,
you too will continue to share the wealth.
Contents at a Glance
About the Authors ...
xix
About the Technical Reviewer ...
xxi
Acknowledgments ...
xxiii
■
Chapter 1: An Introduction to APEX 5.0 ...
1
■
Chapter 2: A Developer’s Overview ...
7
■
Chapter 3: Identifying the Problem and Designing the Solution ...
37
■
Chapter 4: SQL Workshop ...
45
■
Chapter 5: Applications and Navigation ...
67
■
Chapter 6: Forms and Reports: The Basics ...
107
■
Chapter 7: Forms and Reports: Advanced ...
167
■
Chapter 8: Programmatic Elements ...
231
■
Chapter 9: Security ...
259
■
Chapter 10: Application Bundling and Deployment ...
287
■
Chapter 11: Understanding Websheets ...
309
■
Chapter 12: A Websheet Example ...
339
■
Chapter 13: Extended Developer Tools ...
359
■
Chapter 15: Team Development ...
401
■
Chapter 16: Dynamic Actions ...
431
■
Appendix A: Page Designer Walkthrough and Reference ...
449
Contents
About the Author ...
xix
About the Technical Reviewer ...
xxi
Acknowledgments ...
xxiii
■
Chapter 1: An Introduction to APEX 5.0 ...
1
What Is APEX? ...
1
A Brief History of APEX ...
2
Ancient History ...
2
More Recent History ...
2
APEX 5.0 and the Future ...
3
What You Need to Get Started ...
4
Access to an APEX Instance ...
5
Web Browser ...
5
SQL Developer ...
5
Summary ...
6
■
Chapter 2: A Developer’s Overview ...
7
The Anatomy of a Workspace ...
7
APEX Users ...
8
Applications, Pages, Regions, and Items ...
9
Workspaces, Applications, and Schemas ...
10
A Final Word on Workspaces ...
12
A Tour of the APEX Modules ...
12
The Home Page ...
13
SQL Workshop ...
19
Packaged Apps ...
32
Administration and Team Development ...
35
Summary ...
36
■
Chapter 3: Identifying the Problem and Designing the Solution ...
37
Identifying System Requirements ...
37
Never a Clean Slate ...
37
A Broken System ...
38
How Do You Fix Things? ...
38
System Design with APEX in Mind ...
40
Table Definition and User-Interface Defaults ...
40
APEX and Primary Keys ...
41
Business Logic vs. User-Interface Logic ...
41
Placement of Database Objects ...
42
Translating Theory to Practice ...
42
Summary ...
43
■
Chapter 4: SQL Workshop ...
45
Creating Objects with the Object Browser ...
. 45
Loading Data with the Data Workshop Utility ...
52
Creating a Lookup Table ...
57
Loading and Running SQL Scripts ...
60
User Interface Defaults ...
64
Understanding User Interface Defaults ...
64
Defining UI Defaults for Tables ...
64
Summary ...
66
■
Chapter 5: Applications and Navigation ...
67
The Create Application Wizard ...
67
Sample and Packaged Applications ...
68
■ CONTENTS
■
Chapter 6: Forms and Reports: The Basics ...
107
APEX Forms ...
107
Form on a Table ...
109
Creating a Form on a Table ...
109
Modifying a Form on a Table ...
115
Looking Behind the Scenes ...
120
Form on a Procedure ...
122
Creating a Form on a Procedure ...
122
Modifying a Form on a Procedure ...
125
Looking Behind the Scenes ...
126
Master–Detail Report and Form ...
127
Creating a Master–Detail Report and Form ...
127
Modifying a Master-Detail Report ...
132
Session State ...
137
Understanding Session State ...
137
Setting and Retrieving Session State ...
139
Viewing Session State ...
140
APEX Items ...
141
Page vs. Application Items...
142
The Importance of Bind Variables ...
142
Built-In Items ...
143
APEX URL Syntax ...
143
Searchable APEX Reports ...
145
Creating a Searchable APEX Report...
145
Adding Reset Pagination...
147
Looking Behind the Scenes—APEX Report ...
148
Looking Behind the Scenes—APEX Master–Detail Forms ...
150
More on APEX Forms ...
152
Item Layout ...
152
Placing Multiple Items in the Same Row ...
154
Implementing LOVs ...
156
Master–Detail Cleanup ...
159
APEX Help ...
160
Adding a Help Text Region ...
161
Seeding Help Text ...
162
Declarative BLOBs ...
163
Summary ...
166
■
Chapter 7: Forms and Reports: Advanced ...
167
■ CONTENTS
Restricting Functionality by Report ...
182
Restricting Functionality by Column ...
184
Using the Column Heading Menu ...
184
Searching by Column ...
185
Adding Charts to Interactive Reports ...
194
Filtering Data for a Chart ...
226
Looking Behind the Scenes ...
229
Summary ...
229
■
Chapter 8: Programmatic Elements ...
231
Conditions ...
231
Processes in the Help Desk Application ...
248
■ CONTENTS
Read-Only Items ...
279
Data Security ...
281
Session-State Protection ...
284
Summary ...
285
■
Chapter 10: Application Bundling and Deployment ...
287
Identifying Application Components ...
287
■
Chapter 11: Understanding Websheets ...
309
User Authentication ...
316
■
Chapter 12: A Websheet Example ...
339
Setup ...
339
Creating and Configuring a Websheet Application ...
340
Adding Content to a Websheet ...
345
Creating Data Grids ...
345
■
Chapter 13: Extended Developer Tools ...
359
Page Locks ...
359
APEX Conflicts ...
360
Locking an APEX Page ...
360
Unlocking a Page ...
361
■ CONTENTS
Application and Page Groups ...
362
Application Groups ...
362
Page Groups ...
364
APEX Views and the APEX Dictionary ...
364
The APEX Schema ...
365
Prompting for Build Option Status ...
377
Applying Build Options...
378
Reporting on Build Option Utilization ...
379
Page-Specific Utilities ...
379
APEX and Oracle SQL Developer ...
380
Integration ...
380
Refactoring Support...
381
■
Chapter 14: Managing Workspaces ...
383
Developer Activity and Click Count Logs ...
388
Session State ...
389
Viewing Usage Reports and Dashboards ...
399
Summary ...
399
■
Chapter 15: Team Development ...
401
■ CONTENTS
User Roles for Team Development ...
429
■
Chapter 16: Dynamic Actions ...
431
Dynamic Action Benefits ...
431
Breaking Down Dynamic Actions ...
431
Dynamic Actions in the Help Desk Application ...
432
Starting Simple ...
432
Using Page-Level Events ...
439
Dynamic Actions with Multiple Triggering Elements ...
441
Dynamic Actions Using PL/SQL ...
443
Dynamic Actions Using JavaScript ...
445
Summary ...
447
■
Appendix A: Page Designer Walkthrough and Reference ...
449
About the Author
Doug Gault is a Consulting Member of Technical Staff at Oracle Corporation and has been working with Oracle since 1988, starting with version 5.1B, SQL*Forms 2.0, and RPT/RPF. He has focused his career on Oracle’s development technologies, spending the majority of that time dedicated to web-based technologies, including the OWA Web Toolkit, PL/SQL Server Pages, WebDB, Oracle Portal, and more recently HTML-DB and APEX.
His many years of Oracle experience have taken him all over the world to participate in some truly groundbreaking projects. Doug has presented and participated in roundtable discussions at a number of conferences, including Oracle OpenWorld, UKOUG, and ODTUG’s APEXposed & Kaleidoscope conferences. He holds an Associate’s Degree in Computer Science and an honorary Master’s Degree from The School of Hard Knocks, believing there is no replacement for hard-earned experience.
Doug can be found on Twitter as @dgault_apex and on his blog at
About the Technical Reviewer
Warren Capps, president of Illuminations Inc, has worked with Oracle since 1987 when he worked on version 5.1a. Since 1991, his principal efforts have been spent in training clients in the use of Oracle products, concentrating on database server technologies. He is a well-known presenter at user-group conferences and has written numerous articles and book reviews for a variety of publications. He also ran an Oracle bookstore for ten years and is a retired Navy Commander.
Acknowledgments
First, my heart-felt thanks to all the co-authors of the original version of this book: Karen Cannell, Patrick Cimolini, Martin D’Souza, and Tim St. Hilaire. Warren Capps also needs to be thanked for his technical review efforts and his input on content and form. If not for these wonderful people, this book may never have come to be. The opportunity to work with such a talented and distinguished group of individuals has been a pleasure.
I’d also like to thank a few people who have been driving forces in my life: Kerry Osborne for providing me with an immense amount of mentorship and encouragement over the years, even after having left his employ; Cary Millsap for his friendship and helping to solidify in my mind how to think objectively about technology and to use proof to find the truth; and last but not least, Scott Spendolini for his all-around support before, during, and after the book. Without these people, I wouldn’t be where I am today.
An Introduction to APEX 5.0
Welcome to the wonderful world of Oracle Application Express (APEX). You’re about to learn how to use a tool that will revolutionize the way you think about and approach writing web-based Oracle systems. It certainly has done so for me.
Prior to the advent of APEX, developing fully interactive, web-based systems for data that resided within an Oracle database almost always meant learning a new and often complex language like Java, .NET, or PHP and then figuring out how to integrate your chosen language seamlessly with that data. Often this also meant trying to incorporate business rules that were already coded in the form of PL/SQL program units.
In such situations, it could take months or even years just to become proficient enough with your chosen language to begin to write a functional system. If you’re like many developers, you become frustrated with the fact that you’ve spent an inordinate amount of time doing what seems to be a relatively easy task.
Fear not! The days of long-winded and complex web-development platforms may be behind you.
What Is APEX?
APEX is a 100% browser-based rapid application development (RAD) tool that helps you to create rich, interactive, Oracle-based web applications very quickly and with relatively little programming effort.
There are many RAD development tools and platforms on the market. If you’re dealing with data that resides in an Oracle database, a number of things make APEX distinctive and thus more attractive as a development platform. First and foremost, APEX is built on and uses as its core languages SQL and PL/SQL. This is a huge advantage for those of you who have already been working with the Oracle database, because it means you can immediately draw on what you know. Even if you don’t have an Oracle background, but are going to be working with an Oracle database, you need to learn about its particular flavor of SQL and will at some point likely find a need for the PL/SQL procedural language.
PL/SQL program units become even more beneficial when migrating from an Oracle-based system that already has a significant amount of business logic coded into stored PL/SQL program units. In this instance, you can almost immediately take advantage of that logic with very little effort or changes to the existing code.
Another great advantage is that APEX is a declarative tool that provides a feature-rich core of
functionality designed to make your job easier. Because APEX takes care of many of the underlying functions common to all web-based applications, you can focus on the logic specific to your application.
CHAPTER 1 ■ AN INTRODUCTION TO APEX 5.0
During the course of this book, you’ll likely discover that you want a few other tools at your disposal, but, in truth, you could easily develop a very rich application using nothing but your web browser and what APEX provides for you.
A Brief History of APEX
APEX has been around for quite some time—perhaps even longer than most people know. The first public release of APEX, or HTML DB, as it was called then, came in 2004, but its history reaches back a long way.
Ancient History
APEX has its roots in technology that has been around for quite a while. In fact, parts of the PL/SQL Web Toolkit, which is used under the covers by APEX to generate the HTML that is sent to the browser, date back to as early as 1994.
At that point in time, you could actually write web applications in PL/SQL by hand, and unfortunately many of us did. This required not only a thorough knowledge of PL/SQL and HTML, but also the patience of a saint and the determination of a headstrong mule. The end result wasn’t very pretty, and it was definitely not secure by today’s terms, but it was functional, if somewhat limited.
Not long after, Oracle introduced PL/SQL Server Pages (PSPs). This involved first coding the static HTML and including special Oracle markup to indicate where dynamic data would go. Once you had the output looking as you wanted, you then ran it through a program called LOADPSP. This would translate the raw HTML and the special Oracle markup into a PL/SQL procedure that, again, used the PL/SQL Web Toolkit to emit the HTML, including the dynamic data you requested. At the time, this was a huge leap forward. I worked at a company where I built an entire framework using PSP technology and deployed it at several clients.
Finally, in 1997, WebDB came on the scene. The true grandfather of what is now called APEX, WebDB was revolutionary in that it was a 100% web-based tool that allowed developers to design web applications. It was written entirely in PL/SQL, even though Java seemed to be taking over the world. Developers could point WebDB at their database and generate code that would produce forms, reports, charts, and calendars. There was no session-state management, and there were no templates; once the code was generated, you couldn’t go back through the tool.
WebDB allowed a large number of companies that wanted to jump on the web-based bandwagon to do so without spending vast amounts of time and effort retraining their staff. As a tribute to its success, I know of a number of companies that still have WebDB systems running in production environments.
Unfortunately, WebDB’s days were numbered. Because it generated code (and if you didn’t like the code it generated, then too bad for you), it had already begun to fade from favor by the time it was absorbed into Oracle’s Portal product. However, creator Mike Hichwa didn’t forget the glimpse of greatness that WebDB had seen.
More Recent History
Based on the success of the internal calendaring and scheduling system, the team was allowed to move forward toward making Oracle Flows a product. In 2001, using what was then known as Flow Builder, Mike and his team began implementing systems for various customers, including one situation where they managed to replace a Java development project that was going horribly wrong.
By 2003, the team had proven the tool’s power, and they were given permission to release it as a product. HTML DB 1.5 was released to the public as a no-cost option of Oracle 10gR1.
Since then, various releases have been introduced, each providing improved features and functionality. The following is a very brief list of the releases and some of the more notable features:
• HTML DB 1.6 (2004) introduced themes, master-detail forms, page groups, page
locking, and some multilingual capabilities.
• HTML DB 2.0 (2005) introduced SQL Workshop, a graphical query builder, a
database object browser, and session-state protection.
• APEX 2.2 (2006) introduced packaged applications, the APEX dictionary views, and
the access control wizard.
• APEX 3.0 (2007) introduced PDF printing with BI Publisher, migration from
Microsoft Access, and page and region caching.
• APEX 3.1 (2008) introduced interactive reports, the runtime-only installation
capability, and improved security.
• APEX 3.2 (2009) introduced a migration helper for Oracle Forms–based systems and
various security enhancements.
• APEX 4.0 (2010) was a huge leap forward, introducing dynamic actions and
plug-ins—declarative ways to introduce server-side logic and extend the core APEX environment, respectively. Also introduced was the new Team Development module.
• APEX 4.1 (2011) included a new user-facing data-uploading feature, enhanced
error-handling capabilities, and much-improved support for tabular forms.
• APEX 4.2 (2012) originally introduced some new themes as well as enhancements
to the debugging API, but over its more than two-year life span, patch releases introduced such changes as HTML 5 charting and deeper security enhancements.
APEX 5.0 and the Future
And so we arrive at the release of APEX 5.0. While the changes introduced with versions 4.0 through 4.2 undoubtedly changed the landscape of APEX development, the changes introduced in version 5.0 have brought APEX to a point where it can rightly be compared with many of the popular desktop-based development environments.
The original focus of APEX 5.0 was to make development of rich, interactive web applications easier by providing the developer with a vastly enhanced development environment. However, the development team has introduced so many new features—indeed, new ways to attack problems—that it will be hard not to choose APEX as the preferred development platform for Oracle-based applications.
CHAPTER 1 ■ AN INTRODUCTION TO APEX 5.0
allows developers to edit the attributes of several items at once. The only downside to the new Page Designer is that you may find yourself wanting a bit more screen real estate due to the nature of its layout. However, with widescreen monitors becoming ubiquitous, this shouldn’t be an issue for most.
Apart from the new Page Designer IDE, one of the most exciting new features of APEX 5.0 is the Universal Theme. This new application user interface does away with the need for the complex templates from days gone by and enables developers to build more modern, responsive, and consistent applications without needing to know the intricate details of HTML, CSS, or APEX template design.
The new Universal Themes (Desktop theme 42 and Mobile theme 51) allow you to adjust a number of attributes with what is called a Theme Style—a Cascading Style Sheet (CSS) that is added to the base CSS. This can be done via the new Theme Roller tool, allowing you to visually alter a theme. The Universal Themes also allow you to easily customize how items on the page are displayed by using Template Options.
After having been in the cards for quite some time, the Flexible Workspace Authentication has finally been implemented by the APEX team; this allows APEX administrators to define how APEX itself will authenticate developers. Much like APEX applications, workspaces may now be authenticated against Single Sign-On servers, LDAP, and so forth.
Interactive Reports are no longer limited to being one-per-page, freeing you from the restriction that had plagued them since their inception. Interactive Reports also get a few new features. A Pivot View has been added that allows end users to select the column(s) and provide the function(s) by which to pivot the report. This was functionality previously available only by either a lot of hand coding or by creating or using plug-ins. When using the new Universal Theme, Report column headers can now be defined so that they remain fixed in position while the user scrolls down the page.
Native support for Dialog page types has been introduced, thus allowing any page to be displayed either normally or as a pop-up dialog. Pages can be defined as either “Modal” or “Non-Modal.” Modal pages do not allow the end user to interact with the underlying page, whereas Non-Modal pages allow such interaction.
New jQuery Mobile and Tablet themes have been introduced and make use of the newer features of the latest jQuery Mobile libraries. Panels, pop-ups, and dialogs (among other things) are now all available in the mobile interface.
An improved charting engine provides enhanced performance for large datasets. Improvements to accessibility for the visually impaired have been added. A new APEX_AUTHORIZATION package has been added to aid in the management of authorization within an application. And the list goes on.
As you can see, the APEX core functionality continues to grow with each release. But what you may not know is that you can help drive the future direction of APEX. By going to the following URL, you can not only request new features, but also view and vote on features that others have requested. You need an Oracle Technical Network account, but it’s free and easy to sign up:
https://apex.oracle.com/pls/apex/f?p=55447:1
To get a view of what the APEX team is committed to providing, you can read the most recent Statement of Direction (SoD). It may take a short time after a release for this to be updated, but it normally contains an overview of the main functional areas for the next planned release. You can find the SoD at the following URL:
www.oracle.com/technetwork/developer-tools/apex/application-express/apex-sod-087560.html
What You Need to Get Started
Access to an APEX Instance
This is definitely a hands-on book, so to work through the examples and exercises you need access to an instance of APEX 5.0. There are a number of different ways you can access APEX; depending on your level of comfort and expertise with Oracle, some may be better for you than others. Here is a description of the three most common scenarios:
• By far the easiest is to sign up for an account on Oracle’s hosted version of APEX at
https://apex.oracle.com. It’s free for nonproduction applications and is a great place to get started, because you don’t have to worry about installing either the database or APEX.
• If you already have an Oracle database installed locally, you can download and
install APEX 5.0 into that instance. Simply go to the Oracle APEX home page at
http://otn.oracle.com/apex and download the latest version of the software.
• If you don’t have an Oracle database already but would like to install one locally,
you can download a free developer’s license version of the database from Oracle Technology Network (OTN) at http://otn.oracle.com/database. Both Oracle 11g and 12c run APEX 5.0. Both allow you to install APEX (albeit an earlier version) as an option during the database install.
Although having a locally accessible instance of the Oracle database gives you more direct access to the data, it’s definitely not necessary for completing the exercises in this book. All code and instructions have been written so that they can be completed on Oracle’s hosted instance with no special access required.
■
Note
Oracle provides very good documentation on the installation process for both the database and
APEX, so it isn’t covered in detail here. However, if you’re planning to install APEX on an environment in your
organization, you should coordinate with the database administrator responsible for that instance to ensure that
no mishaps occur.
Web Browser
The APEX documentation states that to view or develop APEX applications, you must have a web browser that supports cookies, JavaScript, HTML 5, and CSS 3. However, although you can deploy to any browser that supports these things, the list of supported browsers is fairly narrow. Currently, the following browsers are supported: Internet Explorer 9+, Firefox 35+, Apple’s Safari 7+, and Google Chrome 40+.
Without getting into a religious debate about which web browser is the best on the market, the author’s preference for development is either Firefox or Chrome due to the number of developer tools and add-ons that can help you with APEX development. Note that because of the difference in the way each browser interprets HTML and JavaScript, you must test your application in any and all web browsers that your target audience might use.
SQL Developer
CHAPTER 1 ■ AN INTRODUCTION TO APEX 5.0
SQL Developer is a free SQL and PL/SQL IDE provided by Oracle. You can download SQL Developer from the OTN’s home page at http://www.oracle.com/sqldeveloper.
Using SQL Developer, you can browse database objects, edit row data, develop and test stored PL/SQL program units, code and test SQL statements, and interactively debug PL/SQL code. SQL Developer also has many direct integration points with APEX that make reporting in, monitoring, and maintaining APEX instances and applications easier. This book doesn’t cover those, but it’s definitely worth your time to look into this tool.
Summary
A Developer’s Overview
You’re probably anxious to get started, but there are a few concepts you should understand before you jump into APEX development headfirst. This chapter will introduce the fundamental development architecture of APEX and then walk you through the different areas of the developer interface.
You will delve deeper into the details as you go through the book and put the architecture to work, but it will help tremendously to know how things are structured ahead of time. This chapter is designed to ease you in, but it isn’t a complete guided tour of every nook and cranny. Be patient; you’ll get there.
The Anatomy of a Workspace
APEX was designed from the beginning to be a multi-tenant architecture where many different development environments (called workspaces) can exist in a single APEX instance. For instance, apex.oracle.com, Oracle’s free hosted instance, holds over 10,000 active workspaces, each of which is a completely separate environment unable to see or interact with any of the others. You can think of this as Software as a Service (SaaS) or a cloud-computing architecture, but basically it means each workspace is distinct and segregated from all others.
In simple terms, each workspace represents a virtual private container in which developers create and deploy their APEX applications. The development process takes place in the context of a workspace, so it’s important to know how a workspace is structured. Figure 2-1 uses database entity-relationship diagram parlance to help explain the makeup of the objects in a workspace.
CHAPTER 2 ■ A DEVELOPER’S OVERVIEW
A workspace may have:
One to many users: These users may one of three types: Administrator, Developer, or End User.
Zero to many applications: Applications can be added from the list of packaged applications, imported, or created from scratch.
One to many schemas: Although a workspace must be assigned at least one schema when it’s created, an Instance Administrator may assign multiple schemas to a workspace.
There can be many applications and many schemas in a workspace, but an application may only parse as one (and only one) schema, which can only be set during development. The following sections delve more deeply into this to give you a full understanding of how these concepts relate.
APEX Users
To log in to an APEX workspace, you must have access to a valid APEX user. A number of different user roles are available that dictate what you can do when you log in. The roles are as follows:
• Instance Administrators are special users who manage and maintain the overall
APEX instance. They can set instance-level preferences and messages, create and manage workspaces, monitor space utilization, and perform many other actions related to the overall APEX installation. Instance Administrators are only able to log in to the special INTERNAL workspace, which houses the APEX Admin Services application.
• Workspace Administrators are responsible for managing the details of a specific
workspace and can manage user accounts related to the workspace, monitor workspace activity, view log files, override developer locks and settings, and so on. Although it isn’t good practice, the Workspace Administrator can also act as a Developer, creating and modifying applications.
• Developers are the users who create and edit the applications in the workspace. They
have access to the underlying tables in the schema(s) assigned to the workspace and may create and modify database objects and stored PL/SQL units. Most people writing APEX applications only need this level of access.
• End Users are only able to run applications in a workspace. They don’t have direct
access to any of the underlying database objects, nor do they have access to any of the APEX development modules. End users can’t log directly into a workspace.
With the exception of the APEX Instance Administrator, in a default installation APEX users are specific and unique to a workspace, meaning you can have users with the same name in multiple workspaces in a single APEX instance, but each of these users is unique. They can have their own passwords and settings and aren’t linked together in any way.
APEX 5.0 introduces the ability to use an external repository, such as Single Sign-on or LDAP, as a source to assign and validate APEX users, meaning that a single user could have access to multiple workspaces. However, this functionality is not set up by default and requires an Instance Administrator to configure.
■
Note
This book uses the last three types of user. It assumes that APEX has been installed, a workspace
has been created, and you have been given the Workspace Administrator’s login credentials. If you’re using
the hosted instance at
apex.oracle.com, then the user name you were given when you signed up has the
credentials of a Workspace Administrator. If, however, you’re using a local instance, either refer to the APEX
documentation or get your Instance Administrator to help you set up a workspace.
Applications, Pages, Regions, and Items
Although a workspace starts off basically empty, you can have many applications that reside in a workspace. There is no specific rule, but it’s likely that all the applications in a workspace share something: they might all use the same underlying database objects, target the same user community, or use the same method for authenticating users.
As you build an application, you add new pages and build out those pages with regions and items. Figure 2-2 shows the hierarchy of the different types of objects.
CHAPTER 2 ■ A DEVELOPER’S OVERVIEW
Applications are basically groups of pages that perform a task (or set of tasks) related to a business function. During the course of this book, you’ll build one application in a single workspace, but it’s important to know that in a typical development environment, you’ll probably be working on many applications across several workspaces.
Pages are the basic building blocks of applications and contain both the user-interface (UI) components and the programming logic that processes the user’s input. We cover the rendering of the UI versus the processing of user input later, but for now consider a page to be roughly equivalent to a screen in desktop UI lingo.
Regions are UI items that serve as content containers. You can have any number of regions on a page, and regions can be nested in other regions. This gives you the opportunity to create things like dashboards, where you might nest a data report region and a graph region in a single parent HTML region.
Items are the HTML form elements that are used to present the UI to the user. These include things such as buttons, select lists, text fields, check boxes, radio groups, and so on. There are two categories of items: page-level items and application-level items. The difference is that the latter are defined at the application level and aren’t rendered directly on the page. You can think of these as global variables. Page-level items are defined on a specific page and are assigned to a region in order to control where and how they display to the user.
There is obviously a lot more to an application than these simple building blocks, but if you understand the basic hierarchy between these, you’ll have a jumpstart when it comes to building your first pages and a solid foundation when it’s time to perform more intricate tasks.
Workspaces, Applications, and Schemas
Although the relationship between workspaces and applications is straightforward, it becomes a bit more complex when you introduce the relationship with database schemas. Figure 2-3 diagrams this relationship.
Figure 2-3. How schemas relate to workspaces and applications
When a workspace is created, it’s linked with at least one, and possibly many, underlying database schemas. This provides access to database objects such as tables, views, stored PL/SQL program units, and so on.
When an application is created, it’s assigned a single “parse as” schema from the list of schemas associated with the workspace. A “parse as” schema is the Oracle database user in which all SQL queries and PL/SQL calls run by that application are executed. So, if your application was defined with a “parse as” schema of DOUG, a query such as
select * from emp
would execute in the database as if it were written
Because APEX applications are portable and may not necessarily be run in the same schema they were developed in, it’s not good practice to hard code the schema names into your SQL or PL/SQL. Instead, APEX provides a replacement variable (one of many you’ll be introduced to throughout the course of this book) for the “parse as” schema. The #OWNER# replacement variable is substituted for the actual “parse as” schema for the application at runtime. So the statement
select * from #OWNER#.emp
resolves to
select * from DOUG.emp
In the most common implementations, a workspace is created and associated with a single underlying database schema. The applications developed in that workspace have their “parse as” schema set to the only schema associated with the workspace and use the database objects belonging to that schema.
Where a workspace has more than one schema assigned to it, things can become a little more complex. You might be tempted to think that if you associate three schemas with a workspace, any application in that workspace can automatically access the data in all three schemas. However, you would be mistaken.
Because an application is assigned one—and only one—“parse as” schema, all SQL statements and PL/ SQL calls are executed as that schema. Although the workspace may be associated with multiple schemas, the application itself isn’t. If you want to access data in a schema other than the application’s “parse as” schema, you must make sure the correct database-level grants are in place, just as you would when using any other Oracle tool or development environment.
Take a look at the example shown in Figure 2-4, where two tables you wish to join as part of a SQL statement are owned by separate schemas.
Figure 2-4. Tables joined across schemas
If your “parse as” schema is DOUG, then you must be specifically granted privileges on the objects in the JOEY schema to be able to access it. To do this, you sign on to the database as JOEY (or as a DBA) and grant the appropriate database privileges on JOEY.DEPT to DOUG.
In this example, if you needed to join the two tables together in a select statement, granting the SELECT privilege on JOEY.DEPT to DOUG would suffice. Then, you could write your select statement as follows:
select e.empno,
CHAPTER 2 ■ A DEVELOPER’S OVERVIEW
■
Note
Because the grants that allow the
selectfrom the
JOEYschema are put in place at the database
level, it isn’t necessary to associate the
JOEYschema to your workspace. You only need to associate a schema
to a workspace if you’ll be using it as the “parse as” schema for an application in that workspace or need to
access the schema objects directly from within the SQL Workshop.
A Final Word on Workspaces
As you have learned, an APEX instance can have many workspaces. But how many workspaces should there be? The answer isn’t straightforward.
Unless you’re in a very small organization with very few apps, you probably shouldn’t have only one workspace. On the other hand, you probably shouldn’t create a new workspace for every new application you code, either.
There are a couple schools of thoughts on this, but I tend to think in terms of application suites. If a number of applications are performing similar tasks against the same underlying data sets and are aimed at the same target set of users, then they would probably do well in the same workspace.
The key is to use your judgment and try to keep things easy to develop and maintain. There is nothing worse than logging in to a workspace to find you have to page through tens or even hundreds of apps to find the one you want to work on.
A Tour of the APEX Modules
Now that you have a little background on how things are logically architected, it’s time to get a closer look at the APEX development environment. This section will introduce you to the different sections of the APEX environment and give you an overview of how things are laid out.
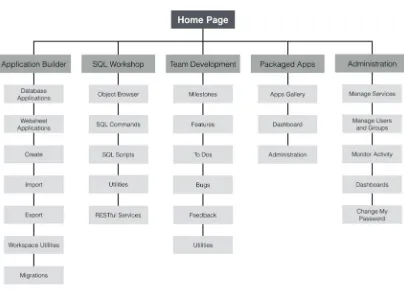
Figure 2-5 shows a hierarchical layout of the APEX menu structure. Later, you will look at each of the main sections and glimpse what’s under the covers; this is just an introductory tour. You will get a much deeper look as we work our way through the development processes.
As you can see, the development environment is broken into five main sections:
• The Application Builder is where you create and modify applications and pages, and
it’s where you’ll probably spend most of your time.
• The SQL Workshop is where you deal directly with the underlying database objects
and their related data. Think of it as a web-based version of SQL*PLUS with some GUI goodness thrown in to make things easier.
• Team Development is the section that lets you enter and track information related to
the development of APEX applications.
• Packaged Apps provides a way to install and manage the myriad of applications
that come with Oracle APEX. Many of these applications can be used out of the box to solve real business problems. Others are merely sample applications to help demonstrate the capabilities of APEX.
• Administration is where you can manage the details of your workspace—its defaults,
Figure 2-5. APEX 5.0 hierarchical menu structure
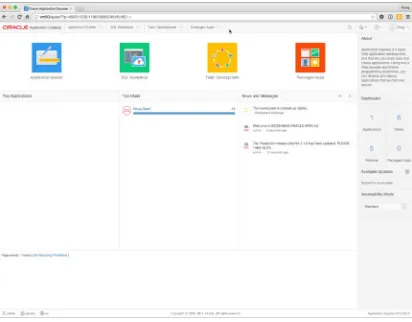
The Home Page
CHAPTER 2 ■ A DEVELOPER’S OVERVIEW
Figure 2-6. APEX development Home screen
At the right of the navigation bar is a set of four menu options represented by icons, as shown in Figure 2-8.
Figure 2-7. Using the drop-down menus on the menu bar
Figure 2-8. Right-hand icons on the navigation bar
First is a search icon that, when clicked, allows you to perform context-sensitive searches. The context of the search depends on where you are in the Application Builder. For instance, if you’re on the workspace Home page, your search is across the entire workspace. However, if you’re in the Application Builder or the Administration section, the search is limited contextually to those specific areas.
Second is the Administration menu. This menu will be available to you whether you are a Workspace Administrator or a Developer. The difference will be what functionality you have access to. Developers will have access to monitoring certain areas of the workspace activity and to the dashboards, while Workspace Administrators will have full access to all functionality including user maintenance and service requests.
Third is the help menu, which provides access to online documentation, the APEX Support Forums, the APEX section of the Oracle Technical Network site, and an About section.
Last is a link to the profile of the currently logged in user. Here, the user will be able to edit their details, update their profile picture, and change their password.
CHAPTER 2 ■ A DEVELOPER’S OVERVIEW
The rest of the page is dedicated to either giving you a quick link to the four main sections or providing you with information about what’s going on in the workspace.
The first two regions, from left to right, show an overview of the activity in the workspace. They show the Top Applications and the Top Users in the workspace. The News & Messages region allows the developers in a workspace to enter information they want others in the workspace to see. In a new workspace, there probably won’t be anything in these regions, but as you work your way through the book, you’ll see that start to change.
Notice that most of the main pages for each section of the development environment adhere to this dashboard-style home page interface, the notable exception being the Application Builder. Let’s look at that section first.
Application Builder
The Application Builder is the core of the APEX application-development environment. Whereas you’ll use the SQL Workshop to manipulate the underlying database objects, you’ll use the Application Builder to do most of the real work when it comes to coding, testing, and debugging your applications.
The Application Builder Home Page
Clicking the Application Builder menu option takes you to the Application Builder home page. Like most of the home pages, it’s laid out with the menu bar across the top and regions that hold tasks and quick links down the right side.
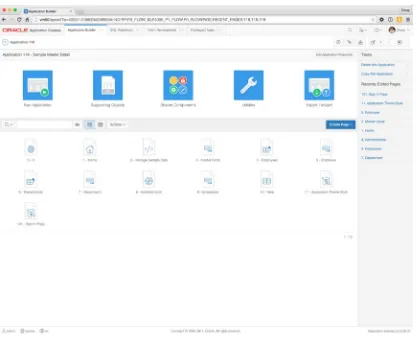
Figure 2-9 shows one application in the workspace, named Sample Master Detail. However, there isn’t much information about it other than its name and the application ID (118). This is where you begin to see the beauty of what APEX can do, not only in the developer UI, but also in your applications.
The list of applications you see is actually a style of report called an Interactive Report (IR). IRs allow us to customize how reports and their contents are displayed. IRs are used throughout the APEX development interface and can also be used when creating your own applications. They’re extremely powerful tools, and you’ll use them a lot.
On the right side of the page are three regions that show About information, recently edited
applications, and a link to the Application Migration wizard. You will deal more with these later; for now, we will drill in to see the details of an application.
The Application Home Page
Clicking any one of the applications listed drills into the Application home page, as shown in Figure 2-10. This page is very similar to the Application Builder home page, but it shows all the pages in a specific application. Again, it uses an IR, so you can customize the way you see this data.
CHAPTER 2 ■ A DEVELOPER’S OVERVIEW
Notice the way the page is structured, with page-related tasks and recently edited pages presented along the right side of the page. This layout will become a familiar theme as you navigate through the interface.
From here, you can click any of the listed pages to edit that page using the Page Designer. You can also run, export, and import the application, edit the supporting objects or shared components, and access the application-related utilities.
The Page Designer
One of the biggest changes is that, due to the single-page interface, alterations to a page must now be explicitly saved. While this may seem disruptive, it actually brings with it some useful functionality. For instance, now multiple changes can be made and saved all at once, potentially reducing development time. Also, unsaved changes can now be easily undone.
Another major time-saving feature is the ability to select multiple components on a page using Shift+Click (or Cmd+Click on Mac). Once multiple items are selected, you can edit their common properties in the property editor. This can be useful if, for instance, you want to edit the attributes of all buttons on a page to set their visual properties to all be the same.
Region and item placement has been enhanced with the introduction of a drag-and-drop interface. All rendering components can be easily placed or rearranged on the page.
The layout of the new Page Designer is quite in-depth and, if you’re not familiar with it, can potentially be a bit perplexing. Appendix A at the back of this book will give you a detailed tour of the Page Designer and its components, laying out the nomenclature that will be used through the rest of this book. Take a moment to thumb through Appendix A to familiarize yourself with the terms and the placement of the tools.
It is my goal for the rest of this book to take you through the development process in a way that will help you naturally learn how to use the Page Designer. However, if you’re ever confused by an instruction or forget what a particular tool is called, referring to Appendix A should help clear things up.
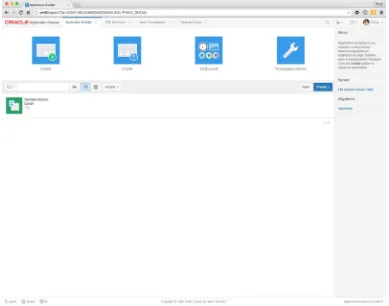
SQL Workshop
CHAPTER 2 ■ A DEVELOPER’S OVERVIEW
Because there may be more than one schema assigned to the workspace, a schema-selection dialog at right allows you to select and set the default schema for all the tools. You may change the schema you’re working in within each of the tools as well.
The main tools available as part of the SQL Workshop are displayed in the toolbar at the top of the page. Each of the individual tools deserves its own introduction, so let’s spend some time now looking at what they are and what they can do. You’ll use this area of APEX more heavily when you create the database objects for your application.
The Object Browser
If you’ve been working with databases for any length of time, you’ve probably used one of the more popular GUI tools that allows you to browse and manage database objects in a schema. The APEX Object Browser is a very similar tool presented through your web browser. Figure 2-12 shows the Object Browser being used to examine the table EBA_DEMO_MD_DEPT.
The name Object Browser is somewhat of a misnomer, because the tool can be used not only to browse the objects in the underlying schema(s), but also to create new objects, browse and edit data, delete objects, and edit object definitions. Although there are some limitations on the types of objects it can manipulate, it’s powerful enough to do most of the daily tasks that an application developer needs to tackle.
You choose the object type you want to work with by selecting it from the drop-down list in the upper-left corner. You can search the selected object type by entering a text string in the search box just below it and clicking the refresh icon to the right. Clicking the name of an object displays its properties along with links to drill into more details.
Although the interface for the Object Browser is pretty intuitive, there are some interesting things to note. In the upper-right corner is a drop-down list that allows you to set the current schema. The list contains all schemas currently assigned to the workspace. You can switch between them simply by choosing a new one from the list.
The SQL Commands Interface
CHAPTER 2 ■ A DEVELOPER’S OVERVIEW
Although its core function is quite straightforward, the SQL Commands interface is more robust than it first appears. Beyond the ability to save and retrieve SQL and PL/SQL, it can also run explain plans on statements and allow you to view your statement history. Therefore, if you ran a script or statement that was particularly useful, but you forgot to save it, you still have the ability to retrieve it from the history buffer.
The SQL Commands interface also integrates with the Query Builder (described later), allowing you to load and manipulate saved statements that were built in the Query Builder.
■
Note
By default, all SQL statements executed via the SQL Commands interface are automatically
committed. To override this setting and enter into transactional mode, uncheck the Autocommit check box in the
toolbar. Once this is done, you can manually both commit and roll back your SQL statement.
There is no way to turn off Autocommit permanently, so you need to remember to do this any time you want to
enter transactional mode.
SQL Scripts Interface
The SQL Scripts interface allows you to manage and run sets of SQL commands that are saved into script files. A single script can contain one or more SQL statements or PL/SQL blocks. SQL scripts coded outside of APEX can be loaded into the SQL script repository and edited or run from there. You can also create SQL scripts from scratch using the SQL Scripts interface. Figure 2-14 shows the main SQL Scripts interface page.
CHAPTER 2 ■ A DEVELOPER’S OVERVIEW
In this example, one script, called database_objects.sql, is loaded into the script repository. By clicking the Edit icon, you can edit the contents of the script, as shown in Figure 2-15. Helpfully, APEX provides syntax highlighting in the Script Editor. The editor also has a Find and Replace function and autocomplete, as well as undo and redo capabilities.
You can also download the script to a local file so you can edit it in your favorite local text editor. When you’re done, simply cut and paste it back into the editor or upload it as a new script file.
■
Note
When you upload a script file to the repository, the name of the script must be unique. You can’t
overwrite an existing script file of the same name with a new version without first deleting the existing script
from the script repository.
Once a script is ready to run, you can click the Run icon in the list (or the Run button in the editor), and you’re stepped through the Run Script wizard. This allows you to choose whether you want to run the script immediately or run it in the background. If you choose Run in Background, your script is entered into a queue, and it is executed when it reaches the front of the queue.
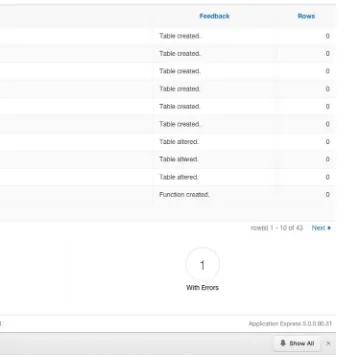
Either way, you’re taken to the Manage Script Results page of the SQL Scripts interface, as shown in Figure 2-16. This screen allows you to see the status and certain high-level details of the script’s execution. In the case of scripts that have been submitted in batch mode, you can also see the status of specific scripts in the queue.
CHAPTER 2 ■ A DEVELOPER’S OVERVIEW
Clicking the View Results icon shows you the final results of running the script. In Figure 2-17, you can see that the script had errors, the details of which are displayed in the body of the report. If the script were successful, no errors would be shown, and the statement results at the bottom of the page would show zero errors.
Figure 2-17. An example of errors from the SQL Scripts interface
■
Note
Although both the SQL Commands and the SQL Scripts interfaces can accept and run standard SQL
statements, the extended commands of SQL*PLUS aren’t valid in these tools.
The Query Builder
Although the Query Builder has been relegated to the Utilities page, it merits discussion specifically because it’s helpful to beginners. The Query Builder allows you to build SQL select statements using a more graphical interface, and although it’s not quite drag and drop, it’s fairly intuitive.
When you first enter the Query Builder, you’re presented with a screen that lists all the tables and views available in the currently active schema. Figure 2-18 shows the initial Query Builder screen.
Figure 2-18. The initial Query Builder screen
CHAPTER 2 ■ A DEVELOPER’S OVERVIEW
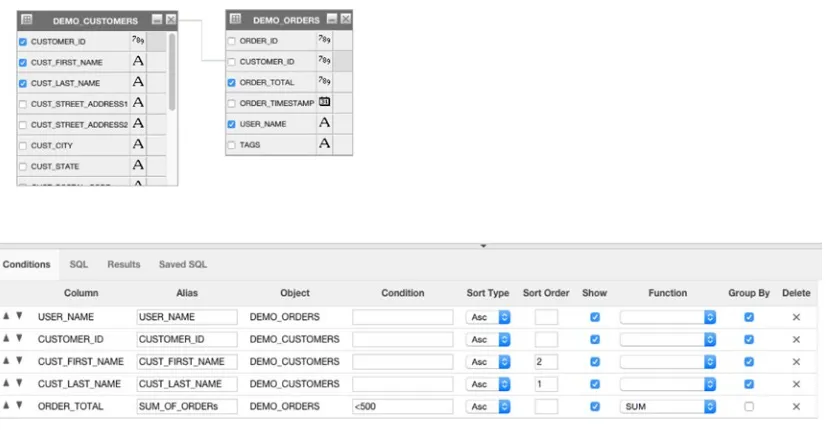
Figure 2-19 shows an example graphical representation for the DEMO_ORDERS table and outlines the different interactive features.
Figure 2-19. The DEMO_ORDERS table as represented in the Query Builder
Taken from top to bottom as they appear in Figure 2-19, these action areas are as follows
• Table Actions displays a dialog allowing you to do one of several things:
• Check All allows you to quickly select or deselect all columns of the object for
inclusion in the query being built.
• Add Parent allows you to select and add a parent table, as defined by
foreign-key relationships, to the Query Builder.
• Add Child allows you to select and add a child table, as defined by foreign-key
relationships, to the Query Builder.
• Show/Hide Columns expands and collapses the object so the column definitions are
shown or hidden.
• Remove deletes the table and any of its related clauses from the select statement. • Select Column for Join is activated by clicking the blank square next to a column
• Data Type Indicator indicates the data type of the column, such as number,
character, date, and so on.
• Column Name indicates the column name as defined in the table description. • Column Selector allows you to individually select or deselect columns to be included
in the SQL statement for processing. This may also include columns that you want to use in the where clause but not display in the output of the SQL statement. The basic rule is that you need to select all the columns you want to display, but you don’t necessarily have to display all the columns you select.
As you add and join tables and select columns to operate on, the region at the bottom of the screen begins to change. This region is subdivided into several tabs, as follows:
• The Conditions tab shows one row for each column selected in the area above and
allows you to further define its attributes. (More on this feature in just a moment.)
• The SQL tab displays the SQL statement as the wizard builds it. Although it’s not
directly editable, you can easily highlight the statement and copy it to the clipboard from here.
• The Results tab shows the results of running the SQL statement and allows you to
download the resulting data in CSV format.
• The Saved SQL tab allows you to save, recall, and manage statements that have been
built with the Query Builder. There are also filters that allow you to search and limit which saved queries are displayed.
All but the Conditions tab are self-explanatory, so let’s go over this one in a little more detail. Figure 2-20
shows an example two-table join, with five columns selected to operate on.
CHAPTER 2 ■ A DEVELOPER’S OVERVIEW
In this example, the following modifications have been applied to the query:
• Changed the alias of the ORDER_TOTAL column to SUM_OF_ORDERS
• Limited the result set to only those records where ORDER_TOTAL is less than 500 • Sorted the records returned by CUST_LAST_NAME, CUST_FIRST_NAME ascending • Performed a SUM function on the ORDER_TOTAL column
• Grouped the query by USER_NAME, CUSTOMER_ID, CUST_FIRST_NAME, CUST_LAST_NAME
Based on the column selections as well as the restrictions and changes introduced in the Conditions tab, the SQL statement (as it appears in the SQL tab) looks like this:
select DEMO_ORDERS.USER_NAME as USER_NAME,
Although the Query Builder is very useful and allows you to put together a basic query fairly quickly using a simple GUI, it does have its limitations, such as nested subqueries and complex unions. We can use the Query Builder to get the skeleton of a query defined; we can then take the query to the SQL Commands window or a SQL IDE and fine tune it from there.
As a final note, it’s worth mentioning that the Query Builder is linked to from several places in APEX, so any time you’re prompted for a SQL statement (for example, as the basis for a report), you can open the Query Builder in a pop-up window and return the query to the calling form.
Utilities
The SQL Workshop Utilities section gives you access to tools and reports that help you view and manage information about the underlying database objects and their data. This section introduces each tool set and its main purpose. However, the majority of these tools are very straightforward, so in most cases the deep details are left for you to explore on your own.
You’ve already seen the Query Builder, which gives users the ability to visually create queries. The Data Workshop provides tools that import and export data in many different formats, including comma- or tab-separated data, XML data, or spreadsheet data. These tools also help you manage files that you have loaded into either the text or spreadsheet repository.
The Generate DDL wizard allows you to choose a schema associated with the workspace and then generates a script that can be used to re-create some or all of the objects with that schema based on your selection. The generated script doesn’t include any insert statements for the data that resides in the database objects, but it’s a good way to easily re-create the underlying objects an application might use.
The Methods on Tables wizard generates an Application Programming Interface (API) based on a specific table or set of tables. For each table selected (up to ten named tables), the generated package contains a procedure for each of the following actions: Insert, Update, Delete, and Select. The benefit of using table APIs instead of accessing the table directly is that any required validation logic can be included once, in the API, and accessed from various alternate interfaces including APEX.
The Object Reports are actually a set of utilities that let you get detailed information about the different types of objects that live in the “parse as” schema(s) assigned to the workspace. Although most of the reports have to do with tables, others deal with PL/SQL objects, invalid objects, grants and permissions, and so on. This is a good place to find details of the objects in your working schema.
The Schema Comparison utility allows you to compare the objects in two separate schemas and create a difference report. You may choose to compare only certain attributes or all attributes of the objects in the selected schemas. The limitation here is that both schemas must be assigned to the workspace in order for the comparison to take place.
User-Interface Defaults allow you to define default display attributes for APEX regions and items. The utility lets you manage these UI defaults at two different levels: Table Dictionary and Attribute Dictionary. UI Defaults will be discussed in more detail later.
CHAPTER 2 ■ A DEVELOPER’S OVERVIEW
About Database and Database Monitor are special utilities that require the user running them to have access to a database login that has been granted the DBA role. The Database Monitor utilities allow the privileged user to view Sessions, Systems Statistics, Top SQL, and Long Operations reports. The About Database report shows detailed information about the database instance and the APEX environment. Depending on the settings the Instance Administrator has chosen, these two utilities may not appear in the list, because they can be turned off.
When an object is dropped, Oracle doesn’t immediately remove the space associated with the table, but instead renames the table and places it and its associated storage in the Recycle Bin. The Recycle Bin utility allows you to view and potentially recover objects that have been dropped from the schemas associated with a workspace. You may also purge the Recycle Bin, allowing the space to be reclaimed by the Oracle database for use somewhere else.
Packaged Apps
The Packaged Apps section is where you will install and managed the applications that are bundled with the APEX distribution. The main page, shown in Figure 2-22, shows the Packaged Apps home page. From here you can see which applications are installed and can navigate to the three subsections.
Packaged App Gallery
The Packaged App Gallery presents all of the applications that come bundled with the APEX distribution. There are 35 separate packaged apps that can belong to several different categories, including Software Development, Tracking, Team Productivity, Marketing, Knowledge Management, IT Management, Project Management, Sample Application and Sample Websheet.
Clicking on the icon of an application takes you to a detailed information page for that application. Here, you’ll be able to see a screenshot of the application, read its full description, and see version information, as seen in Figure 2-23.