800 East 96th Street, Indianapolis, Indiana, 46240 USA
Julie Meloni
Michael Morrison
24
in
Hours
Sams
Teach Yourself
HTML
and CSS
All rights reserved. No part of this book shall be reproduced, stored in a retrieval system, or transmitted by any means, electronic, mechanical, photocopying, recording, or other-wise, without written permission from the publisher. No patent liability is assumed with respect to the use of the information contained herein. Although every precaution has been taken in the preparation of this book, the publisher and author assume no responsi-bility for errors or omissions. Nor is any liaresponsi-bility assumed for damages resulting from the use of the information contained herein.
International Standard Book Number: 0-672-33097-0
Library of Congress Cataloging-in-Publication Data Meloni, Julie C.
Sams teach yourself HTML and CSS 24 hours / Julie Meloni, Michael Morrison. -- 8th ed.
p. cm.
Rev. ed. of: Sams teach yourself HTML and CSS in 24 hours / Dick Oliver, 7th ed., 2006.
ISBN 978-0-672-33097-1 (pbk.)
1. HTML (Document markup language) 2. XHTML (Document markup language) 3. Cascading style sheets. I. Morrison, Michael, 1970- II. Oliver, Dick. Sams teach yourself HTML and CSS in 24 hours. III. Title.
QA76.76.H94O4526 2010 006.7'4--dc22
2009046100 Printed in the United States of America First Printing: December 2009
Trademarks
All terms mentioned in this book that are known to be trademarks or service marks have been appropriately capitalized. Sams Publishing cannot attest to the accuracy of this information. Use of a term in this book should not be regarded as affecting the validity of any trademark or service mark.
Warning and Disclaimer
Every effort has been made to make this book as complete and as accurate as possible, but no warranty or fitness is implied. The information provided is on an “as is” basis. The author and the publisher shall have neither liability nor responsibility to any person or entity with respect to any loss or damages arising from the information contained in this book or from the use of the CD or programs accompanying it.
Bulk Sales
Sams Publishing offers excellent discounts on this book when ordered in quantity for bulk purchases or special sales. For more information, please contact
U.S. Corporate and Government Sales 1-800-382-3419
For sales outside of the U.S., please contact
Contents
PART I:
Getting Started on the Web
HOUR 1: Understanding How the Web Works
A Brief History of HTML and the
World Wide Web ...1
Creating Web Content ...2
Understanding Web Content Delivery ...3
Selecting a Web Hosting Provider ...6
Testing with Multiple Web Browsers ...8
HOUR 2: Publishing Web Content Creating the Sample File for this Hour ...13
Using FTP to Transfer Files...14
Understanding Where to Place Files on the Web Server ...18
Distributing Content without a Web Server ...22
Testing Web Content ...24
HOUR 3: Understanding HTML and XHTML Connections Getting Started with a Simple Web Page...28
HTML Tags Every XHTML Web Page Must Have ...32
Organizing a Page with Paragraphs and Line Breaks ...34
Organizing Your Content with Headings ...36
Validating Your Web Content ...39
The Scoop on HTML, XML, XHTML, and HTML 5 ...41
HOUR 4: Understanding Cascading Style Sheets How CSS Works ...48
A Basic Style Sheet...49
A CSS Style Primer ...54
Using Style Classes ...58
Using Style IDs ...61
Internal Style Sheets and Inline Styles ...62
PART II:
Building Blocks of Practical
Web Design
HOUR 5: Working with Text Blocks and Lists Aligning Text on a Page ...68The Three Types of HTML Lists ...71
Placing Lists Within Lists...73
HOUR 6: Working with Fonts Boldface, Italics, and Special Text Formatting...82
HOUR 7: Using Tables to Display Information Creating a Simple Table...96
Controlling Table Sizes ...99
Alignment and Spanning Within Tables ...102
Page Layout with Tables...105
HOUR 8: Using External and Internal Links Using Web Addresses ...111
Linking Within a Page Using Anchors ...114
Linking Between Your Own Web Content ...117
Linking to External Web Content...120
Linking to an Email Address ...120
Opening a Link in a New Browser Window...122
Using CSS to Style Hyperlinks ...123
HOUR 9: Working with Colors Best Practices for Choosing Colors ...131
Understanding Web Colors...133
Using Hexadecimal Values for Colors ...135
Using CSS to Set Background, Text, and Border Colors ...136
HOUR 10: Creating Images for Use on the Web Choosing Graphics Software ...143
The Least You Need to Know About Graphics ....144
Preparing Photographic Images ...145
Creating Banners and Buttons ...151
Reducing the Number of Colors in an Image ....153
Working with Transparent Images ...154
Creating Tiled Backgrounds ...154
Creating Animated Web Graphics ...156
HOUR 11: Using Images in Your Web Site Placing Images on a Web Page ...162
Describing Images with Text...163
Specifying Image Height and Width...165
Aligning Images...165
Turning Images into Links ...169
Using Background Images ...172
Using Imagemaps ...173
HOUR 12: Using Multimedia in Your Web Site Linking to Multimedia Files ...184
Embedding Multimedia Files ...187
Additional Tips for Using Multimedia...190
HOUR 13: Working with Frames What Are Frames?...197
PART III:
Advanced Web Page Design
with CSS
HOUR 14: Working with Margins, Padding, Alignment, and Floating
Using Margins...212
Padding Elements ...219
Keeping Everything Aligned ...223
Understanding the Float Property ...224
HOUR 15: Understanding the CSS Box Model and Positioning The CSS Box Model ...231
The Whole Scoop on Positioning ...235
Controlling the Way Things Stack Up...239
Managing the Flow of Text ...242
HOUR 16: Using CSS to Do More with Lists HTML List Refresher ...245
How the CSS Box Model Affects Lists ...246
Placing List Item Indicators ...249
Creating Image Maps with List Items and CSS ...251
HOUR 17: Using CSS to Design Navigation How Navigation Lists Differ from Regular Lists...259
Creating Vertical Navigation with CSS ...260
Creating Horizontal Navigation with CSS ...270
HOUR 18: Using Mouse Actions to Modify Text Display Creating a Tool Tip with CSS ...277
Displaying Additional Rollover Text with CSS ....281
Accessing Events ...283
Using onclick to Change <div> Appearance....284
HOUR 19: Creating Fixed or Liquid Layouts Understanding Fixed Layouts ...294
Understanding Liquid Layouts ...295
Creating a Fixed/Liquid Hybrid Layout...298
PART IV:
Advanced Web Site
Functionality and Management
HOUR 20: Creating Print-Friendly Web Pages What Makes a Page Print-Friendly? ...312Applying a Media-Specific Style Sheet...315
Designing a Style Sheet for Print Pages ...317
Viewing a Web Page in Print Preview...320
HOUR 21: Understanding Dynamic Web Sites Understanding the Different Types of Scripting ...325
Including JavaScript in HTML ...326
Displaying Random Content ...328
Understanding the Document Object Model ...332
Changing Images Based on User Interaction ....333
HOUR 22: Working with Web-Based Forms How HTML Forms Work ...339
Creating a Form ...340
Accepting Text Input ...344
Naming Each Piece of Form Data ...345
Including Hidden Data in Forms ...345
Exploring Form Input Controls ...346
Submitting Form Data ...349
HOUR 23: Organizing and Managing a Web Site When One Page Is Enough...356
Organizing a Simple Site ...357
Organizing a Larger Site...360
Writing Maintainable HTML Code ...364
HOUR 24: Helping People Find Your Web Pages Publicizing Your Web Site ...371
Listing Your Pages with the Major Search Sites ...373
Providing Hints for Search Engines ...374
v
PART V:
Appendixes
APPENDIX A: HTML and CSS Resources on the Internet
General HTML, XHTML, and CSS Information ....385
Web Browsers...386
Web Page Design ...386
Software...386
Colors and Graphics ...387
Multimedia ...388
Advanced Developer Resources ...388
Web Site Hosting ...389
Web Site Services...389
APPENDIX B: HTML and CSS Quick Reference HTML Structure...392
HTML Text Phrases and Paragraphs ...395
XHTML Text Formatting Elements ...398
XHTML Lists ...399
XHTML Links...400
XHTML Tables ...402
XHTML Embedded Content ...407
XHTML Style ...410
XHTML Forms ...410
XHTML Scripts ...413
XHTML Common Attributes ...414
CSS Dimension Style Properties ...415
CSS Text and Font Style Properties ...416
CSS Background Style Properties...419
CSS Border Style Properties ...420
CSS Margin Style Properties ...423
CSS Padding Style Properties ...424
CSS Layout and Display Style Properties ...424
CSS List and Marker Style Properties ...427
About the Authors
Julie C. Meloni is both the technical director for i2i Interactive, a multimedia company located in
Los Altos, CA, and a scholar working in the field of Digital Humanities. She has written several books and articles on Web-based programming languages and database topics, including the best-sellingSams Teach Yourself PHP, MySQL, and Apache All in One.
Michael Morrisonis a writer, developer, toy inventor, and author of a variety of computer
technolo-gy books and interactive web-based courses. In addition to his primary profession as a writer and freelance nerd for hire, Michael is the creative lead at Stalefish Labs, an entertainment company he co-founded with his wife, Masheed.
We Want to Hear from You!
As the reader of this book,youare our most important critic and commentator. We value your opin-ion and want to know what we’re doing right, what we could do better, what areas you’d like to see us publish in, and any other words of wisdom you’re willing to pass our way.
You can email or write me directly to let me know what you did or didn’t like about this book—as well as what we can do to make our books stronger.
Please note that I cannot help you with technical problems related to the topic of this book, and that due to the high volume of mail I receive, I might not be able to reply to every message.
When you write, please be sure to include this book’s title and author as well as your name and phone or email address. I will carefully review your comments and share them with the author and editors who worked on the book.
Email: [email protected] Mail: Mark Taber
Associate Publisher Sams Publishing 800 East 96th Street Indianapolis, IN 46240 USA
Reader Services
Visit our web site and register this book at informit.com/registerfor convenient access to any
vii
Introduction
In 2009, it is estimated that more than 1.5 billion people have access to the Internet, including 220 million in the U.S. alone. Throw in 338 million Chinese users, 55 million German users, 48 million British users, 38 million Russian users, and 67 million Brazilians, and you can see the meaning of the word “world” in the term World Wide Web. Many of these Internet users are also creating content for the Web—you can be one of them! Although accurate measurements of the total number of web pages are difficult to come by, Google’s most recent data indicates they hit the 1 trillion mark of indexed pages in the middle of 2008.
In the next 24 hours, hundreds of millions of new pages will appear in accessible areas of the Internet. At least as many pages will be placed on private intranets, where they will be viewed by businesspeople connected via their local networks. Every one of those pages—like the more than 1 trillion pages already online—will use Hypertext Markup Language (HTML).
As you complete the 24 one-hour lessons in this book, your web pages will be among those that appear on the Internet. These lessons will also help you develop one of the most valuable skills in the world today: mastery of HTML.
Can you really learn to create top-quality web pages yourself, without any specialized software, in less time than it takes to schedule and wait for an appointment with a highly paid HTML wizard? Can this relatively short, easy-to-read book really enable you to teach yourself state-of-the-art web page publishing?
Yes. In fact, within the first two lessons in this book, someone with no previous HTML experience at all can have a web page ready to place on the web.
How can you learn the language of the Web so fast? By example. This book organizes HTML into simple steps and then shows you exactly how to tackle each step. Every HTML code example is listed directly before a picture of the web page it produces. You see how it’s done, you read a clear, concise explanation of how it works, and then you immediately do the same thing with your own page. Ten minutes later, you’re on to the next step.
After 24 hours of work, you’re marveling at your own impressive pages on the Internet.
Beyond HTML
This book covers more than just HTML because HTML isn’t the only thing you need to know to cre-ate web content today. The goal of this book is to give you all the skills you need to crecre-ate a mod-ern, standards-compliant web site in just 24 short, easy lessons. This book covers the following key skills and technologies:
. All the examples in the book have been tested for compatibility with the latest version of every major web browser. That includes Apple Safari, Google Chrome, Microsoft Internet Explorer, Mozilla Firefox, and Opera. You’ll learn from the start to be compatible with the past, yet ready for the future.
. There is extensive coverage of Cascading Style Sheets (CSS), which allows you to carefully control the layout, fonts, colors, and formatting of every aspect of your web pages, including both text and images. When it comes to creating eye-popping web pages, CSS goes far beyond what traditional HTML pages could do by themselves. For example, did you know that CSS allows you to specifically tailor the information on a page just for printing, in addition to normal web viewing?
. Hours 10 through 12 introduce you to multimedia applications and their use, including where to find industry-standard software you can download and try free.
. The technical stuff is not enough, so this book also includes the advice you need when set-ting up a web site to achieve your goals. Key details—designing an effective page layout, posting your page to the Internet with FTP software, organizing and managing multiple pages, and getting your pages to appear high on the query lists at all the major Internet search sites—are all covered in enough depth to get you beyond the snags that often frustrate beginners.
Attention to many of these essentials are what made the first seven editions of this book best-sellers, and this updated edition—the first for this title since 2005—is no different. All of the examples have been updated and a significant portion of the content has been revised to match new examples and new technologies.
Visual Examples
Every example in this book is illustrated in two parts:
. The text you type to make an HTML page is shown first, with all HTML and CSS code high-lighted.
. The resulting web page is shown as it will appear to users who view it with the world’s most popular web browsers.
You’ll often be able to adapt the example to your own pages without reading any of the accompany-ing text at all.
ix
You will also find the use of colors within code examples and when elements of code appear in the explanatory text. These colors highlight the different bits and pieces of code both to enhance your familiarity with them and to call attention to their use.
. HTML tags are displayed in dark blue. . HTML comments are displayed in brown. . CSS elements are displayed in green.
. HTML attribute names are displayed in light blue. . HTML attribute values are displayed in magenta.
Be aware that the colors of certain terms change depending on their context. For instance, when CSS elements are used within the style attribute of an HTML tag, they will be color-coded as HTML attribute values (magenta) rather than CSS elements (green).
Special Elements
As you complete each hour, margin notes help you immediately apply what you just learned to your own web pages.
Q&A, Quiz, and Exercises
Every hour ends with a short question-and-answer session that addresses the kind of “dumb ques-tions” everyone wishes they dared to ask. A brief but complete quiz lets you test yourself to be sure you understand everything presented in the hour. Finally, one or two optional exercises give you a chance to practice your new skills before you move on.
TIP
Tips and tricks to save you precious time are set aside in “Tip” boxes so that you can spot them quickly.
WARNING
When there’s something you need to watch out for, you’ll be warned about it in “Warning” boxes.
NOTE
Before learning the intricacies of HTML and CSS, it is important that you gain a solid understanding of the technologies that help transform these plain-text files to the rich multimedia displays you see on your computer or handheld device when browsing the World Wide Web.
A file containing HTML and CSS is useless without a web browser to view it, and no one besides yourself will see your content unless a web server is involved. Web servers make your content available to others who, in turn, use their web browsers to navigate to an address and wait for the server to send information to them. You will be intimately involved in this process, as you must create files and then put them on a server to make them avail-able in the first place, and you must ensure that your content will appear to the end-user as you intended.
A Brief History of HTML and the
World Wide Web
Once upon a time, back when there weren’t any footprints on the moon, some farsighted folks decided to see whether they could connect several major computer networks together. I’ll spare you the names and stories (there are plenty of both), but the eventual result was the “mother of all networks,” which we call the Internet.
Until 1990, accessing information through the Internet was a rather techni-cal affair. It was so hard, in fact, that even Ph.D.-holding physicists were often frustrated when trying to swap data. One such physicist, the now-famous (and knighted) Sir Tim Berners-Lee, cooked up a way to easily cross-reference text on the Internet through “hypertext” links.
HOUR 1
Understanding How
the Web Works
WHAT YOU’LL LEARN IN
THIS HOUR:
.A very brief history of the World Wide Web
.What is meant by the term “web page,” and why that term doesn’t always reflect all the content involved .How content gets from
your personal computer to someone else’s web browser
.How to select a web hosting provider .How different web
This wasn’t a new idea, but his simple Hypertext Markup Language (HTML) managed to thrive while more ambitious hypertext projects floun-dered. Hypertextoriginally meant text stored in electronic form with cross-reference links between pages. It is now a broader term that refers to just about any object (text, images, files, and so on) that can be linked to other objects.Hypertext Markup Languageis a language for describing how text, graphics, and files containing other information are organized and linked together.
By 1993, only 100 or so computers throughout the world were equipped to serve up HTML pages. Those interlinked pages were dubbed the World Wide Web (WWW), and several web browser programs had been written to allow people to view web pages. Because of the growing popularity of the Web, a few programmers soon wrote web browsers that could view graph-ical images along with text. From that point forward, the continued devel-opment of web browser software and the standardization of the HTML— and XHTML—languages has lead us to the world we live in today, one in which more than 110 million web servers answer requests for more than 25 billion text and multimedia files.
These few paragraphs really are a brief history of what has been a remark-able period of time. Today’s college freshmen have never known a time in which the World Wide Web didn’t exist, and the idea of “always-on” infor-mation and ubiquitous computing will shape all aspects of our lives mov-ing forward. Instead of seemov-ing web content creation and management as a set of skills possessed only by a few technically-oriented folks (ok, call them “geeks” if you will), by the end of this book you will see that these are skills that anyone can master, regardless of inherent geekiness.
Creating Web Content
You may have noticed the use of the term “web content” rather than “web pages”—that was intentional. Although we talk of “visiting a web page,” what we really mean is something like “looking at all the text and the images at one address on our computer.” The text that we read, and the images that we see, are rendered by our web browsers, which are given certain instructions found in individual files.
Those files contain text that is marked up, or surrounded by, HTML codes that tell the browser how to display the text—as a heading, as a paragraph, in a red font, and so on. Some HTML markup tells the browser to display NOTE
For more information about the history of the World Wide Web, see the Wikipedia article on this topic:
Understanding Web Content Delivery
3an image or video file rather than plain text, which brings me back to the point—different types of content are sent to your web browser, so simply saying “web page” doesn’t begin to cover it. Here we use the term “web content” instead, to cover the full range of text, image, audio, video, and other media found online.
In later lessons, you will learn the basics of linking to or creating the vari-ous types of multimedia web content found in web sites. All you need to remember at this point is that youare in control of the content a user sees when visiting your web site. Beginning with the file that contains text to display or codes that tell the server to send a graphic along to the user’s web browser, you have to plan, design, and implement all the pieces that will eventually make up your web presence. As you will learn throughout this book, it is not a difficult process as long as you understand all the little steps along the way.
In its most fundamental form, web content begins with a simple text file containing HTML or XHTML markup. XHTML is another flavor of HTML; the “X” stands for eXtensible, and you will learn more about it as you con-tinue through the lessons. The most important thing to know from the out-set is that all the examples in this book are HTML 4 and XHTML compati-ble, meaning that they will be rendered similarly both now and in the future by any newer generations of web browsers. That is one of the bene-fits of writing standards-compliant code: you do not have to worry about having to go back to your code sometime in the future and change it because it “doesn’t work.” Your code will likely always “work” for as long as web browsers adhere to standards (hopefully a long time).
Understanding Web Content
Delivery
However, there are several steps in the process—and potentially several trips between the browser and server—before you see the entire content of the site you requested.
Suppose you want to do a Google search, so you dutifully type
http://www.google.comin the address bar or select the Google bookmark from your bookmarks list. Almost immediately, your browser will show you something like what’s shown in Figure 1.2.
FIGURE 1.1
A browser request and a
server response.
FIGURE 1.2
Visiting www.google.com.
Figure 1.2 shows a web site that contains text plus one image (the Google logo). A simple version of the processes that occurred to retrieve that text and image from a web server and display it on your screen is as follows:
Understanding Web Content Delivery
52. After receiving the request for a specific file, the web server process looks in its directory contents for the specific file, opens it, and sends the content of that file back to your web browser.
3. The web browser receives the content of the index.html file, which is text marked up with HTML codes, and renders the content based on these HTML codes. While rendering the content, the browser hap-pens upon the HTML code for the Google logo, which you can see in Figure 1.2. The HTML code looks like this:
<img src
=”/logos/logo.gif”
width=”384”
height=”121”
border=”0”
alt=”Google”
/>The tag provides attributes that tell the browser the file source loca-tion (src), width (width), height (height), border type (border), and alternative text (alt) necessary to display the logo. You will learn more about attributes throughout later lessons.
4. The browser looks at the srcattribute in the <img/>tag to find the source location. In this case the image logo.gif can be found in the “logos” directory at the same web address (www.google.com) from which the browser retrieved the HTML file.
5. The browser requests the file at the
http://www.google.com/logos/logo.gif web address.
6. The web server interprets that request, finds the file, and sends the contents of that file to the web browser that requested it.
7. The web browser displays the image on your monitor.
As you can see in the description of the web content delivery process, web browsers do more than simply act as picture frames through which you can view content. Browsers assemble the web content components and arrange those parts according to the HTML commands in the file.
Selecting a Web Hosting Provider
Despite just telling you that you can work through all the lessons in this book without having a web server, we actually recommend that you work with a web server. Don’t worry— obtaining a hosting provider is usually a quick, painless, and relatively inexpensive process. In fact, you can get your own domain name and a year of web hosting for just slightly more than the cost of the book you are reading now.
If you type web hosting providerin your search engine of choice, you will get millions of hits and an endless list of sponsored search results (also known as ads). There are not this many web hosting providers in the world, although it might seem like there are. Even if you are looking at a managed list of hosting providers, it can be overwhelming—especially if all you are looking for is a place to host a simple web site for yourself or your company or organization.
You’ll want to narrow your search when looking for a provider and choose one that best meets your needs. Some selection criteria for a web hosting provider are
. Reliability/server ”uptime”—if you have an online presence, you want to make sure people can actually get there consistently.
. Customer service—look for multiple methods for contacting cus-tomer service (phone, email, chat) as well as online documentation for common issues.
. Server space—does the hosting package include enough server space to hold all the multimedia files (images, audio, video) you plan to include in your web site (if any)?
. Bandwidth—does the hosting package include enough bandwidth so that all the people visiting your site and downloading files can do so without you having to pay extra?
. Domain name purchase and management—does the package include a custom domain name, or must you purchase and maintain your domain name separately from your hosting account?
Selecting a Web Hosting Provider
7Here are three reliable web hosting providers whose basic packages con-tain plenty of server space and bandwidth (as well as domain names and extra benefits) at a relatively low cost. If you don’t go with any of these web hosting providers, you can at least use their basic package descrip-tions as a guideline as you shop around.
. A Small Orange (http://www.asmallorange.com)—their “Tiny” and “Small” hosting packages are perfect starting places for the new web content publisher.
. DailyRazor (http://www.dailyrazor.com)—their RazorLIMIT and RazorSTARTER hosting packages are full-featured and reliable.
. LunarPages (http://www.lunarpages.com)—the Basic hosting pack-age is suitable for many personal and small business web sites.
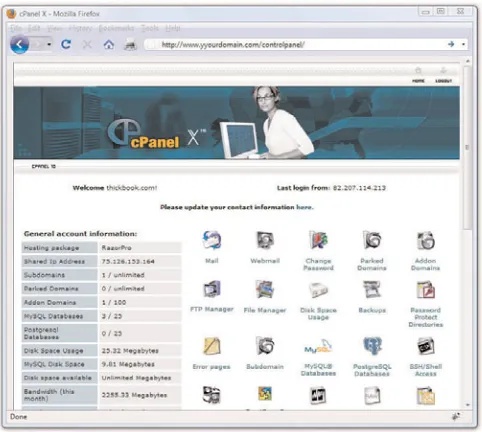
One feature of a good hosting provider is that they provide a “control panel” for you to manage aspects of your account. Figure 1.3 shows the control panel for my own RazorPRO hosting account at Daily Razor. Many web hosting providers offer this particular control panel software, or some control panel that is similar in design—clearly labeled icons leading to tasks you can perform to configure and manage your account.
FIGURE 1.3
You might never need to use your control panel, but having it available to you simplifies the installation of databases and other software, the viewing of web statistics, and the addition of e-mail addresses (among many other features). If you can follow instructions, you can manage your own web server—no special training required.
Testing with Multiple Web Browsers
Having just discussed the process of web content delivery and the acquisi-tion of a web server, it might seem a little strange to step back and talk about testing your web sites with multiple web browsers. However, before you go off and learn all about creating web sites with HTML and CSS, do so with this very important statement in mind: every visitor to your web site will potentially use hardware and software configurations that are dif-ferent than your own. Their device types (desktop, laptop, netbook, smart-phone, iPhone), their screen resolutions, their browser types, their browser window sizes, their speed of connections—remember that you cannot con-trol any aspect of what your visitors use when they view your site.Although all web browsers process and handle information in the same general way, there are some specific differences among them that result in things not always looking the same in different browsers. Even users of the same version of the same web browser can alter how a page appears by choosing different display options and/or changing the size of their view-ing windows. All the major web browsers allow users to override the back-ground and fonts specified by the web page author with those of their own choosing. Screen resolution, window size, and optional toolbars can also change how much of a page someone sees when it first appears on their screens. You can ensure only that you write standards-compliant HTML and CSS.
Do not, under any circumstances, spend hours on end designing some-thing that looks “perfect” on your own computer—unless you are willing to be disappointed when you look at it on your friend’s computer, the computer in the coffee shop down the street, or on your iPhone.
You should always test your web sites with as many of these web browsers as possible:
. Apple Safari (http://www.apple.com/safari/) for Mac and Windows
Summary
9. Mozilla Firefox (http://www.mozilla.com/firefox/) for Mac, Windows, and Linux
. Microsoft Internet Explorer (http://www.microsoft.com/ie) for Windows
. Opera (http://www.opera.com/) for Mac, Windows, and Linux/UNIX
Summary
This hour introduced you to the concept of using HTML to mark-up text files in order to produce web content. You also learned that there is more to web content than just the “page”—web content also includes image, audio, and video files. All of this content lives on a web server—a remote machine often far away from your own computer. On your computer or other device, you use a web browser to request, retrieve, and eventually display web content on your screen.
Q&A
Q You’ve said “web content” instead of “web page,” but I hear people refer to “web pages.” So what do they mean? And how are these terms different from a “home page” or a “web site”?
A The metaphor of the World Wide Web as a library has always been easy
for people to understand; in that library, individual web sites are books, and the individual content files on web sites as “pages.” A “web site” is comprised of one or more pages that are created together and relat-ed in content. A “home page” usually means the first page people visit when they look at a web site. Problems arise, however, when people say “visit my web page” when really they mean “come to my web site”— sites are full of pages. Referring to a collection of web content as a page instead of a site can tip someone off that you really don’t under-stand how the web works—either because you don’t underunder-stand the way web content works together to create a site, or because you’ve planned, designed, and implemented a site in which your content really is all on one page!
Q I’ve looked at the HTML “source” of some web pages on the Internet and it looks frighteningly difficult to learn. Do I have to think like a computer programmer to learn this stuff?
A Although complex HTML pages can indeed look daunting, learning HTML
is much easier than learning actual software programming languages (such as C++ or Java). HTML is a markup language rather than a pro-gramming language; you mark-up text so that the text can be rendered a certain way by the browser. That’s a completely different set of thought processes than developing a computer program. You really don’t need any experience or skill as a computer programmer to be a successful web content author.
One of the reasons the HTML behind many commercial web sites looks complicated is because it was likely created by a visual web design tool—a “what you see is what you get” or “WYSIWYG” editor that will use whatever markup its software developer told it to use in certain cir-cumstances—as opposed to being hand-coded, in which youare
Workshop
11Workshop
The workshop contains quiz questions and exercises to help you solidify your understanding of the material covered. Try to answer all of the ques-tions before looking at the “Answers” section that follows.
Quiz
1. Define the term web content.
2. How many files would you need to store on a web server to produce a single web page with some text and two images on it?
3. What are some of the features to look for in a web hosting provider?
Quiz Answers
1. Web content is a term that describes the full range of text, image, audio, video, and other media files delivered from web servers to web browsers.
2. You would need three: one for the web page itself, which includes the text and the HTML markup, and one for each of the two images.
3. Look for reliability, customer service, web space and bandwidth, domain name service, site management extras, and price.
Exercises
In the previous hour, you learned about the process of requesting web con-tent via a web browser and how the web server responds to those requests. In this hour you’ll learn where you, as the content creator, fit into making web content available online—you have to publish that content on a web server in order for other people to find it.
Creating the Sample File for this Hour
Before we begin, take a look at Listing 2.1. This listing represents a simple piece of web content—a few lines of HTML that print “Hello World! Welcome to My Web Server.” in large, bold letters on two lines centered within the browser window.Listing 2.1 Our Sample HTML File
<html> <head>
<title>Hello World!</title> </head>
<body>
<h1 align=”center”>Hello World!<br/>Welcome to My Web Server.</h1> </body>
</html>
To make use of this content, open a text editor of your choice, such as Notepad (on Windows) or TextEdit (on a Mac). Do not use WordPad, Microsoft Word, or other full-featured word-processing software, as those create different sorts of files than the plain-text files we use for web content.
HOUR 2
Publishing Web Content
WHAT YOU’LL LEARN IN
THIS HOUR:
.How to create a basic HTML file using a text editor
.How to transfer files to your web server using FTP .Where files should be
placed on a web server .How to distribute web
con-tent without a web server .How to use other
publish-ing methods such as blogs
NOTE
Type the content that you see in Listing 2.1 and then save the file using sample.htmlas the file name. The .html extension tells the web server that your file is, indeed, full of HTML. When the file contents are sent to the web browser that requests it, the browser will also know that it is HTML and will render it appropriately.
Now that you have a sample HTML file to use—and hopefully somewhere to put it, such as a web hosting account—let’s get to publishing your web content.
Using FTP to Transfer Files
As you’ve learned so far, you have to put your web content on a web serv-er in ordserv-er to make it accessible to othserv-ers. This process typically occurs by usingFile Transfer Protocol (FTP). To use FTP, you need an FTP client—a program used to transfer files from your computer to a web server.
FTP clients require three pieces of information in order to connect to your web server; this information will have been sent to you by your hosting provider after you set up your account:
. The hostname, or address, to which you will connect
. Your account username
. Your account password
Once you have this information, you are ready to use an FTP client to transfer content to your web server.
Selecting an FTP Client
Using FTP to Transfer Files
15There are many FTP clients freely available to you, but you can also trans-fer files via the web-based File Manager tool that is likely part of your web server’s control panel. However, that method of file transfer typically introduces more steps into the process and isn’t nearly as streamlined (or simple) as installing an FTP client on your own machine.
Here are some popular free FTP clients:
. Classic FTP (http://www.nchsoftware.com/classic/) for Mac and Windows
. Cyberduck (http://cyberduck.ch/) for Mac
. Fetch (http://fetchsoftworks.com/) for Mac
. FileZilla (http://filezilla-project.org/) for all platforms
. FireFTP (http://fireftp.mozdev.org/) Firefox extension for all plat-forms
Once you have selected an FTP client and installed it on your computer, you are ready to upload and download files from your web server. In the next section, you’ll see how this process works using the sample file creat-ed at the beginning of this hour.
Using an FTP Client
The following steps show how to use Classic FTP to connect to your web server and transfer a file. However, all FTP clients use similar, if not exact,
FIGURE 2.1
interfaces. If you understand the following steps, you should be able to use any FTP client.
Remember, you first need the hostname, the account username, and the account password.
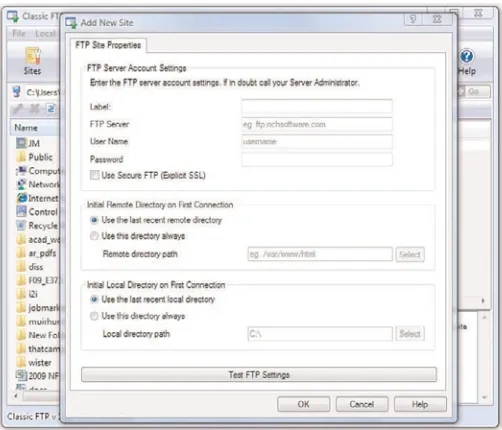
1. Start the Classic FTP program and click the Connect button. You will be prompted to fill out information for the site to which you wish to connect, as shown in Figure 2.2.
FIGURE 2.2
Connecting to a new site in Classic FTP.
2. Fill in each of the items shown in Figure 2.2 as follows:
. The site Label is the name you’ll use to refer to your own site. Nobody else will see this name, so enter whatever you want.
. The FTP Server is the FTP address of the web server to which you need to send your web pages. This address will have been given to you by your hosting provider. It will probably be
yourdomain.com, but check the information you received when you signed up for service.
. The User Name field and the Password field should also be com-pleted using information given to you by your hosting provider.
Using FTP to Transfer Files
173. When you’re finished with the settings, click OK to save the settings and establish a connection with the web server.
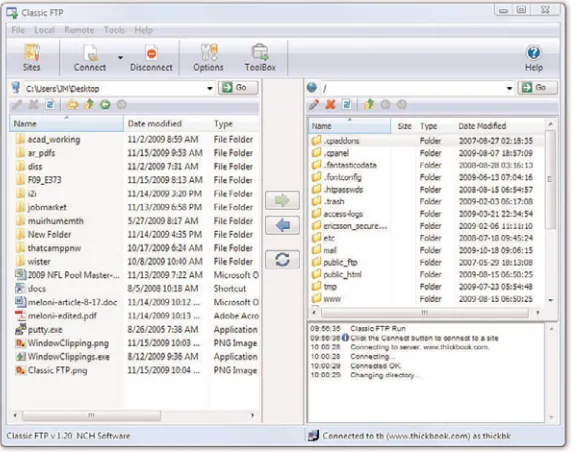
You will see a dialog box indicating that Classic FTP is attempting to connect to the web server. Upon successful connection, you will see an interface like that which is shown in Figure 2.3, showing the con-tents of the local directory on the left and the concon-tents of your web server on the right.
FIGURE 2.3
A successful connection to a remote web server via Classic FTP.
4. You are now almostready to transfer files to your web server. All that remains is to change directories to what is called the document rootof your web server. The document root of your web server is the direc-tory that is designated as the top-level direcdirec-tory for your web con-tent—the starting point of the directory structure, which you will learn more about later in this hour. Often, this directory will be named public_html (as shown in Figure 2.3), www (also shown in Figure 2.3, as www has been created as an alias for public_html) or htdocs. This is not a directory that you will have to create, as your hosting provider will have created it for you.
5. The goal is to transfer the sample.html file you created earlier from your computer to the web server. Find the file in the directory listing on the left of the FTP client interface (navigate around if you have to) and click it once to highlight the file name.
6. Click the right-arrow button in the middle of the client interface to send the file to the web server. Once the file transfer is completed, the right side of the client interface should refresh to show you that the file has made it to its destination.
7. Click the Disconnect button to close the connection, and then exit out of the Classic FTP program.
These steps are conceptually similar to the steps you will take anytime you want to send files to your web server via FTP. You can also use your FTP client to create subdirectories on the remote web server. To create a subdi-rectory using Classic FTP, click the Remote menu and then click New Folder. Different FTP clients will have different interface options to achieve the same goal.
Understanding Where to Place Files
on the Web Server
An important aspect of maintaining web content is determining how you will organize that content—not only for the user to find, but also for you to maintain on your server. Putting files in directories will help you to man-age those files.
Naming and organizing directories on your web server, and developing rules for file maintenance, is completely up to you. However, maintaining a well-organized server simply makes your management of its content more efficient in the long run.
Basic File Management
Understanding Where to Place Files on the Web Server
19http://www.companyname.com/
to
http://www.companyname.com/products/
or
http://www.companyname.com/services/
In the previous section, I used the term document rootwithout really explaining what that is all about. The document root of a web server is essentially the trailing “slash” in the full URL. For instance, if your domain is yourdomain.com and your URL is http://www.yourdomain.com/, then the document root is the directory represented by the trailing slash (/). The document root is the starting point of the directory structure you create on your web server; it is the place where the web server begins looking for files requested by the web browser.
If you put the sample.html file in your document root as previously direct-ed, then you will be able to access it via a web browser at the following URL:
http://www.yourdomain.com/sample.html
If you were to enter this URL into your web browser, you would see the rendered sample.html file as shown in Figure 2.4.
FIGURE 2.4
The sample.html file accessed via a web browser.
However, if you created a new directory within the document root and put the sample.html file in that directory, then the file would be accessed at this URL:
If you put the sample.html file in the directory you originally saw upon connecting to your server—that is, you did notchange directories and place the file in the document root—then the sample.html file would not be accessible from your web server at any URL. The file will still be on the machine that you know as your web server, but since the file is not in the document root—where the server software knows to start looking for files—it will never be accessible to anyone via a web browser.
The bottom line? Always navigate to the document root of your web server before you start transferring files.
This is especially true with graphics and other multimedia files. A common directory on web servers is called “images,” where, as you can imagine, all the image assets are placed for retrieval. Other popular directories include “css” for stylesheet files (if you are using more than one) and “js” for exter-nal JavaScript files. Or, if you know you will have an area on your web site where visitors can download many different types of files, you might sim-ply call that directory “downloads.”
Whether it’s a ZIP file containing your art portfolio or an Excel spreadsheet with sales numbers, it’s often useful to publish files on the Internet that aren’t simply web pages. To make a file available on the Web that isn’t an HTML file, just upload the file to your web site as if it werean HTML file, following the instructions earlier in this hour for uploading. After the file is uploaded to the web server, you can create a link to it (as you’ll learn in later hours). In other words, your web server can “serve” much more than HTML.
Here’s a sample of the HTML code that you will learn in that hour. The following code would be used for a file named artfolio.zip, located in the downloads directory of your web site, and link text that reads “Download my art portfolio!”:
<a href=”/downloads/artfolio.zip”>Download my art portfolio!</a>
Using an Index Page
When you think of an index, you probably think of the section in the back of a book that tells you where to look for various keywords and topics. The index file in a web server directory can serve that purpose—if you design it that way. In fact, that’s where the name originates.
Understanding Where to Place Files on the Web Server
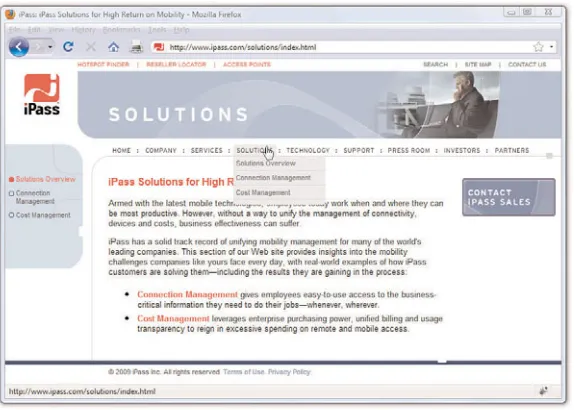
21navigate to a specific directory in your web site. If you’ve created that page with usability in mind, your users will be able to get to all content in that section from the index page.
For example, Figure 2.5 shows the drop-down navigation and left-side navigation both contain links to three pages: Solutions Overview (the sec-tion index page itself), Connecsec-tion Management, and Cost Management. The content of the page itself—called index.html and located within the solutions directory—also has links to those two additional pages in the solutions section. When users arrive at the index page of the solutions tion in this particular web site, they can reach any other page in that sec-tion (and three different ways!).
FIGURE 2.5
Showing a good section index page.
Another function of the index page is that when users visit a directory on your site that has an index page, but they do not specify that page, they will still land on the main page for that section of your site—or for the site itself.
For instance, in the previous example, a user could have typed either of the following URLs and landed on the main page of the solutions section of that web site:
Had there been no index.html page in the solutions directory, the results would depend on the configuration of the web server. If the server is con-figured to disallow directory browsing, the user would have seen a “Directory Listing Denied” message when attempting to access the URL without a specified page name. However, if the server is configured to allow directory browsing, the user would have seen a list of the files in that directory.
These server configuration options will have already been determined for you by your hosting provider. If your hosting provider allows you to mod-ify server settings via a control panel, then you can change these settings so that your server responds to requests based on your own requirements.
Not only is the index file used in subdirectories, it’s used in the top-level directory (or document root) of your web site as well. The first page of your web site—or home pageormain page, or however you wish to refer to the web content you want users to see when they first visit your domain— should be named index.html and placed in the document root of your web server. This will ensure that when users type
http://www.yourdomain.com/ into their web browsers, the server will respond with content you intended them to see (rather than “Directory Listing Denied” or some other unintended consequence).
Distributing Content without a Web
Server
Publishing HTML and multimedia files online is obviously the primary reason to learn HTML and create web content. However, there are also sit-uations in which other forms of publishing simply aren’t viable. For exam-ple, you might want to distribute CD-ROMs, DVD-ROMs, or USB drives at a trade show with marketing materials designed as web content—that is, hyperlinked text viewable through a web browser, but without a web serv-er involved. You might also want to include HTML-based instructional manuals on removable media for students at a training seminar. These are just two examples of how HTML pages can be used in publishing scenar-ios that don’t involve the Internet.
Distributing Content without a Web Server
23Publishing Content Locally
Let’s assume you need to create a local site that you want to distribute on a USB drive. Even the cheapest USB drives hold so much data these days— and basic hypertext files are quite small—that you can distribute an entire siteand a fully-functioning web browserall on one little drive.
Simply think of the directory structure of your USB drive just as you would the directory structure of your web server. The top-level of the USB drive directory structure can be your document root. Or if you are distrib-uting a web browser along with the content, you might have two directo-ries—for example, one named browser and one named content. In that case, the content directory would be your document root. Within the docu-ment root, you could have additional subfolders in which you place con-tent and other multimedia assets.
It’s as important to maintain a good organization with a local site as it is with a remote web site, so that you avoid broken links in your HTML files. You will learn more about the specifics of linking together files in a later hour.
Publishing Content on a Blog
You might have a blog hosted by a third-party, such as Blogger or
WordPress (among others), and thus have already published content with-out having a dedicated web server or even knowing any HTML. These services offer visual editorsin addition to source editors, meaning that you can type your words and add visual formatting such as bold, italics, or font col-ors without knowing the HTML for these actions. But still, the content becomes actual HTML when you click the Publish button in these editors.
However, with the knowledge you will acquire throughout this book, your blogging will be enhanced because you will able to use the source editor for your blog post content and blog templates, thus affording you more control over the look and feel of that content. These actions occur different-ly than the process you learned for creating an HTML file and uploading it via FTP to your own dedicated web server, but I would be remiss if I did not note that blogging is, in fact, a form of web publishing.
NOTE
Distributing a web browser isn’t required when creating and dis-tributing a local site, although it’s a nice touch. You can rea-sonably assume that users have their own web browsers and will open the index.html file in a directory to start browsing the hyperlinked content. However, if you would like to distribute a web browser on the USB drive, go to
Testing Web Content
Whenever you transfer files to your web server or place them on remov-able media for local browsing, you should immediately test every page thoroughly. The following checklist will help ensure that your web content behaves the way you expected. Note that some of the terms might be unfa-miliar to you at this point, but come back to this checklist as you progress through this book and create larger projects:
. Before you transfer your files, test them locally on your machine to ensure that the links work and the content reflects the visual design you intended. After you transfer the pages to a web server or remov-able device, test them all again.
. Perform these tests with as many browsers that you can—Chrome, Firefox, Internet Explorer, Opera, and Safari is a good list—and on both Mac and Windows platforms. If possible, check at low resolu-tion (800x600) and high resoluresolu-tion (1600x1200).
. Turn off auto image loading in your web browser before you start testing so that you can see what each page looks like without the graphics. Check your alt tag messages and then turn image loading back on to load the graphics and review the page carefully again.
. Use your browser’s font size settings to look at each page in various font sizes to ensure that your layout doesn’t fall to pieces if users override your font specifications with their own.
. Wait for each page to completely finish loading and then scroll all the way down to make sure that all images appear where they should.
. Time how long it takes each page to load. Does it take more than a few seconds to load? If so, is the information on that page valuable enough to keep users from going elsewhere before the page finishes loading? Granted, broadband connections are common, but that doesn’t mean you should load up your pages with 1 MB images.
Summary
25Summary
You began this hour by creating a very simple HTML file to use as a test file for the process of transferring files to your web server. You learned how that file transfer process works and what type of software you need to perform those transfers (an FTP client). You also learned a little bit about web server directory structures and file management, as well as the very important purpose of the index.html file in a given web server directory. You also learned that you can distribute web content on removable media, and you learned how to go about structuring the files and directories to achieve the goal of viewing content without using a remote web server. Finally, you learned how to test your files before releasing your site for public consumption.
Q&A
Q All the tests you recommend would take longer than creating my pages! Can’t I get away with less testing?
A If your pages aren’t intended to make money or provide an important
service, it’s probably not a big deal if they look funny to some users or produce errors once in a while. In that case, just test each page with a couple of different browsers and call it a day. However, if you need to project a professional image, there is no substitute for rigorous testing.
Q Seriously, who cares how I organize my web content?
A Believe it or not, the organization of your web content does matter to
Workshop
The workshop contains quiz questions and exercises to help you solidify your understanding of the material covered. Try to answer all questions before looking at the “Quiz Answers” section that follows.
Quiz
1. What three pieces of information do you need to connect to your web server via FTP?
2. What is the purpose of the index.html file?
3. Does your web site have to include a directory structure?
Quiz Answers
1. The hostname, your account username, and your account password.
2. The index.html file is typically the default file for a directory within a web server. It allows users to access
http://www.yourdomain.com/somedirectory/ without using a trail-ing file name and still end up in the appropriate place.
3. No. Using a directory structure for file organization is completely up to you, although it is highly recommended to use one because it sim-plifies content maintenance.
Exercises
. Using your FTP client, create a subdirectory within the document root of your web site. Paste the contents of the sample.html file into another file named index.html, change the text between the <title>
and</title>tags to something new, and change the text between the
<h1>and</h1>tags to something new. Save the file and upload it to the new subdirectory. Use your web browser to navigate to the new directory on your web server and see that the content in the index.html file appears. Then, using your FTP client, delete the index.html file from the remote subdirectory. Return to that URL with your web browser, reload the page, and see how the server responds without the index.html file in place.
The first two hours gave you a basic idea of the process behind creating web content and viewing it online or locally, if you do not yet have a web hosting provider. In this hour, we’ll get down to the business of explaining the various elements that must appear in an HTML file.
At the end of the hour, you’ll learn how HTML differs from XHTML and why there are two different languages designed to do the same thing—cre-ate web content. In general, this hour provides a quick summary of HTML and XHTML basics and gives some practical tips to make the most of your time as a web page author and publisher. It’s not all theory, however; you do get to see a real web page and the HTML code behind it.
Here’s a review of what you need to do before you’re ready to use the rest of this book:
1. Get a computer. I used a computer with Windows Vista to test the sample web content and capture the figures in this book, but you can use any Windows, Macintosh, or Linux/UNIX machine to create and view your web content.
2. Get a connection to the Internet. Whether you have a dial-up, wire-less, or broadband connection doesn’t matter for the creation and viewing of your web content, but the faster the connection, the better for the overall experience. The Internet Service Provider (ISP), school, or business that provides your Internet connection can help you with the details of setting it up properly. Additionally, many public spaces such as coffee shops, bookstores, and libraries offer free wireless Internet service that you can use if you have a laptop computer with Wi-Fi network support.
HOUR 3
Understanding HTML
and XHTML Connections
WHAT YOU’LL LEARN IN
THIS HOUR:
.How to create a simple web page in HTML .How to include all the
HTML Tags that every web page must have
.How to organize a page with paragraphs and line breaks
.How to organize your con-tent with headings .How to validate your web
content
.How to differentiate between HTML, XML, XHTML, and HTML 5
NOTE
http://www.the-3. Get web browser software. This is the software your computer needs in order to retrieve and display web content. As you learned in the first hour, the most popular browser software (in alphabetical order) is Apple Safari, Google Chrome, Mozilla Firefox, Microsoft Internet Explorer, and Opera. It’s a good idea to install several of these browsers so that you can experiment and make sure that your con-tent looks consiscon-tent across them all; you can’t make assumptions about the browsers other people are using.
4. Explore! Use a web browser to look around the Internet for web sites that are similar in content or appearance to those you’d like to create. Note what frustrates you about some pages, what attracts you and keeps you reading others, and what makes you come back to some pages over and over again. If there is a particular topic that interests you, consider searching for it using a popular search engine such as Google (http://www.google.com/) or Bing
(http://www.bing.com/).
Getting Started with a Simple Web
Page
In the first hour, you learned that a “web page” is just a text file that is “marked-up” by (or surrounded by) HTML codes that tell the browser how to display the text. To create these text files, use a text editorsuch as Notepad (on Windows) or TextEdit (on a Mac)—do not use WordPad, Microsoft Word, or other full-featured word-processing software, as those create different sorts of files than the plain-text files we use for web content.
Before you begin working, you should start with some text that you want to put on a web page:
1. Find (or write) a few paragraphs of text about yourself, your family, your company, your softball team, or some other subject in which you’re interested.
2. Save this text as plain, standard ASCII text. Notepad and most sim-ple text editors always save files as plain text, but if you’re using another program, you might need to choose this file type as an option (after selecting File, Save As).
As you go through this hour, you will add HTML markup (called tags) to the text file, thus making it into web content.
NOTE
Although all web browsers process and handle information in the same general way, there are some specific differences among them that result in things not always looking the same in different browsers. Be sure to check your web pages in multi-ple browsers to make sure that they look reasonably consistent. NOTE
As discussed in Hour 1, if you plan to put your web content on the Internet (as opposed to pub-lishing it on CD-ROM or a local intranet), you’ll need to transfer it to a computer that is connected to the Internet 24 hours a day. The same company or school that provides you with Internet access might also provide web space; if not, you might need to pay a host-ing provider for the service. WARNING
Do not create your first HTML file with Microsoft Word or any other HTML-compatible word processor; most of these pro-grams attempt to rewrite your HTML for you in strange ways, potentially leaving you totally confused. Additionally, I recom-mend that you do notuse a
Getting Started with a Simple Web Page
29When you save files containing HTML tags, always give them a name end-ing in.html. This is important: if you forget to type the .htmlat the end of the filename when you save the file, most text editors will give it some other extension (such as .txt). If that happens, you might not be able to find the file when you try to look at it with a web browser; if you find it, it certainly won’t display properly. In other words, web browsers expect a web page file to have a file extension of .html.
You might also encounter a web page with a file extension of .htm, which is also acceptable. You might find other file extensions used on the Web, such as .jsp (Java Server Pages), .asp(Microsoft Active Server Pages), or
.php(PHP: Hypertext Preprocessor), but these file types use server-side technologies that are beyond the scope of HTML.
Listing 3.1 shows an example of text you can type and save to create a sim-ple HTML page. If you opened this file with Firefox, you would see the page shown in Figure 3.1. Every web page you create must include the
<html></html>,<head></head>,<title></title>, and <body></body>tag pairs.
Listing 3.1 The <html>, <head>,<title>, and <body>Tags
<?xml version=”1.0” encoding=”UTF-8”?>
<!DOCTYPE html PUBLIC “-//W3C//DTD XHTML 1.1//EN” “http://www.w3.org/TR/xhtml11/DTD/xhtml11.dtd”>
<htmlxmlns=”http://www.w3.org/1999/xhtml” xml:lang=”en”> <head>
<title>The First Web Page</title> </head>
<body> <p>
In the beginning, Tim created the HyperText Markup Language. The Internet was without form and void, and text was upon the face of the monitor and the Hands of Tim were moving over the face of the keyboard. And Tim said, Let there be links; and there were links. And Tim saw that the links were good; and Tim separated the links from the text. Tim called the links Anchors, and the text He called Other Stuff. And the whole thing together was the first Web Page.
</p> </body>
</html>
NOTE
If you’re using TextEdit on a Macintosh computer, the steps for creating an HTML file are a little different than for using Notepad on a Windows comput-er—both are popular text edi-tors, but with the latter you must first click on the Format menu and select Make Plain Text and then change the pref-erences under the Saving head-er by unchecking the box for Append ‘.txt’ Extension to Plain Text Files. Also, the default pref-erences are set to show .html
FIGURE 3.1
When you save the text in Listing 3.1 as an HTML file and view it with a web browser, only the actual title and body text are displayed.
NOTE
Technically speaking, HTML 5 will be the next web standard but it’s not quite at the point of full adoption. Current estimate put the full adoption of HTML somewhere in the year 2011. However, as you learn about important features of HTML and XHTML in this book, I will include notes about how HTML 5 features might differ.
In Listing 3.1, as in every HTML page, the words starting with <and end-ing with >are actually coded commands. These coded commands are called HTML tags because they “tag” pieces of text and tell the web brows-er what kind of text it is. This allows the web browsbrows-er to display the text appropriately.
Getting Started with a Simple Web Page
31If you have obtained a web hosting account, you could use FTP at this point to transfer the firstpage.html file to the web server. In fact, from this hour forward, the instructions will assume you have a hosting provider and are comfortable sending files back and forth via FTP; if that is not the case, please review the first two hours before moving on. Or, if you are consciously choosing to work with files locally (without a web host), be prepared to adjust the instructions to suit your particular needs (such as ignoring “transfer the files” and “type in the URL”).
Creating and Viewing
a Basic Web Page
Before you learn the meaning of the HTML tags used in Listing 3.1, you might want to see exactly how I went about creating and viewing the document itself. Follow these steps:
1. Type all the text in Listing 3.1, including the HTML tags, in Windows Notepad (or use Macintosh TextEdit or another text editor of your choice).
2. Select File, Save As. Be sure to select plain text (or ASCII text) as the
file type.
3. Name the file firstpage.html.
4. Choose the folder on your hard drive where you would like to keep your
web pages—and remember which folder you choose! Click the Save or OK button to save the file.
5. Now start your favorite web browser. (Leave Notepad running, too, so
you can easily switch between viewing and editing your page.)
In Internet Explorer, select File, Open and click Browse. If you’re using Firefox, select File, Open File. Navigate to the appropriate folder and select the
firstpage.htmlfile. Some browsers and operating systems will also allow
you to drag and drop the firstpage.htmlfile onto the browser window in
order to view it.
Voilà!You should see the page shown in Figure 3.1.
TRY IT YOURSELF
▼
NOTE
HTML Tags Every XHTML Web Page
Must Have
The time has come for the secret language of HTML tags to be revealed to you. When you understand this language, you will have creative powers far beyond those of other humans. Don’t tell the other humans, but it’s really pretty easy.
Before you get into the HTML tags, let’s first address the messy-looking code at the top of Listing 3.1. The first line indicates that the HTML docu-ment is, in fact, an XML docudocu-ment:
<?xml version=”1.0” encoding=”UTF-8”?>
The version of XML is set to 1.0, which is fairly standard, as is the type of character encoding (UTF-8).
The second and third lines of code in Listing 3.1 are even more complicat-ed looking:
<!DOCTYPE html PUBLIC “-//W3C//DTD XHTML 1.1//EN” “http://www.w3.org/TR/xhtml11/DTD/xhtml11.dtd”>
Again, the specifics of this code aren’t terribly important as long as you remember to include the code at the start of your pages. This code identi-fies the document as being XHTML 1.1, which then allows web browsers to make sure the code meets all the requirements of XHTML 1.1.
Most HTML tags have two parts: an opening tag, which indicates where a piece of text begins, and a closing tag, which indicates where the piece of text ends. Closing tags start with a /(forward slash) just after the < sym-bol. Another type of tag is the empty tag, which is unique in that it doesn’t include a pair of matching opening and closing tags. Instead, an empty tag consists of a single tag that starts with a <and ends with a /just before the
>symbol. Following is a quick summary of these three tags just to make sure you understand the role each of them plays:
. Anopening tagis an HTML tag that indicates the start of an HTML command; the text affected by the command appears after the open-ing tag. Openopen-ing tags always begin with < and end with >, as in
<html>.
. Aclosing tagis an HTML tag that indicates the end of an HTML com-mand; the text affected by the command appears before the closing tag. Closing tags always begin with </ and end with >, as in </html>. NOTE
It isn’t terribly important that you understand concepts such as character encoding at this point. What is important is that you include the appropriate boil-erplate code in your pages so that they adhere to the latest web standards. As of this writ-ing, XHTML 1.1 is a web stan-dard. HTML 5 is not yet a web standard, but if you were creat-ing an HTML 5 document, these lines at the beginning of your HTML file would not be neces-sary.
NOTE
The XML/XHTML boilerplate code isn’t strictly required in order for you to create web pages. You can delete the opening lines of code in the example so that the page starts with the <html>tag and it