TeAM
YYePG
Digitally signed by TeAM YYePG
DN: cn=TeAM YYePG, c=US, o=TeAM YYePG, ou=TeAM YYePG, [email protected] Reason: I attest to the accuracy and integrity of this document
Game Interface
Design
SVP, Thomson Course Technology PTR: Andy Shafran
Publisher: Stacy L. Hiquet
Senior Marketing Manager: Sarah O’Donnell
Marketing Manager: Heather Hurley
Manager of Editorial Services: Heather Talbot
Senior Acquisitions Editor: Emi Smith
Senior Editor: Mark Garvey
Associate Marketing Manager: Kristin Eisenzopf
Marketing Coordinator: Jordan Casey
Project Editor/Copy Editor: Estelle Manticas
Technical Reviewer: Les Pardew
PTR Editorial Services Coordinator:
Elizabeth Furbish
Interior Layout Tech: William Hartman
Cover Designer: Mike Tanamachi
CD-ROM Producer: Brandon Penticuff
Indexer: Kelly Talbot
Proofreader: Gene Redding © 2005 by Thomson Course Technology PTR. All rights reserved. No part of this book may be reproduced
or transmitted in any form or by any means, electronic or mechanical, including photocopying, record-ing, or by any information storage or retrieval system without written permission from Thomson Course Technology PTR, except for the inclusion of brief quotations in a review.
The Premier Press and Thomson Course Technology PTR logo and related trade dress are trademarks of Thomson Course Technology PTR and may not be used without written permission.
Trial version of Flash MX 2004 is Copyright © Macromedia® Flash™ MX 2004. Macromedia, Inc. and its suppliers. All rights reserved.
All other trademarks are the property of their respective owners.
Important:Thomson Course Technology PTR cannot provide software support. Please contact the appro-priate software manufacturer’s technical support line or Web site for assistance.
Thomson Course Technology PTR and the author have attempted throughout this book to distinguish proprietary trademarks from descriptive terms by following the capitalization style used by the manufac-turer.
Information contained in this book has been obtained by Thomson Course Technology PTR from sources believed to be reliable. However, because of the possibility of human or mechanical error by our sources, Thomson Course Technology PTR, or others, the Publisher does not guarantee the accuracy, adequacy, or completeness of any information and is not responsible for any errors or omissions or the results obtained from use of such information. Readers should be particularly aware of the fact that the Internet is an ever-changing entity. Some facts may have changed since this book went to press.
Educational facilities, companies, and organizations interested in multiple copies or licensing of this book should contact the publisher for quantity discount information. Training manuals, CD-ROMs, and por-tions of this book are also available individually or can be tailored for specific needs.
ISBN: 1-59200-593-4
Library of Congress Catalog Card Number: 2004111222
Printed in the United States of America
04 05 06 07 08 BU 10 9 8 7 6 5 4 3 2 1
For my wife Amy, a beautiful and intelligent woman.
Acknowledgments
M
any people worked hardto make this book possi-ble. Steve Taylor helped immensely with the content; he pro-vided technical information and even some early editing. I thank my editor, Estelle Manticas, for the many hours she spent helping me through the writing process. Thanks to Les Pardew, my technical editor and an all around good guy. Also, thanks go to Emi Smith and the entire team at Premier Press, who not only pro-vided the opportunity to write this book, but also shared their expertise with me.
About the Author
B
rent Fox worked his way through college as an art director for a package design company. While in college, he took a class in 3D animation and was hooked. Brent received his degree in Graphic Design from Brigham Young University, and shortly after graduation he began creating video games. He has worked in the video game industry for more than eight years, and he has worked on games for a wide variety of platforms. His title list includes games on the PC, Game Boy Color, PlayStation, Nintendo 64, Dreamcast, PlayStation 2, and GameCube.Brent has not only created art for the games he has worked on, but he has also served as project manager and art director on many other games as well. He has managed development teams with up to 28 team members. He has created artwork for games published by Blizzard, EA, Midway, 3DO, and Konami, just to name a few. His pub-lished title list includes games such as
Brood War(aStarcraftexpansion set),
Contents at a Glance
Introduction ...xv
Chapter 1
Introduction to Video Games...1
Chapter 2
Planning Menu Flow...7
Chapter 3
The Look and Feel of Your Interface...27
Chapter 4
Basic Design Principles ...43
Chapter 5
Console or PC? ...61
Chapter 6
Button States...73
Chapter 7
Chapter 8
Using Text in Your Interface...87
Chapter 9
Technical Requirements and Tricks ...99
Chapter 10
Tools of the Trade ...113
Chapter 11
Using Animation ...125
Chapter 12
Icons, Icons, Icons ...139
Chapter 13
Designing the HUD ...145
Chapter 14
Designing an Interface ...155
Chapter 15
Creating an Interactive Mock-Up...179
Index ...199
Contents
Introduction . . . .xv
Chapter 1 Introduction to Video Games . . . .1
The Importance of the Interface . . . .1
Real-Life Game Development . . . .2
Working with a Team . . . .3
Listen to Others . . . .4
Ask Questions . . . .4
A Career in Video Games . . . .4
The Publisher / Developer Relationship . . . .5
Chapter 2 Planning Menu Flow . . . .7
Why Is Planning So Valuable? . . . .7
Creativity in Planning . . . .8
Getting Approval . . . .9
Interface Planning Helps Game Design . . . .10
Game Design Goals . . . .10
Possible Game Goals . . . .11
Breaking Down Your Goal into Specifics . . . .12
How Priorities Affect Decision-Making . . . .12
Charting Methods . . . .13
Button Types . . . .17
Sliders . . . .19
Toggle Switches . . . .19
Lists . . . .20
Input Text . . . .20
Drop-Down Menus . . . .22
Other Variations . . . .22
Common Menu Screens . . . .23
Simplicity versus Depth . . . .23
Planning for HUD . . . .24
Chapter 3
The Look and Feel of Your Interface . . . .27
Define a Look . . . .27
Create a Mock-Up . . . .27
Working with Logos . . . .29
Define a Color Scheme . . . .29
Express Yourself in the Design . . . .31
Research and Inspiration . . . .32
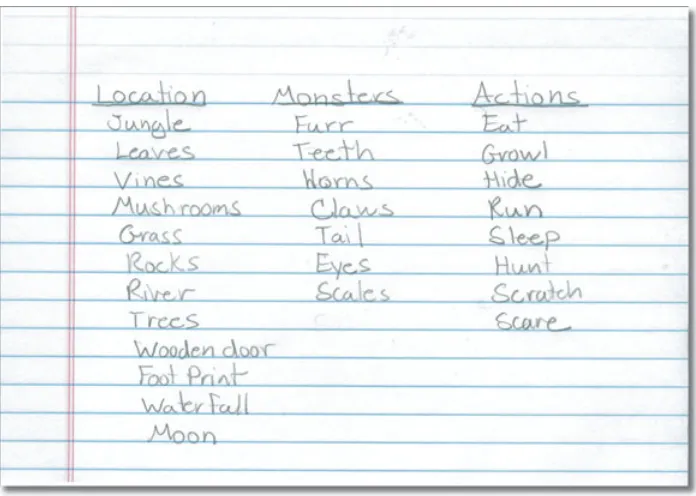
Make Lists . . . .32
Search for Images . . . .32
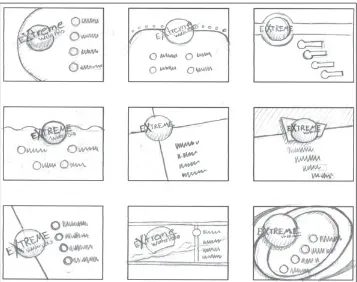
Thumbnails . . . .33
Work Quickly . . . .34
Push for Variation . . . .34
Creativity versus Standards . . . .35
Using Photographs . . . .35
Illustrations . . . .37
3D Solutions . . . .38
Pre-Rendered 2D Art . . . .38
Involve the Programmers . . . .39
Combining 3D and 2D . . . .39
3D Challenges . . . .39
Don’t Get Too Attached to Your Ideas . . . .40
Summary . . . .41
Chapter 4 Basic Design Principles . . . .43
Getting Back to Basics . . . .43
Really See Your Design . . . .44
Using Color . . . .44
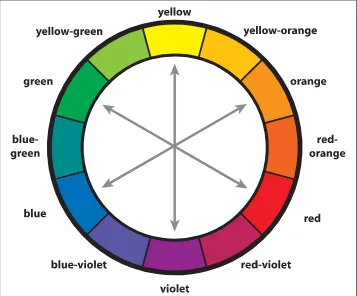
Creating Color Harmony . . . .45
Finding Complementary Colors . . . .45
Using More Than Two Colors . . . .47
Subjective Color . . . .48
Balancing Color Strength . . . .49
Warm and Cold Colors . . . .49
Color on a Monitor or TV . . . .50
Creating Digital Colors . . . .51
Visual Organization . . . .53
Unity and Variation . . . .54
Negative Space . . . .55
Movement . . . .55
Eye Movement . . . .56
Balance and Weight . . . .57
Unbalancing Your Design to Create Tension . . . .58
Odd Numbers . . . .59
Dividing an Image . . . .59
Intersections . . . .60
Summary . . . .60
Chapter 5 Console or PC? . . . .61
Bad Conversions . . . .61
Console Development . . . .62
Console Hardware Manufacturers . . . .62
Developer Approval . . . .62
Concept Approval . . . .63
Technical Approval . . . .63
Console Game Cost . . . .64
Effect on the Interface . . . .64
Handheld Development . . . .65
Contents x
PC Development . . . .65
Minimum Requirements for PC Games . . . .65
The Controller . . . .66
Getting the Timing Right . . . .67
Limiting Buttons . . . .68
Displaying Navigation Information . . . .68
The Mouse . . . .68
Keep the Design Simple . . . .69
Image-Based Interfaces . . . .69
Resolution . . . .70
PC Game Resolution . . . .70
Front-End Menu Resolution . . . .70
Standard TV Resolution . . . .70
PAL versus NTSC Television . . . .71
TV Color . . . .71
Interlace Flicker . . . .72
Color Variation . . . .72
Summary . . . .72
Chapter 6 Button States . . . .73
Controller Button States . . . .74
The Standard Button State . . . .74
The Selected Button State . . . .74
The Pressed Button State . . . .75
The Active Button State . . . .75
The Active-Selected Button State . . . .76
The Disabled Button State . . . .77
PC Button States . . . .77
Other States . . . .77
Animated States . . . .78
Workload . . . .79
Saving Time . . . .79
Audio . . . .80
Summary . . . .80
Chapter 7 Creating a Focal Point . . . .81
The Most Important Element . . . .81
Size Variation . . . .83
Color . . . .84
Value . . . .85
Movement . . . .85
Summary . . . .86
Chapter 8 Using Text in Your Interface . . . .87
Using Text Wisely . . . .87
Type Anatomy . . . .88
Serif versus Sans-Serif . . . .88
Ascenders and Descenders . . . .89
Uppercase and Lowercase . . . .90
Points and Picas . . . .90
File Size and DPI . . . .91
Kerning . . . .92
Thicks and Thins . . . .92
Font Choice . . . .93
Theme Fonts . . . .94
Multiple Fonts . . . .95
Know Your Fonts . . . .95
Creating a Game Font . . . .95
Icons in Fonts . . . .97
Font Effects . . . .97
Summary . . . .98
Chapter 9 Technical Requirements and Tricks . . . .99
File Sizes . . . .99
Limited RAM . . . .100
Disk Space . . . .101
Load Time . . . .102
Online Content . . . .102
File Compression . . . .102
Using Palettes . . . .103
Using Programmer Art . . . .105
Texture Size . . . .106
Scalable Objects . . . .106
Tiling Textures . . . .108
Alpha Channels . . . .108
Localization . . . .110
Source Files . . . .110
Summary . . . .111
Chapter 10 Tools of the Trade . . . .113
Tools for Creating Mock-Ups . . . .113
Asset Management . . . .114
Adjusting Game Properties . . . .115
Using Custom Tools . . . .115
Plug-Ins . . . .116
Stand-Alone Software . . . .116
In-Game Tools . . . .117
Advantages of Using Custom Tools . . . .117
Disadvantages of Using Custom Tools . . . .117
Commercial Tools . . . .118
Advantages of Using Commercial Tools . . . .118
Disadvantages of Using Commercial Tools . . . . .118
Middleware . . . .119
Commonly Used Commercial Software . . . .119
Features of Good Tools . . . .121
The Ideal Situation versus Reality . . . .122
Software or the Artist? . . . .122
3D Tools . . . .123
Summary . . . .124
Chapter 11 Using Animation . . . .125
Movement . . . .125
How Animation Works . . . .125
Frame Rate . . . .126
Interface Frame Rates . . . .126
Key Frames and Tweening . . . .127
Interpolation . . . .127
Contents xii
Animation Principles . . . .129
Squash and Stretch . . . .129
Anticipation . . . .130
Ease In and Ease Out . . . .130
Follow Through . . . .131
Arcs . . . .132
Exaggeration . . . .132
Designing Transitions . . . .132
Consider Experienced Users . . . .134
Properties That Can Be Animated . . . .134
Translation, Rotation, and Scale . . . .134
Transparency and Color . . . .135
Using Effects . . . .136
Overlaid Animations . . . .136
Particle Systems . . . .137
Other In-Game Effects . . . .137
Summary . . . .138
Chapter 12 Icons, Icons, Icons . . . .139
Use Text Sparingly . . . .139
Budget Constraints . . . .140
Using Icons Instead of Text . . . .140
Image Choice . . . .140
Standard Icons . . . .141
Non-Game Standard Icons . . . .141
Every Pixel Counts . . . .143
Photo Reference . . . .144
Summary . . . .144
Chapter 13 Designing the HUD . . . .145
Screen Space . . . .145
In-Game Information . . . .147
Pop-Up Menus . . . .148
Dynamic Content . . . .148
Combining Information . . . .149
Legibility . . . .150
Eye Movement . . . .150
Ease of Use . . . .151
Making HUD Look Cool . . . .151
Game-Play Adjustments . . . .151
Graphic Information Display . . . .152
Standard Elements versus Non-Standard Elements . . .153
Summary . . . .154
Chapter 14 Designing an Interface . . . .155
NomadDesign Goals . . . .155
The Rough Sketches . . . .156
Temporary Art . . . .159
Re-Do’s . . . .160
NomadColors . . . .160
Using Color as a Tool . . . .161
Creating the Art . . . .163
Breaking Up the Art . . . .163
Selected Rows . . . .167
Step-by-Step Art Creation . . . .169
The Ship Information Panel . . . .169
The Trade Dialog Box . . . .173
The Big Change . . . .177
Summary . . . .178
Chapter 15 Creating an Interactive Mock-Up . . . .179
The Ideal Situation . . . .180
Realizing Your Vision . . . .180
Experimentation . . . .180
Commercial Tools . . . .181
Why Flash? . . . .181
Introduction to Flash . . . .182
Using Frames . . . .182
Animation in Flash . . . .186
Playback Speed . . . .188
Using Scripting . . . .188
Creating Buttons in Flash . . . .190
Putting Scripts on Buttons . . . .192
Seeing Your Button Work . . . .193
Publishing Files . . . .194
Flash Summary . . . .195
The Sample Flash File . . . .195
Actions on Frames . . . .196
Actions on Buttons . . . .196
Summary . . . .198
Index . . . .199
Introduction
A
n interface, as you no doubt already know, is the part of the game that allows the user to interact with the game. Interaction is what makes a video game different from a movie. When playing a video game, the user can make choices and respond to events. An interface is the connection between the user and the game, and a well-designed interface makes the video game experience more fun.Interface design is a creative, exciting, and challenging subject. The purpose of this book is to introduce you to the game interface design principles and concepts used in the game industry. There is a huge amount of informa-tion to learn about interface design,
and I couldn’t hope to cover it all. This book will, however, cover all of the basics you need to know in order to design your own game interface. An interface has many pieces. This book will cover the interface from the first image that appears on the screen to the information displayed on screen during game-play. The player of your game interacts with buttons, sliders, menus, and many other com-ponents of an interface, and this book will show you how and when to use each of these input methods.
I hope that this book inspires you to create better and more effective game interfaces. You are capable of making a great, unique interface. Don’t limit your vision by what has been done in the past.
Who Should Read This
Book?
If you are just getting started in the game industry, this book will serve as a great introduction to interface design. It will also provide a little insight into the video game industry itself.
Introduction xvi
Even if you are an experienced inter-face designer, this book will provide hints and tricks that can help you in your daily tasks. After reading this book, you will be able to better evalu-ate the effectiveness of an interface, and you will be aware of the areas in which you can improve.
The application of the principles I will show you in this book will help improve your design skills. It will also provide inspiration to go beyond the norm and create interfaces that capti-vate and entertain the user.
What’s in This Book?
Great interfaces never happen by acci-dent. They require a lot of planning. This book will outline the steps to good planning. You will be encour-aged to define goals that will guide you through the design process and be shown how to plan and chart your menus before you begin to create art. You will learn how to be innovative and creative in the planning stages of the design process.
I will also walk you through the early planning stages for a game interface and present methods for crafting a unique look and feel for your inter-face. Creating icons, animation, and buttons will be covered.
Basic design and art principles are essential for any interface designer to understand. As you read through these pages, you will learn about these basic concepts and how they can guide you through the design process. You can use these design principles to effectively evaluate your own design and identify areas for improvement. You will begin to understand how much skill and talent is needed to produce a great interface. It’s hard work, but it’s worth it.
In this book, you will also explore the world of interface buttons. This simple-sounding topic is actually very complex. I will explain the con-cept of button states and teach you how to make a functioning button for a game interface. You’ll learn how to create buttons that are easy to use and that look cool.
I will also show you how to avoid using too much text in your interface and how to replace as much text as possible with images and icons. This is not always an easy task, but a good use of icons can separate an extraor-dinary interface from a mediocre one. A screen full of text will turn users away; learn about methods you can use to communicate with the user without text.
Make it move! Animations can be a game interface designer’s greatest asset. I’m not just talking about a spinning logo, but about serious ani-mation. Understanding and applying solid animation techniques can bring a static interface to life. Learn these animation principles and how you can use them in an interface.
In Chapter 15, you’ll learn how to use Flash to create an interface with real interactivity. This software provides an effective method to mock-up and test a game interface design. Don’t wait for a programmer to write code to see your design in action. You can do it yourself. Learn how to use Flash to make buttons function and objects move.
What’s on the CD?
This book also comes with a CD con-taining images and examples. You will have access to many of the images in this book. You will also be able to open the Flash file created in the last chapter of the book and see it move. The CD also includes a free game demo and trial version of Macro-media Flash.
1
W
elcome to the world ofinterface design for video games. Of course, the best instruction you can receive is real-life experience. No matter how good a game artist is before he begins developing video games, he learns a lot during the development process. Gaining this experience will take time. In the meantime, I hope to share a lit-tle of my experience with you and give you a head start.
The Importance of the
Interface
Too often, video game interfaces are an afterthought. Sufficient time is not scheduled for interface design because too many project managers assume anyone can whip up an interface. They feel that interface design does not require any particular talent or very much time, so they assign the new guy to work on the interface. This is a big mistake, and when it happens, it’s apparent to anyone who plays the game. It isn’t hard for the user to immediately see poor quality. The
visual quality of a game is very impor-tant; it is hard to sell a game if it looks bad, even if the game-play is fun. Great art can do amazing things to boost game sales. Many game pub-lishers claim that their number-one priority is game-play, but I’ve seen these same publishers look at a game and respond with “that looks great,” even though they never picked up a controller or mouse. If a game doesn’t look good, no one may ever play it and find out if the game-play is good. Consumers are used to seeing great art, and they demand high quality in
Introduction to
Video Games
Chapter 1 ■ Introduction to Video Games
2
any game they play. Great visuals can actually make a game more fun to play.
Even more important than the visual aspect of interface design is the func-tionality. A poor interface can ruin the entire video game experience. The game experience will be negative if the user is confused and can’t figure out how to navigate the front-end menu or if he can’t understand where to find information while playing the game. The more the user has to search for information and think about how to play, the less enjoyable the game becomes. The interface is a vital com-ponent of a game and should not be treated as a component that is unre-lated to the game or as an unimpor-tant task.
On the other hand, a great interface can significantly enhance the experi-ence. A simple-to-use and visually appealing menu can set the tone for the game. The first thing that the user sees when he starts a game is the front-end menu. A good-looking interface with a lot of well-designed features can actually be fun to use and even seem like a game itself. Have you ever played around with a quality
“player editor”? Changing character outfits, hair, skin color, and tattoos can be a lot of fun. All of this takes place in the menu. Without ever start-ing the core game, the user feels like he is already playing.
Real-Life Game
Development
In this book, I will discuss interface design for video games under perfect conditions—if there is no limit on time or budget. I will assume that you have been given total creative freedom and, as the interface designer, you can make decisions. In an ideal situation, a producer or designer won’t mandate that the interface should look like a previous version of the game (most likely designed by a less-competent artist and designer than you) or direct that the interface must be in his favorite color. Too often, someone at your company notes that a competing game has a hair-color option in the player editor and demands that your game must have the same feature. It then becomes a requirement that this feature must be implemented exactly how it was done in the other game. Another one of my least-favorite
interface or for trips to a junkyard to collect photo references. Although the extra effort may result in a better interface, not working under the restrictions of the game can have dis-astrous results.
I have worked on many games that were canceled before they were fin-ished. These games were cancelled for many reasons—most of them out of my control. If the game publisher thinks that they can’t complete the game within the budget, they have a decision to make: They can try to come up with the extra money to complete the game or they can cut their losses and cancel the game. A surprising number of publishers decided to cancel the game.
Choose your battles and work well with others. Feedback and direction can actually make the completed game better. Sometimes the guys in charge actually know what they are talking about! If you are closed to ideas and suggestions, you may pass up some really good advice. Your skills and abilities will be trusted more as you demonstrate your skills and you learn more about the game development process. This will take
time. Telling everyone that you always know better than they do won’t inspire others to join your cause (even if after reading this book you really do know better).
Don’t be afraid to explain that you don’t agree with feedback, but make sure you can explain why. “It will look better” is not as convincing as offering the explanation that serif fonts are hard to read at low resolutions. Don’t be shy—offer constructive options, and tactfully point out potential problems. After a focus group has found a flaw in the design, you won’t be very convincing when you try to explain that you knew it should have been done differently but didn’t want to say anything.
Don’t ever let these real-world limita-tions keep you from designing amaz-ing interfaces, though. Let them serve as a challenge. Learn to work your best under these conditions. They aren’t an excuse for poor design—if you really are good, you can still cre-ate great interfaces.
I have worked on games with very small budgets. One such game is on the CD that comes with this book. On
this game, we had to make some care-ful decisions about what to leave out and what to add. If we had had a big-ger budget and more time, I would have done many things differently. I am proud of this game, not because it is the best game in the world, but because it was made really quickly by a few artists and programmers. It still is very fun, and it got some great reviews.
Working with a Team
Video game development requires a team effort. This is especially true with the really cool, big-budget games. While there may be few exam-ples of a group of three or four people who make an entire game, these are rare exceptions, and it is often evident in the final product if a full team did not work on the game. The triple-A blockbuster games often involve amazingly large teams. The members of these big teams must learn to work well with one another.
Often, problems occur during game development because team members just can’t get along. Fighting and arguing can cause just as many prob-lems as incompetence. Because of
Chapter 1 ■ Introduction to Video Games
4
this, putting 20 people who do not work well together on the same team may not be twice as effective as putting 10 people together who do. On the other hand, putting 20 people who work really well together on the same team can produce more than twice the results of a 10-person team. Cooperation is key.
Listen to Others
You may actually be right. You might even know more than the decision-makers. Your ideas may be better. But this doesn’t mean that you should argue. Express your opinion politely when it is appropriate to do so. If you have an “I’m right, you’re wrong” atti-tude, you won’t get far.
Whether you have the authority over your co-workers or they have the abil-ity to enforce their ideas, the best thing you can do is listen. Take the time to listen to their ideas and seriously con-sider what they are telling you. The best game and interface designers are not afraid to change things if they come across a better idea. They are able to recognize good ideas, even if the ideas are not their own.
Ask Questions
If someone has an idea that you think is wrong, the best thing to do is ask questions. Good questions require a lot of thought and effort on your part. These questions can demonstrate that you understand their point of view. Try to get all of the information you can. Make sure you completely under-stand the opposing point of view before you offer your suggestion. If you feel that an idea has flaws, polite-ly ask if the person you are talking to has considered these problems. They may have a solution to the problems that they just have not described well. Or they may see the flaws and change their mind without an argument. I once worked with a great game designer who was really good at this. Everyone liked him, and no one was afraid to approach him with a sugges-tion. The great thing was that when he made a decision, he was usually right. If anyone disagreed, he would talk things through with them and ask a lot of questions, like: “Have you thought about . . .” or “Why do you think that it would be better to do it that way?” Because of his great com-munication skills, everyone came out
of the conversation understanding why he made his decision, even if they did not agree with it.
The bottom line is that working in a team is essential for game develop-ment. Don’t be a problem in the game development process. Even if you are talented, you need to work well in a team.
A Career in Video
Games
Reading about the potential obstacles may make video game development sound like a terrible experience. In reality, making video games is great! It is not easy, but that’s one of the rea-sons it’s so rewarding. If it were easy, anyone could do it.
The game industry is not easy to break into. The best way to get into the industry is to be really good. You will also need to be able to demon-strate how good you are. This is why a good portfolio is key. Having a great portfolio is essential to getting your first job in the game industry.
can afford to have an interface expert who spends all of his time creating interfaces. It may be harder to land a job at these bigger developers because they have more experienced artists who are applying for the same job. The way to combat this problem is to diversify. Make sure you have other skills that can be used when ing video games. Smaller develop-ment studios may have the same guy designing the interface and building 3D models. If you are trying to break into the industry as an interface designer, you might want to choose another area of game development and develop these skills along with your interface design skills.
I was lucky that a discerning art direc-tor saw my potential. When I think back to my portfolio when I first graduated from college and started looking for a job, I am not sure that I would have hired myself! I worked my way through college at a company that did packaging. I was hired just as the company was creating a Design department. By the time I graduated, I had been promoted to the Art Director position. This management experience is what helped me get my
first job in the game development industry. I found a company that was looking for someone to fill the role of art lead. I had more than just art skills, and that is why I got the job. You should do something you love for a living. The best artists are the ones who have a passion for making great art and great games. The game indus-try is too demanding if you don’t love it. It is very rewarding to see your game on the shelf in a store, but it is not easy to get it there. Many late nights must be spent and tedious tasks must be completed during the game-development process. If the process is not fun and rewarding for you, it will be hard to push through the tough spots.
I always get a good reaction when I tell teenagers what I do for a living, but I don’t always get the same enthu-siastic response from their parents. Many people assume that because some video games contain offensive material, all games are bad. This is tantamount to declaring that all movies are bad because some movies are violent. If you plan on working in the game industry, it is a good idea to decide early on what you are and
aren’t willing to work on. A wide vari-ety of games exist, from those that involve pornography and gambling to religious and educational games. If you want to work on a particular type of game, it is a good idea to develop a portfolio that fits with the kind of game you want to make.
After you have broken into the indus-try, you should continue to build your portfolio. Improve your skills and find a way to prove you can do the job. The most important thing for your next job is your title list. The most important game on your title list is the last one you worked on. Because games take so long to make, it is not easy to build this list. The experience you gain in making a game in invalu-able.
The Publisher /
Developer Relationship
Most of my experience has been developing video games for consoles. The most common model for console development is that a game publisher provides all (or part) of the funding to develop a game. The publisher also funds marketing, packaging, and
Chapter 1 ■ Introduction to Video Games
6
distribution. Because the publisher is paying for the game, they have the final say. The power is in the money. Publishers often give a developer a great deal of creative freedom, but they always have the final say. They are taking the financial risk and, therefore, they have the right to get what they want.
The publisher typically pays for devel-opment by giving the developer pay-ments along the development process. A milestone schedule is created at the beginning of development that out-lines what will need to be completed for each milestone. The developer then presents these items to the pub-lisher on the date they are due. If the publisher approves these milestones, then they make a payment to the developer. Because money is tied to each payment, getting these approvals from a publisher becomes very important to the developer.
In this book, I will refer to the pub-lisher/developer relationship often. I will assume that a publisher is provid-ing fundprovid-ing and that the publisher makes any final decisions. This is not always the case. Many independent game developers fund their own
7
P
lanning is vital to a successful interface. If budget or time requirements are tight and corners must be cut, then cut some-thing else. If you cut out the planning stage, your project will probably end up taking longer and costing more than it would have with careful plan-ning. If you really want to complete an interface design quickly, spend more time planning. A large-budget project may afford the luxury of more experimentation and trials, but with a lean project, you need to get it right the first time.Why Is Planning So
Valuable?
The best way to speed up the design process is to only do things once, and careful planning gives you a shot at getting things right the first time. It may seem impossible to get a perfect interface on the first attempt, but if you don’t plan your process, then you almost guarantee that things will need to be redone. You know that you will make changes, but that doesn’t mean you should avoid planning. If you don’t plan, you will end up having to make even more changes.
Without good planning, it is hard to know what needs to be done. It is easy for artists to waste time creating art for things that will never appear in the game. How many screens are needed? What pieces of art can be re-used in different areas? What information must be displayed in game? All of these questions should be answered in the planning stage. Good planning will generate a list of assets that are needed and there will never be a ques-tion of what art needs to be created. Just like with everything else in the game development process, you should strive for the best but plan for
Planning Menu Flow
Chapter 2 ■ Planning Menu Flow
8
the worst. In the ideal scenario, all of the details can be planned in advance and never changed. But in reality, some changes will always be neces-sary. Plan time for revisions but do all you can to avoid them. A trap many interface designers fall into is, when they see that time is planned for mak-ing changes, they use this “extra” time to justify incomplete work. “I can always fix it later,” is a bad attitude. What usually happens in these cases is that the final polish is never added, and the game ships with an inferior interface.
Solid planning can also help deter-mine schedules. If the design requires 100 screens, each with unique art, it may just take too long to create a fully animated 3D scene for each of these screens. If the design can be simplified and the resulting design only requires a handful of screens, then more time and attention can be given to each screen. More time will be required if the game design is so complicated that a large number of options and a lot of information must be displayed. You can make more reliable time esti-mates if the quantity of art needed for the game can be determined.
If I know how many screens will be needed for the front-end menu, then I can simply do a little math and know how much time I have for each indi-vidual screen. This will make it easy to determine if I am on schedule or if I am falling behind. You will need to ramp up and expect that the first tasks will take longer than the tasks at the end. If you have designed five other screens, it will be easy to make a sixth screen that fits into the design of the first five. Of course, make sure not to cut it too tight—add some time for revisions and adjustments. Without a good plan, it is difficult to know how much time you can spend on a task and if you are ahead or behind. Accurate scheduling can reduce the panic level at the end of the project. There will always be a push at the end of the project, but you will be able to better manage things if you have a plan early on—you can attack prob-lems early. A common result of poor planning is a string of “all-nighters” at the end of a project. This is one of the situations that cause your significant other to insist you find a job outside the video game industry. While crunch time is part of the industry it
can be greatly reduced by smart plan-ning early in a project. This will only be beneficial if you are willing and able to react and adjust to the risks you identify early in the project.
Creativity in Planning
At first glance, the planning process may not seem very creative. It might even seem boring. Charts and graphs that are kept intentionally visually plain are often used in the planning stage. Little or no art is being created, and it can seem very tedious to some-one who is bursting with creative energy.
the same approach as in every other game and just make a cool logo. In the planning stage, you can make these types of decisions. You are choosing the most important places in which to put your time and effort. If a 3D guide is not going to significantly add to the user’s experience, you may find it bet-ter to spend your time creating cool, animated transitions between screens. An interface designer who truly understands interface design can plan for creative and elegant concepts in the planning stage. It is much harder to find a designer who understands this concept and can come up with creative ideas that are also possible under the budget. These designers are more valuable than those who can create only cool-looking art. Creative planning is an area wherein an inter-face designer can become truly great. If you can come up with great ideas and you can skillfully execute these ideas, you will be in demand.
Getting Approval
Another reason for good planning is to get proper approval before starting to create art. A well-planned interface
offers the game designer, project manger, or other team members the opportunity to give the go-ahead or voice concerns. Time can be wasted if the decision-makers decide halfway through the project that everything should be done differently. A produc-er could decide that the usproduc-er should be able to choose a weapon before starting a level. If the producer has a chance to review the plan early, he could point this out.
You won’t be able to avoid changes from the person in charge, but you can reduce the amount of changes you get. You can make it much easier for the producer to give you direction early if you present him with a good plan. He may not even know what he wants himself, and planning can help him to figure it out.
As you are presenting your plan to your boss or publisher, make sure that he understands that you are seeking approval and that this is the best stage to provide feedback. If the person in charge glosses over the plan, it can cause problems later. If you can make adjustments now, everything will go much more smoothly.
Getting approval can avoid your being blamed later because you can always refer back to the approved plan. Once you have received approval, it should never be used as a threat. This will make everyone hesi-tant to give you approval. You don’t want to give the impression that you will fight against any reasonable changes after your plan has received approval, but the person giving approval needs to understand that there is a certain level of commitment in the approval.
Get as much information as you can before you even start to plan. This will help you get approval faster. If you understand the expectations, it is much easier to get approval. The more difficult problem comes when the publisher or producer doesn’t know or can’t articulate what he wants. This is where good communi-cation skills come in. It is your job to understand what the producers or publishers are looking for and give it to them, even if they don’t know what they want.
After a plan has been laid out, suffi-cient time must be spent evaluating the details of this plan. This should be
Chapter 2 ■ Planning Menu Flow
10
done by anyone who has veto power. You can help make this clear by asking something like, “I need to get your approval on this layout to make sure that everything is the way you want it. This will help avoid changes.” A polite request like this one conveys the idea that you expect this to be final approval. Just because flow charts don’t look pretty doesn’t mean they don’t deserve serious consideration.
Interface Planning
Helps Game Design
A detailed plan for a video game interface can really help drive game design. Fleshing out all of the details in the menus and the HUD will force many game-play decisions to be made early. It may also bring up important issues that may not have been consid-ered until later in the game-creation process. The game designer may change actual game-play based on serious consideration of the interface design.
You can ask a lot of good questions in the planning stage. These questions can stimulate the imagination of the game designer. For example, a
seem-ingly simple screen wherein the user chooses an environment can prompt questions that will help determine the game’s ultimate design. Will the user be able to choose between different environments? How many choices will he have? Will some environments be locked and not available to the user until he completes certain tasks? Can the user choose an environment in every mode of the game or are there some modes that will dictate environ-ment choice? Will environenviron-ment choices, in the menu, be affected by other choices made during game-play? The questions could go on and on. They are questions that affect the flow of the menu. It is easy to see how game-play can be affected when seri-ous thought is given the interface. It is difficult to have a solid plan if the game design is underdeveloped. Don’t forget to show your plan to a programmer. The planning stage is a great time to get feedback and sugges-tions from the programmer who will be working on the interface code. The features planned in an interface great-ly affect the programming schedule. Something that may seem easy to an artist can provide a big headache for a
programmer. If you plan on playing full-motion video in your menu while animating buttons on top of the movie, you will need to see if the engine has this capability. If you plan on using real-time 3D in the front-end menu, the programmer will need to make this possible. Do your best to work well with the programmer. Both of you will have to work as a team to get a functional interface—No one can go it alone.
Game Design Goals
A good way to for a game designer to make decisions about the features of a game is to have goals. If the interface designer also understands these goals, it will be much easier for him to make decisions about the interface. It’s not always easy to define the overall game goals, but if the game designer takes the time to create concise goals for the entire game and the interface design-er clearly unddesign-erstands these, many decisions will be easy to make. Goal-oriented design produces great results.
inter-face ever may be the first thing that comes to mind. This goal sounds great, but it probably shouldn’t be the first priority. As much as everyone wants a cool interface, there may be other things that are more important. If you are making a kids’ game, for example, it might be more important that the menu is easy for a six-year-old to use than that it looks cool. Prioritization is key to using these goals to guide your design.
The game designer, publisher, and project manager may need to work out the game goals. Everyone will need to agree on the goals. Each of these people has a different role and may have a different prospective. If they can agree on a prioritized list of goals, it can help everyone work together.
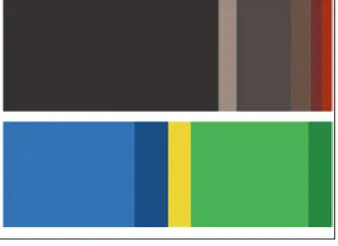
Some goals may not be what you would expect. For example, the first goal of the game may be to reach a broad market. If you are creating an online game that will be used to pro-mote soap, the client’s goal may be to reach a broad audience. This goal may not lend itself to the type of design that hard-core gamers might consider the coolest interface ever. You might
choose a completely different art style because of this goal. You might use a little less rust and grunge than you would use in a game aimed at hard-core gamers, for example.
Possible Game Goals
Below is a list of possible goals that a developer or publisher may have. These goals may not match perfectly with your personal goals, but it is important to understand the goals of the guy in charge. This list is by no means a complete list of goals that could ever be used for game design. In fact, it is a very brief list. This list is just meant to stimulate thought about the real goals of your next game.
■ Promote an existing license or
famous personality.
■ Capitalize on an existing license
or famous personality.
■ Meet a particular schedule. ■ Reach a particular audience. ■ Create something completely
unique.
■ Outdo a competing game. ■ Capitalize on the success of a
competing game.
■ Continue a successful series. ■ Sell another product (other
than the game itself).
■ Promote a moral issue.
■ Create a buzz using controversy. ■ Create an educational
experi-ence.
■ Pass the approval process of the
console manufacturer.
■ Please the Marketing
depart-ment.
■ Tell a story.
Don’t treat goals lightly. As an inter-face designer, if you are not given goals for the game, you might want to present the goals that you think every-one would agree on. This will give you a chance to see if you understand what everyone else is expecting. Ask questions about the target market, subject matter of the game, budget, schedule requirements, what the most important feature of the game is, what makes the game unique, what other games might be similar, and so on. A clear understanding of all aspects of the game will make it much easier to understand the overall goals of the game.
Chapter 2 ■ Planning Menu Flow
12
If you have input on creating the game goals, be honest with yourself. Get honest information from the game publisher. It may take a little coaxing to get a publisher to give you the direction you need. It is, however, very important to understand the publisher’s vision. He is paying for the project, and therefore his goals and opinions are always the most impor-tant. It won’t do any good to pretend that the number-one goal of the game is to be innovative when the number one goal of the publisher really is to reach a sales goal.
If you are working on a game that has a movie tie-in, the number-one goal may be to get the game on the shelf at the same time as the movie is released. This may be more important than adding cool new features. In such a case, the schedule should rule. Any feature that has the potential to delay the project may need to be scrapped, even if it would make the game “super cool.” When making decisions, it will be easy to throw out anything that would jeopardize the schedule and choose the features wisely.
Breaking Down Your Goal
into Specifics
Avoid the temptation to set one large goal that is actually several goals in one. This is often the easy way out—it is more difficult to articulate specific goals than it is to generalize. But a goal like “Make a cool game” is not nearly as clear as “Add three new and creative features that are not found in competing racing games.” You could even break down this goal into sever-al more detailed gosever-als: Create one new feature that appeals to avid racing game fans and add two new features that appeal to the more casual gamer. All of these goals could be a subhead-ing of “Create a game that will sell more copies than the last version.” The point is to define useful goals that will provide direction during devel-opment. Understanding the motive behind the goal is very important.
How Priorities Affect
Decision-Making
Now think about how priorities can affect decisions. Let’s say that the first priority of a game is to be
education-al and teach kids about animeducation-als. A secondary goal is to make the inter-face intuitive and easy to use. This secondary goal is important, but it is lower on the priority list. If you are armed with this information about the game’s priorities, decisions will be easier to make. For example, a lot of text describing the difference between amphibians and reptiles may be used in the interface. Using all of this text may not support the goal of a simple interface, but as the first goal of edu-cation is more important, the text must be kept. This does not mean that the lesser goal of a simple interface can be dumped. There may be ways to work around the text and create the best possible solutions that includes the text.
other information buttons can be selected. This way, the user can easily access all of the information, but the screens with the images of the animals can be kept simple.
Charting Methods
The menu system that appears before the game begins is often referred to as thefront-end. This term helps distguish this menu from all of the in-game and pause menus that can appear in a game. The best way to plan and organize a front-end menu is to create a flow chart. This will give you the chance to organize your ideas. Once you have a chart, it is also easy to give this information to others for approval or feedback. A great flow chart can even allow the programmer to begin programming the interface with temporary art, before the final art is completed. A flow chart makes it easy to see what tasks need to be done. The important thing to remember when charting a menu is to be consis-tent and clear. The purpose of creat-ing a flow chart is to be organized. Clear communication of the flow of the interface is the number one goal
of a flow chart. Don’t worry about what the chart looks like so much as what information and options will be displayed on each screen. Just get the flow on paper and make it easy to understand. You can waste time mak-ing pretty borders and cool-lookmak-ing backgrounds. Simplicity and clarity should be the governing factors. There are many software programs that can help you create charts. I pre-fer to use Adobe Illustrator because I know it well and use it for other parts of game development. There are pro-grams, like Visio, that are specifically made for creating flow charts. These programs can be much more efficient than a standard art program. Making changes should be easy. If you don’t plan on using a program that was made for creating flow charts, I would strongly suggest at least using a vector program, like Illustrator, and not a raster program such as Photoshop. Vector files will be much more flexible when it comes to editing; they create smaller files and print clearly. I have seen some cool-looking flow charts created in Photoshop, but they were big files that were hard to send in an
e-mail, and it was much harder to make changes to them.
I have come up with a charting method that works well for me. There are many other methods that would work equally well, but I’ll share my method as an example. Feel free to develop your own methods and sym-bols. The important thing is that your chart includes all of the information discussed here and is easy for others to understand.
Start by creating a box that represents the first screen that is seen when the user starts the game. Make a box that is large enough to fit several lines of text. All of the options for that screen should be listed in this box. Place a title at the top. As you choose the size of the document and the size of all of the elements that appear in this flow-chart, you should take several things into account. Most likely, this chart will be printed at some point. The text and images will need to be large enough to be easily read on paper. Think about the total number of screens that will appear in the flow chart, and make sure that the spacing and size will allow for all of these items to fit (See Figure 2.1).
Figure 2.1
Create a box that represents the
Your menu may become too compli-cated to fit on one page. Most software programs provide the option to print one document on multiple pages— when the chart is printed, these pages can be pasted together to make one big chart.
Charting may not be easy. It is very likely that you’ll have questions that aren’t easily answered during this charting process, and you’ll need to make changes to your chart once these decisions have been made. Don’t let this intimidate you. The best way to root out problems is just to get started. Take your best guess at the options that should appear in this first menu and type them into your chart. As you move onto other
screens, you may discover something that will cause you to come back to the first screen and make changes. This is a natural part of the charting process.
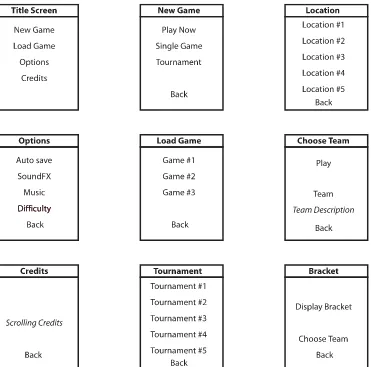
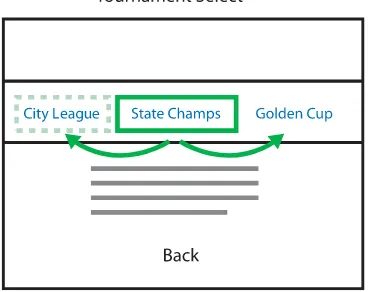
Once you’ve listed the options, you need to decide where each of these buttons will take the user. Create new boxes, just like the first box, for each of these new screens. Type in all the options that should appear on these screens and decide where each of the buttons in these menus will send the user. Use this method to chart out the entire front-end menu. If important information or images (such as a tournament bracket in a sports game) will need to be displayed, make sure to list these items. Make sure that they are visually distinct from the items that will be interactive. I have created a sample of a chart that could be used for a sports game interface. All of the items that are not interactive have been italicized in this example. (See Figure 2.2.)
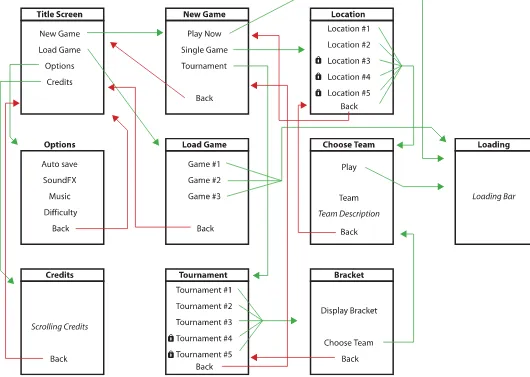
The next thing you need to do is cre-ate arrows that show the flow of the interface. Use these arrows to connect all of the various screens. Don’t forget
Charting Methods 15
Chapter 2 ■ Planning Menu Flow
16
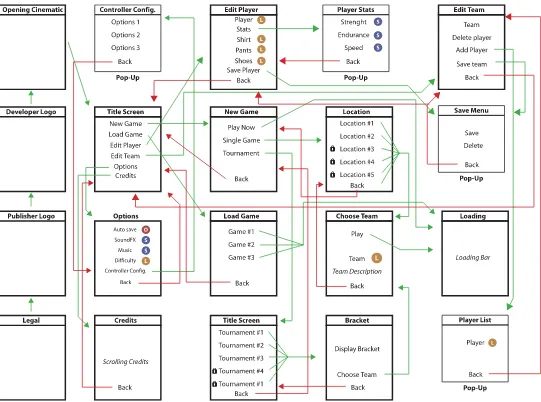
The charting process may seem sim-ple, but it can take a lot of thought to get it right. This first example is rela-tively simple and straightforward. It doesn’t take long for a menu to become very complex, however. Take a look at Figure 2.4 and see how this same game, but with a bigger budget and more features, is more complex and will take more time to plan. Notice another type of screen in Figure 2.4. These are pop-up menus. The traditional pop-up menu is dif-ferent from a regular screen in two important ways. These menus are not stand-alone screens; they appear on top of the current screen. When they are activated, they “pop up” over the current screen. The screen that was visible before the pop-up appeared can often be seen in the background. The pop-up menu only covers part of the screen. Pop-up menus often appear when there is a small amount of information that needs to be dis-played and this information does not justify a full-screen menu.
A common technique, used to avoid confusion, is to darken the previous menu, which is in the background. This way, the user does not think that the buttons on that part of the menu are active. Occasionally, a pop-up menu can advance a user onto a brand-new screen, but it is much more common to have these pop-up menus close and return the user to the screen he just came from—they are sort of “dead ends” in the menu flow. Because they are often small, they typ-ically do not contain as many options and information as a full screen does.
Button Types
This is a good stage at which to exam-ine the interactive aspects of the menu. How does the user make adjustments or choices? Most menus have several different ways of accept-ing user input. Buttons, sliders, and toggles are very common and are all used in many menus. The trick is to choose the appropriate input method for each item. What information does the user need to input, and what is the simplest method to get this infor-mation?
I will assume that the user will be using a mouse or a controller as an input device. There are, however, many other options. Voice recogni-tion technology has improved and there are some games that use a microphone as an input device. Some systems use other input devices such as guns or drums. Not as many inter-faces have taken advantage of these interesting input devices. This does not mean that there are not any great solutions that use this non-standard hardware.
The way to get input from the user is to detect which buttons have been chosen by the user. The user makes choices that advance him through the menu. Every time the user makes a selection, the game engine detects these choices and the appropriate changes are made when the game starts. Simply put, the user chooses features such as Single Player mode and Easy difficulty level by pressing the buttons or pressing Select on the controller. When the game starts, these settings take effect.
Chapter 2 ■ Planning Menu Flow
18
Sliders
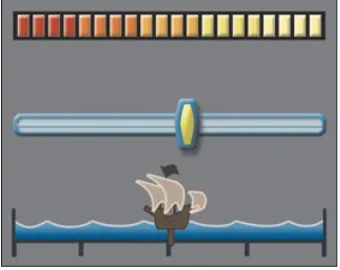
Sliders are a great way to adjust values that have a wide range of possibilities. If the value that is being adjusted only has a small number of distinct choic-es, such as Easy, Moderate, and Difficult, then other methods work better. Numeric values like a range from 1 to 10 or 0 to 100 percent work great for sliders. Music volume is another good example of an input that could use a slider—the user can move the slider left and right and get a wide range of volumes. When using sliders, the settings are typically remembered by the game engine. If the user sets the volume at 3, and leaves the menu, the volume should remain at 3. If the game system has a method to save information on the hard drive or on a memory card, this setting should also remain the next time the user plays. Just because you’re using the stan-dard input method for a slider does-n’t mean there isdoes-n’t any creativity involved. All sliders don’t need to look the same. This is another area where you are only limited by your creative ability—the only thing that is important is that the user recog-nizes the control as a slider and
instinctively knows what to do with it. (See Figure 2.5.)
Toggle Switches
You can use a toggle input method when there are two possible states, such as On and Off. Methods for dis-playing these two states and getting the user input can vary. As the word
toggle implies, the user can change from one state to the other by toggling
or changing the switch.
A radio button is a commonly used toggle switch that is placed next to text or an icon. The text or icon repre-sents one of the two states. When the
box is checked or the button filled, this means that the state represented is on. If it is empty, the state is off. For example, a radio button may be placed next to a line of text that reads “High Level of Detail.” If the circle is empty, then High Level is off. If a dot appears in the circle, then this option is turned on. A radio button does not always have be a circle with a dot. For example, the same functionality could be accomplished with a check box. It is important that the empty version looks empty and the filled version looks filled. The user should be able to recognize it as a radio button.
Changing a toggle switch can be accomplished using several different methods. When playing a console game, the user can make a change by moving the control stick left and right when the option is highlighted. The toggle can also change as the user presses the Select button when the
Button Types 19
Figure 2.5 Be creative when designing the look of sliders. Just be sure not to confuse the user!
Chapter 2 ■ Planning Menu Flow
20
option is highlighted. Look at the methods used by other games and see what will work best for your game. The goals are to use what you think will come naturally to the user, and to be consistent throughout the entire menu.
Lists
Lists are used in many different ways. If all of the screen options can be seen on the screen at once, then the user can move the selection indicator to the option he wants and the options remain in place. (See Figure 2.7.)
If there are too many options to dis-play all at once, you can handle the situation in a couple of different ways. One method is to keep the selection indicator stationary and the options scroll on and off screen and move into place. (See Figure 2.8.)
You can use a combination method, but this can become confusing if it’s not executed well. In the combination method, the cursor moves from option to option if it is visible on screen. Once the selection reaches the last visible option on the screen, and the user continues to move it in the
same direction, then the selection indicator remains still while the options move onscreen. (See Figure 2.9.)
Input Text
In some cases, the user may need to input text. For example, the user may be given the option to enter a name for his character. This can be a simple process when playing a game on a PC, but it can become very complicated
Figure 2.8 The selection indicator remains still and the options move.
without a keyboard, as when playing a game on a console.
This challenge has been addressed in basically the same way ever since the old arcade games asked the user to enter initials after receiving a high score. The most common method is to make three or four rows of text. This list should include every letter of the alphabet and any characters that can be used for input. There are also two additional options: Delete and Done (the Done button is only need-ed if the number of characters is not
pre-determined). One of the letters is always highlighted, and the user can move this highlight left, right, up, and down. When the correct letter is high-lighted, the user presses the Select button on the controller and this let-ter is added. If the user makes a mis-take, he can select the Delete button and delete one letter. Each time the Delete button is selected, another let-ter is deleted. This method is effective and it can work with a very simple controller, such as a joystick and one button. The problem with this
method is that it can take a long time to enter a name—it is much slower than typing. Figure 2.10 shows an example of this method for entering text.
Another approach is to start with one letter blinking. If the user moves the joystick up, the list cycles backward through the alphabet. If the user moves the joystick down, it moves forward through the alphabet. In both cases, the letter cycling wraps around and continues when at the end or beginning of the alphabet. When the
Button Types 21
Figure 2.9 The selection indicator moves until it reaches the edge, and then the options move onto the screen
Chapter 2 ■ Planning Menu Flow
22
user moves the joystick right, another letter is added. When the user moves the joystick left, a letter is deleted. Pressing the Select button on the con-troller finalizes the input and advances the menu.
These are just some of the most com-mon solutions for allowing users to input text. There are many more that have been used, and I have heard some solutions described that would make the entry process much faster. I challenge interface designers to come
up with a better text-entry solution for a console game, but I do so with caution. A new method can cause confusion and frustration in users. It must be very intuitive or explained really well. Neither of the methods described here is simple. The first time someone uses these methods to enter text, he is usual-ly a bit confused. These methods do, however, have a huge advantage: Almost everyone who’s played a game has used one of these methods and is familiar with them— in fact, users have come to expect them.
Drop-Down Menus
Drop-down menus are commonly used as an input method in PC games, but they are seldom used on a console game. Technically, a drop-down menu is just another way to use a list of items as input. It is just hidden until
the user selects the correct option. Drop-down menus are a common solution in most PC operating sys-tems and are very standard with application software. There aren’t many software applications that don’t use drop-down menus extensively. While drop-down menus can be use-ful, remember that you are making a game. A lot of the Windows conven-tions may be very familiar to the user, but they aren’t much fun. In general, it is better to get away from the feel of the operating system and make your game feel like a game. Drop-down menus typically don’t make you feel like you’re playing.
If you determine that a drop-down menu is still best for your game, you can at least do some variations. These menus can drop to the side or “drop” up. Interesting animations used for the transitions can also help give these menus a fun look. Just remember that you are making a game.
Other Variations
Not all of the methods for accepting input are listed in this book. In fact, there are many still waiting to be
ceived. This is an area where vision and creativity can have a great impact on game design. Just be very careful when implementing new methods— if a new method makes the interface confusing, then it is not a better solu-tion, even if it looks really cool. The user should know what to do without having to think very much. Stick with generally accepted methods most of the time; the user is familiar with these methods and will expect them. Use new and innovative methods sparingly and only when they will have a positive impact on the design.
Common Menu
Screens
Some of the sample menus that were charted previously were simple. A big-budget game with a lot of options can get very complicated. Take a look at Figure 2.4. You can see that creating a flow chart for a menu like this can be complicated. I’ve worked on games that had interfaces that are even more complicated than this sample.
Below is a list of some commonly used menu screens. Again, this is by no means an exhaustive list. There are many other screens that appear in many games. Looking at this list may help you to begin to make a flow chart for your next game. Think about which of these menus could be used in your game and what your game might need that is not listed here.
■ Legal screen. This can be a
short sentence or a screen full of text. It will include legal issues like copyright notices.
■ Publisher logo screen. It can be
a requirement to show this screen before the developer logo. There may also be a requirement for how long it needs to be displayed before the user can move on.
■ Developer logo screen. This is
where your company logo is seen.
■ Console logo screen. Some
consoles require or encourage developers to display the system logo.
■ Title screen.The name of the
game appears here. It can also include interactive options.
■ Options. An option screen
allows the user to change many game settings.
■ Credits. This is where everyone
who worked on the game is listed.
■ Environment or level select.
This is used in games where the user can choose a level of loca-tion to play.
■ Player editor. A player editor
will allow the user to change the look and attributes of char-acters in the game.
■ Information. This screen can
have extra information, such as story, maps, and so on.
■ Save / Load game. This screen
lists how many games are saved and allows the user to load and save games.
Simplicity versus Depth
After you have created a flow chart, it’s time to evaluate the flow of your