Programming ArcGIS
with Python Cookbook
Second Edition
Over 85 hands-on recipes to teach you how to automate
your ArcGIS for Desktop geoprocessing tasks using Python
Eric Pimpler
Programming ArcGIS with Python Cookbook
Second Edition
Copyright © 2015 Packt Publishing
All rights reserved. No part of this book may be reproduced, stored in a retrieval system, or transmitted in any form or by any means, without the prior written permission of the publisher, except in the case of brief quotations embedded in critical articles or reviews.
Every effort has been made in the preparation of this book to ensure the accuracy of the information presented. However, the information contained in this book is sold without warranty, either express or implied. Neither the author, nor Packt Publishing, and its dealers and distributors will be held liable for any damages caused or alleged to be caused directly or indirectly by this book.
Packt Publishing has endeavored to provide trademark information about all of the companies and products mentioned in this book by the appropriate use of capitals. However, Packt Publishing cannot guarantee the accuracy of this information.
First published: February 2013
Second edition: July 2015
Production reference: 1230715
Published by Packt Publishing Ltd. Livery Place
35 Livery Street
Birmingham B3 2PB, UK.
ISBN 978-1-78528-289-8
About the Author
Eric Pimpler
is the founder and owner of GeoSpatial Training Services(http://geospatialtraining.com/) and has over 20 years of experience implementing and teaching GIS solutions using Esri, Google Earth/Maps, open source technology. Currently, Eric is focusing on ArcGIS scripting with Python and the development of custom ArcGIS Server web and mobile applications using JavaScript. Eric is the author of Programming ArcGIS with Python Cookbook and Building Web and Mobile ArcGIS Server Applications with JavaScript, both by Packt Publishing.
About the Reviewers
Mohammed Alhessi
is a GIS professional and instructor who is interested in geospatial theory, algorithms, and applications. He has a good amount of experience in GIS analysis, development, and training. He has conducted quite a few training courses for people from different backgrounds. The courses have been diverse in terms of subjects and have included, but are not limited to, Enterprise Geodatabase Administration in MS SQL Server, spatial data analysis and modeling, and Python scripting for ArcGIS.He has worked at the University of Stuttgart as a GIS developer, where he programmed Geoprocessing tools using Java and Python. He is involved in many local GIS projects, providing consultancy for the local community. He is currently a lecturer at the Islamic University—Gaza, Palestine. He also holds classes at University College of Applied Sciences, Gaza.
Mohammed has a master's degree in geomatics engineering from the University of Stuttgart. He also has a bachelor's degree in civil engineering from the Islamic University—Gaza.
Matthew Bernardo
is the senior GIS analyst at Newport Renewables, a renewable energy firm based in Newport. An avid outdoorsman and technophile, he is drawn to the assimilation of environment and technology that GIS offers. Over the last few years, he has used GIS and Python programming to answer complex questions in many fields, including renewable energy, intelligence analysis, remote sensing, marine science, environmental science, and town planning.Rahul Bhosle
earned his bachelor of engineering degree in information technology from Shivaji University, India, and a master of geospatial information science and technology from North Carolina State University. Currently, he is a Geospatial Developer at GIS Data Resources, Inc. By profession, he is a geospatial developer. He has experience in the fields of Python, JavaScript, ArcGIS Suite, GeoServer, PostGIS, PostgreSQL, SQL Server, Leaflet, Openlayers, Machine Learning, and NoSQL.Kristofer Lasko
earned his bachelor's degree in geographical sciences from the University of Maryland. He subsequently earned a master's degree in geospatial information science from the University of Maryland. He teaches a graduate and undergraduate GIS course at the University of Maryland. He began learning about Python several years ago, when he found it necessary to automate mundane tasks as well as process large volumes of geospatial data.He is currently a PhD student at the University of Maryland, where he's studying geographical sciences. He has previously worked at NASA's Goddard Space Flight Center and NASA's Jet Propulsion Lab. He has also worked as a GIS and remote sensing analyst at the University of Maryland. His current research focuses on the burning of crop residue in Vietnam.
His website can be viewed at http://terpconnect.umd.edu/~klasko/cv.html.
Ann Stark
, a GISP since 2005, has been active in the GIS profession for 20 years. She is passionate about GIS and is an active and engaging member of the GIS community in the Pacific Northwest of the United States, coordinating local user groups and serving as the president of the region's GIS professional group. She is an enthusiastic teacher who explains how to effectively use Python with ArcGIS and maintains a blog devoted to the topic athttps://gisstudio.wordpress.com/. She co-owns a GIS consulting business, Salish Coast Sciences, which provides strategic planning, process automation, and GIS development services.
www.PacktPub.com
Support files, eBooks, discount offers, and more
For support files and downloads related to your book, please visit www.PacktPub.com.
Did you know that Packt offers eBook versions of every book published, with PDF and ePub files available? You can upgrade to the eBook version at www.PacktPub.com and as a print book customer, you are entitled to a discount on the eBook copy. Get in touch with us at
[email protected] for more details.
At www.PacktPub.com, you can also read a collection of free technical articles, sign up for a range of free newsletters and receive exclusive discounts and offers on Packt books and eBooks.
TM
https://www2.packtpub.com/books/subscription/packtlib
Do you need instant solutions to your IT questions? PacktLib is Packt's online digital book library. Here, you can search, access, and read Packt's entire library of books.
Why Subscribe?
f Fully searchable across every book published by Packt
f Copy and paste, print, and bookmark content
f On demand and accessible via a web browser
Free Access for Packt account holders
i
Table of Contents
Preface v
Chapter 1: Fundamentals of the Python Language for ArcGIS
1
Using IDLE for Python script development 2
Using the ArcGIS Python window 6
Python language fundamentals 9
Summary 29
Chapter 2: Managing Map Documents and Layers
31
Introduction 31
Referencing the current map document 32
Referencing map documents on a disk 34
Getting a list of layers in a map document 35
Restricting the list of layers 37
Zooming in to selected features 39
Changing the map extent 42
Adding layers to a map document 44
Inserting layers into a map document 46
Updating layer symbology 49
Updating layer properties 52
Working with time-enabled layers in a data frame 57
Chapter 3: Finding and Fixing Broken Data Links
65
Introduction 65 Finding broken data sources in your map document and layer files 66 Fixing broken data sources with MapDocument.
Table of Contents
Chapter 4: Automating Map Production and Printing
83
Introduction 83Creating a list of layout elements 84
Assigning a unique name to layout elements 86 Restricting the layout elements returned by ListLayoutElements() 90 Updating the properties of layout elements 91
Getting a list of available printers 94
Printing maps with PrintMap() 95
Exporting a map to a PDF file 96
Exporting a map to an image file 98
Exporting a report 100
Building a map book with Data Driven Pages and ArcPy mapping 104 Publishing a map document to an ArcGIS Server service 109
Chapter 5: Executing Geoprocessing Tools from Scripts
117
Introduction 117Finding geoprocessing tools 118
Retrieving a toolbox alias 122
Executing geoprocessing tools from a script 125 Using the output of a tool as an input to another tool 128
Chapter 6: Creating Custom Geoprocessing Tools
131
Introduction 131
Creating a custom geoprocessing tool 131
Creating a Python toolbox 149
Chapter 7: Querying and Selecting Data
161
Introduction 161 Constructing a proper attribute query syntax 162
Creating feature layers and table views 167
Selecting features and rows with the Select Layer by Attribute tool 171 Selecting features with the Select by Location tool 175 Combining a spatial and attribute query with the Select by Location tool 178
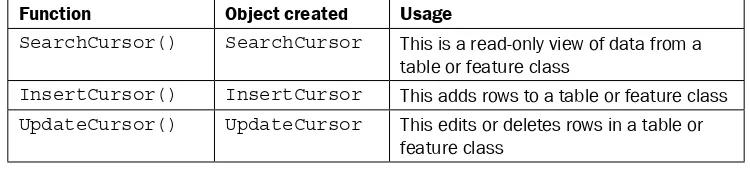
Chapter 8: Using the ArcPy Data Access Module with Feature
Classes and Tables
181
Introduction 182 Retrieving features from a feature class with SearchCursor 184
Filtering records with a where clause 187
Improving cursor performance with geometry tokens 188
Inserting rows with InsertCursor 192
Table of Contents
Deleting rows with UpdateCursor 201 Inserting and updating rows inside an edit session 203 Reading geometry from a feature class 207 Using Walk() to navigate directories 209
Chapter 9: Listing and Describing GIS Data
213
Introduction 213
Working with the ArcPy list functions 214
Getting a list of fields in a feature class or table 217 Using the Describe() function to return descriptive information about
a feature class 219
Using the Describe() function to return descriptive information about
a raster image 223
Chapter 10:
Customizing the ArcGIS Interface with Add-ins
225
Introduction 225 Downloading and installing the Python Add-in Wizard 226 Creating a button add-in and using the Python add-ins module 229Installing and testing an add-in 239
Creating a tool add-in 245
Chapter 11: Error Handling and Troubleshooting
251
Introduction 251 Exploring the default Python error message 252 Adding Python exception handling structures (try/except/else) 253 Retrieving tool messages with GetMessages() 255 Filtering tool messages by the level of severity 257 Testing for and responding to specific error messages 258
Chapter 12: Using Python for Advanced ArcGIS
261
Introduction 261
Getting started with the ArcGIS REST API 262
Making HTTP requests and parsing the response with Python 268 Getting layer information with the ArcGIS REST API and Python 271 Exporting a map with the ArcGIS REST API and Python 274 Querying a map service with the ArcGIS REST API and Python 278 Geocoding with the Esri World Geocoding Service 282
Using FieldMap and FieldMappings 284
Using a ValueTable to provide multivalue input to a tool 291
Table of Contents
Installing Python for ArcGIS Pro 298
Converting ArcGIS for Desktop Python code to ArcGIS Pro 298
Appendix A:
Automating Python Scripts
301
Introduction 301
Running Python scripts from the command line 302 Using sys.argv[ ] to capture command-line input 308 Adding Python scripts to batch files 310 Scheduling batch files to run at prescribed times 311
Appendix B: Five Python Recipes Every GIS Programmer Should Know 319
Introduction 319 Reading data from a delimited text file 320Sending e-mails 323
Retrieving files from an FTP server 327
Creating ZIP files 331
Reading XML files 334
Preface
ArcGIS is an industry-standard geographic information system from Esri.
This book will show you how to use the Python programming language to create geoprocessing scripts, tools, and shortcuts for the ArcGIS for Desktop environment.
It will make you a more effective and efficient GIS professional by showing you how to use the Python programming language with ArcGIS for Desktop to automate geoprocessing tasks, manage map documents and layers, find and fix broken data links, edit data in feature classes and tables, and much more.
Programming ArcGIS with Python Cookbook Second Edition, starts by covering fundamental Python programming concepts in an ArcGIS for Desktop context. Using a how-to instruction style, you'll then learn how to use Python to automate common important ArcGIS
geoprocessing tasks.
In this book, you will also cover specific ArcGIS scripting topics that will help save you time and effort when working with ArcGIS. Topics include managing map document files, automating map production and printing, finding and fixing broken data sources, creating custom geoprocessing tools, and working with feature classes and tables, among others.
What this book covers
Chapter 1, Fundamentals of the Python Language for ArcGIS, will cover many of the basic language constructs found in Python. Initially, you'll learn how to create new Python scripts or edit existing scripts. From there, you'll get into language features, such as adding comments to your code, variables, and the built-in typing systems that makes coding with Python easy and compact. Furthermore, we'll look at the various built-in data types that Python offers, such as strings, numbers, lists, and dictionaries. In addition to this, we'll cover statements, including decision support and looping structures for making decisions in your code, and/or looping through a code block multiple times.
Chapter 2, Managing Map Documents and Layers, will use the ArcPy mapping module to manage map document and layer files. You will learn how to add and remove geographic layers from map document files, insert layers into data frames, and move layers around within the map document. You will also learn how to update layer properties and symbology.
Chapter 3, Finding and Fixing Broken Data Links, will teach you how to generate a list of broken data sources in a map document file and apply various ArcPy mapping functions to fix these data sources. You will learn how to automate the process of fixing data sources across many map documents.
Chapter 4, Automating Map Production and Printing, will teach you how to automate the process of creating production-quality maps. These maps can then be printed, exported to image file formats, or exported to PDF files for inclusion in map books.
Chapter 5, Executing Geoprocessing Tools from Scripts, will teach you how to write scripts that access and run geoprocessing tools provided by ArcGIS.
Chapter 6, Creating Custom Geoprocessing Tools, will teach you how to create custom geoprocessing tools that can be added to ArcGIS and shared with other users. Custom geoprocessing tools are attached to a Python script that processes or analyzes geographic data in some way.
Chapter 7, Querying and Selecting Data, will teach you how to execute the Select by Attribute and Select by Location geoprocessing tools from a script to select features and records. You will learn how to construct queries that supply an optional where clause for the Select by Attribute tool. The use of feature layers and table views as temporary datasets will also be covered.
Chapter 9, Listing and Describing GIS Data, will teach you how to obtain descriptive information about geographic datasets through the use of the ArcPy Describe function. As the first step in a multistep process, geoprocessing scripts frequently require that a list of geographic data be generated followed by various geoprocessing operations that can be run against these datasets.
Chapter 10, Customizing the ArcGIS Interface with Add-ins, will teach you how to customize the ArcGIS interface through the creation of Python add-ins. Add-ins provide a way of adding user interface items to ArcGIS for Desktop through a modular code base designed to perform specific actions. Interface components can include buttons, tools, toolbars, menus, combo boxes, tool palettes, and application extensions. Add-ins are created using Python scripts and an XML file that define how the user interface should appear.
Chapter 11, Error Handling and Troubleshooting, will teach you how to gracefully handle errors and exceptions as they occur while a geoprocessing script is executing. ArcPy and Python errors can be trapped with the Python try/except structure and handled accordingly.
Chapter 12, Using Python for Advanced ArcGIS, covers the use of the ArcGIS REST API with Python to access services exposed by ArcGIS Server and ArcGIS Online. You will learn how to make HTTP requests and parse the responses, export maps, query map services, perform geocoding, and more. Also covered in this chapter are some miscellaneous topics related to ArcPy FieldMap and FieldMappings, as well as working with ValueTables.
Chapter 13, Using Python with ArcGIS Pro, covers some distinctions between the new ArcGIS Pro environment and ArcGIS for Desktop related to Python and, in particular, the Python Window for writing and executing code.
Appendix A, Automating Python Scripts, will teach you how to schedule geoprocessing scripts to run at a prescribed time. Many geoprocessing scripts take a long time to fully execute and need to be scheduled to run during nonworking hours on a regular basis. You will learn how to create batch files containing geoprocessing scripts and execute these at a prescribed time.
Appendix B, Five Python Recipes Every GIS Programmer Should Know, will teach you how to write scripts that perform various general purpose tasks with Python. Tasks, such as reading and writing delimited text files, sending e-mails, interacting with FTP servers, creating ZIP files, and reading and writing JSON and XML files, are common. Every GIS programmer should know how to write Python scripts that incorporate these functionalities.
What you need for this book
Who this book is for
Programming ArcGIS with Python Cookbook, Second Edition, is written for GIS professionals who wish to revolutionize their ArcGIS workflow with Python. Whether you are new to ArcGIS or a seasoned professional, you almost certainly spend time each day performing various geoprocessing tasks. This book will teach you how to use the Python programming language to automate these geoprocessing tasks and make you a more efficient and effective GIS professional.
Sections
In this book, you will find several headings that appear frequently (Getting ready, How to do it, How it works, There's more, and See also).
To give clear instructions on how to complete a recipe, we use these sections as follows:
Getting ready
This section tells you what to expect in the recipe, and describes how to set up any software or any preliminary settings required for the recipe.
How to do it…
This section contains the steps required to follow the recipe.
How it works…
This section usually consists of a detailed explanation of what happened in the previous section.
There's more…
This section consists of additional information about the recipe in order to make the reader more knowledgeable about the recipe.
See also
Conventions
In this book, you will find a number of text styles that distinguish between different kinds of information. Here are some examples of these styles and an explanation of their meaning.
Code words in text are shown as follows: "we have loaded the ListFeatureClasses.py
script with IDLE."
A block of code is set as follows:
import arcpy
fc = "c:/ArcpyBook/data/TravisCounty/TravisCounty.shp"
# Fetch each feature from the cursor and examine the extent # properties and spatial reference
for row in arcpy.da.SearchCursor(fc, ["SHAPE@"]): # get the extent of the county boundary
ext = row[0].extent
# print out the bounding coordinates and spatial reference print("XMin: " + ext.XMin)
print("XMax: " + ext.XMax) print("YMin: " + ext.YMin) print("YMax: " + ext.YMax)
print("Spatial Reference: " + ext.spatialReference.name)
When we wish to draw your attention to a particular part of a code block, the relevant lines or items are set in bold:
import arcpy
fc = "c:/data/city.gdb/streets"
# For each row print the Object ID field, and use the SHAPE@AREA # token to access geometry properties
with arcpy.da.SearchCursor(fc, ("OID@", "SHAPE@AREA")) as cursor:
for row in cursor:
print("Feature {0} has an area of {1}".format(row[0], row[1]))
Any command-line input or output is written as follows:
[<map layer u'City of Austin Bldg Permits'>, <map layer u'Hospitals'>, <map layer u'Schools'>, <map layer u'Streams'>, <map layer u'Streets'>,
New terms and important words are shown in bold. Words that you see on the screen, in menus or dialog boxes for example, appear in the text like this: "go to Start | All Programs |
ArcGIS | Python 2.7 | IDLE".
Warnings or important notes appear in a box like this.
Tips and tricks appear like this.
Reader feedback
Feedback from our readers is always welcome. Let us know what you think about this book—what you liked or disliked. Reader feedback is important for us as it helps us develop titles that you will really get the most out of.
To send us general feedback, simply e-mail [email protected], and mention the book's title in the subject of your message.
If there is a topic that you have expertise in and you are interested in either writing or contributing to a book, see our author guide at www.packtpub.com/authors.
Customer support
Now that you are the proud owner of a Packt book, we have a number of things to help you to get the most from your purchase.
Downloading the example code
You can download the example code files from your account at http://www.packtpub.com
for all the Packt Publishing books you have purchased. If you purchased this book elsewhere, you can visit http://www.packtpub.com/support and register to have the files e-mailed
xi
Errata
Although we have taken every care to ensure the accuracy of our content, mistakes do happen. If you find a mistake in one of our books—maybe a mistake in the text or the code—we would be grateful if you could report this to us. By doing so, you can save other readers from frustration and help us improve subsequent versions of this book. If you find any errata, please report them by visiting http://www.packtpub.com/submit-errata, selecting your book, clicking on the Errata Submission Form link, and entering the details of your errata. Once your errata are verified, your submission will be accepted and the errata will be uploaded to our website or added to any list of existing errata under the Errata section of that title.
To view the previously submitted errata, go to https://www.packtpub.com/books/ content/support and enter the name of the book in the search field. The required
information will appear under the Errata section.
Piracy
Piracy of copyrighted material on the Internet is an ongoing problem across all media. At Packt, we take the protection of our copyright and licenses very seriously. If you come across any illegal copies of our works in any form on the Internet, please provide us with the location address or website name immediately so that we can pursue a remedy.
Please contact us at [email protected] with a link to the suspected pirated material.
We appreciate your help in protecting our authors and our ability to bring you valuable content.
Questions
1
Fundamentals of the
Python Language
for ArcGIS
Python supports many of the programming constructs found in other languages. In this chapter, we'll cover many of the basic language constructs found in Python. Initially, we'll cover how to create new Python scripts and edit existing scripts. From there, we'll delve into language features, such as adding comments to your code, creating and assigning data to variables, and built-in variable typing with Python, which makes coding with Python easy and compact.
Next, we'll look at the various built-in data types that Python offers, such as strings, numbers, lists, and dictionaries. Classes and objects are a fundamental concept in object-oriented programming and in the Python language. We'll introduce you to these complex data structures, which you'll use extensively when you write geoprocessing scripts with ArcGIS.
In addition to this, we'll cover statements, including decision support and looping structures to make decisions in your code, and/or looping through a code block multiple times along with the with statement, which is used extensively with the cursor objects from the ArcPy data access module that are used to insert, search, and update data. Finally, you'll learn how to access modules that provide additional functionality to the Python language. By the end of this chapter, you will have learned the following:
f How to create and edit new Python scripts in IDLE
f Complex data structures
f Looping structures
f Additional Python functionalities
Using IDLE for Python script development
As mentioned in the preface, when you install ArcGIS for Desktop, Python is also installed along with a tool called IDLE that allows you to write your own code. IDLE stands for
Integrated DeveLopment Environment. Since it is available with every ArcGIS for Desktop installation, we'll use IDLE for many of the scripts that we write in this book along with the Python window embedded in ArcGIS for Desktop. As you progress as a programmer, you may find other development tools that you prefer over IDLE. There are many other development environments that you may want to consider, including PyScripter, Wingware, Komodo, and others. The development environment you choose is really a matter of preference. You can write your code in any of these tools.
The Python shell window
To start the IDLE development environment for Python, you can navigate to Start | All Programs | ArcGIS | Python 2.7 | IDLE. Please note that the version of Python installed with ArcGIS will differ depending upon the ArcGIS version that you have installed. For example, ArcGIS 10.3 uses Python 2.7, whereas ArcGIS 10.0 uses version 2.6 of Python.
The Python shell window is used for output and error messages generated by scripts. A common mistake for beginners is to assume that the geoprocessing scripts will be written in this shell window. This is not the case. You will need to create a separate code window to hold your scripts.
Although the shell window isn't used to write entire scripts, it can be used to interactively write code and get immediate feedback. ArcGIS has a built-in Python shell window that you can use in a similar way. We'll examine the ArcGIS Python window in the next chapter.
The Python script window
Editing existing Python scripts
In this instance, we have loaded the ListFeatureClasses.py script with IDLE. The code is loaded inside the script window:
Now that the code window is open, you can begin writing or editing code. You can also perform some basic script debugging with the IDLE interface. Debugging is the process of identifying and fixing errors in your code.
Executing scripts from IDLE
Once you've written a geoprocessing script in the IDLE code window or opened an existing script, you can execute the code from the interface. IDLE does provide functionality that allows you to check the syntax of your code before running the script. In the code window, navigate to
Run | Check Module to perform a syntax check of your code.
Once you're satisfied that no syntax errors exist in your code, you can run the script. Navigate to Run | Run Module to execute the script:
Any error messages will be written to the shell window along with the output from the print
statements and system-generated messages. The print statement simply outputs text to the shell window. It is often used to update the status of a running script or to debug the code.
Using the ArcGIS Python window
In this recipe, you'll learn how to use the ArcGIS Python window. In the last section, you learned how to use the IDLE development environment for Python, so this section will give you an alternative to write your geoprocessing scripts. Either development environment can be used, but it is common for people to start writing scripts with the ArcGIS for Desktop Python window and then move on to IDLE or another development environment when scripts become more complex.
The ArcGIS Python window
The ArcGIS Python window has a number of capabilities in addition to being the location to write your code. You can save the content of the window to a Python script file on a disk or load an existing Python script into the window. The window can be either pinned or floating. While floating, the window can be expanded or contracted as you wish. The window can also be pinned to various parts of the ArcGIS display. You can also format the font and text colors displayed in the window by right-clicking on the window and selecting Format.
Displaying the ArcGIS Python window
The Python window can be opened by clicking on the Python window button on the Standard ArcGIS for Desktop toolbar, as seen in the screenshot. This is a floating window, so you can resize as needed and also dock it at various places on the ArcMap interface:
You can load an existing script by right-clicking inside the Python window and selecting
Load… from the menu. You can also format the font and text colors displayed in the window by right-clicking on the window and selecting Format. You will be provided with White and Black themes; you can select fonts and colors individually:
9
The ArcGIS Python window also provides code-completion functionalities that make your life as a programmer much easier. You can try this functionality by opening the ArcGIS Python Window and typing arcpy followed by a dot on the first line. ArcPy is a module-oriented
package, which means that you access the properties and methods of an object using a dot notation. Notice that a drop-down list of available items is provided. These are the tools, functions, classes, and extensions that are available for this particular object. All objects have their own associated items, so the list of items presented will differ depending on the object that you have currently selected:
This is an auto-filtering list, so as you begin typing the name of the tool, function, class, or extension, the list will be filtered according to what you have typed:
You can choose to have the Python window auto-complete the text for you by selecting an item from the list using your mouse or by using the arrow keys to highlight your choice, and then using the Tab key to enter the command. This autocompletion feature makes you a faster, more efficient programmer. Not only is it easy to use, but it also dramatically cuts down the number of typos in your code.
Python language fundamentals
Commenting code
Downloading the example code
You can download the example code files for all Packt books you have
purchased from your account at http://www.PacktPub.com. If you have purchased this book elsewhere, you can visit
http://www.PacktPub.com/support and register to have
the files e-mailed directly to you.
Importing modules
Although Python includes many built-in functions, you will frequently need to access specific bundles of functionality, which are stored in external modules. For instance, the Math module stores specific functions related to processing numeric values and the R module provides statistical analysis functions. We haven't discussed the topic of functions yet, but basically functions are a named block of code that execute when called. Modules are imported through the use of the import statement. When writing geoprocessing scripts with ArcGIS, you will always need to import the arcpy module, which is the Python package that is used to access GIS tools and functions provided by ArcGIS. The import statements will be the first lines of
code (not including comments) in your scripts. The following line of code imports the arcpy
and os modules. The Python os module provides a way of interfacing with the underlying operating system:
import arcpy import os
Variables
At a high level, you can think of a variable as an area in your computer's memory that is reserved to store values while the script is running. Variables that you define in Python are given a name and a value. The values assigned to variables can then be accessed by different areas of your script as needed, simply by referring to the variable name. For example, you might create a variable that contains a feature class name, which is then used by the Buffer
tool to create a new output dataset. To create a variable, simply give it a name followed by the assignment operator, which is just an equals sign (=), and then a value:
fcParcels = "Parcels" fcStreets = "Streets"
There are certain naming rules that you must follow when creating variables, including the following:
f It can contain letters, numbers, and underscores
f The first character must be a letter
f No special characters can be used in a variable name other an underscore
f Python keywords and spaces are not permitted
There are a few dozen Python keywords that must be avoided, including class, if, for,
while, and others. These keywords are typically highlighted in a different font color from other Python statements.
Here are some examples of legal variable names in Python:
f featureClassParcel
f fieldPopulation
f field2
f ssn
f my_name
These are some examples of illegal variable names in Python:
f class (Python keyword)
f return (Python keyword)
f $featureClass (illegal character, must start with a letter)
f 2fields (must start with a letter)
f parcels&Streets (illegal character)
Python is a case-sensitive language, so pay particular attention to the capitalization and naming of variables in your scripts. Case-sensitivity issues are probably the most common source of errors for new Python programmers, so always consider this as a possibility when you encounter errors in your code. Let's look at an example. The following is a list of three variables; note that although each variable name is the same, the casing is different, resulting in three distinct variables:
f mapsize = "22x34"
f MapSize = "8x11"
If you print these variables, you will get the following output:
print(mapsize) >>> 22x34
print(MapSize)
>>> 8x11 #output from print statement
print(Mapsize)
>>>36x48 #output from print statement
Python variable names need to be consistent throughout the script. The best practice is to use camel casing, wherein the first word of a variable name is all lowercase and then each successive word begins with an uppercase letter. This concept is illustrated in the following example with the fieldOwnerName variable name. The first word (field) is all lowercase followed by an uppercase letter for the second word (Owner) and third word (Name):
fieldOwnerName
In Python, variables are dynamically typed. Dynamic typing means that you can define a variable and assign data to it without specifically defining that a variable name will contain a specific type of data. Commonly used data types that can be assigned to variables include the following:
Data type Example value Code example
String "Streets" fcName = "Streets"
We will discuss each of these data types in greater detail in the coming sections.
In the following C# code example, we've created a new variable called aTouchdown, which is defined as an integer variable, meaning that it can contain only integer data. We then assign the 6 value to the variable:
int aTouchdown; aTouchdown = 6;
In Python, this variable can be created and assigned data through dynamic typing. The Python interpreter is tasked with dynamically figuring out what type of data is assigned to the variable:
aTouchdown = 6
There may be times when you know that your script will need a variable, but don't necessarily know ahead of time what data will be assigned to the variable. In these cases, you could simply define a variable without assigning data to it. Here, you will find a code example that depicts creating a variable without assigning data:
aVariable = '' aVariable = NULL
Data that is assigned to the variable can also be changed while the script is running.
Variables can hold many different kinds of data, including primitive data types, such as strings and numbers, along with more complex data, such as lists, dictionaries, and even objects. We're going to examine the different types of data that can be assigned to a variable along with various functions that are provided by Python to manipulate the data.
Built-in data types
Python has a number of built-in data types. The first built-in type that we will discuss is the
string data type. We've already seen several examples of string variables, but these types of variables can be manipulated in a lot of ways, so let's take a closer look at this data type.
Strings
String manipulation
Strings can be manipulated in a number of ways in Python. String concatenation is one of the more commonly used functions and is simple to accomplish. The + operator is used with
string variables on either side of the operator to produce a new string variable that ties the two string variables together:
shpStreets = "c:\\GISData\\Streets" + ".shp" print(shpStreets)
Running this code example produces the following result:
>>>c:\GISData\Streets.shp
String equality can be tested using Python's == operator, which is simply two equals signs placed together. Don't confuse the equality operator with the assignment operator, which is a single equals sign. The equality operator tests two variables for equality, while the assignment operator assigns a value to a variable:
firstName = "Eric" lastName = "Pimpler" firstName == lastName
Running this code example produces the following result because the firstName and
lastName variables are not equal:
>>>False
Strings can be tested for containment using the in operator, which returns True if the first
operand is contained in the second:
fcName = "Floodplain.shp" print(".shp" in fcName) >>>True
Characters in a string are obtained by providing the numeric offset contained within square brackets after a string. For example, you could obtain the first string character in the fc
variable by using the fc[0] syntax. Python is a zero-based language, meaning the first item in
a list is 0. Negative offsets can be used to search backwards from the end of a string. In this case, the last character in a string is stored at the -1 index. Indexing always creates a new variable to hold the character:
The following image illustrates how strings are an ordered collection of characters with the first character occupying the 0 position, the second character occupying the 1 position, and each successive character occupying the next index number:
While string indexing allows you to obtain a single character from a string variable, string slicing enables you to extract a contiguous sequence of strings. The format and syntax is similar to indexing, but with the addition of a second offset, which is used to tell Python which characters to return.
The following code example provides an example of string slicing. The theString variable has been assigned a value of Floodplain.shp. To obtain a sliced variable with the contents of Flood, you would use the theString[0:5] syntax:
theString = "Floodplain.shp" print(theString[0:5])
>>>Flood
Python slicing returns the characters beginning with the first offset up to,
but not including, the second offset. This can be particularly confusing for new Python programmers and is a common source of errors. In our example, the returned variable will contain the Flood characters. The first
Either of the offsets can be left off. This, in effect, creates a wild card. In the case of
theString[1:], you are telling Python to return all characters starting from the second character to the end of the string. In the second case, theString[:-1], you are telling Python to start at character zero and return all characters except the last.
Python is an excellent language to manipulate strings and there are many additional functions that you can use to process this type of data. Most of these are beyond the scope of this text, but in general, all the following string manipulation functions are available:
f String length
f Casing functions for conversion to upper and lowercase
f The removal of leading and trailing whitespace
f Finding a character within a string
f The replacement of text
f Splitting into a list of words based on a delimiter
f Formatting
Your Python geoprocessing scripts for ArcGIS will often need to reference the location of a dataset on your computer or, perhaps, a shared server. References to these datasets will often consist of paths stored in a variable. In Python, pathnames are a special case that deserve some extra mention. The backslash character in Python is a reserved escape character and a line continuation character, thus there is a need to define paths using two back slashes, a single forward slash, or a regular single backslash prefixed with r. These pathnames are always stored as strings in Python. You'll see an example of this in the following section.
The example for an illegal path reference is as follows:
fcParcels = "c:\Data\Parcels.shp"
The example for legal path references are as follows:
fcParcels = "c:/Data/Parcels.shp" fcParcels = "c:\\Data\\Parcels.shp" fcParcels = r"c:\Data\Parcels.shp"
Numbers
Python also has built-in support for numeric data, including int, long, float, and complex
Although Python provides a few built-in mathematical functions, the math module can be used to access a wide variety of more advanced math functions. To use these functions, you must specifically import the math module as follows:
import math
Functions provided by the math module include those that return the ceiling and floor
of a number, the absolute value, trigonometric functions, logarithmic functions, angular conversion, and hyperbolic functions. It is worth noting that there is no simple function to calculate mean or average and these will have to be coded to be calculated. More details about the math module can be found by navigating to All Programs | ArcGIS | Python 2.7
| Python Manuals. After opening the python manual, navigate to Python Standard Library |
Numeric and Mathematical Modules. You can also reference this for any data types, syntax, built-in functions, and other things that you wish to understand in more detail, of which there are too many to be covered here.
Lists
A third built-in data type provided by Python is lists. A list is an ordered collection of elements that can hold any type of data supported by Python as well as being able to hold multiple data types at the same time. This could be numbers, strings, other lists, dictionaries, or objects. So, for instance, a list variable could hold numeric and string data at the same time. Lists are zero-based, with the first element in the list occupying the 0 position. This is illustrated here:
listOfValues =[ streets , mains , parcels , values ]' ' ' ' ' ' ' '
3 2 1 0
Each successive object in the list is incremented by one. Additionally, lists have the special capability of dynamically growing and shrinking.
Lists are created by assigning a series of values enclosed by brackets. To pull a value from a list, simply use an integer value in brackets along with the variable name. The following code example provides an illustration of this:
fcList = ["Hydrants", "Water Mains", "Valves", "Wells"] fc = fcList[0] ##first item in the list - Hydrants print(fc)
>>>Hydrants
fc = fcList[3] ##fourth item in the list - Wells print(fc)
You can add a new item to an existing list by using the append() method, as seen in this code example:
fcList.append("Sewer Pipes") print(fcList)
>> Hydrants, Water Mains, Valves, Wells, Sewer Pipes
You can also use slicing with lists to return multiple values. To slice a list, you can provide two offset values separated by a colon, as seen in the following code example. The first offset indicates the starting index number and the second indicates the stopping point. The second index number will not be returned. Slicing a list always returns a new list:
fcList = ["Hydrants", "Water Mains", "Valves", "Wells"]
fc = fcList[0:2] ##get the first two items – Hydrants, Water Mains
Lists are dynamic in nature, meaning that you can add and remove items from an existing list as well as change the existing contents. This is all done without the need to create a new copy of the list. Changing values in a list can be accomplished either through indexing or slicing. Indexing allows you to change a single value, while slicing allows you to change multiple list items.
Lists have a number of methods that allow you to manipulate the values that are part of the list. You can sort the contents of the list in either an ascending or descending order through the use of the sort() method. Items can be added to a list with the append() method, which adds an object to the end of the list, and with the insert() method, which inserts an object at a position within the list. Items can be removed from a list with the remove()
method, which removes the first occurrence of a value from the list, or the pop() method, which removes and returns the object at the end of the list. The contents of the list can also be reversed with the reverse() method.
Tuples
Tuples are similar to lists but with some important differences. Just like lists, tuples contain a sequence of values. The contents of a tuple can include any type of data just like lists. However, unlike lists, the contents of a tuple are static. After a tuple has been created, you can't make any changes to the sequence of the values nor can you add or remove values. This can be a good thing for situations where you want data to always occupy a specific position. Creating a tuple is as simple as placing a number of comma-separated values inside parentheses, as shown in the following code example:
fcTuples = ("Hydrants", "Water Mains", "Valves", "Wells")
Similar to lists, tuple indices start with an index value of 0. Access to values stored in a tuple occurs in the same way as lists. This is illustrated in the following code example:
fcTuples = ("Hydrants", "Water Mains", "Valves", "Wells") print(fcTuples[1])
>>>Water Mains
Tuples are typically used in place of a list when it is important for the contents of the structure to be static. You can't ensure this with a list, but you can with a tuple.
Dictionaries
Dictionaries are a second type of collection object in Python. They are similar to lists, except that dictionaries are an unordered collection of objects. Instead of fetching objects from the collection through the use of an offset, items in a dictionary are stored and fetched by a key. Each key in a dictionary has an associated value, as seen here:
dFires ={ FireName : Bastrop , Acres : 3000, Contain : N , Location : (-95.456, 32.948) }' ' ' ' ' ' ' ' ' ' ' '
K K
K
K V V V V
Similar to lists, dictionaries can grow and shrink in place through the use of methods on dictionary. In the following code example, you will learn to create and populate a dictionary and see how values can be accessed through the use of a key. Dictionaries are created with the use of curly braces. Inside these braces, each key is followed by a colon and then a value is associated with the key. These key/value pairs are separated by commas:
##create the dictionary
dictLayers = {'Roads': 0, 'Airports': 1, 'Rail': 2}
##access the dictionary by key print(dictLayers['Airports']) >>>1
print(dictLayers['Rail']) >>>2
Unlike lists, dictionaries can't be sliced due to the fact that their contents are unordered. Should you have the need to iterate over all the values in a dictionary, simply use the keys() method, which returns a collection of all the keys in the dictionary and can then be used individually to set or get their value.
Classes and objects
Classes and objects are a fundamental concept in object-oriented programming. While Python is more of a procedural language, it also supports object-oriented programming. In object-oriented programming, classes are used to create object instances. You can think of classes as blueprints for the creation of one or more objects. Each object instance has the same properties and methods, but the data contained in an object can and usually will differ. Objects are complex data types in Python composed of properties and methods, and can be assigned to variables just like any other data type. Properties contain data associated with an object, while methods are actions that an object can perform.
These concepts are best illustrated with an example. In ArcPy, the extent class is a rectangle specified by providing the coordinate of the lower-left corner and the coordinate of the upper-right corner in map units. The extent class contains a number of properties and methods. Properties include XMin, XMax, YMin, YMax, spatialReference, and others. The minimum and maximum of x and y properties provide the coordinates for the extent rectangle. The spatialReference property holds a reference to a spatialReference
object for extent. Object instances of the extent class can be used both to set and get the values of these properties through dot notation. An example of this is seen in the following code example:
# get the extent of the county boundary ext = row[0].extent
# print out the bounding coordinates and spatial reference print("XMin: " + str(ext.XMin))
print("XMax: " + str(ext.XMax)) print("YMin: " + str(ext.YMin)) print("YMax: " + str(ext.YMax))
print("Spatial Reference: " + ext.spatialReference.name)
Running this script yields the following output:
The extent class also has a number of methods, which are actions that an object can perform. In the case of this particular object, most of the methods are related to performing some sort of geometric test between the extent object and another geometry. Examples include contains(), crosses(), disjoint(), equals(), overlaps(), touches(), and within().
One additional object-oriented concept that you need to understand is dot notation. Dot notation provides a way of accessing the properties and methods of an object. It is used to indicate that a property or method belongs to a particular class.
The syntax for using dot notation includes an object instance followed by a dot and then the property or method. The syntax is the same regardless of whether you're accessing a property or a method. A parenthesis and zero or more parameters at the end of the word following the dot indicates that a method is being accessed. Here are a couple of examples to better illustrate this concept:
Property: extent.XMin Method: extent.touches()
Statements
Each line of code that you write with Python is known as a statement. There are many different kinds of statements, including those that create and assign data to variables, decision support statements that branch your code based on a test, looping statements that execute a code block multiple times, and others. There are various rules that your code will need to follow as you create the statements that are part of your script. You've already encountered one type of statement: variable creation and assignment.
Decision support statements
The if/elif/else statement is the primary decision-making statement in Python and tests for a True/False condition. Decision statements enable you to control the flow of your
programs. Here are some example decisions that you can make in your code: if the variable holds a point feature class, get the X, Y coordinates; if the feature class name equals Roads, then get the Name field.
Decision statements, such as if/elif/else, test for a True/False condition. In Python, a True value means any nonzero number or nonempty object. A False value indicates not true and is represented in Python with a zero number or empty object. Comparison tests return values of one or zero (true or false). Boolean and/or operators return a true or false operand value:
if fcName == 'Roads':
arcpy.Buffer_analysis(fc, "c:\\temp\\rail.shp", 50) else:
print("Can't buffer this layer")
The Python code must follow certain syntax rules. Statements execute one after another until your code branches. Branching typically occurs through the use of if/elif/else. In addition to this, the use of looping structures, such as for and while, can alter the statement flow.
Python automatically detects statement and block boundaries, so there is no need for braces or delimiters around your blocks of code. Instead, indentation is used to group statements in a block. Many languages terminate statements with the use of a semicolon, but Python simply uses the end of line character to mark the end of a statement. Compound statements include a ":" character. Compound statements follow this pattern, that is, header terminated by a colon. Blocks of code are then written as individual statements and are indented underneath the header.
Looping statements
Looping statements allow your program to repeat lines of code over and over as necessary. The while loops repeatedly execute a block of statements as long as the test at the top of the loop evaluates to True. When the condition test evaluates to False, Python begins interpreting code immediately after the while loop. In the next code example, a value of 10 has been assigned to the x variable. The test for the while loop then checks to see if x is less than 100. If x is less than 100, the current value of x is printed to the screen and the value of x is incremented by 10. Processing then continues with the while loop test. The second time, the value of x will be 20; so the test evaluates to True once again. This process continues until x is equal to or greater than 100. At this time, the test will evaluate to False and processing will stop. It is very important that the while statements have some way of breaking out of the loop. Otherwise, you will wind up in an infinite loop. An infinite loop is a sequence of instructions in a computer program that loops endlessly, either due to the loop having no terminating condition, having one that can never be met, or one that causes the loop to start over:
x = 10
The for loops execute a block of statements a predetermined number of times. They come in two varieties—a counted loop to run a block of code a set number of times, and a list loop that enables you to loop through all the objects in a list. The list loop in the following example executes once for each value in the dictionary and then stops looping:
dictLayers = {"Roads":"Line","Rail":"Line","Parks":"Polygon"} for key in dictLayers:
print(dictLayers[key])
There are times when it will be necessary for you to break out of the execution of a loop. The
break and continue statements can be used to do this. The break jumps out of the closest enclosing loop, while continue jumps back to the top of the closest enclosing loop. These statements can appear anywhere inside the block of code.
Try statements
A try statement is a complete, compound statement that is used to handle exceptions. Exceptions are a high-level control device used primarily for error interception or triggering. Exceptions in Python can either be intercepted or triggered. When an error condition occurs in your code, Python automatically triggers an exception, which may or may not be handled by your code. It is up to you as a programmer to catch an automatically triggered exception. Exceptions can also be triggered manually by your code. In this case, you would also need to provide an exception handling routine to catch these manually triggered exceptions.
There are two basic types of try statements: try/except/else and try/finally. The basic try statement starts with a try header line followed by a block of indented statements. Then, this is followed by one or more optional except clauses that name the exceptions that are to be caught. After this, you will find an optional else clause at the end:
import arcpy import sys
inFeatureClass = arcpy.GetParameterAsText(0) outFeatureClass = arcpy.GetParameterAsText(1)
try:
# If the output feature class exists, raise an error
if arcpy.Exists(inFeatureClass):
raise overwriteError(outFeatureClass) else:
# Additional processing steps
# to complete the message.
arcpy.AddIDMessage("Error", 12, str(e))
The try/except/else statement works as follows. Once inside a try statement, Python marks the fact that you are in a try block and knows that any exception condition that occurs at this point will be sent to the various except statements for handling. If a matching exception is found, the code block inside the except block is executed. The code then picks up the full try statement, which will be mentioned shortly. The else statements are not executed in this case. Each statement inside the try block is executed. Assuming that no exception conditions occur, the code pointer will then jump to the else statement and execute the code block contained by the else statement before moving to the next line of code that follows the try block.
The other type of try statement is the try/finally statement, which allows for finalization
actions. When a finally clause is used in a try statement, its block of statements always run at the very end, whether an error condition occurs or not.
Here is how the try/finally statement works: if an exception occurs, Python runs the try
block, then the except block, followed by the finally block, and then execution continues past the entire try statement. If an exception does not occur during execution, Python runs the try block, then the finally block. This is useful when you want to make sure an action happens after a code block runs, regardless of whether an error condition occurs. Cleanup operations, such as closing a file or a connection to a database, are commonly placed inside a
finally block to ensure that they are executed regardless of whether an exception occurs in your code:
import arcpy
try:
if arcpy.CheckExtension("3D") == "Available": arcpy.CheckOutExtension("3D")
With statements
The with statement is handy when you have two related operations that need to be executed as a pair with a block of code in between. A common scenario to use the with statements is opening, reading, and closing a file. Opening and closing a file are the related operations, and reading a file and doing something with the contents is the block of code in between. When writing geoprocessing scripts with ArcGIS, the new cursor objects introduced with version 10.1 of ArcGIS are ideal when using the with statements. We'll discuss the cursor objects in great detail in a later chapter, but I'll briefly describe these objects now. Cursors are an
in-memory copy of records from the attribute table of a feature class or table. There are various types of cursors. Insert cursors allow you to insert new records, search cursors are a read-only copy of records, and update cursors allow you to edit or delete records. Cursor objects are opened, processed in some way, and closed automatically using a with statement.
The closure of a file or cursor object is handled automatically by the with statement, resulting in cleaner, more efficient coding. It's basically like using a try/finally block, but with fewer lines of code. In the following code example, the with block is used to create a new search cursor, read information from the cursor, and implicitly close the cursor:
import arcpy
fc = "c:/data/city.gdb/streets"
# For each row print the Object ID field, and use the SHAPE@AREA # token to access geometry properties
with arcpy.da.SearchCursor(fc, ("OID@", "SHAPE@AREA")) as cursor: for row in cursor:
print("Feature {0} has an area of {1}".format(row[0], row[1]))
Statement indentation
Also, an if statement is inside the try statement. This too is a compound statement as defined by the colon at the end of the statement. Therefore, any statements that are part of the if statement should be further indented. You should also notice that there is a statement that is not indented inside the if statement, but is rather at the same level. This
statement4 is part of the try code block but not part of the if code block:
Many languages, including JavaScript, Java, and .NET, use curly braces to indicate a group of statements. Python uses indentation instead of curly braces in an attempt to cut down on the amount of code you have to write and to make code more readable. Anyone who has ever used these other languages can attest to the difficulty in reading code that contains many curly braces. However, indentation does take some getting used to and is critical to the way that Python executes lines of code.
File I/O
You will often find it necessary to retrieve or write information to files on your computer. Python has a built-in object type that provides a way to access files for many tasks. We're only going to cover a small subset of the file manipulation functionality provided, but we'll touch on the most commonly used functions, including opening and closing files, and reading and writing data to a file.
Python's open() function creates a file object, which serves as a link to a file residing on your computer. You must call the open() function on a file before reading and/or writing data to a file.
The first parameter for the open() function is a path to the file you'd like to open. The second
parameter corresponds to a mode, which is typically read (r), write (w), or append (a). A value of r
Notice that we have also used the with keyword to open the file, ensuring that the file
resource will be cleaned up after the code that uses it has finished executing.
After a file has been opened, data can be read from it in a number of ways and using various methods. The most typical scenario would be to read data one line at a time from a file through the readline() method. The readline() function can be used to read the file one
line at a time into a string variable. You would need to create a looping mechanism in your Python code to read the entire file line by line. If you would prefer to read the entire file into a variable, you can use the read() method, which will read the file up to the End Of File (EOF) marker. You can also use the readlines() method to read the entire contents of a file,
separating each line into individual strings, until the EOF is found.
In the following code example, we have opened a text file called Wildfires.txt in the read-only mode and used the readlines() method on the file to read its entire contents
into a variable called lstFires, which is a Python list containing each line of the file as a
separate string value in the list. In this case, the Wildfire.txt file is a comma-delimited
text file containing the latitude and longitude of the fire along with the confidence values for each fire. We then loop through each line of text in lstFires and use the split() function to extract the values based on a comma as the delimiter, including the latitude, longitude, and confidence values. The latitude and longitude values are used to create a new Point object, which is then inserted into the feature class using an insert cursor:
import arcpy, os try:
arcpy.env.workspace = "C:/data/WildlandFires.mdb" # open the file to read
with open('Wildfires.txt','r') as f: #open the file
lstFires = f.readlines() #read the file into a list cur = arcpy.InsertCursor("FireIncidents")
for fire in lstFires: #loop through each line if 'Latitude' in fire: #skip the header
pnt = arcpy.Point(longitude,latitude) feat = cur.newRow()
29
except:
print(arcpy.GetMessages()) #print out any errors finally:
del cur f.close()
Just as is the case with reading files, there are a number of methods that you can use to write data to a file. The write() function is probably the easiest to use and takes a single string argument and writes it to a file. The writelines() function can be used to write the contents of a list structure to a file. In the following code example, we have created a list structure called fcList, which contains a list of feature classes. We can write this list to a file
using the writelines() method:
outfile = open('c:\\temp\\data.txt','w') fcList = ["Streams", "Roads", "Counties"] outfile.writelines(fcList)
Summary
2
Managing Map
Documents and Layers
In this chapter, we will cover the following recipes:
f Referencing the current map document
f Referencing map documents on a disk
f Getting a list of layers in a map document
f Restricting the list of layers
f Zooming in to selected features f Changing the map extent
f Adding layers to a map document
f Inserting layers into a map document
f Updating layer symbology
f Updating layer properties
f Working with time-enabled layers in a data frame
Introduction
In this chapter, you will learn how to use the ArcPy mapping module to manage map documents and layer files. You will also learn how to add and remove geographic layers and tables from map document files, insert layers into data frames, and move layers around within the map document. Finally, you will learn how to update layer properties and symbology.
Referencing the current map document
When running a geoprocessing script from the ArcGIS Python window or a custom script tool, you will often need to make a reference to the map document which is currently loaded in ArcMap. This is typically the first step in your script before you perform geoprocessing operations against layers and tables in a map document. In this recipe, you will learn how to reference the current map document from your Python geoprocessing script.
Getting ready
Before you can actually perform any operations on a map document file, you need to make a reference to it in your Python script. This is done by calling the MapDocument() method on the arcpy.mapping module. You can reference either the currently running document or a document at a specific location on disk. To reference the currently active document, you simply supply the keyword CURRENT as a parameter to the MapDocument() function. This loads the currently active document in ArcMap. The following code example shows how a reference to the current active document is obtained:
mxd = mapping.MapDocument("CURRENT")
You can only use the CURRENT keyword when running a script from the ArcGIS Python window or a custom script tool in ArcToolbox. If you attempt to use this keyword when running a script from IDLE or any other development environment, it won't
have access to the map document file that is currently loaded in
ArcGIS. I should also point out that the CURRENT keyword is not case sensitive. You could just as easily use "current".