Daniel Howard
ISBN: 978-1-449-33360-7
[LSI]
Node.js for PHP Developers by Daniel Howard
Copyright © 2013 Daniel Howard. All rights reserved. Printed in the United States of America.
Published by O’Reilly Media, Inc., 1005 Gravenstein Highway North, Sebastopol, CA 95472.
O’Reilly books may be purchased for educational, business, or sales promotional use. Online editions are also available for most titles (http://my.safaribooksonline.com). For more information, contact our corporate/ institutional sales department: 800-998-9938 or [email protected].
Editors: Simon St. Laurent and Meghan Blanchette Production Editor: Kara Ebrahim
Copyeditor: Jasmine Kwityn
Proofreader: Kara Ebrahim Indexer: Potomac Indexing, LLC Cover Designer: Karen Montgomery Interior Designer: David Futato Illustrator: Rebecca Demarest
December 2012: First Edition
Revision History for the First Edition:
2012-11-28 First release
See http://oreilly.com/catalog/errata.csp?isbn=9781449333607 for release details.
Nutshell Handbook, the Nutshell Handbook logo, and the O’Reilly logo are registered trademarks of O’Reilly Media, Inc. Node.js for PHP Developers, the image of the Wallachian sheep, and related trade dress are trademarks of O’Reilly Media, Inc.
Many of the designations used by manufacturers and sellers to distinguish their products are claimed as trademarks. Where those designations appear in this book, and O’Reilly Media, Inc., was aware of a trade‐ mark claim, the designations have been printed in caps or initial caps.
Table of Contents
Preface. . . v
1. Node.js Basics. . . 1
The node and npm Executables 1
Stack Traces 7
Eclipse PDT 9
2. A Simple Node.js Framework. . . 21
An HTTP Server 21
Predefined PHP Variables 29
A PHP Example Page 42
3. Simple Callbacks. . . 47
Linearity 49
Making Code Linear 57
4. Advanced Callbacks. . . 65
Anonymous Functions, Lambdas, and Closures 66
PHP 5.3 69
PHP 4 73
5. HTTP Responses. . . 89
Headers 90
Body 92
A PHP Example Page 97
6. Syntax. . . 107
String Literals 109
PHP Alternative Syntax 117
7. Variables. . . 125
Simple Variables 126
Array Variables 128
Other Variable Types 143
Undefined Variables 144
Scope 148
8. Classes. . . 157
Encapsulation 157
Inheritance 166
PHP parent and static Keywords 173
9. File Access. . . 177
Reading and Writing Files 177
PHP file() API Function 183
Low-Level File Handling 186
Filenames 191
10. MySQL Access. . . 199
Database Approaches 200
node-mysql 203
11. Plain Text, JSON, and XML. . . 219
Plain Text 221
JSON 223
XML 226
12. Miscellaneous Functions. . . 241
Array 242
Time and Date 246
File 247
JSON 247
Math 248
String 249
Type 253
Text 254
MySQL 257
Variable 257
php.js License 258
Preface
Why bother with this book?
PHP is an old language, as Internet languages go, invented in 1995. Node.js is new, very new, invented in 2009. Looking at PHP side by side with Node.js gives you a bird’s eye view of where web servers started, how far they have come, and what’s changed. But, more importantly, it shows what hasn’t changed—what the industry as a whole has agreed are good practices—and a little bit of what the future holds.
The biggest difference between PHP and Node.js is that PHP is a blocking language, relying on APIs that don’t return until they are done, and Node.js is a nonblocking language, relying on APIs that use events and callbacks when they are done. But, except for that, they are surprisingly similar. Both use the curly bracket notation ( { and } ) for blocks of code, just like the C programming language. Both have the function keyword, which serves the exact same purpose and has the exact same syntax in both languages. If Node.js shows that blocking APIs are the past, it also shows that a pretty specific variation of the C programming language is the past, present, and future. Callbacks may be an evolution, but syntax is almost frozen.
But beyond just, “oh, isn’t that interesting,” why bother with this book?
PHP is supported by a zillion cPanel website hosting services. If you develop a web application and want to give it to other people to run, they can install it almost anywhere if it is written in PHP. They can buy web hosting for $10 per month, install your PHP web application, and be on their way.
interested in it and are writing Node.js code. By writing Node.js code, you make your web application code interesting and useful to a lot of developers. If you develop a web application and want to give it to other developers to improve and reuse, they can get your Node.js web application from GitHub or wherever else the source code is hosted.
In a perfect world, you could appeal to both sets of people.
Ours isn’t a perfect world, but you can still achieve this goal by porting your PHP code to Node.js code and simultaneously having and developing two working codebases in two different languages.
The Mission
The mission of this book—and when I write “mission,” I mean it in the “I really, really, really, really want you to do it” kind of mission—is to convince you to convert some of your PHP code to Node.js code. I don’t want you to just read this book. I want you to actually sit down at a computer and take some of your most tired, annoying PHP 4 code and convert it to Node.js using this book as a guide. I want you to see for yourself that PHP and Node.js are not that different. I want you to see for yourself that your PHP code does not need to be thrown away and rewritten in Node.js from scratch. I want you to see for yourself that you don’t have to surrender to just living with your PHP code, being a prisoner of the past.
As you will see, converting your PHP code to Node.js code isn’t just about Node.js. It is also about improving your PHP code. An important step throughout this book is re‐ factoring and improving your PHP code such that it is easier to convert it to Node.js code. This book isn’t just about making a new Node.js codebase. It is about improving your PHP codebase and creating a new Node.js codebase. It is about both codebases: your PHP codebase and your Node.js codebase. Converting your PHP codebase to Node.js can make you a better PHP developer.
If you are a PHP developer, this book is perfect for you because you can learn how to develop Node.js code by using your existing PHP knowledge. You can see how certain code works in PHP, such as reading a text file, and in the next few paragraphs, you can see how exactly the same thing is accomplished in Node.js. Unlike other Node.js books, this book does not describe file handling in general. It specifically compares it to PHP so you can see the nuts and bolts of what it looks like in the language that you know as well as in the language you are learning. You might even find a few corners of PHP you weren’t previously aware of, because a few of those PHP corners are central concepts in Node.js.
side by side with Node.js, there is good reason to think that Node.js developers can figure out PHP by looking at the same code. Even better, by comparing Node.js to a specific different language, such as PHP, it will give you a good idea as to how much of Node.js is the same as PHP.
Comparing two languages or, even better, showing how to convert or port from one language to another, is a powerful way to become an expert in both languages. Other books, which deal with only one language, mostly read like step-by-step tutorials or encyclopedias. “This is this,” they read, “that is that.” They can describe concepts only as abstractions. Other books can’t use the powerful explanation of an ongoing compar‐ ison of two languages that this book does.
Besides being more effective, a book such as this one can also be more interesting and focus on only the interesting topics. In a run-of-the-mill Node.js programming book, time is spent explaining what a statement is and why every Node.js statement ends in a semicolon (;). That’s dull. But when a book is explaining how to program in Node.js in a vacuum without any point of reference (such as the PHP language), there is no alter‐ native. With this book, I can assume that you already know what a PHP statement is and that a PHP statement ends in a semicolon (;). All that needs to be said is that Node.js is exactly the same way. With this book, I can assume that the reader has a specific background—PHP development—instead of needing to write more broadly for people who come with a Python or Microsoft Office macro background.
By proselytizing the conversion of PHP code to Node.js code, I am not saying that PHP code is bad. In fact, I think PHP is a very capable and pretty good language. I am not saying that you should convert your PHP code to Node.js code and then throw away the original PHP code. I am encouraging you to keep the original PHP code and improve it while, at the same time, becoming a skilled Node.js developer. PHP and Node.js are both important.
When first setting out to write this book, I made a very important decision early on: I was going to focus on real-life, practical, existing PHP code. PHP 5 is the current PHP version, but there is still a lot of PHP 4 code out there. This book has explicitly avoided the easy prescription: convert your PHP 4 code to PHP 5 code, then use this book to convert your PHP 5 code to Node.js. No, despite the fact that PHP 4 support is rapidly fading in favor of PHP 5 support, this book takes the much harder road of showing how PHP 4 code can be improved upon and converted to Node.js code without requiring PHP 5 features. Although this book does show how to convert PHP 5 code to Node.js, let me assure you that PHP 4 code is readily convertible to Node.js using this book.
fixes could be developed on both codebases simultaneously. This decision avoids a much easier approach, which would have been a “convert-and-discard” conversion process where the PHP codebase would be unsynchronized and possibly not working at the end of the conversion process and the developer’s only option would be to proceed ahead with the Node.js codebase by itself. This would have made a much shorter book, but would have been a cheap trick—a way to make life easier for me, as the writer, and make the book less useful to you, as the reader.
These two decisions, one to support PHP 4 and the other to support two synchronized PHP and Node.js codebases as an end product, have made this book longer than it would otherwise be, but have also made it eminently practical. This is not a book that you will read once and put on the shelf as an “isn’t that nice to know” book. This is a book that you can use for reference to quickly refresh yourself about important aspects of either PHP or Node.js.
By now, you might understand what the mission is and why it might be worthwhile. But maybe you are still doubtful.
Consider the following PHP code, which was taken from a real-world PHP web appli‐ cation that implemented instant message−style chatting:
function roomlist() {
$rooms = array();
$room_list = mysql_query(
'SELECT room FROM '.SQL_PREFIX.'chats GROUP BY room ORDER BY room ASC'
);
while ($row = mysql_fetch_assoc($room_list)) {
$room = $row['room'];
$rooms[] = $room;
}
print json_encode($r); }
Now consider the equivalent code in Node.js:
function roomlist() {
var rooms = [ ];
link.query(
'SELECT room FROM '+SQL_PREFIX+'chats GROUP BY room ORDER BY room ASC',
function(err, rows, fields) {
for (var r=0; r < rows.length; ++r) {
var row = rows[r];
var room = row['room'];
rooms.push(room);
}
res.writeHead(200, {'Content-Type': 'text/plain'});
res.end(JSON.stringify(r));
}
Sure, the syntax is a bit different. To concatenate strings, PHP uses the dot (.) operator whereas JavaScript uses the plus (+) operator. PHP uses array() to initialize an array, but JavaScript uses square brackets ( [ and ] ). It’s not identical.
But for heaven’s sake, it’s still pretty darn close. This isn’t “fake” code, either: it uses arrays, accesses a MySQL database, uses JSON, and writes output.
The similarities and the possibility of converting PHP source code to Node.js, and con‐ sequently the writing of this book for O’Reilly Media, are a direct result of my experience with creating a Node.js implementation of my open source project.
Who I Am
I’m Daniel Howard, the founder and sole maintainer of ajaximrpg, a preeminent browser-based instant messaging (IM) and chat system. ajaximrpg is specifically geared toward playing tabletop role-playing games, such as Dungeons & Dragons, over the Internet, although the role-playing specific features can be stripped away to reveal a general-purpose client. ajaximrpg is completely open source and available via Source‐ Forge with a full range of supporting services such as a Twitter feed, a Google Group, and a live demo.
ajaximrpg was originally written in PHP 4 with no inkling that it might someday be ported to Node.js JavaScript. But it works on PHP 5 and, now, on Node.js.
Starting in January 2012, it took me a single week to come up to speed on Node.js and do a proof of concept to have my client-side JavaScript code detect the installation status of the server side running on Node.js. In a month, I had enough of a few thousand lines converted to enable users to log in and IM each other. It dawned on me that there were general principles at work here, and that these general principles could be laid out in a book to explain how to convert any PHP source code to Node.js and, using these prin‐ ciples, the reader of the book could apply them to his PHP source code much quicker and more accurately than just muddling along as I had.
I put aside my mostly working but not yet completed Node.js implementation and im‐ mediately set out to write this book that you now hold in your hands (or view on your screen).
This Book
Chapter 1, Node.js Basics
This chapter describes how to install Node.js and use the Node.js executables, node and npm. It also describes how to install the Eclipse PDT and configure it for use for a PHP to Node.js conversion.
Chapter 2, A Simple Node.js Framework
This chapter presents a simple Node.js framework such that individual PHP pages can be converted to Node.js files and the resulting Node.js files will be invoked when actions, such as visiting a URL, are taken against the Node.js web server.
Chapter 3, Simple Callbacks
This chapter explains how to refactor blocking PHP source code such that it can be easily converted to nonblocking Node.js source code that uses callbacks. It presents the concept of linearity as a simple way to analyze and improve PHP source code such that it can be placed in Node.js callbacks when converted to Node.js.
Chapter 4, Advanced Callbacks
This chapter presents a more sophisticated and generic way to refactor blocking PHP 4 source code to simulate anonymous functions, function variables, and clo‐ sure. For PHP 5 source code, it explains how to use PHP 5 features to actually implement anonymous functions, function variables, and closure.
Chapter 5, HTTP Responses
This chapter explains how to convert PHP output, such as the print and echo keywords, into HTTP responses in Node.js.
Chapter 6, Syntax
This chapter explains how to convert PHP syntax, such as concatenating two strings, into Node.js syntax.
Chapter 7, Variables
This chapter explains how to convert PHP single and array variables into Node.js, as well as common operations, such as adding and deleting elements from array variables. It also describes how to convert PHP types to Node.js types.
Chapter 8, Classes
This chapter presents a way to implement PHP classes and class inheritance in Node.js with a step-by-step technique to perform the conversion.
Chapter 9, File Access
Chapter 10, MySQL Access
This chapter describes all the ways that a database, specifically a MySQL database, can be used in a web application. It provides a step-by-step procedure for converting database access code from the PHP MySQL APIs to use the node-mysql Node.js npm package.
Chapter 11, Plain Text, JSON, and XML
This chapter explains three data formats: plain text, JSON, and XML. It explains how to convert PHP source code that uses PHP JSON or XML APIs into Node.js source code that uses similar Node.js npm packages.
Chapter 12, Miscellaneous Functions
This chapter provides Node.js implementations for a large number of PHP API functions. These Node.js implementations can be used to speed along conversion and provide an interesting way to contrast PHP and Node.js.
Now let’s get started with Node.js.
About This Book
This book is about how to take existing PHP source code and develop new Node.js source code from it. PHP and Node.js have many similarities, but of course, there are some significant differences. By leveraging the similarities and noting the differences, you can use your PHP experience to learn Node.js and, ultimately, create a Node.js web application that is a drop-in replacement for any existing PHP web application that you have.
This book assumes that you are a developer who understands the basics of development, such as creating and then implementing a design in working lines of programming code. It assumes that you are already familiar with classes, functions, and looping constructs. It also assumes that you are familiar with web development, including the basics of how web browsers and web servers interact to create a web application.
Furthermore, this book assumes that you have significant expertise in the PHP pro‐ gramming language. If you do not have a background in the PHP programming lan‐ guage, it is possible that you can use your background in another programming language (e.g., Python, Ruby, or C) and, by reading this book and examining the intersection between PHP, Node.js, and the programming language that is familiar to you, acquire a good understanding of both PHP and Node.js. Not necessarily easy, but possible.
No matter how you approach this book, as its author, I sincerely hope that it answers the questions you have about PHP and Node.js.
Conventions Used in This Book
The following typographical conventions are used in this book:
Italic
Indicates new terms, URLs, email addresses, filenames, and file extensions.
Constant width
Used for program listings, as well as within paragraphs to refer to program elements such as variable or function names, databases, data types, environment variables, statements, and keywords.
Constant width bold
Shows commands or other text that should be typed literally by the user.
Constant width italic
Shows text that should be replaced with user-supplied values or by values deter‐ mined by context.
This icon signifies a tip, suggestion, or general note.
This icon indicates a warning or caution.
Using Code Examples
This book is here to help you get your job done. In general, you may use the code in this book in your programs and documentation. You do not need to contact us for permis‐ sion unless you’re reproducing a significant portion of the code. For example, writing a program that uses several chunks of code from this book does not require permission. Selling or distributing a CD-ROM of examples from O’Reilly books does require per‐ mission. Answering a question by citing this book and quoting example code does not require permission. Incorporating a significant amount of example code from this book into your product’s documentation does require permission.
If you feel your use of code examples falls outside fair use or the permission given above, feel free to contact us at [email protected].
Safari® Books Online
Safari Books Online (www.safaribooksonline.com) is an on-demand digital library that delivers expert content in both book and video form from the world’s leading authors in technology and business.
Technology professionals, software developers, web designers, and business and creative professionals use Safari Books Online as their primary resource for research, problem solving, learning, and certification training.
Safari Books Online offers a range of product mixes and pricing programs for organi‐ zations, government agencies, and individuals. Subscribers have access to thousands of books, training videos, and prepublication manuscripts in one fully searchable database from publishers like O’Reilly Media, Prentice Hall Professional, Addison-Wesley Pro‐ fessional, Microsoft Press, Sams, Que, Peachpit Press, Focal Press, Cisco Press, John Wiley & Sons, Syngress, Morgan Kaufmann, IBM Redbooks, Packt, Adobe Press, FT Press, Apress, Manning, New Riders, McGraw-Hill, Jones & Bartlett, Course Technol‐ ogy, and dozens more. For more information about Safari Books Online, visit us online.
How to Contact Us
Please address comments and questions concerning this book to the publisher:
O’Reilly Media, Inc.
1005 Gravenstein Highway North Sebastopol, CA 95472
800-998-9938 (in the United States or Canada) 707-829-0515 (international or local)
707-829-0104 (fax)
We have a web page for this book, where we list errata, examples, and any additional information. You can access this page at http://oreil.ly/nodejs-php. To comment or ask technical questions about this book, send email to [email protected].
For more information about our books, courses, conferences, and news, see our website at http://www.oreilly.com.
Find us on Facebook: http://facebook.com/oreilly
Follow us on Twitter: http://twitter.com/oreillymedia
Acknowledgments
This book is the product of many months of effort by me, of course, but also by several others.
I want to thank the editors at O’Reilly Media, Inc., specifically Simon St. Laurent and Meghan Blanchette, for their encouragement and feedback.
I want to thank Neha Utkur, the book’s technical editor, for her enthusiasm and will‐ ingness to provide feedback on a whole range of areas that sorely needed her input. Her contribution has made this a much better book.
CHAPTER 1
Node.js Basics
Let’s assume you have a significant PHP codebase that you have decided to convert to Node.js. You will provide both the PHP and Node.js codebases to your users for the foreseeable future, meaning that you will update and improve both codebases simulta‐ neously. But you only know a little about Node.js; in fact, you have not really done any serious development with Node.js yet. Where do you start?
The first thing to do is to download Node.js for your platform, probably Linux or Win‐ dows (yes, they have a Windows version now!). Since installation methods and installers vary from version to version and change over time, this book will not spend time on how to install the current version. Instead, if you need assistance with installation, you should use the online documentation and, if that fails you, use Google or another search engine to find web pages and forum postings where others have come across the same installation issues you are having and have found solutions that you can use.
The node and npm Executables
Once installed, you will see that a Node.js installation is fairly simple and has two main parts: the main node executable and the npm executable.
The node executable is simple to use. Although it has other arguments, usually you will pass only one argument, the name of your main Node.js source file. For example:
node hello.js
The node executable will interpret the Node.js code within the source file (hello.js in this case), execute the code, and when it finishes, exit back to the shell or command line.
else in common. Client-side JavaScript code needs to be served out to browsers, while server-side Node.js code needs to have the node executable run on it or otherwise needs to be accessible to the main Node.js code that is being run under the node executable. This is a serious and unnecessary cause of confusion.
In some Node.js projects, the client-side JavaScript files are put in one folder, such as a
client folder, while the Node.js files are put in another folder named something like
server. Separating client-side JavaScript files from Node.js files via a folder scheme helps, but is still problematic because many source code editors show only the filename but not the full path name in a title bar or tab.
Instead, I have adopted the .njs extension for Node.js files and reserved the .js extension for client-side JavaScript files in my own projects. Let me be clear, though: the .njs
extension is not a standard! At least, not yet (and maybe not ever). I have diligently searched using Google, and it is common to use the .js extension for Node.js code. To avoid constant confusion between client-side and server-side JavaScript, I use the .njs
extension for Node.js code, and in your own PHP to Node.js conversion, I suggest that you do the same.
So, instead of using the hello.js file given earlier, I would use hello.njs:
node hello.njs
The remainder of this book will use the .njs extension for Node.js files. A simple hello.njs looks like:
console.log('Hello world!');
If you run node hello.njs on this source file, it prints “Hello world!” to the console and then exits.
To actually get a web server running, use the following hellosvr.njs source file:
var http = require('http');
http.createServer(function (req, res) {
res.writeHead(200, {'Content-Type': 'text/plain'});
res.end('Hello World!\n'); }).listen(1337, '127.0.0.1');
console.log('Server running at http://127.0.0.1:1337/');
If you run node hellosvr.njs, the command line will intentionally hang. The server must continue to run so it can wait for web page requests and respond to them.
For now, the important line in this source file is the first line that uses the Node.js require() global function. The require() function makes a Node.js module available for use. Node.js modules are what you might expect: a collection of data and functions that are bundled together, usually providing functionality in some particular area. In this case, the http Node.js module provides simple HTTP server functionality.
The node executable has a number of built-in modules: http, https, fs, path, crypto, url, net, dgram, dns, tls, and child_process. Expect these built-in modules and their functionality to vary from version to version.
By design, a module resides in a namespace. A namespace is an extra specification that is added to the front of a data or function reference; for example, http is the namespace that the createServer() function resides in. In Node.js, a namespace is just imple‐ mented as an object. When the http module is loaded, the require() function returns an object and that object is assigned to the http variable. The variable does not have to be called “http”; it could be called “xyzzybub” and, in that case, the server would be created by calling the xyzzybub.createServer() function.
Why have a namespace? Why not just put all the data and functions as global variables?
Node.js anticipated that new modules with new functionality, such as a MySQL access, would be developed by other people and need to be integrated into the node executable after Node.js was already installed on a user’s computer. Since the names of data and functions in those modules would be unpredictable, a developer might accidentally choose the exact same name for a function in a module as a different developer might choose for another module. But since a module is contained in a namespace, the name‐ space would distinguish between the two functions. In fact, an important improvement over previous languages, such as C++ and Java, is that Node.js allows the user of the module to specify the name of the namespace because the user himself assigns the module to his variable, such as http or xyzzybub.
These new modules with new functionality are packages. A package is a module that can be added to the node executable later and is not built into the node executable by default. The difference between a module and a package is not very important; it is really just a change of terminology.
The npm (node package manager) executable adds new packages to the node executable.
To install a package, first use Google or another search engine to find the npm package that you want to install. Often, the package will be found on GitHub. An alternative to using a search engine is to use the npm executable itself to find the package using the search command.
engine is “nodejs static file web server”. Alternatively, “npm search static”, “npm search file”, or “npm search server” will list the npm packages that have the words “static”, “file”, or “server” in their names or descriptions. Using either of these two methods or both in combination (and with a little extra reading and browsing), you will find that Alexis Sellier, a.k.a. cloudhead, created a popular static file server module and hosted it here.
This package can be installed by running the following command line (additional op‐ tions, such as the -g or --global command line switch, are available to configure the package installation):
npm install node-static
The npm executable will retrieve the package and, hopefully, install it successfully. Here’s the output from a successful installation:
npm http GET https://registry.npmjs.org/node-static npm http 200 https://registry.npmjs.org/node-static
npm http GET https://registry.npmjs.org/node-static/-/node-static-0.5.9.tgz npm http 200 https://registry.npmjs.org/node-static/-/node-static-0.5.9.tgz [email protected] ./node_modules/node-static
The GET indicates that an HTTP GET was used to attempt to retrieve the package. The 200 indicates that the HTTP GET request returned “HTTP status 200 OK”, meaning that the file was retrieved successfully.
There are hundreds of npm packages, but a few very popular ones are express, node-static, connect, sockets.io, underscore, async, and optimist.
To implement a web server that serves up static web pages, use the following httpsvr.njs
source file:
var http = require('http');
var static = require('node-static');
var file = new static.Server();
http.createServer(function (req, res) {
file.serve(req, res); }).listen(1337, '127.0.0.1');
console.log('Server running at http://127.0.0.1:1337/');
At this point, three Node.js servers have been presented: hello.njs, hellosvr.njs, and
httpsvr.njs. These source files have been so simple that it did not matter how they were created. You could have used any text editor to create them and they would work fine. If you made a mistake, it was easily remedied by editing the source file.
It is safe to assume, though, that you already have a complicated PHP web application with dozens of files and tens of thousands of lines of PHP that you want to convert to Node.js. The conversion strategy will follow a straightforward but tedious step-by-step routine.
The first step will be to create a boilerplate Node.js source file, as described in detail in Chapter 2, that will support the new Node.js code. This boilerplate Node.js code will be enhanced to respond to the specific URLs that are available to be invoked by the client. A web application is, at its heart, a series of URL requests. The objective of conversion is to make a Node.js server that responds to the client in the exact same way as the PHP server. To make this happen, the boilerplate Node.js code is modified to handle each HTTP call and route it to specific Node.js code that will later implement the functionality of the specific PHP page in Node.js.
The second step will be to refactor the PHP code, as described in detail in Chapter 3 and Chapter 4, to make it easier to convert to Node.js code—that is, make the PHP code more Node.js friendly. It may come as a shock, but the conversion process is not just a matter of freezing the PHP code in whatever form it currently is, copying the PHP code into the Node.js source file, and then, line by line, converting the PHP code to Node.js code. Since both the PHP and Node.js code will be improved and have new features added going forward, it makes sense that both the PHP and Node.js code will need to “give” a little in their purity to smooth over the differences between how the two lan‐ guages function. The PHP code will need to be refactored and make some sacrifices that will allow functional Node.js code to be created later on. At the end of the conversion process, both codebases will look very similar and will be written in a sort of hybrid metalanguage, a collection of idioms and algorithms that are easily ported from PHP to Node.js. The metalanguage will make both codebases look a little odd, but will be fully functional and, with time, will become very familiar and understandable to the devel‐ opers who maintain and improve both codebases. Even if you plan to throw away the PHP code in the end and want to have pristine Node.js code, it is best to refactor the PHP code anyway, convert both the PHP and Node.js code into the odd hybrid meta‐ language, throw away the PHP code, and then refactor the hybridized Node.js code into pure Node.js code. Refactoring PHP code is an essential step for any PHP to Node.js conversion, no matter what your eventual goal is.
The fourth step is to convert and fix the newly added code in the Node.js file, as described in detail in the remaining chapters, such that it becomes working Node.js code. Initially, the Node.js server will not run and will immediately exit with a stack trace. The stack trace will indicate the location of the error, which will be caused by some PHP code that was not completely converted or was not converted correctly to Node.js code. After the problem is analyzed, a conversion technique from one of the remaining chapters will be applied to the entire Node.js file; for example, Chapter 7 shows the technique to convert PHP array initialization using the array() function to Node.js object initialization using curly brackets ( { and } ). When the Node.js server is run again, it will get a little further along, but will most likely continue to exit with a stack trace. Eventually, the Node.js code will be good enough such that it will not immediately exit with a stack trace.
It is surprising how much unconverted PHP code can exist in a Node.js source file and not cause the Node.js server to immediately exit with a stack trace. As you become familiar with the conversion process, you will learn just how similar PHP and Node.js are, even such that unconverted PHP code will be parseable by the node executable and will allow the node executable to run and accept HTTP requests and fail only when it needs to actually execute some unconverted PHP code.
Once the Node.js code is good enough that it does not immediately exit with a stack trace, you can begin to test the client against it. The client will usually be a browser, like Firefox or Google Chrome. Usually, when you start trying to use the client, the Node.js code will exit with a stack trace at some point, and then you will need to analyze the stack trace and apply a conversion technique to fix the problem. Over time, you will develop an ad hoc series of test cases that you can execute with the client to reveal unaddressed conversion issues or hopefully to confirm that the Node.js server is running correctly.
At times, it will also help to use a visual diff tool to compare the PHP code and Node.js code; by viewing it side by side with the original PHP code, you can more easily locate issues in the new Node.js code. This will help remind you of conversion techniques that you have not used yet but need to use. It will also help you keep the conversion process on track and under control.
Stack Traces
During the conversion process, you will see a lot of stack traces. A lot. Here’s an example stack trace that is generated because the node-static npm package was not installed using the npm executable before the httpsvr.njs was run:
module.js:337
throw new Error("Cannot find module '" + request + "'"); ^
Error: Cannot find module 'node-static'
at Function._resolveFilename (module.js:337:11) at Function._load (module.js:279:25)
at Module.require (module.js:359:17) at require (module.js:375:17)
at Object.<anonymous> (httpsvr.njs:2:14) at Module._compile (module.js:446:26) at Object..js (module.js:464:10) at Module.load (module.js:353:31) at Function._load (module.js:311:12) at Array.0 (module.js:484:10)
The top of the stack trace shows the code that threw the error. This is not the code that caused the error; this is the code that created and threw the error object.
Below that, the error message inside the Error object is shown. This error message indicates that the node-static module could not be found.
The remainder is the “call stack,” a series of function calls indicated by the word “at” that show the chain of function calls that arrived at the code that threw the error. The call stack is listed from innermost call to outermost call. In this case, the Function._resol veFilename() function is the call at the top of the call stack, which indicates that it is the innermost call and thus the one that actually contains the code that threw the error. The Function._resolveFilename() function was called by the Function._load() function, which was called by the Module.require() function, which was called by the require() function, which was called by the Object.<anonymous>() function, and so on.
After each function call in the call stack, you will see the filename of the source file that contains that function, the last line that was executed (which is either the line that called the function above it or the line that actually threw the error object), and the position in the line that was last executed. In the example, you can see that two source files are involved: module.js and httpsvr.njs.
perfect working order. Even if they are not, we must assume that they are working until we prove otherwise by eliminating all errors from our calling code. Even if we discover that the error originates elsewhere, we have control only over our own code, not over any other code. The solution would likely be to create a workaround in our own code rather than take on the long and slow process of lobbying other developers to fix their code. So, in the end, regardless of where the ultimate fault may be, the first place to focus our attention is on the httpsvr.njs file.
The part of the call stack to focus our attention on is:
Object.<anonymous> (httpsvr.njs:2:14)
This function call is on line 2 at position 14 in the httpsvr.njs file. Here’s the httpsvr.njs
file:
var http = require('http');
var static = require('node-static');
var file = new static.Server();
http.createServer(function (req, res) {
file.serve(req, res); }).listen(1337, '127.0.0.1');
console.log('Server running at http://127.0.0.1:1337/');
By cross-referencing the call stack with the source code, the require() function that attempts to load the node-static module is the function call in which the error occur‐ red. This is consistent with the error message: “Cannot find module ‘node-static’”.
If we look up the call stack, we see the Function._load() function and the Function ._resolveFilename() function at the top. Looking at the name of these two functions, we guess that the Node.js environment is having difficulty loading the module because it cannot find the file that is associated with the module. We can guess that the module file (probably the npm package) is missing because it has not been installed yet. Again, this is consistent with the error message: “Cannot find module ‘node-static’”.
The Object.<anonymous> so-called function probably indicates that the require() function call was made in the global space, instead of within a user-defined function in
httpsvr.njs. But that is not always the case. An anonymous object may be generated inside a user-defined function. But farther down the call stack, below the Object.<anony mous> function call, we see that the caller was the Module._compile function in the
module.js file. The require() function call was made in the global space.
Using all this information, one solution is to try to install the node-static npm package:
Admittedly, you won’t need to do all this analysis every time you see a Node.js call stack. But since you will be seeing many, many call stacks, you should understand how to thoroughly analyze one—especially because catching and fixing errors is what takes 95% of the time in a PHP to Node.js conversion.
In summary, here’s the process to analyze a call stack: read the error, look at the error message (if any), take a guess and focus on a particular function call in your own code, look at the code and find the line and perhaps even the position of the error, look up the stack to see if it indicates more detail about what the error might be, and look down the stack to see how the execution of the server got to that particular function call.
Eclipse PDT
Learning how to fully analyze a stack trace is one helpful skill for doing a successful PHP to Node.js conversion. A stack trace is a diagnostic tool for figuring out what is wrong with the code, like an x-ray is used by a doctor to figure out what is wrong with his patient. From a certain point of view, converting PHP to Node.js can be seen as similar to a complex surgery on a patient. You will be performing surgery on PHP and Node.js code. Like performing surgery, it takes a lot of skill and tenacity, but having a good environment can really help, too. Just like the x-ray is a tool used in the operating room, the stack trace will be a tool in the development environment for the conversion. Next, we will discuss integrated development environments, which will provide a sort of “op‐ erating room theater” for the conversion process.
Since you will probably be dealing with dozens of PHP files and tens of thousands of lines of PHP and, very soon, dozens of Node.js files and tens of thousands of lines of Node.js, a simple plain text editor will probably not be good enough to keep track of everything and keep the conversion process efficient. A plain text editor will be fine when you are typing in some simple examples to learn how to program using Node.js, but when you are dealing with a large amount of PHP and Node.js code, you will need something more effective.
However, your objective is to convert PHP code to Node.js code while simultaneously improving and adding features to both codebases. To do this effectively, I recommend using the Eclipse PDT, but with some modifications to help it support Node.js code. Additional knowledge on how to easily compare PHP and Node.js code will be needed to support the conversion process.
Now, before I describe how to set up Eclipse PDT for PHP to Node.js conversion, I should briefly address developers who reject such tools and insist on using simple plain text editors. They say, “I only use vi!” If you are somebody who feels this way, you are free to skip the rest of this chapter and set up your conversion environment in any way that works for you. I am describing the installation and modification of Eclipse PDT here only because it was an essential tool for me to do my own PHP to Node.js conversion project and it will be an essential tool for a lot of other developers as well.
To install Elipse PDT, first download Java. All the Eclipse IDEs are developed in Java and need Java to run, including the Eclipse PDT. I prefer to install the Java JDK instead of the JRE. At the time of this writing, I am using jdk-6u29-windows-i586.exe.
Next, browse to here. Consider using the Zend Server Community Edition (CE) instal‐ lation, which includes Eclipse PDT, the Zend Server HTTP server with built-in PHP debugging support, and even the MySQL database. I assume that your PHP web appli‐ cation uses the MySQL database or at least has the MySQL database as an option.
As of this writing, there is a PDT and Zend Server Community Edition link on the Eclipse PDT downloads page. If the link does not exist or you have a different web server already running, download the latest stable Eclipse PDT version that is appropriate for your operating system. Then, skip the next few paragraphs until the text describes in‐ stalling and configuring the Eclipse PDT. Otherwise, follow the link and download the Eclipse PDT for Zend Server CE. For now, I am using zend-eclipse-php-helios-win32-x86.zip. Unzip but do not run the Eclipse PDT yet.
From the same web page, download Zend Server CE itself. At this time, I am using
ZendServer-CE-php-5.3.8-5.5.0-Windows_x86.exe.
Install Zend Server CE. In brief, choose sensible, mostly default, selections until the Setup Type page. Select the Custom radio button on the Setup Type page, instead of the Typical radio button, and press the Next button. Check the “MySQL Server (separate download)” checkbox from the Custom Setup page. Then finish the installer.
Currently, Zend Server CE shows a browser to configure the way that it operates. In our case, no special configuration is needed for the server itself.
Run the Eclipse PDT. Zend Server CE is built on Apache 2 and has an htdocs folder. When the Eclipse PDT runs, find and select the htdocs folder as the Eclipse PDT Work‐ space folder. If you are using a different web server than Zend Server CE or Apache, select the document root as the Eclipse PDT Workspace folder so the PHP files that are deployed to the web server can be edited in place.
It is beyond the scope of this book, but if you wish, try to experiment with using the PHP debugger on your existing PHP codebase.
The Eclipse PDT and your web server will be the foundation of your “conversion de‐ velopment environment.” Now, let’s make some modifications and learn how to use the Eclipse PDT to effectively manage and implement the conversion process.
The Eclipse PDT, by itself, already supports JavaScript files, and since Node.js is Java‐ Script, it supports Node.js. But because the .njs file extension is nonstandard, Eclipse PDT does not recognize a .njs file as a Node.js file. So if a .njs file (e.g., httpsvr.njs) is opened in Eclipse PDT, it is shown as plain text with no syntax coloring or popup code completion like in a regular JavaScript (.js) file.
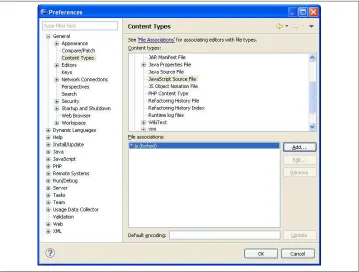
To modify Eclipse PDT to recognize .njs files as Node.js files, open the Window menu from the Eclipse PDT main menu and select the Preferences menu item. When you do this, you will see the Preferences dialog box with two inset panes (Figure 1-1). In the left pane, you will see a tree control with a hierarchically organized group of categories and subcategories of preferences. In the right pane, you will see a dialog that allows you to view and edit the preference items for the currently selected category in the left pane.
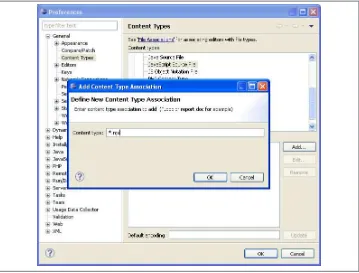
In the left pane, open the General tree folder item, then select the Content Types tree item. In the right pane, you will see a list of content types. Open the Text tree folder item in the “Content types” tree control in the right pane. Beneath the Text tree folder item, select the JavaScript Source File tree item. When you select the JavaScript Source File tree item, you should see a list box with a single item, “*.js (locked)”, in the “File asso‐ ciations” list box along with an Add… button on the middle-right of the pane. Press the Add… button. Once the Add… button is pressed, the Add Content Type Association dialog box should pop up (Figure 1-2). You will type *.njs into the “Content type” edit box in that new dialog box.
Then, press the OK button on all the open dialog boxes to store the modifications.
Figure 1-1. Eclipse PDT Preferences dialog box
With syntax coloring working for .njs files, you can spot simple Node.js syntax errors by noticing that some words have the wrong color. Visual inspection is an important part of any programming project, particularly in a PHP to Node.js conversion project. Another useful visual inspection technique is comparing the PHP and Node.js code‐ bases using an advanced and very visual diff viewer to find out all kinds of things about the quality and progress of the conversion.
Figure 1-2. Eclipse PDT Add Content Type Association dialog box
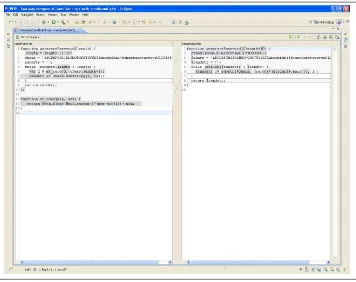
Figure 1-3. Eclipse PDT Compare view
You do not need to look at the figure in detail to either understand how it works or see just how similar PHP and Node.js are.
On the left is the rand.njs file. On the right is the rand.php file. The differences are in gray; the identical sequences of characters that have been matched are in white.
Notice how many of the lines are almost completely in white, except for a stray dollar sign ($) in gray. Both PHP and Node.js use the keyword function in the same place and put the name of the function in the same place. Over the years, it has become common for new languages to eschew variation in syntax structure and adopt a similar syntax for things like defining functions. Also, notice that the while statement is very similar.
file might be irrelevant to the performance and functionality of the code, but might make the visual diff feature match up the code much more accurately. It is worth spend‐ ing some time periodically throughout the conversion process to experiment with mov‐ ing code around in each file and seeing the effect on the comparison.
In Eclipse PDT, the code can be edited in a separate window, in the comparison window itself, or in both. If it is edited in a separate window and saved, any comparison windows that show the same file will be reloaded and recompared. Making some tweaks in a separate window and saving the file so that the effect on the comparison can be deter‐ mined is a common technique.
Naturally, it really helps to keep the code in the same format in both files to use the same names for everything (such as functions and variables), and even to refactor the code in one or both files such that the visual diff feature will find as many matches as possible.
To keep the PHP and Node.js code synchronized and simultaneously improve and add features to both codebases, you will often rely on the visual diff to make sure that the PHP and Node.js code are correct. In time, a developer will develop a finely tuned sense of what is not enough white and what is too much white.
When there isn’t enough white, the visual diff feature usually is getting off track and trying to match PHP code in the .php file to Node.js code in the .njs file, which is not meant to be matched. There will be a lot of gray in the comparison, indicating differ‐ ences, and not each matches. Experimentation will often correct this issue.
When there is too much white, it often means that there is some PHP code in the .njs
file that has not been converted completely to Node.js code. Even though the .njs file can be parsed and run, too much white indicates that more conversion is needed. Often, eyeballing the Node.js code will indicate specific conversions that have not been done yet. One simple conversion that may be missed is that dollar signs ($) need to be added to PHP variables; dollar signs are not used on Node.js variables. Adding dollar signs to the PHP code will reduce the amount of white, bringing the comparison closer to having the right amount of white.
Visual inspection, especially using the visual diff feature, is much faster than interactively testing the PHP and the Node.js code. Visual inspection can act as a “smoke test” to determine if the conversion is approximately correct. Automated test cases, which are beyond the scope of this book, may also be used to quickly test the effectiveness of the conversion so far.
contain many PHP array() function calls that will need to be replaced by Node.js object literals. A simple way to address this particular conversion issue might be to simply use Eclipse PDT’s Find/Replace feature to do a global search for array( and universally replace it with a left curly bracket ( { ); see Figure 1-4.
Figure 1-4. Eclipse PDT Find/Replace dialog box
The operation of this dialog box is straightforward.
Rather than including a screenshot of the Find/Replace dialog box every time that it is needed, this book uses a text shorthand. For the Find/Replace dialog box options in the figure, the text will have the following blurb inserted:
Operation: "Find/Replace" in Eclipse PDT Find: array(
Replace: {
Options: Case sensitive Action: Replace All
The Find/Replace dialog box can be used in two different ways.
One way is to do what I call a “blind” global find-and-replace action, like the example find-and-replace blurb in Figure 1-4. I call it “blind” because it finds and replaces every occurrence in the file all at once, with no warning and no manual inspection. If all the Find/Replace dialog box values are tested and determined to be foolproof, a “blind” global find-and-replace action is fast and accurate. Unfortunately, if the result causes an error, there are only two options: undo the action or perform a new action that corrects the previous action.
convert 298 code elements and incorrectly convert two code elements than it is to do a complicated find-and-replace action that correctly converts the same 300 code elements. Manually finding and fixing a few edge cases is a worthwhile technique; not everything needs to be fully automatic. Even though PHP to Node.js conversion is a lengthy task, it is not a task that you will be running over and over. This book is not describing “continuous conversion”; it is describing conversion as a one-time event. So manually finding and fixing a few edge cases is a perfectly acceptable technique to get the job done.
A second way to use the Find/Replace dialog box is to do a step-by-step global find-and-replace action. First, the Find/Replace dialog box is used to find the first instance. The developer then examines the instance and decides whether to modify the code manually (which he can do by clicking on the code and without dismissing the dialog box), or to execute the replace (by pressing the Replace/Find button), or to skip to the next instance without changing the current instance (by pressing the Find button again). Here’s the blurb for a step-by-step global find-and-replace action:
Operation: "Find/Replace" in Eclipse PDT Find: array(
Replace: {
Options: Case sensitive
Action: Find, then Replace/Find
The Find/Replace dialog box in the Eclipse PDT can also use regular expressions. Reg‐ ular expressions are a pattern matching technique: instead of finding an exact phrase, a regular expression describes a pattern to search for. Each time that the pattern is found, the exact phrase that matches the pattern can be applied to the Replace field. For ex‐ ample, if the array\((.*)\) regular expression matches array(id=>'name'), the (.*) in the regular expression will save the id=>'name' text. This saved text is called a capture field, or less commonly, a capture group. In the Eclipse PDT Find/Replace dialog box, a capture field is captured by surrounding it with undelimited parentheses. To apply a capture field to the Replace field, the capture fields are enumerated according to the order that they were captured in the Find field. A dollar sign ($) indicates that a capture field is being specified, followed by the capture field number. For example, $1 in the Replace field indicates the first capture field, which, in the example earlier in this para‐ graph, would contain the id=>'name' text. Very often, there is only one capture field, so it is very common to only see $1 and rarely to see $2, $3, or beyond.
Here’s a blurb for a blind global find-and-replace action using regular expressions:
Operation: "Find/Replace" in Eclipse PDT Find: array\((.*)\)
Replace: {$1}
In converting PHP to Node.js, regular expressions are only tangential to the process, so this book will not be giving a primer on how to understand and write your own regular expressions. The regular expressions will be provided as part of blurbs for find-and-replace actions that can be copied to the appropriate fields of the Find/Replace dialog box in the Eclipse PDT, usually verbatim, without requiring you to understand or modify them. If you need additional help with regular expressions or need to understand the rules and how they work, you are encouraged to consult the Eclipse PDT and to use Google or a similar search engine to find websites, blogs, and forums that will answer your questions.
Find-and-replace actions with regular expressions are often more comprehensive and effective than literal find-and-replace actions (i.e., actions where only one specific string is matched). A regular expression allows more variation in what it can match, and with capture fields, it can transport that variation to the Replace field. Often, a literal find-and-replace will be able to match only the beginning of a code element or the end of a code element at one time because the code element can vary in the middle. With a regular expression, the middle can be matched to a pattern that allows the entire code element to be matched in a single find-and-replace action. When the conversion of a code ele‐ ment can be done in a single find-and-replace action, instead of multiple ones, the chances for errors are reduced.
Until now, this chapter has described a range of activities and knowledge about how to set up a development environment for doing a PHP to Node.js conversion. The first thing to do was to download and install Node.js itself and become familiar with the two executables that it comes with. After that, we dug into Node.js stack traces to learn how to read them and how to use them to find what the real, underlying problem is such that the coding issue can be addressed and repaired. Then, we set up the Eclipse PDT as a foundation for a development environment, including a modification for it to under‐ stand .njs files, geared toward PHP to Node.js conversion. And finally, we learned how to use the visual diff feature and find-and-replace actions that will be very important when doing the conversion.
A capable development environment is essential to efficiency and is the way that big efforts get done. Too often, amateur developers will leap into coding with an inefficient or even an annoying development environment. At first, the development will go quickly in any environment because a small amount of code is simple to improve upon. But as the codebase grows larger, the complexity of the code will also grow and the pace of development will slow down. An inefficient or annoying development environment will do nothing to help the developer with the complexity, but a capable development envi‐ ronment will simplify the knowledge needed and help the developer such that the pace can be sustained and, ultimately, the project finished.
size: the PHP code will be refactored for conversion, not brevity, so it will increase, and of course, an entire Node.js codebase will be added. The initial PHP codebase might have been created by many developers, but in conversions, there is often so much cou‐ pling between the activities that only a single developer will do the majority of the conversion. Even though a primitive development environment might have been ac‐ ceptable for the creation of the original PHP codebase, a more sophisticated develop‐ ment environment will be needed to convert it to Node.js.
If a project already has an existing development environment, it may not be necessary to adopt the Eclipse PDT. The Eclipse PDT is presented as a workable, prototypical environment suitable only for conversion activities. Alternative development environ‐ ments can work if they can support and be coupled with additional tools that support the features in this chapter. In summary, they need to be made to support the following syntax coloring for both .php and .njs files, visual side-by-side comparison between two files down to a word-by-word comparison and not just line-by-line comparison, and find-and-replace actions that support regular expressions.
CHAPTER 2
A Simple Node.js Framework
In the previous chapter, I presented a development environment along with a general education about how to use it to execute a conversion. In this chapter, we will start using that development environment and begin the actual conversion.
An HTTP Server
In PHP, a PHP file represents an HTML page. A web server, such as Apache, accepts requests and if a PHP page is requested, the web server runs the PHP. But in Node.js, the main Node.js file represents the entire web server. It does not run inside a web server like Apache; it replaces Apache. So, some bootstrap Node.js code is needed to make the web server work.
The httpsvr.njs file was presented as an example in the previous chapter. Here’s the Node.js code for the httpsvr.njs file:
var http = require('http');
var static = require('node-static');
var file = new static.Server();
http.createServer(function (req, res) { file.serve(req, res);
}).listen(1337, '127.0.0.1');
console.log('Server running at http://127.0.0.1:1337/');
How does this work?
As described in the previous chapter, the Node.js require() API function makes a module available for use. The first two lines show a built-in module and an external module:
var http = require('http'); // built-in module
If you installed Node.js and followed the examples in the previous chapter, the node-static npm package, which contains the node-static external module, will already be installed. If not, install it now using the npm executable:
npm install node-static
The third line is a little tricky:
var file = new static.Server();
The node-static module wants to provide the Node.js server with as many file serving objects as needed rather than limit the client to a single file serving object. So, instead of using the module itself as the file serving object, the file serving object is created by calling a constructor function. A constructor function is a function that is designed to be used with the new keyword. Using the new keyword and invoking the constructor function creates a new object.
In this case, the module object is named static. Inside the module object, there is a key named Server, which has a value that is a constructor function. The dot (.) operator indicates this relationship such that the new operator is properly applied. A newly con‐ structed file serving object is created and stored in the file variable.
The file serving object constructor can take zero or one arguments. If no arguments are provided, the file serving object uses the current directory (folder) as the HTTP server’s top-level documents directory. For example, if the httpsvr.njs is run in the ferris directory and a web browser such as Google Chrome goes to http://127.0.0.1:1337/hello.html, the file serving object will look for the hello.html file in the ferris directory. However, if a web browser goes to http://127.0.0.1:1337/exit/goodbye.html, the file serving object will look for the goodbye.html file in the exit directory inside the ferris directory.
However, when one argument is passed to the file serving object constructor, the file serving object will look for files in the directory specified in the argument. For example, if the .. string is passed as the argument, the newly created file serving object will look for files in the parent directory of the current directory.
The require() function takes only one argument, the name of the module to load. There is no flexibility to pass additional arguments to the module while loading. Since it is desirable to specify a directory to load files from as an argument, it is best that loading the module be completely separate from specifying where to load files from.
After creating a file serving object, the HTTP server object is created to accept HTTP requests and return the file to the client, probably a web browser:
http.createServer(function (req, res) {
This code can be rewritten as three statements to make it easier to understand:
var handleReq = function(req, res) {
file.serve(req, res); };
var svr = http.createServer(handleReq); svr.listen(1337, '127.0.0.1');
The first statement takes up three lines. It defines a variable named handleReq that, instead of containing a “normal” value like a string or a number, contains a function. In Node.js, functions can be assigned to variables, just like strings and numbers. When a function is assigned to a variable, the function itself is called a callback, and for our convenience, the variable that it is assigned to is called a callback variable. A callback variable is defined nearly the same as a regular function is defined, except that a callback can be unnamed and is preceded by a variable assignment.
In this case, the callback expects two parameters. The first parameter, req, contains all the data related to the HTTP request. The second parameter, res, contains all the data related to the HTTP response. In this implementation, the file serving object, file, decodes the HTTP request, finds the appropriate file on the hard disk, and writes the appropriate data to the HTTP response such that the file will be returned to the browser. The node-static module was specifically written with this in mind, so that the file serving object could return hard disk files with only one line of code.
The fourth line creates an HTTP server and an HTTP request handling loop that will continuously wait for new HTTP requests and use the handleReq callback variable to fulfill them:
var svr = http.createServer(handleReq);
Inside the createServer() function, the handleReq callback variable will be invoked:
function createServer(handleReq) {
while (true) {
// wait for HTTP request
var req = decodeHttpRequest(); // somehow decode the request
var res = createHttpRequest(); // somehow create a response object
handleReq(req, res); // invoke handleReq()
// send HTTP response back to client based on "res" object
} }
Like functions (but unlike other types of variables), a callback variable can invoke the function that it contains. As you can see, invoking the handleReq callback argument is identical to calling a standard function; it just so happens that handleReq is not the name of a function but is the name of a callback variable or argument. Callback variables can be passed to functions as arguments just like other kinds of variables.
function createServer(handleReq) {
while (true) {
// wait for HTTP request
var req = decodeHttpRequest(); // somehow decode the request
var res = createHttpRequest(); // somehow create a response object
file.serve(req, res); // hardcode a reference to the "node static" module
// send HTTP response back to the client based on "res" object
} }
Yes, but passing a callback to the createServer() function is more flexible. Remember: the http module is built into Node.js and the node static module is an npm package that was installed separately. If the file.serve() call was baked into the create Server() function, using a different module instead of the node static module or adding additional custom HTTP request handling code would require copying and pasting the entire createServer() function just so a line in the middle could be tweaked. Instead, a callback is used. So, if you think about it, a callback is a way for some calling code to insert some of its own code into a function that it is calling. It is a way to modify the function that it is calling without having to modify the code of the function itself. The function being called, createServer() in this case, has to expect and support the callback, but if it is written with the callback in mind, a caller can create a callback that matches what is expected and the called function can use it without knowing anything about the calling code. Callbacks enable two pieces of code to successfully work together, even though they are written by different people at different times.
In this case, a callback function is passed to allow the caller to handle an HTTP request in whatever way that it sees fit. But, in many other cases, a callback function is passed as an argument so that the callback function can be invoked when an asynchronous operation has been completed. In the next chapter, this use of callback functions will be covered in detail.
The fifth line uses the svr object to listen on port 1337 on the '127.0.0.1' computer, a.k.a. the “localhost” computer (meaning the computer that the Node.js server is run‐ ning on):
svr.listen(1337, '127.0.0.1');
It should be pointed out that it is much more likely that the HTTP request handling loop is in the listen() function instead of the createServer() function. But for the purposes of explaining callbacks, it really does not matter.
Since the svr variable and the handleReq variable are used only once and can be replaced with more succinct code, the three statements are combined into one:
http.createServer(function(req, res) {
The last statement of the httpsvr.njs file writes a message to the console so that the person who started the HTTP server will know how to access it:
console.log('Server running at http://127.0.0.1:1337/');
The httpsvr.njs file makes a basic Node.js HTTP server. Now we move all the files that constitute the web application from the current web server that supports PHP to the same directory that the httpsvr.njs file resides in. When the httpsvr.njs file is started, these files—which include all the HTML, CSS, client-side JavaScript, image files (e.g., PNG files), and other assorted files—will be delivered to the client, probably a web browser, and work just as they always have. The client needs to be directed only to the correct port (e.g., 1337) to load these files from Node.js instead of the original web server. The only reason that the web application will break is that it is still written in PHP, but since HTML, CSS, client-side JavaScript, and image files are all handled and executed exclusively on the client, they will work as much as they can until a PHP file is needed. The .php files can be moved to the Node.js server, too, but they will not work because Node.js cannot interpret .php files.
The key difference between the .php files and all the other files is that the .php files are interpreted and the result of the interpretation is passed back to the client as an HTTP response. For all other files, the contents of the file are read and then written directly into the HTTP response with no interpretation. If the .php file is not interpreted, the client receives the PHP source code, which it does not know how to use. The client needs the output of the source code, not the source code itself, in order to work. A PHP to Node.js conversion boils down to writing Node.js code that will produce the exact same HTTP response in all cases that the PHP source code would have produced. It seems simple, but it is still a ton of work.
To start with, a Node.js local module will be created for each .php file. For the purposes of this book, a local module is a local .njs file that can be loaded by the main .njs file (i.e., httpsvr.njs) using the Node.js require() API function. To create a Node.js local module for a .php file, we will create an empty .njs file in the same directory as the .php file using the same filename but a different extension. For example, for admin/ index.php, create an empty admin/index.njs file.
For your own conversion effort, you will have to use your own judgment. In some cases, there may be so many .php files that creatin