by John Paul Mueller and Debbie Walkowski
Microsoft®OfficeVisio
®
2007
FOR
Visio®2007 For Dummies®
Copyright © 2007 by Wiley Publishing, Inc., Indianapolis, Indiana Published by Wiley Publishing, Inc., Indianapolis, Indiana Published simultaneously in Canada
No part of this publication may be reproduced, stored in a retrieval system or transmitted in any form or by any means, electronic, mechanical, photocopying, recording, scanning or otherwise, except as permit-ted under Sections 107 or 108 of the 1976 Unipermit-ted States Copyright Act, without either the prior written permission of the Publisher, or authorization through payment of the appropriate per-copy fee to the Copyright Clearance Center, 222 Rosewood Drive, Danvers, MA 01923, (978) 750-8400, fax (978) 646-8600. Requests to the Publisher for permission should be addressed to the Legal Department, Wiley Publishing, Inc., 10475 Crosspoint Blvd., Indianapolis, IN 46256, (317) 572-3447, fax (317) 572-4355, or online at
http://www.wiley.com/go/permissions.
Trademarks:Wiley, the Wiley Publishing logo, For Dummies, the Dummies Man logo, A Reference for the Rest of Us!, The Dummies Way, Dummies Daily, The Fun and Easy Way, Dummies.com, and related trade dress are trademarks or registered trademarks of John Wiley & Sons, Inc. and/or its affiliates in the United States and other countries, and may not be used without written permission. Visio is a registered trade-mark of Microsoft Corporation in the United States and/or other countries. All other tradetrade-marks are the property of their respective owners. Wiley Publishing, Inc., is not associated with any product or vendor mentioned in this book.
LIMIT OF LIABILITY/DISCLAIMER OF WARRANTY: THE PUBLISHER AND THE AUTHOR MAKE NO REP-RESENTATIONS OR WARRANTIES WITH RESPECT TO THE ACCURACY OR COMPLETENESS OF THE CONTENTS OF THIS WORK AND SPECIFICALLY DISCLAIM ALL WARRANTIES, INCLUDING WITHOUT LIMITATION WARRANTIES OF FITNESS FOR A PARTICULAR PURPOSE. NO WARRANTY MAY BE CRE-ATED OR EXTENDED BY SALES OR PROMOTIONAL MATERIALS. THE ADVICE AND STRATEGIES CON-TAINED HEREIN MAY NOT BE SUITABLE FOR EVERY SITUATION. THIS WORK IS SOLD WITH THE UNDERSTANDING THAT THE PUBLISHER IS NOT ENGAGED IN RENDERING LEGAL, ACCOUNTING, OR OTHER PROFESSIONAL SERVICES. IF PROFESSIONAL ASSISTANCE IS REQUIRED, THE SERVICES OF A COMPETENT PROFESSIONAL PERSON SHOULD BE SOUGHT. NEITHER THE PUBLISHER NOR THE AUTHOR SHALL BE LIABLE FOR DAMAGES ARISING HEREFROM. THE FACT THAT AN ORGANIZATION OR WEBSITE IS REFERRED TO IN THIS WORK AS A CITATION AND/OR A POTENTIAL SOURCE OF FUR-THER INFORMATION DOES NOT MEAN THAT THE AUTHOR OR THE PUBLISHER ENDORSES THE INFORMATION THE ORGANIZATION OR WEBSITE MAY PROVIDE OR RECOMMENDATIONS IT MAY MAKE. FURTHER, READERS SHOULD BE AWARE THAT INTERNET WEBSITES LISTED IN THIS WORK MAY HAVE CHANGED OR DISAPPEARED BETWEEN WHEN THIS WORK WAS WRITTEN AND WHEN IT IS READ.
For general information on our other products and services, please contact our Customer Care Department within the U.S. at 800-762-2974, outside the U.S. at 317-572-3993, or fax 317-572-4002. For technical support, please visit www.wiley.com/techsupport.
Wiley also publishes its books in a variety of electronic formats. Some content that appears in print may not be available in electronic books.
Library of Congress Control Number: 2006934833 ISBN-13: 978-0-470-08983-5
ISBN-10: 0-470-08983-0
Manufactured in the United States of America 10 9 8 7 6 5 4 3 2 1
About the Authors
John Muelleris a freelance author and technical editor. He has writing in his blood, having produced 70 books and over 300 articles to date. The topics range from networking to artificial intelligence and from database manage-ment to heads-down programming. Some of his current books include a Windows power optimization book, a book on .NET security, and books on Amazon Web Services, Google Web Services, and eBay Web Services. His technical editing skills have helped more than 51 authors refine the content of their manuscripts. John has provided technical editing services to both
Data Based Advisorand Coast Computemagazines. He’s also contributed arti-cles to magazines like DevSource, InformIT, Informant, DevX, SQL Server Professional, Visual C++ Developer, Hard Core Visual Basic, asp.netPRO,
Software Test and Performance, and Visual Basic Developer.
When John isn’t working at the computer, you can find him in his workshop. He’s an avid woodworker and candle maker. On any given afternoon, you can find him working at a lathe or putting the finishing touches on a bookcase. He also likes making glycerin soap and candles, which comes in handy for gift baskets. You can reach John on the Internet at [email protected]. John is also setting up a Web site at http://www.mwt.net/~jmueller/; feel free to look and make suggestions on how he can improve it. Check out his weekly blog at http://www.amazon.com/gp/blog/id/AQOA2QP4X1YWP.
Dedication
This book is dedicated to those purveyors of the medicinal latte, Muhammad and Marilyn Kharbush.
Author’s Acknowledgments
From John Mueller: Thanks to my wife, Rebecca, for working with me to get this book completed. I really don’t know what I would have done without her help in researching and compiling some of the information that appears in this book. She also did a fine job of proofreading my rough draft and page-proofing the result. She also had to do without my help in the garden this summer, which made things mighty tough on her.
Russ Mullen deserves thanks for his technical edit of this book. He greatly added to the accuracy and depth of the material you see here. Russ is always providing me with great URLs for new products and ideas. I really appreci-ated Russ’ input on several of the new Visio 2007 features. They were helpful in rounding out the information you find in this book.
Matt Wagner, my agent, deserves credit for helping me get the contract in the first place and taking care of all the details that most authors don’t really con-sider. I always appreciate his assistance. It’s good to know that someone wants to help.
A number of people read all or part of this book to help me refine the approach, test the examples, and generally provide input that every reader wishes they could have. These unpaid volunteers helped in ways too numer-ous to mention here. I especially appreciate the efforts of Eva Beattie who read the entire book and selflessly devoted herself to this project. Members of various newsgroups and the support staff from Microsoft were instrumen-tal in helping me overcome obstacles. A number of other people helped me in ways too numerous to mention.
Publisher’s Acknowledgments
We’re proud of this book; please send us your comments through our online registration form located at www.dummies.com/register/.
Some of the people who helped bring this book to market include the following:
Acquisitions, Editorial, and
Media Development Specialists:Angela Denny, Kate Jenkins, Steven Kudirka, Kit Malone Media Development Coordinator:
Laura Atkinson
Media Project Supervisor:Laura Moss Media Development Manager:
Laura VanWinkle
Editorial Assistant:Amanda Foxworth Sr. Editorial Assistant:Cherie Case
Cartoons:Rich Tennant (www.the5thwave.com)
Composition Services
Project Coordinator: Erin Smith Layout and Graphics: Lavonne Cook,
Stephanie D. Jumper, Clint Lahnen, Barbara Moore, Barry Offringa, Lynsey Osborn, Heather Ryan, Julie Trippetti
Proofreaders: Kevin Broccoli, Jessica Kramer, Christy Pingleton
Indexer: Techbooks
Publishing and Editorial for Technology Dummies
Richard Swadley,Vice President and Executive Group Publisher Andy Cummings,Vice President and Publisher
Mary Bednarek,Executive Acquisitions Director Mary C. Corder,Editorial Director
Publishing for Consumer Dummies
Diane Graves Steele,Vice President and Publisher Joyce Pepple,Acquisitions Director
Composition Services
Contents at a Glance
Introduction ...1
Part I: Starting with Visio 2007 Basics ...7
Chapter 1: Visio 101 ...9
Chapter 2: Creating and Saving a Simple Visio Drawing...29
Chapter 3: Printing Visio Drawings ...69
Part II: Creating Visio Drawings ...89
Chapter 4: Discovering What Visio Shapes Are All About ...91
Chapter 5: Adding Text to Your Drawings ...119
Chapter 6: Connecting Shapes...145
Part III: Taking Your Drawings to the Next Level...167
Chapter 7: Perfecting Your Drawings...169
Chapter 8: Creating and Customizing Shapes...191
Chapter 9: Working with Pages...227
Chapter 10: Layering Your Drawings ...249
Part IV: Advancing Your Knowledge of Visio ...265
Chapter 11: Creating Stencils, Master Shapes, and Templates ...267
Chapter 12: Managing Shape Information, Behavior, and Protection...281
Chapter 13: Marking Up Drawings for Review ...313
Chapter 14: Using Visio with Other Programs ...329
Part V: The Part of Tens ...357
Chapter 15: Ten Common Tasks in Visio ...359
Chapter 16: Ten Web Sites Devoted to Visio...365
Table of Contents
Introduction...1
About This Book...1
Conventions Used in This Book ...2
What You’re Not to Read ...2
Foolish Assumptions ...3
How This Book Is Organized...3
Part I: Starting with Visio 2007 Basics ...3
Part II: Creating Visio Drawings ...4
Part III: Taking Your Drawings to the Next Level ...4
Part IV: Advancing Your Knowledge of Visio ...4
Part V: The Part of Tens...4
About the Web Site...5
Icons Used in This Book...5
Where to Go from Here...6
Part I: Starting with Visio 2007 Basics...7
Chapter 1: Visio 101 . . . .9
Getting the Scoop on Visio...9
Comparing Visio products ...10
A quick peek at some Visio features ...11
What’s new in Visio 2007? ...13
Familiarizing Yourself with Visio Lingo ...15
Understanding the Vista Difference...16
The graphical interface difference ...16
Helpful user interface changes ...16
Understanding the security features ...17
Jumping Head First into Visio...18
Getting familiar with the Visio screen...20
Checking out the menus ...21
Working with toolbars ...22
Getting Help When You Need It ...25
Using general help...25
Don’t forget ToolTips ...26
Chapter 2: Creating and Saving a Simple Visio Drawing . . . .29
Creating a Drawing the Standard Way ...29
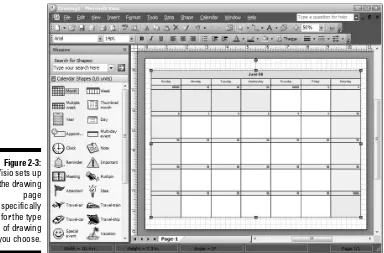
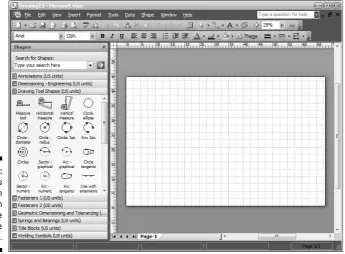
Understanding the Visio Drawing Categories...32
Working with Stencils ...53
Moving and arranging stencils ...53
Closing stencils...54
Opening additional stencils ...54
Selecting a Pointer Tool Button...56
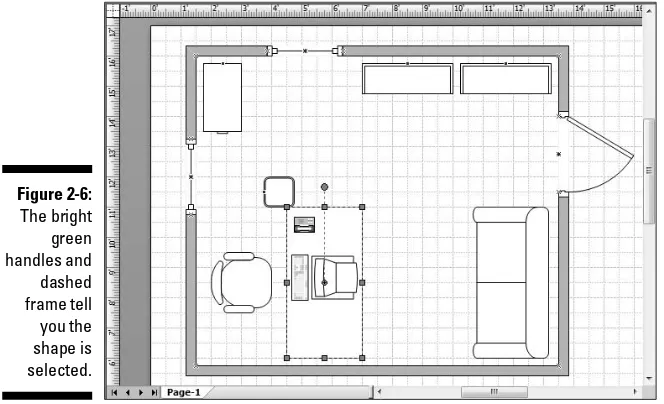
Working with Shapes ...56
Adding a shape to a drawing ...57
Selecting a shape ...57
Selecting more than one shape at a time ...58
Navigating through a Drawing ...59
Zeroing In on a Drawing ...60
Using the Zoom button ...60
Using the Pan & Zoom window...61
Using Drawing Explorer ...62
Saving Drawings ...64
Saving a drawing the first time ...64
Setting up AutoSave ...64
Saving a drawing as a template ...66
Saving a drawing in another file format...66
Using a Visio Wizard to Create a Drawing...67
Opening Drawings ...67
Chapter 3: Printing Visio Drawings . . . .69
Understanding How Visio Prints ...69
Preparing to Print...70
Checking the printer paper and drawing page sizes ...70
Previewing your drawing...73
A clear view in Print Preview ...74
Printing Your Drawing ...76
Adding Headers and Footers to a Drawing ...77
Printing Gridlines ...80
Printing Part of a Drawing...80
Reducing and Enlarging Printed Drawings ...81
Altering the print scale of a drawing ...81
Printing oversized drawings ...82
Using online printing services ...83
Printing to scale...84
Setting Shapes Not to Print...85
Printing Reviewers’ Comments ...86
Printing a Background Separately...87
Printing Layers Separately...88
Visio 2007 For Dummies
Part II: Creating Visio Drawings ...89
Chapter 4: Discovering What Visio Shapes Are All About . . . .91
Discovering What’s in a Shape ...92
Examining open and closed shapes ...93
Comparing one- and two-dimensional shapes...94
Displaying all of the shape handles ...95
Working with Shapes ...96
Moving shapes ...97
Nudging shapes ...98
Copying and pasting shapes ...98
Sizing up your shapes ...99
Deleting shapes ...101
Controlling Shapes ...101
Adjusting shapes using control handles ...103
Adjusting shapes using control points ...105
Shaping corners...106
Rotating shapes into place...107
Modifying arcs using eccentricity handles ...107
Using connection points...108
Using automatic connection points ...110
Finding the Shapes You Want ...111
Jazzing Up Your Drawings...113
Loading stencils from other templates...114
Using the Visio Extras stencil shapes ...114
Using themes...115
Chapter 5: Adding Text to Your Drawings . . . .119
Understanding Text Blocks...119
Adding Text to a Drawing...120
Working with Text and Text Blocks ...123
Editing text ...123
Copying and pasting text...124
Moving a text block ...125
Resizing a text block ...126
Changing alignment...127
Adjusting margins...131
Using tabs in a text block ...132
Creating bulleted lists ...135
Creating numbered lists ...136
Setting the indentation and spacing of text ...138
Changing the Way Your Text Looks ...139
Changing the font, size, color, and style of text...139
Choosing a background color for a text block ...142
Painting the formatting to other text ...143
Rotating text...143
xi
Chapter 6: Connecting Shapes . . . .145
Discovering Connectors ...145
Working with Connection Points...148
Adding connection points to a shape ...148
Deleting a connection point ...149
Using the automatic connection feature ...149
Applying Glue (without the Mess) ...150
Choosing static or dynamic glue ...151
Identifying glue types...152
Switching from one glue to the other ...153
Setting glue options ...154
Gluing Connectors to Shapes ...155
Connecting shapes as you drag them...155
Drawing connectors using the Connector Tool...156
Saving time with the Connect Shapes feature ...158
Choosing a custom connector to connect shapes...158
Dragging connector shapes into your drawing ...160
Moving connectors ...161
Managing Connectors...162
Handling connectors that cross paths ...162
Performing changes on single connections quickly ...164
Laying Out Shapes Automatically ...164
Part III: Taking Your Drawings to the Next Level ...167
Chapter 7: Perfecting Your Drawings . . . .169
All about Measurements and Placement Tools ...170
Using the Drawing Grid ...173
Using Dynamic Grid ...175
Setting Drawing Scale ...175
Snapping Shapes into Place ...178
Measuring Up with Rulers...181
Using Guide Lines and Guide Points...184
Creating guide lines...185
Creating guide points...186
Aligning and Distributing Shapes...187
Chapter 8: Creating and Customizing Shapes . . . .191
Creating Unique Shapes the Fun Way...192
Uniting shapes ...194
Visio 2007 For Dummies
Drawing Your Own Shapes...200
Drawing with the Line Tool ...200
Drawing with the Pencil Tool ...202
Drawing with the Arc Tool...203
Creating irregular shapes with the Freeform Tool ...204
Creating shapes with the Ellipse Tool and Rectangle Tool ...204
Manipulating Shapes...205
Moving and adding vertices...206
Moving control points...208
Rotating shapes ...209
Flipping shapes...212
Adding Style to Your Shapes...213
Changing line style ...213
Adding fill color, pattern, and shadow ...216
Copying formats ...218
Reformatting a shape ...218
Creating new theme colors ...218
Creating new theme effects...220
Copying new themes...221
Managing Shapes by Grouping ...223
Creating groups ...223
Editing a group...224
Adding a shape to a group ...225
Removing a shape from a group...225
Adding text to grouped shapes ...225
Chapter 9: Working with Pages . . . .227
The Role of the Template ...227
Reorienting a Page ...228
Setting a Page Size...230
Adding and Deleting Pages in a Drawing...233
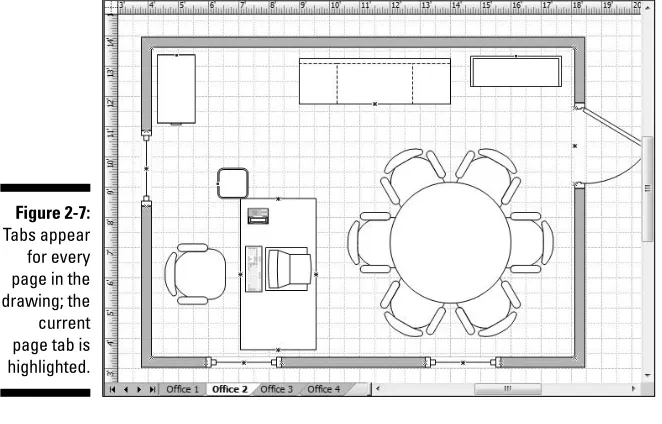
Working with Multiple Pages ...237
Getting from one page to another ...238
Displaying multiple pages at once ...238
Reordering pages...239
Renaming Pages ...240
Viewing on the Big Screen...240
What’s in a Background? ...242
Creating and assigning a background page...243
Unassigning a background page ...244
Displaying a background page...245
Editing a background page...245
Using a background shape ...245
Rotating Pages ...246
xiii
Chapter 10: Layering Your Drawings . . . .249
Getting the Essential Facts on Layers and Layering...250
Working with Layers ...252
Toolbars for working with layers ...253
Adding a layer and removing one ...253
Renaming a layer ...255
Hiding a layer ...256
Assigning Shapes to Layers ...256
Determining which layer a shape is assigned to ...258
Activating layers...258
Using Layers on Background Pages...259
Protecting Layers from Changes ...259
Assigning a Color to a Layer ...260
Selecting Layers to Print ...262
Snap and Glue Options for Layers ...263
Part IV: Advancing Your Knowledge of Visio...265
Chapter 11: Creating Stencils, Master Shapes, and Templates . . . .267
Working with Stencils ...267
Using the Stencil toolbar ...268
Using a Document Stencil...270
Creating a custom stencil ...271
Naming master shapes on a custom stencil ...274
Adding master shapes to a custom stencil ...276
Deleting master shapes from a custom stencil ...277
Creating a custom icon ...277
Creating a Custom Template ...278
Chapter 12: Managing Shape Information, Behavior, and
Protection . . . .281
Storing Data in Visio Shapes ...281
Entering custom shape data ...284
Editing custom property fields ...285
Reporting on Data Stored in Visio Shapes ...291
Using a predefined report ...292
Creating a custom report ...294
Customizing Shape Behavior...304
Changing a shape from 2-D to 1-D ...304
Setting a shape’s group behavior ...306
Setting a shape’s double-click behavior ...306
Protecting Your Work ...308
Preventing shapes from being changed ...308
Keeping drawings secure ...310
Visio 2007 For Dummies
Chapter 13: Marking Up Drawings for Review . . . .313
Discovering Markup Tools ...314
Adding Comments to a Drawing...315
How Markup Tracking Works ...316
Working with Markup ...318
Using the Reviewing toolbar and the task pane ...318
Adding markup to a drawing ...319
Viewing markup in a drawing...320
Incorporating markup changes in a drawing...321
Deleting markup ...323
Using Digital Ink...324
Selecting an ink tool ...325
Using ink tools ...325
Changing digital ink shapes to geometry ...327
Changing digital-ink shapes to text ...327
Chapter 14: Using Visio with Other Programs . . . .329
Using Files from Other Programs in Visio ...330
Generating Drawings from Data Stored in Non-Visio Files...331
Creating an organization chart from existing data...332
Creating a Gantt chart by importing data ...338
Creating a calendar by importing Outlook appointments ...341
Incorporating Visio Shapes and Drawings in Non-Visio Documents ...343
Linking shapes and drawings...344
Embedding shapes in drawings...345
Hyperlinking shapes and drawings ...346
Exporting and importing shapes and drawings ...346
Using Visio Viewer to Share Visio Drawings ...348
Saving Visio Drawings for the Web ...348
Publishing Your Drawing in XPS Format ...350
Creating Data Links to SQL Server and Spreadsheets...350
Using the Data Link feature ...351
Using the Data Graphics feature...353
Working with the PivotDiagram feature ...355
Part V: The Part of Tens ...357
Chapter 15: Ten Common Tasks in Visio . . . .359
Rotating Shapes to a Specific Angle...359
Centering a Drawing before Printing ...360
Resizing a Page to Fit the Content of a Drawing...360
Creating a Drawing That Spans Several Pages ...361
Saving a Company Logo as a Stencil Shape ...361
xv
Creating and Adding a Background Design to a Drawing ...361
Adjusting the Transparency of Shapes and Text in a Drawing...362
Adding the Same Shape or Image to All Pages in a Drawing ...362
Unlocking a Shape...363
Copying Formatting from One Shape to Another ...363
Chapter 16: Ten Web Sites Devoted to Visio . . . .365
VisioCafe...365
Microsoft Visio ...366
Design-Drawing...366
Visio The Blog...367
Cisco Systems...367
Dell ...367
Microsoft Visio Home Page ...368
Nick Finck...368
ConceptDraw ...368
ABC Amber Conversion and Merging Software...369
Index...371
Visio 2007 For Dummies
Introduction
V
isio is one of the most flexible and easy-to-use drawing products around. Yet, its ease of use doesn’t mean that this product lacks functionality. You can draw anything of just about any complexity you want. The whole focus of Visio is getting your ideas down on electronic paper as quickly as possible. Using this program means that you can think about your ideas, rather than how to perform the next task. Visio 2007 For Dummiesintroduces you to this very exciting drawing program and demonstrates the ever-growing number of features it provides.Of course, you don’t have to use all of these features. Visio 2007 For Dummies
is structured like Visio — you can use as little or as much of the book as you want to achieve your level of comfort with Visio. If your only goal is to sketch out a few ideas using something better than a napkin, the first two parts of the book are all you need.
One of the most exciting things about Visio 2007 is that you gain access to a number of new productivity features. Instead of wasting time formatting shapes one at a time, you can use themes to format an entire drawing with one click. If that sounds interesting, you’ll find the whole scoop in this book. Likewise, if you’re tired of having to update the data in a drawing manually every time you open one, check out the new Data Link feature. This feature makes it possible to track changes to a system quickly and easily. Analysts will love the new PivotDiagram feature. You can drill down as far as neces-sary to see the interactions in your data when using Visio. These are just a few of the new features you’ll find in this book.
About This Book
With this in mind, Visio 2007 For Dummiesis designed to make you produc-tive as quickly as possible. You find basic, useful information that helps you accomplish your goals. You find real-world examples and figures that show
you how to do something rather than just tellyou. You find concise step-by-step instructions for accomplishing specific tasks rather than a lot of ram-bling text that fills space and means nothing to you.
This book doesn’t provide everything to everyone. For example, even though Visio supports Visual Basic for Applications (VBA) so you can write programs to make it do even more, this book doesn’t discuss VBA. Visio 2007 For Dummies focuses on user tasks; it makes you more productive, fast.
Conventions Used in This Book
Here’s a summary of the conventions used in this book:
⻬When directions indicate that you type something, for example, “Enter
13in the size box,” the characters you type appear in bold.
⻬When you are to clicksomething, that means to click your left mouse button. Right-clickingis — you guessed it — clicking the right mouse button. (These terms assume that you are using the mouse with your right hand.)
⻬When you dragsomething, you click and hold the left mouse button as you move the mouse. Release the mouse button when you’re finished dragging.
⻬The term shortcut menurefers to the pop-up menu that appears when you right-click something on the screen. (Shortcut menus are not avail-able for all elements in a drawing.)
⻬You can select commands using toolbar buttons, menu commands, or the Alt key. Because toolbar buttons are by far the fastest method, these buttons are always listed along with the menu command. (When toolbar buttons aren’t available, only the menu command is shown.) A menu command is specified by writing, for example, Choose File➪Save, which means click the File menu to open it and then choose the Save option.
What You’re Not to Read
If you’re new to Visio and just want to know enough to create simple draw-ings or diagrams, you can safely skip Part IV. That section takes you deeper into customizing Visio and using some of its advanced features. Clearly, not every reader will become devoted to discovering advanced features. Browse
through Part III for any features that you might find useful and have the time to work through. Also, glance through Part V, which contains many interest-ing tips, tricks, and trivia that you might find very useful.
On the other hand, if you’ve used Visio before, you can safely skip Parts I and II, which offer basic getting-up-and-running information.
Foolish Assumptions
You probably have a reasonable working knowledge of Microsoft Windows and have at least some idea of what you want to draw. For this reason, Chapter 1 doesn’t spend any of your valuable time describing how to find your way around Windows or how to work with dialog boxes. If you need to review these concepts, see Windows Vista For Dummies,by Andy Rathbone (published by Wiley).
Although Chapter 2 does provide a basic overview of all of the templates available in Visio, this book doesn’t tell you when you need to use the Unified Modeling Language (UML) Model Diagram template. If you don’t already know what the UML Model Diagram does, you can safely skip that descrip-tion. None of the examples in the book focus on a particular kind of diagram except when you need a specific diagram type to accomplish a particular task in the more advanced sections. In short, all of the procedures and tech-niques work for all diagram types unless the book specifically mentions that you must use a particular diagram type.
How This Book Is Organized
Visio 2007 For Dummies is organized into five distinct parts. Use the parts to guide you to where you want to go on your Visio journey. You don’t need to read the chapters in order. The book is designed so that you can skip around to suit your needs.
Part I: Starting with Visio 2007 Basics
Part I lays the groundwork for your success with Visio. Every software pro-gram has its unique personality; Visio is no exception. Here you find concep-tual information about Visio, get the Visio terminology down, discover how to recognize and work with what’s on the screen, start Visio, save and open files, and print drawings.
3
Part II: Creating Visio Drawings
Part II is for those in a hurry because it teaches you the basics of creating a
simpledrawing. You find out about the basic elements of a Visio drawing and discover how to implement those elements in your drawing. You’ll also dis-cover how to add and manipulate text, as well as how to work with margins and tabs, indentation, alignment, spacing, and more. You see how to use and manipulate a drawing’s connectors,the lines that connect one shape to another. (They’re more than just simple lines, as you’ll soon discover.)
Part III: Taking Your Drawings
to the Next Level
In Part III, you move into the intermediate features of Visio. You find out how to place shapes precisely on a drawing, create your own shapes, enhance and manipulate shapes, perform complex tasks with connectors, and work with pages and layers.
Part IV: Advancing Your
Knowledge of Visio
Certainly not every user needs to pursue Part IV! Here you find out how to create custom templates and themes, how to store data in shapes and report on that data, and how to protect your shapes and drawings from inadvertent changes. You also see how to use Visio drawings with other programs and how to save files for publishing on the Web. Most importantly, this is the part that helps you discover the new Data Link and PivotDiagram functionality that Visio provides.
Part V: The Part of Tens
One of the most useful sections of every For Dummiesbook, “The Part of Tens” is a collection of a variety of information. In Visio 2007 For Dummies,
you find ten “how to” pointers for useful tasks and ten pointers to online resources for Visio.
About the Web Site
This book contains a wealth of drawing examples, a few themes, some sten-cils, and other helpful Visio drawing information. Trying to replicate what you see in the book precisely could be time consuming and wholly unnecessary since the work is already done. Consequently, you’ll find all of the art in this book on the Dummies Web site at www.dummies.com/go/visiofd2007. All you need to do is download it, locate the chapter you’re working with, and open the drawing you want to use. The drawings all have names that make their purpose quite clear. Using the Web site content will help you discover Visio with greater ease without having to worry about becoming an artist to do it.
Icons Used in This Book
The following icons are used in this text to call attention to specific types of information.
The Tip icon indicates information that’s likely to save you time or informa-tion that will make you say to yourself, “Wow, I never knew that!” Be sure to read this stuff.
Wherever a Technical Stuff icon occurs, you’ll find a discussion of something that’s bogged down in technical jargon. Generally, you can skip these para-graphs because they contain advanced information. However, more experi-enced readers will want to read this material because it provides essential information for advancing your skill further.
Definitely pay attention to the Warning icons. They’re designed to warn you of impending doom or, at the very least, a possible problem you’d just as soon avoid.
Remember icons are designed as a gentle nudge rather than a blatant slam to the head. In other words, “Remember this — it may be important to you some day.”
This icon draws attention to the slick new improvements in Visio 2007. Chapter 1 provides an overview of these new features. However, Microsoft improved Visio 2007 in a considerable number of ways, so it’s important to look for these icons when you’re upgrading from an earlier version of Visio.
5
Where to Go from Here
If you’ve never used Visio before, definitely start with Part I! Work your way through Part II as well, but don’t feel that you must go beyond this point. If you’ve used Visio before, you might get crazy and start with Part V, skim Parts I and II, and go directly to Parts III and IV to look for any features you might not be familiar with. Whether you are a beginner or an experienced Visio user, be sure to look through Part V for answers, tips, and pointers to Visio-related Web sites.
Part I
In this part . . .
V
isio is an amazing program! If you can imagine it, you can probably sketch it using Visio. Many people use Visio as their only drawing application because it does pro-vide great output, but many others use it for sketching their ideas and sharing them with others. In some respects, Visio is a tool for showing your dreams to others.Other drawing applications help you create graphics. Visio, however, is a different animal. It’s not really a draw-ing program, and it’s certainly not a Computer-Aided Design (CAD) program. In this part, you understand what Visio is and what it does, you discover how to “speak” and “think” Visio, you negotiate your way around the screen, and you find out how to get help when you need it. You also print a drawing, something you’ll no doubt find useful if you want to be productive!
Chapter 1
Visio 101
In This Chapter
䊳Getting the scoop on Visio features
䊳Understanding the lingo of Visio
䊳Opening Visio and touring the screen
䊳Getting help
䊳Closing the program
C
lose your eyes for a minute and picture the amount of visual information that comes to you on any given day. Magazines, newspapers, reports, television programs, and presentations illustrate a great deal of information in the form of charts, tables, graphs, diagrams, and technical drawings. These graphical elements often convey ideas far more quickly and clearly than long, boring paragraphs. You don’t typically think of charts, diagrams, and graphs as art,but they are graphical, and this is where Visio comes in.Although Visio is easy to use, you can benefit from a bit of explanation before you jump right in creating drawings. In this chapter, you become familiar with what you see on the Visio screen and find out how Visio works conceptually.
Getting the Scoop on Visio
Visio’s grab bag of icons — or shapes,as Visio calls them — represents all sorts of things from computer network components, to office furniture, to boxes on an organization chart or a flow chart, to electrical switches and relays. Even programmers can use Visio to create diagrams that represent application elements and then use that content to create the application. You simply drag the shapes that you want into the drawing window, and arrange and connect them the way that you want. You can add text and other graphi-cal elements wherever you like.
Comparing Visio products
Over the years, Visio has been available in several different flavors — Standard, Professional, Technical, and Enterprise — plus you could find advanced developer’s tools in Visual Studio .NET and advanced network dia-gramming tools in Visio Enterprise Network Tools. Whew! All these versions became confusing and overwhelming to the average user, so Microsoft decided to simplify things and produce just two editions of Visio: Standard and Professional. The same “engine” drives both, but the audience for each is slightly different and the types of charts and diagrams you can create
address different needs:
⻬Visio Standard:Designed for business professionals, this edition gives all kinds of businesspeople — from product managers to financial ana-lysts to sales and marketing professionals — the ability to create busi-ness-related charts and diagrams that illustrate business processes, marketing trends, organizations, project schedules, and so on. However, just about anyone can make use of this version. For example, an office manager could use this version to show the office arrangement in a building or the structure of an organization. It’s important to not limit yourself; Visio can help you diagram just about anything you can imag-ine as long as the diagram doesn’t require the precise measurements normally provided by a computer-aided design (CAD) program.
⻬Visio Professional:Designed for technical users, this edition includes everything that Visio Standard includes and more. Network managers and designers, electrical engineers, IT managers, facilities planners, Internet specialists, Web designers and administrators, and software developers can use Visio Professional to create charts and diagrams that illustrate a wide variety of technical concepts and processes. The pro-fessional version also contains a number of database features that you can use to import data from other applications. For example, you could import information from Access and use it to create a special diagram.
So, how do you know which Visio is right for you? If you’re involved in net-works, IT, Internet or Web design, electrical engineering, architecture facili-ties planning and management, or software development, Visio Professional
is the edition to use because it provides all the shapes and symbols you need to create simple or complex diagrams. If you’re not involved in any of these fields but are a business professional involved in company sales, profits, mar-keting, or managing projects, Visio Standard is right for you. It includes all the shapes you need to create business-related charts, diagrams, and draw-ings, without cluttering your screen with shapes you’ll never use (such as a proximity limit switch or a guided light transmitter).
It’s easy to get lost when you look at all of the diagrams that Visio can create. Many people get started using Visio for simple needs. For example, just about everyone needs a calendar from time to time. With Visio, you can create a custom calendar to meet any need. You can also use it to create directional maps to show someone how to get from the airport to your company. When working with Visio, it’s best to start simple and work your way up to the com-plex diagrams used by various professionals.
A quick peek at some Visio features
Visio is often a misunderstood product, especially by those who’ve never used it. Some people limit Visio to drawing organizational charts, but it can do considerably more. The following list describes some of the tasks you can perform with Visio:
⻬Printing what you want:Even though creating a diagram in Visio is relatively easy, you still need to show other people the graphical repre-sentation of your ideas. Fortunately, Visio provides extensive printing capabilities, which means you get just the output you need. (See Chapter 3 for more information on printing everything from a simple calendar to complex floor diagrams.)
⻬Diagrams without drawing:Visio provides a wealth of shapes that you can use to create diagrams of any type. All you do is place the shape where you want to see it on-screen; no drawing is required! (See Chapter 2 for more information on using shapes to create any diagram type.)
⻬Customize shapes easily:One of the best features of Visio is that you can use it to customize shapes in a number of ways. You can add text, modify the size of the shape, change its appearance, and connect shapes. No matter what your skill level or how you use Visio, you can create professional-looking results with a few clicks. (See Chapters 5 through 7 for details on customizing shapes simply. Chapter 8 describes how you can create your own shapes when the defaults don’t work. Chapters 9 through 12 show how to manipulate shapes in various ways.)
⻬See only the data you need:Data overload is a condition where you become overwhelmed by the very data that you’re supposed to use to complete tasks. Layering in Visio helps you reduce complexity by letting
11
you see only the layer of data you actually need. All of the data is still there, but you only access it when you actually need it. (See Chapter 10 for ideas on how you can use layering to manage your data efficiently.)
⻬Make your diagrams a group activity:The ability to comment on ideas in a group is essential in business today. The diagrams that you create are ideas only they’re in graphical, rather than textual, format. Visio helps you make the diagrams you create a group activity by providing a number of ways to add comments and revisions. (See Chapter 13 for more informa-tion on working with comments and the Visio review features.)
⻬Report on data:Wouldn’t it be great if you could store data in a drawing and then report on that data? With Visio, you can. Suppose you draw an office layout plan that includes cubicle walls, fixtures, office furniture, and telephone and computer equipment. You can store each piece of fur-niture and office equipment with data such as its inventory number, owner, and current location. From this drawing, you can generate prop-erty, inventory, and location reports. (See Chapter 12 for more informa-tion on storing and reporting on data in shapes.)
⻬Use the drill-down feature:Jump quickly from an overview drawing to a detailed drawing and back again. For example, you can draw an overview map of a worldwide computer network and double-click the name of a city to see a drawing of that city’s computer network. This drill-down fea-ture is possible because Visio lets you define a shape’s behavior when you double-click it. (See Chapter 12 for more information.)
⻬Generate drawings from data:In contrast to the previous point, would-n’t it be great to be able to generate drawings from existing data? Again, with Visio, you can. Suppose you have employee data (name, title, department, reporting manager, and so on) stored in a text or spread-sheet file. You can generate an organization chart automatically from this data using Visio. (See Chapter 14 for more information on using external data in Visio.)
⻬Use hyperlinks:Often, you can’t convey in a single drawing all the infor-mation necessary to make your point. You might want to refer the reader to a separate drawing, a Web site, or another document with related information. With Visio, you can add hyperlinks to a drawing or shape. This is an invaluable feature for pulling pieces of information together to present a comprehensive picture. (See Chapter 14 for tips on using hyperlinks in diagrams.)
Visio actually provides support for eight categories of drawings. You can create everything from business charts to software and database diagrams. The “Understanding the Visio Drawing Categories” section of Chapter 2 pro-vides a description of each of these drawing categories so that you have a better idea of precisely what Visio can do for you.
What’s new in Visio 2007?
Visio 2007 has a lot to offer. With each update, Visio improves the functional-ity you need to create diagrams quickly. The emphasis in this update is efficiency — helping you get more done with fewer errors and in less time. The following list provides you with an overview of the major feature changes in Visio 2007. You’ll see these features described in more detail throughout the book.
⻬Starting quickly with improved templates:Visio 2007 supports fewer template categories and the category names now make more sense. You actually have access to more templates, but Microsoft has organized them better. In addition, the template examples are larger with clear text descriptions, so you have a better idea of how to use a particular tem-plate. A recent template list tells you which templates you use most often and makes these templates easier to access. The Professional edi-tion also includes sample diagrams and data sources that you can use as examples of how to retrieve data from your own data sources.
⻬Improving drawing appearance with themes:You have probably seen the effect of themes in Windows. A theme in Visio is the same concept. You use themes to give your diagrams a particular appearance. Using themes helps ensure that your diagrams have a pleasing appearance and are easy to see.
⻬Automatically connecting shapes:Visio now makes it easier to create great-looking drawings with greater ease by creating the connections you need automatically and aligning new drawing elements. You can connect drawing elements when you drag the shape onto the form. However, when you decide to make the connection later, all you need to do is point at the two connectors that you want to connect. You’ll dis-cover more about these fast connection techniques in Chapter 6.
⻬Sharing diagrams with other Office applications:Keeping others informed about your ideas is essential. This feature relies on SharePoint server to make it easier to share data in various ways. For example, you can generate a Visio pivotdiagram from within Microsoft Project and place it on SharePoint server for comment by other collaborators. You can also attach Visio diagrams to e-mail created in Outlook. Other people can see the diagrams even if they don’t have Visio installed.
⻬Saving data using the XPS file format:A problem with custom data for-mats is that it isn’t easy to move the data to other locations. The XML Paper Specification (XPS) file format provides a standard method of saving your data in a form that other applications can use. You can effec-tively use the data in any application that supports XML.
13
⻬Improving efficiency with smaller diagrams:Other people don’t always need every piece of information in a diagram. For example, you might have unused master shapes or comments that other people don’t need to see. Visio makes it easier to clean up your diagrams before you send them to someone else. In addition to presenting a cleaner form, your dia-gram will also consume less space, making it more efficient for data transfers and local storage.
One of the ways you can determine whether you need Visio Professional edi-tion is by the features it provides. The following list describes a number of special features that the Professional edition provides. These aren’t the only differences, but they’re significant reasons for choosing the Professional edi-tion over the Standard ediedi-tion.
⻬New templates and shapes:The Professional edition of Visio comes with a number of new templates and shapes that make it easier to display complex data on-screen. The PivotDiagram, Value Stream Map, and Information Technology Infrastructure Library (ITIL) templates help you model complex data in new ways. In addition, the new Work Flow shapes that are part of the Work Flow Diagram template help you model dynamic workflows that better match how people in your company perform tasks. Workflows model business processes of all types, which includes every-thing from the steps to produce a product to the events that occur when you receive a customer order.
⻬Using data from other sources in diagrams:You already have a vast store of data to use in creating diagrams. The problem is that this data isn’t in graphical format, making it very difficult to understand. Visio now makes it easy to create a connection to that data so that the infor-mation you already have appears in the diagrams you create. Because of the connection between your diagram and the data source, any changes in the data automatically appear in the diagram. A new Data Selector Wizard helps you create the data connection to data in other applica-tions such as Access, SQL Server, and Excel (in addition to a number of non-Microsoft products).
⻬Seeing data in the Data Graphics task pane:Getting data from an exter-nal data source is only part of the process. Although plain text is fine for a report, you might want to dress it up a bit for your diagram. The Data Graphics task pane helps you turn plain text into something that will dazzle those around you.
⻬Viewing complex data using a pivotdiagram:A pivotdiagramis a collec-tion of shapes in a treelike structure that helps you present complex data in a less confusing manner. Using a pivotdiagram helps you analyze the data, drill down into it, and display it from various perspectives.
Familiarizing Yourself with Visio Lingo
Like all software programs, Visio uses a particular terminology. You need to be familiar with the following terms before you begin creating diagrams and drawings:
⻬Drag and drop:The method Visio uses to create drawings. What are you dragging and where are you dropping it, you ask? You drag shapes and you drop them onto a drawing page.
⻬Shape:Probably the most important element in Visio. A shape repre-sents an object of nearly any conceivable kind, such as a piece of office furniture in an office-layout diagram, a road sign in a directional map, a server in a network diagram, a box on an organization chart, or a bar on a comparison chart. Visio contains literally thousands of shapes. You can draw and save your own shapes as described in Chapter 8.
⻬Master shape:A shape that you see on a stencil. When you drag a shape onto the drawing page, you’re copying a master shapeonto your drawing page, making it just one instanceof that shape. Visio makes the distinc-tion between master shapes and instances of shapes. The only time this distinction is important is when you begin modifying Visio to meet spe-cific needs by creating your own shapes.
⻬Stencil:A tool Visio uses to organize shapes so that you can find the one you’re looking for. A stencilis nothing more than a collection of related shapes. If you want to create a cubicle-layout diagram for your office, for example, you use the cubicles stencil, which includes shapes such as workstations, posts, panels, work surfaces, storage units, and file cabi-nets. Stencils are displayed in the Shapes pane on the left side of the screen so that the shapes are always available while you’re working.
⻬Template: A collection of stencils in addition to predefined document settings. A templateis essentially a model for creating a particular type of drawing. A template defines certain characteristics of the drawing so that the drawing is consistent. For example, when you use a Visio tem-plate for a specific type of drawing, Visio automatically opens one or more appropriate stencils, defines the page size and scale of your draw-ing, and defines appropriate styles for things such as text, fills, and lines. You can change any of these elements, but the point of using a template is to maintain consistency throughout the drawing.
⻬Connector:A line that connects one shape to another. Perhaps the most common example of a connector is in an organization chart. The lines that connect the president to various groups in an organization and the lines that run through an organization are connectors. Chapter 6 describes con-nectors in detail.
15
Understanding the Vista Difference
Visio operates a little differently from a visual and security perspective under Vista than it does under earlier versions of Windows, such as Windows XP. In fact, you don’t get to see all of the functionality that Visio can provide unless you use it under Vista. The best way to describe these differences is to group them into two categories: graphical (what you can see) and security (the pro-tection Visio provides).
In addition to Visio-specific changes, Vista also requires a change in how you perform some Visio-related tasks. For example, when you want to work with a printer in Vista, you must locate it within the Control Panel. It’s easy to find the Vista specifics in the Visio help file. Simply type Vista in the Search field of the Visio Help file and click Search. The following sections describe the Visio-specific differences in Vista.
The graphical interface difference
Vista sports the new Aero Glass visual interface. This new interface offers some efficiencies not found in older versions of Windows and, of course, it provides a healthy dose of eye candy. The big thing to remember is that Vista doesn’t affect the actual functionality of Visio. All of the features (the tech-niques you use to perform a task) work the same under Windows XP as they do under Vista.
You do receive some additional benefits from using Vista. Graphics do appear faster on-screen and you’ll notice that Vista does tend to make the graphics look better. For example, the fonts are easier to read and the lines used to create a diagram look crisper. Even though this might seem like a small bene-fit for Visio users who work in Vista, the effects can reduce eyestrain and help you avoid mistakes that you might otherwise make. Vista makes it less likely that you’ll encounter errors such as connections where you didn’t think any existed.
Helpful user interface changes
Vista also promises to be a less painful experience for users. For example, normally when you apply a patch and the system has to reboot, you have to restart your applications, locate your position, and only then start work again. It’s a waste of time and effort. Vista provides a new feature called Freeze Dry that remembers program settings such as window size, window position, and even cursor position. After a system reboots, Vista automati-cally resets your Office application to its previous state for you.
You may have run into problems accessing information on international Web sites in the past. Vista now supports the special characters used by these Web sites so that your Visio experience can include data from these sites. In addi-tion, Vista provides full Internet Protocol Version 6 (IPv6) support. This means that your copy of Visio is ready to work with the additional Web addresses that IPv6 provides.
All Office products now use the Vista Save, Open, and Insert common dialog boxes, which means that you gain full access to the Vista functionality. The Vista functionality includes the ability to organize your files with greater ease and to search for documents based on metadata as well as regular content. For example, you can search for a Visio document based on the author or the comments you provide.
A very useful feature for Visio users is the ability to store a thumbnail of your diagram. Instead of looking one document at a time for a particular diagram, you can simply view the thumbnails. This feature makes it considerably easier to locate a particular diagram. Even when several diagrams look simi-lar, you can usually reduce the number of diagrams you have to check.
Office also emphasizes reliability under Vista. If Office or Vista detects that a certain operation could cause the operating system to crash, Office will stop the operation and tell you about the problem, rather than attempting to per-form the operation as it did in the past. Generally, this feature means that you’ll not only see fewer crashes, but you’ll also encounter a reduced risk of data loss.
Understanding the security features
The biggest reason to use Vista is the security features. It’s a lot easier to pro-tect the data in your diagrams under Vista and you’ll find that the security is very reliable. In addition, many of the security features work automatically. You don’t have to remember to change a setting to protect the data, in many cases, because Vista does it for you — at least from an operating system level. The following sections describe a few other security changes for Visio users under Vista.
Defining the difference between users and administrators
One of the most difficult changes that users will encounter under Vista is that it differentiates between users and administrators. In addition, every account works in user mode most of the time. Consequently, activities that might have worked fine in the past may not work under Vista. For example, you’ll find that you need to give yourself permission to access your data directory. Although this sounds very odd, it does help protect your data. No one gains access to your data unless you specifically give him rights to do so.
17
Digitally signing your macros
You’ll probably find that those macros you relied on in previous versions of Visio no longer work. That’s because most people don’t sign their macros. In order to use macros successfully in many cases, you must digitally sign the file that contains them. Since Microsoft is making this particular feature more robust as it introduces new versions of Office and Windows, it’s probably a good time to start signing your macros now.
In addition to macros, you’ll find that Vista makes it more difficult to perform some tasks using Explorer or typing from the command line. For example, you must have administrative privileges to perform tasks such as deleting a file. These changes work along with the macro protection to make it less likely that an errant macro will destroy your data. If your macro performs any command line tasks, such as deleting a file, it also requires the correct privi-leges. The bottom line is that no matter how you try to perform some tasks, Vista won’t let you unless you have the correct rights. Many macros will simply stop working as currently written.
This book doesn’t discuss how to create or use macros. A book such as VBA For Dummies, 5th Edition (published by Wiley) provides complete coverage of this topic.
Relying on trusted locations
Vista is also quite fussy about where you store your data. Trying to open a file on a network drive or store data on a network drive will normally meet with a number of permission requests. Generally, you must have administra-tive privileges or specific rights on the network drive to use it. In this case, however, you can get around the problem by setting Visio to use trusted loca-tions. See the “Saving Drawings” section of Chapter 2 for more details on using trusted locations.
Jumping Head First into Visio
The best way to get started with Visio is to open a new drawing page, so you can cruise around the screen and get a feel for what’s there. Then, in Chapter 2, you create a drawing.
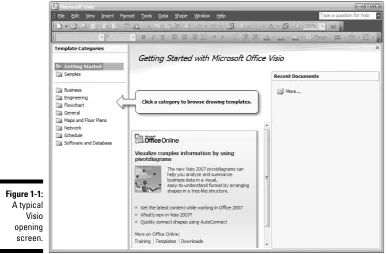
To start Visio, choose Start➪Programs➪Microsoft Office➪Microsoft Office Visio 2007. Visio displays the window shown in Figure 1-1.
Visio divides the application functionality into several areas. At the top are the toolbars and menus you use when working with Visio. Most of the toolbar entries are grayed out because you haven’t selected a template yet. The rest of the book describes these entries. Along the left side of the display, you see several entries that control the appearance of the right side of Visio. For example, when you select Getting Started, you see topics that help you begin using Visio. The following list describes these entries:
⻬Getting Started:This entry displays two panes. The center pane con-tains information on how to get started using Visio. You can obtain infor-mation about training, templates, and downloading, in addition to the latest news about Visio. The right pane contains a list of your current projects. Simply click the project to open it.
⻬Samples:If you’re wondering how to use a particular diagram template or simply don’t want to start from scratch, select the Samples entry. This entry also displays two panes on the right side. The center pane contains a list of the samples that Microsoft has provided. The sample entry contains a basic view of the template type and the sample name. The right pane contains a detailed view of the selected sample. The dia-gram is bigger and more detailed. You’ll also see a write-up about the
Figure 1-1:
A typical Visio opening screen.
19
sample. To use the sample, select the US Units or Metric option, and click Open Sample Data.
⻬Category: The Category list shows eight items. These items represent the diagram types including Business, Engineering, Flowchart, General, Maps and Floor Plans, Network, Schedule, and Software and Database. Selecting a particular category displays a list of associated templates in the center pane. For example, when you select the Business category, you see Brainstorming Diagram, Organizational Chart, and PivotDiagram as templates. Below these templates is a list of other templates that you might want to see when looking for business diagrams, even though Microsoft hasn’t placed them in this category. Select a particular tem-plate and you’ll see a larger, more detailed picture of it along with a two-or three-sentence description. To create a new drawing based on a tem-plate, choose the temtem-plate, select the US Units or Metric option, and click Create.
Getting familiar with the Visio screen
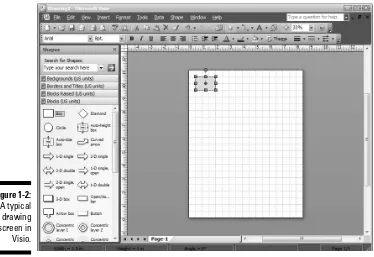
A typical Visio screen looks like the one shown in Figure 1-2. This screen is displayed when you select the General category and the Basic Diagram (US units) template. In this section, you look at what’s going on in this window.
Figure 1-2:
A typical drawing screen in Visio.
The display contains the same menu, Standard toolbar, and Formatting tool-bar as before, but the entries are active now. The left side of the display con-tains the Shapes window, while the right side concon-tains the Drawing window.
The Shapes window contains the list of shapes that you can use. In this case, the drawing is using the Box shape. The shapes appear within stencils. This example uses the Blocks (US Units) stencil.
The Drawing window contains the area where you create a diagram. You see rulers across the top and left side of this window that help you position and size shapes. The drawing area looks like graph paper. You can use the lines to position shapes, as shown in Figure 1-2.
Checking out the menus
Visio’s menu bar contains some typical menus found in almost every Windows application (such as File, Edit, Format, and Help). Even so, it’s important to review each menu for commands that you may not expect. The following list describes commands unique to Visio (even though some of the menus might look familiar):
⻬Tools:On this menu, you find all kinds of tools for working with Visio shapes, the Visio drawing page, and the drawing itself. There are tools for setting Visio’s color palette, rulers, grids, and so on. You also find the standard Microsoft options such as Spelling, Track Markup, Customize, and Options.
⻬Data:The Data menu only appears when you use the Professional edi-tion. It contains entries that help you obtain data from other sources and create reports.
⻬Shape:The Shape menu contains commands for grouping, rotating, flip-ping, and aligning, as well as commands for choosing a drawing’s color scheme. You also find commands for changing the stacking order of shapes and doing some creative things such as fragmenting and inter-secting shapes. (See Chapter 8 for details.)
The options on the Shape menu change depending on the type of draw-ing you’re creatdraw-ing.
For certain types of drawings, Visio adds an additional menu to the menu bar. For example, when you create a Gantt chart using the Gantt Chart template in the Schedule category, Visio adds a Gantt Chart menu just after the Shape menu and before the Window menu (see Figure 1-3). On the Gantt Chart menu, you find commands specific to creating Gantt charts, such as adding and deleting tasks, linking tasks, and setting working hours. As soon as you close the drawing, the menu option disappears.
21
Working with toolbars
Visio has a dozen or so toolbars, two of which are displayed automatically when you start the program. The two default toolbars are Standard and Formatting. You can hide either of these, and you can display additional tool-bars as well.
After you begin to recognize the toolbar buttons, it’s much faster to click a button than to select a menu command. Many of these buttons appear on the Cheat Sheet at the beginning of this book.
To hide or display toolbars, right-click anywhere in the toolbar area. On the shortcut menu that appears, click a toolbar name. Toolbars that have a check mark next to them are displayed; all others are hidden (see Figure 1-4).
Figure 1-4:
The toolbar shortcut menu lets you turn toolbars on and off.
Figure 1-3:
Visio inserts a new menu in the menu bar when you create a Gantt chart.
All Visio toolbars can be docked at different locations on the screen. Just grab the vertical bar at the left end of any toolbar and drag it to a new location on the screen. A moved toolbar automatically becomes its own window, and you can position it anywhere you like on the screen by dragging its title bar.
If you’re a toolbar fanatic, you might want to customize the toolbars by adding buttons you use most often and deleting buttons you never use. You can also choose any buttons you want and create a new toolbar.
Creating a toolbar
To create a custom toolbar, follow these steps:
1. Choose View➪Toolbars➪Customize.
Visio displays the Customize dialog box.
2. On the Toolbars tab, click the New button.
Visio displays the New Toolbar dialog box.
3. In the Toolbar Name field, type a name (see Figure 1-5), and then click the OK button.
Visio adds the new name to the list of toolbars and displays a new, blank toolbar on the screen. (It’s small, but it’s there!)
4. If you want to add buttons to the new toolbar, drag and drop the new blank toolbar into the toolbar area, and then follow the steps in the next section, “Modifying a toolbar.”
5. Click Close to close the Customize dialog box. Figure 1-5:
You can add and delete toolbar buttons or create a custom toolbar.
23
Modifying a toolbar
If you just want to add a button here or there, consider modifying an existing toolbar rather than creating a new one. However, in many cases, it’s a good idea to create your own custom toolbar so that you can see everything you want without having to worry about someone changing the toolbar back to a default state later. Use the following steps to modify any toolbar:
1. Display the toolbar that you want to change.
To do so, right-click the toolbar area and select the toolbar.
2. Right-click the toolbar and choose Customize.
Visio displays the Customize dialog box.
3. Click the Commands tab.
Categories are on the left and commands are on the right, as shown in Figure 1-6.
4. Click a category on the left, and then scroll through the list of com-mands (buttons) on the right.
5. Drag the button from the dialog box to the location on the toolbar where you want to add the button.
When you release the mouse button, the new button becomes part of the existing toolbar at the point where you dropped it.
Deleting a button from a toolbar
Sometimes you end up with buttons you don’t really want on a toolbar. The following steps tell how to remove a button from a toolbar:
1. Display the toolbar that you want to change. Figure 1-6:
Choose a toolbar on the left and buttons on the right.
2. Right-click the toolbar and choose Customize.
Visio displays the Customize dialog box.
3. Drag the button that you want to delete off the toolbar.
If you want to delete additional buttons, repeat this step.
4. Click the Close button to close the Customize dialog box.
Getting Help When You Need It
Visio makes it easy to obtain help about any topic. Microsoft has centralized help in Visio 2007 and made it easier to use. The following sections describe the two forms of help that Visio provides.
Using general help
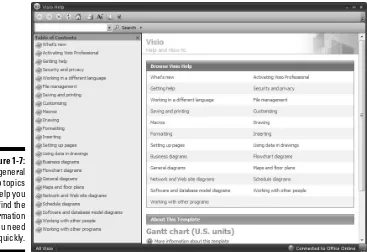
Visio presents help using a separate window. You can display this window by clicking the question mark (?) in any dialog box and pointing to any control. Visio displays the Help window with the information for that control displayed. If you want help on a general topic, choose the Help➪Microsoft Office Visio Help command. You see a general listing of Visio help as shown in Figure 1-7.
Figure 1-7:
The general help topics help you find the information you need quickly.
25
If you don’t see the help you want, type a search term in the Type Words to Search For field and click Search. For example, if you want to learn more about the Vista differences for Visio, type Vistaand click Search. Help dis-plays all of the entries associated with Vista in the right pane.
Sometimes Help returns too much information. You can limit the scope of a search by clicking the down arrow next to the Search button. The context menu contains a list of places that you can search. For example, you might choose to search just the Visio Templates, rather than All Visio (the default).
You may not have any search terms in mind when you begin your search. Perhaps you’re just looking to see what Visio offers. In this case, you can use the Table of Contents list in the left pane of the Help window. Click a book icon to open that particular topic. You can drill down through the topics to find the information you need.
Don’t forget ToolTips
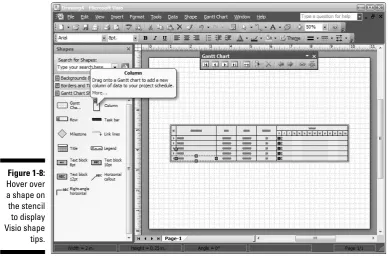
Like most Windows programs, Visio also uses ToolTips. When you point to a button on a toolbar and hoverover it (pause without clicking), a tip pops up to tell you the name of the button. This is especially helpful when you’re learning Visio.
Visio expanded the concept of ToolTips to its stencils. When you hover over a stencil shape, a tip pops up and gives the name of the shape and a descrip-tion, as shown in Figure 1-8.
If you don’t want to view ToolTips or stencil tips, choose Tools➪Options, and then click the View tab. Click to remove the check mark from Toolbar
ScreenTips and Other ScreenTips, and then click OK.
Closing Visio
When you’re ready to close Visio, choose File➪Exit. If you haven’t recently saved all open files, Visio prompts you to do so for each file. Choose Yes to save or Cancel to return to Visio without saving the drawing.
Figure 1-8:
Hover over a shape on the stencil to display Visio shape tips.