•HowtoinstallandsetupyourNetBeansIDEandenvironment •HowtowriteyourfirstJavaapplicationusingNetBeans •HowtoexplorethekeyNetBeanswizardsandplug-ins
Beginning NetBeans IDE
for Java Developers
Copyright © 2015 by Geertjan Wielenga
This work is subject to copyright. All rights are reserved by the Publisher, whether the whole or part of the material is concerned, specifically the rights of translation, reprinting, reuse of illustrations, recitation, broadcasting, reproduction on microfilms or in any other physical way, and transmission or information storage and retrieval, electronic adaptation, computer software, or by similar or dissimilar methodology now known or hereafter developed. Exempted from this legal reservation are brief excerpts in connection with reviews or scholarly analysis or material supplied specifically for the purpose of being entered and executed on a computer system, for exclusive use by the purchaser of the work. Duplication of this publication or parts thereof is permitted only under the provisions of the Copyright Law of the Publisher’s location, in its current version, and permission for use must always be obtained from Springer. Permissions for use may be obtained through RightsLink at the Copyright Clearance Center. Violations are liable to prosecution under the respective Copyright Law.
ISBN-13 (pbk): 978-1-4842-1258-5
ISBN-13 (electronic): 978-1-4842-1257-8
Trademarked names, logos, and images may appear in this book. Rather than use a trademark symbol with every occurrence of a trademarked name, logo, or image we use the names, logos, and images only in an editorial fashion and to the benefit of the trademark owner, with no intention of infringement of the trademark.
The use in this publication of trade names, trademarks, service marks, and similar terms, even if they are not identified as such, is not to be taken as an expression of opinion as to whether or not they are subject to proprietary rights.
While the advice and information in this book are believed to be true and accurate at the date of publication, neither the authors nor the editors nor the publisher can accept any legal responsibility for any errors or omissions that may be made. The publisher makes no warranty, express or implied, with respect to the material contained herein.
Managing Director: Welmoed Spahr Lead Editor: Steve Anglin
Technical Reviewer: Josh Juneau
Editorial Board: Steve Anglin, Louise Corrigan, Jonathan Gennick, Robert Hutchinson, Michelle Lowman, James Markham, Susan McDermott, Matthew Moodie, Jeffrey Pepper, Douglas Pundick, Ben Renow-Clarke, Gwenan Spearing, Steve Weiss
Coordinating Editor: Mark Powers Copy Editor: Kezia Endsley Compositor: SPi Global Indexer: SPi Global Artist: SPi Global
Distributed to the book trade worldwide by Springer Science+Business Media New York, 233 Spring Street, 6th Floor, New York, NY 10013. Phone 1-800-SPRINGER, fax (201) 348-4505, e-mail [email protected], or visit www.springeronline.com. Apress Media, LLC is a California LLC and the sole member (owner) is Springer Science + Business Media Finance Inc (SSBM Finance Inc). SSBM Finance Inc is a Delaware corporation.
For information on translations, please e-mail [email protected], or visit www.apress.com.
Apress and friends of ED books may be purchased in bulk for academic, corporate, or promotional use. eBook versions and licenses are also available for most titles. For more information, reference our Special Bulk Sales–eBook Licensing web page at www.apress.com/bulk-sales.
Contents at a Glance
About the Author ...
xiii
About the Technical Reviewer ...
xv
About the Illustrator ...
xvii
Acknowledgments ...
xix
Foreword ...
xxi
Preface ...
xxiii
Introduction ...
xxv
■
Chapter 1: Installing and Setting Up ...
3
■
Chapter 2: Getting Started ...
17
■
Chapter 3: Java Editor ...
33
■
Chapter 4: Using Wizards and Plugins ...
87
■
Chapter 5: Putting the Pieces Together ...
105
■
Chapter 6: Analysis and Refactoring ...
127
■
Chapter 7: Testing and Code Quality ...
167
■
Chapter 8: Debugging ...
183
■
Chapter 9: Profiling and Tuning ...
211
■
Chapter 10: Versioning ...
229
Contents
About the Author ...
xiii
About the Technical Reviewer ...
xv
About the Illustrator ...
.xvii
Acknowledgments ...
xix
Foreword ...
xxi
Preface ...
xxiii
Introduction ...
xxv
■
Chapter 1: Installing and Setting Up ...
3
What Is NetBeans IDE? ...
3
Advantages of the IDE ...
4
Downloading the IDE ...
4
Installing the IDE ...
6
Using Mac OSX ...
13
■
Chapter 2: Getting Started ...
17
Hello World ...
17
Trying Out the IDE with Sample Code ...
22
Exploring the IDE ...
23
Project Views ...
24
■
Chapter 3: Java Editor ...
33
Overview ...
33
Getting Started ...
34
Opening a File ...
34
Opening a File Without a Project ...
36
Reconfiguring the Source Editor ...
37
Changing Keyboard Shortcuts, Fonts, and Colors ...
39
Comparing Differences Between Two Files ...
46
Typing ...
47
Finishing and Concatenating ...
47
Matching Other Words in a File...
48
Text Selection Shortcuts ...
48
Macros ...
49
Code Snippets ...
50
Code Completion ...
51
Code Completion Tricks ...
54
Customizing Settings for Code Completion ...
55
Templates ...
57
Indenting Blocks of Code Manually ...
67
Navigation ...
68
Navigating Within the Current Java File...
69
Navigating from the Source Editor ...
73
Search and Replace ...
76
Adding, Removing, and Changing Action Item Tags ...
82
Filtering Action Items ...
83
■
Chapter 4: Using Wizards and Plugins ...
87
Overview ...
87
■
Chapter 5: Putting the Pieces Together ...
105
Setting Up ...
105
Exposing Data to Frontend Clients ...
117
Generate JSF Pages from Entity Classes ...
117
Generate RESTful Web Services from Entity Classes ...
118
Generate RESTful JavaScript Clients from RESTful Web Services ...
119
Deploying the Application ...
120
■
Chapter 6: Analysis and Refactoring ...
127
Analysis ...
128
Manual Refactoring ...
144
Deleting Code Safely ...
146
Changing a Method’s Signature...
148
Encapsulating a Field ...
149
Moving a Class to a Different Package ...
151
Moving Class Members to Other Classes ...
153
Creating a Method from Existing Statements ...
156
Creating an Interface from Existing Methods ...
157
Extracting a Superclass to Consolidate Common Methods ...
158
Changing References to Use a Supertype ...
160
Unnesting Classes ...
161
Quick Access to Keyboard Shortcuts ...
162
■
Chapter 7: Testing and Code Quality ...
167
Steps ...
186
Executing Code Line By Line ...
186
Executing a Method Without Stepping Into It...
186
Resuming Execution Through the End of a Method ...
187
Continuing to the Next Breakpoint ...
187
Continuing to the Cursor Position ...
187
Stepping Into the JDK and Other Libraries ...
187
Limiting the Classes that You Can Step Into for a Library ...
187
Backing Up from a Method to its Call ...
188
Breakpoints ...
188
Setting Breakpoints ...
188
Managing Breakpoints ...
199
Watches ...
201
Setting a Watch on a Variable or Field ...
202
Threads ...
204
Switching the Currently Monitored Thread ...
204
Suspending and Resuming Threads ...
204
Suspending a Single Thread at a Breakpoint ...
204
Isolating Debugging to a Single Thread ...
205
Identifying Deadlocks ...
205
Code Changes ...
206
GUI Snapshot ...
206
■
Chapter 9: Profiling and Tuning ...
211
Performance Tuning ...
212
Coding for Performance ...
213
Tuning the Environment ...
213
Planning for Capacity ...
214
Telemetry ...
215
Methods ...
217
Objects ...
219
Threads ...
221
Lock Contention ...
222
Attaching the Profiler to External Processes ...
223
Getting Started with Apache JMeter ...
223
Using Apache JMeter ...
224
■
Chapter 10: Versioning ...
229
Setting Up Git in the IDE ...
229
Initializing a Git Repository ...
230
Cloning a Git Repository ...
232
Adding Files to a Git Repository ...
233
Editing Files ...
233
Viewing Changes in the Source Editor ...
234
Viewing File Status Information ...
235
Comparing File Revisions ...
238
Reverting Changes ...
239
Committing Sources to a Repository ...
239
About the Author
Geertjan Wielenga (@geertjanw) is a product manager in the NetBeans team. He lives and works in Amsterdam. He is a Java technology enthusiast, evangelist, trainer, speaker, and writer.
His journey into software was long and winding. He spent most of his youth in South Africa, where he studied law at the University of Natal in Pietermaritzburg. On graduating, suspecting that the world of suits and ties was not for him, he decided to travel for a while and see where events would lead him. In early 1996, he found himself as a proofreader for a software organization in the Netherlands called SuperNova, which was a 4GL language that rose and fell while Java was just beginning its upward trajectory. After having worked at various other software organizations in the Netherlands, such as Seagull and Uniface, he moved to Vienna, Austria and joined Coca-Cola Computer Services, which at that time supplied most of the ERP needs of the Coca-Cola Company around the world. When he had an opportunity in 2004 to move to Prague, Czech Republic to work on the free and open source NetBeans IDE, he took the chance to continue his adventures elsewhere.
He discovered that NetBeans IDE was a unique product, project, and ecosystem. NetBeans is used all over the world at schools, universities, open source projects, and large organizations, and Geertjan became inspired and continually enthused by the open source ecosystem and the central role that the NetBeans community was playing in it. At the time at Sun Microsystems, the place of NetBeans IDE was unambiguously as the enabler of Java learning and Java productivity around the world, as well as the driver of a wonderful and diverse ecosystem that had spread to all the nooks and crannies of the software development universe. With the change to Oracle, the focus became even more specifically on Java and gradually on JavaScript. Since NetBeans IDE is pluggable and extensible, NetBeans has been able to take this change in stride.
About the Technical Reviewer
Josh Juneau (@javajuneau) has been developing software since the mid-1990s. PL/SQL development and database programming were the focus of his career in the beginning, but as his skills developed, he began to use Java and later shifted to it as a primary base for his application development.
Josh has worked with Java in the form of graphical user interfaces, web, and command-line programming for several years. During his tenure as a Java developer, he has worked with many frameworks, such as JSF, EJB, and JBoss Seam.
About the Illustrator
Martien Bos (martienbos.com) lives and works in Amsterdam. He studied industrial design at the Technical University Delft and at the École Nationale Supérieure de Création Industrielle Les Ateliers in Paris and Dutch language and culture at the University of Amsterdam. He’s a mostly self-taught illustrator.
While studying in Amsterdam, Martien was the editor of Nymph literary magazine, which was subsequently taken over by a publisher for whom he illustrated a number of books. Not long thereafter, he made a series of portraits of well-known authors for many newspapers in the Netherlands, including NRC Handelsblad, PZC, De Stentor, Tubantia, and BN/De Stem. He’s also created illustrations for the Spanish Barcelona Magazine and the Belgian newspaper De Standaard.
Acknowledgments
I would like to thank the many people without whom this book would not have been possible. A team of highly skilled people—who I really have enjoyed working with—has greatly assisted me in creating this work.
First, I would like to thank the people at Apress involved in this project. Thanks to Steve Anglin for coming up with the idea for this book and for his assistance and insight in putting the initial table of content together. Thanks to project Manager Mark Powers for gently pushing me along and for keeping everything well scheduled and organized. Your experience and professionalism helped to make the book-writing process considerably easier than it otherwise might have been. Kezia Endsley, who copy edited the book, I would like to thank very much for your finely tuned eye and the precision and dedication you applied to the task. When I saw how many comments you had on each chapter I delivered, I knew this book would be even better than I had hoped. As a result, this book is not only full of new and interesting insights into NetBeans IDE, but also concisely written and consistently formulated.
Next, many, many thanks to Josh Juneau. Not sure exactly when I first met Josh, probably at JavaOne some years ago! He’s an author in his own right and a very focused and technically savvy supporter of all things NetBeans. The second I was asked to provide a technical reviewer, I thought of Josh. Aside from many insights and shared wisdom, he’s contributed a large part of the Chapter 9 on profiling and tuning, with thanks to Andrew Binstock from the Oracle Java Magazine, who let us reuse parts of an article that Josh published there.
Jaroslav Tulach and the original group of students in Prague, in the Czechoslovakia of 1995, need a very special thanks for their revolutionary insights and ideas, which they translated into what we now all know as NetBeans IDE. Without them, and of course without James Gosling and his team, who came up with Java in the first place, you, the reader of this book, would definitely not be holding this book in your hands! Many thanks to the NetBeans team, all the engineers over the many years, especially those still working on NetBeans today and who continue to make NetBeans a little bit better every day.
Furthermore, I’d like to thank the NetBeans community all over the world. In particular, the enthusiastic NetBeans Dream Team—that is, the community of volunteer evangelists that has helped over many years make NetBeans a fun and worthwhile environment for me and so many others to work in.
Special thanks to those who underwent the process of getting their portraits done for this book! That’s certainly a unique aspect, for which Martien Bos did a fantastic job. Each chapter begins with a portrait of a well-known NetBeans user, together with a quote that relates to the chapter. Thanks to everyone involved in this, it certainly adds something special and meaningful, and helps visualize the diversity of the NetBeans community and highlights some of the many places around the world where it is used.
There’s also a small army of volunteers who read this book at various stages of the writing process. In particular, I’d like to thank Constantin Drabo, Glenn Holmer, Pieter van den Hombergh, Benno Markiewicz, Hermien Pellissier, and Brett Ryan. Not all your comments made it into the book, though I am sure there will be many more editions of it where your insights will be used.
Throughout this text, reference and use has been made of earlier books written about NetBeans IDE, in particular, NetBeans IDE Field Guide (Prentice Hall, 2006) by Patrick Keegan and others and Pro NetBeans IDE 5.5 Enterprise Edition (Apress, 2007) by Adam Myatt.
Foreword
NetBeans started as a student project named Xelfi at the Faculty of Mathematics and Physics at Charles University, Prague, in the Czech Republic. We originally wanted to create Delphi for the XWindow system, though later we decided to switch to Java and create the first integrated development environment (IDE) for Java written in Java.
In 1995, I and 80 other students were supposed to select a final software project with which to complete our studies. There was a huge gathering where various professors presented their projects, hoping to attract the attention of the students. For example, there was a project to control a real robot; the previous year’s group had managed to move it and even speed it up, until it hit a wall. The goal for the next team working on this project was to slow the robot down or even stop it, to avoid a crash. Nice—but a bit too hardware-oriented, and I was more of a software guy. There was also project to build a database system for a hospital—a nice and valuable goal to help poor patients, though I was not a huge fan of SQL and similar technologies. And so on, and so on. When the presentation by the professors was over, I still didn’t know which project I should join.
However, I wasn’t alone! Several other guys were also disappointed with the choices that had been presented. We chatted a bit and agreed on what we’d like to do—we came up with the idea to build an IDE, something like Delphi, but to run on Linux. That is, for the XWindow system. Luckily there was a visiting professor from the US named Adam Dingle. We contacted him and, though he didn’t really know what it would be like to lead seven students in a software project, he agreed to do it. We officially announced the project and started holding weekly meetings. A usual meeting lasted around an hour. In that time, we chatted about our great design, our various plans, and then went to the pub! It was hard work, though we managed to keep it up for almost a year. Without producing a single line of code!
During that time, we did manage to participate in another project in which we used the new, cool language called Java. It didn’t feel that bad, so at one of the Xelfi before-the-pub meetings, I suggested we use Java instead of C. The response was overwhelming: No, never! And so we continued our regular meetings for the next three months, still without writing a single line of code. When I later proposed to use Java again, the timing was better, and this time the suggestion got accepted. We all started to learn and code in Java. Our progress was good. Java really delivered on the promise to run everywhere—I was an OS/2 user, there were a few Linux users, and of course a bunch of students using Windows. We ended up providing a single GUI toolkit on all these platforms, which was something we had struggled to unify when working on the C version of Xelfi. In a few months, the IDE was working and even ready to help us pass our final exam!
However, of course, the IDE was not fake at all. We actually liked what we did and so some of us tried to push Xelfi further. We started to offer Xelfi as a shareware, asking for $20 per copy. We didn’t make much money in this way, but—and that is more important—we attracted a lot of attention. We were contacted by Roman Staneˇk, who was looking for investment opportunities and, in the autumn of 1997, the company which later turned into NetBeans was established. The rest, as they say, is history. James Gosling and Sun Microsystems came into the picture, which was later taken over by Oracle.
Speaking of James Gosling, he says this about NetBeans IDE, on the NetBeans Facebook page:
I live in NetBeans. I use it more than email. Everything works together smoothly; it doesn’t
feel like a bag of disconnected parts. All the tools are there. The refactoring tools are so good
that they’ve replaced a huge amount of what I used to do with the editor - using them is not
an occasional thing for me.
NetBeans continues to innovate, to this day. And that is one thing that I continue to like about NetBeans IDE—its development team is continually striving for innovation. One of the best examples is, in my opinion, the NetBeans debugger, described in this book. Thanks to the excellent work of the NetBeans engineers and the close co-operation with the JDK team, the NetBeans debugger was the first to deliver mixed languages (e.g., Java/JavaScript) debugging for JDK8 and its Nashorn JavaScript engine. I am proud of that feature, because it later was copied to other IDEs, which, in my opinion, is a sign of extraordinary quality!
I wish you, the reader of this book, productivity and enjoyment as you learn about the key features of NetBeans IDE and apply the principles you learn here to your projects, at schools and universities, as well as in the enterprise.
Preface
A constant search for fresh technology made my young Java life very exciting.
In the early 2000’s, I started to write my first book Enterprise Java Frameworks, and bumped into NetBeans IDE. I liked the look and feel but hated the concepts behind it. Back then, NetBeans IDE was too complicated to use and I almost forgot about NetBeans altogether. . .
A few years later, NetBeans IDE 5 came out and was praised by Sun Microsystems engineers as “the only IDE you need” and was supposed to be especially powerful. Meanwhile, I had invested a lot in the Eclipse ecosystem. I was maintaining 35 client-specific workspaces with different and incompatible plugin-sets. But it worked well enough for me. However, I gave NetBeans IDE 5 a shot. My expectations were very low. I expected a configuration and plugin-installation party and an overly complicated IDE. The opposite was true. NetBeans IDE 5 was not only trivial to install; it was production-ready after a double-click.
The installation also contained the GlassFish application server, which I already used in my projects.
Nevertheless, I kept being skeptical about the integration and potential Sun-proprietary extensions. None of my prejudices turned out to be true, however. NetBeans output was IDE-agnostic, GlassFish integration was tight, though not proprietary. It was really hard to criticize anything. At the same time, I was having similar positive experiences with the GlassFish application server and so I tried to explain the miracle to myself as “The New Sun Microsystems Wave of Quality.” I have stuck with NetBeans IDE from version 5 and have never regretted the choice. Now I’m even frequently using NetBeans development builds in production and they are surprisingly stable.
What was also interesting was that there were no migration steps between the 35 Eclipse workspaces and NetBeans. I just opened the projects in NetBeans and seamlessly proceeded with my work. Back then, my projects were 50% Ant and 50% Maven, and both project types were immediately recognized by NetBeans without any additional configuration. Nowadays, I’m exclusively using Maven with NetBeans and I am still amazed by the nice integration.
However, NetBeans is mature, but not boring — the out-of-the-box Nashorn, JavaScript, and HTML 5 support in the recent NetBeans IDE 8 releases are very useful in my daily work. I use NetBeans daily as a capable editor for writing Nashorn automation scripts, for doing docker development, for exploring files, for editing HTML documents, for monitoring Jenkins, for debugging JavaScript, as well as for Java profiling and memory leak hunting.
Introduction
From this book you will gain structured insights into the key features that NetBeans IDE makes available, all for free. Starting from installation and your first “hello world” application in Java, you will travel through every key feature of the IDE, whether you are just beginning to learn Java or want to be productive in Java enterprise environments.
If there is one area on which this book particularly focuses, it is the Java Editor. More pages and screenshots are dedicated to this topic than to any other. The reason for this is quite simple. Writing Java code, quickly and efficiently, is what the IDE is all about. All the other features, while powerful, are secondary. Programming is all about your fingers being on the keyboard and your keyboard being a whirl of click-clacking while you input Java code into the editor. The editor is bursting with features to help you focus on your business logic. It has a host of functionality that has been developed with the single purpose of letting you write robust and useful applications that meet your business needs, including your users’ many and diverging expectations. The better you become familiar with the treasures of the Java Editor in the IDE, the better equipped you will be to pass your exams at educational institutions and complete your sprints on time in the enterprise!
While the focus of the book is to equip you with everything you need to program Java applications effectively, you should be aware that the Java language itself is out of scope of this book. To learn about Java objects, methods, and the myriad of other Java syntax elements, many other books are available that will get you up and running quickly. In contrast to those books, this book is specifically focused on the IDE itself and aims to help you to get everything you can out of it. By the end of the book, you’ll have a thorough overview of the IDE and its tools and you’ll be a lot more productive than you might have hoped!
experience. A simple click-through installation procedure provides all the tools you need,
with a friendly and intuitive user interface to develop all kinds of Java applications.
Installing and Setting Up
In this chapter, I introduce you to NetBeans IDE, after which I provide you with the information needed to get the IDE up and running. You’ll see that the process is simple and soon you’ll be able to work through a basic scenario, as described in Chapter 2, which guides you through the workflow of programming in Java with the IDE.
What Is NetBeans IDE?
The IDE is a 100% free and open source development environment that helps you create different kinds of software applications. In the context of this book, we will focus specifically on the IDE as an environment for developing Java applications. The IDE provides support for all types of Java applications, helping you develop projects that use all the Java technologies—Java SE, Java EE, Embedded, and Cloud.
The IDE is modular and can be extended via plugins. The features included in the download bundles that you will be introduced to in this chapter are extensive enough that you will not need to use any plugins, at least not initially.
Java is the language in which the IDE is written. It can run on operating systems on which the Java
Development Kit (JDK) has been installed. Installers that guide you through the process of installing and setting up the IDE are available for Windows, Linux, and Mac OSX. The IDE can also be downloaded as a ZIP or TAR file, which can be useful if you want to use the IDE on an operating system for which no installer is provided.
For the purposes of this book, the IDE exists to simplify the development process of Java applications. Without the IDE, the edit-compile-debug cycle inherent in Java development is cumbersome and error prone. To overcome and help in the development process, the IDE integrates tools for these activities. Specifically, the IDE does the following:
• Notifies you of problems in your code and highlights them in the Java Editor.
• Assists you in coding quickly and efficiently using the editor’s features such as code templates, code completion, and hints in the Java Editor.
• Shows documentation for classes and methods while you type in the Java Editor.
• Includes visual navigation assistance, including the Navigator and editor features such as code folding, together with many keyboard shortcuts to speed up coding.
• Provides hyperlinks in the Output window to let you jump from compilation errors to lines in the Java Editor where the related problematic code is found.
• Comes with a debugger and profiler that work together to help you identify problems in your code quickly and easily. As your code runs, you can step through it and set breakpoints, instead of needing to add print statements. The profiler lets you identify bottlenecks in your code, such as areas causing performance problems and deadlocks.
• Lets you integrate your development workflow into a single environment, including checking your code into and out of version control systems, such as Git, Mercurial, and Subversion.
Advantages of the IDE
Just like other development environments, the IDE consists of a set of editors and graphical tools for efficiently coding and quickly detecting problems. The IDE guides you from the point of project creation, through the editing process, to compilation, debugging, and the packaging of your applications.
While using the IDE, you can use its free and cutting-edge set of tools and features, without the disadvantages that you might associate with moving your code to a single integrated development environment. For example, the IDE is unique in that the project architectures and build structures it supports, based on Maven, Gradle, or Ant, are also based on open standards. Other IDEs enforce IDE-specific structures and processes on you, with proprietary metadata and other files, so that you need to change your application architecture when you want to run it outside the other IDEs. With NetBeans IDE, you can be sure that the work you do compiles and runs outside the IDE exactly as it does within it. This is especially convenient when you are using continuous build servers such as Hudson or Jenkins, as well as when you are using Maven as your build tool.
The IDE is consistently aligned with and even ahead of the curve in providing support for new and evolving software standards. When you are working with Java, you can be sure that the latest specifications and techniques are supported by the IDE and that all the assistance you get from it is based on the most recent standards. For example, the latest language features—in particular those that relate to lambdas and functional operations that have been introduced in Java SE 8—are supported in the IDE’s Java Editor by means of refactoring tools, batch analyzers, Java hints, and syntax coloring.
New users of the IDE tend to be surprised by the array of features that are available “out of the box,” that is, without requiring you to install any additional plugins. The IDE has a full-featured Java EE platform development environment built-in, again, out of the box. The editor, debugger, profiler, and project support available for Java SE applications are also available, without any setup or configuration, for Java EE development.
Downloading the IDE
You can download the IDE from the NetBeans.org web site:
http://www.netbeans.org/downloads/index.html
You can also download it, together with the JDK, from the Oracle.com web site:
It’s best to use the latest available version of the JDK and IDE. At the time of this writing, the latest version of the IDE is NetBeans IDE 8.1. NetBeans IDE 8.1 is used throughout this book, and the assumption is that you are using NetBeans IDE 8.1 while working through this book.
Figure 1-1 shows the download bundles available on NetBeans.org.
Figure 1-1. NetBeans IDE download bundles
■
Note
For Java development, that is, if you want to use the Java SE, Java EE, or All distributions, having
the IDE and only the Java Runtime Environment (JRE) installed on your system is not sufficient for running the
IDE. You need to have the JDK, that is, the Java Development Kit, which includes the JRE. The IDE relies on
development tools provided by the JDK, such as the
javaccompiler, and takes advantage of other parts of that
download, such as JDK sources that it includes. Go here to download the latest version of the JDK:
http://www.oracle.com/technetwork/java/javase/downloads
Installing the IDE
Once you have downloaded the IDE, installing it is simple. Start by making sure that you have a suitable version of the JDK installed on your system, which must be JDK 7 or higher. Open a command prompt and run the following:
Table 1-1. NetBeans IDE Download Bundles
Download Bundle
Features
Java SE Provides features for creating Java desktop applications, with tools for JavaFX and Swing for the user interface, including a Java Editor, Java debugger, and Java profiler.
Java EE Provides the same features as the Java SE distribution, together with tools for working with the Java EE platform such as for Java servlets, Java Server Faces, Java Persistence API, Enterprise Java Beans, Java RESTful Web Services, and code generators for working with frameworks such as PrimeFaces. Includes tools for registering and deploying to GlassFish and Tomcat, as well as managing applications deployed to these servers.
C/C++ Provides features for developing C and C++ applications, including project templates, editors, code generators, debugger, and make file wizard for configuration management.
HTML5/JavaScript and PHP
Provides features for HTML5 web applications, with editors, templates, and code generators for HTML5, JavaScript, and CSS3, as well as for creating hybrid mobile applications with Cordova for deployment to iOS and Android. Includes a JavaScript debugger, tools for SASS and LESS, and JavaScript framework support, such as for Knockout.js and AngularJS. The PHP features include editors, code templates, code generators, and a debugger, as well as integration with MYSQL and other database servers.
You should see output comparable to the following:
java version "1.8.0_40-ea"
Java(TM) SE Runtime Environment (build 1.8.0_40-ea-b23)
Java HotSpot(TM) 64-Bit Server VM (build 25.40-b25, mixed mode)
You can see that JDK 8 Update 40 is installed. If the command is not recognized, go to http://www.oracle.com/technetwork/java/javase/downloads, download the latest version of the JDK and install it.
Once the JDK is installed, you can begin installing the IDE. On Windows, double-click the installer of the IDE, which you downloaded in the previous section. On Mac OSX or Linux, launch the installer from the command prompt. Step through the installer wizard, as described next.
1. Figure 1-2 shows the first screen in the wizard that you use to install the IDE. As you can see, together with the IDE, you can install the GlassFish server and the Apache Tomcat server. GlassFish is useful if you want to work with Java EE, while Apache Tomcat is focused on Java web applications, which do not make full use of the Java EE platform. For the purposes of this book, you should install the GlassFish server so that you can use the IDE tools that relate to the Java EE platform.
Figure 1-3 shows the licensing terms that you need to agree to when using the IDE.
2. In Figure 1-4 you can see that you need to specify the location where the IDE will be installed, together with the JDK that will be used to start it. If you need to change the JDK used to start the NetBeans IDE after you have installed it, you can use the netbeans.conf file, which is in the installation directory’s etc folder, to point to a different JDK.
Figure 1-5. Summary
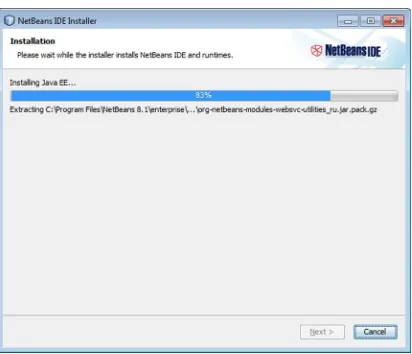
Once you have gone through these steps, the IDE begins the installation process, as shown in Figure 1-6.
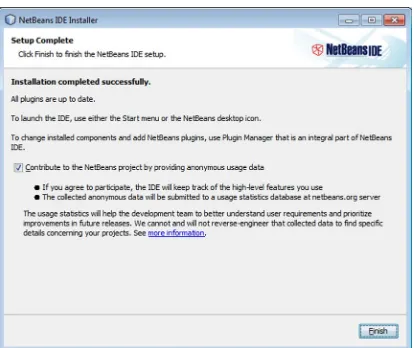
As shown in Figure 1-7, the installer informs you when the installation process is complete. You can help the IDE engineers improve the IDE by letting the IDE periodically and automatically submit anonymous data of your usage of the IDE.
That’s all you need to do, NetBeans IDE is now installed, as you can see in Figure 1-8. As you can see, the installer guides you through selecting a JDK on your system to run the IDE and, on Windows, can create desktop icons and Start menu items to launch the IDE from.
Figure 1-8.
Using Mac OSX
Although the IDE runs on Windows, Linux, and Mac OSX, it is important to be aware of the differences in terms of how you will work with the IDE. To be consistent, and to not clutter the book with operating system-specific differences, all images and descriptions assume that you are using Windows. On Linux distributions, the IDE behaves identically to Windows, although, of course, the IDE itself looks quite different. On Mac OSX the IDE not only looks different, it also behaves differently in certain specific ways. It’s important to be aware of these differences, to avoid a lot of frustration, not only in this book, but when using the IDE itself.
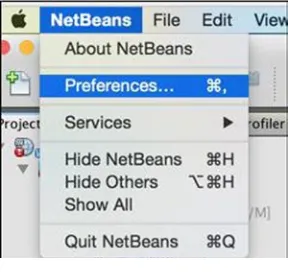
Most importantly, whenever the book tells you to open the Options window by going to
Tools ➤ Options in the menu bar in the IDE, if you are using Mac OSX, you should instead go to NetBeans ➤
The keyboard shortcuts used throughout the book also need a slight adjustment to work with Mac OSX. In general, whenever you see a keyboard shortcut that uses the Ctrl key, you should use the Cmd key on Mac OSX instead. For example, on Windows and Linux you use Ctrl+C to copy characters to the keyboard, while on Mac OSX you use Cmd+C instead. For full details and more examples, see the following URL:
https://netbeans.org/kb/articles/mac.html.
Now that you have downloaded and installed the IDE and you are aware of the differences in relation to Mac OSX, you are ready to create your first “hello world” application, which will be the focus of the next chapter.
on-hand when you need it. NetBeans works out of the box, no further assembly is required,
and it’s really intuitive to use. New users are productive right from the start.
Getting Started
In this chapter, you’ll work through a simple “Hello World” example in Java using NetBeans IDE. After that, I’ll show you the example projects that the IDE provides to help you get started with a variety of technologies. The chapter rounds off with an exploration of the IDE’s main windows. It’s a good idea to spend some time familiarizing yourself with the key components of the workspace that the IDE provides.
Hello World
To help you make the IDE come alive, this section provides a quick run-through of setting up, compiling, and running a “Hello World” project.
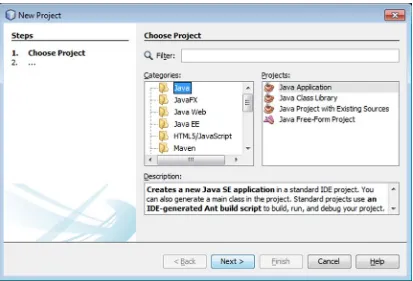
1. To set up the project, start by choosing File ➤ New Project. The New Project window opens, as shown in Figure 2-2.
Figure 2-2. The New Project window
2. In the New Project window, expand the Java node, select Java Application, and click Next. The Java Application template sets up a basic project and includes a main class.
4. In the Create Main Class field, change helloworld.HelloWorld to
com.mydomain.myproject.HelloWorld. When you enter a fully-qualified class name in this field, the IDE will generate directories for each level of the package structure when you complete this process. Click Finish.
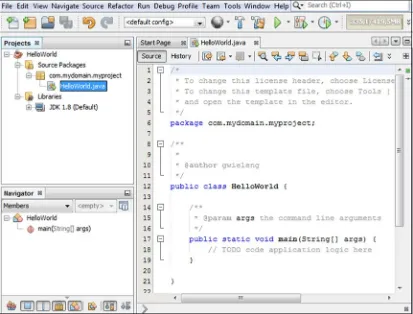
The IDE creates a new Java project for you, as shown in Figure 2-4.
Figure 2-3. Setting the name and location in the New Project window
Figure 2-5. Windows populated when Java project is created
The windows that you see in Figure 2-5 are described next.
• The Projects window is in the top-left side of the workspace. It provides access to your sources, any tests you might have, and your classpath. You can display multiple projects in the Projects window.
• The Navigator is in the bottom-left portion of the workspace. It provides an easy way for you to view and access members of the currently selected class.
• The Source Editor covers the main area of the workspace. It provides tabs for multiple documents, such as Java files. A tab for the HellowWorld.java class automatically opens.
Let’s now modify, build, and run the project.
1. In the Source Editor, click within the main method at the end of the line that reads // TODO code application logic here. Press the Enter key and then type the following statement.
System.out.println("Hello World!");
2. Press Ctrl+S to save the file.
3. Press F11 (or choose Build ➤ Build Main Project) to compile and package the application. This command triggers a script that the IDE has generated and maintains for the project. The Output window opens and displays the output from the script as it runs through its targets, as shown in Figure 2-6.
Figure 2-6. Output window
4. Press F6 (or choose Run ➤ Run Main Project) to run the project. The Output window should display the "Hello World!" message from your application, as shown in Figure 2-7.
Trying Out the IDE with Sample Code
If you want to check out the features of the IDE on working code without touching your existing files or you just want to see what a working project looks like in the IDE, you can open one or more of the IDE's sample projects.
When you create a sample project, the sample code is copied into a directory of your choosing and all necessary project metadata is generated.
1. To create a sample project, choose File ➤ New Project. In the New Project window, expand the Samples folder and choose a template from one of the categories, as shown in Figure 2-8. Then click Next.
Figure 2-8. Samples in the New Project window
Exploring the IDE
You’ll now orientate yourself by taking a tour through all the windows that comprise the IDE. There are so many windows that it’s not possible to capture them in a single image. Many of them are shown in Figure 2-9. In subsequent sections, I’ll go through each of the windows in turn.
Figure 2-9. Most windows open in the IDE
The windows in the IDE can be grouped into five categories, depending on the view they provide.
• Project views
• File views
• Hierarchy views
• Service views
Project Views
The Projects window (Ctrl+1) is the main entry point to your project sources. It shows a logical view of the important project content; that is, it shows you the files you are most likely to want to work with, organized in folders that you are likely to easily understand.
Together with the Projects window, the IDE provides the Files window (Ctrl+2), both of which are shown in Figure 2-10, so that you can see all the files that belong to a project. For example, whenever a project is built, that is, its files are compiled, a new “build” folder is created (for Ant-based projects) or a new ”target” folder is created (for Maven-based projects), although it is only shown in the Files window, because you are unlikely to want to work with files that are going to be regenerated. In general, the Projects window shows only those files that are not going to be overwritten by actions performed on the project or its files.
A third project view is provided by the Favorites window (Ctrl+3). The Favorites window gives you access to all the folders and files on disk. It is equivalent to a file browser, built into the IDE. In the Favorites window, you can add arbitrary folders and files that you find on your disk so that you can easily access and browse folders and files within the IDE that are of particular interest to you. By default, the user directory is added to this window, although you can remove it, add other folders and files, or do combinations of these.
File Views
The Navigator window (Ctrl+7), shown in Figure 2-11, provides a compact view of the currently selected file and simplifies navigation between different parts of the file.
Figure 2-11. Navigator window
The Hierarchy window integrates with the Navigator window and the Javadoc window, so that you can easily see the elements of the selected item, as well as its Javadoc.
Service Views
The Services window (Ctrl+5), shown in Figure 2-13, gives you access to many ancillary resources, such as databases, servers, web services, and issue trackers.
Figure 2-12. Hierarchy window
You can start and stop databases and servers directly in the IDE. When working with databases, you can add, remove, and modify your data in the IDE. When you deploy an application to a server, you can manage your deployed resources because they are displayed in the Servers node. You can connect to a bug database, such as Issuezilla or Bugzilla, and list issue reports for your project right in the IDE.
Supporting Views
The windows available to support the project views, file views, and service views are the Output window, Properties window, Action Items window, Tasks window, and Notifications window.
Output Window
The Output window (Ctrl+4), shown in Figures 2-6 and 2-7, is a multi-tabbed window that displays processing messages from the IDE. It is displayed automatically when you encounter compilation errors, debug your program, and generate Javadoc documentation. You can configure the display options for the Output window in the Options window.
If the file that contains the error is open, the Source Editor jumps to the line containing each error as you move the insertion point into the error in the Source Editor. You can also use the F12 and Shift+F12 keyboard shortcuts to move to the next and previous error in the file.
When you run a program that requires user input, a new tab appears in the Output window. This tab includes a cursor. You can enter information in the Output window as you would on a command line.
Properties Window
Depending on the currently selected item, you can edit the values of some properties in the Properties window. To change a property value, click the property’s value field. The appearance of the field changes depending on the type of value required.
Action Items Window
The Action Items window (Ctrl+6), shown in Figure 2-15, displays a unified list of problems that you need to resolve in your various files and projects.
You can use filters to determine the entries that are displayed in the list and you can sort the list by clicking a column heading.
Tasks Window
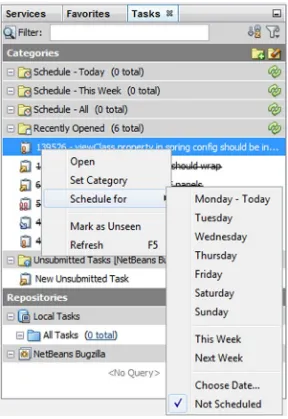
The Tasks window (Ctrl+Shift+6), shown in Figure 2-16, provides an organized overview of tasks that are recorded in a task repository, such as Bugzilla and JIRA.
Notifications Window
The Notifications window, shown in Figure 2-17, displays a list of the IDE messages, errors, and warnings that occurred in the current IDE session. You can select a notification in the list to view details about the notification in the right pane of the window.
provides suggestions and syntax auto-completion with a key press automagically.
This feature is so smooth it has replaced Internet searching for me.
Java Editor
NetBeans IDE provides a collection of interrelated tools to support Java application development. However, it is the Source Editor, in particular, where you will spend most of your time. Given that fact, a lot of attention has been focused on providing features and subtle touches in, and around, the Source Editor to help developers code faster and more efficiently. This chapter examines in detail the ways you can use the Source Editor to simplify and speed up common coding tasks, specifically for Java files.
Overview
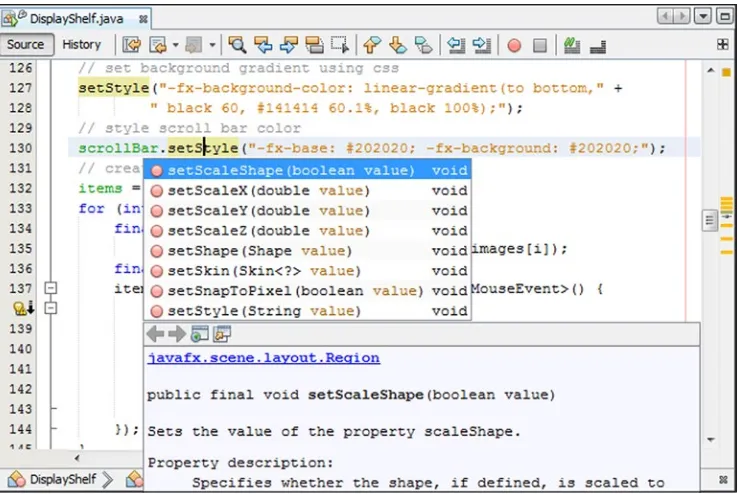
While you are writing, editing, and refactoring Java code, many editor features are available to you. For example, one of these is code completion, sometimes also known as “intellisense,” shown in Figure 3-1. Use it to learn about the context in which your cursor is located and to generate code or provide information applicable to that context.
Keyboard shortcuts for code generation features and for navigation through files in your application ensure that your hands rarely need to leave the keyboard.
Be aware that the Source Editor is a collection of different types of editors, each of which contains features specific to certain files. For example, when you open a Java file, which is the focus of this chapter, there is a syntax-highlighting scheme specifically for Java files, along with code completion, refactoring, and other features relevant to Java files. Likewise, when you open JSP, HTML, XML, and other types of files, you are exposed to a set of features applicable to those types of files.
Perhaps most importantly, the Source Editor is tightly integrated with other parts of the IDE, which greatly streamlines your workflow. For example, you can define breakpoints directly in the Source Editor and trace Java code as it executes. Similarly, when compilation errors are reported in the Output window, you can jump to the source of those errors by clicking the error or pressing F12.
Getting Started
This section helps you get comfortable with the layout and structure of the Source Editor. The most immediate tasks relating to getting started with the Source Editor are described here. Subsequent sections will go into details on specific features. Here, you learn about the most basic initial concerns users have, based on user questions on mailing lists and elsewhere, when they are new to the Source Editor.
Opening a File
Before starting to work with the Source Editor, you will typically want to have a NetBeans project set up. You can then open an existing Java file in the project or create a new Java file from a template. The next chapter goes through these tasks in detail, so they aren’t covered in detail here. Instead, you’ll go through the basic processes quickly, to get you to a point where you have a Java file in the Source Editor in preparation for the other sections in this chapter.
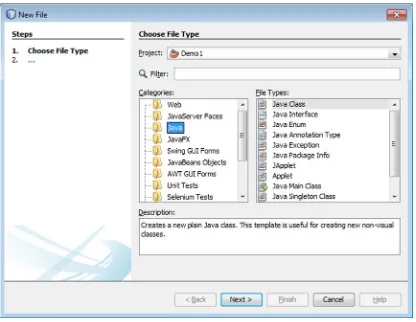
Once you have a project, you’ll want to create new files in it. To create a new Java file in a project, choose File ➤ New File, click the New File button in the File toolbar, or press Ctrl+N. The New File window appears, as shown in Figure 3-3, enabling you to create a new Java file.
Opening a File Without a Project
If you would like to code in Java without setting up a project, you can use File ➤ Open File to open a specific Java file on disk. Use File ➤ Open Recent File (Ctrl+Shift+T) to open the file that you have most recently closed since opening the IDE.
Alternatively, you can use the Favorites window (Ctrl+3), shown in Figure 3-4. The Favorites window enables you to make arbitrary folders and files on your system accessible to the IDE.
However, note that although the Favorites window can be useful if you just want to open and edit a few files quickly, it is not designed for full-scale Java application development, such as usage of the refactoring tools, for example.
To use the Favorites window to give you access to the Source Editor without needing to create a project, choose Favorites from the Window menu, or press Ctrl+3. This will open the Favorites window. Add the folder where you want the file to live (or where it already lives) by right-clicking in the Favorites window, choosing Add to Favorites, and choosing the folder from the file chooser. In the Favorites window, navigate
Reconfiguring the Source Editor
Now that you have one or more Java files open, it’s time to get comfortable! The first step is to set up the Source Editor the way you’d like it to be.
To begin with, you’ll be happy to know you can split the Source Editor to view multiple files
simultaneously or to view different parts of the same file, as shown in Figure 3-5. To split the Source Editor window to view multiple files, make sure at least two files are already open. Click a tab on one file, hold down the mouse button, and drag the tab to the far left, far right, or bottom of the Source Editor. Release the mouse button when the red outline that appeared around the tab when you started dragging changes to a rectangle. This indicates the placement of the split window.
You can view different parts of the same file simultaneously, as shown in Figure 3-6, using a variety of different tools in the IDE.
• Clone Document. Right-click the file’s tab in the Source Editor and choose Clone Document to create a second tab for the same document. If needed, drag and drop one of the tabs to create a split Source Editor area. See the previous procedure on dragging and dropping Source Editor tabs.
• Split Document. Right-click the file’s tab in the Source Editor and choose Split Document. Then choose Vertically or Horizontally, depending on how you want to split the document.
• Split Document Button. Drag the Split Document button, from the top right of each editor document, vertically or horizontally to split the editor according to your needs.
Next, let’s explore the actions you can take to make more space for your code.
• Double-click the file’s tab. When you do this, the file takes the entire space of the IDE except for the main menu and row of toolbars. You can make the other windows reappear as they were by double-clicking the tab again.
• Make other windows “sliding” windows. Make other windows sliding windows by right-clicking their tabs and choosing Minimize, which minimizes them. They will appear only when you click or mouse over a button representing that window on one of the edges of the IDE. You can return the window to its normal display by clicking the button in the sliding window.
• Hide the IDE’s toolbars. You can toggle the display of the main toolbars in the View menu, where you can choose Toolbars. Then, individually, you can choose the toolbars that you want to hide or display. You can toggle the display of the Source Editor’s toolbar in the View menu by choosing Show Editor Toolbar.
Changing Keyboard Shortcuts, Fonts, and Colors
You can change default keyboard shortcuts or map other available commands to shortcuts. If you are familiar with keyboard shortcuts defined in other IDEs, you can choose to use those instead of the defaults provided by NetBeans IDE.
Moreover, if you are comfortable with fonts and colors in other IDEs or editors, or for some reason you don’t like the default colors used in the editor or in the IDE as a whole, you can relatively easily switch to your preferred font and color combinations.
To modify keyboard shortcuts, choose Options from the Tools menu. When the Options window opens, click the Keymap panel. In the Actions list, navigate to an action that you want to change, click the ellipsis button, and click Edit. Type in the keyboard shortcut that you want to use and press Enter.
As shown in Figure 3-7, the IDE comes with keyboard shortcut profiles for Eclipse, IntelliJ IDEA, and Emacs, any of which you can select from the Profiles dropdown box in the Keymap panel. You can also create your own profiles.
To modify the fonts and colors of the Source Editor, choose Options from the Tools menu. When the Options window opens, click the Fonts & Colors panel, as shown in Figure 3-8. Choose a profile from the Profile dropdown box. If you want to fine-tune a profile, use the Category list to navigate to a class
For example, if you select Norway Today from the Profile dropdown without making any further changes, the editor will look as shown in Figure 3-9.
Go to the following URL to design and download your own themes: http://netbeansthemes.com. Nowadays, dark backgrounds are increasingly popular in development tools. You can switch to a dark background throughout the IDE by installing the Dark Look & Feel Themes plugin.
Figure 3-10. Dark Look and Feel Themes plugin
After installing the plugin and restarting the IDE, the IDE looks as shown in Figure 3-11.
However, the plugin provides two different dark themes. Moreover, various other themes are provided by default, defined by Swing “Look & Feel” implementations.
To switch between themes, choose Options from the Tools menu. When the Options window opens, click the Appearance panel, as shown in Figure 3-12. Use the Preferred Look and Feel dropdown to switch themes.
After switching themes to Dark Nimbus and restarting the IDE, it looks as shown in Figure 3-13.
Comparing Differences Between Two Files
You can generate a side-by-side comparison of two files with the differing lines highlighted.
To compare two files, right-click on the two files you want to compare. Choose Tools and then choose Diff, as shown in Figure 3-14.
The Diff window appears in the Source Editor, as shown in Figure 3-15.
In comparing the document, the colors in the Diff window show deleted lines (red), changed lines (blue), and added lines (green).
Note that the Diff item appears in the Tools menu only when two (and no more than two) files are selected in the Projects, Files, or Favorites window.
Typing
When you’re typing in the Source Editor, one of the first things that you will notice is that the closing characters are automatically inserted when you type the opening character. For example, if you type a quote mark, the closing quote mark is inserted at the end of the line. Likewise, parentheses(()), brackets ([]), and curly braces ({}) are completed for you.
While this might seem surprising at first, the feature was designed to not get in your way. If you type the closing character yourself, the automatically inserted character is overwritten. Also, you can end a line by typing a semicolon (;) to finish a statement. The semicolon is inserted at the end of the line after the automatically generated character or characters.
See the following subtopics for information on how to use the insertion of matching closing characters.
Finishing and Concatenating
When the Source Editor inserts matching characters at the end of the line, this would appear to force you to move the insertion point manually past the closing character before you can type the semicolon.
In fact, you can hold down the Ctrl key and type the semicolon without moving the insertion point, and it will be placed at the end of the line automatically. When you hold down the Shift key together with the Ctrl key, and you then type the semicolon without moving the insertion point, a new line is added after the semicolon.
For example, to get the line
ArrayList ls = new ArrayList();
you would only have to type
ArrayList ls = new ArrayList(;
If you have a long string that you want to split between two lines, the Source Editor adds the syntax for concatenating the string when you press Enter. For example, to get the lines
String s = "Though typing can seem tedious, reading long" + "and convoluted sentences can be even worse."
you could type
String s = "Though typing can seem tedious, reading long and convoluted sentences can be even worse.
The final three quote marks and the plus sign (+) are added for you.
If you want to break the line without creating the concatenation, press Shift+Enter.
Matching Other Words in a File
If you are typing a word that appears elsewhere in your file, you can use a keyboard shortcut to complete that word according to the first word found in the Source Editor that matches the characters you have typed. This word-match feature works for any text in the file. It also searches through files that you have been recently working in (in the order that you have last accessed the files). Press Ctrl+K to search backward from the cursor for a match. Press Ctrl+L to search forward from the cursor for a match.
For example, if you have defined the method refreshCustomerInfo on line 100 and now want to call that method from line 50, you can type ref and then press Ctrl+L. If there are no other words that start with ref between lines 50 and 100, the rest of the word refreshCustomerInfo will be filled in. If a different match is found, keep pressing Ctrl+L until the match that you want is filled in.
For typing variable names, you might find that the word match feature is preferable to code completion, since the IDE only has to search a few files for a text string, compared to the code completion feature, where the IDE searches the whole classpath.
Text Selection Shortcuts
Macros
You can record macros in the IDE to reduce what would normally involve a long set of keystrokes to one keyboard shortcut. In macros, you can combine the typing of characters in the Source Editor and the typing of other keyboard shortcuts.
To record a macro:
1. Put the insertion point in the part of a file in the Source Editor where you want to record the macro.
2. Click the Start Macro Recording button in the Source Editor’s toolbar to begin recording.
3. Record the macro using any sequence of keystrokes, whether it is typing characters or using keyboard shortcuts. Mouse movements and clicks (such as menu selections) are not recorded.
4. Click in the Source Editor’s toolbar to finish recording.
5. In the Macro field of the Recorded Macro window that appears, fine-tune the macro, if necessary.
6. Click Add to assign a keyboard shortcut to the macro. In the Add Keybinding window, press the keys that you want to use for the keyboard shortcut. (For example, if you want the shortcut Alt+Shift+Z, press the Alt, Shift, and Z keys.) If you press a wrong key, click the Clear button to start over.
Table 3-1. Text Selection Shortcuts
Shortcut
Description
Alt+Shift+J Selects the current identifier or other word that the insertion point is on.
Ctrl+Shift+[ Selects all the text between a set of parentheses, brackets, or curly braces. The insertion point must be resting immediately after either the opening or closing parenthesis/bracket/brace.
Alt+Shift+Period (Alt+Shift+Comma)
Selects the current code element. Upon subsequent pressings, incrementally increases (Alt+Shift+Period) or decreases
(Alt+Shift+Comma) the size of the selection to include surrounding code elements. For example, if you press Alt+Shift+Period once, the current word is selected. If you press it again, the rest of the expression might be selected. Pressing a third time might select the whole statement. Pressing a fourth time might select the whole method.
Shift+Right (Shift+Left) Selects the next (previous) character or extends the selection one character.
Ctrl+Shift+Right (Ctrl+Shift+Left) Selects the next (previous) word or extends the selection one word. Shift+Down (Shift+Up) Creates or extends the text selection one line down (up).
Shift+End (Shift+Home) Creates or extends the text selection to the end (beginning) of the line. Ctrl+Shift+End (Ctrl+Shift+Home) Creates or extends the text selection to the end (beginning) of the
document.
Be careful not to use a shortcut that is already assigned. If the shortcut you enter is an editor shortcut, a warning appears in the dialog box. However, if the key combination is a shortcut that applies outside of the Source Editor, you will not be warned.
You can assign a new shortcut in the Options window. Choose Tools ➤ Options, click the Editor panel, select the Macros tab, and then click the Set Shortcut button.
Code Snippets
The Source Editor has several features for reducing the keystrokes needed for typing code. And you can access many of these features without using the mouse, having to use menus, or remembering scores of keyboard shortcuts.
Arguably the most important mechanisms for generating code are the following:
• Ctrl+spacebar. This shortcut opens the code completion box, as shown in Figure 3-16. The code completion box contains a context-sensitive list of ways you can complete the statement you are currently typing and of other code snippets you might want to insert in your code.
• Multi-keystroke. Abbreviations for longer snippets of code called code templates. These abbreviations are expanded into the full code snippet after you press the spacebar, as shown in Figure 3-17.
• Alt+Insert. This shortcut opens a small popup, shown in Figure 3-18, from which code snippets can quickly be generated.
Figure 3-16. Code completion
• Alt+Enter. You can use this shortcut to display suggestions the IDE has regarding missing code and then have the IDE insert that code. The IDE notifies you that it has a suggestion by displaying a light bulb icon in the left margin of the line you are typing, as shown in Figure 3-19.
In addition to saving keystrokes and use of the mouse, these features assist in preventing typos and also help you find the right class and method names.
The following sections illustrate how to get the most out of these features when coding in Java.
Code Completion
When you are typing Java identifiers in the Source Editor, you can use the code completion feature to help you finish expressions. In addition, Javadoc documentation appears and displays documentation for the currently selected item in code completion.
A variety of types of code generation tools have been added to the code completion feature. Using code completion, you can do the following:
• Fill in names of classes and class members while reading the related Javadoc documentation, as shown in Figure 3-20.
Figure 3-19. Java hints
• Generate whole snippets of code from dynamic code templates, as shown in Figure 3-21.
• Generate getter and setter methods, as shown in Figure 3-22.
Figure 3-20. Code completion
• Generate skeletons for abstract methods of classes extended by and interfaces implemented by the current class and override inherited methods, as shown in Figure 3-23.
• Generate skeletons of anonymous inner classes, as shown in Figure 3-24.
Figure 3-23. Override inherited methods
Figure 3-24. Generate anonymous inner classes