Contents at a Glance
Contents ... iv
About the Author ... ix
About the Technical Reviewers ... x
Acknowledgments ... xi
Introduction ... xii
■
Chapter 1: UDK Overview ... 1
■
Chapter 2: UnrealScript Overview ... 29
■
Chapter 3: Player Controllers, Pawns, and Weapons ... 53
■
Chapter 4: UDK Collisions ... 83
■
Chapter 5: UDK Bots ... 137
■
Chapter 6: Environment: Sounds, Kismet, and HUD ... 175
■
Chapter 7: Sample Game and GamePlay ... 205
■
Chapter 8: 3D Math Review ... 227
■
Chapter 9: Physics Game Framework ... 261
■
Chapter 10: First-Person Shooter Game Framework ... 283
■
Chapter 11: Third-Person Shooter/Adventure Game Framework ... 319
■
Chapter 12: Top-Down Shooter/RPG Game Framework ... 351
Introduction
The release of the Unreal Development Kit is really the first time a powerful 3D commercial game engine has been available to the masses of ordinary people for free. The underlying technology has been used for numerous high-quality commercial triple-A games that you see in the retail stores in the United States and around the world. The UDK contains the Unreal Engine 3 3D graphics engine and related tools that would normally cost hundreds of thousands of dollars. The only limitation is that the C/C++ source code used to create the UDK is only available to those who pay the full license fee. Thus, you can not modify the UDK engine itself.
This book provides an introduction to using this technology, including the UnrealScript language, for creating 3D iOS games. I have used the technology extensively and used it to create a full commercial physics puzzle type game for iOS similar to the iOS game Angry Birds. It is a powerful tool that is excellent for iOS development. My intention here is to give others a quickstart guide for creating their own iOS games and share game frameworks I’ve developed that readers can use as the basis for their own work.
Who This Book Is For
This book is for people that want to use the Unreal Development Kit (UDK) to create 3D games for Apple’s iOS platform. This includes devices such as the iPhone, iPad, and iPod Touch. This book also is useful for people that want to develop games on the PC platform with the UDK since much of what is covered in this book would apply to creating a game for the PC as well.
This book assumes the reader has some experience with an object-oriented programming language like C++ or at least some programming experience in general. However, several basic game frameworks are presented in this book as a means to help those who are not professional programmers build their own game using the frameworks as a starting point.
It is also assumed that the reader has some basic knowledge of how to use an iOS device since the final game created using the UDK will be played on the actual iOS device.
General Layout of the Book
Before we cover the general layout of this book there are some key points that the reader should note. First, this book is not designed to cover every feature of the UDK since that would
The general format of this book is to discuss UDK topics and then demonstrate these topics in the form of a “Hands-On Example” in which we show you how to develop an UnrealScript program along with the creation of any levels that are needed. We take you, step by step, through these examples along with showing you how to set up any configuration files that are required.
We start with overviews of the UDK and UnrealScript, including a practical coding example. Then we work through key topics with hands on examples and culminating with a complete sample game. Some of these topics rely on 3D math concepts that are reviewed and
demonstrated in a separate chapter. Then, in the latter part of the book we present game frameworks which are actually small working games that you can modify and use to build your own custom games. Game frameworks include a physics game, a first-person shooter game, a third-person shooter/adventure game, and a top-down shooter/role playing game.
Other Resources
Epic Games provides a wealth of resources you can use to supplement what you learn in this book:
■ Epic’s UDK Mobile home page:
http://udn.epicgames.com/Three/MobileHome.html ■ Getting Started: Developing Mobile Projects:
http://udn.epicgames.com/Three/GettingStartediOSDevelopment.html ■ iOS Provisioning Overview:
http://udn.epicgames.com/Three/AppleiOSProvisioning.html ■ Distributing iOS Applications:
http://udn.epicgames.com/Three/DistributionAppleiOS.html ■ UnrealScript Language Reference:
Chapter
UDK Overview
This chapter covers the basic background information needed to get started with Unreal 3D games development for iOS and for the hands-on examples that follow in
subsequent chapters. To start, we take a quick tour of the Unreal Development Kit (UDK) and familiarize those new to Unreal with the development environment. We cover the Unreal Editor, which is where levels are built and assets within the UDK are imported and managed. Some examples of UDK assets are textures, materials, static meshes, skeletal meshes, and sound cues. These are all covered in this chapter. Finally, information specific to game development on the iOS platform using the UDK is also covered. Readers who already use Unreal might want to jump ahead to this section.
Getting Started
The first thing you need to do is go to the UDK’s website, located at http://udk.com, download the June 2011 Beta version of the UDK (approximately 1.5 GB) that is used in this book, and install it on your computer. The code examples in this book work
correctly with the version of the UDK presented in this book at the time of the writing. The UDK is currently still in the Beta phase and new versions of the UDK are being released about every month. After downloading the executable, run the program to install the UDK. At least Microsoft Net Framework 3.1 is required and will be installed on your system if not detected. You can also download UDK Remote at
http://itunes.apple.com/us/app/udk-remote, which helps with testing your iOS games.
Unreal Editor Overview
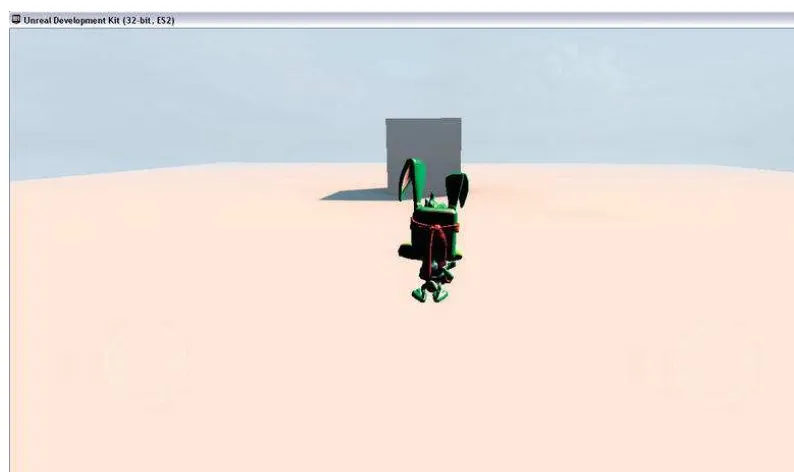
Once you have the UDK installed, go to the Start bar and navigate to where you installed the UDK and run the UDK Editor. Once the Unreal Editor is loaded, you should see something similar to Figure 1–1. The Editor is where you build your game levels, as well as manage and manipulate the game assets used in the level. You can run your game on the iOS mobile previewer from the Unreal Editor, as well as set the specific game type to be played.
Figure 1–1. UDK Startup Screen
Click the Close button inside the Welcome to UDK box to get started. On the right hand side there is a window with many different tabs.
The Generic Browser
I won’t go over all the buttons and toolbars in the Unreal Editor UI. We’ll discuss all that in context as we work through the book. It is important to take a look at the Generic Browser, however, especially the Content Browser, covered in detail later in this section, and the Actor Classes tab.
As you can see in Figure 1–1, there are six tabs:
Content Browser. The Content Browser tab is the main interface by which users import, select, and manipulate UDK assets. This tab is discussed in greater detail later in this chapter.
Actor Classes. The Actor Classes tab contains a list of the
Levels. The Levels tab manages the levels in your world that can consist of one level or many levels that are streamed.
Scene. The Scene tab displays objects in the current level in table form where you can click on the name of an object and bring up its properties in a side panel.
Layers. The Layers tab allows you to organize the actors in your level so you can view certain groups of actors and hide others.
Start Page. The Start Page tab contains internet content related to the UDK, such as documentation, news, community forums, etc.
Now let’s take a look at the Actor Classes tab in a bit more detail before moving on to the Content Browser.
Actor Classes Tab
The Actor Classes tab, shown in Figure 1–2, displays the Unreal Script classes currently available. This is where new classes you create appear after you integrate them into the UDK system, as well as classes that are part of the UDK code base.
The term Actor generally refers to an object created from the Actor class or an object created from a class derived from the Actor class. The Actor class is important, because it implements many items needed for gameplay, including code needed for:
Displaying an object Animating an object
Performing physics and world interaction Making sounds
Figure 1–2. Actor Classes Tab
There are three checkbox options in this tab:
Use ‘Actor’ as Parent. Check “Use Actor as Parent” to view only classes that use Actor as a base class. In other words, only classes built from the Actor class. If you uncheck this box, then all classes in the UDK system will be displayed. The class Object will be displayed as the root of the new tree, since Object is the base class of all other classes.
Placeable Classes Only. If you check the “Placeable Classes Only” checkbox, then only classes that you can place in a game level using the Unreal Editor will be displayed. If you uncheck this box, then both placeable and not placeable classes will be displayed.
Show Categories. Checking the “Show Categories” checkbox will group and display the classes in different categories like Physics and Navigation.
There is also a search function in which you can search the tree by class name. We use this tab and discuss its features in more detail later in the book.
The Content Browser and UDK Assets
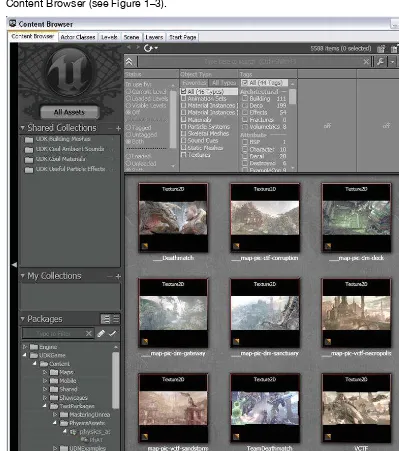
The Content Browser tab is the starting point for importing and manipulating game content in the UDK system. Game content can be sounds, textures, and 3d computer images used in your game. Click the Content Browser tab to change focus to the Content Browser (see Figure 1–3).
Importing New Content
You can import new content into the UDK system by clicking the Import button in the lower left hand corner of the Content Browser Tab and can preview that content in the section of the browser where you see the previous images. Clicking the Import button brings up a window in which you can navigate to where your asset is, select it, and then load it into the UDK system. Examples of assets that can be imported from outside the UDK and placed into the UDK system are:
Sound files in .wav format
Texture files in .bmp, .pcx, .png, and .tga formats
Static and Skeletal mesh files in .fbx format
Movies in .bik format
Shockwave movies in .swf and .gfx formats
Searching for UDK Assets
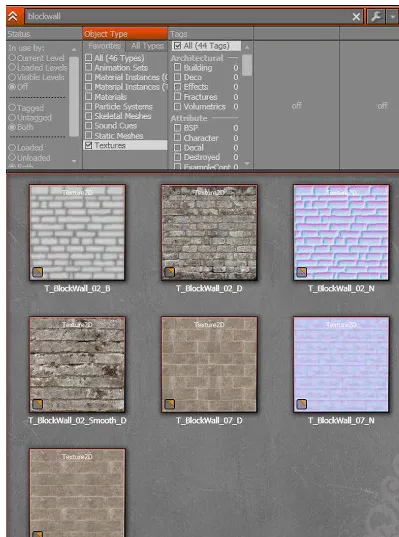
You can also filter the objects displayed by name, as well as type. In the upper right side of the Content Browser there is a search box in which you can type the game asset name to search for that is located next to a pair of arrows (see Figure 1–4). There is a section below that with the heading Object Type that contains two subsections named “Favorites” and “All Types.” Currently, all of the assets in the game, regardless of type, are displayed, since the “All” checkbox is checked.
Figure 1–4. Asset Search Filtering Section of the Content Browser
You can double click these texture assets, and a texture’s properties window will pop up, giving you more information about each texture asset. For example, click the texture called “T_BlockWall_02_D,” and the Texture Properties window shown in Figure 1–6 opens.
Figure 1–6. Texture Properties
UDK Texture Assets
Textures for iOS platforms need to be square. That is, the length in pixels must equal the width in pixels for the texture, such as 512x512 pixels. Textures are generally created outside the UDK system in a paint program like Adobe PhotoShop or PaintShop Pro and saved in a graphics file format, such as windows bitmap (.bmp), that the UDK system can understand and import in. Once inside the UDK system, textures can serve as the building blocks for UDK materials.
Figure 1–7. Materials Editor
UDK Material Assets
Figure 1–8. Setting Textures in the Material Editor
On the right hand side of the Mobile Base Texture property is a set of buttons. These buttons are also used in many other fields throughout the UDK:
Arrow. The arrow button allows you to select a texture in the content browser, and then click this icon to place the name of that texture here so it can be used as the Mobile Base Texture.
Magnifying Glass. The magnifying glass button allows you to find the object currently in the field by clicking the icon. When you do this, it should take you to the Content Browser and highlight the texture “T_BlockWall_02_D”.
Clear Screen. The clear screen button clears the Mobile Base Texture property field.
UDK Mesh Assets
A UDK material can be used to provide the surface covering for a mesh, either a static mesh or a skeletal mesh. A mesh is the actual 3d object consisting of a collection of vertices that can be placed in a game level. A skeletal mesh also includes moving parts, called bones, which are generally used to animate a 3d character. The material is what gives the surface of a mesh color and texture.
Now, let’s look at an example.
1. Go back to the Object Type Favorites subsection, check Static Meshes, and make sure to uncheck all the other boxes.
2. Type “Cube” into the search box to only display static meshes that have “Cube” as part of their name.
Figure 1–9. The Static Mesh Editor
4. You can rotate the cube by first selecting the left hand side of the Mesh Editor that contains the cube. Hold down the right mouse button and move the mouse around to rotate the cube.
5. Hold down the left mouse button and move the mouse back and forth to move the cube view back and forth. Static meshes are meshes without any moving parts.
Figure 1–10. Setting Materials in the Static Mesh Editor
7. As before, double click the material in the content browser to bring up this material in the Unreal Material Editor.
Now, let’s search for skeletal meshes in the UDK. Check the Skeletal Meshes box under the Object Type Favorites, making sure all the other checkboxes are unchecked. Type “Jazz” in the search box and change the Package to search in to UDKGame. You should see a skeletal mesh called “SK_Jazz” in the content browser. Double click this skeletal mesh to bring it up in the Unreal AnimSet Editor (see Figure 1–11).
Figure 1–11. The AnimSet Editor
Figure 1–12. Setting Materials in the AnimSet Editor
You can also use the magnifying glass button to find the current material in the Content Browser, as well as set a new material from the Content Browser using the Arrow button.
In summary, textures are created in paint programs outside the UDK system and are imported into the UDK system via the Content Browser. These textures can be used to create materials inside the Unreal Material Editor. These materials can then be applied to static meshes via the Static Mesh Editor and skeletal meshes via the AnimSet Editor. In addition to textures, materials, static meshes, and skeletal meshes, there are two other important game assets within the Content Browser, Particle Systems and Sound Cues.
UDK Particle System Assets
Particle Systems consist of an emitter and the particles that they emit. These are useful for such things as explosions and trails that projectiles leave when fired.
Let’s take a look at one.
1. In the Object Type subsection, select Particle Systems as your object type, making sure all the other options are unchecked.
2. Type “fire” as the search filter term, making sure the UDKGame package is highlighted in the Packages section of the Content Browser.
Figure 1–13. Unreal Cascade
Unreal Cascade has many options for creating your own custom emitters. Such things, including particle type, particle speed, and particle direction, can be customized. For now, let’s not get into the details, but just know that custom emitters can be easily created from within the UDK system.
UDK Sound Cue Assets
Now, let’s search for sound cues. Select Sound Cues as the Object Type you will search for by checking its box. You can double click a sound cue to hear it. You can also edit the sound cue in the Sound Cue Editor by right clicking the Sound Cue you want to edit and selecting the “Edit Using Sound Cue Editor” option (see Figure 1–14). This should bring up the Sound Cue Editor shown in Figure 1–15.
NOTE:You can also access the editor for other game assets like static meshes, materials, etc. by right clicking that asset and selecting “Edit Using EditorType”. The EditorType will depend on the
Figure 1–15. Sound Cue Editor
The Sound Cue Editor allows you to mix different sound samples into a single sound cue. For example, the sound editor has options for looping a sound and generating a random sound from a group of sounds.
IOS Specific UDK Information
There are certain differences to keep in mind when developing game for the iOS platform. The major differences involve saving data, preparing textures for an iOS device, and the types of player controls available to the user. We will return to the information discussed in this section later in the book and use it in the numerous hands-on examples.
Saving Data on an iOS Device
solve this problem is to use the basic save game object feature of the UDK. This method works on both the PC side and the iOS platform.
The idea of the basic save object is to put all the information you need to save into a class. Create a new object of this class and save the needed information into variables in this class object. You then save this object to a file. Once a file is created, then you can load this information back into this class variable.
Create a new class that will hold the variables you want to save to a file. For example, create a new file called PlayerInfo.uc and type the following into it.
class PlayerInfo extends Actor;
This declares a new class, called PlayerInfo, which is derived from Actor. Type in the following variables that will be the information saved to the new file.
var int PlayerLevel; var float PlayerAgility; var string PlayerName; var bool PlayerInfected;
Save this file and open the class file that needs to use this information. Declare a class reference variable that uses the PlayerInfo class.
var PlayerInfo PlayerRecord;
Next, create a new object of this class using the Spawn command and set PlayerRecord to point to it.
PlayerRecord = Spawn(class’PlayerInfo');
In the same file that you declared the PlayerRecord variable, add the following two functions that will be used to save and load the data in PlayerRecord to a file. The filename that it is saved in is PlayerData.bin.
function SavePlayerRecord() {
class'Engine'.static.BasicSaveObject(PlayerRecord, "PlayerData.bin", true, 1); }
function LoadPlayerRecord() {
class'Engine'.static.BasicLoadObject(PlayerRecord, “PlayerData.bin", true, 1); }
Textures on an iOS Device
Textures on the iOS platform must be square. The length of the texture must be equal to the width of the texture in pixels. For example, texture sizes of 512x512 and 1012x1012 are both square textures.
Player Input Controls on an iOS Device
the iOS device and are located in the Development\Src\GameFramework\Classes under your main UDK installation directory, which is by default UDK\UDK-2011–06. The easiest way to handle touch input is through setting and processing different input zones in your game through the MobileInputZone class. If you need a greater degree of control, then use the MobilePlayerInput class. However, for most uses,
MobileInputZones will be adequate. In each of the hands-on examples in this book, we guide you on how to configure the mobile input controls for that specific example. So don’t worry if you don’t understand everything in this section. We guide you on exactly how to set up your mobile input controls when the time comes.
Setting Up Virtual Joysticks
To use virtual joysticks, the first thing you need to do is configure the input zones for your virtual joysticks. To do this, open the Mobile-UDKGame.ini file located in the \UDK\UDK-2011–06\UDKGame\Config directory of your UDK installation using a plain text word processor like Windows Notepad.
Type the following in the file. This defines joystick input zones for the first hands-on example we cover at the end of Chapter 2. The first line indicates that this configuration will belong to Example1Game type game located in the Example1 directory. For each new game type that uses joysticks, you must create a similar set of configurations.
[Example1.Example1Game]
The following sets up a GroupName defined as an "UberGroup" and two input zones, called "UberStickMoveZone" and "UberStickLookZone".The order in which you define the zones is important, since input captured by the first zone in the list is not passed along to subsequent zones. This might be a problem if you have overlapping zones.
RequiredMobileInputConfigs=(GroupName="UberGroup",RequireZoneNames=("UberStickMoveZone", "UberStickLookZone"))
Next, we need to define the zones. The following line defines the block of configurations to follow as data for the UberStickMoveZone.
[UberStickMoveZone MobileInputZone]
Some of the more important configurations are subsequently discussed.
The InputKey defines the name of the inputkey to send to the input subsystem for input in the vertical direction. In this case, pushing this stick up or down will move the player forward or backward.
InputKey=MOBILE_Aforward
The HorizontalInputKey defines the name of the inputkey to send to the input subsystem for input in the horizontal direction. For this stick, this means that movements right or left will move the player right or left in a side to side manner suitable for strafing an enemy while facing it.
The Type indicates the kind of zone this is. This zone type is set to be a virtual joystick:
Next, you need to configure the Joystick for turning the player left and right and moving the view up and down. Add the following definition for the UberStickLookZone. For vertical movements, an inputkey of value MOBILE_AlookUp is sent to the input system, indicating that the player should look up or down. For the HorizontalInputKey that tracks horizontal movements, the MOBILE_Aturn value is sent to the input system, which indicates the player should turn left or right.
[UberStickLookZone MobileInputZone]
The virtual joysticks themselves should look like the transparent round circles shown in Figure 1–16.
Figure 1–16. Virtual Joysticks
Setting Up Touch Input
Now let’s add in touch input for things like swipes and taps. To do this, we need to add in some more configurations to the Mobile-UDKGame.ini file that we added our joystick configuration info in earlier. First, add in "UberLookZone" to the zone names in the RequiredMobileInputConfigs section. Make sure you put the new zone at the end of the zone list. This new zone will take up the entire screen. Remember that input goes sequentially from the first listed input zone to the last. If you list the UberLookZone first, then all input will be processed by that zone and none will get to the zones that follow. This would make the virtual sticks unusable.
[Example1.Example1Game]
RequiredMobileInputConfigs=(GroupName="UberGroup",RequireZoneNames=("UberStickMoveZone", "UberStickLookZone","UberLookZone"))
Next, add in the zone definition for the UberLookZone as follows. As with the joysticks, the InputKey refers to the up and down movements and the HorizontalInputKey refers to the left and right movements. Note that the Type is ZoneType_Trackball. Also note that the X and Y values are set to 0, which indicates the zone starts at the top left hand corner. The bRelativeSizeX and bRelativeSizeY values are set to true, and the SizeX and SizeY are set to 1, which means the size of the zone is full screen.
[UberLookZone MobileInputZone] InputKey=MouseY
HorizontalInputKey=MouseX TapInputKey=MOBILE_Fire Type=ZoneType_Trackball bRelativeSizeX=true bRelativeSizeY=true X=0
Y=0 SizeX=1.0 SizeY=1.0
VertMultiplier=-0.0007 HorizMultiplier=0.001 Acceleration=12.0 Smoothing=1.0
EscapeVelocityStrength=0.85 bIsInvisible=1
Once you setup the touch input zone, you will need to set up the callback function that will process the touch input for your zone. First, you need to create a new player controller that derives from SimplePC.
class Example1PC extends SimplePC;
In this new player controller, you need to create the callback function that has the same format as the subsequent SwipeZoneCallback in terms of parameters and a Boolean return value. The EventType is ZoneEvent_Touch when the user first touches the screen. As the user moves his or her finger across the screen, the EventTypes become ZoneEvent_Update to indicate these touches are an update to a touch still in progress. Finally, the ZoneEvent_UnTouch EventType that indicates that the user has lifted his or her finger off the screen is received and the current touch is finished.
Function bool SwipeZoneCallback(MobileInputZone Zone, float DeltaTime,
if(EventType == ZoneEvent_Update) {
} else
if (EventType == ZoneEvent_UnTouch) {
}
return retval; }
Next, you need to actually set the delegate OnProcessInputDelegate that controls touch input. Create a SetupZone function like the subsequent example that sets the touch input delegate to your custom callback function.
function SetupZones()
LocalPlayer(Player).ViewportClient.GetViewportSize(ViewportSize); if (FreeLookZone != none)
{
FreeLookZone.OnProcessInputDelegate = SwipeZoneCallback; }
Motion Input
For motion input, you need to use the delegate: delegate OnMobileMotion(PlayerInput PlayerInput, vector CurrentAttitude, vector CurrentRotationRate, vector CurrentGravity, vector CurrentAcceleration);
located in the MobilePlayerInput class. As before, you need to set up a callback function to handle the player input.
function MobileMotionCallback(PlayerInput PlayerInputMobile, vector CurrentAttitude, vector CurrentRotationRate, vector CurrentGravity, vector CurrentAcceleration) {
// Code to handle Motion Input }
Next, you need to set the delegate to point to your custom callback function. Depending on your iOS device, some motion input values will be unavailable or unreliable. For example, yaw measurement, acceleration, and gravity are only valid if the iOS device has a gyroscope.
MPI.OnMobileMotion = MobileMotionCallback;
PC to iOS Setup
In this section, we will give you a quick rundown of how to set up your completed UDK game to run on an iOS device. In addition to the overview in this section, you should reference the extensive resources provided by Epic Games which are listed in the “Other Resources” section in this book’s Introduction.
iOS Requirements
Games developed using the UDK can run on the following types of iOS devices: iPhone 4
iPhone 4s iPhone 3GS iPad iPad2
iPod touch 4th generation
These devices must be running iOS 3.2 or later.
Apple Developer’s License
In order to run games on an actual iOS device, you need to register as an Apple developer. Apple charges $99 per year for this. You can register at the following URL: http://developer.apple.com/programs/ios/
Participating in the Apple Developer program also entitles you to a variety of resources and enables you to distribute applications via the App Store.
Provisioning
Provisioning refers to the generations of keys, certificates, and mobile profiles needed to run a UDK game on an actual iOS device. We won’t go into detail about provisioning here, but Epic Games provides detailed instructions at the following site:
http://udn.epicgames.com/Three/AppleiOSProvisioningSetup.html
Running the UDK Game on the iOS Device
In order to play a game developed in the UDK on an actual iOS device, you need to package the game and then deploy it to the iOS device. After obtaining an Apple developer’s license and doing the required provisioning, follow these steps to run your game on an iOS device.
NOTE:This is the process for running default UDK game types. If you create a game with a custom type, as we’ll do in this book, see the following section for some additional preparatory
steps.
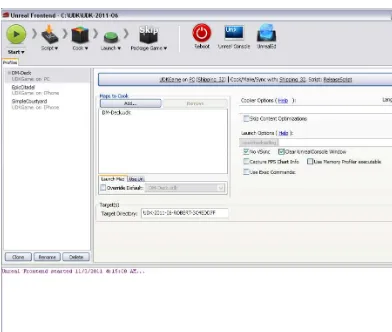
1. Connect your iOS device to your PC that is running the UDK.
Figure 1–17. Unreal Frontend
3. Change the deployment platform setup from the default PC platform to the iOS platform. To do this, first press the Configuration button shown in Figure 1–18. This brings up a window shown in Figure 1–19.
Figure 1–18. The Configuration button
4. Change the settings to those shown in Figure 1–20.
Figure 1–20. The iOS Deployment Setup
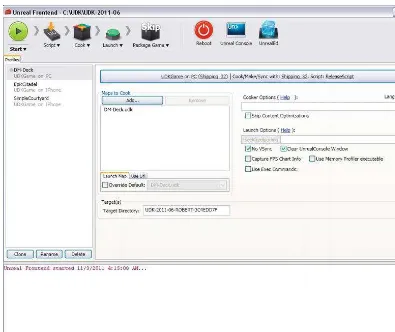
5. Click the OK button. The Mobile section should become visible below the Configuration button.
6. In the Mobile section, change the Packaging Mode to Default as shown in Figure 1–21.
Figure 1–21. Packaging Mode
7. Next you need to add the UDK level maps that you want to cook and place in the package that you deploy to your iOS device. Figure 1–22 shows the Maps to Cook section.
Figure 1–22. Adding Maps to Cook
Figure 1–23. Selecting Maps
9. Select the UDK level map or maps that you want to include, and then click Add Selected Maps to add the map(s). The added map(s) should show up as in Figure 1–24.
10. Make sure that Override Default is checked. Then, from the drop-down box, select the map that you want to bring up by default when the game is first started.
11. The final thing to do is to make sure the entire build pipeline is active (which means that none of the pictures representing the Script, Cook, Package and Deploy processes have “Skip” written over them) and then click on the Start button (see Figure 1–25). If one of the processes is disabled, you can enable it by clicking on it and selecting Step Enabled from the drop-down box.
Figure 1–25. Starting the Deployment Pipeline from Frontend
This will compile, cook, package, and deploy your game to the iOS device where you can run it like any other iOS application. At this point the icon representing your UDK game should appear on your iOS device ready to run.
NOTE: Epic Games provides more information on cooking content at
http://udn.epicgames.com/Three/ContentCooking.html
Configuring Custom Game Types
In the hands-on examples in this book, we will first create, compile, and then run the UnrealScript program in the Mobile Previewer. You will also create the level in the Unreal Editor that uses this script. After making sure that the example works on the Mobile Previewer, you are ready to follow the steps in the preceding section to deploy it to an actual iOS device. Since we use custom game types in our examples, however, you will need to perform a few additional steps before completing the steps from the preceding section.
TIP: In terms of compiling your script, it does not matter if the Frontend is set for iOS or PC deployment. You can have your Frontend set for the PC and still compile and run your
UnrealScript program in the Mobile Previewer.
First, you need to set the game type that will be played in the deployed version of the example. In order to do this, you need to change the Mobile-UDKGame.ini and the DefaultGame.ini configuration files located in
and set the specific default game that is used in the hands-on example. (If you are using a different version of the UDK your default directory will be different.) For example, change the DefaultGame and DefaultServerGame configurations to the following to play the game type for the hands-on example in Chapter 2:
[Engine.GameInfo]
DefaultGame=ExampleCh2.ExampleCh2Game DefaultServerGame=ExampleCh2.ExampleCh2Game
Next, we need to add the package that contains the code for this new game type to the list of packages that are cooked and deployed to the iOS device.
In the UDKEngine.ini configuration file add the following entries under the existing headings:
[Engine.PackagesToAlwaysCook] Package=ExampleCh2
[Engine.StartupPackages] Package=ExampleCh2
Next, in the DefaultEngine.ini configuration file, add the following entries under the existing headings:
[Engine.PackagesToAlwaysCook] +Package=ExampleCh2
[Engine.StartupPackages] +Package=ExampleCh2
Now you are ready to perform the steps from the preceding section.
NOTE: Be sure to return to this chapter when you are ready to deploy any of the examples from this book to your iOS device, and complete the steps in this section and then those from the preceding section.
Summary
Chapter
UnrealScript Overview
In this chapter we will cover the UnrealScript programming language that is used to develop games for the UDK. We will cover key information concerning the UnrealScript programming language as well as Kismet which is the graphical version of that
language. Such topics as data types, functions, classes, and operators are briefly discussed to give you a quick working understanding of the UnrealScript language. You will also learn how to create and compile your UnrealScript using the Unreal Frontend. There are also many hands-on examples that apply UnrealScript throughout the book and an appendix with additional UnrealScript language information. If you are already familiar with UnrealScript feel free to skip over the language review in this chapter directly to the Hands-on Example at the end of this chapter.
Finally, we’ll work through a hands-on example in which you’ll create your first iOS objects that you can select and receive information about using the UDK Mobile Previewer.
Kismet or UnrealScript?
Kismet is a more limited and less flexible graphical version of UnrealScript. There may also be memory and performance issues with using Kismet on older iOS devices. At least one poster on the iOS development forum on the official UDK message board complained that older iOS devices would only run his game if most of the Kismet was stripped out. The game would crash otherwise. He concluded that either it was a memory issue related to Kismet or a performance issue where a Kismet sequence was causing the game to crash. In the end he decided to only release his game for newer iOS devices and was looking for an UnrealScript programmer to convert all of his Kismet code to UnrealScript.
Kismet is more limited than UnrealScript in that it:
Does not allow direct access to the UDK’s base code with direct access to classes such as Object, Actor and so on.
Does not allow the creation of certain variable types such as structures.
Does not allow the creation of new classes that are derived from the UDK’s base classes.
Does not allow loading and saving Kismet sequences to separate files for merging together Kismet code from different programmers on a large project.
UnrealScript is able to do all of the above listed items.
However, for smaller games, demos, or prototypes that use little Kismet like the Jazz Jackrabbit game demo that ships with the UDK, Kismet can work well. Another area where Kismet works well is in simple level and location specific items like moving platforms, doors, gates including doors and gates that require the player to push a button to activate or unlock. Kismet will be discussed further in Chapter 6 as it relates to opening doors and locked gates.
To access the Kismet Editor first bring up the Unreal Editor. Once the editor is up and running, click the button that contains a “K” in it that is located in the Unreal Editor at the top middle portion in the first row of buttons (see Figure 2–1).
Figure 2–1. Unreal Kismet Editor button and Matinee button
Figure 2–2. Unreal Kismet Editor
Figure 2–3. Unreal Matinee
Kismet is good for rapid prototyping of small games or demos, and certain things like the control of gates and doors when used with Matinee. Kismet is very limited in its access to underlying UDK base code and lacks the ability to create new classes that are derived from UDK base classes as well as being unsuited for large projects with many different programmers and large amounts of code. UnrealScript is suitable for large and small projects and gives you the flexibility and expandability you want in your UDK game.
Overview of UnrealScript
Key features of UnrealScriptUnrealScript are:
Single inheritance—All class objects derive directly or indirectly from a single class, which is Object. Actor is a class that derives from Object. Most important game classes like Pawn and Controller are derived from Actor. Multiple inheritance is not supported
Support for States—An object can execute different code based on what current state it is in. UnrealScript basically implements a finite state machine as part of its built-in language features.
No crashes when accessing “None” references -
UnrealScriptUnrealScript handles accessing a None object reference (which is similar to NULL in C/C++) by logging the error should a crash occur. This alone saves much time in game development.
Automatic garbage collection—Objects that are not used (unreferenced) are eventually deleted by UnrealScript’s built-in garbage collector. This automatically regains memory that would otherwise be lost.
Latent Functions—These are functions that require game time to execute and must finish executing before returning. Some examples are Sleep() which allows the Actor to suspend all code execution for a certain amount of game time or game ticks before continuing and MoveTo() which moves the actor to a target destination. Latent
functions may only be called from within a State block and not within a function even if the function is located inside a State block.
UnrealScript objects execute script independently—Each object in the game is updated simultaneously. For example, a game object may be executing a latent function such as a MoveTo() command but another
object can access a function in this game object at the same time.
NOTE: UnrealScript is about 20 times slower than C/C++ in execution speed. So the key to creating an efficient UnrealScriptUnrealScript program is to only use UnrealScript to handle key events that you want to customize such as when two Actors collide with one another for example.
The Unreal Engine is basically a virtual machine. UnrealScript runs on this virtual machine and thus there is an extra layer of overhead required to convert UnrealScript code into code that is understood by the CPU processor running the Unreal Engine. This is one reason why UnrealScript is much slower than C/C++ which are compiled into machine language and optimized to run on a certain CPU such as Intel. The benefit of this is that UnrealScript is platform independent which means that you can take your UnrealScript code and create games on other platforms besides
UnrealScript is an object-oriented language similar to C++. This book assumes that you have a basic understanding of object-oriented programming (OOP).
NOTE: If you need a refresher or introduction to OOP with C++, a good reference book is Programming: Principles and Practice Using C++ by Bjarne Stroustrup (Addison-Wesley, 2008). Stroustrup is the original designer and implementer of the C++ programming language. Another good book on C++ is by Ray Lischner called Exploring C++: The Programmer's Introduction to C++ (Apress, 2008). For those newer to programming, an alternative would be Sams Teach Yourself C++ in 24 Hours by Jesse Liberty (Sams, 2011).
The following sections give you a brief working look into the UnrealScript language itself in terms of basic variables, functions, classes, and data types. Certain aspects of UnrealScript, such as its object-oriented nature and inheritance, will not be discussed in depth because you are expected to have knowledge of this already. It is not a complete reference to the UnrealScript language. We will also be going more deeply into the language as the book progresses.
NOTE: For a full official reference on UnrealScript please check out:
http://udn.epicgames.com/Three/UnrealScriptReference.html
UnrealScript Comments
There are two kinds of comments styles in UnrealScript: the single line comments starting with “//” and the multi-line comments enclosed by “/* */”.
//—Single line comments begin with double slashes. The following is an example of a single line comment:
// This is an example of a single line comment
/* */—Multi line comments begin with a slash followed by an asterisk and end with an asterisk followed by a slash. The following is an example of this multi-line comment:
/* This is an example of
a multi line
comment */
UnrealScript Variables
Scope Modifiers
All variables in UnrealScript must specify a scope which is either var or local.
var—The specifier var indicates this variable is global to the class it is declared in.
local—The specifier local indicates that this variable is declared within a function.
Variable Types
There are many different variable types in the UnrealScript language including types like int and float that hold numbers. Strings can hold characters. Boolean variables can hold the values true or false. An Object reference can hold a reference to a class object. Structures can comprise any of the above mentioned types.
int—The int type holds an integer value. The following declares a local function variable of type int.
local int dist2goal; // Declares a local variable of type int
float—The float type holds a floating point value. The following declares a local function variable of type float.
Local float MinimumForce; // Declares a local variable of type float
bool—The bool type holds a boolean value of true or false. The following declares a global class variable of type bool.
Var bool bdestroyed; // Declares a global boolean variable
string—The string type holds a group of characters. The following declares a local function variable of type string.
Local string Player1Name; // Declares a local variable of type string
enum—The enum type declares an enumerated type. The following declares and enumeration called eColors that can contain the values of Purple, Violet, or Red. The variable ColorGroup1 is declared as a variable of eColors type.
enum eColors
{ Purple, Violet, Red };
struct—The struct type declares a structure type that can hold any combination of the other variable types. The following declares a structure of called sPlayerInfo that contains two variables, one int variable called PlayerHeartRate and one bool variable called PlayerInfected. A variable called Player1Info is declared as a global class variable of type sPlayerInfo structure.
Struct sPlayerInfo
{
var int PlayerHeartRate; var bool PlayerInfected; };
var sPlayerInfo Player1Info; // Declares a global variable of type sPlayerInfo
Static Arrays—Static arrays can hold collections of objects. The length of this type of array is set at compile time and cannot be changed during program execution. Static arrays in UnrealScript are restricted to one dimension. Any variable type can be put into a static array except boolean. The following declares a global variable of type static array that holds 5 elements of objects references to an Actor. Var Actor SquadMembers[5];
Dynamic Arrays—Dynamic arrays can hold a collection of objects. The length of the array can change during script execution. Dynamic arrays have many functions that can manipulate items in the array. The following declares a dynamic array of type reference to an Actor. Var array<Actor> SquadMembers;
The following code adds a new member to the SquadMembers array assuming that TempBot is an object reference variable to an Actor.
var Actor TempBot;
SquadMembers.AddItem(TempBot);
The following code finds the number of members in the array or in this case the number of members in our squad.
numbersquadmembers = SquadMembers.length;
Object Reference – The object reference type holds a reference to an object of type Class Object. The following declares an object reference variable to an Actor called TempActor. A new object of class Actor is created by the Spawn command and assigned to the TempActor reference.
Var Actor TempActor;// Declares a global reference variable to an Actor TempActor = Spawn(class'Actor');
You can cast an object reference variable to a specific class to test if it refers to an object of that type. If it returns a None reference then it does not refer to an object of that class or any subclass of that class. If the returned result is not None then the returned reference will be to an object of the type of the cast. In the following code the variable TempActor is tested to see if it is of class Pawn though a cast. The result is put into the variable TempPawn. If the conversion was successful (holding a value besides None) then TempActor was indeed a Pawn or a subclass of Pawn. If the value in TempPawn is None then the object in TempActor is not a Pawn or a subclass of Pawn.
NOTE: For object reference variables like TempActor above you need to make sure to either assign a valid reference to TempActor before you use it or you need to create a new object using the Spawn function built into the base UDK code. Example: TempActor = Spawn(class'Actor');
Class Reference—A class reference variable holds a reference to a class. The format is in
class<BaseClass> VariableName;
The following code holds a reference to the player controller class used to spawn players. The PlayerControllerClass variable is then set to a custom player controller class that we will create later in this chapter.
var class<PlayerController> PlayerControllerClass;
PlayerControllerClass=class'ExampleCh2.ExampleCh2PC'
Operators
In order to perform mathematical calculations UnrealScript has the standard arithmetic operators available for you to use. UnrealScript also has many different conditional operators to test expressions for such things as equality, inequality, and so on. Each of the operators takes two expressions. Expressions can consist of a single variable or many variables and operators.
Artithmetic Operators
UnrealScript provides you with add, subtract, multiply, and divide operators that allow you to make math calculations. You can use parenthesis to group these operators together if needed.
+, - , * , /—The standard add, subtract, multiply and divide operators
Conditional Operators
Conditional operators return a value of true or false depending on what type of conditional operator is involved and the value that the expressions evaluate to.
Conditional operators are mostly used in combination with flow control statements such as if, while, and for.
(expression1) || (expression2)—Evaluates to true if expression1 or expression2 are true. False otherwise.
(expression1) && (expression2)—Evaluated to true if expression1 and expression2 are true. False otherwise.
(expression1) == (expression2)—Evaluates to true if expression1 is equal to expression2. False otherwise.
(expression1) != (expression2)—Evaluates to true if expression1 is not equal to expression2. False otherwise.
(expression1) > (expression2)—Evaluates to true if expression1 is greater than expression2. False otherwise.
(expression1) < (expression2)—Evaluates to true if expression1 is less than expression2. False otherwise.
(expression1) <= (expression2)—Evaluates to true if expression1 is less than or equal to expression2. False otherwise.
Code Execution Flow Control Statements
UnrealScript code, just like C/C++ code, executes sequentially one line after another. However, UnrealScript also has statements to control the execution of code so that it does not have to always execute sequentially.
If Statement—If expression1 evaluates to true then the code in Section 1 will execute. If expression1 evaluates to false then the expresion2 is evaluated and if it evaluates to true then Section 2 code is executed.
if (expression1)
{
// Section 1 Code }
else if (expression2) {
// Section 2 Code }
In the following example if PlayerHealth is less than 0 then the code within the braces is executed.
if (PlayerHealth < 0) {
// Execute code for Player’s Death }
While Statement—The code within the While block is executed as long as expression1 evaluates to true.
While (expression1)
{ }
In the following example the code block is executed if PlayerHealth is less than 20 and keeps executing as long as that condition evaluates to true.
While (PlayerHealth < 20) {
For Statement—The for statement is composed of three sections. The first section is the variable initialization section where the initial value of the counter variable is set and optionally declared. The second section contains the expression to be evaluated. This expression is evaluated at the beginning of the for loop and if it evaluates to true then the code block is executed. At the end of the code block the counter variable is incremented/decremented. The expression is tested again and if it evaluates to true then the code block is executed. This continues until the expression evaluates to false then the for loop is exited.
for (counter variable initialization; (expression1);
countervariable increment/decrement) {
}
In the following example, the for loop counter variable is initialized to 0. If i is less than 10 then the code block is executed. The counter variable is incremented by 1 at the end of the loop.
For (int i = 0; i < 10; i++) {
// Execute this block of code while i < 10, increase i by 1 after every loop }
Switch/Case Statement—The switch statement is a more elegant and organized alternative to the if then else statement. Instead of many else if statements with many braces you have a neat case break pair. The expression in the switch statement is evaluated. Execution will jump to the case break block that matches the value in the case statement or will jump to the default block if there are no matches. Switch (expression1)
{
In the following example, the value of ColorGroup1 is determined then that value is matched with the values Purple, Violet, or Red to
determine which case break block to jump to. Switch (ColorGroup1)
{
case Purple:
// Insert Code Here break;
// Insert Code Here
UnrealScript supports object oriented classes and class inheritance. In order to have one class derive from a parent class use the extends keyword. A class consists of the class heading which declares the classname followed by “the” extends keyword and the class it derives from. This is followed by the global class variables if any. Then the class functions are declared. UnrealScript classes can have many different options associated with them and these are discussed in a subsequent chapter later in this book.
The following code declares a new class of type Soldier that derives from the Actor class. Two global class variables are also declared. Each class must be put in a separate plain text file created with a program like Notepad and named after the class. This class’s filename would be Soldier.uc.
class Soldier extends Actor; var bool bIsSick;
var bool bHasOpenSores;
Functions
Functions in UnrealScript help you divide a big task into smaller more manageable pieces much like other programming languages like C and C++. UnrealScript functions have many different options and function specifiers. These will be discussed in detail in a subsequent chapter.
The following declares a basic function called TestSoldierInfected(). It takes an input parameter of type Soldier and returns a boolean value depending on weather this soldier is infected or not.
function bool TestSoldierInfected(Soldier TestActor ) {
local bool bInfected;
States
UnrealScript has built-in support for a finite state machine. A finite state machine (or FSM) used in this book refers to a computer model that describes the behavior of computer controlled bots. An FSM can only be in one state at a time and can move to other states depending on a trigger such as a change of conditions in the game. For example, a bot using an FSM can initially be put into an idle state then when an enemy is within a certain distance change to an attacking state and move toward the enemy and fire its weapon at it.
The following is the general format for a state. The items in brackets are optional. [Auto] State[()] StateName
{
[ignores FunctionName1, FunctionName2, …] event BeginState( Name PreviousStateName ) {
// Code for BeginState Goes Here }
event EndState( Name NextStateName ) {
// Code for EndState Goes Here }
function StateSpecificFunction() {
The Auto specifier for the state indicates that this state is the initial state that the actor is placed in when it is created.
The ignores keyword is optional and causes the functions specified after ignores to not be executed while the object is in this state.
The parenthesis () after the State keyword means that this state can be edited in the Unreal Editor.
Within a state you can define functions that only will be executed when the object is in that specific state.
The beginning of the actual state code starts at the Begin: label.
Debug Messages
One helpful way to debug your program is to have messages displayed on your screen via the Broadcast() function. UnrealScript is very flexible and will automatically convert boolean, int, float, and even class objects into a displayable format using the code below.
WorldInfo.Game.Broadcast(self, "Soldier Object = " @ TestActor @
"Soldier's Sick Status = " @ TestActor.bIsSick @ ", Soldiers's Open Sore Status = " @
TestActor.bHasOpenSores);
Creating and Compiling UnrealScript
Figure 2–4. Unreal Frontend
In order to start the actual compiling click the Script button on the top left-hand side of the toolbar, which will highlight options for compilation (see Figure 2–5).
The “Compile scripts” option only compiles scripts that have been changed since the last compile. The “Full recompile” option compiles all the scripts in the UDK system regardless if they have changed since the last compile or not. Once the scripts have been successfully compiled then any new classes are automatically added to the Actor Classes tab in the Unreal Editor where they can be used in building game levels.
Hands-On Example: Selecting an Object with Touch
In this tutorial you will learn how to use the iOS touch input system to pick out an actor. The first thing we need to do is create a new level for this example and put some objects in it.1. Start up the Unreal Editor.
2. Change the object type filter in the Content Browser to search for static meshes.
3. Put static meshes of your choice into the blank level that is the default level that is loaded when the Unreal Editor comes up. One way you can do this is you can click on the static mesh you want to put into the level then drag it to where you want to place it into the level. Another way is to click on the static mesh then go to the place in the level where want to place it then right-click and select the add StaticMesh option (see Figure 2–6).
Figure 2–6. Adding a Static Mesh to a level
NOTE: We will discuss collision models in Chapter 4 on UDK collisions. Some examples of static meshes with collision models are SM_GEN_Foliage01_LargeTree01_Opt,
SM_GEN_Ruins_512Block01, and SM_VendorCrate_01_E. The collision models are already incorporated within each of the static meshes so you don’t need to set any specific collision model for the meshes since they are already part of the static mesh. You can search for these models using the search function of the Content Browser and place them in the level.
5. The next thing to do is to save the level. To do this, click “File” menu item and choose the “Save As” option which brings up the Save As file dialog box. Enter the filename as “ExampleCh2Map” and click the Save button.
Creating the Game Type
Now that we have created our map for this example we need to create the code to handle touches and code to pick an actor.
1. Create a new directory called ExampleCh2 under the Development\Src directory of the UDK installation which by default is \UDK\UDK-2011-06 on the drive you installed the UDK on.
2. Under that directory create another directory called Classes. This is where the source code from this example will be placed in.
3. Create a new file called ExampleCh2Game.uc in the Classes directory. This new class will hold information for the type of game to be played and is a subclass of the GameInfo class.
4. Add the following line to the file, which declares the new ExampleCh2Game class as deriving from FrameworkGame. class ExampleCh2Game extends FrameworkGame;
5. Add the OnEngineHasLoaded() function to the file. This function is called when the Unreal engine has finished loading and prints out a message that our custom game type is now active.
event OnEngineHasLoaded() {
WorldInfo.Game.Broadcast(self,"ExampleCh2Game Type Active - Engine Has Loaded !!!!");}
6. Add the PreventDeath() function to the file. The PreventDeath function returns true to stop our player from dying in the game.
function bool PreventDeath(Pawn KilledPawn, Controller Killer,
vector HitLocation) {
return true; }
7. Add the SetGameType() function to the file. The SetGameType function can be used to allow only certain mapnames to be used with our gametype. For now just let all maps use our gametype.
static event class<GameInfo> SetGameType(string MapName, string Options, string Portal) {
return super.SetGameType(MapName, Options, Portal); }
8. Add the defaultproperties block to the file. The important thing to take note of is that custom player controllers, custom pawns and custom HUD classes can be specified here. The PlayerControllerClass variable is set to our custom player controller that we will create next which is ExampleCh2PC.
defaultproperties {
PlayerControllerClass=class'ExampleCh2.ExampleCh2PC'
DefaultPawnClass=class'UDKBase.SimplePawn' HUDType=class'UDKBase.UDKHUD'
bRestartLevel=false bWaitingToStartMatch=true bDelayedStart=false }
9. Save the ExampleCh2Game.uc file that you just added the above lines into.
Creating the Player Controller
Now let’s create the player controller.1. Create a new file called ExampleCh2PC.uc and save it in the same directory as the other file. Add in the following line to declare this new player controller class as a subclass of SimplePC.
class ExampleCh2PC extends SimplePC;
2. Add the following line to the file. PickDistance is the maximum distance that the picked item can be from the player.
var float PickDistance;
function Actor PickActor(Vector2D PickLocation, out Vector HitLocation, out TraceHitInfo HitInfo)
{
local Vector TouchOrigin, TouchDir; local Vector HitNormal;
local Actor PickedActor; local vector Extent;
//Transform absolute screen coordinates to relative coordinates PickLocation.X = PickLocation.X / ViewportSize.X;
PickLocation.Y = PickLocation.Y / ViewportSize.Y;
//Transform to world coordinates to get pick ray
LocalPlayer(Player).Deproject(PickLocation, TouchOrigin, TouchDir);
//Perform trace to find touched actor Extent = vect(0,0,0);
PickedActor = Trace(HitLocation, HitNormal,
4. Add the SwipeZoneCallback() function to the file. The following is the touch input callback function that calls the PickActor function and displays the result. If the user picks an actor then that actor’s name is printed out, followed by the hit location where the user touches the object in the 3d world, and the zone that the touch occurred in. function bool SwipeZoneCallback(MobileInputZone Zone,
float DeltaTime, local TraceHitInfo HitInfo;
retval = true;
if (EventType == ZoneEvent_Touch) {
// If screen touched then pick actor
if(EventType == ZoneEvent_Update) {
} else
if (EventType == ZoneEvent_UnTouch) {
}
return retval; }
5. Add the SetupZones() function to the file. The SetupZones function sets the SwipeZoneCallback as the function that handles touch input
processing.
LocalPlayer(Player).ViewportClient.GetViewportSize(ViewportSize); if (FreeLookZone != none)
{
FreeLookZone.OnProcessInputDelegate = SwipeZoneCallback; }
} }
6. Add the defaultproperties block to the file. Here the PickDistance variable is set by default to 10000.
defaultproperties {
PickDistance = 10000; }
7. Save this file.
Settting up the Game Type Configuration
Now we need to set up the configuration to compile and run our game. First you need to modify the UDKEngine.ini file located in the UDKGame\Config under your UDK
installation.
1. Under the UnrealEd.EditorEngine section add in the following line to allow our new code to be added to the compile list
UDKEngine.ini
[UnrealEd.EditorEngine] ModEditPackages=ExampleCh2
Mobile-UDKGame.ini
[ExampleCh2.ExampleCh2Game]
RequiredMobileInputConfigs=(GroupName="UberGroup",RequireZoneNames=("UberStickMoveZone", "UberStickLookZone","UberLookZone"));
NOTE: You can set up a general set of configurations here for the rest of the chapters by making new entries for other chapters if you wish. However, some chapters will contain multiple examples and will require a configuration entry for each example. We will show you the details on how to set up these configurations in the hands-on examples in the rest of the book.
Next, we need to compile our script. Bring up the Unreal Frontend and select Compile scripts to compile our code. After the code successfully compiles then we are ready to start up the Unreal Editor.
Running the Game Type
Starting in the June version of the UDK you can select and save the game type you want associated with a level and play this level in the Mobile Previewer from the Editor.
1. Start up the Unreal Editor.
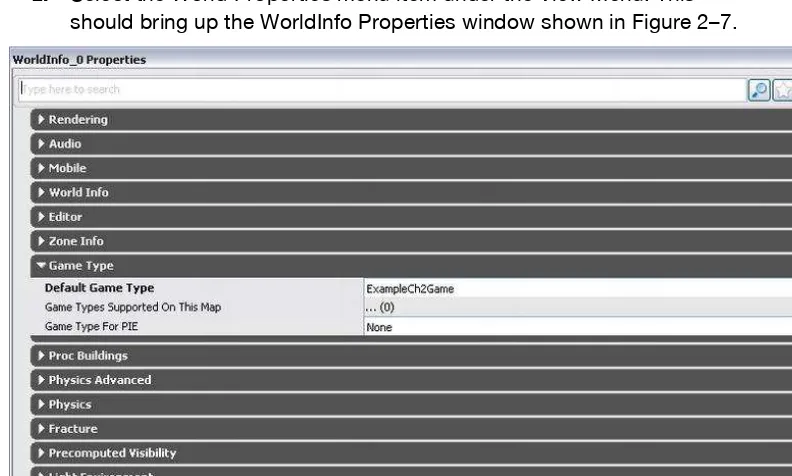
2. Select the World Properties menu item under the View Menu. This should bring up the WorldInfo Properties window shown in Figure 2–7.
3. Under the Game Type property set the Default Game Type to ExampleCh2Game from the drop-down list box.
4. Close the WorldInfo Properties window.
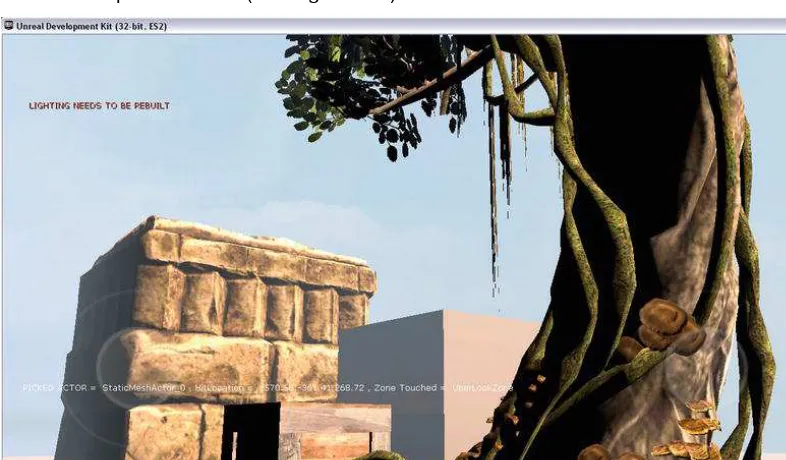
5. Under the Play menu select On Mobile Previewer. This should start up the Mobile Previewer with your level using the new game type
ExampleCh2Game (see Figure 2–8).
Figure 2–8. ExampleCh2Game for our first hands-on example
Both the joysticks should be working. The right stick should turn the player left and right and move the view up and down. The left stick should move the player forward and back and side to side. You should be able to use your mouse to click on various static meshes and the Actor name, hitlocation, and zone should be printed out on the screen. An Actor name of None means that no Actor was selected. For now, ignore the message about the lighting needing to be rebuilt since this does not affect the gameplay.
Summary
Chapter
Player Controllers,
Pawns, and Weapons
This chapter will cover player controllers, the player’s pawn, and weapons. A pawn in the UDK represents the physical presence of a player or a computer controlled game character. Think of this as the player’s body in the game. The player controller controls the pawn and translates player input into pawn movement and other actions.
Information regarding these topics is presented followed by tutorials. You will find out how to:
Use the PlayerController and Pawn classes Make a pawn visible using a skeletal mesh Use camera views
Set and change your pawns’ views Use the Weapon and related classes Add weapons to pawns from different views
Player Controller and Pawn Overview
The player input system within the UDK is divided between the player controller and the pawn. The pawn represents the player’s physical presence in the game. When you need to find the player’s location, or rotation you will need to find the location or rotation of the player’s pawn. The player controller takes input from the player, processes this input and translates them into movement for the pawn it controls.
All player controllers must derive from the PlayerController class and all pawns must derive from the Pawn class. For programming on the iOS platform the SimplePC class can be used for the base for custom player controllers and SimplePawn can be used as the base for custom pawns. The advantage of using the SimplePC class as the base of your custom player controller is that this class already has set up joystick and touch input
zones as well as some other features like footstep sounds and simulated player breathing through camera motion. The advantage of using the SimplePawn is that it features “head bobbing” which makes the camera move up and down as the player walks around. This makes the player’s view more realistic. Head bobbing is done by setting the bScriptTickSpecial=true which is the default value in SimplePawn. The actual head bobbing is done in the TickSpecial() function in the SimplePawn class. To turn head bobbing off, set bScriptTickSpecial=false in a derived pawn class. The main update function for the PlayerController class is PlayerTick(), which is called at regular intervals, or “ticked” once per frame update of the game.
Here you can add in custom code to handle items unique to your particular game. For example, if a goal in your game is to retrieve a certain item then you can check for the player’s possessions for this item in PlayerTick(). The way you would do this is override the PlayerTick() function in your custom player controller, execute the normal PlayerTick() function through the Super prefix and then execute your custom code afterwards. See Listing 3–1.
Listing 3–1. Customizing the PlayerTick() function function PlayerTick(float DeltaTime) {
Super.PlayerTick(DeltaTime);
// Add in additional code here for your custom player controller If (Jazz3Pawn(Pawn).Lives <= 0)
{
Gameover = true; }
}
The modified PlayerTick() function checks if the player’s has more lives and if not then sets the Gameover variable to true.
The PlayerMove() function is called every time PlayerTick() is called and calculates new acceleration and rotation values for the player. This function then calls
ProcessMove() which then executes the actual move. It is in the ProcessMove() function that we can change how the player’s pawn responds to the player’s movement input. For example, in your custom controller class if you declared a function ProcessMove() that is defined in the PlayerWalking state then this new function will override the default ProcessMove() function.
state PlayerWalking {
ignores SeePlayer, HearNoise, Bump; function ProcessMove(float DeltaTime, vector NewAccel,