Information in this document is subject to change without notice. Examples provided are fictitious. No part of this document may be reproduced or transmitted in any form, or by any means, electronic or mechanical, for any purpose, in whole or in part, without the express written permission of OpenText.
© 2003 - 2015 by Actuate Corporation. All rights reserved. Printed in the United States of America. Contains information proprietary to:
Actuate Corporation, 951 Mariners Island Boulevard, San Mateo, CA 94404 www.actuate.com
The software described in this manual is provided by Actuate Corporation under an Actuate License agreement. The software may be used only in accordance with the terms of the agreement. Actuate software products are protected by U.S. and International patents and patents pending. For a current list of patents, please see http://www.actuate.com/ patents.
Actuate Corporation trademarks and registered trademarks include:
Actuate, ActuateOne, the Actuate logo, Archived Data Analytics, BIRT, BIRT 360, BIRT Analytics, The BIRT Company, BIRT Content Services, BIRT Data Analyzer, BIRT for Statements, BIRT iHub, BIRT Metrics Management, BIRT Performance Analytics, Collaborative Reporting Architecture, e.Analysis, e.Report, e.Reporting, e.Spreadsheet, Encyclopedia, Interactive Viewing, OnPerformance, The people behind BIRT, Performancesoft, Performancesoft Track, Performancesoft Views, Report Encyclopedia, Reportlet, X2BIRT, and XML reports.
Actuate products may contain third-party products or technologies. Third-party trademarks or registered trademarks of their respective owners, companies, or organizations include:
Mark Adler and Jean-loup Gailly (www.zlib.net): zLib. Adobe Systems Incorporated: Flash Player, Source Sans Pro font. Amazon Web Services, Incorporated: Amazon Web Services SDK. Apache Software Foundation (www.apache.org): Ant, Axis, Axis2, Batik, Batik SVG library, Commons Command Line Interface (CLI), Commons Codec, Commons Lang, Commons Math, Crimson, Derby, Hive driver for Hadoop, Kafka, log4j, Pluto, POI ooxml and ooxml-schema, Portlet, Shindig, Struts, Thrift, Tomcat, Velocity, Xalan, Xerces, Xerces2 Java Parser, Xerces-C++ XML Parser, and XML Beans. Daniel Bruce (www.entypo.com): Entypo Pictogram Suite. Castor (www.castor.org), ExoLab Project
(www.exolab.org), and Intalio, Inc. (www.intalio.org): Castor. Alessandro Colantonio: CONCISE. Day Management AG: Content Repository for Java. Eclipse Foundation, Inc. (www.eclipse.org): Babel, Data Tools Platform (DTP) ODA, Eclipse SDK, Graphics Editor Framework (GEF), Eclipse Modeling Framework (EMF), Jetty, and Eclipse Web Tools Platform (WTP). Dave Gandy: Font Awesome. Gargoyle Software Inc.: HtmlUnit. GNU Project: GNU Regular Expression. Groovy project (groovy.codehaus.org): Groovy. Guava Libraries: Google Guava. HighSlide: HighCharts. headjs.com: head.js. Hector Project: Cassandra Thrift, Hector. Jason Hsueth and Kenton Varda (code.google.com): Protocole Buffer. H2 Database: H2 database. Groovy project (groovy.codehaus.org): Groovy. IDAutomation.com, Inc.: IDAutomation. IDRsolutions Ltd.: JBIG2. InfoSoft Global (P) Ltd.: FusionCharts, FusionMaps, FusionWidgets, PowerCharts. Matt Inger (sourceforge.net): Ant-Contrib. Matt Ingenthron, Eric D. Lambert, and Dustin Sallings (code.google.com): Spymemcached. International Components for Unicode (ICU): ICU library. JCraft, Inc.: JSch. jQuery: jQuery. Yuri Kanivets (code.google.com): Android Wheel gadget. LEAD Technologies, Inc.: LEADTOOLS. The Legion of the Bouncy Castle: Bouncy Castle Crypto APIs. Bruno Lowagie and Paulo Soares: iText. MetaStuff: dom4j. Microsoft Corporation (Microsoft Developer Network): CompoundDocument Library. Mozilla: Mozilla XML Parser. MySQL Americas, Inc.: MySQL Connector. Netscape Communications Corporation, Inc.: Rhino. nullsoft project: Nullsoft Scriptable Install System. OOPS Consultancy: XMLTask. OpenSSL Project: OpenSSL. Oracle Corporation: Berkeley DB, Java Advanced Imaging, JAXB, JDK, Jstl, Oracle JDBC driver. PostgreSQL Global Development Group: pgAdmin, PostgreSQL, PostgreSQL JDBC driver. Progress Software Corporation: DataDirect Connect XE for JDBC Salesforce, DataDirect JDBC, DataDirect ODBC. Quality Open Software: Simple Logging Facade for Java (SLF4J), SLF4J API and NOP. Rogue Wave Software, Inc.: Rogue Wave Library SourcePro Core, tools.h++. Sam Stephenson
(prototype.conio.net): prototype.js. Sencha Inc.: Ext JS, Sencha Touch. Shibboleth Consortium: OpenSAML, Shibboleth Identity Provider. Matteo Spinelli: iscroll. StAX Project (stax.codehaus.org): Streaming API for XML (StAX). SWFObject Project (code.google.com): SWFObject. ThimbleWare, Inc.: JMemcached. Twittr: Twitter Bootstrap. VMWare: Hyperic SIGAR. Woodstox Project (woodstox.codehaus.org): Woodstox Fast XML processor (wstx-asl). World Wide Web Consortium (W3C) (MIT, ERCIM, Keio): Flute, JTidy, Simple API for CSS. XFree86 Project, Inc.: (www.xfree86.org): xvfb. ZXing Project (code.google.com): ZXing.
Installing for multiple tenants . . . .31
Reviewing the BIRT Analytics installation . . . .33
Starting and stopping BIRT Analytics services . . . .33
Uninstalling BIRT Analytics . . . .34
Chapter 3
Setting up BIRT Analytics . . . 37
Accessing BIRT Analytics . . . .38
Using BIRT Analytics web client . . . .38
Managing BIRT Analytics . . . .38
Loading BIRT Analytics data . . . .38
Accessing REST API documentation . . . .39
Using ODA drivers . . . .39
Configuring BIRT Analytics security . . . .40
Understanding HTTPS . . . .40
Understanding TLS . . . .41
BIRT Analytics secure communication process . . . .41
Securing web applications using HTTPS . . . .42
Using custom security certificates . . . .45
Securing communications to ApplicationWS . . . .49
Securing communications to Connectors . . . .51
Securing communications to FastDB . . . .52
Securing communications using REST API . . . .55
Migrating BIRT Analytics from release 5.1 . . . .55
I n t r o d u c t i o n
About
Installing BIRT Analytics
Installing BIRT Analytics includes the following chapters:
■ Introduction. Provides an overview of this guide and Actuate BIRT iHub documentation.
■ Chapter 1. About BIRT Analytics architecture. Describes the BIRT Analytics packages and environment.
■ Chapter 2. Installing BIRT Analytics. Describes how to install BIRT Analytics in a Windows environment.
■ Chapter 3. Setting up BIRT Analytics. Describes how to access BIRT Analytics and configure security.
Accessing BIRT Analytics information
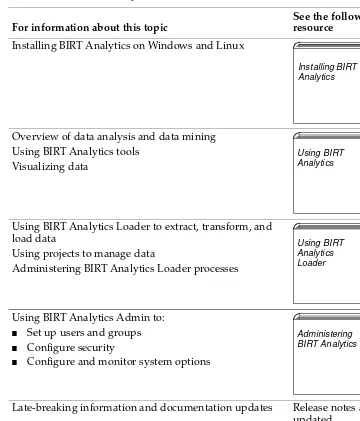
Table 1-1 BIRT Analytics documentation
For information about this topic
See the following resource
Installing BIRT Analytics on Windows and Linux
Overview of data analysis and data mining Using BIRT Analytics tools
Visualizing data
Using BIRT Analytics Loader to extract, transform, and load data
Using projects to manage data
Administering BIRT Analytics Loader processes
Using BIRT Analytics Admin to:
■ Set up users and groups ■ Configure security
■ Configure and monitor system options
Late-breaking information and documentation updates Release notes and updated
localization files posted on Actuate Support
Installing BIRT Analytics
Using BIRT Analytics
Using BIRT Analytics Loader
Obtaining documentation
Actuate provides technical documentation in PDF and HTML formats. You can download PDF or view HTML versions of the documentation from the following URL:
http://developer.actuate.com/resources/documentation/birt-analytics.
Obtaining late-breaking information and
documentation updates
The release notes contain late-breaking news about Actuate products and features. The release notes are available on the Actuate Support site at the following URL:
http://support.actuate.com/documentation/releasenotes
If you are a new user, you must first register on the site and log in to view the release notes. actuate.com also provides product update information.
Obtaining technical support
You can contact Customer Support by e-mail or telephone. For contact information, go to the following URL:
http://www.actuate.com/services/support/contact-support.asp
Supported and obsolete products
The Actuate Support Lifecycle Policy and Supported Products Matrix are available at the following URL:
C h a p t e r
1
Chapter 1
About BIRT Analytics
architecture
This chapter contains the following topics:
■ Understanding BIRT Analytics architecture
Understanding BIRT Analytics architecture
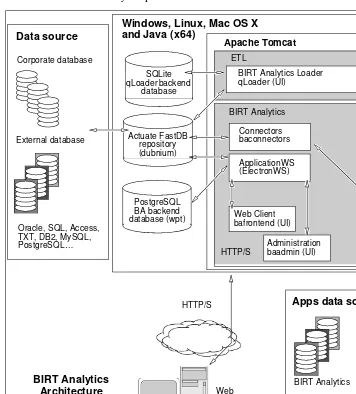
In a standard installation, all the packages that make up BIRT Analytics are installed in a single server. In a custom installation, you can install these packages on two or more servers, where each server runs selected packages. Figure 1-1 illustrates the BIRT Analytics process architecture.
BIRT Analytics is made up of the following packages, described in Table 1-1.
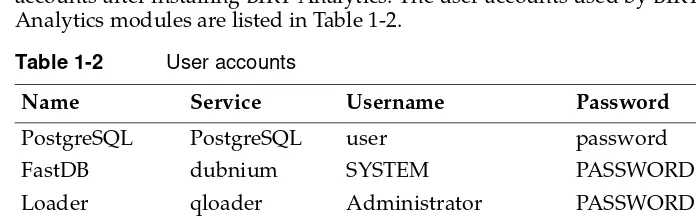
Understanding user accounts
BIRT Analytics modules manage their user accounts. You can change these accounts after installing BIRT Analytics. The user accounts used by BIRT Analytics modules are listed in Table 1-2.
Table 1-1 BIRT Analytics packages
Name Service Description
Administration baadmin Enables administrators to manage BIRT Analytics.
ApplicationWS electronws Responsible for processing requests, defining, and orchestrating what tasks are done, and finally, returning the information to the client.
Connectors baconnectors Web application to retrieve data from external data sources.
FastDB dubnium A service and database engine for analyzing
performance metrics.
Loader qloader Manages data Extracting, Transforming, and
Loading (ETL).
Launcher qlauncher A Java-based utility, runs projects from batch files or a command prompt.
BIRT Analytics web client
bafrontend A client-side DHTML application for data mining and analysis.
BIRT Analytics bafrontend Administrator PASSWORD
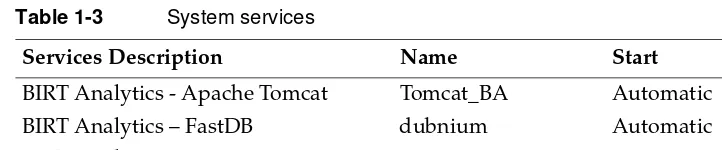
Understanding BIRT Analytics system services
The following services in Table 1-3 are installed as part of a complete BIRT Analytics installation in Windows, Linux and Mac OS X.During installation, BIRT Analytic services are set to use the following user account:
■ In Windows the Local System account
■ In Linux and Mac OS X, the installation user
Linux and Mac OS X installations require the account used to run these services have the following permissions within the BIRT Analytics installation folder:
■ Read in the BIRT Analytics installation folder .\BIRT Analytics\
■ Read and Write in the data folder, such as .\BIRT Analytics\data\
■ Read and Write in the log folder, such as .\BIRT Analytics\log\
■ Read and Write in the Tomcat logs folder, such as .\BIRTAnalytics\3rdParty\ Tomcat\logs
About security
Use HTTPs as the communication protocol between the different servers (in the case of having more than one) and between client and server.
Use FastDB secure communication by TLS in a distributed installation when FastDB (dubnium) is in a different server of ApplicationWS (electronws) or Connectors (baconnectors).
About REST API
The REST API is a resource extension installed with BIRT Analytics that responds to RESTful requests. The REST API adheres to the REST standard, a strategy for developing web and mobile components that are platform and language independent, require very little time to implement, and that use minimal client
Table 1-3 System services
Services Description Name Start
BIRT Analytics - Apache Tomcat Tomcat_BA Automatic
BIRT Analytics – FastDB dubnium Automatic
Understanding the installation environment
The following sections provide supplementary information about the BIRT Analytics installation environment.
Overview of installation operations
When installing BIRT Analytics, ensure you run the same versions of all products. If you do not have a license for purchased options you can use the trial license included with the installation package.
To install BIRT Analytics, the system administrator performs one of the following operations:
■ Installs on Windows, Linux, or Mac OS X using the installation program or script
■ Downloads the installation package for BIRT Analytics from the download
site
■ Decompresses the BIRT Analytics installation package ■ Runs the installation program
■ Installs on Linux using the BIRT Analytics command-line installer
■ Downloads the BIRT Analytics command-line installation package and
installation modules from the download site
■ Extracts the contents of the installation package into a directory ■ Runs the installation script
The system administrator then finishes the installation with the following steps:
■ Configures user accounts.
■ Installs any 3rd party database drivers such as native clients and ODBC drivers.
■ Loads company data into FastDB for analysis using Loader.
Downloading the installation packages
Download BIRT Analytics installation packages from an Actuate download site using the URLs provided by e-mail.
Installing database drivers
SQL Server, MySQL, PostgreSQL or DB2 you must install the database native client or ODBC driver on the computer running BIRT Analytics. Loader and loading data through the BIRT Analytics web client uses a database driver to load data into FastDB.
Verify that your database native client or ODBC driver is supported for your database server version and the operating system where BIRT Analytics is installed. This information is available in the Actuate Supported Products Matrix at the following URL:
http://developer.actuate.com/resources/supported-products/birt-analytics/
Following best practices
Before deploying BIRT Analytics in a production environment, Actuate
recommends testing the installation in a separate staging area before deploying to the production system. The following sections provide some guidelines for setting up a test environment and production staging area.
Using a test environment
Set up a test environment. Then move to BIRT Analytics on the production system when the testing is complete.
Complete the following general tasks in this order to determine how to upgrade your site to BIRT Analytics:
■ Create a test environment for BIRT Analytics. Do not install a the test environment on the same machine that hosts an earlier Actuate installation.
■ Install the software in the test environment.
■ Ask application developers and a few users to perform some typical tasks in the test environment.
■ Create a backup of your BIRT Analytics installation if you plan to use the same configuration in your production environment.
■ Create a production staging area.
■ Schedule a low-impact time to switch to the production system.
Setting up a production staging area
■ Restore your backup of BIRT Analytics.
■ Load your organization data into the BIRT Analytics system.
■ Verify that the BIRT Analytics production staging environment works correctly.
■ Create a backup of your BIRT Analytics installation.
■ Begin setting up a production environment as described in the following section.
Setting up a production environment
When testing is complete, confirm that your applications work as expected in the BIRT Analytics environment. Set up the production environment and schedule a date and time to activate BIRT Analytics.
When you activate BIRT Analytics for production, use the following procedure list as a general guideline:
■ Install BIRT Analytics software in a production staging area.
■ Restore your backup of BIRT Analytics.
■ Start BIRT Analytics.
C h a p t e r
2
Chapter 2
Installing BIRT Analytics
This chapter contains the following topics:
■ Preparing to install BIRT Analytics
■ Using the BIRT Analytics installation program
■ Customizing the BIRT Analytics installation
■ Starting and stopping BIRT Analytics services
Preparing to install BIRT Analytics
BIRT Analytics supports the following types of installation:
■ Standard where all the services are installed on the same computer
■ Multi-server that installs services on different computers
■ Multi-tenant that installs multiple instances of BIRT Analytics on the same computer infrastructure
A standard installation of BIRT Analytics installs the following web services.
■ BIRT Analytics at the following URL:
http://localhost:8110/bafrontend
■ BIRT Analytics Administration at the following URL:
http://localhost:8110/baadmin
■ FastDB Loader at the following URL:
http://localhost:8110/qloader
■ REST API documentation at the following URL:
http://localhost:8110/restapi
The REST API documentation is only available from the computer where BIRT Analytics was installed.
Replace localhost with the name or IP address of the computer where BIRT Analytics is installed.
For optimum performance, use a system that has a minimum of 8GB RAM.
About the Java Runtime Environment
BIRT Analytics includes a 64-bit release of the Oracle JAVA SE Runtime
Environment. The installation routine installs the JRE files in the following folder, unless you have specified a different folder during installation:
[installation path]\3rdParty\JRE64
The installation path is the folder where you installed BIRT Analytics. For example, in Windows this path would be:
Checking for ports used by BIRT Analytics
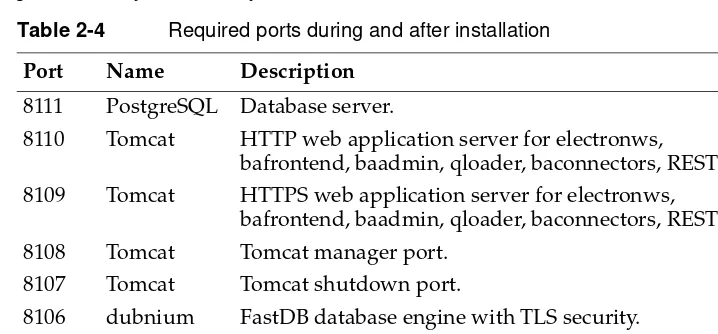
BIRT Analytics processes use network ports to communicate. Before installation, ensure that the ports used by BIRT Analytics are available on the system. The ports used by BIRT Analytics are listed in Table 2-4.
Using the BIRT Analytics installation program
The following instructions make a standard installation of BIRT Analytics. A folder containing a Java runtime is included to complete the installation. You can use these instructions to install BIRT Analytics in Windows, Linux, and Mac OS X.
When installing using the BIRT Analytics installation program, the administrator performs the following tasks:
■ Copy the installation file for BIRT Analytics from the software distribution site:
■ For Windows copy BIRTAnalytics-version-Windows.zip ■ For Linux copy BIRTAnalytics-version-Linux.tar.gz ■ For Mac OS X copy BIRTAnalytics-version-MacOSX.tar.gz
Replace version in the installation file name with the release number you have downloaded. For example, the Windows installation file would have the name BIRTAnalytics-5.2.985-Windows.zip if the release was 5.2.985.
■ Decompress the installation file. It generates the following folder and files in the install folder:
■ The folder JRE64 for all platforms
Table 2-4 Required ports during and after installation
Port Name Description
8111 PostgreSQL Database server.
8110 Tomcat HTTP web application server for electronws,
bafrontend, baadmin, qloader, baconnectors, REST API. 8109 Tomcat HTTPS web application server for electronws,
bafrontend, baadmin, qloader, baconnectors, REST API.
8108 Tomcat Tomcat manager port.
8107 Tomcat Tomcat shutdown port.
■ For Windows:
install.bat
BIRTAnalytics-5.2.xxx-Windows.jar
■ For Linux:
install.sh
BIRTAnalytics-5.2.xxx-Linux.jar
■ For Mac OS X:
install.command
BIRTAnalytics-5.2.xxx-MacOSX.jar
■ Run the installation program for BIRT Analytics. You can use the embedded evaluation license or a purchased license when the installation process requests a license file.
Installing the BIRT Analytics product
How to install the BIRT Analytics product
Navigate to the folder you decompressed the BIRT Analytics installation files to and complete the following tasks:
1 Start the BIRT Analytics installation process with the following command:
■ For Windows, run the following command as Administrator: install.bat ■ For Linux, run the following command as a user other than root:
./install.sh
■ For Mac OS X, run the following command: install.command
If you are asked to allow the Java SE runtime to make changes to your computer, choose Yes.
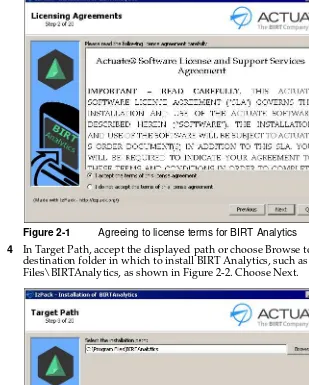
2 At the Welcome screen choose Next.
Figure 2-1 Agreeing to license terms for BIRT Analytics
4 In Target Path, accept the displayed path or choose Browse to specify a new destination folder in which to install BIRT Analytics, such as C:\Program Files\BIRTAnalytics, as shown in Figure 2-2. Choose Next.
If the target installation path does not exist choose OK to confirm that you want to create it.
5 In Installation Type, verify that Standard is selected and choose Next. The standard installation uses the default network ports and makes a complete installation of BIRT Analytics.
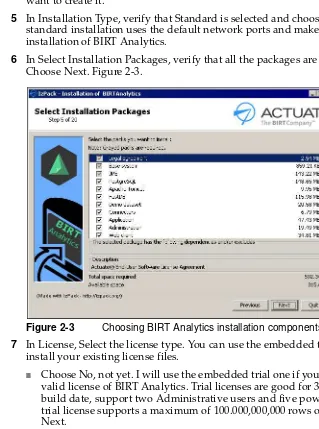
6 In Select Installation Packages, verify that all the packages are selected. Choose Next. Figure 2-3.
Figure 2-3 Choosing BIRT Analytics installation components
7 In License, Select the license type. You can use the embedded trial license or install your existing license files.
■ Choose No, not yet. I will use the embedded trial one if you don’t have any
valid license of BIRT Analytics. Trial licenses are good for 30 days from build date, support two Administrative users and five power users. The trial license supports a maximum of 100.000,000,000 rows of data. Choose Next.
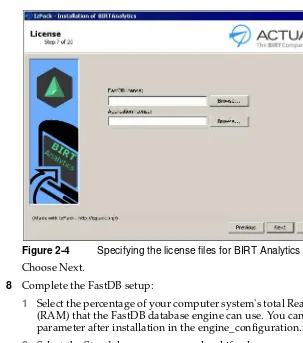
■ Choose Yes and I want to use it if you You have a valid license of BIRT
Figure 2-4 Specifying the license files for BIRT Analytics
Choose Next.
8 Complete the FastDB setup:
1 Select the percentage of your computer system's total Read Access Memory (RAM) that the FastDB database engine can use. You can change this parameter after installation in the engine_configuration.ini.
2 Select the Standalone concurrency level if only one user accesses FastDB. Select Multi-User if multiple users will access FastDB. You can change this parameter after installation in the engine_configuration.ini.
Figure 2-5 Specifying the FastDB settings for BIRT Analytics
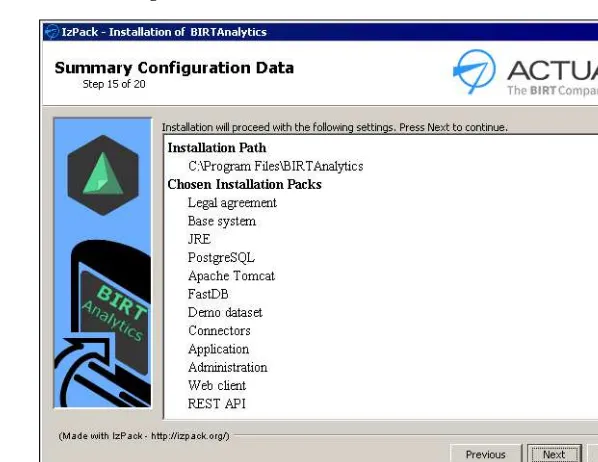
9 Check the installation summary and choose Next to begin the installation, as shown in Figure 2-7.
Figure 2-7 Verifying the installation summary
10 Choose Next when the installation process has finished. The installation process registers and starts the services.
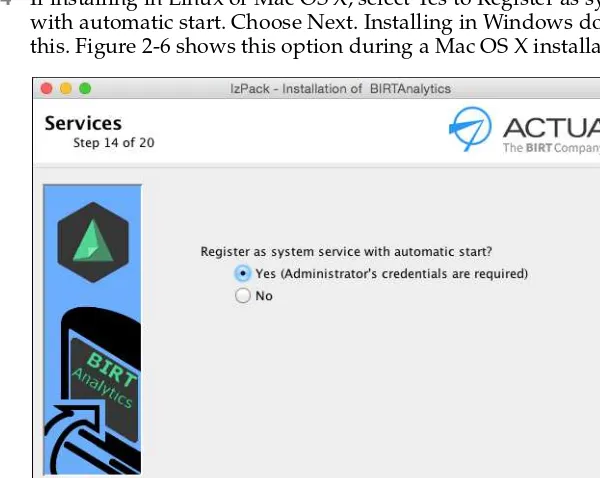
11 If installing in Linux or Mac OS X, type the username and password for an Administrator's account and choose OK. Figure 2-8 this step during a Mac OS X installation.
Figure 2-8 Using the administrator authentication to run services 12 In Configuring BIRT Analytics, choose Next.
Figure 2-9 Configuring application shortcuts for Windows
Choose Next to setup the shortcuts for BIRT Analytics in a program group named BIRT Analytics.
Figure 2-10 Reviewing first steps to using BIRT Analytics
14 Choose Done to finish the installation.
Installing from the Linux terminal
BIRT Analytics supports installation from the Linux terminal when you run the following script:
./install.sh -console
The process will request all the installation steps in text mode, without a
graphical user interface. The following example shows the beginning of a console installation:
[admin@localhost BIRTAnalytics-5.2-Linux]$ ./install.sh -console Aug 18, 2015 4:13:23 AM INFO: Logging initialized at level 'INFO' Aug 18, 2015 4:13:23 AM INFO: Commandline arguments: -console Aug 18, 2015 4:13:24 AM INFO: Detected platform:
red_hat_linux,version=3.10.0-123.el7.x86_64,arch=x64,symbolicName=null,javaVersion=1.8.0_51 Welcome to the installation of BIRTAnalytics 5.2.985!
This software is developed by:
- BIRT Analytics team <[email protected]>
The homepage is at: http://birtanalytics.actuate.com
Checking the installation
After the installation is complete, you can access the following BIRT Analytics applications with the username Administrator and the password PASSWORD:
■ BIRT Analytics at the following URL:
http://localhost:8110/bafrontend
■ BIRT Analytics Administration at the following URL:
http://localhost:8110/baadmin
■ FastDB Loader at the following URL:
http://localhost:8110/qloader
■ REST API interactive documentation at the following URL:
http://localhost:8110/restapi
The REST API interactive documentation is only available from the computer where BIRT Analytics is installed.
Replace localhost with the name or IP address of the computer where you installed BIRT Analytics when you access BIRT Analytics from another computer on your network. These items also appear in your Windows start menu or desktop shortcuts if you chose to install the shortcuts during the installation.
You can verify that the BIRT Analytics services are running with the following commands:
■ In Windows, use the following command:
net start | find "BIRT"
■ In RedHatLinux, use the following commands:
systemctl status dubnium systemctl status Tomcat_BA systemctl status PostgreSQL_BA
■ In Linux installations other than RedHat, use the following commands:
/etc/init.d/dubnium status /etc/init.d/Tomcat_BA status /etc/init.d/PostgreSQL_BA status
■ In Mac OS X use the following commands:
If a Process ID (PID) appears with a value, the service is running.
A log file is created during the installation and is saved in the following location:
BIRTAnalytics\log\installer.log
A complete installation installs the folders, shown in Figure 2-11.
Figure 2-11 Reviewing BIRT Analytics folders
Figure 2-12 Reviewing BIRT Analytics installation in Mac OS X
The data folder contains the following folders:
■ ApplicationWS folder includes the application license, folders; export, import, campaign and cache, SVG maps, and images for the header when exporting to PDF
■ FastDB folder includes databases, loader configuration, the loader backend database dubnium.db, loading projects, FastDB license, the FastDB backend database admin.sqlite
■ PostgreSQL folder includes wpt, the application backend database
■ Tomcat folder includes the keystore
Customizing the BIRT Analytics installation
You can customize the ports used by the BIRT Analytics packages when you select the custom installation type. During a custom installation, each package display additional options.
Customizing Apache Tomcat
During a custom installation Apache Tomcat the following multi-tenant options are available:
During a custom installation Apache Tomcat displays the following network options:
■ Tomcat shutdown port 8107
■ Tomcat manager port 8108
■ Tomcat HTTPS port 8109
■ Tomcat default port 8110
■ Transport protocol type HTTP
You can change the values and select Next to continue with the installation, as shown in Figure 2-13.
Figure 2-13 Customizing the installation of Tomcat
For more information about multi-tenant installations see “Installing for multiple tenants,” later in this chapter.
For more information about HTTPS secured installations see Chapter 3, “Setting up BIRT Analytics.”
Customizing PostgreSQL
During a custom installation PostgreSQL the following multi-tenant options are available:
■ Tenant name
■ PostgreSQL display name BIRT Analytics - PostgreSQL
During a custom installation PostgreSQL displays the following options:
■ PostgreSQL port 8111
■ PostgreSQL user user
■ PostgreSQL password password
You can change the values and select Next to continue with the installation, as shown in Figure 2-14.
Figure 2-14 Customizing the installation of PostgreSQL
For more information about multi-tenant installations see “Installing for multiple tenants,” later in this chapter.
Customizing Apache Tomcat and FastDB
During a custom installation of Tomcat and FastDB the following multi-tenant options are available:
■ Tenant name
■ Tomcat service name Tomcat_BA
During a custom installation the following network options are available:
■ Tomcat shutdown port 8107
■ Tomcat manager port 8108
■ Tomcat HTTPS port 8109
■ Tomcat default port 8110
■ Transport protocol type HTTP
■ FastDB port 8105
You can change the values and select Next to continue with the installation, as shown in Figure 2-15.
Figure 2-15 Customizing the installation of FastDB and Tomcat
For more information about multi-tenant installations see “Installing for multiple tenants,” later in this chapter.
For more information about HTTPS secured installations see Chapter 3, “Setting up BIRT Analytics.”
Customizing Apache Tomcat and Application
During a custom installation of Tomcat and Application the following multi-tenant options are available:
■ Tomcat service name Tomcat_BA
■ Tomcat display name BIRT Analytics - Apache Tomcat
During a custom installation the following network options are available:
■ Tomcat shutdown port 8107
■ Tomcat manager port 8108
■ Tomcat HTTPS port 8109
■ Tomcat default port 8110
■ Transport protocol type HTTP or HTTPS
■ PostgreSQL server localhost
■ PostgreSQL port 8111
■ PostgreSQL user user
■ PostgreSQL password password
■ FastDB server localhost
■ FastDB port 8105
■ FastDB user SYSTEM
■ FastDB password PASSWORD
■ FastDB secure communication No or TLS
■ Connectors server localhost
■ Connectors port 8110
■ Connectors protocol type HTTP or HTTPS
Figure 2-16 Customizing the installation of Tomcat and Application
For more information about multi-tenant installations see “Installing for multiple tenants,” later in this chapter.
For more information about HTTPS secured installations see Chapter 3, “Setting up BIRT Analytics.”
Customizing Tomcat, Administration, Web Client and
REST API
During a custom installation of Tomcat, Administration, Web Client and the REST API the following multi-tenant options are available:
■ Tenant name
■ Tomcat display name BIRT Analytics - Apache Tomcat
During a custom installation the following network options are available:
■ Tomcat shutdown port 8107
■ Tomcat manager port 8108
■ Tomcat HTTPS port 8109
■ Tomcat default port 8110
■ Transport protocol type HTTP or HTTPS
■ Application server localhost
■ Application port 8110
■ Application protocol type HTTP or HTTPS
You can change the values and select Next to continue with the installation, as shown in Figure 2-17.
Figure 2-17 Customizing the installation of Tomcat, Administration, Web Client and REST API
Installing to multiple servers
A multi-server enables each package of BIRT Analytics to install into a different server. It is common to group the packages in two servers, an applications server and a core server as follows:
■ Application server for applications such as the Administration,
ApplicationWS, Connectors, BIRT Analytics web client, and the REST API
■ Core server for core packages such as FastDB and Loader
When using 2 or more servers, the HTTPS communication protocol is an important security necessity. Use FastDB TLS secured communication in cases when FastDB (dubnium) is on a different server than the ApplicationWS (electronws) package.
The multi-server installation process uses the custom installation type and installs only the packages required for each server.
Before starting a multi-server installation verify that the IP and hostname.domain entries appear in the host files. In a distributed installation between two servers, each server must have the IP and hostname.domain entries for both servers.
The following example shows the packages required for a two server installation.
To install a server for core packages, install the following packages:
■ Apache Tomcat
■ Base system
■ Demo data set (optional)
■ FastDB
■ JRE
■ Legal agreement
Figure 2-18 Customizing the installation of core packages
To install a server for applications, install the following packages on a different server:
■ Administration
■ Apache Tomcat
■ Application
■ Base system
■ Connector
■ JRE
■ Legal agreement
■ PostgreSQL
■ REST API
■ Web Client
Figure 2-19 Customizing the installation of application packages
During the install process, you select information concerning the FastDB server, port and credentials where the core server was installed.
You also identify the type of connection if you require secure communication by TLS between Application (electronws) and FastDB (dubnium).
Installing for multiple tenants
A multi-tenancy architecture provides the possibility of running multiple instances on the same infrastructure, to serve multiple client organizations (tenants).
Each tenant works with a customized virtual application instance that:
■ Runs a different services of the FastDB engine
■ Runs load processes in a separate configuration
■ Loads data in a separate repository
■ Manages a separate backend database (PostgreSQL / wpt)
■ Runs an independent BIRT Analytics configuration:
■ 2 or more Connectors configurations ■ 2 or more REST API configurations
■ Runs a different instance of Tomcat
■ Runs a different instance of PostgreSQL
Run a custom installation of BIRT Analytics multiple times. Each time change multi-tenant installation install to a different location and customize the service names and port numbers. The installation process automatically adds the Tenant name as a suffix in service and display names for the BIRT Analytic services. A common method of managing port numbers is to increase them by 100 for each tenant.
Table 2-5 summarizes the changes for a two tenant installation:.
Table 2-5 Planning a multi-tenant installation
Parameter Tenant 1 Tenant 2
Install path \Install1\BIRTAnalytics \Install2\BIRTAnalytics
Tenant name Tenant1 Tenant2
Tomcat service name Tomcat_BA Tomcat_BA
Tomcat display name BIRT Analytics - Apache Tomcat
BIRT Analytics - Apache Tomcat
Tomcat shutdown port 8107 8207
Tomcat manager port 8108 8208
Tomcat HTTPS port 8109 8209
Tomcat default port 8110 8210
PostgreSQL service
FastDB service name dubnium dubnium
How to make a multi-tenant installation
The following steps show a multi-tenant installation:
1 Start the BIRT Analytics installation
2 In target Path, select a different path for each tenant
3 Select the Custom installation type and choose Next
4 Select a descriptive name for tenant, (Tenant name), select Ports and Transport Protocol type. For every instance use different ports.The process adds
automatically the Tenant name as a suffix in service names and display names for the 3 BA services.
5 Creating desktop shortcuts
■ Each desktop shortcut includes the tenant name as a prefix
■ Set the Program Groups name for each tenant to the same name to place all
tenant shortcuts in the same group. Optionally, set the Program Groups name to a different name for each tenant to keep the shortcuts in separate groups.
Repeat the process for each tenant installation.
Reviewing the BIRT Analytics installation
The BIRT Analytics installation programs create log files containing information about the tasks completed during the installation process in a log folder. This folder is located in the following folder, where Installation path is the folder where BIRT Analytics was installed:
[Installation path]\log
For example, log files for a Windows installation are located in the following location:
C:\Program Files\BIRTAnalytics\log
Starting and stopping BIRT Analytics services
BIRT Analytics controls the Tomcat_BA, Dubnium, and PostgreSQL_BA services using the following scripts:
■ Start: [Installation path]/scripts/startServices ■ Stop: [Installation path]/scripts/stopServices
■ Tomcat_BA
■ Start: [Installation path]/scripts/startTomcat ■ Stop: [Installation path]/scripts/stopTomcat
■ Dubnium, also known as FastDB
■ Start: [Installation path]/scripts/startFastDB ■ Stop: [Installation path]/scripts/stopFastDB
■ PostgreSQL_BA
■ Start: [Installation path]/scripts/startPostgreSQL ■ Stop: [Installation path]/scripts/stopPostgreSQL
The following file extensions are used:
■ .bat file extension for Windows scripts
■ .sh file extension for Linux scripts
■ .command file extension for Mac OS X scripts
Uninstalling BIRT Analytics
Uninstalling BIRT Analytics deletes the BIRT Analytics from your computer. If you plan to move your installation to another computer, create a backup of your BIRT Analytics files before starting the uninstall process.
The uninstall program unregisters the modules from the operating system and shuts down the specified BIRT Analytics services.
Complete the following methods to uninstall BIRT Analytics:
1 Run the uninstall script:
■ In Windows, run the following command as Administrator:
[installation path]\Installer\uninstall.bat
■ In Linux, run the following command:
[installation path]\Installer\./uninstall.sh
■ In Mac OS X, run the following command:
Analytics installation. If you are migrating to a newer version of BIRT Analytics, do not select the Force the deletion of [installation
path].-Figure 2-20 Starting the uninstaller process
3 When the Uninstaller is finished choose Quit, as shown in Figure 2-21.
C h a p t e r
3
Chapter 3
Setting up BIRT Analytics
This chapter contains the following topics:
■ Accessing BIRT Analytics
■ Configuring BIRT Analytics security
■ Securing web applications using HTTPS
Accessing BIRT Analytics
BIRT Analytics web client, administration, and data loader are available as web applications running in supported web browsers. Accessing these web
applications from another computer requires any network firewalls to allow inbound and outbound TCP traffic on port 8110. For example, if using Windows Firewall, change the Windows Firewall advanced settings to open port 8110 to TCP inbound traffic.
Using BIRT Analytics web client
To access the BIRT Analytics web client, double-click the BIRT Analytics icon on the computer where BIRT Analytics is installed or open a browser manually and type the following URL:
http://localhost:8110/bafrontend
To access the BIRT Analytics web client from another computer, replace localhost with the name or IP address of the computer where BIRT Analytics is installed.
For more information about BIRT Analytics, see Using BIRT Analytics.
Managing BIRT Analytics
To access BIRT Analytics administration tools, double-click the BIRT Analytics Administration icon on the computer where BIRT Analytics is installed or open a browser manually and type the following URL:
http://localhost:8110/baadmin
To access BIRT Analytics administration tools from another computer, replace localhost with the name or IP address of the computer where BIRT Analytics is installed.
For more information about BIRT Analytics administration tools, see
Administering BIRT Analytics.
Loading BIRT Analytics data
To access BIRT Analytics data loading tools, double-click the FastDB Loader icon on a Windows desktop or open a browser manually and type the following URL:
http://localhost:8110/qloader
Accessing REST API documentation
After installing the REST API, the interactive documentation is configured for use from the computer where BIRT Analytics is installed. All of the URLs generated by the interactive documentation use localhost. To use the REST API interactive documentation from a remote computer you must change the REST API configration.
A direct query to the REST API does not require any changes after installation. For example, the following REST request will work after an installation:
http://analytics.example.com:8110/restapi/rest/user/ login?username=Administrator&password=PASSWORD
How to configure remote access to REST API documentation
The following steps enables remote access to the REST API interactive documentation:
1 Edit the REST API configuration file. This configuration file is in the following location:
[installation path]\restAPI\WEB-INF\settings\configuration.xml
The installation path is the folder where you installed BIRT Analytics. For example, in Windows this path would be:
C:\Program Files\BIRTAnalytics\restAPI\WEB-INF\settings\ configuration.xml
If you are using Windows, you will need to first open your text editor, such as notepad, as Administrator to edit files in the C:\Program Files path.
2 Modify the following elements in the configuration file:
<bootstrap>http://localhost:8110/restapi/rest</bootstrap>
to
<bootstrap>http://hostname.domain:8110/restapi/rest</bootstrap>
Replace hostname.domain with the name of the computer running BIRT Analytics, such as analytics.example.com. In a distributed installation using two servers, apply these changes in SERVER1 - BAapps.
3 Restart the BIRT Analytics - Apache Tomcat service.
Using ODA drivers
BIRT design files exported from BIRT Analytics requires ODA analytic drivers to use the design file in both BIRT Designer Professional and BIRT iHub. For example, you export a cross tab analysis to a BIRT design file. Install BIRT Analytic ODA drivers in BIRT Designer Professional to edit the file in BIRT Designer Professional. Install BIRT Analytic ODA drivers in BIRT iHub to view and schedue the file in BIRT iHub.
Install the ODA FastDB drivers when you want to retrieve data directly from the FastDB engine. This enables users to analyze the data directly in BIRT reports, dashboards, and visualizations. The ODA drivers are available from the following URL:
http://developer.actuate.com/community/forum/index.php?/files/ file/1093-oda-for-birt-analytics/
For more information about BIRT Analytic ODA drivers see Using BIRT Analytics.
Configuring BIRT Analytics security
BIRT Analytics secures data in transit to prevent unauthorized third parties from accessing information passing between BIRT Analytics services and between the BIRT Analytics server and the end user. Data in transit use the following security protocols:
HyperText Transfer Protocol Secure (HTTPS) and Transport Layer Security (TLS) is used for:
■ Communication between the user’s web browser and the web client, administration and loader services.
■ BIRT Analytic packages that communicate with each other, such as FastDB and the ApplicationWS packages
For testing purposes you can enable the use of a self-signed certificate with the common name localhost.
Understanding HTTPS
HyperText Transfer Protocol Secure (HTTPS) is a protocol used to enable secure communication over a computer network. When HTTPS is at the beginning of a URL web address such as https://www.actuate.com, the web browser attempts to activate an encrypted connection using the Transport Layer Security (TLS).
After the client completes the TLS handshake, the web browser securely uses the same features available to an HTTP connection, such as hyperlinks and
JavaScript.
Understanding TLS
Transport Layer Security (TLS) is a protocol for securely exchanging information, such as passwords, credit card numbers, medical, and other private data, over a computer network. TLS provides the means to:
■ Encrypt data exchanged between two parties.
■ Verify the identity of the server and optionally the client.
■ Verify the integrity of the message, that no tampering of the data occurred. TLS uses the following components:
■ Private key
Available only to the owner of the private key. Used to decrypt a message encrypted by the public key.
■ Public key
Available to the public. Used to encrypt a message sent to the owner of the private key.
■ Digital certificate
Contains information such as the certificate issuer, certificate expiration date, information about the certificate owner, and the certificate owner’s public key. The certificate is signed by a certificate authority, using a digital signature.
■ Certification authority (CA)
A trusted agency that validates information about an entity such as an online business and signs a digital certificate for the entity to use.
BIRT Analytics secure communication process
A client uses a web browser to access a server hosting BIRT Analytics. The secured connection starts when a client visits the server using a URL web address beginning with HTTPS. The client receives the server’s digital certificate
identifying the server and including the server’s public key. The client web browser checks the following characteristics of the certificate:
■ That the domain in the certificate matches the domain of the server
■ That the certificate is trusted or signed by a trusted certificate authority
■ That the certificate is not expired
■ That the certificate is not revoked
After accepting the server’s certificate, the client uses the public key from the server’s certificate to encrypt a message. The client then sends the message to the server. The message requests that the server generate a session key, also known as a shared secret key. At the same time, the client uses the data in the message to generate the same session key that the client expects the server to generate.
The server uses its private key to decrypt the message from the client. Then, the server uses the data in the message to generate a session key, identical to the session key the client generated. The client and the server use the generated session key to encrypt data, decrypt data, and verify data integrity using checksums.
The server sends a message encrypted using the generated session key back to the client. This message completes the TLS handshake and confirms that data travels securely between both sides of the connection.
Securing web applications using HTTPS
Using a security certificate with BIRT Analytics enables verification of the identity of the BIRT iHub Analytics and encryption of data sent between the web browser and BIRT Analytics services. The certificate installed with BIRT Analytics is self-signed and is for demonstration purposes only. A self-signed certificate is not signed by a Certification Authority (CA). A CA verifies that a certificate is valid and that no tampering has occurred. Using this demonstration a security certificate shows a warning in the web browser. Use the self-signed certificate to test the creation of an TLS-based connection between the web browser and the BIRT Analytics server.
Using self-signed certificates during server testing is common practice for web developers. To test a secure HTTPS connection, generate a root certificate that signs and validates the self-signed certificate. This root certificate can then be installed and trusted in web browsers that connect to BIRT Analytics. Root certificates from many certificate authorities are preinstalled in operating systems.
A security certificate has the following general characteristics:
■ Domain name, such as actuate.com. The name confirms the server is associated with the domain name of the website.
■ Expiration date. After this expiration date, the certificate will not be trusted.
How to enable HTTPS secured communication
Complete the following steps during the BIRT Analytics installation process to enable HTTPS secured communications.
1 In Installation Type, verify that Custom is selected and choose Next.
2 In Advanced Installation enable the HTTPS transport protocol type, as shown in Figure 3-1.
Figure 3-1 Enabling HTTPS communication
3 Finish the rest of the BIRT Analytics installation process. The desktop and start menu links for BIRT Analytics services will use the HTTPS secured URLs to access services.
4 Test the use of HTTPS in your web browser to access the different BIRT Analytics applications. For example shortcuts in the Windows start menu and on the desktop enable you to access the HTTPS secured applications.
■ BIRT Analytics at the following URL:
https://localhost:8109/bafrontend
■ BIRT Analytics Administration at the following URL:
https://localhost:8109/baadmin
■ FastDB Loader at the following URL:
■ REST API at the following URL:
http://localhost:8109/restapi
5 The self-signed certificate used for testing HTTPS secure communication with BIRT Analytics will trigger a warning with your web browser because this certificate is not signed by a certificate authority and uses the domain name localhost. Choose the option with your browser to continue viewing the HTTPS URL for BIRT Analytics.
■ In Internet Explorer, choose Continue to this website.
■ In Chrome, select Advanced. Then, choose Proceed to localhost.
■ In Firefox, select I Understand the Risks. Choose Add Exception. Then,
choose Confirm Security Exception.
When you use an security certificate signed by a trusted certificate authority, these warnings will not appear.
6 Verify that the BIRT Analytics website appears and that the URL is using HTTPS, as shown in Figure 3-2.
Figure 3-3 Viewing the security certificate
Using custom security certificates
The following steps install your own client certificate, self-signed or signed by a certificate authority. Complete these steps after installing BIRT Analytics with the HTTPS secured communication enabled.
Before starting, verify that the hostname.domain are resolved by your domain name server (DNS). Optionally, verify that the IP and hostname.domain entries appear in the host files of connecting computers and servers. In a distributed installation between two servers, each server must have the IP and
hostname.domain entries for both servers.
The following terms are used during the installation of a custom security certificate:
■ cert.p12
The name of the PKCS#12 file that contains your new certificate.
■ keystore.jks
The output file name for your Java keystore.
■ original_alias
■ new_alias
The alias of the Java Keystore you are creating. Consider using the same alias as you used during installation in order to ensure there is only one signature per jar. To determine what value was used, open the install.log file and search for "Enter the alias of your private key."
■ password
This password protects the keystore you are creating.
■ PFX
A PKCS#12 archive that contains a private key, one or more Certificate authority certificates and an optional password.
■ same_password
This password protects the private key in the keystore you are creating. Use the same password that you specified for deststorepass.
■ TLS
Transport Layer Security security protocol
How to use a custom security certificate
These steps configure security secured access to the webclient, administration and FastDB Loader using TCP port 8109. You import your custom security certificate in the PKCS#12 format into a new Java keystore file. These steps use the keytool software included with the BIRT Analytics Java Runtime Environment.
In a distributed installation using two servers, apply these changes in both servers; SERVER1 – BAapps and SERVER2 – BAcore.
1 Stop the BIRT Analytics - Apache Tomcat service.
2 Verify the location of your Java keystore with the file name keystore.jks. The default location is in the following location:
[installation path]\data\Tomcat\keystore.jks
The installation path is the folder where you installed BIRT Analytics. For example, in Windows this path would be:
C:\Program Files\BIRTAnalytics\data\Tomcat\
This will be the location for your new keystore file in this example. You can store your new keystore file in another location.
3 Obtain the following information about your PKCS#12 file:
You can see the Friendly Name, also called the alias name, with the following command:
keytool –list –v -storetype pkcs12 –keystore <cert.p12>
Replace <cert.p12> with your certificate file and type the password that protects your PKCS#12 file when prompted to do so. For example, the following command displays the Friendly Name of the PKCS#12 archive quite4me.pfx:
C:\Program Files\BIRTAnalytics\3rdParty\JRE64\bin>keytool –list –v –storetype pkcs12 –keystore “C:\Program Files\
BIRTAnalytics\data\Tomcat\quite4me.pfx”
4 Use the following command to import your PKCS#12 file into a new Java keystore file:
keytool -importkeystore -srckeystore <cert.p12> -destkeystore <new_keystore_name.jks> -srcstoretype pkcs12 -deststoretype JKS alias <original_alias> destalias <new_alias>
-deststorepass <password> -destkeypass <same_password>
When prompted to type the source keystore password, type the password that protects your PKCS#12 file. For example, the following command imports the custom certificate from the PKCS#12 archive quite4me.pfx into a new keystore birtanalytics.jks:
C:\Program Files\BIRTAnalytics\3rdParty\JRE64\bin>keytool -importkeystore -srckeystore “C:\Program Files\BIRTAnalytics\ data\Tomcat\quite4me.pfx” -destkeystore “C:\Program Files\ BIRTAnalytics\data\Tomcat\birtanalytics.jks” -srcstoretype pkcs12 deststoretype JKS alias 1 destalias quite4me -deststorepass birtanalytics -destkeypass birtanalytics
5 Verify the content of your new Java keystore using the following command:
keytool –list –v –keystore <keystore.jks>
For example, the following command verifies the contents of the keystore file birtanalytics.jks:
C:\Program Files\BIRTAnalytics\3rdParty\JRE64\bin>keytool –list –v –keystore "C:\Program Files\BIRTAnalytics\data\Tomcat\ birtanalytics.jks"
6 Locate the Tomcat server.xml file and the section about the SSL connector. This file is located in the following location:
The section about the SSL connector looks like the following code:
<!-- Define a SSL HTTP/1.1 Connector on port 8109
This connector uses the BIO implementation that requires the JSSE
style configuration. When using the APR/native implementation, the
OpenSSL style configuration is required as described in the APR/native
7 Edit the Tomcat server.xml to identify the location of the new keystore file, and include the password to access the new keystore file.
1 Change the keystoreFile to the location of the new Java keystore that contains your custom security certificate
2 Change the keystorePass to the password to access the keystore that you created.
For example, the following security connector configuration identifies the location of the Java keystore file named birtanalytics.jks. This example also sets the password to access the new keystore to birtanalytics:
<Connector port="8109"
9 Visit one of the HTTPS secured BIRT Analytics services and verify the certificate that is used by your web browser.
Securing communications to ApplicationWS
You can secure communication to ApplicationWS using port 8109 and HTTPS. Add your certificate to the Java keystore and configure ApplicationWS to use the new certificate. In a distributed installation in two servers, apply these changes in both servers; SERVER1 – BAapps and SERVER2 – BAcore.
How to use HTTPS with ApplicationWS
The following steps enable HTTPS communication to ApplicationWS. You also configure BIRT Analytics Administration, Loader, REST API, and Web Client to use HTTPS to access ApplicationWS.
1 Open Windows Command Prompt or a terminal session in Linux or Mac OS X.
2 Navigate to the following folder:
[installation path]\3rdParty\JRE64\bin
The installation path is the folder where you installed BIRT Analytics. For example, in Windows this path would be:
C:\Program Files\BIRTAnalytics\3rdParty\JRE64\bin
3 In this folder, run the following command to import your PEM format security certificate into the cacerts keystore:
keytool -import -trustcacerts -file "[path to your
certificate]\root.pem" -alias ALIAS -keystore "[installation path]\3rdParty\JRE64\lib\security\cacerts"
When prompted to type the cacerts keystore password use the default "changeit". For example, in Windows this path would be:
C:\Program Files\BIRTAnalytics\3rdParty\JRE64\bin >keytool -import -trustcacerts -file " C:\Program Files\BIRTAnalytics\ data\Tomcat\gdig2.pem" -alias CA_DADDY_Q -keystore " C:\ Program Files\BIRTAnalytics\3rdParty\JRE64\lib\security\ cacerts "
4 Configure the Administration configuration file to enable HTTPS access to ApplicationWS by completing the following steps:
1 Edit the configuration file is in the following location:
2 Modify the following element in the configuration file:
Replace hostname.domain with the name of the computer running
ApplicationWS, such as server1.quite4me.com. In a distributed installation in two servers, apply these changes in SERVER1 - BAapps.
5 Configure the Web Client configuration file to enable HTTPS access to ApplicationWS by completing the following steps:
1 Edit the configuration file is in the following location:
[installation path]\WebClient\WEB-INF\settings\ configuration.xml
2 Modify the following element in the configuration file:
<electronurl>https://localhost:8109/electronws/services</ electronurl>
to
<electronurl>https://hostname.domain:8109/electronws/ services</electronurl>
Replace hostname.domain with the name of the computer running
ApplicationWS, such as server1.quite4me.com. In a distributed installation using two servers, apply these changes in SERVER1 - BAapps.
6 Configure the Loader configuration file to enable HTTPS access to ApplicationWS by completing the following steps:
1 Edit the configuration file is in the following location:
[installation path]\FastDB\Loader\WEB-INF\settings\ configuration.xml
The installation path is the folder where you installed BIRT Analytics. For example, in Windows this path would be:
C:\Program Files\BIRTAnalytics\FastDB\Loader\WEB-INF\ settings\configuration.xml
2 Modify the following element in the configuration file:
to
<electronurl>https://hostname.domain:8109/electronws/ services</electronurl>
Replace hostname.domain with the name of the computer running
ApplicationWS, such as server1.quite4me.com. In a distributed installation using two servers, apply these changes in SERVER2 - BAcore
7 Configure the REST API configuration file to enable HTTPS access to ApplicationWS by completing the following steps:
1 Edit the configuration file is in the following location:
[installation path]\restAPI\WEB-INF\settings\ configuration.xml
The installation path is the folder where you installed BIRT Analytics. For example, in Windows this path would be:
C:\Program Files\BIRTAnalytics\restAPI\WEB-INF\settings\ configuration.xml
2 Modify the following element in the configuration file:
<electronurl>https://localhost:8109/electronws/services</ electronurl>
to
<electronurl>https://hostname.domain:8109/electronws/ services</electronurl>
Replace hostname.domain with the name of the computer running
ApplicationWS, such as server1.quite4me.com. In a distributed installation using two servers, apply these changes in SERVER1 - BAapps.
Securing communications to Connectors
You can secure communication to Connectors using port 8109 and HTTPS. Add your certificate to the Java keystore and configure ApplicationWS to use the new certificate. In a distributed installation in two servers, apply these changes in SERVER1 - BAapps.
How to configure ApplicationWS to use HTTPS with Connectors
The following steps configures ApplicationWS to access Connectors using HTTPS.
1 Edit the ApplicationWS configuration file to enable HTTPS access to Connectors. This configuration file is in the following location:
The installation path is the folder where you installed BIRT Analytics. For example, in Windows this path would be:
C:\Program Files\BIRTAnalytics\ApplicationWS\WEB-INF\settings\ configuration.xml
2 Modify the following elements in the configuration file:
<baconnector>https://localhost:8109/baconnectors/metainf</
Replace hostname.domain with the name of the computer running
Connectors, such as server1.quite4me.com. In a distributed installation using two servers, apply these changes in SERVER1 - BAapps.
Securing communications to FastDB
You can secure communication to FastDB using port 8106 and TLS. Using TLS secure communication to access FastDB is only used in a distributed installation when FastDB, also known as dubnium, is installed in a different server than ApplicationWS, also known as electronws.
Configure FastDB to use the new certificate and configure ApplicationWS to access FastDB with a secured connection. In a distributed installation in two servers, apply these changes in SERVER1 - BAapps.
How to configure ApplicationWS to use TLS with FastDB
The following steps configures ApplicationWS to access FastDB using TLS.
1 Edit the ApplicationWS configuration file to enable HTTPS access to Connectors. This configuration file is in the following location:
[installation path]\ApplicationWS\WEB-INF\settings\ configuration.xml
The installation path is the folder where you installed BIRT Analytics. For example, in Windows this path would be:
2 Modify the following elements in the configuration file:
<engineserver>localhost</engineserver> <engineport>8105</engineport>
<engineignoredangerous>false</engineignoredangerous> <enginesecure>false</enginesecure>
to
<engineserver>SERVER2</engineserver> <engineport>8106</engineport>
<engineignoredangerous>true</engineignoredangerous> <enginesecure> true </enginesecure>
Replace SERVER2 with the name of the computer running Connectors, such as server1.quite4me.com. In a distributed installation using two servers, apply these changes in SERVER1 - BAapps.
How to configure FastDB to use TLS
The following steps configure FastDB to use TLS if you did not enable it during installation or you are using your own certificate. In a distributed installation using two servers, apply these changes in SERVER2– BAcore.
1 Stop the BIRT Analytics – FastDB service.
2 Open the FastDB configuration file in a text editor. This configuration file is in the following location:
[installation path]\data\FastDB\engine_configuration.ini
The installation path is the folder where you installed BIRT Analytics. For example, in Windows this path would be:
3 Add the following parameters to the FastDB configuration file if you are using your own certificate and not the auto-generated certificate created during the installation process:
[server]
enable_secure_port = 1
--server.ssl_mode arg (=simple) Certificate mode for TLS ('simple'=self-signed certificate, 'complete'=with root CA) --server.dh_filename arg (=dhparams.pem) Diffie-Hellman
parameters file
--server.rand_filename arg (=ssl.rnd) Random file for TLS calculations
--server.certificate arg (=server.pem) Server public certificate
--server.private_key arg (=server.key) Server private key --server.private_key_password arg Password for server private
key
--server.root_ca_certificate arg (=cacert.pem) Root CA public certificate
--server.cert_country arg Server certificate data: two character country (US, UK, SP, ...)
For example
FastDB auto-generates the needed certificates and can use TLS without these options. The auto-generated certificates are not signed by a certificate authority so they provide minimum authentication. If you have a valid certificate purchased from a Certificate Authority, or even a self-generated one, you can use these parameters to specify required values of your custom certificate. These parameters can also be used with the FastDB auto-generated certificate to customize certificate properties such as country, email,
organization.
Securing communications using REST API
You can secure communication to the REST API using port 8109 and HTTPS. For example, the following REST request uses HTTPS security to communicates with BIRT Analytics:
https://analytics.example.com:8109/restapi/rest/user/ login?username=Administrator&password=PASSWORD
You can also configure the REST API interactive documentation to use the new certificate. In a distributed installation in two servers, apply these changes in SERVER1 - BAapps.
How to configure secure access to REST API documentation
The following steps enables remote access to the REST API interactive documentation:
1 Edit the REST API configuration file. This configuration file is in the following location:
[installation path]\restAPI\WEB-INF\settings\configuration.xml
The installation path is the folder where you installed BIRT Analytics. For example, in Windows this path would be:
C:\Program Files\BIRTAnalytics\restAPI\WEB-INF\settings\ configuration.xml
If you are using Windows, you will need to first open your text editor, such as notepad, as Administrator to edit files in the C:\Program Files path.
2 Modify the following elements in the configuration file:
<bootstrap>http://localhost:8110/restapi/rest</bootstrap>
to
<bootstrap>https://hostname.domain:8109/restapi/rest</ bootstrap>
Replace hostname.domain with the name of the computer running BIRT Analytics, such as analytics.example.com. In a distributed installation using two servers, apply these changes in SERVER1 - BAapps.
3 Restart the BIRT Analytics - Apache Tomcat service.