MATERI AUDIO
SHORT COURSE
1. PENGENALAN DASAR AUDIO
1. AUDIO
• SOUND WAVE
• WAVELENGTH / PANJANG GELOMBANG • AMPLITUDO
• FREQUENCY
2. KONSEP SISTEM SUARA
• TRANSDUCER • AMPLIFIER 3. 3 BAGAN AUDIO • SUMBER • PROCESSOR • OUTPUT 4. DIGITAL AUDIO • SAMPLE RATE • DYNAMIC RANGE 2. MICROPHONES • JENIS MIKROFON o DYNAMIC o CONDENSOR • POLAR PATTERNS
• CONTOH MIC DALAM FILM/TV/VIDEO
3. UNSUR-UNSUR AUDIO DALAM FILM/TV
• LIVE DIALOG • OVERDUBS/VOICE OVER • ATMOS • FOLEY • SOUND FX • SCORING • AUDIO EFEK • SOUNDTRACK
4. DIGITAL AUDIO WORKTATION (DAW) • DEFINISI DAW
• CONTOH SKEMA
5. PENGENALAN PRO TOOLS
• SESSION START • MIX WINDOW • EDIT WINDOW • RECORD • IMPORT AUDIO • IMPORT VIDEO • EXPORT DATA • MIX DOWN/BOUNCE
Pengenalan Dasar Audio
Audio berarti “suara” atau “reproduksi suara”. Dalam ilmu fisika, suara adalah bentuk energi yang dikenal sebagai energi akustik. Secara khusus, mengacu pada rentang frekuensi yang dapat dideteksi oleh telinga manusia – sekitar 20Hz to 20kHz. Frekuensi 20Hz merupakan nada suara terendah (bassiest) yang kita bisa dengar, dan 20kHz merupakan nada tertinggi yang kita bisa dengar.
Lingkup kerja audio meliputi produksi, perekaman, manipulasi dan reproduksi gelombang suara. Untuk memahami audio Kita harus memiliki pemahaman tentang dua hal:
. Sound Waves: Apa arti sound waves, bagaimana terjadinya dan bagaimana kita dapat mendengarnya.
. Sound Equipment: Mengenai komponen-komponennya, cara kerjanya, bagaimana memilih peralatan yang benar dan cara penggunaannya.
.
Hal pertama yang harus kita kuasai adalah dasar teori gelombang suara (Sound Waves)…
Bagaimana Sound Waves Bekerja
Sebelum Kita mempelajari bagaimana peralatan sound bekerja, sangat penting untuk memahami kerja gelombang suara. Pengetahuan ini akan menjadi dasar dari segala sesuatu yang akan Kita lakukan di bidang audio.
Gelombang suara terjadi sebagai variasi tekanan dalam sebuah media, seperti udara. Ia tercipta dari bergetarnya sebuah benda, yang menyebabkan udara sekitarnya ikut bergetar. Udara yang bergetar kemudian diterima oleh telinga, menyebabkan gendang telinga manusia bergetar, kemudian otak menafsirkannya sebagai suara.
Gelombang suara berjalan melalui udara, sama seperti gelombang yang terjadi di air. Bahkan, gelombang air lebih mudah untuk dilihat dan dimengerti, hal ini sering digunakan sebagai analogi untuk menggambarkan bagaimana gelombang suara berperilaku.
Gelombang suara juga dapat ditampilkan dalam stkitar grafik XY. Hal ini memungkinkan kita untuk membayangkan dan bekerja dengan gelombang dari sudut pkitang matematika.
Perhatikan, bahwa suatu grafik gelombang berbentuk dua dimensi, tetapi di dunia nyata gelombang suara berbentuk tiga-dimensi. Grafik menunjukkan gelombang bergerak sepanjang jalan dari
kiri ke kanan, tapi kenyataannya perjalanan gelombang suara bergerak ke segala arah menjauhi sumber. Kira-kira sama seperti riak air yang terjadi ketika kita menjatuhkan sebuah batu ke dalam kolam. Namun model 2-dimensi ini, cukup dapat menjelaskan tentang bagaimana suara bergerak dari satu tempat ke tempat lain.
Hal berikutnya yang perlu diperhatikan adalah : apa artinya ketika gelombang mencapai titik tertinggi atau titik rendah.
Pada sinyal elektronik, nilai tinggi menunjukkan tegangan positif yang tinggi. Ketika sinyal ini dikonversi menjadi gelombang suara, Kita dapat membayangkan nilai-nilai tinggi tersebut sebagai daerah yang mewakili peningkatan tekanan udara. Ketika gelombang menyentuh titik tertinggi, hal ini berhubungan dengan molekul udara yang menyebar bersama-sama secara padat. Ketika gelombang menyentuh titik rendah, molekul udara menyebar lebih tipis (renggang).
Sekarang ada satu hal penting: Semua pekerjaan audio adalah memanipulasi gelombang suara. Hasil akhir dari pekerjaan Kita adalah rangkaian tekanan tinggi dan tekanan rendah dari gelombang suara. Itulah mengapa sangat penting untuk memahami bagaimana suara bekerja – karena suara adalah “materi” seni Kita.
Bagian-bagian Gelombang Suara
Semua gelombang memiliki sifat-sifat tertentu. Ada tiga bagian yang paling penting untuk audio :
Panjang gelombang: Jarak antara titik manapun pada gelombang (pada gambar ditunjukkan sebagai titik tertinggi) dan titik setara pada fase berikutnya. Secara harfiah, panjang gelombang adalah jarak yang
digambarkan dgn huruf “T”.
Amplitudo: atau kekuatan sinyal gelombang (intensity). Titik tertinggi dari gelombang bila dilihat pada grafik. Amplitudo tinggi biasa disebut sebagai volume yang lebih tinggi, diukur dalam dB. Nama perangkat untuk meningkatkan amplitudo disebut amplifier.
Frequency: Frekuensi waktu yang dibutuhkan oleh gelombang bergerak dari satu pase ke pase berikutnya dalam satu detik. Diukur dalam herz atau cycles per second. Semakin cepat sumber suara bergetar, semakin tinggi frekuensi. Jangkauan frekuensi yang dapat didengar telinga adalah 20 Hz – 20Khz.
Frekuensi yang lebih tinggi ditafsirkan sebagai pitch yang lebih tinggi. Sebagai contoh, ketika Kita menyanyi dengan suara bernada tinggi Kita memaksa pita suara Kita bergetar lebih cepat.
Sistem Suara (Sound System)
Bekerja dengan audio berarti bekerja dengan sistem suara (sound system). Tentu saja, sangat banyak sound system yang tersedia dengan aneka aplikasi yang berbeda, tergantung merk dan model. Namun, semua sound system elektronik memiliki satu konsep yang sama, yaitu : Untuk mengambil gelombang suara, mengkonversinya menjadi arus listrik dan memanipulasi mereka sesuai yang diinginkan, kemudian mengubahnya kembali menjadi gelombang suara.
Sebuah sistem suara sangat sederhana terdiri dari dua jenis komponen:
Transducer – Perangkat yang mengubah energi akustik menjadi energi elektrik atau sebaliknya. Dua jenis transduser yang sering kita gunakan adalah mikrofon (yang mengubah energi akustik
menjadi energi listrik) dan speaker (yang mengubah energi listrik menjadi energi akustik).
Amplifier – Perangkat yang menerima sinyal dan meningkatkan kekuatannya (yakni meningkatkan amplitudo sinyal tersebut). . Proses bermula dari sumber suara (seperti suara manusia, instrumen
musik, dll), yang menciptakan gelombang suara (akustik energi). . Gelombang ini dideteksi oleh transduser (mikrofon), yang
merubahnya menjadi energi listrik.
. Sinyal listrik dari mikrofon sangat lemah, jadi harus diberikan penguatan.
. Loudspeaker mengubah sinyal listrik kembali ke gelombang suara, sehingga dapat didengar oleh telinga manusia.
Pada diagram sebuah sistem yang sedikit lebih rumit biasanya memiliki fungsi tambahan, yang meliputi:
Sinyal prosesor – perangkat dan software yang memungkinkan manipulasi sinyal. Prosesor yang paling umum adalah tone adjuster seperti kontrol nada bass dan treble.
Bagian Perekaman dan pemutaran – perangkat yang mengkonversi sinyal ke format penyimpanan tertentu untuk reproduksi lebih lanjut. Format perekam tersedia dalam berbagai bentuk, seperti pita magnetik, optik CD, hard drive komputer, dll.
. Sinyal audio dari transduser (mikrofon) melewati satu atau lebih processing unit, yang kemudian menghasilkan out put untuk kemudian direkam (atau untuk di amplifikasi).
. Sinyal dihubungkan ke perangkat perekam untuk penyimpanan. . Sinyal yang disimpan akan diputar kembali dan diolah lebih lanjut. . Sinyal diperkuat dan dihubungkan kepada pengeras suara.
The 3-part audio model
3-bagian model
audio
Salah satu cara sederhana untuk memvisualisasikan sistem audio adalah dengan membaginya menjadi tiga bagian: sumber, prosesor dan output.
Sumber adalah tempat sinyal audio elektronik yang diterima.. Bisa berasal dari sumber “live” seperti mikrofon atau alat musik elektrik, atau sumber “playback” seperti tape deck, CD, dll. Bagian pengolahan adalah tempat di mana sinyal dimanipulasi.
equaliser , left/right stereo balance, and amplifiers.
Bagian output adalah tempat di mana sinyal diubah menjadi gelombang suara (oleh pengeras suara), sehingga dapat didengar oleh manusia. Output bisa berupa headphone atau loud speaker.
Sekarang bayangkan sound system yang digunakan untuk konser stadion dengan menggunakan daya multi-kilowatt. Walaupun ini merupakan sistem yang kompleks, pada dasarnya sama, terdiri dari tiga bagian: Sumber (mikrofon, instrumen, dll), prosesor dan speaker.
Pengenalan digital audio
Sample Rate
Sample rate adalah jumlah sample audio per detik. Diukur dengan satuan hertz.
Tiap sample diterjemahkan oleh bahasa binary komputer. Terdapat beberapa langkah penterjemahan (encoding) sample audio yang disebut word length dan diukur dalam bit.
Jumlah penterjemahan (BIT LENGHTS) yang sering ditemukan dalam proses audio adalah :
8-bit word = (nnnn nnnn) = 256 langkah
16-bit word = (nnnnnnnn nnnnnnnn) = 65.536 langkah
24-bit word = (nnnnnnnnnnnn nnnnnnnnnnnn) = 16.777.216 langkah
Semakin besar bit lengths atau bit depth nya , semakin kecil tingkat kesalahan (error rate) yang menghasilkan resolusi suara yang lebih baik.
Dynamic range
Dynamic Range adalah perbandingan (rasio) atau jangkauan suara terlemah terhadap suara terkuat pada sebuah alat music atau electronic. Diukur dengan desibel (dB).
Sebagai perbandingan, dynamic range pendengaran manusia, antara suara yang terlemah yang dapat didengar dengan suara terkuat adalah 120 dB.
Headroom dan Struktur Gain
Headroom dapat diartikan sebagai besarnya gain yang dapat dioperasikan di atas level operasi normal sebelum timbul distorsi. Kamera semi pro pada umumnya dikenal memiliki SEDIKIT headroom, sehingga sangat penting mengatur struktur gain yang benar.
Signal to noise ratio (S/N atau SNR) adalah perbandingan antara
signal/suara yang terekam terhadap level noise (noise floor) yang terdapat dalam system audio anda
Gain bisa diatur dengan pre-amp. Kesalahan umum adalah mengatur gain terlalu lemah. Dapat menimbulkan noise/hiss saat diperkuat pada proses signal berikutnya, yang juga memperkuat noise yang terekam.
.
Mic level vs. Line level –
Mikrofon menghasilkan signal sangat lemah, berkisar -40dB, sehingga kita menggunakan pre-amp untuk menaikkan gain level, yang berkisar +4 dB. Mudahnya adalah, signal yang keluar dari mic disebut mic level, yang dihasilkan mixer atau preamp adalah line level.
Contoh setting mic pada kamera
MICROPHONES
Mikrofon adalah sebua transducer, yang mengubah getaran tekanan udara menjadi arus listrik.
Ada 5 jenis mikrofon; dynamic, condensor, ribbon (pita), Kristal, dan carbon.
2 jenis yang paling banyak digunakan adalah
Dynamic mics ; memakai kumparan magnet. Tidak memerlukan power untuk beroperasi. Kurang sensitive yang berarti biasa dipakai untuk merekam suara keras tanpa distorsi. Kelemahannya kurang menangkap jangkauan frekuensi yang luas, tetapi lebih awet dan lebih murah dari condensor.
;
skema dynamic mic
Condensor mics ; terdapat plat dekat diafragma, memerlukan power untuk beroperasi, dari Phantom Power +48V yang berasal dari kamera atau mixer, atau dari baterai. Lebih sensitive sehingga lebih akurat dan dapat menangkap suara yang lebih halus. Jangkauan frekuensi yang terekam juga lebih lebar.
Polar Pattern
Terdapat satu pattern lagi yang merupakan turunan dari hyper cardiod yaitu;
Contoh jenis mic untuk film/tv
Ø
ShotgunDigunakan mengambil suara jarak relatif dekat, dan suara tertentu (spesifik), di lingkungan ramai. Sering digunakan dengan boom dan windscreen.
Ø Lavalier (lapel mic)
Mic condensor kecil dipakai bila diperlukan penempatan mikrofon yang dekat tanpa terlihat. Dapat digunakan dengan transmitter wireless.
Ø Parabolic mic
Microphone terletak di tengah parabola, digunakan untuk mengambil suara dari jarak jauh. Efektif untuk suara dengan frekuensi tinggi seperti suara burung.
Contoh setting mic pada kamera
UNSUR AUDIO DALAM
FILM/TV/VIDEO
Ø Live Dialog
Ø Overdub/Voice Over ; Rekaman dialog/narasi
o ADR ( Additional Dialog Replacement)
Mengganti rekaman dialog di studio dipandu oleh gambar. Sebaiknya menggunakan mic yang sama saat pengambilan gambar.
Disebabkan antara lain ;
• Kualitas rekaman awal kurang baik
• Penampilan/pengucapan kurang baik
• Over dub ke dalam bahasa lain
• Perlu diganti dengan karakter suara lain
Ø Atmos ; Suara lingkungan/luar (atmosfir)
Ø Foley ; sound efek yang direkam secara live
Ø Score; contoh orchestra dll
Ø Sound fx; library fx terbagi dalam Synchronous & Asynchronous. Synchronous ; sinkron dengan gambar yang sedang ditampilkan. Asynchronous; Suara diluar yang terlihat pada gambar saat itu.
Ø Audio FX ; Manipulasi audio dengan efek seperti reverb,eq,pitch dll.
Ø Soundtrack ; Lagu yang diciptakan untuk gambar.
Digital Audio Workstation ; merupakan kombinasi perangkat lunak dan perangkat keras digital (sequenser) untuk audio processing and
recording.
Contoh software DAW yang sering digunakan;
Ø Protools
Ø Nuendo
Ø Cubase
Ø Logic…dll
Contoh set up DAW
PENGENALAN PRO TOOLS
SESSION START
Ø Menentukan Jenis session
Ø Nama session
Ø Menentukan Tipe Audio File
Ø Menentukan sample rate dan bit depth
Chapter 11: Sessions 155
Chapter 11: Sessions
The first step in beginning a Pro Tools project is creating a new session. Sessions are represented by session files that can be saved, copied and made into templates.
Quick Start Session Dialog Pro Tools provides a Quick Start dialog on launch that lets you quickly and easily create a new session or open an existing one. You can choose to show or hide the Quick Start dialog on launch in the Pro Tools Operation Preferences. When you first launch Pro Tools, you are prompted by the Quick Start dialog to do one of the following:
• Create a new session from a template. • Create a new blank session.
• Open any of the last ten most recent sessions. • Open any other session on your system.
Creating a New Session from a Template
To create a new session from a template:
1 Select Create Session from Template.
2 From the Session Template pop-up menu, se-lect the category for the session templates you want.
Press Control+Up Arrow or Down Arrow (Windows) or Command+Up Arrow or Down Arrow (Mac) to select different Ses-sion Quick Start options. Also, you can use the Up and Down Arrows to select different items in the Recent Sessions and Session Templates lists.
Session Template pop-up menu, Quick Start dialog
You can create your own custom categories. For more information, see “Session Tem-plates” on page 168.
Chapter 12: Pro Tools Main Windows 173 Pro Tools Mix window
Inserts (A–E) View (page 932) Track List (page 222) Volume fader (page 208) Pan knob (page 208) Level meter (page 209) Stereo Audio Track (page 200) Auxiliary Input (page 201) Delay Compensation View (page 933) Master Fader (page 202) AutoMatch indicator (page 1013)
Track Path selectors (page 226 and page 235) Mono Audio Track (page 200) MIDI Track (page 203) Sends (A–E) View (page 932) Automation Mode selector (page 1004) Track Comments View (page 931) Voice selector (page 232) Track Name (page 212) Mix Group List
(page 245) Group ID indicator (page 248) Instrument Track (page 203) Instrument View (page 931) Mix Window View selector (page 930) Show/Hide
Track List/Group List View (page 222) Channel strips (page 201) Solo/Mute (page 237) Input Monitoring / Record Enable (page 442 and page 436) EDIT WINDOW
Chapter 12: Pro Tools Main Windows 175
Pro Tools Edit window
Timebase and Conductor rulers (page 749) Region List (page 259) Track List (page 222) Edit Mode buttons (page 527) Edit tools (page 531) Zoom buttons (page 532)
Counters and Edit Selection indicators
(page 573)
Grid and Nudge values
(page 177)
MIDI Editor pane (Notation view)
(page 183)
MIDI Controller lanes (page 716) Selected Region (page 561) Edit Group List (page 755) Transport controls (page 180) Edit Window Toolbar and menu
(page 176) Tracks (page 199) Playlists Track View (page 621) Elastic Audio Warp Track View
(page 855) Automation (page 1001) Universe view (page 575) Edit Window Zoom buttons (page 178)
Dalam editing bisa dilakukan operasi seperti separation, time stretch, mute, copy dsb.
RECORDING
Chapter 22: Audio Recording 449
Chapter 22: Audio Recording
In Pro Tools, you record audio to audio tracks. Audio tracks can be mono, stereo, or multichan-nel as appropriate for the recording source. When recording a mono source, record to a sin-gle, mono audio track in Pro Tools. A sinsin-gle, mono audio file is written to disk, and the file appears as a region both in the track’s playlist and in the Region List.
When recording a stereo audio source, record to a single, stereo audio track in Pro Tools. A single, mono audio file is written to disk for each chan-nel of a stereo track: one for the left chanchan-nel, and one for the right channel. These files appear as a stereo region both in the track’s playlist and in the Region List.
Recording a multichannel source to a multi-channel track (Pro Tools HD and Pro Tools with Complete Production Toolkit 2 only) is similar to recording stereo audio tracks. A single, mono audio file is written for each channel in the track, and these files appear as multichannel re-gions in both the track’s playlist and in the Re-gion List (see “Multichannel Audio Tracks” on page 1085).
Before Recording
Before you start recording in Pro Tools, you need to set up your Pro Tools system, a session, and one or more tracks for recording. You will also need to configure how Pro Tools monitors the input you intend to record. For information, see Chapter 21, “Record Setup.”
Basic Recording Steps
To record an audio track:
1 From the track’s Input Path selector, select the audio Input Path you want to record (see “As-signing Hardware I/O on a Track” on page 435). 2 From the track’s Output Path selector, select the main monitoring path.
3 Select the Record Enable button for the audio track. It lights red.
Record enabling a track in the Mix window
Pro Tools Reference Guide 450
4 Adjust the output level of your sound source (instrument, mixer, or preamp). Monitor the track’s meter levels in Pro Tools to ensure that levels peak within at least –6 dB to –12 dB on the input meter without triggering the clipping in-dicator on your audio interface.
5 Do one of the following:
• In the Mix window, adjust the track’s vol-ume and pan faders. These settings are for monitoring purposes only and do not af-fect the recorded material.
– or –
• In the Output window for the track, adjust the track’s Volume fader and Pan sliders. These settings are for monitoring purposes only and do not affect the recorded mate-rial. (See “Output Windows for Tracks and Sends” on page 944.)
6 Choose Window > Transport to display the Transport window. Click Return to Zero to go to the beginning of the session.
7 Click Record in the Transport window to arm Pro Tools for recording. The Record button flashes red to indicate that Pro Tools is ready to record.
8 Ensure that Normal Record mode is selected (see “Record Modes” on page 431).
9 When you are ready to start recording, click Play or press the Spacebar.
If using Countoff, Pro Tools counts off the spec-ified number of measures and then begins re-cording. See “Recording with a Click” on page 426.
10 Record your performance.
11 Click Stop in the Transport window or press the Spacebar when you are finished recording. The newly recorded audio is written to disk and appears as an audio region both in the track’s playlist and in the Region List.
To play back the audio track:
1 Click the Record Enable button for the audio track so that it is no longer record-enabled. Track volume faders now function as playback level controls.
2 To have playback start from the beginning of the session, click Return to Zero in the Trans-port.
3 To start playback, click Play in the Transport or press the Spacebar.
Transport window Fast Forward Record Go to End Play Stop Rewind Return to Zero Online
If a record-enabled track is in Auto Input Monitor mode, you will hear “through” the input while the Transport is stopped. The track automatically switches to playback when you press play, then back to Input mode when you either stop, or punch into re-cord. For more information, see “Auto Input Monitoring” on page 443.
Ø Tentukan input path
Ø Tentukan output path
Ø Pilih tombol Record
Ø Atur gain input sumber suara
Ø Atur volume dan pan untuk monitor
Ø Tentukan titik mulai record
Ø Click record pada transport untuk rekam
Ø Tekan space bar untuk berhenti.
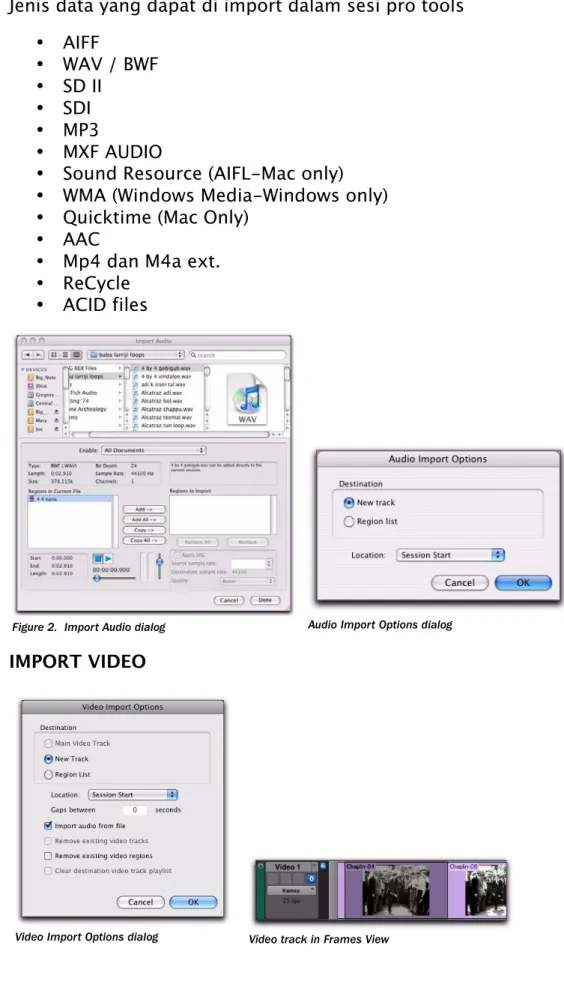
Jenis data yang dapat di import dalam sesi pro tools • AIFF • WAV / BWF • SD II • SDI • MP3 • MXF AUDIO
• Sound Resource (AIFL-Mac only) • WMA (Windows Media-Windows only) • Quicktime (Mac Only)
• AAC
• Mp4 dan M4a ext. • ReCycle
• ACID files
Pro Tools Reference Guide
330
You can choose to display only a certain file type (such as AIFF) by selecting the type from the Show pop-up menu. To display all supported file types, select All Documents from the Show
pop-up menu.
In the import list, audio files are distinguished from regions by their icons.
3 To preview a selected file or region before you import it, click the Play and Stop buttons in the Import Audio dialog.
Adjust the preview volume with the vertical slider. To navigate to a particular location in the file, use the horizontal slider under the Play and Stop buttons.
The audition output path defaults to channels 1–2. For Pro Tools systems with more than 2 channels of output, the audition path can be changed in the I/O Setup (see “Audition Paths” on page 91).
4 Do any of the following:
• To place a file or region in the Import list, select the file and click Add or Convert. • To import all files and regions in the
cur-rent directory, click Add All or Convert All. • To remove a file or region from the Import
list, select it and click Remove.
• To remove all files and regions, click Re-move All.
5 When you have added all audio files and re-gions to the Import list, you can apply sample rate conversion by doing the following:
• Enable Apply SRC.
• Specify the Source Sample Rate either by typing a number, or by selecting a sample rate from the pop-up menu.
• Select the sample rate conversion quality from the Quality pop-up menu. This setting overrides the Sample Rate Conversion Qual-ity setting in the Processing Preferences page.
Figure 2. Import Audio dialog
File and Region icons in the Import Audio dialog On Mac, Sound Resource files must have the “.SFIL” extension to be imported by Pro Tools.
Audio File icon Audio Region icon
The Preview Volume control in the Import Audio dialog also affects the preview volume when auditioning regions in the Region List.
Pro Tools lets you add files to a session that are at a different sample rate than your session. In the comments field of the Import Audio dialog, a warning is posted that these files will play back at the wrong speed and pitch if they are not converted.
Chapter 17: Importing and Exporting Session Data 331
6 Click Done.
7 If you are copying or converting files, choose a location for the new files. Choose a folder on a valid audio drive, such as the Audio Files folder for the current session.
8 In the Audio Import Options dialog, select where the imported files will go in the session:
New Track Each audio file is imported into its own individual track and into the Region List. When importing audio into a track, you can also choose the location in the track where the audio file will begin (such as Session Start).
Region List Audio files are imported into the Re-gion List without creating a new track. Imported audio files appear in the Region List and can then be dragged to audio tracks.
9 If you chose to create a new track, choose a lo-cation for the imported file in the track: Session Start Places the file or region at the start of the session.
Song Start Aligns the beginning of the file or re-gion to the Song Start point.
Selection Aligns the beginning of the file or re-gion to the edit cursor or to the beginning of a selection in the Timeline.
Spot Displays the Spot dialog, which lets you spot the file or region to a precise location based on any of the Time Scales.
10 Click OK.
Importing Audio from Audio CDs
Pro Tools lets you import tracks from audio CDs using the same methods that you use to import audio files, as follows:
• Drag and drop CD audio from the CD folder.
• Drag and drop files from DigiBase Browser. • Use the Import Audio command.
Before importing CD audio, make sure your hard drive has enough space for the converted audio files.
Because the transfer is made in the digital do-main, there is no signal loss.
The sample rate for audio CDs is 44.1 kHz. Therefore, if your session’s sample rate is set to 48 kHz or higher, Pro Tools will convert the sample rate for the imported audio. Before im-porting CD audio, set the Sample Rate Conver-sion Quality preference accordingly. For more in-formation, see “Sample Rate Conversion Quality” on page 323.
Audio Import Options dialog
Importing CD audio with either drag and drop method lets you continue working in the session foreground (such as in the Mix or Edit window), while the Task Manager (Window > Task Manager) works in the background (importing and converting the audio until the import is completed). For more information on the Task Manager, see “Task Window” on page 317.
IMPORT VIDEO
Chapter 51: Working with Video in Pro Tools 1153 2 In any Edit mode, drag the selected video files
to a blank area in the Timeline (to create a new video track) or an existing video track (to place it within that track).
Configuring Video Import Options
The Video Import Options dialog appears when you import video into Pro Tools by using the Import Video command or dragging video files from a DigiBase browser or from Windows Ex-plorer or Mac Finder.
Destination Section
The Destination section of the Video Import Options dialog lets you choose a general desti-nation for imported video in Pro Tools.
Main Video Track The video file is imported di-rectly to the track that is currently online (known as the main video track) and into the Region List. If no track is currently online, the video file will be imported to the last existing video track that was online.
New Track Each video file is imported into its own individual track and into the Region List.
Region List (Pro Tools HD and Pro Tools with Com-plete Production Toolkit or2, or an Avid Video Pe-ripheral Only) Each video file is imported directly into the Region List, where it will be available to drag and drop into the Timeline.
Location Pop-Up Menu
If you do not select the Region List as a destina-tion in the Destinadestina-tion secdestina-tion, the Locadestina-tion pop-up menu lets you choose precisely where in the Timeline Pro Tools places imported video.
Session Start Places the video file at the start of the session.
Song Start Places the video file at the Song Start position.
Selection Places the video file at the edit cursor position or within the selection (if one was made).
Spot Displays the Spot dialog, which lets you spot video to precise locations based on any of the Time Scales.
Original Time Stamp (Avid Video Only) Places Avid video in the Timeline at a time code loca-tion that corresponds to the timestamps from the original source tape. With multiple video files, this places all video files in the Timeline at their respective original timestamps.
Video Import Options dialog
See “Bypassing the Video Import Options Dialog” on page 1154 for details on bypassing the Video Import Options dialog when dragging and dropping video files.
Pro Tools Reference Guide
1148
Video Track Controls and Indicators
Video Track View
The video track can be viewed in Frames View or in Blocks View, both of which display all video region boundaries and metadata. Video frame images are displayed only in Frames View.
To set the view for the video track:
On the video track, select Frames or Blocks from the View Options pop-up menu.
Frames View
In Frames View, video data is displayed as pic-tures in the video track. These picpic-tures are com-puted based on the video image, and scale ac-cording to your track zoom and height settings. They allow you to easily find a scene or se-quence in the video track.
Frames do not display properly if you change zoom settings during playback. Black frames are drawn until playback is stopped. You should stop playback before changing zoom settings if you want to view frames.
If video pull-up or pull-down is enabled, frames do not change position.
Frames View Performance
When using Frames View to view video content in the video track, your computer may exhibit reduced or sluggish performance. If this hap-pens on your computer, hide the video track or switch to Blocks View.
Blocks View
In Blocks View, video frames are replaced by col-ored blocks.
Video Track Type Icons
A video track displays a QuickTime icon, Win-dows Media icon, or an Avid icon depending on the type of video added to it. No icon displays when the video track is empty.
When switching from Blocks mode to Frames mode during playback, the video track will not update to displaying frames until playback is stopped.
Video track in Frames View
Video track in Blocks View
Video tracks displaying QuickTime, Windows Media, and Avid icons
Avid icon QuickTime
icon
Windows Media icon (Windows Vista only)
EXPORT DATA
Ø Di Region list tentukan region yang akan di export
Ø Di menu region list pilih Export Region as Files
Ø Dalam Export Selected Dialog, tentukan File type, Format, Bit depth dan sample rate. Tentukan juga conversion Quality dan pilih Destination Directory.
Pro Tools Reference Guide
334
Exporting Audio
Pro Tools supports exporting audio regions as audio files, exporting left and right audio files as stereo interleaved files, and exporting region in-formation.
You can also export audio from Pro Tools by bouncing or consolidating audio tracks. For more information, see “Bounce to Disk” on page 1062 and “Consolidating Regions” on page 592.
Exporting a Region as a New Audio File
You can export regions as audio files with the Export Regions as Files command. Use this command if you intend to use a region in other sessions (or other audio applications) without using its parent source file.
This command also provides a way to convert regions to a different audio format, sample rate, or bit depth.
To export regions as new audio files:
1 In the Region List, select the regions you want to export.
2 From the Region List menu, choose Export Re-gions as Files.
3 In the Export Selected dialog, set the File Type, Format, Bit Depth, and Sample Rate. In addition, specify the Conversion Quality, and choose the Destination Directory.
When you export regions to a lower bit depth, Dither (with or without Noise Shaping) is ap-plied as shown in the following table. Warped regions (Elastic Audio) will be
ex-ported unwarped at their original duration.
Export Selected dialog
Dither and Noise Shaping with Export Selected dialog Bit Depth Dither Noise
Shaping
24-bit to 24-bit No No 16-bit to 24-bit No No 24-bit to 16-bit Yes Yes 16-bit to 16-bit No No 24-bit to 8-bit Yes No 16-bit to 8-bit Yes No
BOUNCE TO DISK
Setelah kita melakukan mix, dengan berbagai fasilitas seperti compressing, gate, eq, efek, kita bounce hasil mix kita dengan fasilitas bounce to disk. Bounce beroperasi secara real time.
Ø Tentukan seleksi yang akan kita bounce
Ø Pilih File > Bounce to > Disk
Ø Tentukan Bounce Option
Ø Klik Bounce
Chapter 46: Mixdown 1063 Time Stamp Information Bounced material is
au-tomatically time stamped so that you can drag it into a track and place it at the same location as the original material. For more information about time stamping, see “Time Stamping” on page 1137.
Bounced Files Are Delay-Compensated
Pro Tools compensates for any bus and plug-in delays due to a bounce. This means that if a bounced file is imported back into a session, and placed directly in time against the source mix, it is time-aligned with the original source mix.
Record-Enabled Tracks and TrackInput-Enabled Tracks Cannot Be Bounced
Pro Tools does not allow you to bounce tracks that are either record-enabled or in Input Only monitoring mode.
To Bounce to Disk:
1 Make a Timeline selection to define the range to be bounced.
2 Choose File > Bounce to > Disk.
3 Configure the Bounce options (see “Bounce Options” on page 1063).
4 Click Bounce.
Bouncing with Mute Frees Assigned Voice (Pro Tools HD Only)
When bouncing sessions that include muted tracks, enabling “Mute Frees Assigned Voice” can, in some instances, increase the number of tracks that can be successfully bounced. See “Mute Frees Assigned Voice” on page 240.
Bounce Options
When you use the Bounce to Disk command, you can configure several file options.
Help
The Help button in the Bounce to Disk dialog opens a display-only dialog that describes the Bounce to Disk features.
Bounce Source
Select any mono, stereo, or multichannel output or bus path as the source for the bounce in the Bounce to Disk dialog. All currently active out-put or bus paths as defined in the I/O Setup dia-log are available as the Bounce Source.
To set the bounce source:
Select an output or bus path from the Bounce Source selector.
Bounce to Disk dialog, with conversion and options enabled