The sole remedy in the event of a claim of any kind is expressly limited to the replacement of the book and only at the discretion of the Publisher. When it comes to forms of security involved in the storage and management of digital information, we often think or hear about the terms information security, data security and database security.
INFORMATION SECURITY
The third information security principle of accessibility ensures timely availability of information to agents authorized to access that information. If the information is recalled to the user in the expected time, the principle of accessibility is fulfilled.
SECURITY THREATS, CONTROLS, AND REQUIREMENTS
The increased demand may be in the form of requiring confidentiality for larger amounts or percentages of overall data. We also need to consider the time frame that defines a "timely manner". In more critical environments, that window can be within a minute or second of time.
DATA SECURITY
Integrity requirements can vary depending on the amount of data to be verified and how the data is to be verified. This can be further broken down into how the data is accessed, who has access to the data, how data is processed, and how data can relate to other data.
DATABASE SECURITY
Entity integrity requires that each entity instance (or each table row) be uniquely identified by a primary key value. Referential integrity requires that for each instance of a relationship, the foreign key value must refer to an existing primary key value.

SUMMARY
The design of a database (that is, the structure of the tables and relationships between them) can also have a database security impact in terms of integrity. But with database security, we also need to consider cases where data is validly changed in an authorized manner, but the changes may not be seen as expected.
NORMALIZATION
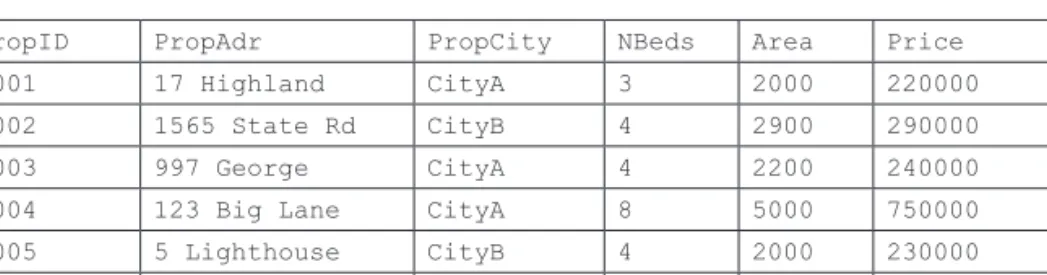
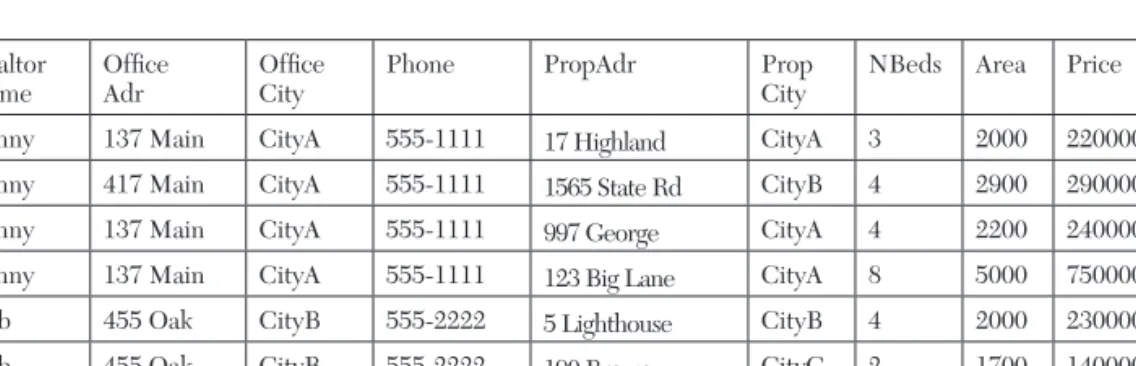
We have already captured the table definition for Listing in Figure 2.2 and the functional dependency based on the primary key in Figure 2.4. Looking at the first functional dependency, shown in Figure 2.4, we confirm whether the left side (Phone, PropAdr, PropCity) itself is a primary or candidate key for a given table.
SURROGATE KEYS AND DATA INTEGRITY
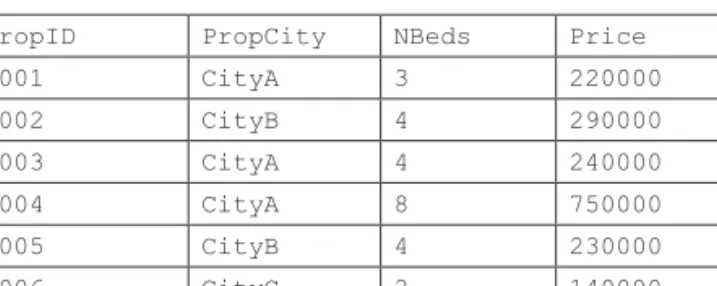
We will introduce a surrogate key called RealtorID in the Realtor table, so the Realtor relation has the structure and data given in Figure 2.12. With a surrogate key called PropID inserted into the Property table, we will have the following Property table structure and data given in Figure 2.13.

NORMALIZATION, ACCESS RESTRICTIONS, AND BEYOND
To implement security-based street and zone public restriction at the table level, we can further split the Property into two tables. We can then allow the public to enter the first table but not the second.
SUMMARY
For representation purposes, we will present SQL keywords in all capital letters in this text. For names of databases, tables, columns and other components we will use PascalCase (uppercase for the first letter of each word without underscores).
BACKUP AND RECOVERY
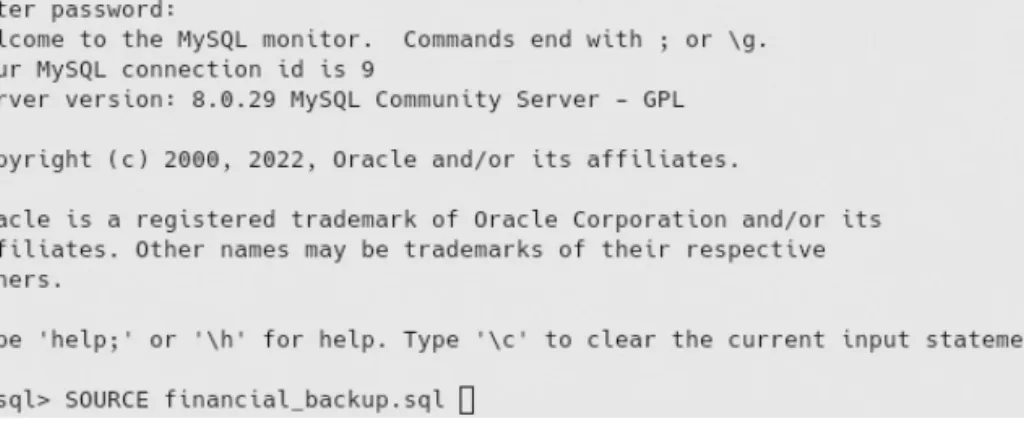
As an example, Figure 3.1 shows how we can get a backup of the Financial database, including its tables and data, in the file financial_. Note that the mysql command given in Figure 3.2 does not require a DBMS session to already exist for the restore operation.
USER ACCOUNT SECURITY CONFIGURATIONS
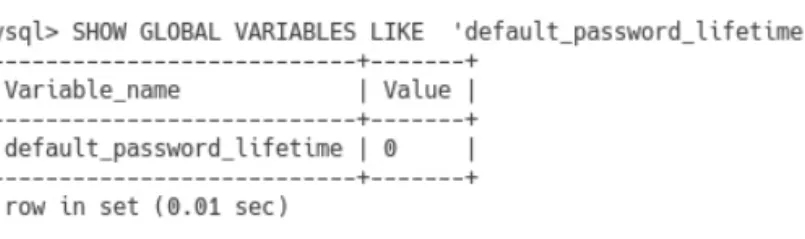
To change the password expiration interval for a specific user, we can issue the statement whose general syntax is given in Figure 3.12. To reactivate (or unlock) a user's account, we can also issue an ALTER USER statement, the general syntax of which is given in Figure 3.22.
SUMMARY
We consider a database user to be a person or agent (such as an application or system service) that is authorized to interact with a database. The way in which a specific database user can interact with the database's data is defined by the user's needs or responsibilities.
CREATING AND REMOVING DATABASE USER ACCOUNTS
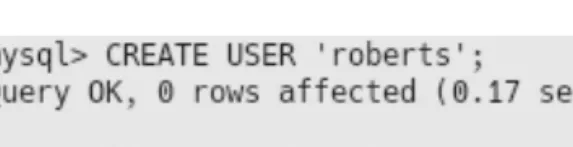
In Figure 4.3, we enclosed the username in single straight quotes ('), although technically the quotes were not required in this specific example. That database user can then access the database by specifying only the username with the SQL command shown in Figure 4.4.1 Here the mysql command includes the -u option, followed by one or more spaces and username.
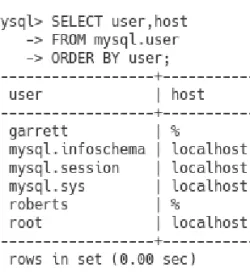
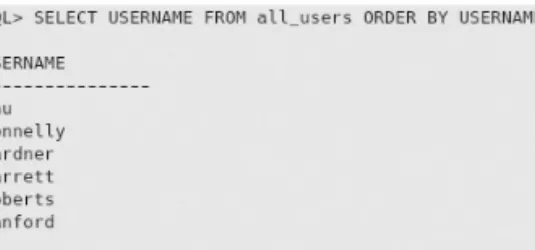
LISTING USER ACCOUNTS
HOST-RESTRICTED ACCOUNTS
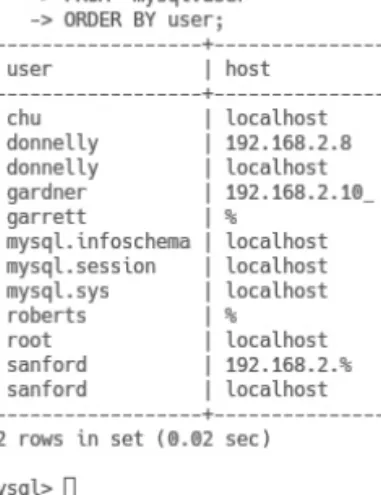
For example, if we want to allow the user donnelly to log in from the DBMS system itself and from the IPv4 address, we create two user@hostname accounts or instances for donnelly, as shown in Figure 4.14. We can specify % to match any value for the fourth number in the IP address, as shown in Figure 4.16.
SUMMARY
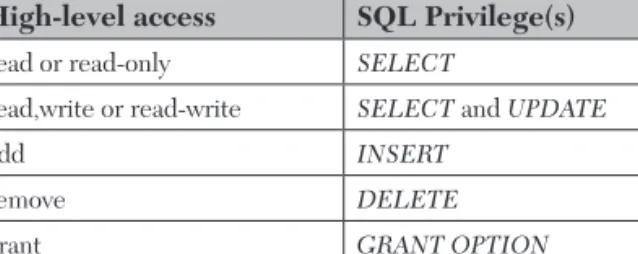
At the highest level, the database level, we can manage as a whole how a user accesses all the data in that database. The table level represents the largest granularity or unit at which we can manage a user's access types.
OVERVIEW OF PRIVILEGES AND DATABASE-LEVEL PRIVILEGES
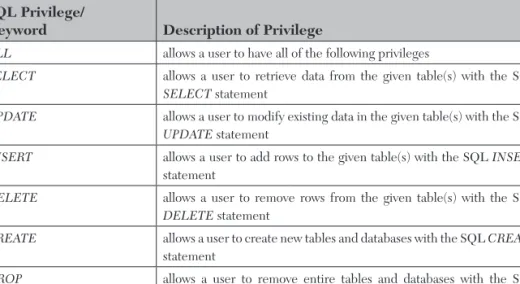
SELECT allows a user to retrieve data from the given table(s) with the SQL SELECT statement. INSERT allows a user to add rows to the given table(s) using the SQL INSERT statement.
CAPABILITY TO MANAGE PRIVILEGES
In addition to allowing a user to manage privileges, this example also shows how we can implement security measures that define or limit the types of access for a given user based on which system the user is logging into the DBMS from. This security measure does not allow sanford the ability to manage privileges when logging into the DBMS from another system, and organizations often limit what administrative access can occur remotely or over a network.
LISTING PRIVILEGES
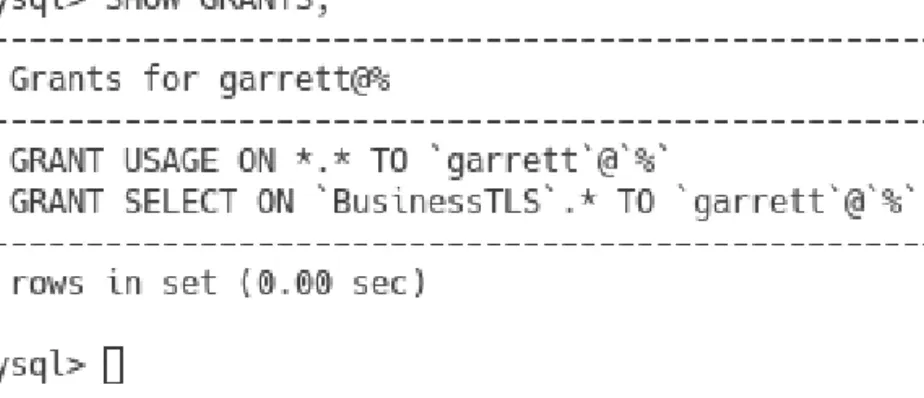
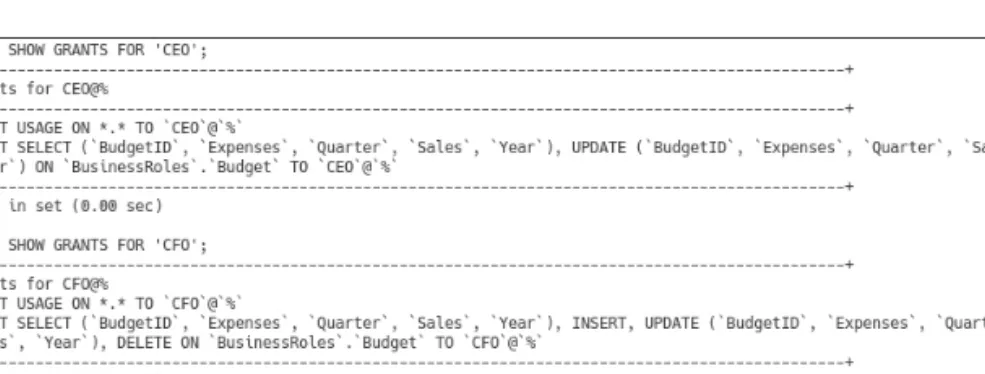
For our demonstration, let's give Sanford all but non-administrative access to BusinessTLS, as shown in Figure 5.10. To view the permissions of another database user, the root or an administrator account can issue the SHOW GRANTS statement and specify the desired user, in this case roberts, as shown in Figure 5.14.
REMOVING PRIVILEGES
As shown in Figure 5.18, we first issue the REVOKE statement that removes all the privileges that roberts has, and then with GRANT we only add the privilege to SELECT on the database. To "clean up" from the last example of leaving overlooked privileges, if it was done (and it would be necessary to set up our next examples), we can revoke the privileges left for 'chu'@'localhost ' as shown in Figure 5.21 and specify the user's privileges to confirm that there are no privileges left for this user.
WORKING WITH TLS AND TABLE-LEVEL PRIVILEGES
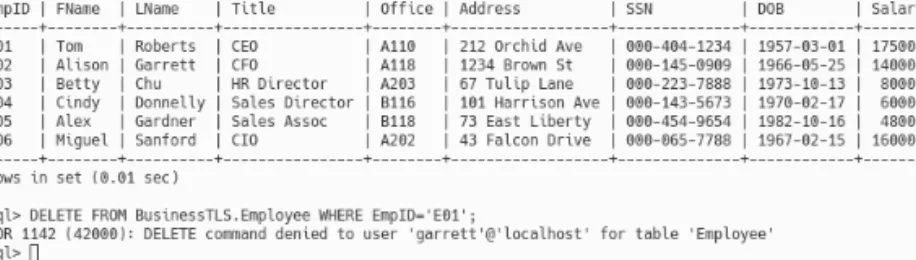
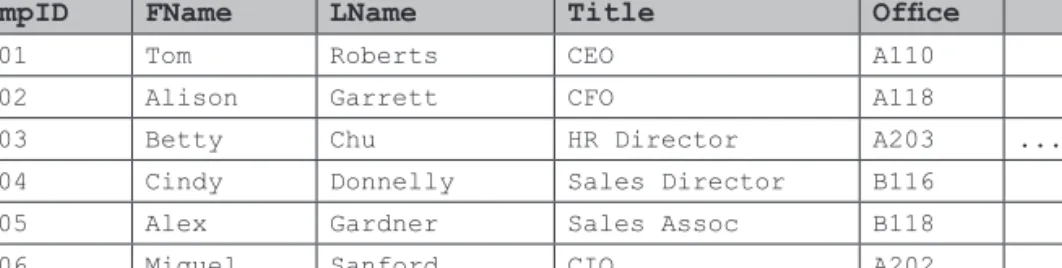
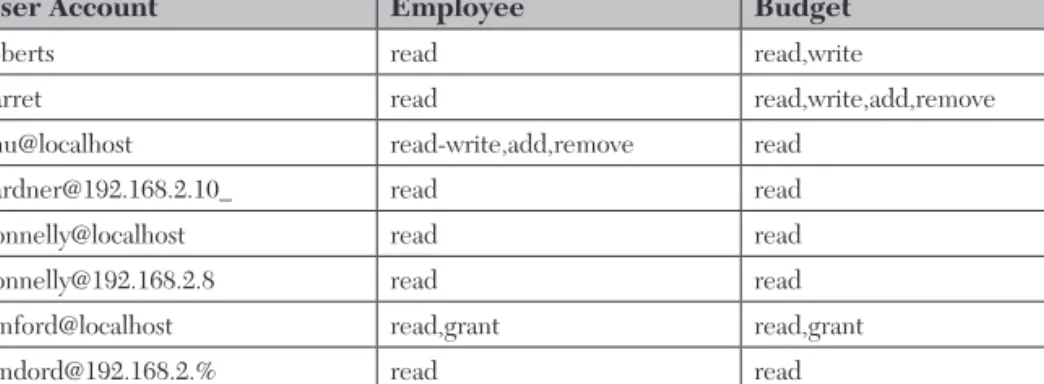
Starting with the Employee table, we can specify that the username 'roberts' has read-only access to the Employee table, as shown in Figure 5.25. We can assign those privileges to the human resources staff with the grant statements shown in Figure 5.28.
TLS AND NORMALIZATION REVISITED
Note that in Figure 5.39 we specify that 'sanford'@'localhost' has the ability to manage privileges even though that user does not have access to the table data. As an example, Figure 5.43 shows that Roberts does not have the ability to access the HR table (this should be the case for all non-human resources personnel).

COLUMN LEVEL SECURITY (CLS)
Moving to the human resources staff, we can grant read and write access for 'chu'@'localhost' with the GRANT statement shown in Figure 5.50. We might be tempted to issue 'chu'@'localhost' a table-level read-write privilege, like that in Figure 5.51, because the user is defined to have read-write access to all Employee columns .
CLS AND EVOLVING DATA ACCESS REQUIREMENTS AND DATA
We can add a new column to the budget table with the ALTER statement shown in Figure 5.63. We can confirm that users roberts and garrett now have access to the new column, as illustrated for roberts in Figure 5.65.

ROW LEVEL SECURITY
SUMMARY
Alternatively, we can first add a user to the role and then assign privileges to the role. In our demo, we then assign privileges to the role and then add users to the role.
DEFINING ROLE MEMBERS AND DATA ACCESS REQUIREMENTS
We can reduce the total set of requirements for CLS data access and simplify the implementation of column-level privileges with the consolidated list in Table 6.3b. In Table 6.4a, we also see some identical CLS data access requirements for all roles for the Budget table.

CREATING A DATABASE ROLE, SHOWING ROLE PRIVILEGES, AND REMOVING A ROLE
Regarding the CEO and CFO roles, we also see that they have identical data access requirements and can be consolidated. To avoid such confusion, we can choose to create a new role (such as Finance) and consolidate the CEO and CFO roles into it.
ASSIGNING PRIVILEGES TO ROLES
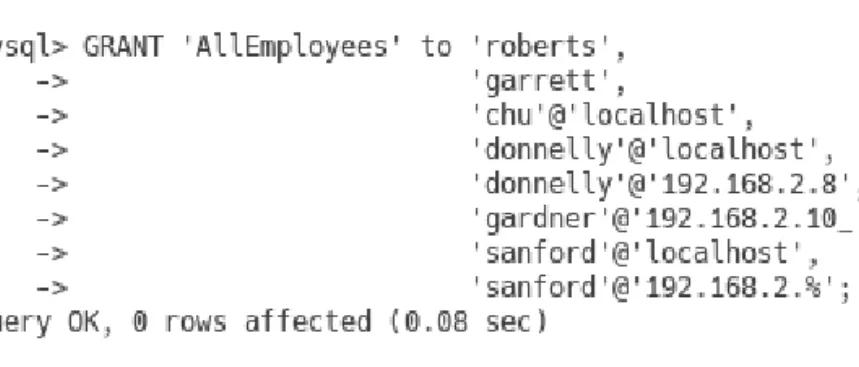
Starting with the AllEmployees role, we assign read-only privileges to all columns as shown in Figure 6.12. As shown in Figure 6.17, we see USE privilege similar to the AllEmployees role, with the added ability to manage user privileges as indicated by the WITH PERMISSION OPTION privilege.
DATABASE USERS AND ROLE
We will return to other forms of the SHOW GRANTS syntax shown in Figure 6.24 later. As shown in Figure 6.29, compared to the list in Figure 6.25, we see the privileges granted by the active role (AllEmployees) highlighted in this figure for emphasis.
ROLES AND EVOLUTION
In addition to adding the CFO role to this user, we need to remove the user from the HR role, as shown in Figure 6.45. To remove the user from all roles and privileges, or certain roles or privileges, we can use REVOKE statements like the one in Figure 6.44.
SUMMARY
The administrator should list the user's privileges and roles to confirm that the appropriate ones have been removed. If we actually wanted to remove the database user account and/or role, we could do so with the DROP statement.
VIEWS
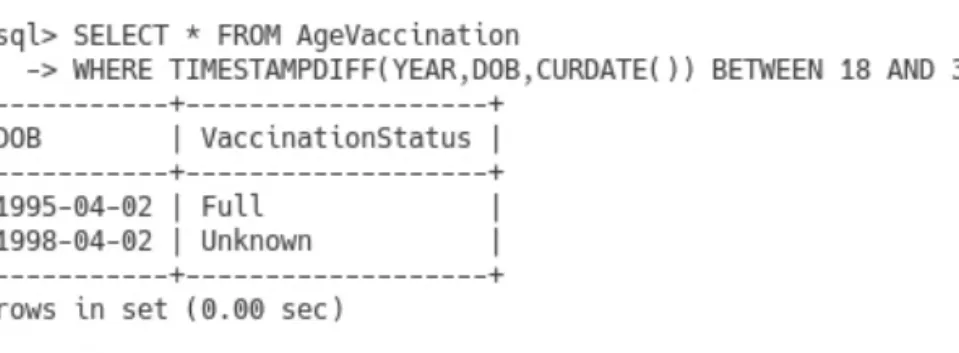
In Figure 7.18, we add the RevaccinationStatus column to the Patient table and create a new view of all Patient columns with the wildcard *. Alternatively, we can redefine an existing view without first deleting it by using a version of the CREATE VIEW statement, as shown in Figure 7.21.

ENCRYPTION, DECRYPTION, AND HASHING
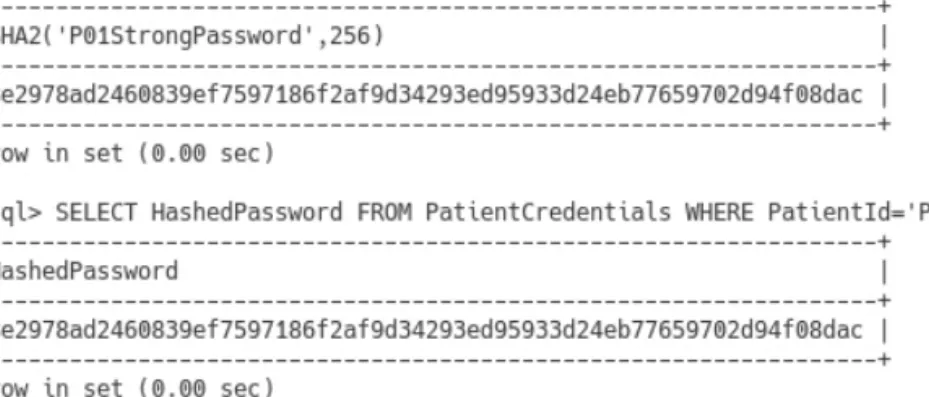
To encrypt data in our DBMS, we use the AES_ENCRYPT function, the basic syntax of which is given in Figure 7.26. In Figure 7.44 we do this for patient P02 with the same password as that for patient P01.
STORED ROUTINES
We then define the data type of the value that the function will return to the caller with the RETURN keyword, followed by the returned data type. The FUNCTION keyword indicates that we grant the privilege to a stored function name for the name that follows.
SUMMARY
We can think of the transfer itself as one data task, although that task actually involves several database operations. In fact, we may also involve other database operations for that transfer task, such as one or more INSERT statements to track or log the transfer activity, but we'll keep this first scenario simple and consider only the two UPDATE statements.
COMMITS, ROLLBACKS, AND AUTOMATIC COMMITS
When we issue a database operation that changes data (such as with an INSERT, UPDATE, or DELETE statement), that change is generally considered not visible to other database users or applications until the change is committed to the database. To make the effects of those operations permanent and visible, we can issue a COMMIT statement.
BEGINNING A TRANSACTION WITH COMMIT OR ROLLBACK
Compared to Figure 8.5, we don't see any state change as if the transfer never happened, which is exactly what we want in this situation: we don't want a result with an invalid data set, but we'd rather go back to the previous data set that was was valid. Note that we didn't need to show the states in Figure 8.6 before issuing the ROLLBACK—we showed the states to help illustrate the effect before and after the ROLLBACK.

BEGINNING A TRANSACTION WITH START TRANSACTION
At this point, we consider that because we have an invalid balance, we don't want to make the changes permanent and visible, but we want to undo them, so we issue a ROLLBACK. If we show the account balances after the RETURN, we will see that none of the transfer operations appear, as shown in Figure 8.7.