If repairs are required, return DNA Engine Dyad or Dyad Disciple cyclers to the factory (US customers) or authorized distributor (all other customers). Thank you for purchasing the DNA Engine Dyad Cycler and/or the Dyad Disciple Thermal Cycler.
Layout and Specifications
Alpha ™ Units
Single-Block Models
Dual-Block Models
Slide Block
Moto Alpha ™ Unit
DNA Engine Dyad Specifications
Gradient Specifications (96 Alpha unit only)
Installation
Packing Checklist
Setting Up the DNA Engine Dyad Cycler
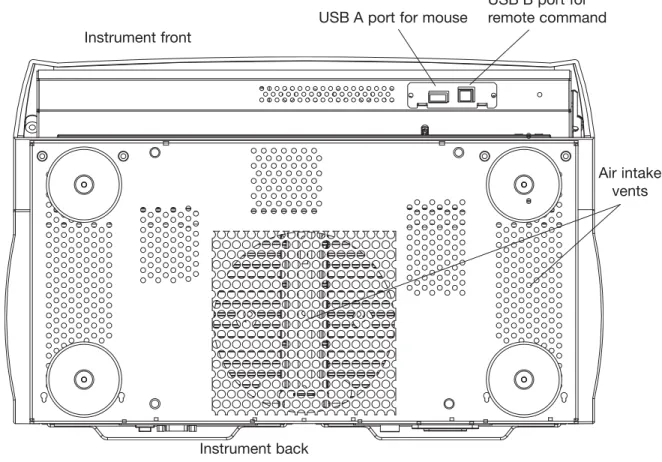
External Mouse Device
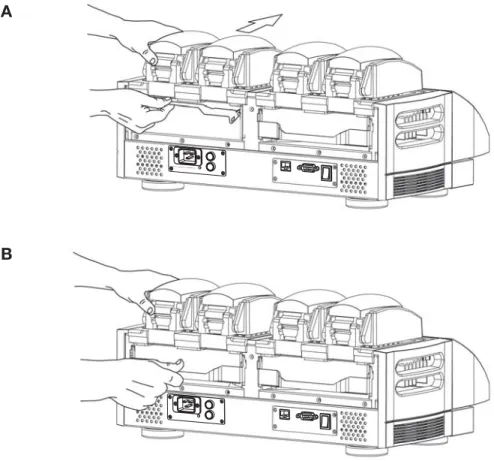
Grasping the sides of the DNA Engine Dyad Cyclist, tilt the instrument back so that the bottom of the lip is visible.
Environmental Requirements
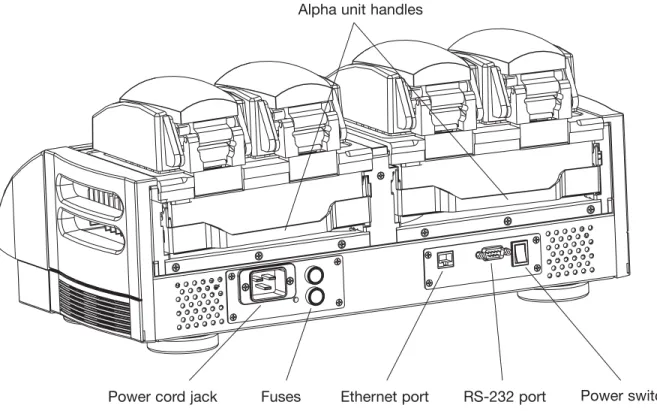
Power Supply Requirements
Air Supply Requirements
Ensuring an Adequate Air Supply
Ensuring That Air Is Cool Enough
Requirements for Robotics Installations
384-Well Microplate Specifics
Operation
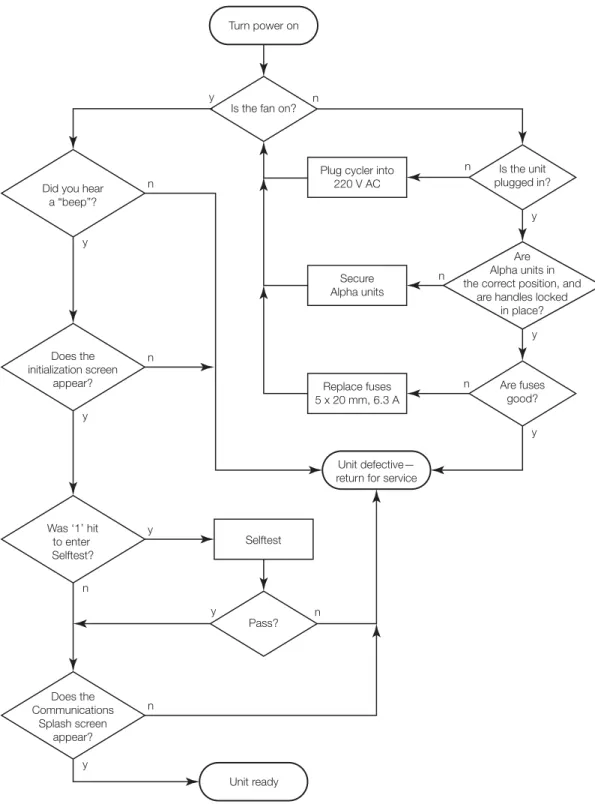
Turning the DNA Engine Dyad ® Cycler On
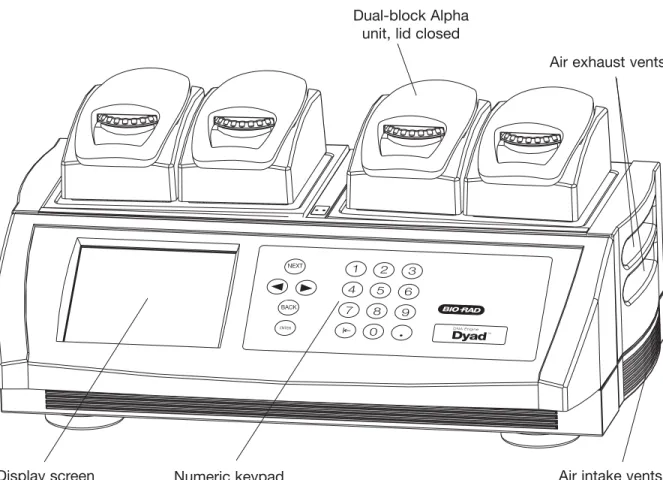
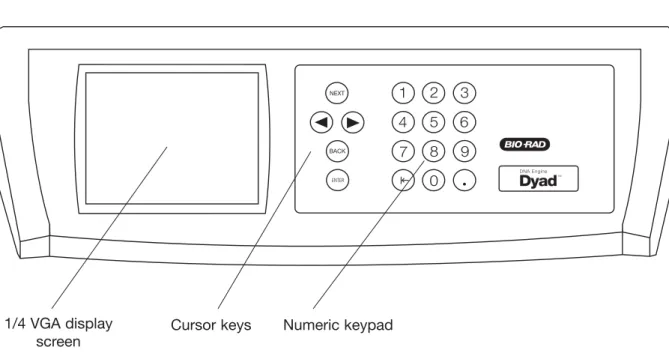
Using the Control Panel
Display Screen
Operation Keys
Block Status Lights
Using the Data Ports
Operating Alpha Units
Installing an Alpha Unit
Removing an Alpha Unit
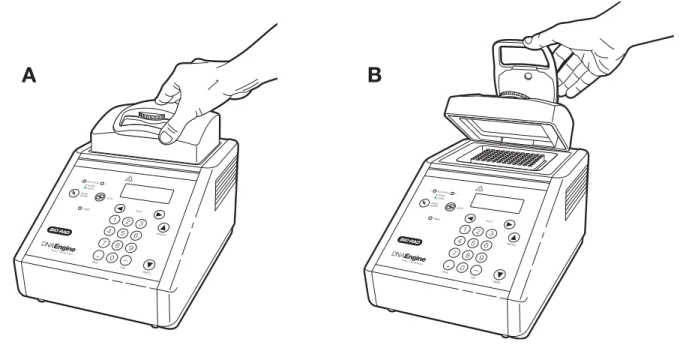
Opening an Alpha Unit
Closing an Alpha Unit
Selecting the Correct Sample Vessel
For best results, we recommend using thin-walled 0.5 ml tubes specifically designed for thermal cycling. Bio-Rad thin-walled 0.5 ml tubes are designed for precise block fitting and tight sealing of reactions up to 10 µl.
0.5 ml thick-walled tubes may not fit tightly into thermal cycler wells and typically provide poor thermal transfer, as these tubes were originally designed for centrifuges. Modern thermal cyclers have much faster ramp rates (up to 2–3°C/second), so the faster heat transfer provided by thin-walled tubes allows protocols to be significantly shortened.
Microplates
Thick-walled tubes slow sample heating, as heat is transferred more slowly through the tube walls. These machines' ramp rate was so slow (below 1°C/sec) that there was plenty of time for heat to transfer through the tube wall to the sample during a given incubation.
Sealing Sample Vessels
Sealing with Oil or Wax
Sealing with the Hot Bonnet ® Lid
Stop turning the thumbwheel when you feel increased resistance, indicating that the inner cover has contacted the microplate/tubes. Once this pressure is determined, the thumbwheel position can be marked with a colored marker pen or piece of tape.
Loading Sample Vessels into the Block
An additional one-half to three-quarters of a turn provides adequate pressure for most types of reaction vessels. Note: As an aid to measuring how much the thumbwheel has turned, mark it at the quarter-turn positions, or every sixth "bump" on the thumbwheel (there are 24 "bumps" in total).
Using Oil to Thermally Couple Sample Vessels to the Block
Tube, Microplate, and Sealing System Selection Chart
The following sample containers and sealing options are recommended for use with the DNA Engine Dyad and Dyad Disciple thermal cyclers and are available from Bio-Rad. As the plates can adhere tightly to the Microseal 'P+' pad, this sealant is only recommended for use with the Moto Alpha motorized unit which can hold the plate in the block.
Safety Warning Regarding Use Of
35 S Nucleotides
The Problem
The Solution
If mild cleaners do not remove the radioactivity, more aggressive cleaners can be used occasionally and cautiously. Please note: Harsh cleaners (as above) are corrosive and should be thoroughly rinsed away within minutes of application.
Creating Programs
This chapter describes how to create your own protocols, while the next chapter describes how to modify pre-programmed protocols and those you create yourself. In this chapter, we first revisit the front panel setup, specifically those elements used in program input.
Front Panel Setup
Navigation Keys
Numeric Keypad
Programming Conventions
The Elements of a Program
Increase Temperature: Changes a temperature step to allow a "per cycle" increase or decrease in temperature (0.1°C to 10.0°C per cycle) each time the step is executed. Extend Time: Changes a temperature step to allow a "per cycle" extension or shortening of a temperature step hold (by 1-60 sec/cycle) each time a step is executed.
Types of Programs
Slow Ramp: Temperature change which allows for slower temperature rise than the default maximum rate of 3.0°C/sec.
Basic Programs
This can be particularly useful if you tend to repeatedly run the same general protocol with limited changes (eg varying annealing temperatures).
Advanced Programs
Designing a New Program
Suppose you have the necessary components for a 30-cycle reaction, and you have calculated the annealing temperature of your oligonucleotide to be 60°C.
The Goto Option
Considerations During Program Creation
Choosing a Temperature Control Mode
Computed control is also the method of choice for most types of programs because it provides the most consistency, reliability, and speed. Block control programs can be changed to calculated control by deducting at least 15–20 seconds from each temperature step.
Choosing a Lid Control Mode
Choosing a Temperature Ramping Rate (Advanced Mode Only)
Choosing a Temperature Hold Time
In graphics programs, the maximum programmable hold time for a step is 1 hour 39 minutes and 59 seconds (99:59), with the exception of an eternal incubation. In advanced programs, the maximum programmable holding time is 18 hours, with the exception of an eternal incubation.
Choosing a Thermal Gradient
Beyond the Example Protocol: Other Considerations
Entering Program Steps
The Status Window
The menu bar at the top of the Status window includes four submenus:
Entering a Program Using Graphical Mode
Place the cursor (text cursor) in the temperature field from step 1 and select by clicking once. Place the cursor (text cursor) in the time:minute field from step 3 and select by clicking once. Place the cursor (text cursor) in the time:second field of step 3 and select by clicking once.
Entering a Program Using Advanced Mode
The step temperature is useful for modifying a temperature step to allow a "cycle-wise" increase or decrease in temperature each time the step is executed (see "Elements of a Program" near the beginning of this chapter for more information). Cap Pressure - The pressure exerted by the inner cap of the Moto Alpha unit must be adjusted to suit a particular type of reaction vessel. Lid Angle - The angle that the lid is fully open with the block is also set either through the front panel of the cycler or through the remote control panel.
Programs
In the previous chapter, we described how to enter a graphical and/or advanced program. In this chapter, we discuss in more detail the options available for manipulating existing Dyad™ protocols, both user-programmed and factory-programmed.
Opening a Program
Opening a Program in Advanced Mode
While all graphics programs can be opened and edited in advanced mode, only a subset of advanced programs can be opened and edited in basic mode. Our advanced program, ADV#1, cannot be opened in basic mode because it contains the pitch modification option, Beep on Target.
Opening a Program in Basic Mode
Editing a Program
Editing a Graphical Program
Editing an Advanced Program
Select an incubation temperature of 60 °C, a holding time of 3 minutes and the Beep on Target option.
File Utilities
Saving an Edited Program
Copying a Program
Deleting a Program
Moving a Program
Deleting a Folder
Running Programs
Using the Instant Incubation Feature
In this chapter we explore the implementation of the Dyad programs and the instant incubation function. To run a program displayed in the Advanced Programming Window or the Graphical Programming Window, select
The Run Program window
During the Run
Run Status
The Status window will display the block, sample and lid temperatures in relation to the program running on the block selected in the block selection menu. The remaining time in the current step and the remaining time in the program are displayed together with the current cycle number. To view the status of all blocks at once, including block name, block status, running program name, remaining program time, elapsed time, and user name, select the
Terminating a Run
Pausing/Resuming a Run
Skipping a Step
Inaccessible Features
Running Multiple Programs
Using the Utilities
In the previous chapters, you learned how to install and operate the DNA Engine Dyad cycler and how to write and run programs. In this chapter, we will discuss the various functions of the
Select
Transferring Program Files
Maintenance
Cleaning the DNA Engine Dyad ® and Dyad Disciple ™ Cyclers
Cleaning the Chassis and Blocks
Cleaning the Air Vents
Cleaning Radioactive or Biohazardous Materials From the Block
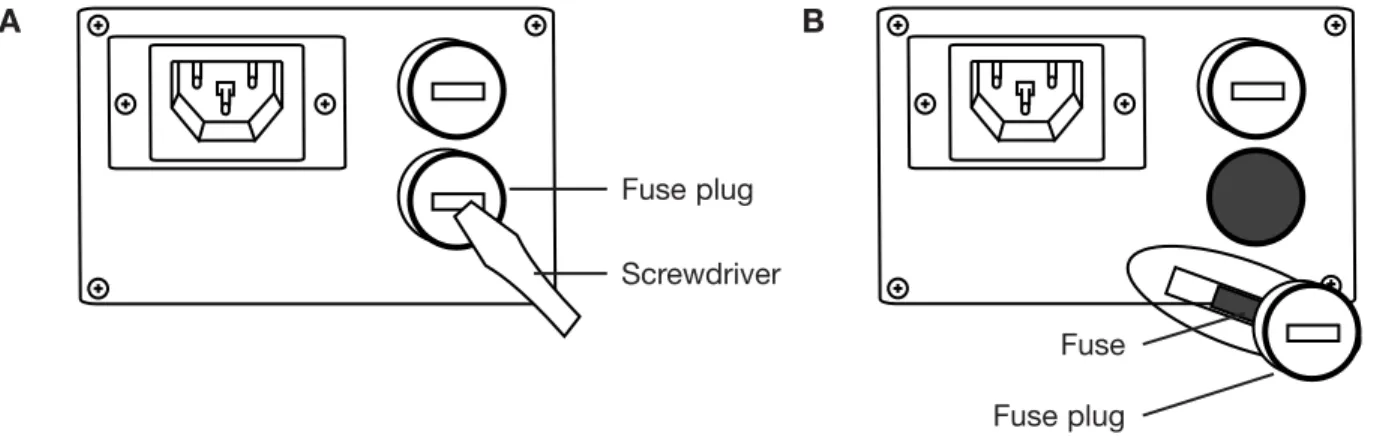
Changing the Fuses
Troubleshooting
Sources of Problems
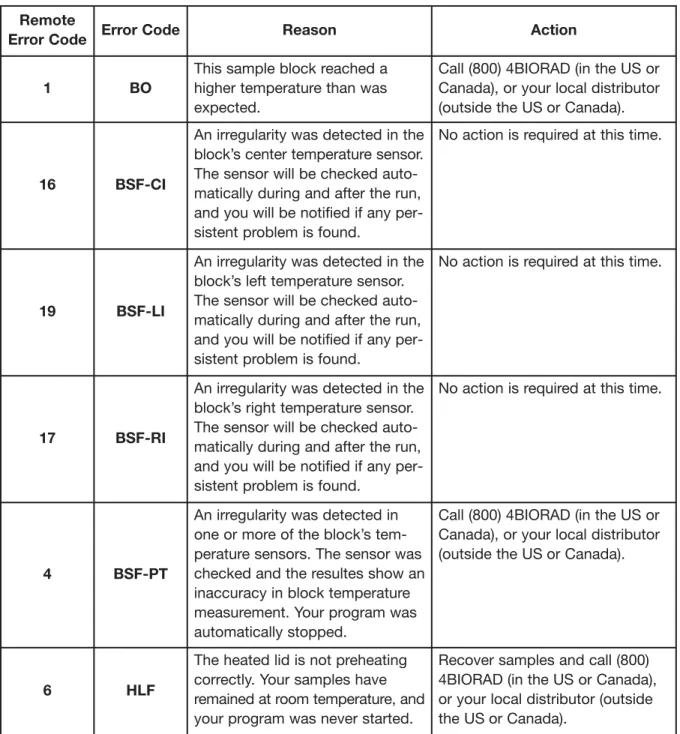
System Problems
HSSF
Please observe the following guidelines: 1) place instruments with a distance of at least 10 cm, 2) avoid placing instruments in any place where hot air can enter the intake openings, 3) place instruments on a hard surface without dirt or paper underneath, 4 ) clean all ventilation openings and the fins of the alpha unit from dust and dirt, 5) avoid operating the instrument in areas with ambient temperatures above 25°C. If the problem recurs, please call (800) 4BIORAD (in the US or Canada) or your local distributor (outside the US or Canada). Please observe the following guidelines: 1) place instruments with a distance of at least 10 cm, 2) avoid placing instruments in any place where hot air can enter the intake openings, 3) place instruments on a hard surface without dirt or paper underneath, 4 ) clean all ventilation openings and the fins of the alpha unit from dust and dirt, 5) avoid operating the instrument in areas with ambient temperatures above 25°C.
Problems in Power-Up
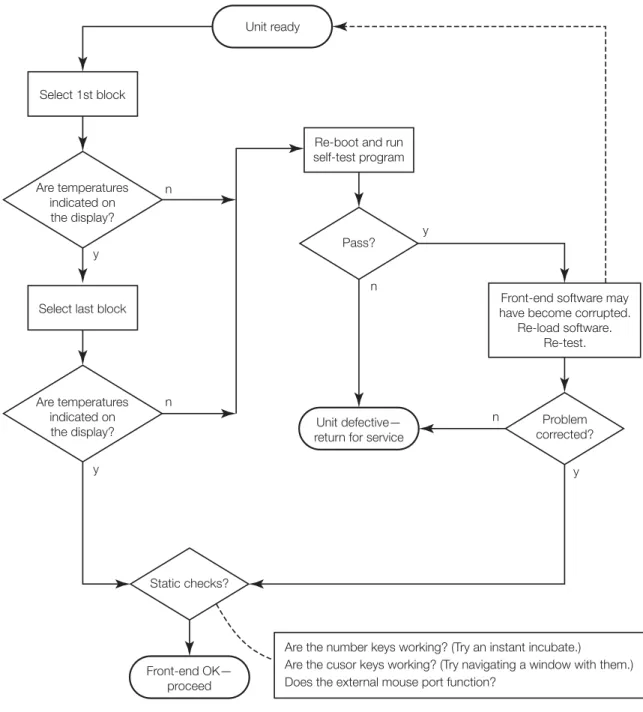
Problems with System Performance
Problems with an Alpha Unit
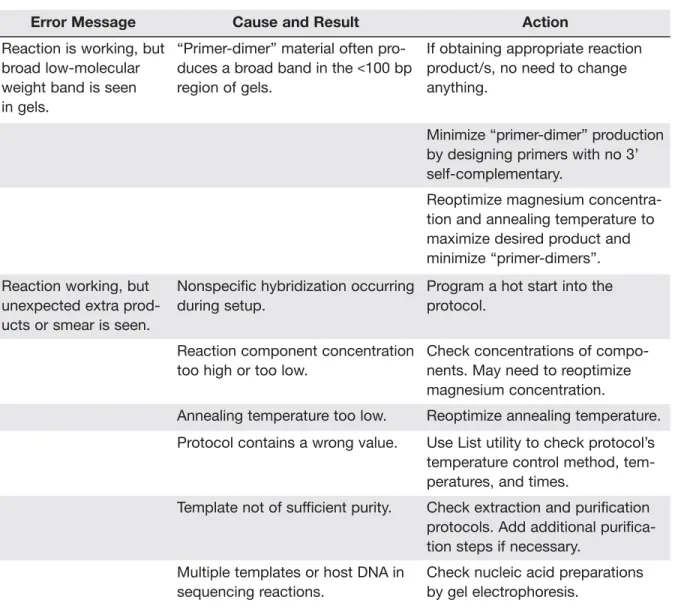
Problems Related to Protocols
Primer-dimer” material often produces a broad band in the <100 bp region of gels. Re-optimize magnesium concentration and annealing temperature to maximize desired product and minimize "primer dimers".
Problems due to Environmental Conditions, Setup, and Maintenance
Thermal Cycler and
System Configurations
About the Dyad Disciple Cycler
Specifications
The Dyad Disciple cycler can use the voltage in the specified range without adjustment, so there is no voltage setting switch. The Dyad Disciple cycler requires a continuous supply of air that is 31°C or cooler in order to remove heat from the Alpha unit heater. The air supply requirements of the Dyad Disciple cycler are identical to those of the DNA Engine Dyad cycler.
Setting Up the Dyad Disciple Cycler
If the air supply is inadequate or too hot, the device can overheat, causing performance problems, software error messages (especially "HS Overheating" and "Slow Block Cycling") and even automatic shutdowns. Special attention should be paid to the air flow and air temperature in Dyad Disciple robotic cyclers. See the “Air Supply Requirements” section in Chapter 3 for a complete discussion of air supply requirements for the Dyad Disciple cycler and considerations for robotic installations.
About the Linear Dyad ™ Configuration
Linear Dyad Configuration Layout
Setting Up the Linear Dyad Configuration
Operating the Linear Dyad Configuration
About the Stacked Dyad Configuration
Stacked Dyad Configuration Layout
Setting Up the Stacked Dyad Configuration
Operating the Stacked Dyad Configuration
Programming and Running the Dyad Disciple Cycler
Maintaining the Dyad Disciple Cycler
Appendix A: Warranties
Warranties
Appendix B: License Agreement
- SCOPE OF AGREEMENT
- SOFTWARE PRODUCT LICENSE GRANT
- SOFTWARE PRODUCT LIMITED WARRANTY
- LIMITATION OF LIABILITY
- LIMITATION OF LIABILITY. TO THE MAXIMUM EXTENT PERMITTED BY APPLICABLE LAW, IN NO EVENT SHALL BIO OR ITS SUPPLIERS OR EMPLOYEES BE LIABLE
- INDEMNIFICATION
- TERM AND TERMINATION
- GENERAL PROVISIONS
Use the MANUAL and other documentation to support LICENSEE in using the SOFTWARE PRODUCT. In the event of termination by BIO, LICENSEE shall destroy all copies of the SOFTWARE PRODUCT in LICENSEE's possession and all of its components. LICENSEE may terminate any license granted under this Agreement by returning the SOFTWARE PRODUCT and all documentation, including the MANUAL, to BIO.
Installed Protocols
PCR protocol STD-2
PCR protocol STD-3
Index
This product is imported into the EU by Bio-Rad Laboratories, Ltd., Bio-Rad House, Maxted Road, Hemel Hempstead (London area), Hertfordshire HP2 7DX England. This product is imported into the EU by Bio-Rad Laboratories, Ltd., Bio-Rad House, Maxted Road, Hemel Hempstead (London area), Hertfordshire HP2 7DX England.