Faculty of Engineering
Department of Textile Engineering
REPORT ON
Study on the comments on samples of knit garment production
Course Title: Project (Thesis) Course Code: TE-4214
Submitted By
Khairul Islam ID: 162-23-4664 Md. Majadul Islam ID: 162-23-4741
Supervised By Md. Abdullah Al-Mamun
Assistant Professor
This Report Presented in Partial Fulfilment of the Requirements for the Degree of Bachelor of Science in Textile Engineering.
Advance in Apparel Manufacturing Technology
Letter of Approval
February 01, 2020 To
The Head
Department of Textile Engineering
102, Sukrabad, Mirpur Road. Dhaka – 1207
Subject: Approval of Thesis Report of B.Sc. in TE Program.
Dear Sir,
I am just waiting to let you know that this thesis ‘Study on the comments on samples of knit garment production’ has been prepared bearing ID’s (162-23-4664, 162-23-4741) is
completed for final evaluation. The whole report is prepared based on proper assessment and investigation. We were directly involved with our work.
Therefore it will be highly appreciated if you kindly accept the Thesis report and considered for final evaluation
You Sincerely.
--- Md. Abdullah Al Mamun Assistant Professor
Department of Textile Engineering Daffodil International University
Declaration
We hereby declare that the work which is presented in this thesis entitled “Study on the comments on samples of knit garment production” has been done under the supervision of Md.
Abdullah Al Mamun, Assistant Professor TE, Daffodil International University. We also state that this project has not been presented in any other universities and all the resource of information are totally acknowledged.
Supervised By
Md. Abdullah Al Mamun Assistant Professor
Department of Textile Engineering Daffodil International University
Submitted By
Name of Student ID Signature
Khairul Islam 162-23-4664
Md. Majadul Islam 162-23-4741
Department of TE Faculty of Engineering Daffodil International University
Acknowledgement
First of all, we would like to express our heartfelt thanks to Almighty Allah for his kind blessing to complete this Project (Thesis) successfully. With sincerity, we extend our warm and deep appreciation and gratitude to our supervisor, Md. Abdullah Al Mamun, Assistant Professor, Department of Textile Engineering of Daffodil International University for his guidance and support to come up with this research work. Being working with him, we have not only earned valuable knowledge but were also inspired by his innovativeness which helped to enrich our experience to a greater extent. His ideas and the way he worked really were remarkable. We believe that this research could not be finished if he did not help us continuously.
We would like to express our heartiest gratitude to Prof. Dr. Engr. Md Saifur Rahman, Head of the Department, Textile Engineering of Daffodil International University for his kind help to finish our project and also to other faculty members and the stuff of the Textile Engineering Department of Daffodil International University. Also, we would like to thank our senior brothers and course mates in Daffodil International University, who took part in this discuss while completing the course work. Then we would like to thank for the support and encouragement rendered by, “ABC Knit Dyeing & Finishing Mills Ltd.” stuffs were very vital in the completion of this project, their guidance and encouragement played a vital role in the planning and completion of the research work.
Finally, we express our sincere gratitude to our parents and friends for their continuous support, ideas and love during our studies.
Dedication
The study is whole heartedly dedicated to our parents, who have been our source of inspiration and gave us strength when we thought of giving up, who continuously provide their moral, spiritual, emotional and financial support.
And lastly, we dedicated this book to the almighty God, thank you for the guidance, strength, power of mind, protection and skills and for giving us a healthy life. All of these, we offer to you.
Abstract
Our Project (Thesis) is on “Study on the comments on samples of knit garment production.”
The role of sample section in RMG sector is very important. Whatever the efficiency or profitability of the manufacturing floors may be, the factory merchandising department will not be able to build a good business relationship with the customer if they fail to deliver quality products to the customers on time. The samples produced in the sample section are vital parameters by which buyers evaluate the emphasizing performance of the factory. They become frustrated with the factory or the factory merchandising team when they do not receive samples in a timely and unqualified manner, resulting in the cancelation of orders or the decline to reward future orders to that factory. These can have an impact on the overall economy of the factory.
By analyzing the project there are many faults are found. In this study most of the fault found in measurement (22.73%), followed by workmanship fault (22.73%), fitting fault (22.73%), Accessories faults (15.15%), Sade faults (10.60%) & material fault (6.06%). Causes, effect and results of problems; potential problem-solving. The goal of this project is to define the Sample Section problem and develop possible solutions as well as practical solutions that will save the factory from losing future orders from well-known customers
Table of Content
Contents
Chapter- 01 ... 1
1. Introduction: ... 2
1.1 Objectives of the study ... 3
1.2 Limitations of the Study ... 4
Chapter- 02 ... 5
2. Literature Review ... 6
2.1 Previous Work ... 6
2.2 Garments Sampling ... 7
2.3 Purpose of Sampling ... 7
2.4 The Details Attached to the Garment Sample ... 7
2.5 Sampling Process ... 8
2.6 Flow chart of Garment Sample Making ... 9
2.7 Sampling Types ... 10
2.7.1 Proto Samples or Fit Samples ... 10
2.7.2 Photo shoot Sample ... 10
2.7.3 Salesman Sample ... 11
2.7.4 Size set Samples ... 11
2.7.5 Counter Sample or Reference Sample ... 11
2.7.6 Pre-production Samples ... 11
2.7.7 Wash Sample ... 11
2.7.8 Online Sample ... 12
2.7.9 Shipment Samples ... 12
2.8 Meeting with Buyers ... 12
2.9 Development of Initial Samples for the Buyer ... 12
2.10 Development of Fabric Sample, Bit Loom, Print and Embroidery Artwork ... 12
2.11 Costing of Garment (complete cost as well as manufacturing cost) ... 13
Chapter- 03 ... 14
3. METHODOLOGY ... 14
3.1 Data Collection ... 15
3.1.1 Sample No: 01 ... 15
3.1.2 Sample No: 02 ... 19
3.1.3 Sample No: 03 ... 24
3.1.4 Sample No: 04 ... 29
3.1.5 Sample No: 05 ... 35
3.1.6 Sample No: 06 ... 39
3.1.7 Sample No: 07 ... 45
3.1.8 Sample No: 08 ... 50
3.1.9 Sample No: 09 ... 54
3.1.10 sample No: 10 ... 59
3.1.11 Sample No: 11 ... 64
3.1.12 Sample No: 12 ... 66
3.1.13 Sample No: 13 ... 69
3.1.14 Sample No: 14 ... 72
3.1.15 Sample No: 15 ... 74
Chapter- 04 ... 77
4. Result & Discussion ... 78
4.1 Fault Analysis ... 78
4.2 Fault Calculation in Percentage: ... 79
4.3 Fault Percentage ... 79
4.4 Fault Percentage in Graphical View ... 80
4.5 Major Fault and Remedies ... 81
4.5.1 Measurement Fault: ... 81
4.5.2 Workmanship Faults: ... 81
4.5.3 Fitting Fault: ... 82
4.5.4 Material Fault ... 82
4.5.5 Shade Variation Faults ... 83
4.5.6 Accessories Fault ... 83
Chapter- 05 ... 84
5. Conclusion ... 85
Chapter- 06 ... 86
6. Reference ... 87
List of figures:
Figure: 3. 1 Sample Front Part and Back Part ... 16
Figure: 3. 2 Rib direction ... 17
Figure: 3. 3 Rib width ... 17
Figure: 3. 4 Incorrect rib ... 17
Figure: 3. 5 Neck and armhole lines ... 17
Figure: 3. 6 Bottom ... 17
Figure: 3. 7 Sample pattern... 18
Figure: 3. 8 Position of Main and care label position and design ... 18
Figure: 3. 9 Front and Back part of sample ... 20
Figure: 3. 10 Fabric direction ... 21
Figure: 3. 11 Rib and Back neck piping ... 21
Figure : 3. 12 Technical tape ... 21
Figure: 3. 13 Armhole seam ... 21
Figure: 3. 14 Sample Pattern ... 22
Figure: 3. 15 Bottom ... 22
Figure: 3. 16 Bottom line ... 22
Figure: 3. 17 Instruction of Main label, care label and Folding ... 23
Figure: 3. 18 Sample Front and Back Part ... 25
Figure: 3. 19 Pocket Position and color matching ... 26
Figure: 3. 20 Neck and armhole placket ... 27
Figure: 3. 21 Bottom workmanship ... 27
Figure: 3. 22 Stitches ... 27
Figure: 3. 23 Piping ... 27
Figure: 3. 24 Pattern ... 28
Figure: 3. 25 Instruction ... 28
Figure: 3. 26 Pocket ... 28
Figure: 3. 27 Scheme for print... 31
Figure: 3. 28 Elastic tape ... 32
Figure: 3. 29 Cuff ... 32
Figure: 3. 30 Neckline ... 32
Figure: 3. 31 Stitch ... 33
Figure: 3. 32 Sample Bottom ... 33
Figure: 3. 33 Neckline ... 34
Figure: 3. 34 Instruction of Accessories and Folding ... 34
Figure: 3. 35 Neckline and armhole... 36
Figure: 3. 36 Main label ... 36
Figure: 3. 37 Armhole ... 37
Figure: 3. 38 Bottom edge ... 37
Figure: 3. 39 Seam ... 37
Figure: 3. 40 Instruction of Accessories and Folding ... 38
Figure: 3. 41 Sample Front and Back part ... 40
Figure: 3. 42 Position of Pocket, bottom and neck line ... 41
Figure: 3. 43 Placket and Bottom ... 42
Figure: 3. 44 Bottom ... 42
Figure: 3. 45 Stitch ... 42
Figure: 3. 46 Piping ... 42
Figure: 3. 47 Pattern ... 43
Figure: 3. 48 Pocket ... 43
Figure: 3. 49 Slit ... 44
Figure: 3. 50 Instruction of Accessories and Folding ... 44
Figure: 3. 51 Sample Front and Back part ... 46
Figure: 3. 52 Rib... 47
Figure: 3. 53 Tape ... 47
Figure: 3. 54 Pocket ... 47
Figure: 3. 55 Pattern ... 47
Figure: 3. 56 Bottom ... 47
Figure: 3. 57 Neck ... 48
Figure: 3. 58 Stitch ... 48
Figure: 3. 59 Armhole line... 48
Figure: 3. 60 Armhole seam ... 48
Figure: 3. 61 Accessories and folding ... 49
Figure: 3. 62 Sample front and back part ... 51
Figure: 3. 63 Bottom and String ... 52
Figure: 3. 64 Pattern ... 52
Figure: 3. 65 Neck ... 52
Figure: 3. 66 Armhole ... 52
Figure: 3. 67 Armhole Placket ... 53
Figure: 3. 68 Accessories and Folding ... 53
Figure: 3. 69 Sample Front and back part ... 55
Figure: 3. 70 Bottom ... 56
Figure: 3. 71 Armhole ... 56
Figure: 3. 72 Bottom hem ... 56
Figure: 3. 73 Piping ... 57
Figure: 3. 74 Inner and Face side Piping ... 57
Figure: 3. 75 Back part of Sample ... 57
Figure: 3. 76 Accessories and folding ... 58
Figure: 3. 77 Sample Front and back part ... 60
Figure: 3. 78 Bottom design ... 61
Figure: 3. 79 Piping ... 61
Figure: 3. 80 Seam ... 62
Figure: 3. 81 Armhole ... 63
Figure: 3. 82 Bottom ... 63
Figure: 3. 83 Instruction of Accessories and Folding ... 63
Figure: 3. 84 Sample front, side back and shoulder part ... 65
Figure: 3. 85 Sample Front, Side and Back Part ... 68
Figure: 3. 86 Armhole ... 68
Figure: 3. 87 Sample Front, Back and Side Part ... 71
Figure: 3. 88 Armhole ... 71
Figure: 3. 89 Neck ... 71
Figure: 3. 90 Sample Front, Back and Side Part ... 73
Figure : 3. 91 Sample Front, Back and Side Part... 76
Figure: 3. 92 Armhole ... 76
Figure: 3. 93 Neck ... 76
List of Tables:
Table: 3. 1 Sample Measurements No: 1 ... 15
Table: 3. 2 Sample Measurements No: 2 ... 19
Table: 3. 3 Sample Measurements No: 3 ... 25
Table: 3. 4 Sample Measurements No: 4 ... 29
Table: 3. 5 Sample Measurements No: 5 ... 35
Table: 3. 6 Sample Measurements No: 6 ... 39
Table: 3. 7 Sample Measurements No: 7 ... 45
Table: 3. 8 Sample Measurements No: 8 ... 50
Table: 3. 9 Sample Measurements No: 9 ... 54
Table: 3. 10 Sample Measurements No: 10 ... 59
Table: 3. 11 Sample Measurements No: 11 ... 64
Table: 3. 12 Sample Measurements No: 12 ... 66
Table: 3. 13 Sample Measurements No: 13 ... 69
Table: 3. 14 Sample Measurements No: 14 ... 72
Table: 3. 15 Sample Measurements No: 15 ... 74
Table: 4. 1 Fault Analysis ... 78
Table: 4. 2 Fault Percentage ... 79
Chapter- 01
1. Introduction:
A large number of materials or objects represent the whole item in a small or small number of them, a small or small number of which will be known as the sample. In a simple word, a separate unit or a representative part of the whole unit. This is the engineering view of the definition of the sample. Generally, in the garments manufacturing industry, the terms
"Sample" are known as the model or design that will be followed for bulk or mass production.
In the RMG sector, before moving to the production order, prototypes are made according to the wishes of the buyer. In general, the purpose of the sample is to attract the buyer only, and then confirm the order. If the sample develops with the good quality then the buyer willing to put the order automatically to the garment industry. From the very beginning of the order to ship wherever the sample is needed.
Therefore, the creation or output of the sample is immediately becoming a very important task.
Every RMG sample production field has its own Sampling or Sample Unit. Their only goal is to produce a sample according to the requirements of the purchaser. Once all the parameters have been met, it can easily be inferred that the sample plays the most important role in the manufacture of clothes.
1.1 Objectives of the study
The purpose of the study is to properly clarify the sample, sample faults, causes of sample failure and how the failures can be improved and overcome. If a full-time worker has the correct sample failure information, then the loss will be significantly reduced.
Also, if a worker has a small shortage on the sample the knowledge will fulfill his or her shortage. This research or expertise will boost experience and competencies.
The key aims are given below for the moment:
To learn the sampling or sampling segment or department of the RMG Sector
To know the form and value of the sample
Understanding of working with both information, experience and skills
To learn step by step about the right sample creation
To learn the defects of the sample
To know the reasons for the sample failure
To detect defects in the sample
To learn the remedies for fault
Learn how to be mindful of errors
To determine the sample failure problems and limitations
To know about the buyer’s requirements samples
1.2 Limitations of the Study
There are many challenges, drawbacks, fails, problems and obstacles in every kind of work and it's very natural. And as usual in our work we have also faced several problems. But they didn't face any major or critical issues. Though the problems or limitations are not too small or easy, either. Hardly any of them. During the research work I would like to note the problems, and they are given below:
Workers have good skills, but they're not able to give us enough attention and work information.
Staff and office materials are too tied, and they don't have enough time for us as well.
Even if he is skilled in his work, he gives us time, but he doesn't have enough knowledge of the work.
Also, hundred percent of sampling and failure problems cannot be learned within 60 days.
Chapter- 02
2. Literature Review
2.1 Previous Work
A study on investigation on the defects found in the different types of samples in a RMG industry was done by Md. Rayhan Uddin and Rezaul Karim in April, 2017 and they found measurement problem 28.34%, sewing problem 15%, print problem 15% and rest of the faults are fitting problem 13.33%, fabric construction problem 13.33% and rest of the faults are 15%.
Another study on investigation on the comments on sample garments was conducted by Shah Mizanur Rahman and Sojol Podder in December, 2017 and they found measurement fault 43%, garment part shape fault 29% and rest of the faults are 28%.
Another study on investigation on the comments of sample garments was done by Jahed Hossain Jamy and Masrukh Ahmed in April, 2018 and they found workmanship fault 28%, fitting fault 26%, Color fault 14%, Material fault 12% and rest of the faults are 20%.
Also, another study on buyer comments on different sample was conducted by Md. Selim Reza and S.M. Hassan Al Mamun in April, 2019 and they found measurement fault 27%, high stretch/tension 12.5%, uneven join 12.5%, Puckering 10%, Pattern problem 10% and rest of the faults are 28%
2.2 Garments Sampling
Garment sampling is an extremely important process. It is a blueprint of what can be performed in bulk production. Sampling is very challenging but the industry should attract buyers. Since buyers usually place the order after the sample value pleases them. Garment sampling is a very important task in clothing manufacturing since it gives the customer satisfaction with the item being made. It is important partially because if the consumer is not happy with the goods it puts the following at risk:
• Order placement
• Acceptance of certain or all of the garments produced.
An industry may have a separate department for the sampling. However, since the merchandiser is the person who deals with the customers in terms of samples and other criteria, this sampling department must operate according to the guidance. Since the products are to be made according to the buyers' price ranges and quality standards, merchandiser must advise.
2.3 Purpose of Sampling
❖ To allow the buyer to assess the manufacturer's production capabilities.
❖ To provide a way to update the production process in bulk.
❖ To allow the thread and fabric usage to be calculated by the manufacturer and to create cost quotations.
2.4 The Details Attached to the Garment Sample
After the order confirmation, the following details are attached to each sample sent to the buyer with the help of a tag. It contains both the details of what the buyer has requested and what the fabric / trim supplier has used, etc.
❖ Ref no.
❖ Color
❖ Fabric
❖ Composition
❖ Description
❖ Quantity
❖ Style no/ Size
❖ Store
2.5 Sampling Process
The sample department process will vary on an ongoing basis and the development process will cover a wide variety of unique products from natural fabrics, fiber blends, new yarns, textile structures, finishes and new technology surface effects, and all types of composite products such as woven, knit wear, hosiery, cut and sewn clothes, household products, industrial and medical products.
The sampling stages are different; the first step includes the creation of the initial concept or design idea and the approval of the client.
The second phase covers the process after approval of the first model sample and the functions of the manufacturing and ordering portion are performed, the item is checked and trails are carried out once the final sample requirements have been drawn up.
The third and final phase includes a range of activities that are performed outside the manufacturer/developer, if needed, before large-scale or bulk production capacity.
2.6 Flow chart of Garment Sample Making
Garments Design or Sketch (Manually or Computerized)
↓
Basic Block (Manually or Computerized)
↓
Working Pattern (By Machine)
↓ Fabric cutting
↓
Print/ Embroidery (If required)
↓ Sewing
↓ Finishing
↓
Sample Garments (Manually)
↓
Problem of Production or Production Related Matter
↓
Costing...↓...Send to Buyer
↓
Approved Sample
↓
Production Pattern ( By Hand or Computer )
2.7 Sampling Types
They are many types of sample like-
❖ Proto samples or fit samples
❖ Photo shoot samples
❖ Salesmen samples or promotional samples
❖ Size set samples
❖ Pre-production samples
❖ Online sample
❖ Shipment sample
❖ Counter samples or reference samples
2.7.1 Proto Samples or Fit Samples
The samples are made after the new order is put with the customer. Those samples are needed to test the measurements, style and fit. Therefore they can be made available in similar materials, except in the exact dimensions and requirements of the buyer. Some buyers may need these samples if they want to print the pictures of the garments on the packing box, hang mark, in showrooms, etc., after sending the proto samples, the buyers will discuss the samples and access the sample content and give us feedback and reviews.
2.7.2 Photo shoot Sample
In this category, which deals primarily with the actual fit of clothing. The buyers will do photo shoot sessions with the samples that we have sent out. This specifically helps us to get the correct criteria and measuring issues. By doing this the buyer will send us feedback on the picture attachments.
2.7.3 Salesman Sample
The buyer wants those samples to get the requests from their customers. If the buyer has seven sellers in his office, then the buyer will ask us to make seven samples of each design. The salesmen will book their customers ' orders by displaying those examples. Buyer must place the order according to the customer's test appeal. Sales samples are made of textiles, trimmings and accessories. The buyer pays the dealer for the developer samples.
2.7.4 Size set Samples
The analysis is carried out after the seller has reviewed it. We will send out specimens in one SMS package. Therefore, comparisons of the package range are made to ensure that the scoring of all sizes is ok and the measurements are fairly good.
2.7.5 Counter Sample or Reference Sample
These are the samples which are made in the same way as the other samples. We must send customers samples and hold one of the same samples for our use. After receiving authorization from the customer, we will conduct the task according to the comparison study we have with us.
2.7.6 Pre-production Samples
Such samples were more like authorization samples. In actual manufacturing material, we have to be made from real bulk trims. This must reflect that the output will be the same as those samples.
2.7.7 Wash Sample
Wash sample is produced and sent to the buyer for assessment of the feeling and handle of the fabric during Denim washing or shirt washing method, then either at the size set point or PP level washing sample is sent to the buyer for authorization and the washing cycle is continued.
If the sample is not approved with suggestions or accepted, then the factory must apply for approval the second sample. After feeling assessment, buyer may suggest changes in the washing process.
2.7.8 Online Sample
Some pieces were taken out in the middle of production while manufacturing is online. The output parts are sent as a TOP sample to the consumer. Every buyer demands some TOP sample. The goal is to cross-check whether the factory meets the specification of the PP sample or not.
2.7.9 Shipment Samples
These samples should be sent straight before shipment. This should be shipped in actual packaging with all the labels, logos, etc. (such specimens will not necessarily be tested by the buyer for anything). But even if we get some suggestions from consumers, such as price tag modifications or range enhancements, we'll follow the process changes, but that isn't the danger to the manufacturer.
2.8 Meeting with Buyers
The stage developer of a production house shows its inventions, the new models for customers.
On the other hand, if the customer already had a set model of a fashion and needed some relevant adjustments to the layout, materials or trims, they would address this with the merchandiser of the production unit.
2.9 Development of Initial Samples for the Buyer
Samples are made with available fabrics and trims at this stage after receiving the buyer's concept or instructions on the new style.
2.10 Development of Fabric Sample, Bit Loom, Print and Embroidery Artwork
The fabric is designed according to the buyer's requirements. Creation of fabric means procurement of customer-specific fabric for solid colors with matching properties. Allowing for the solid color lap dip is very important process. Merchants re-send lap dips before they accept lap dip test. In the case of yarn dyed fabrics, merchants produce fabric samples with specified patterns, lines, or checks. Those fabric samples are called Bit Loom. Other
permissions are available, such as acceptance of print and embroidery artwork, and paint approval. In the pre-production process, this can be done later.
2.11 Costing of Garment (complete cost as well as manufacturing cost)
Merchants compile price sheets containing value break-up information such as cost of raw materials, cost of production, depreciation and profit. It's a very critical stage to price. Because it depends on their price whether a company gets order or not. If the price of fabric is very high, the supplier will lose the order because, on the other side, if the producer holds the cost low, they won't benefit from the order. Estimating the price of the clothes should be based on data.
Chapter- 03
3. METHODOLOGY
3.1 Data Collection
We have collected secondary data from a reputed knit composite factory.
3.1.1 Sample No: 01
JERSEY
Sample size
Deviations allowed in production
±
SM size S befree
2,021,413,482
XS S M L 11/11/2019 COMMENTS
A
FRONT LENGTH from
fold to bottom 102.5 102.5 104.5 104.5 1.0 101.0
Pls prolong it by 1,5 cm.
See pic.2.
B
BACK LENGTH by centre
100.5 100.5
102.5 102.5
1.0 99.0
Pls prolong it by 1,5 cm.
See pic.2.
C
1/2 CHEST WIDTH under
armpit 32.5 34.5
37.5 40.5 1.0 34.5
W
1/2 WAIST WIDTH 36,0
cm from H.P.S. 28.6 30.6 33.6 36.6 1.0
33.0
Pls lessen it by 1,2 cm.
See pic.2.
H
1/2 HIP WIDTH 60,0 cm
from H.P.S 36.5 38.5 41.5 44.5 1.0 38.5
D 1/2 BOTTOM WIDTH
37.0 39.0
42.0 45.0 1.0 39.0
E
NECK WIDTH
17.0 17.5
18.0 18.5 0.5
15.5
Pls widen it by 2,0 cm.
See pic.2.
F1 NECK DROP FRONT 9.3 9.5 9.7 9.9 0.5 10.0
F2 NECK DROP BACK 2.0 2.0 2.0 2.0 0.5 1.7
J
SHOULDER STRAP
WIDTH 6.0 6.0
6.0 6.0 0.0 6.0
K
ARMPIT DEPTH straight angle from L.P.S.
18.5 19.0
19.5 20.0 0.5
16.8
Pls make it 19,0 cm. See pic.2.
M1
BACK WIDTH 13 cm from H.P.S
19.5 20.5
22.0 23.5 0.5
18.5
Pls widen it by 2,0 cm.
See pic.2.
M2
FRONT WIDTH 13 cm
from H.P.S 22.0 23.0
24.5 26.0 0.5 23.0
R1
RIB WIDTH
2.0 2.0
2.0 2.0 0.0
0.8
Pls make it 2,0 cm. See pic.1.
R2
1/2 NECK RIB LENGTH
23.0 23.5
24.0 24.5 0.5
22.5
Pls change E measure. See pic.2.
R3
1/2 ARMHOLE RIB LENGTH
22.1 22.8
23.8 24.8 0.5
22.0
Pls change K measure. See pic.2.
Table: 3. 1 Sample Measurements No: 1
COMMENTS:
1. Jersey quality is correct on sample.
2. Rib quality is correct on sample. See pic.1.
Rib is made from main jersey.
Rib width is not correct. It should be 2.0 cm like in style 2021 413 482.
Pls don’t deform neck and armhole line.
Pls don’t twist rib. Control rib stripes direction.
3. Pls change patterns according to the picture 2 and the table above.
Pls make measures of E, K, M1, M2, R1 like you make in style 2021 413 482.
4. Bottom line is stretched. Pls control bottom workmanship. See pic.3.
Bottom hem is correct on sample.
Cover lock stitches should hide bottom edge.
5. Main and care labels position and design are correct on sample. Pls follow our instructions on the pic.4.
Figure: 3. 1 Sample Front Part and Back Part
A
B C
W
E F1
J F2
K M
1 M
2
1 3
H
D
60 cm
Figure: 3. 2 Rib direction Figure: 3. 3 Rib width
Figure: 3. 4 Incorrect rib Figure: 3. 5 Neck and armhole lines
Figure: 3. 6 Bottom
Pic.1. Rib quality is correct on sample. Rib is made from main jersey. Pls don’t deform neck and armhole line. Rib width is not correct on sample.
Pls don’t twist rib. Control rib stripes direction.
Correct rib direction
Incorrect rib direction Rib width should be 2.0 cm like in
style 2021 413 482.
2,0 cm
Pic.3. Bottom line is stretched. Pls control bottom workmanship. Bottom hem is correct on sample. Coevrlock stitches should hide bottom edge.
1,9
1,6
Figure: 3. 7 Sample pattern
Figure: 3. 8 Position of Main and care label position and design
Pic.2. Pls change patterns according to the picture 2 and the table above. Pls make measures of E, K, M1, M2, R1 like you made in style 2021 413 482.
Pic.4. Main and care label position and design are correct on sample.
Pls follow our instruction on the picture.
3.1.2 Sample No: 02
BLOUSE
Sample size
Deviation s allowed
in productio
n ±
SM Size S
befree 2021 432 492
11/19/201
9
COMMENT S
XS S M L
FRONT LENGTH from H.P.S to bottom
46.
5 47.
0 49.
5 52.
0 1.0
44.5
Pls prolong it by 2,5 cm.
See pic.4
BACK LENGTH by centre
43.
5 43.
5 45.
5 47.
5 1.0
42.5
Pls prolong it by 1,0 cm.
See pic.4 1/2 CHEST WIDTH under
armpit
51.
5 53.
5 56.
5 59.
5 1.0 53.5
1/2 BOTTOM WIDTH 51.
5 53.
5 56.
5 59.
5 1.0 53.5
BACK NECK WIDTH 20.
3 20.
7 21.
1 21.
5 0.5 19.7
Pls widen it by 1,0 cm.
See pic.4 NECK DROP FRONT
9.3 9.5 9.7 9.9 0.0 10.5
Pls lift it by 1,0 cm. See pic.4
NECK DROP BACK 2.4 2.5 2.6 2.7 0.0 2.6
SLEEVE LENGTH short sleeve 18.
7 19.
0 19.
3 19.
6 0.5 19.0
1/2 BICEPS direct under arm pit 21.
4 22.
0 22.
9 23.
8 0.5 21.8
1/2 SLEEVE WIDTH at bottom 18.
4 19.
0 19.
9 20.
8 0.5 18.8
ARMPIT DEPTH straight from H.P.S.
27.
5 28.
0 28.
5 29.
0 0.5 28.0
SHOULDER
16.
2 16.
5 17.
0 17.
5 0.5 16.7
BACK WIDTH 15cm from H.P.S
44.
5 45.
5 47.
0 48.
5 0.5 45.7
CHEST WIDTH 15cm from H.P.S.
45.
0 46.
0 47.
5 49.
0 0.5 46.0
NECK RIB HEIGHT 1.8 1.8 1.8 1.8 0.0 1.8
1/2 NECK RIB LENGTH
21.
1 21.
5 21.
9 22.
3 0.5 21.5
SLEEVE BOTTOM FINISH 2.0 2.0 2.0 2.0 0.0 2.1
NECK PIPING WIDTH 1.0 1.0 1.0 1.0 0.0 1.0
Table: 3. 2 Sample Measurements No: 2
COMMENTS:
1. Pls use approved fabric quality. Warp direction is distorted. See pic.1.
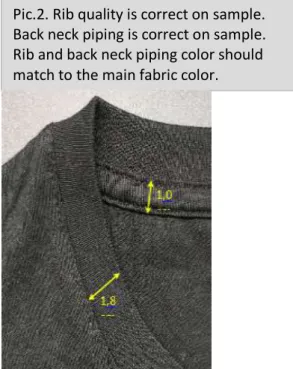
2. Rib quality is correct on sample. Rib color should match to the main fabric color. See pic.2
3. Back neck piping is correct on sample. Its color should match to the main fabric color.
See pic.2.
4. Shoulder technical tape is correct on sample. See pic.3.
5. Pls change patterns according to the pic.4 and the table above.
6. Fashion seams along armhole is correct on sample. See pic.5.Seam should be parallel to the armhole line.
7. Sleeve bottom hem is correct on sample. See pic.6.
8. Bottom should be raw and rolled. See pic.7.Sample bottom line isn't rolled enough. Pls control it.
9. Pls change care label position. See pic.8.Pls follow our instructions.
Figure: 3. 9 Front and Back part of sample
15 cm
M2
E
M 1 C B
D L
A
G
15 cm
F 2
F 1 K
Z 1
Z 3
R 1
Figure: 3. 10 Fabric direction
Figure: 3. 11 Rib and Back neck piping
Figure : 3. 12 Technical tape
Figure: 3. 13 Armhole seam
Pic.1. Pls use approved fabric quality.
Warp direction is distorted.
Pic.2. Rib quality is correct on sample.
Back neck piping is correct on sample.
Rib and back neck piping color should match to the main fabric color.
Pic.3. Shoulder technical tape is correct on sample.
Pic.5. Fashion seams along armhole is correct on sample.
Seam should be parallel to the armhole line.
Figure: 3. 14 Sample Pattern
Figure: 3. 15 Bottom
Figure: 3. 16 Bottom line
Pic.4. Pls change patterns according to the pic.4 and the table above.
Pic. 6. Sleeve bottom hem is correct on sample.
Pic.7. Bottom line should be raw and rolled.
Sample bottom line isn't rolled enough. Pls control it.
Figure: 3. 17 Instruction of Main label, care label and Folding
Pic.8
Place main label at centre back neck.
Attach size label to main label.
MAIN LABEL, SIZE LABELFOLDINGCARE LABEL
Place care label at left side seam 7,0 cm from bottom
30cm
40cm
7,0 cm
3.1.3 Sample No: 03
Jersey dress
Sample size
Deviations allowed in production
±
SM befree
2,021,555,528
XS S M L 11/28/2019 COMMENTS
A
FRONT LENGTH from HPS
to bottom 110.5 111.0 113.5 114.0 1.0 111.0 Pls prolong it by 1,0 cm.
A1
FRONT LENGTH from HPS
to pocket 18.5 19.0 19.5 20.0 1.0 18.0
Pls lower it by 1,0 cm. See pic.4.
B
BACK LENGTH by centre
105.0 105.0 107.0 107.0
1.0 103.0
Pls lift F2 by 1,0 cm. Pls prolong it by 1,0 cm See pic.4.
C
1/2 CHEST WIDTH under armpit
44.5 46.5 49.5 52.5 1.0
48.5
Pls narrow it by 2,0 cm. See pic.4.
H 1/2 BOTTOM WIDTH 53.0 55.0 58.0 61.0 1.0 55.0
E
BACK NECK WIDTH
21.6 22.0 22.5 23.0 0.5
19.6
Pls widen it by 2,4 cm. See pic.4.
F1
NECK DROP FRONT from HPS to bottom
16.9 17.0 17.1 17.2 0.5
15.0
Pls deepen it by 2,0 cm. See pic.4.
F2
NECK DROP BACK
8.0 8.0 8.0 8.0 0.2
9.0
Pls lift it by 1,0 cm. See pic.4.
J
SHOULDER without plackets
2.0 2.0 2.4 2.4 0.1
1.6
Pls widen it by 0,4 cm. See pic.4.
K
ARMPIT DEPTH straight
angle from L.P.S. 20.5 21.0 21.5 22.0 0.5 21.0
M1
BACK WIDTH 13cm from H.P.S
22.9 23.2 23.7 24.2 0.5
20.0
Pls widen it by 3,2 cm. See pic.4.
M2
FRONT WIDTH 13cm from H.P.S
24.5 25.5 27.0 28.5 0.5
21.5
Pls widen it by 4,0 cm. See pic.4.
N1 PIPING WIDTH 1.0 1.0 1.0 1.0 0.0 1.0
N3 1/2 NECK LENGTH 37.1 37.8 38.5 39.2 0.5 34.5 See pic.4.
R1 POCKET HEIGHT 11.0 11.0 11.0 11.0 0.3 10.6
R2 POCKET WIDTH 10.0 10.0 10.0 10.0 0.3 9.9
R3
DISTANCE FROM POCKET TO ARMHOLE
2.0 2.0 2.5 2.5 0.3
2.5
Pls change pocket placement.
See pic.4.
R4
DISTANCE FROM POCKET TO SIDE SEAM
9.0 9.0 9.5 9.5 0.5
13.5
Pls change pocket placement.
See pic.4.
S
SLIT LENGTH
27.0 27.0 27.0 27.0
30,0+30,5
Pls shorten it by 3,0 cm.
They should be
symmetrical.
Table: 3. 3 Sample Measurements No: 3
COMMENTS:
1. Jersey quality is correct on sample.Please pay attention to jersey print color 5, 8, 55 matching and symmetry. See pic.1
2. The piping quality is correct on sample. See pic.2 The piping width is correct on sample.
Piping should be cutted from main jersey and be one colored. See pic. 1B.
3. Placket is correct on sample. See pic.3. Pls make plackets more rolled, so cut them shorter then armhole and neck length.
4. Pls change patterns according to the table above and the picture 4.
5. Pls control pocket placement. See pic.5. Pls improve pocket workmanship.
6. Fixing stitches at the placket near side seams and near left shoulder seam are correct on sample. See pic.6.
7. Main and care labels are correct on sample. See pic.7.
Figure: 3. 18 Sample Front and Back Part
E
B F 2 M 1
13 cm
D K
A A
F
1 1
3 cm
A 1
R 2 R 1
R 3 R 4
J
Pls measure front and back length to coverlock stitch
Figure: 3. 19 Pocket Position and color matching
Col. 8 Col.
55
Col. 5
Pic.1. Jersey quality is correct on sample. Please pay attention to jersey print color 5, 8, 55 matching and symmetry.
- Bottom line should be along wide print line. Rolled bottom should be in one color. See pic.
A;
- Neck and shoulder plackets and back neck piping should be in one color. See pic. B;
- Pocket should match to front detail. See pic. C.
Bottom line Pic. A
Piping Placket Pic. B
Pic. C
not correct
Figure: 3. 20 Neck and armhole placket
Figure: 3. 21 Bottom workmanship
Figure: 3. 22 Stitches
Figure: 3. 23 Piping
Pic.3. Plackets and bottom workmanship are correct on sample.
Pls make plackets more rolled, so cut them shorter then armhole and neck length.
Neck and armholes plackets.
Bottom workmanship.
Pic.6. Fixing stitches at the placket near side seams and near left shoulder seam are correct on sample.
Pic.2. the piping quality is correct on sample.
The piping width is correct on sample.
Piping should be cutted from main jersey and be one colored. See pic.
1B.
Figure: 3. 24 Pattern
Figure: 3. 25 Instruction
Figure: 3. 26 Pocket
Pic.4. Pls change patterns according to the table above and the picture.
Pic.5. Pls control pocket placement. Pls improve pocket workmanship.
Pocket sides should be perpendicular to each other.
Pls control distance between top pocket side and fashion seam.
Pic.7.
3.1.4 Sample No: 04
JERSEY
Sample size
Deviation s allowed
in productio
n ±
SM bulk befree
2,021,555,524
S M L XL
COMMENTS
12/5/201
9
1/14/202
0
A
FRONT LENGTH from H.S.P. to bottom
90.
5 91.
0 94.
5 95.
0 1.5 88.0 88.5 Pls strictly keep 90,5
A 1
DISTANCE to waist seam
43.
0 43.
5 44.
0 44.
5 0.0 43.0 43.0
B
BACK LENGTH by centre
87.
0 87.
0 90.
0 90.
0 1.5 86.0 86.5 Pls follow the
patterns
B1
DISTANCE to waist seam
40.
5 40.
5 40.
5 40.
5 1.0 39.5 40.3
C
1/2 CHEST WIDTH under armpit
60.
0 62.
0 64.
0 66.
0 1.0 59.0 59.0 Pls follow the
patterns
W
1/2 WAIST WIDTH, at seem relax
34.
0 36.
0 38.
0 40.
0 1.0 39.0 39.0 Pls lessen elastic tape by 5,0 cm
W
1/2 WAIST WIDTH, at seem stretched
56.
0 58.
0 60.
0 62.
0 1.0 56.0 55.0 Pls follow the
patterns
D 1/2 BOTTOM WIDTH 57.
0 59.
0 61.
0 63.
0 1.0 56.0 56.0 Pls follow the
ptterns
E
BACK NECK WIDTH neck piping excl
22.
0 22.
5 23.
0 23.
5 0.5 24.5 22.0
F1
NECK DROP FRONT neck piping excl
10.
0 10.
2 10.
4 10.
6 0.0 13.0 10.0
F2
NECK DROP BACK neck piping excl 3.3
3.3 3.3 3.3 0.0 3.5 2.5
Pls control it.
G
SLEEVE LENGTH neck piping excl
23.
5 24.
5 25.
5 26.
5 1.0 22.0 23.5
Z1
1/2 BICEPS direct under arm pit
21.
0 21.
9 22.
8 23.
7 0.5 20.0 20.5
Pls control it.
Z2 CUFF width 2.0
2.0 2.0 2.0 2.0 2.0
K
ARMPIT DEPTH straight angle from HHPS
28.
5 29.
0 29.
5 30.
0 0.5
27.5 29.0
Pls control it.
U POCKET LENGTH 16.
5 16.
5 16.
5 14.
0 0.0 16.5 16.5
U
1
The width of the pocket in an extended
form 4.5 4.5 4.5 4.5 0.5
4.5 4.0
Pls control it
N
NECK PLACKET
HEIGHT 1.5
1.5 1.5 1.5 0.0 2.0 1.5
N
1
1/2 NECK PLACKET LENGTH at top
26.
5 27.
0 27.
5 28.
0 0.5 26.5
N
2
1/2 NECK PLACKET LENGTH at seam
28.
5 29.
0 29.
5 30.
0 0.5 32.0 28.5
R
1 BOTTOM FINISH 2.0
2.0 2.0 2.0 0.0 2.0 1.9
Table: 3. 4 Sample Measurements No: 4
Comment:
1. Jersey quality pls follow confirmed quality. Pls follow the scheme for print.PIC 1 2. The quality of elastic tape is correct on sample, the color of elastic tape should be dtm
to shell. PIC 2. The workmanship of waist is correct. Pls lessen the length of elastic tape by 5.0 cm.
3. Workmanship of cuff is incorrect on sample. The cuff should be the same width. Please control it .PIC 3. Pls change fixing position as on sheme, pls cancel excess fixing 4. Workmanship of neckline is correct on sample. Pls do not strerched the placket of
neckline of front when sew.PIC 4. pls control it on bulk. Main label should be sewed even.
5. PIC 5.The workmanship of pocket is correct .Top stitching should be even, pls control it in bulk.
6. PIC 6. The bottom hem should be carefully. The stitches from the edge should be 1.5 cm. The distance between the stitches should be 0.3 cm. Please improve. The stitch of bottom hem is crooked, no excess fabric should be visible .Pls control it in bulk.
7. The neckline of back should be without crinkles, pls control it in bulk.PIC 7.
8. All seams should be made accurately, seams should not be with fringe, all threads should be cut. Please control it.
9. Pls use main label No. 2. Reg main label attaching follow our instruction below. The folding way should be as per at our instructio below. PIC 7.
Figure: 3. 27 Scheme for print
The strip on the pocket and the bottom of the front should match
a strip along the bottom hem of the front and back, the side seam should match the placket and the cuffs should be solid PIC 1. Pls follow the scheme for print
Figure: 3. 28 Elastic tape
Figure: 3. 29 Cuff
Figure: 3. 30 Neckline
PIC 2. The quality of elastic tape is correct on sample, the color of elastic tape should be dtm to shell.
The workmanship of waist is correct. Pls lessen the length of elastic tape by 7,0 cm.
2,0 cm
PIC 3. Workmanship of cuff is incorrect on sample. The cuff should be the same width. Please control it. Pls change fixing position as on sheme, pls cancel excess fixing.
PIC 4 . Workmanship of neckline is correct on sample. Pls do not strerched the placket of neckline of front when sew, pls control it on bulk. Main label should be sewed even.
Figure: 3. 31 Stitch
Figure: 3. 32 Sample Bottom
PIC 5.The workmanship of pocket is correct.
Top stching should be even, pls control it in bulk.
PIC 6. The bottom hem should be carefully.
The stitches from the edge should be 1.5 cm.
The distance between the stitches should be 0,3 cm. Please improve .
The stitch of bottom hem is crooked, no excess fabric should be visible .Pls control it in bulk.
1,5 cm
0,3 cm
Figure: 3. 33 Neckline
Figure: 3. 34 Instruction of Accessories and Folding
PIC 7. The neckline of back should be without crinkles, pls control it in bulk.
CARE LABEL
Place care label at left side seam 10 cm from bottom
MAIN LABEL, SIZE LABEL
Place main label at center back neck. Attach size label to main label.
FOLDING
PIC 8 Pls use main label No. 2.
Reg main label attaching follow our instruction below. The folding way should be as per at our instruction below.
60cm
40cm