▸ Baca selengkapnya: download format home visit
(2)Praise for
Programming Your Home
Mike has a broad technology experience base that puts all the pieces of some remarkable projects together. It’s amazing that he makes it all so easy and afford-able. Don’t miss all that can be learned from this gem.
➤ Michael Bengtson, Consultant
The Web-Enabled Light Switch project gave my family convenience and security options and enhanced my knowledge of RS-232 communications. It is nice to be able to switch on lights from my favorite chair. And the Tweeting Bird Feeder project has opened my eyes to the uses of radio communications around the home for things besides Wi-Fi, and it will help in my work to contribute to the preserva-tion of bird species that are struggling for food and habitat.
➤ Bob Cochran, Information Technology Specialist
With this book, Mike Riley celebrates the Arduino microcontroller in a way that both beginning and advanced home automation hobbyists will enjoy.
➤ Sven Davies, Vice President of Applications
This is an outstanding reference that should be on the desk of every DIYer. In much the same way that software engineers mention “The Gang of Four Patterns Book,” I predict this text will eventually be referred to as “The Riley Book of Home Automation.”
Every technology is only as exciting as the things you do with it. Mike takes a few cheap electronics parts, an Arduino, and a bit of code and turns your home into a much more exciting and enjoyable place. His easy-to-follow instructions make every single one of these projects both fun and useful.
➤ Maik Schmidt, Software Developer, Author of Arduino: A Quick-Start Guide
I’ve had more fun learning new languages, systems, and gadgets with this book than any other book I’ve read!
➤ James Schultz, Software Developer
Home automation is great fun, and Programming Your Home by Mike Riley will get you started right away. By leveraging this book and the easily available free/inexpensive hardware and software, anyone can tackle some great projects. ➤ Tony Williamitis, Senior Embedded Systems Engineer
This is a fun and enthusiastic survey of electronic devices that can interact with the real world and that starts in your own home!
Programming Your Home
Automate with Arduino, Android, and Your Computer
Mike Riley
Many of the designations used by manufacturers and sellers to distinguish their products are claimed as trademarks. Where those designations appear in this book, and The Pragmatic Programmers, LLC was aware of a trademark claim, the designations have been printed in initial capital letters or in all capitals. The Pragmatic Starter Kit, The Pragmatic Programmer, Pragmatic Programming, Pragmatic Bookshelf, PragProg and the linking g device are trade-marks of The Pragmatic Programmers, LLC.
Every precaution was taken in the preparation of this book. However, the publisher assumes no responsibility for errors or omissions, or for damages that may result from the use of information (including program listings) contained herein.
Our Pragmatic courses, workshops, and other products can help you and your team create better software and have more fun. For more information, as well as the latest Pragmatic titles, please visit us at http://pragprog.com.
The team that produced this book includes:
Jackie Carter (editor)
Potomac Indexing, LLC (indexer) Molly McBeath (copyeditor) David J Kelly (typesetter) Janet Furlow (producer) Juliet Benda (rights) Ellie Callahan (support)
Copyright © 2012 The Pragmatic Programmers, LLC.
All rights reserved.
No part of this publication may be reproduced, stored in a retrieval system, or transmitted, in any form, or by any means, electronic, mechanical, photocopying, recording, or otherwise, without the prior consent of the publisher.
Contents
Acknowledgments . . . xi
Preface . . . xiii
Part I — Preparations
1. Getting Started . . . 3
What Is Home Automation? 3
1.1
1.2 Commercial Solutions 4
1.3 DIY Solutions 5
1.4 Justifying the Investment 5
1.5 Setting Up Your Workbench 6
1.6 Sketching Out Your Ideas 7
1.7 Writing, Wiring, and Testing 8
1.8 Documenting Your Work 9
2. Requirements . . . 11
2.1 Knowing the Hardware 12
2.2 Knowing the Software 17
2.3 Be Safe, Have Fun! 18
Part II — Projects
3. Water Level Notifier . . . 23
What You Need 23
3.1
3.2 Building the Solution 26
3.3 Hooking It Up 26
3.4 Sketching Things Out 27
3.5 Writing the Web Mailer 34
3.7 All Together Now 40
3.8 Next Steps 41
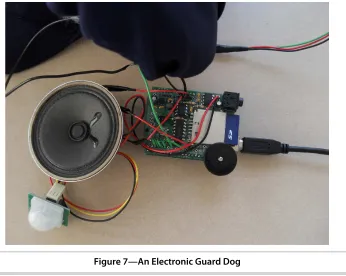
4. Electric Guard Dog . . . 45
What You Need 46
4.1
4.2 Building the Solution 47
4.3 Dog Assembly 48
4.4 Dog Training 52
4.5 Testing It Out 55
4.6 Unleashing the Dog 56
4.7 Next Steps 57
5. Tweeting Bird Feeder . . . 59
What You Need 59
5.1
5.2 Building the Solution 62
5.3 The Perch Sensor 63
5.4 The Seed Sensor 67
5.5 Going Wireless 70
5.6 Tweeting with Python 75
5.7 Putting It All Together 83
5.8 Next Steps 84
6. Package Delivery Detector . . . 87
What You Need 88
6.1
6.2 Building the Solution 90
6.3 Hardware Assembly 91
6.4 Writing the Code 92
6.5 The Package Delivery Sketch 92
6.6 Testing the Delivery Sketch 94
6.7 The Delivery Processor 95
6.8 Creating the Delivery Database 95
6.9 Installing the Package Dependencies 97
6.10 Writing the Script 98
6.11 Testing the Delivery Processor 102
6.12 Setting It Up 104
6.13 Next Steps 105
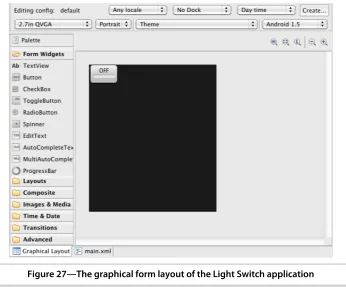
7. Web-Enabled Light Switch . . . 107
What You Need 107
7.1
7.2 Building the Solution 110
7.3 Hooking It Up 111
7.4 Writing the Code for the Web Client 114
7.5 Testing Out the Web Client 116
7.6 Writing the Code for the Android Client 117
7.7 Testing Out the Android Client 121
7.8 Next Steps 124
8. Curtain Automation . . . 127
What You Need 127
8.1
8.2 Building the Solution 130
8.3 Using the Stepper Motor 131
8.4 Programming the Stepper Motor 132
8.5 Adding the Sensors 133
8.6 Writing the Sketch 134
8.7 Installing the Hardware 139
8.8 Next Steps 142
9. Android Door Lock . . . 143
What You Need 143
9.1
9.2 Building the Solution 146
9.3 Controlling the Android Door Lock 150
9.4 Writing the Android Server 154
9.5 Writing the Android Client 166
9.6 Test and Install 170
9.7 Next Steps 171
10. Giving Your Home a Voice . . . 173
What You Need 173
10.1
10.2 Speaker Setup 175
10.3 Giving Lion a Voice 177
10.4 Wireless Mic Calibration 179
10.5 Programming a Talking Lion 181
10.6 Conversing with Your Home 190
10.7 Next Steps 191
Part III — Predictions
11. Future Designs . . . 195
11.1 Living in the Near 195
11.2 The Long View 198
11.3 The Home of the Future 200
12. More Project Ideas . . . 203
Clutter Detector 203
12.1
12.2 Electricity Usage Monitor 204
12.3 Electric Scarecrow 204
12.4 Entertainment System Remote 204
12.5 Home Sleep Timer 205
12.6 Humidity Sensor-Driven Sprinkler System 205
12.7 Networked Smoke Detectors 205
12.8 Proximity Garage Door Opener 206
12.9 Smart HVAC Controller 207
12.10 Smart Mailbox 207
12.11 Smart Lighting 207
12.12 Solar and Wind Power Monitors 207
Part IV — Appendices
A1. Installing Arduino Libraries . . . 211
A1.1 Apple OSX 211
A1.2 Linux 212
A1.3 Windows 212
A2. Bibliography . . . 213
Index . . . 215
Acknowledgments
I have been a lifelong tinkerer. My earliest recollection of dissecting my father’s broken tape recorder instilled an appreciation for the technology that drove it. From there, erector sets, model railroads, and programmable calculators led to personal computers, mobile devices, and microcontrollers. Over the years, this passion for learning not only how stuff works but also how technical concepts can be remixed with surprising, often highly satisfying results has been liberating. That’s why this book was such a joy for me to write.
Helping others to see what’s possible by observing their surroundings and having the desire to take an active role in making their lives easier with technology while having fun is this book’s primary goal. Yet without others helping me distill my ideas into what you are reading now, this book would not have been possible. It is to them that I wish to express my deepest grati-tude for their support.
A boatload of thanks goes to the book’s editor, Jackie Carter, who spent countless hours ensuring that my words were constructed with clarity and precision. Copy editor Molly McBeath did a fantastic job catching hidden (from my view anyway) typos and grammatical misconstructions. Big thanks to Susannah Pfalzer for her infectious enthusiasm and boundless boosts of encouragement and to Arduino expert and fellow Pragmatic author Maik Schmidt, whose own success helped pave the way for a book like this.
music to code by. And to the makers of and contributors to the Arduino and Fritzing projects, you people have changed the world for the better.
I am most grateful to my wife, Marinette, and my family for allowing me to tunnel away for months in my mythical man cave to complete this book. And I can’t gush enough over the wonderful pencil illustrations that my daughter drew for the book. I am so proud of you, Marielle!
Finally, I am sincerely thankful to Dave Thomas and Andy Hunt for their passion and vision. You’re the best.
Mike Riley
mailto:mike@mikeriley.com Naperville, IL, December 2011
Preface
Welcome to the exciting, empowering world of home automation! If you have ever wanted your home to do more than just protect you against the outside elements and want to interface it to the digital domain, this book will show you how. By demonstrating several easy-to-build projects, you will be able to take the skills you learned from this book and expand upon and apply them toward custom home automation projects of your own design.
The book’s primary objective is to get you excited about the broader possibil-ities for home automation and instill the confidence you need to ultimately build upon these and your own ideas. The projects also make great parent-child learning activities, as the finished products instill a great sense of accomplishment. And who knows? Your nifty home automation creations may even change the world and become a huge new business opportunity for other homeowners actively seeking an automation solution that saves them time and money.
Who Should Read This Book
Programming Your Home is best suited to DIYers, programmers, and tinkerers who enjoy spending their leisure time building high-tech solutions to further automate their lives and impress their friends and family with their creations. Essentially, it is for those who generally enjoy creating custom technology and electronics solutions for their own personal living space.
A basic understanding of Arduino and programming languages like Ruby and Python are recommended but not required. You will learn how to combine these technologies in unique configurations to resolve homemaker annoyances and improve home management efficiencies.
A basic familiarity with the Android SDK will be beneficial so that the projects that make use of the Android OS can offer a more mobile reach.
If you’re the type of person who prefers to build versus buy your home acces-sories, this book will further motivate you to use what you learned in the book as a starting point to expand upon and optimize them in various ways for their environment. Even though some of the topics deal with multiple software- and hardware-based solutions, they are easy to follow and inexpen-sive to build. Most of all, they show how a few simple ideas can transform a static analog environment into a smart digital one while having fun.
What’s in This Book
After a basic introduction to home automation and the tools of the trade, this book will teach you how to construct and program eight unique projects that improve home utility and leisure-time efficiencies. Each project incorporates a variety of inexpensive sensors, actuators, and microcontrollers that have their own unique functions. You will assemble the hardware and codify the software that will perform a number of functions, such as turning on and off power switches from your phone, detecting package deliveries and transmitting emails announcing their arrival, posting tweets on Twitter when your bird feeder needs to be refilled, and opening and closing curtains depending on light and temperature, and more.
Because the recommended skill set for building these solutions includes some familiarity with programming, this book builds upon several previously pub-lished Pragmatic Bookshelf titles. If you would like to learn more about programming Arduinos or writing Ruby or Python scripts, I strongly recom-mend checking out the books listed in Appendix 2, Bibliography, on page 213. Each project begins with a general introduction and is followed by a What You Need section that lists the hardware parts used. This is followed by a section called Building the Solution that provides step-by-step instructions on assembling the hardware. Programming Your Home will call upon the Arduino extensively for most (but not all) of the projects. Once the hardware is constructed, it can be programmed to perform the automation task we built it to do. Programs can range from code for Arduino microcontrollers to scripts that execute on a computer designed to control, capture, and process the data from the assembled hardware elements.
Arduinos, Androids, and iPhones, Oh My!
With the meteoric rise of mobile device proliferation, the post-PC moniker has made its way into the tech world’s vocabulary. I am a big proponent of tech-nology shifts, but I am also old enough to have lived through three major computing revolutions (the shift from mainframes to PCs, the rise of the Internet, and the shift from PCs to mobile devices) and know that change isn’t as fast as people say it is. Until mobile applications can be developed on mobile devices the way PC applications can be developed on PCs, a Linux, Windows, or Mac computer will be a central requirement for developing mobile apps. The same holds true for Arduino programming.
That said, the times are indeed a-changing. Microsoft Research was one of the first major phone OS providers to attempt to create native mobile applica-tions directly on the mobile device with their release of TouchStudio. Google engineer Damon Kohler created the Scripting Layer for Android (SL4A) that gives Android users the ability to write fairly sophisticated programs using a text editor on their phone. Coupled with Sparkfun’s IOIO (“yo-yo”) board, we’re already seeing early glimpses of what could replace the PC for some of the scripts created for this book.
Since you will need a Mac, Linux, or Windows computer to program the Arduinos and mobile apps in this book, this computer will also be the machine that runs the server-side programs that interpret and extend information out to your mobile devices. Of course, if you only have one computer and it’s a laptop that travels with you, consider purchasing a cheap Linux or Mac to run as your home server. Not only will you benefit from having a dedicated system to run the monitoring apps 24/7/365, but it can also serve as your home Network Attached Storage (NAS) server as well.
I am a believer in open source hardware and software. As such, the projects in the book depend upon these. I am also technology-agnostic and rarely have any overriding devotion to one hardware supplier or programming language. Code for this book could have been presented just as easily in Mono-based C# and Perl, but I opted for Ruby and Python because of their portability and multiparty open source support. I could have used a Windows or Linux machine as the server and development system but chose Mac for the book because Ruby and Python are preinstalled with the OS, thereby eliminating the time and space required to install, configure, and troubleshoot the oper-ating environment.
personally prefer iOS devices as the platform of choice for my mobile lifestyle, the overhead associated with writing applications for iOS is a hassle. In addi-tion to learning Objective-C and the various frameworks as well as dealing with the burden of memory management, deploying iOS apps requires either a jailbroken device or the legitimate purchase of an annual membership to Apple’s iPhone developer network. Conversely, Android’s SDK and application deployment is free and open. Android programs can also multitask better than iOS programs. Of course, these two advantages also bring on greater security and resource utilization risks. That said, I encourage readers who prefer the mobile demos to run on non-Android devices to port the simple client programs presented in this book to their favorite mobile OS and share these conversions with the Programming Your Home community.
Another term that is gaining a foothold in the tech press is the “Internet of Things.” This phrase refers to the idea that with the proliferation of network-connected microcontrollers, Internet-based communication between such small devices will eventually outnumber people surfing the Web. While that may be the case for submitting data upstream, reaching such a device from the Internet is still a hassle. Besides the technical knowledge required to set up a dynamic DNS and securely configure port forwarding to easily reach the device, ISPs may block outbound ports to prevent end consumers from setting up dedicated servers on popular network ports like FTP, HTTP/S, and SMTP.
The projects in this book should work perfectly fine in a home local area network. However, obtaining sensor data outside of this local network is a challenge. How do you check on the status of something like a real-time temperature reading without going through the hassles of opening and for-warding ports on your router (not to mention the potential security risks that entails)?
Fortunately, several companies have begun to aggressively offer platforms accessible via simple web service APIs to help overcome these hassles. Three of these gaining momentum are Pachube, Exosite, and Yaler.1 Configuring and consuming their services is a fairly straightforward process. I encourage you to visit these sites to learn more about how to incorporate their messaging capabilities into your own projects.
1. http://www.pachube.com, http://www.exosite.com, and http://www.yaler.org,
Code Examples and Conventions
The code in this book consists of C/C++ for Arduino, Java for Android, Ruby for web middleware, and Python for desktop scripts. Most of the code examples are listed in full, except when burdened by external library overhead (such as in the case of Android and Ruby on Rails program listings). Syntax for each of these languages is highlighted appropriately, and much of the code is commented inline along with bullet markings to help bring attention to the big ideas in the listings.
Highlights and sidebars are used sparingly in the book in an effort to keep information moving at a quick yet manageable clip.
Online Resources
Visit the book’s website at http://pragprog.com/titles/mrhome, where you can download the code for all the projects, participate in the book’s discussion forum, ask questions, and post your own home automation ideas. Bugs, typos, omissions, and other errors in the book can be found on the book’s errata web page.
Other popular website resources include the popular DIY websites Makezine, and Instructables,2 where participants share a wide variety of home-brewed
creations with their peers.
There are also several IRC channels on freenode.net and SIG forums on Google Groups dedicated to the subject, with many focused on singular aspects of DIY gadget design, home automation, and hardware hacking.3
OK, enough with the preamble. Let’s get ready to build something!
2. http://www.makezine.com and http://www.instructables.com, respectively. 3. http://groups.google.com/group/comp.home.automation/topics
Part I
CHAPTER
1
Getting Started
Before we start wiring up hardware and tapping out code, let’s lay down the foundation, starting with what exactly we mean by home automation, what’s been available in the consumer space in the past, and why building our own solutions makes sense today and in the future.
We will also review a couple of design and construction best practices that will be put to good use when assembling the projects in this book.
We’ll start by defining what we mean by home automation. Next we’ll consider some of the prepackaged commercial solutions on the market, and then we’ll take a quick snapshot of some of the more popular custom automation hardware and software projects. The chapter will conclude with some of the tools and practices that have helped me quite a bit when building the projects in this book as well as with other projects beyond the home automation category.
1.1
What Is Home Automation?
So what exactly does the term home automation mean? At its most basic level, it’s a product or service that brings some level of action or message to the home environment, an event that was generated without the homeowner’s direct intervention. An alarm clock is a home automation device. So is a smoke alarm. The problem is, these stand-alone devices don’t use a standard network communication protocol, so they can’t talk to one another the way that net-worked computers can.
freshly brewed pot of coffee would be waiting for them. Who would have thought that such a simple concept as a coffee maker combined with an alarm clock would change their world?
Now that we’re in the twenty-first century, rudimentary coffee makers are getting a makeover by tinkerers bolting network adapters, temperature sen-sors, and microcontrollers to make the brew at the right time and temperature and to send a text message alert that the beverage is ready for consumption. It’s only a matter of time before manufacturers incorporate inexpensive elec-tronics into their appliances that do what tinkerers have been doing with their home electronics for years. But a standard communication protocol among such devices remains elusive. Nevertheless, efforts are afoot by a number of home automation vendors to address that problem.
1.2
Commercial Solutions
The number of attempts to standardize home automation communication protocols has been ongoing nearly as long as Mr. Coffee has been in existence. One of the earliest major players was X10, a company that still offers basic and relatively inexpensive home automation solutions today. X10 takes advantage of existing electrical wiring in the home. It uses a simple pulse code protocol to transmit messages from the X10 base station or from a computer connected to an X10 communication interface. But problems with signal degradation, checksums, and return acknowledgments of messages, as well as X10’s bulky hardware and its focus on controlling electrical current via on/off relay switches, have constrained X10’s broader appeal.
Other residentially oriented attempts at standards, such as CEBus and Insteon, have been made, but none have attained broad adoption in the home. This is partly due to the chicken-and-egg problem of having appliance and home electronics manufacturers create devices with these interfaces and protocols designed into their products.
Most recently, Google has placed its bet on the Android operating system being embedded into smart devices throughout the home. Time will tell if Google will succeed where others have failed, but history is betting against it.
software developers, home automation enthusiasts, and tinkerers to design and implement their own solutions. The lucky few will uncover and market a cost-effective, compelling solution that will one day catch on like wildfire and finally provide the impetus to forever change our domestic lives.
1.3
DIY Solutions
The Do-It-Yourself category in home automation is more active today than ever before. The combination of inexpensive electronics with low-cost net-worked computers make this option extremely attractive. There’s other reasons that make DIY an ideal pursuit. Unlike proprietary commercial offerings, the projects you build are not mysterious black boxes. You have the source code. You have the knowledge. You have the measurements, the metrics, and the methods.
Not only will you know how to build it, you will know how to troubleshoot, repair, and enhance. None of the commercial solutions can match exactly what you may need. Home automation vendors have to generalize their products to make them appeal to a large consumer base. By doing so, they don’t have the luxury of creating one-off solutions that exactly match one customer’s specific needs. But with some rudimentary knowledge and project construction experience, you’ll gain the confidence to create whatever design matches your situation.
For example, the first project in this book builds a sump pit notifier that emails you when water levels exceed a certain threshold. While commercial systems have audible alarms, none that I have found at the local hardware store have the means to contact you via such messaging. And should you need to modify the design (add a bright flashing LED to visually broadcast the alert, for example), you don’t need to purchase a whole new commercial product that includes this feature.
Walk around your house. Look for inefficiencies and repetitive tasks that drive you crazy the way George Bailey was with pulling off the loose finial on his staircase’s newel post. Take note of what can be improved with a little ingenuity and automation. You may be surprised at just how many ideas you can quickly come up with.
1.4
Justifying the Investment
exceeds the functionality of a homegrown solution is simply not a good invest-ment. Sure, there may be some value derived from the knowledge gained from the design experience, the pleasure of building the solution, and the satisfac-tion of seeing your creasatisfac-tion come to life. But justifying such an investment to a budget-conscious spouse, for example, may deflate whatever gains you have made in the satisfaction department.
When considering any new design approach, strive for a scenario where you will maximize your time, equipment investment, and learning potential. You may have to try several experiments and iterations before the hardware and software come together and work the way you envisioned. But if you keep at it, you will be well rewarded for your persistence. Not only will you achieve high points for devising a low-cost solution, but such constraints will help drive creativity to even higher levels. That’s why I have tried my best to keep all the projects in this book within a reasonable budget, and I encourage reuse of old electronic parts and materials as much as possible.
Do your homework. Research online to see who may have attempted to build what you have in mind. Did they succeed? Was it worth the money and time they invested? Is there a commercially viable alternative?
If you determine that your idea is unique, put together an estimate of the expenses in terms of your time and of the materials you need to purchase. Remember to also include the cost of any tools you need to buy to construct and test the project’s final assembly. This added expense is not negligible, especially if you’re just starting down the DIY road. As you get more involved with hardware projects, you will quickly find that your needs will expand from an inexpensive soldering iron and strands of wire to a good quality multimeter and perhaps even an oscilloscope. But the nice thing about building your own solutions is that you can build them at your own pace. You will also find that as your network of DIYers grows, your opportunities for group discussion, equipment loans, insightful recommendations, and encouragement will grow exponentially.
1.5
Setting Up Your Workbench
Good assembly follows good design. Building these projects in a frustration-free environment will help keep your procedures and your sanity in check.
Work in a well-lit, well-ventilated area. This is especially important when soldering. Open a window and use a small fan to push the fumes outside. Use a soldering exhaust fan if an open window isn’t an option.
If your work space can afford it, have a large table to spread out your electronic parts. Keep it close to power outlets and have a power strip on the table for easy access.
Organize your components with small craft containers, baby food jars, pill boxes, Altoids tins—anything that helps keep the variety of capacitors, resis-tors, LEDs, wires, shields, moresis-tors, and sensors sorted will make it much easier to keep track of your parts inventory.
Have your computer stationed near or on the work space. This is a no-brainer if it’s a laptop. If it’s a desktop, minimize its table footprint by only placing a monitor, mouse, and keyboard (both preferably wireless) on the table to leave as much unobstructed working space as possible.
Keep clutter away from underneath and around the table. Not only does this aid fire prevention, but doing so will also make it far easier to find that elusive component when it rolls off the table and bounces toward the unknown.
Lastly, keep the work space dedicated to project work. Some projects can be like building a jigsaw puzzle. You need a place for the half-assembled pieces to sit while life goes on. Being able to sit down and start working, rather than start unboxing and repackaging a fur ball of wires and parts, makes building projects a joy instead of a chore.
1.6
Sketching Out Your Ideas
When inspiration strikes, nothing beats old-fashioned pencil and paper to quickly draw out your ideas. For those who prefer to brainstorm their designs on a computer, several free, open source, cross-platform tools have helped me assemble my ideas and document my work:
• Freemind is great for organizing thoughts, objectives, and dependencies.1
This mature mind-mapping application helps you make sense of a brain dump of ideas and see the links between them. This will save you time and money because you will be able to spot key ideas, eliminate redun-dancies, and prioritize what you want to accomplish.
• Fritzing is a diagraming application specifically designed for documenting Arduino-centric wiring.2 Unfortunately, it’s still a work in progress and
is rough around the edges. It also doesn’t have a number of the popular sensors iconically represented yet, but the object library is growing as
1. http://freemind.sourceforge.net 2. http://fritzing.org/
more people contribute to the project. I use this application exclusively for documenting my Arduino-based projects, which is why the wiring diagrams in this book were generated by Fritzing.
• Inkscape is an easy-to-use vector-based drawing program that helps sketch out ideas beyond the Arduino-centricity of Fritzing.3 While Inkscape
is mainly intended for graphic artists, it has accurate measurement tools that are great for scoping out bracket and enclosure ideas for your projects.
Going beyond the desktop, tablets are rapidly taking over the role that were once the domain of traditional paper uses. In fact, it wouldn’t surprise me if you’re reading this book on an iPad or a Kindle right now. Beyond just refer-ence lookups, tablets are excellent for brainstorming ideas and creating initial sketches of preliminary project designs. An iPad (or Android tablet, for that matter) combined with a sturdy stand also makes for a handy electronic ref-erence. Load up your sketches, track your progress, reorder priorities, and make notes along the way.
My current favorite iPad apps for my projects include the following:
• Elektor Electronic Toolbox is an electronic parts reference with a variety of helpful calculators and conversion tools.4
• iCircuit is a electronic circuit simulator that makes building and under-standing circuits far easier than static diagrams on a printed page.5
• iThoughts HD is a mind-mapping application compatible with importing and exporting Freemind files.6
• miniDraw is a vector-based drawing program that can export to SVG format, perfect for importing your sketches into Inkscape.7
In addition to designing and documenting your projects, well-executed projects also rely on taking accurate measurements and running tests to validate your work.
1.7
Writing, Wiring, and Testing
Unfortunately, no good software emulator exists yet for the Arduino; fortu-nately, programs for this platform are usually small and specific enough such
3. http://inkscape.org
4. http://www.creating-your-app.de/electronic_toolbox_features.html?&L=1 5. http://icircuitapp.com/
6. http://ithoughts.co.uk
that the compile-run-debug cycles are tolerable. Good coding and testing techniques go a long way toward ensuring a high-quality outcome. The same goes for constructing and wiring up the physical electrical connections.
While nearly all of the projects in this book can be constructed without solder, permanent installations require good soldering techniques to ensure a con-ductive pathway. It’s best to verify (usually with the help of a breadboard) that the connections work as expected before making them permanent with solder.
Use good code-testing techniques. Whether for microcontroller code for the Arduino or server-side code for your Ruby or Python scripts, Test-Driven Development (TDD) is a good practice to adopt. There are a number of good testing frameworks and books available on the subject. Read Ian Dees’s article, “Testing Arduino Code,” in the April 2011 edition of PragPub magazine,8 as
well as Continuous Testing: with Ruby, Rails, and JavaScript [RC11].
Run unit tests like py.test when writing Python-powered scripts. When coding in Ruby and creating Rails-based web front ends, consider using Rspec (for more details on using Rspec, read The RSpec Book [CADH09]). Use the Android testing framework for your Android applications.9 Even when working on
small applications, using proven testing methodologies will help keep you sane while further elevating the quality in your code.
Know how to use a multimeter. Like a software debugger, a multimeter can come in quite handy when trying to figure out what’s happening inside your project—for example, where a short might be stepping on your project. Besides detecting problems, a multimeter is also useful for measuring electrical output. For example, you can also use it to determine if a solar battery pack can deliver enough uninterrupted energy to power a microcontroller-operated servo.
If you’re not familiar with how a multimeter operates, just type “voltmeter tutorial video” in your favorite search engine. There are plenty online to choose from.
1.8
Documenting Your Work
Hand-drawn scribbles offer nice starting points, but often projects take twists and turns along the way that have to account for limited resources or hardware
8. http://www.pragprog.com/magazines/2011-04/testing-arduino-code 9. http://developer.android.com/guide/topics/testing/testing_android.html
that just doesn’t work as planned. The final product may be vastly different from the original design. That’s why it’s so important to finish a project with accurate, clean, and concise documentation, especially if you plan to share your design with others.
Using applications like Fritzing can aid with the generation of clean, full-color wiring diagrams. Doing so will go a long way toward showing exactly how to wire up a project. Nothing is worse than seeing blurry, angled Flickr photos or YouTube videos of wires plugging into hard-to-see shield or breadboard pinholes as the primary means of documentation. Having those are nice supplementals, but any well-designed project should be accompanied by clear and easy-to-follow wiring illustrations.
Leave verbose comments in your code, even for the simple scripts and sketches. Not only will it help you and those you share the code with under-stand what various routines are doing, good comments will also put you back in the frame of mind you were in when writing the code in the first place. And if you share your code on various repository sites like Github and Sourceforge, well-commented code shows a greater level of professional polish that will gain you more respect among your peers.
With all these recommendations, keep in mind that the most important takeaway from the book’s projects is to have fun doing them. These rewarding experiences will encourage you to use these projects as starting points and infuse your own unique needs and design goals into them.
In the next chapter, we will review the hardware and software we will use and take into account the optimal configurations of each.
CHAPTER
2
Requirements
Before diving into the book’s projects, we need to consider the materials and best practice methodologies we will employ when building the solutions.
A key tenet I practice in this book is for the various projects to be as easy and inexpensive to build as possible. While it may be fun to construct an elaborate Rube Goldberg contraption that costs hundreds of dollars to open a can of soup, it’s far more practical to spend a dollar on a can opener that you can buy from the store. I have tried my best to maximize the value of money and time with each project. As such, few of them should cost more than sixty dollars in parts or take more than an hour to construct.
It’s also good to practice reuse whenever possible. This is far easier for software than for hardware, but it can be done. That is why an inexpensive microcon-troller board like the Arduino is at the center of several of these projects.1 In
an effort to save money on the hardware investment, it may be worthwhile to try out one or two projects concurrently and decide which ones make the most positive impact before buying a half dozen Arduino boards. After you have built the projects that you’re most interested in, then build upon them, improve them, and remix them. When you have an especially cool creation, contribute your discoveries to the Programming Your Home book forum.
Most software development projects typically do not require much more than a computer and the choice of language and frameworks the programming logic executes within. But with the addition of hardware sensors, motors, and purpose-built radios and controllers, the design and construction workflow is a little more complex. Essentially, you are building two major components with each project: the physical collection of hardware and the software that
will measure, interpret, and act on the data that the hardware collects. Let’s take a look at what comprises these two key development aspects.
2.1
Knowing the Hardware
The Arduinos, sensors, and motors (technically referred to as actuators) used in the projects can be purchased from a number of online retailers, with my current two favorites being Adafruit Industries and Sparkfun.2 For the
budget-conscious builder, Craigslist and eBay offer money-saving deals. Purchasing used parts from these online classified listing services may come in especially handy when searching for old Android handsets and X10 controls. But buyer beware: there is often little recourse you can take should a used part stop working a few days after you have received it. Companies like Adafruit and Sparkfun stake their reputations on their over-the-top customer support and will usually accommodate any reasonable replacement request.
Each project in the book contains a What You Need section that lists the hardware and software components required to build the solution. The hardware used is nothing exotic or difficult to find and purchase online, and some projects even incorporate common household items like dry cleaning clothes hangers and cloth scraps in their parts list. Here is a complete inven-tory of electronic components required to build the projects in this book and their estimated per item costs:
• Arduino Uno, Duemilanove, or Diecimila - $30
• Ethernet shield - $45
• Wave shield with speaker, wire, and SD card - $35
• Passive infrared (PIR) motion sensor - $10
• Flex sensor - $12
• Force sensitive resistor - $7
• TMP36 analog temperature sensor - $2
• CdS photoresistor (commonly referred to as a photocell) - $1
• Standard servo motor - $15
• Smarthome electric 12VDC door strike - $35
• FTDI connector cable - $20
• Solar charger with built-in rechargeable battery - $30
• X10 CM11A ActiveHome serial computer interface - $50
• X10 PLW01 standard wall switch - $10
• Serial USB converter - $20
• Home computer (Linux or Mac preferred) - $200 to $2,000, depending on model
• Wireless Bluetooth speaker - $120
• Android G1 phone - $80 to $150, depending on its used condition
• Android smartphone - $50 to $200, depending on features and carrier contract
• Sparkfun IOIO board with JST connector, barrel jack to 2-pin JST con-nector, and 5VDC power supply - $60
• Male USB to male mini-USB cable - $3
• 2.1 mm female barrel jack cable - $3
• Spool of wire (22 AWG should be adequate) - $3
• 10K ohm resistor - $0.10
• 10M ohm resistor - $0.10
• Small breadboard - $4
• Electrical tape or heat shrink tubing - $5
• 9-volt DC power supply - $7
• 12-volt 5A switching power supply - $25
• PowerSwitch Tail II with a 1K resistor and a 4222A NPN transistor - $20
• Stepper motor - $14
Each of these parts is reusable with the projects throughout the book. Natu-rally, if a particular project is permanently installed in your home, you will have to replenish the inventory to replace the parts used in that permanent fixture. Do It Yourself (DIY) hardware project building, like writing code, is a satisfyingly addictive experience. As your confidence grows, so too will your expenditures on electrical components.
Of all the parts used throughout the book, three items that are frequently called upon are Android smartphones, Arduinos, and XBee radios. I will give a brief overview of each in the next sections. If you intend to leverage these useful electronics further, refer to the Android, Arduino, and XBee titles in
Appendix 2, Bibliography, on page 213, for more information on these remark-able, transformative technologies.
Android Programming
The Android operating system is continuing its rapid expansion and domina-tion in certain telecommunicadomina-tions and embedded systems markets. Google announced its Android@Home initiative and is encouraging developers and consumer electronics manufacturers to consider Android as a base technology for smart home systems. Several electronics vendors have released hardware that is compliant with the Android Open Accessory Development Kit (ADK) and that takes advantage of the interfaces Google has designed.3
The ADK board I chose is Sparkfun’s IOIO board. ADK support for the IOIO was still in beta at the time of this book’s publication, and loading the ADK-enabled firmware on the board is not a trivial exercise. Chapter 9, Android Door Lock, on page 143, instead discusses a project in this book using tradi-tional Android SDK calls while incorporating the custom hardware library that the IOIO board currently provides.
As the cost of ADK developer hardware drops, more economically viable options will be available for developers and manufacturers alike. But for now, a used first-generation Android phone coupled with an IOIO is still far more powerful and much less expensive than a comparably spec’d ADK board with the same features (camera, GPS, Bluetooth, Wi-Fi) as a smartphone. By the time ADK devices become cheap and plentiful, you will be ahead of the game by having working knowledge of the Android application development ecosystem.
Some Android-centric projects involve building both a native client and a server application. While the client applications could have been written in a device-agnostic web framework like jQuery Mobile,4 it’s useful to stress the importance of native mobile app development. By having this native foundation from the start, you will be able to more easily call upon advanced phone functions that are inaccessible from a web-based interface. Native applications also tend to load and respond faster than their browser-based counterparts.
3. http://developer.android.com/guide/topics/usb/adk.html
While it’s not necessary to have prior experience developing Android applica-tions to build the Android programs in this book, it will certainly help to have some familiarity with the Android SDK.5
Arduino Programming
If you have C or C++ coding experience, you will feel right at home with writing code for the Arduino’s ATMega 168/328 microcontroller. Arduino programs, known as sketches, are easy to write once you learn the basic structure of an Arduino application.
Let’s take a quick look at the basic anatomy of an Arduino sketch. It begins with #include statements at the head of the sketch import code libraries, just as they are in C programs. This is followed by global variable and object ini-tializations that are usually referenced in the sketch’s setup() routine. The setup()
function is typically used to reference physical wiring connection points, known as “pins” on the Arduino board, along with the global variable assign-ments made in the initialization section. An example of this assignment might be something like int onboard_led = 13; before setup(). This code instructs the Arduino to use pin 13 (the location of its onboard LED) to be accessible in the sketch. We can then assign the pin for output with the line pinMode(on-board_led, OUTPUT) within the setup() routine.
After the variable assignment and setup() program initializations are established, sketches enter the main loop() routine that infinitely iterates over the instruc-tions contained within it. It is here that the sketch waits for some event to occur or repeats a defined action. We will revisit this structure and the process of writing, compiling, and running Arduino programs again in our first project, the Water Level Notifier.
Any text editing program can be used to write sketches, with the most popular being the free Arduino Integrated Development Environment (IDE) available for download from the Arduino website. This Java-based coding environment incorporates everything you need to compile your sketches into machine-friendly ATMega microcontroller instructions. It also comes bundled with dozens of sample sketches to help you quickly learn the syntax and realize the number of different sensors and motors that the Arduino can interact with. And because it is based on Java, the Arduino IDE will run identically on Windows, Mac, and Linux computers.
5. http://developer.android.com/sdk
Joe asks:
Does the Arduino IDE Have a Virtual Emulator?
Unlike most desktop and mobile application development, no official Arduino emulator exists. It’s difficult to simulate all the different physical sensors and motors that the Arduino can be connected to. Several third-party attempts have been made to create such a tool, but they are either limited in the operating systems they support or focus on the ATMega chip and not the full Arduino package. Two Windows-based emulators are Virtual Breadboard and Emulare,a with Virtual Breadboard being the one I recommend due to its virtual representation of Arduino hardware. Virtual Breadboard also provides a limited set of emulated sensors and other devices that connect to the onscreen Arduino.
Given the low cost of the Arduino itself, few find much use for an emulator other than for unit testing and convenient, portable virtual hardware reasons. Spend the money for an actual board rather than messing around with the emulators. Sketches are short, and the serial window in the Arduino IDE is helpful enough to offer detail to adequately debug and tweak real-live hardware.
a. http://www.virtualbreadboard.net and http://emulare.sourceforge.net/, respec-tively.
XBee Programming
Another key technology we will be using in several of the projects is a radio device based on the IEEE 802.15.4 wireless specification, commonly known as XBee. XBee radios are ideal for Arduino-based wireless projects due to their low-cost, low-power, and easy-to-use serial interface communication. Low-powered XBees are used mainly for character-level bitstream communi-cations. Broadcast distances between radios are roughly within a fifteen-meter (50-foot) radius.
The projects in this book that incorporate XBee-to-XBee communications use single characters or short strings to announce a state change as a result of a sensor event. Such changes are then broadcast wirelessly to a paired XBee modem that is usually attached to a computer or embedded system that processes the received signal. I prefer to log this data before acting upon it to store events and help with debugging. After logging the received data, the computer may also further propagate the signal by translating it into a web service-friendly payload, an email message, a servo motor movement, or any other call to action.
but it is also not too difficult either. Fortunately, Limor “Ladyada” Fried, founder of Adafruit Industries and open hardware electrical engineer extraor-dinaire, has posted a terrifically helpful tutorial on her website that provides detailed, step-by-step instructions on assembling XBee adapter kits sold along with the XBee radio modules. We will explore this further when we use XBees for the first time in the Tweeting Bird Feederproject.
Incidentally, Digi International, the company who manufacturers the XBee hardware, recently announced a 802.11 b/g/n Wi-Fi–capable XBee that obvi-ates the need for a second XBee connected via an FTDI cable for the receiving PC. However, the cost for this convenience is considerably more than the configuration I used in the book. If you’re interested in this more convenient approach, check out the XBee Wi-Fi page on Digi’s website.7
A number of books (such as Building Wireless Sensor Networks [Fal10]) and online resources go into greater detail on learning basic electronics, Arduino programming, and wireless networking. This section simply provided an overview of how to work with the specific hardware we will use in this book’s projects. In the next section, we will take a quick survey of the software we will use to bring the assembled hardware to life.
2.2
Knowing the Software
In addition to being familiar with the C/C++ syntax used for programming Arduino sketches, you will be able to follow along easier if you are familiar with the Java, Ruby, and Python languages. Ruby on Rails experience is also a plus. If you are unfamiliar with these, review Appendix 2, Bibliography, on page 213, for several titles that do a great job of teaching these languages and frameworks.
Even if you don’t know much about these languages, you should be able to build and execute the code for these projects with little or no modification on a Linux or Macintosh computer. Windows users will need to install their preferred Python and Ruby distributions as well as the Java runtime, and some of the utilities used in this book that were written for Unix-based oper-ating systems might not have a Windows version available. A PC can be loaded with your preferred Linux distribution, and a Mac Mini will be more than adequate for the OS X crowd. This home server should be a reasonably inexpensive component in the Programming Your Home hardware collection.
7. http://www.digi.com/xbeewifi
Java familiarity will come in handy when writing the Android client and server applications later in the book. Experience with Python and Ruby is also a plus. Python also comes preinstalled on Mac and on nearly all Linux distributions. As such, a majority of server-side scripts in this book are Python-based. Java, Perl, PHP, or Ruby developers intent on staying pure to their favorite technology shouldn’t have too difficult a time porting the project’s server-side applications to their language of choice. I encourage any readers interested in porting the book’s code to a different language to share their work with other readers via the book’s website.
2.3
Be Safe, Have Fun!
I deliberately designed the projects in this book to have little or no chance of electrical shock or damage to persons or property should something unexpect-ed occur. It should go without saying that you should always employ safe practices when assembling any hardware project.
In addition to the book’s disclaimers that I as the author and The Pragmatic Bookshelf as the publisher cannot be held liable for any damages of any kind as a consequence of building and powering these projects (as well as be held liable in any way for hardware you use or modify for these projects—for spe-cific details, see Proceed at Your Own Risk. You Have Been Warned!, on page 19), I cannot stress this highly enough: unless you are a certified electrician, plumber, or carpenter and know exactly what you’re doing at all times, don’t start poking around and tampering with the basic infrastructures found in the home. Call upon the experience of professional, certified electricians when wiring for the home. Trust me. The up-front planning and outside expertise will deter aggravation, save you money, and protect you from physical harm. Leaving these foundational aspects to the professionals will leave you with more time to implement and optimize your ultra-cool and envy-invoking smart home creations.
OK, enough with the requirements and disclaimers. Let’s dive into the next section, where we will finally get to assemble and code some really nifty and unique home automation projects!
Proceed at Your Own Risk. You Have Been Warned!
Your safety is your own responsibility. Use of the instructions and suggestions in this book is entirely at your own risk. The author and the Pragmatic Programmers, LLC, disclaim all responsibility and liability for any resulting damage, injury, or expense as a result of your use or misuse of this information.
It is your responsibility to make sure that your activities comply with all applicable laws, regulations, and licenses. The laws and limitations imposed by manufacturers and content owners are constantly changing, as are products and technology. As a result, some of the projects detailed here may not work as described or may be incon-sistent with current laws, regulations, licenses, or user agreements, and they may even damage or adversely affect equipment or other property.
Power tools, electricity, and other resources used for these projects are dangerous unless used properly and with adequate precautions, including proper safety gear (note that not all photos or descriptions depict proper safety precautions, equipment, or methods of use.) You need to know how to use such tools correctly and safely. It is your responsibility to determine whether you have adequate skill and experience to attempt any of the projects described or suggested here. These projects are not intended for use by children.
Make sure you are comfortable with any risks associated with a project before starting that project. For example, if the idea of dealing with 110V power worries you, then don’t do the projects that use it, and so on. We also don’t know about any local ordi-nances that might apply to you, so before you go wiring stuff in, you should check your building codes. If in doubt, have a chat with a local professional.
Only build these projects if you agree that you do so at your own risk.
Good luck, and have fun!
Part II
CHAPTER
3
Water Level Notifier
If you live in the midwestern part of the United States like I do, you know all about heavy rains and the effects they can have on a basement. Stories of sump pumps failing during torrential downpours are often punctuated with “Had I only known how quickly the water level in my sump pit was rising, I would have had more time to move my stored items out of the way.”
Imagine another scenario, where someone needs to use a dehumidifier to remove dampness in a cellar. Inexpensive dehumidifiers often stop working when water reaches a certain height in the condensation bucket. Some models may include an audible alarm or flashing light when this shutdown occurs, but such alerts are ineffective because the dehumidifier is typically installed in an infrequently visited area.
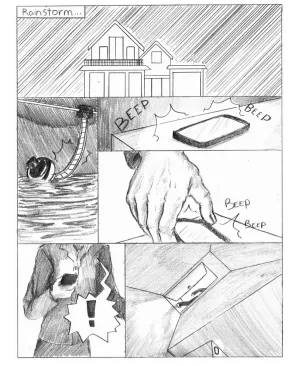
Wouldn’t it be more convenient to receive an email from your house when the water levels in these containment areas exceed a certain threshold, alerting you to take action? (See Figure 1, Have your house email you, on page 24.) Let’s get our feet wet, so to speak, and build a system that will provide this helpful notification service.
3.1
What You Need
The main component required to make this project work is something called a flex sensor. The buoyancy of rising water levels will bend the sensor. As the sensor bends one way or the other, current values will increase or decrease accordingly. The sensor’s position can be read with a simple Arduino program and can be powered via either the Arduino’s 3.3 or 5.0 volt pins.
Figure 1—Have your house email you...when water levels rise precipitously to give you enough time to prevent flood damage. This project can also be used to monitor water levels
in dehumidifiers, air conditioners, and similar devices.
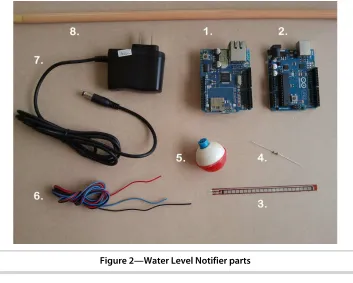
1. An Arduino Uno 2. An Ethernet shield1
3. A flex sensor2 4. A 10k ohm resistor3
1. http://www.adafruit.com/index.php?main_page=product_info&cPath=17_21&prod-ucts_id=201
2. http://www.sparkfun.com/products/8606
Figure 2—Water Level Notifier parts
5. A 1-inch fishing bobber
6. Three wires (power, ground, and analog pin 0) trimmed to desired length 7. A 9-volt power supply to power the Arduino and Ethernet shield once
untethered from the USB cable
8. A pole or wood plank to attach and hang the flex resistor from 9. A web server running PHP 4.3 or higher (not pictured)
You will also need a standard A-B USB cable (not pictured) to connect the Arduino to the computer and an Ethernet cable (also not pictured) to connect the Ethernet shield to your network.
We will be reusing the Arduino and Ethernet shield again in several other projects, so—not including the cost of these two items—the remaining hard-ware expenses should be under twenty dollars. Considering the peace of mind and the ease with which you can build further ideas upon this concept, this is money well spent.
Arduino Ethernet
Would you prefer a board that combines the Arduino Uno and the Arduino Ethernet shield into a single package? The Arduino Uno Ethernet may be what you’re looking for.a However, the board still needs to reserve digital pins 10 through 13 for the Ethernet module, just like the separate Ethernet shield does. The Arduino Uno Eth-ernet also requires an FTDI cable to interface with a computer rather than the more popular A-B USB cable.b The biggest advantage that this board has to offer is the ability to combine Ethernet services with another Arduino shield, assuming that shield does not require the same pin resources that the Ethernet hardware requires.
a. http://www.adafruit.com/products/418 b. https://www.adafruit.com/products/70
3.2
Building the Solution
Before the Water Level Notifier can start broadcasting alerts, we need to complete the following tasks:
1. Attach wires and a resistor to the exposed sensor leads on one end of the flex resistor and the fishing bobber on its other end.
2. Connect the leads of the flex sensor to an analog pin of an Arduino.
3. Write a program (i.e., sketch) for the Arduino that will monitor changes in the flex sensor readings. It should trigger an event when a large-enough deviation from the initial value is detected.
4. Attach an Ethernet shield to the Arduino so that the sketch can commu-nicate with a web server running PHP.
5. Write a PHP script that will capture incoming values from the Arduino. When the water level has changed, it should format a message and send an email alert to the intended recipient, who will need to react quickly to the alert!
We will begin by assembling the hardware and testing out the flex sensor measurements.
3.3
Hooking It Up
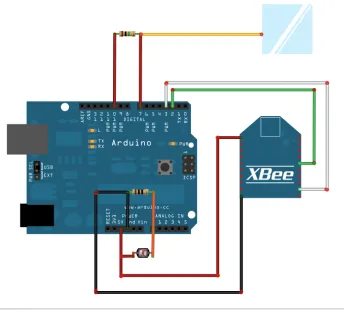
the rungs of a ladder. Connect the negative lead to the analog 0 pin with another wire. Lastly, bridge the analog 0 pin to the ground pin using the 10k ohm resistor to dampen the flow of current through the circuit. Refer to Figure 3, Water Level Notifier wiring diagram, on page 28, to make sure you attach the wires and resistor to the correct pins.
Attach the bobber to the end of the flex sensor. Most bobbers come with a retractable hook that can be fastened to the plastic tip of the sensor. If the bobber doesn’t stay affixed to the sensor, you can also use hot glue or heat shrink tubing to help keep the bobber attached. Just be careful not to damage the sensor when heating it with these affixing solutions. You can also try duct tape as a safe alternative, though the tape may lose its grip over time.
Use plenty of wire so you have enough length to safely mount the Arduino and power source far away from the water source. The Arduino that I have monitoring my sump pit is sitting in a hobby box mounted on the wall several feel above the sump pit, and the two wires attached to the flex resistor are about two meters (roughly six feet) in length.
Now that the Arduino has been wired up, we can work on the logic of what the hardware is supposed to do for us. We will begin with a quick test program that will verify that the flex sensor is connected correctly and working properly.
3.4
Sketching Things Out
Before we start writing code, we first need to make sure we can communicate with the Arduino. Then we will learn how to collect and act upon data sent by the flex sensor with a program (what the Arduino community prefers to call a sketch).
The first sketch we write will detect when the flex resistor values have changed. If the change is large enough (in other words, if water is making the resistor bend), we will transmit a request to a PHP server that will process the request. That server will then send out an email notifying us of the change.
We will build the sketch incrementally, first by connecting the flex sensor to the Arduino and collecting values when the sensor is straight and then when it bends in both directions. Once these values have been identified, we will write conditional statements that will call functions to send HTTP GET statements containing data we will include in the email alert.
Figure 3—Water Level Notifier wiring diagram
Configuring an Arduino
We will use the Arduino IDE to write, compile, and download our code into the Arduino. For those who would like a more comprehensive introduction to Arduino programming, read Maik Schmidt’s excellent Arduino: A Quick Start Guide [Sch11].
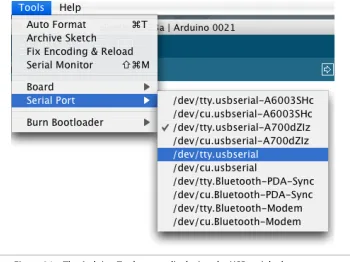
If you are already familiar with the Arduino or are willing to hang on for the ride, let’s get started by launching the Arduino IDE. Check to ensure that your Arduino is connected via USB cable and recognized and selected accord-ingly on one of the serial ports identified by the Arduino IDE’s Tools→Serial Port menu. You can perform a quick test of your configuration with the LED Blink example program located in the Arduino IDE’s File→Examples→1.Basics →Blink menu. Upload it to the attached Arduino and check to see that it executes correctly.
If it fails to do so, first verify that the Arduino is correctly plugged into the computer and powered by the USB. If it is, check next to be sure you’ve selected the correct serial port in the Arduino IDE and highlighted the right type of Arduino board in the Tools→Board. A few correctly placed mouse clicks on either of these settings usually fixes the problem.
The Flex Sensor Sketch
Now that the Arduino is connected and tested, we can write a sketch that will validate and interpret the bending of the flex sensor. We will begin by defining a few constants that we will refer to in the program.
Since we have to account for the sensor bending in either direction, we will define two named constants that will be used to set the upper and lower threshold limits.
We place these constants at the beginning of the sketch so they’re easier to locate in case we need to edit these values later on. By convention, defined constants are also all uppercase so that they are easier to identify in the code. Let’s call them FLEX_TOO_HI and FLEX_TOO_LOW. The range between these upper and lower limits will depend on the degree of flex that is optimal for your own scenario. I prefer a variance of plus or minus five units to allow a minor amount of bend before the notification event is triggered. Having such a range will allow us to account for minor environmental effects like a light breeze or a low-grade vibration.
We also need to account for the Arduino’s onboard LED and the analog pin that the flex sensor is attached to.
• FLEX_TOO_HIGH is the value of the assigned analog pin when the flex sensor is bent forward past this threshold.
• FLEX_TOO_LOW is the value of the assigned analog pin when the flex sensor is bent backward past this threshold.
• ONBOARD_LED is assigned to the Arduino’s onboard LED located at pin 13. We will use it provide us with a visual indicator when the flex resistor has deviated far enough to send an alert. This allows us to use the Arduino’s onboard LED as a kind of visual debugger so that we can visually confirm that the flex events are being detected.
• FLEX_SENSOR is connected to the analog pin on the Arduino that the flex resistor is connected to. In this case, that value is 0 because the resistor is connected to pin 0.
These constants will be defined at the beginning of the sketch.
Download WaterLevelNotifier/WaterLevelSensor.pde
#define FLEX_TOO_HI 475
#define FLEX_TOO_LOW 465
#define ONBOARD_LED 13
#define FLEX_SENSOR 0
Now we will create two variables to capture the changing value and state of the flex resistor and set their initial values to zero.
• bend_value will store the changing analog values of the flex resistor as it bends.
• bend_state is the binary condition of the flex sensor. If it’s straight, its value is equal to zero. If the flex resistor deviates either direction, we will set its state to one.
These variables will follow after the define statements we wrote earlier.
Download WaterLevelNotifier/WaterLevelSensor.pde
int bend_value = 0; byte bend_state = 0;
With the constants defined and the variables initialized, we need to set up the serial port to monitor the continuous stream of values being polled in the main program’s loop. The onboard LED also has to be configured so we can see it turn on and off based on the bend_state of the flex resistor.
Download WaterLevelNotifier/WaterLevelSensor.pde
void setup() {
// for serial window debugging Serial.begin(9600);
// set pin for onboard led pinMode(ONBOARD_LED, OUTPUT); }
With the upper and lower flex bending limits defined, we need a routine that will check to see if these limits have been exceeded. If they have, we will turn on the Arduino’s onboard LED. When the flex resistor returns to its resting straight position, we will turn the LED off.
Download WaterLevelNotifier/WaterLevelSensor.pde
void SendWaterAlert(int bend_value, int bend_state) {
digitalWrite(ONBOARD_LED, bend_state ? HIGH : LOW); if (bend_state)
Serial.print("Water Level Threshold Exceeded, bend_value="); else
Serial.print("Water Level Returned To Normal bend_value="); Serial.println(bend_value);
}
Note the first line of this code block: digitalWrite(ONBOARD_LED, bend_state ? HIGH :
All that is left to write is the program’s main loop. Poll the FLEX_SENSOR pin (currently defined as analog pin 0) every second for any increase or decrease in value. When a flex event is detected, print the bend_value to the serial port so we can see it displayed in the Arduino IDE’s serial window.
Download WaterLevelNotifier/WaterLevelSensor.pde
void loop() {
// wait a second each loop iteration delay(1000);
// poll FLEX_SENSOR voltage
bend_value = analogRead(FLEX_SENSOR);
// print bend_value to the serial port for baseline measurement // comment this out once baseline, upper and lower threshold // limits have been defined
Serial.print("bend_value="); Serial.println(bend_value);
switch (bend_state) {
case 0: // bend_value does not exceed high or low values
if (bend_value >= FLEX_TOO_HI || bend_value <= FLEX_TOO_LOW) {
bend_state = 1;
SendWaterAlert(bend_value, bend_state); }
break;
case 1: // bend_value exceeds high or low values
if (bend_value < FLEX_TOO_HI && bend_value > FLEX_TOO_LOW) {
The main loop of the sketch will poll the value of the flex resistor every second. A switch statement tests the condition of the flex resistor. If its last status was straight (case 0:), check to see if it has since bent beyond the upper and lower threshold limits. If so, set the bend_state accordingly and call the SendWaterAlert
function. Conversely, if the resistor’s last status was bent (case 1:), check to see if it’s now straight. If it is, set the bend_state variable to zero and pass that new state to the SendWaterAlert function.