Moving and Accessing
SAS
®
9.2 Files
SAS
®The correct bibliographic citation for this manual is as follows: SAS Institute Inc. 2008.
Moving and Accessing SAS®9.2 Files. Cary, NC: SAS Institute Inc. Moving and Accessing SAS®9.2 Files
Copyright © 2008, SAS Institute Inc., Cary, NC, USA ISBN 978-1-59994-322-0
All rights reserved. Produced in the United States of America.
For a hard-copy book: No part of this publication may be reproduced, stored in a retrieval system, or transmitted, in any form or by any means, electronic, mechanical, photocopying, or otherwise, without the prior written permission of the publisher, SAS Institute Inc.
For a Web download or e-book: Your use of this publication shall be governed by the terms established by the vendor at the time you acquire this publication.
U.S. Government Restricted Rights Notice. Use, duplication, or disclosure of this software and related documentation by the U.S. government is subject to the Agreement with SAS Institute and the restrictions set forth in FAR 52.227-19 Commercial Computer Software-Restricted Rights (June 1987).
SAS Institute Inc., SAS Campus Drive, Cary, North Carolina 27513. 1st electronic book, February 2008
2nd electronic book, April 2008 1st printing, February 2008 2nd printing, April 2008
SAS®Publishing provides a complete selection of books and electronic products to help customers use SAS software to its fullest potential. For more information about our e-books, e-learning products, CDs, and hard-copy books, visit the SAS Publishing Web site atsupport.sas.com/pubsor call 1-800-727-3228.
SAS®and all other SAS Institute Inc. product or service names are registered trademarks or trademarks of SAS Institute Inc. in the USA and other countries. ®indicates USA
registration.
Contents
What’s New vii Overview vii
Documentation Enhancements vii
P A R T
1
Introduction
1
Chapter 1
4
Moving and Accessing SAS Files between Operating Environments
3
Deciding to Move a SAS File between Operating Environments 3 Deciding to Access a SAS File across Operating Environments 3 Strategies for Moving and Accessing SAS Files 4
Summary of Strategy Features 5
Using National Language Support To Move SAS Files between Computers 6 The Data Set Used for Examples 7
Naming Conventions Used for Examples 7 Accessibility Features in SAS Products 8
P A R T
2
Strategies for Moving and Accessing SAS Files
9
Chapter 2
4
Cross-Environment Data Access (CEDA)
11
Overview of CEDA 11 CEDA Advantages 12 CEDA Limitations 12
Creating or Changing a SAS File’s Format 13 Transferring a SAS File between Computers 15 Identifying the Format of a SAS File 16
Reading and Writing a Foreign File 17
Chapter 3
4
PROC CPORT and PROC CIMPORT
19
Overview of Moving SAS Files Using PROC CPORT and PROC CIMPORT 19 Limitations of Moving SAS Files Using PROC CPORT and PROC CIMPORT 20 Disadvantages of Moving SAS Files Using PROC CPORT and PROC CIMPORT 20 Creating a Transport File at the Source Computer 20
Transferring Transport Files to a Target Computer 22 Restoring Transport Files at the Target Computer 22
Chapter 4
4
XPORT Engine with DATA Step or PROC COPY
27
Overview of the XPORT Engine 27 XPORT Engine Advantages 27 XPORT Engine Limitations 28
iv
Restoring Transport Files at the Target Computer 31
Chapter 5
4
XML Engine with DATA Step or PROC COPY
33
Overview of the XML Engine 33 XML Engine Advantages 33 XML Engine Limitations 34
Creating an XML Document at the Source Computer 34 Transferring an XML Document across a Network 35
Restoring an XML Document as a Data Set at a Target Computer 36
P A R T
3
Transferring Transport Files and Foreign Files
37
Chapter 6
4
Transferring Files
39
Overview of File Transfers 39 Attributes for Transport Files 40
Using the FILENAME Statement or FTP for Foreign Files and Transport Files 41
P A R T
4
Operating Environment Specifics
45
Chapter 7
4
OpenVMS Operating Environment
47
Listing OpenVMS System File Attributes 47 File Attributes Under OpenVMS 48
Identifying the SAS Version Used to Create a File Under OpenVMS 48 Mounting a Tape Device Under OpenVMS 49
Error Messages For OpenVMS 49
Chapter 8
4
z/OS Operating Environment
53
Listing z/OS File Attributes 53
Identifying the SAS Version Used to Create a File under z/OS 53 z/OS Files and the UNIX System Services Directory 54
z/OS Batch Statements for File Transport 54 Transfer Issues for a z/OS Target Computer 54
Reading Transport Files in z/OS Operating Environments 55
Chapter 9
4
UNIX Operating Environment
57
File Attributes Under UNIX 57
Identifying the SAS Version Used to Create a File under UNIX 57 Example: Creating a Transport File on Tape 58
Example: Copying the Transport File from Disk to Tape at the UNIX Source
Computer 59
Example: Copying the Transport File from Tape to Disk at the Target Computer 59
Chapter 10
4
Windows Operating Environment
61
File Attributes Under Windows 61
v
Chapter 11
4
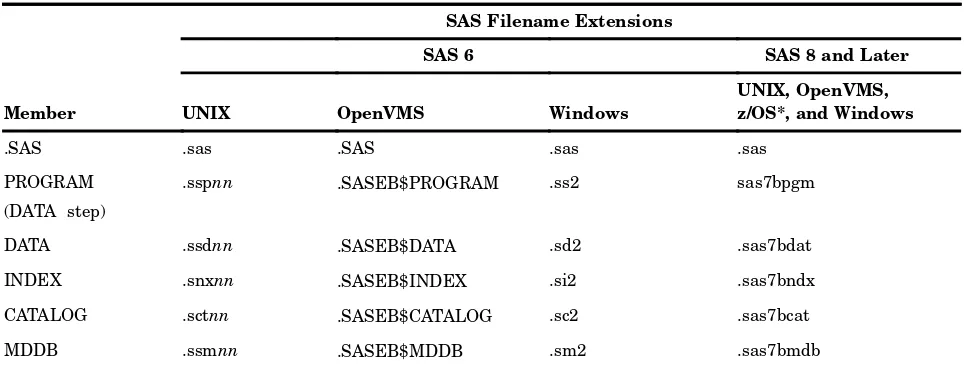
SAS Filename Extensions and File Headers
63
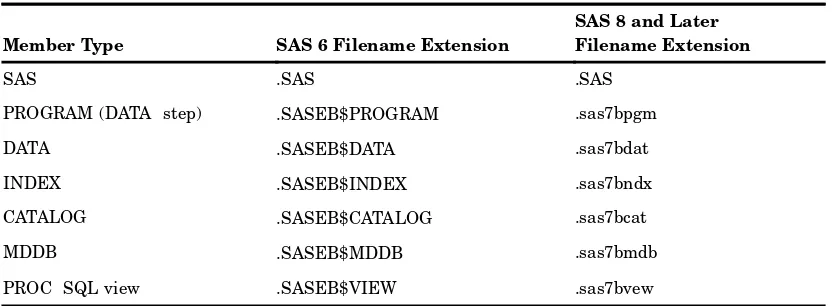
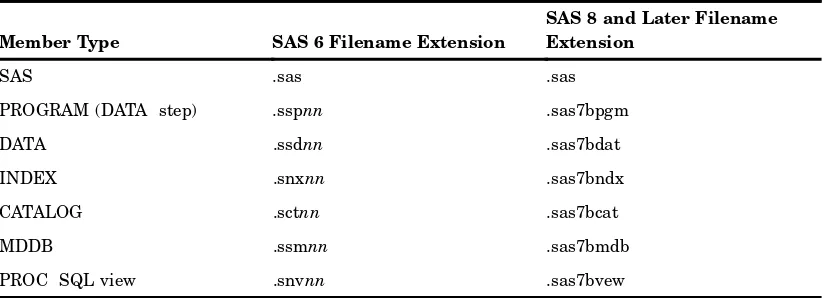
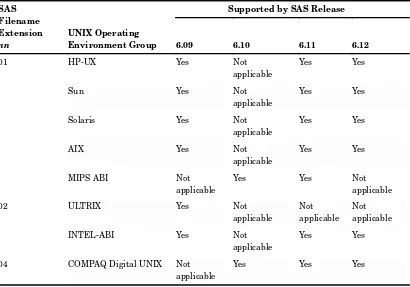
Filename Extensions: Identifying the SAS Engine and Operating Environment Used to Create a SAS File 63
PROC CONTENTS: Identifying the Base SAS Engine Used to Create a SAS File 64 File Headers: Finding Out the Method Used to Create the Transport File 64
P A R T
5
Troubleshooting
67
Chapter 12
4
Preventing and Fixing Problems
69
Troubleshooting: Transferring and Restoring Transport files 70 Error and Warning Messages for Transport Files 73
Verifying Transfer Format and Transport File Attributes 79 Reblocking a Transport File 80
P A R T
6
Samples and Logs
83
Chapter 13
4
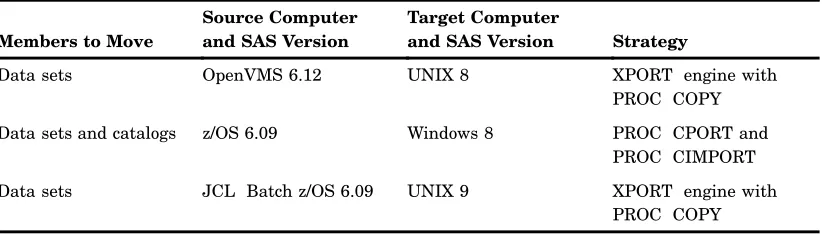
Examples of Moving SAS Files
85
The Overview of Examples of Moving SAS Files between Computers 85 Example: OpenVMS to UNIX File Transport 86
Example: z/OS to Windows File Transport 93
Example: z/OS JCL Batch to UNIX File Transport 97 Strategies for Verifying Transport Files 106
P A R T
7
Appendix
109
Appendix 1
4
Recommended Reading
111
Recommended Reading 111
Glossary
113
vii
What’s New
Overview
Topics that relate to moving and accessing SAS 9.2 files contain several documentation enhancements.
Documentation Enhancements
Several documentation enhancements relate to the Cross-Environment Data Access (CEDA) functionality:
3 CEDA limitations are identified.
1
P A R T
1
Introduction
3
C H A P T E R
1
Moving and Accessing SAS Files
between Operating Environments
Deciding to Move a SAS File between Operating Environments 3
Deciding to Access a SAS File across Operating Environments 3
Strategies for Moving and Accessing SAS Files 4
Summary of Strategy Features 5
Using National Language Support To Move SAS Files between Computers 6
The Data Set Used for Examples 7
Naming Conventions Used for Examples 7
Accessibility Features in SAS Products 8
Deciding to Move a SAS File between Operating Environments
Moving SAS files between operating environments is a common task. Reasons for moving a SAS file between operating environments include the following:
3 to move SAS files to a new operating environment on a different computer (for example, moving HP-UX files to a RedHat Linux operating environment).
3 to move a file and its processing to a high-performance operating environment and then return the file to the requesting operating environment.
3 to make a static copy of a SAS file available to a physically separate operating environment for continued data processing. Files are duplicated for use in the receiving operating environment because the SAS files are not available to the receiving operating environment by means of NFS-mounted file systems.
In all of these scenarios, the move operations recognize differences between operating environment architectures and SAS releases, allowing the original files to be used in the receiving operating environment.
Deciding to Access a SAS File across Operating Environments
In some instances, accessing instead of owning and maintaining your own copy of a file might be preferable. Alternatively, you might need to read data from a locally mounted tape that was created elsewhere, or you might need to read, write, or update data that is remotely mounted on your network.
4 Strategies for Moving and Accessing SAS Files 4 Chapter 1
You can use these methods to access remote SAS files:
3 CEDA (Cross-Environment Data Access) enables you to process SAS 8 and later SAS files.
3 Using SAS/SHARE on your client enables you to access a remote SAS file that resides on an operating environment that a SAS/SHARE server runs under. SAS/SHARE facilitates a transparent concurrent access to remote data among multiple users. Restrictions apply to cross-release access of SAS data.
In addition, SAS/SHARE enables you to access certain third-party DBMS files by means of engines that are supported by SAS/ACCESS.
3 Without the aid of SAS/SHARE or CEDA, you can rely upon network services for access to remote files (both SAS files and third-party DBMS files). Usually, the client and the server must share a compatible architecture, and they must run the same release of SAS software. The operating environment, the network software, and the security software might control users’ permissions to access specific remote files. For more information, see the SAS companion documentation that is appropriate to your operating environment, and see the third-party documentation for the network software and security software that you use.
Strategies for Moving and Accessing SAS Files
You can use these strategies to move or access SAS files: Cross-Environment Data Access (CEDA)
This feature of SAS enables a SAS file that was created in any directory-based operating environment (for example, Solaris, Windows, HP-UX, OpenVMS) to be processed by a SAS session that is running in another directory-based
environment.
CPORT and CIMPORT procedures
In the source environment, you can use PROC CPORT to write data sets or catalogs to transport format. In the target environment, PROC CIMPORT can be used to translate the transport file into the target environment’s native format.
XPORT engine with DATA step or PROC COPY
In the source environment, you can use the LIBNAME statement with the XPORT engine and either the DATA step or PROC COPY to create a transport file from a SAS data set. In the target environment, the same method can be used to
translate the transport file into the target environment’s native format.
Note: The XPORT engine does not support SAS 8 and later features, such as long file and variable names. 4
XML engine with DATA step or PROC COPY
In the source environment, you can use the LIBNAME statement with the XML engine and either the DATA step or PROC COPY to create an XML document from a SAS data set. In the target environment, the same method can be used to translate the XML document into the target environment’s native format. Data Transfer Services (DTS) in SAS/CONNECT
Moving and Accessing SAS Files between Operating Environments 4 Summary of Strategy Features 5
These features give you transparent access to remote data using the REMOTE engine and the LIBNAME statement.
Summary of Strategy Features
Here is a summary of the features of each strategy that you can use to move or access SAS files.
Table 1.1 Summary of Strategy Features for Moving or Accessing SAS Files
Strategies That Can Be Used
Features CEDA PROC CPORT/ PROC CIMPORT XPORT Engine XML Engine SAS/CONNECT DTS SAS/CONNECT RLS and SAS/SHARE RLS SAS Member Types Supported
Data File, PROC SQL views*, SAS/ACCESS views (Oracle and Sybase), MDDB* Library, Data Set, Catalog, Catalog entry Library, Data Set Data File Library, Data Set, Catalog, Catalog entry, PROC SQL view, MDDB, External third-party databases*** Library, Data Set, Catalog**, Catalog entry**, PROC SQL view, MDDB, DATA Step view, SAS/ACCESS view, External third-party databases*** Dynamic Translation or Create a File Format
Dynamic Transport**** Transport**** XML Dynamic Dynamic
SAS Versions Supported
SAS 8 and later SAS 6 and later
SAS 6 and later****
SAS 8.2 and later
SAS 6 and later SAS 6 and later
Regression from a Later to an Earlier SAS Release
6 Using National Language Support To Move SAS Files between Computers 4 Chapter 1
Strategies That Can Be Used
Features CEDA PROC CPORT/ PROC CIMPORT XPORT Engine XML Engine SAS/CONNECT DTS SAS/CONNECT RLS and SAS/SHARE RLS Limited to Operating Environments that Use Directory-Based File Structures
Yes No No No No No
SAS Product License Required
Base SAS Base SAS Base SAS Base
SAS
SAS/CONNECT SAS/CONNECT
or SAS/SHARE
* Data set (files) can have read, write, and update access. PROC SQL views and MDDBs are read-only.
** SAS 9 does not support cross-operating environment access to catalog entries or catalogs in operating environments that are incompatible. For information about architecture groups, see theSAS/CONNECT User’s GuideorSAS/SHARE User’s Guide.
***SAS/CONNECT supports external text files and binary files. SAS/CONNECT and SAS/SHARE support third-party external databases by means of the Remote SQL Pass-Through Facility, but you must have a SAS/ ACCESS license to access these databases.
****The XPORT engine does not support features that were introduced in SAS 8 (such as long file and variable names). If the XPORT engine is used to regress a SAS 8 or later SAS file to an earlier release, the features that are exclusive to SAS 8 and later are removed from the SAS file. Also, the transport formats that are produced by the XPORT engine and PROC CPORT are not interchangeable.
For complete details about relational databases, seeSAS/ACCESS for Relational Databases: Reference. For details about nonrelational databases, seeSAS/ACCESS Interface to CA-Datacom/DB: Reference,SAS/ACCESS Interface to IMS-DL/I
Software, SAS/ACCESS DATA Step Interface to CA-IDMS: Reference, or SAS/ACCESS Interface to SYSTEM 2000: Reference, as appropriate.
Using National Language Support To Move SAS Files between Computers
In order to successfully move a transport file between two computers and operating environments, the encodings of the source and target SAS sessions must be compatible. For example, a source SAS session that uses the Wlatin1 encoding that is associated with the Spanish Mexico locale is compatible with the target SAS session that uses Wlatin1 encoding that is associated with the Italian Italy locale. Both sessions use the Wlatin1 encoding.
However, a transport file cannot be moved between incompatible source and target SAS sessions without national language support (NLS). For example, a source SAS session that uses the Wlatin2 encoding that is associated with the Czech
Czechoslovokia locale is incompatible with the target SAS session that uses the open_ed-1141 z/OS encoding that is associated with the German Germany locale. The Wlatin2 encoding and the open_ed-1141 encodings are not compatible.
Moving and Accessing SAS Files between Operating Environments 4 Naming Conventions Used for Examples 7
transport file. Strategies for specifying locale or encoding vary according to the version of SAS that is running on the source and target computers.
If you are moving SAS files across locales or encodings, you will use the LOCALE= and ENCODING= options. For this information, see theSAS National Language Support (NLS): Reference Guide. For details about using PROC CIMPORT to move transport files between source and target computers that use different locales and encodings, see the Base SAS Procedures Guide.
The Data Set Used for Examples
If you choose to experiment, you can create several simple data sets in a library. Here is a sample SAS program that creates the data set GRADES:
data grades;
input student $ test1 test2 final; datalines;
Fred 66 80 70 Wilma 97 91 98 ;
proc print data=grades; run;
Here is the output:
The SAS System 10:59 Friday, April 25, 2008
Obs student test1 test2 final
1 Fred 66 80 70
2 Wilma 97 91 98
Naming Conventions Used for Examples
These naming conventions are used in the examples in this documentation: WORK
is the default libref that points to the library that contains the data set GRADES. XPORTOUT
is the libref that points to the location where the transport file is created with the XPORT engine.
XPORTIN
is the libref that points to the location on the target operating environment that you transferred the transport file to.
XMLOUT
is the libref that points to the location where the XML file is created with the XML engine.
XMLIN
is the libref that points to the location on the target operating environment that you transferred the XML file to.
CPORTOUT
8 Accessibility Features in SAS Products 4 Chapter 1
IMPORTIN
is the fileref that points to the location on the target operating environment that you transferred the transport file to.
SOURCE
is the libref that points to the location of the source file that is translated into transport or XML format.
LIST
is a catalog entry type. GRADES
is the name of a data set. TARGET
is the libref that points to the location at which the restored SAS file is created. TESTCAT
is the name of a catalog.
TESTNPGM
is the name of a catalog entry.
Accessibility Features in SAS Products
9
P A R T
2
Strategies for Moving and Accessing SAS
Files
Chapter
2
. . . .Cross-Environment Data Access (CEDA)
11
Chapter
3
. . . .PROC CPORT and PROC CIMPORT
19
Chapter
4
. . . .XPORT Engine with DATA Step or PROC COPY
27
11
C H A P T E R
2
Cross-Environment Data Access
(CEDA)
Overview of CEDA 11
CEDA Advantages 12
CEDA Limitations 12
Creating or Changing a SAS File’s Format 13
Creating a SAS File in a Foreign Format 13
Example: Creating a Foreign Format Using the OUTREP= Option in the DATA Step 13
Changing a SAS File to a Foreign Format 14
Example: Changing a File’s Format Using the OUTREP= Option in the LIBNAME Statement and the NOCLONE Option in PROC COPY 14
Example: Verifying the Changed File’s Format in the SAS Log at the Source Computer 14
Transferring a SAS File between Computers 15
Identifying the Format of a SAS File 16
Example: Reporting That CEDA Is Being Used 16
Example: Identifying a File’s Format Using PROC CONTENTS 16
Restrictions on Accessing a Foreign File 16
Reading and Writing a Foreign File 17
Overview of CEDA
CEDA is a simple strategy for file access across a network. CEDA enables you to read a network-mounted SAS file from any directory-based operating environment that runs SAS 8 or later, regardless of the file format of the SAS file being accessed. For example, CEDA enables a PC to read network-mounted SAS files that are in UNIX file format.
Note: Before SAS 8.2, CEDA was packaged with SAS/CONNECT, which requires a separate license. CEDA is now included as part of Base SAS. 4
CEDA runs transparently. You can access a supported SAS file without knowing the file’s format. CEDA detects the format of the accessing computer and automatically translates the “native” format to the representation of the “foreign,” or accessing, computer.
12 CEDA Advantages 4 Chapter 2
CEDA Advantages
CEDA provides these advantages:
3 CEDA runs transparently. The user can read a data set without knowing the native format of the file.
3 CEDA requires a single translation between native and foreign formats versus multiple translations from native format to transport format to native format. 3 No interim transport files are created.
3 CEDA eliminates the need to perform explicit steps in order to access the file. 3 CEDA does not require a dedicated server as is needed in SAS/SHARE or an
explicit sign-on as is needed in SAS/CONNECT.
CEDA Limitations
CEDA is not the preferred strategy for network file access in all situations. CEDA has these limitations:
3 CEDA features are implemented for SAS 9 or SAS 8 data sets, PROC SQL views, SAS/ACCESS views for Oracle and Sybase, and MDDBs. CEDA does not support SAS 9 or SAS 8 stored programs or catalogs, nor does it support any SAS 6 or earlier files. The type of access that CEDA has to a SAS file depends on the engine used and the type of file access requested (read, write, update). For more
information about file access limitations, see “When Is CEDA Supported?” inSAS Language Reference: Concepts.
3 CEDA does not support update processing for any SAS files. 3 CEDA does not support subsetting by means of an index. 3 CEDA can read audit trails but it cannot update them. 3 The processing of integrity constraints is not supported.
3 CEDA is available only for operating environments that use directory-based file structures. Under z/OS, CEDA is available only for SAS data sets that reside in a UNIX System Services Directory. Bound libraries that are traditionally used on the z/OS operating environment do not implement CEDA.
3 Network resources are consumed each time CEDA translates a SAS file.
3 Transcoding could result in character data loss when encodings are incompatible. For details about encoding and transcoding, seeSAS National Language Support (NLS): Reference Guide.
3 If a file that is in a foreign format is damaged, it cannot be repaired because CEDA does not support update processing, which is the strategy that you use to repair a damaged data set. To repair the file, you must move it back to the source environment. For details about repairing a damaged data set, see the REPAIR statement in the DATASETS procedure in theBase SAS Procedures Guide.
3 Numeric variables have a minimum length of either 2 or 3 bytes, depending on the operating environment. In an operating environment that supports a minimum of 3 bytes (such as Windows or UNIX), CEDA cannot process a numeric variable that was created with a length of 2 bytes (for example, in z/OS). If you encounter this restriction, use the XPORT engine or the CPORT and CIMPORT procedures instead of CEDA.
CEDA 4 Example: Creating a Foreign Format Using the OUTREP= Option in the DATA Step 13
likely than short numeric variables to encounter a loss of precision with CEDA. For more information, see the topic about numeric precision inSAS Language Reference: Concepts.
If you have performance problems, analyze file access patterns to determine whether the data set is located on the correct computer. For example, if the SAS data set is represented in UNIX data format, but most of the read operations originate from Windows computers, you might consider moving the data set to a Windows computer and changing the data set’s UNIX file format to Windows format. Windows access to a network-mounted file in Windows format would not require CEDA. Changing the file’s format would improve performance and allow write and update access. However, CEDA would be used to translate between the native Windows format of the SAS file being accessed and the accessing computers other than Windows (such as UNIX, z/OS, and OpenVMS).
For complete details about the types of data that CEDA supports and restrictions on using CEDA, see “Processing Data Using Cross-Environment Data Access” inSAS Language Reference: Concepts.
Creating or Changing a SAS File’s Format
Creating a SAS File in a Foreign Format
By default, new SAS files or SAS libraries that you create using the DATA step or the LIBNAME statement are created in the native format of the source computer. For example, under Windows, a new data set is created in a Windows native format. However, you can override the default and create a data set in a foreign format. For example, under Windows, you could create a new data set in a foreign format, such as a UNIX data representation.
Example: Creating a Foreign Format Using the OUTREP= Option in the
DATA Step
In order to create a SAS file in a foreign format for a supported member type, use the OUTREP= option in the DATA step. The OUTREP= option applies the foreign format to the specified data set.
In this example, assume that the native format is a Windows representation, which is being overridden by the foreign format, HP_UX_64:
data chem.grades (outrep=HP_UX_64); input student $ test1 test2 final; datalines;
Fred 66 80 70 Wilma 97 91 98
run;
In this example, the data set GRADES is created in the foreign format, HP_UX_64. For supported values for the OUTREP= option, see the DATA step and the
14 Changing a SAS File to a Foreign Format 4 Chapter 2
Changing a SAS File to a Foreign Format
You can also change the file’s native format to a foreign format by using the LIBNAME statement and the OUTREP= option along with the COPY procedure and the NOCLONE option at the source computer or at the target computer.
At the source computer, you could change the file’s native format to a foreign format, and then transfer the file to the target computer.
Alternatively, at the source computer, you could transfer the file in its native format to the target computer. At the target computer, you could then change the file’s native format to the foreign format that is used at the target computer.
Example: Changing a File’s Format Using the OUTREP= Option in the
LIBNAME Statement and the NOCLONE Option in PROC COPY
Here is the process to change a SAS file’s native format to a foreign format for a supported member type:
Note: The file format of MDDB files cannot be changed. CEDA supports MDDB files for read-only access. 4
1 Use a LIBNAME statement and the OUTREP= option to point to the file that will be created in foreign format.
2 Use a LIBNAME statement to point to the file that is in native format.
3 Use the COPY procedure to copy the file in native format to the file in foreign format. Also, use the NOCLONE option, which chooses the data representation of the file in foreign format instead of the file in native format.
Here is an example:
libname target ’path-to-target-library’ outrep=HP_UX_64; libname source ’path-to-source-library’;
proc copy in=source out=target noclone memtype=data; run;
In this example, the library of data sets in Windows native format is copied to a library of data sets in HP_UX_64 foreign format.
For supported values for the OUTREP= option, see the LIBNAME statement inSAS Language Reference: Dictionary. For details about the NOCLONE option, see the COPY procedure in theBase SAS Procedures Guide.
Example: Verifying the Changed File’s Format in the SAS Log at the
Source Computer
CEDA 4 Transferring a SAS File between Computers 15
Output 2.1 Data Representation Specified in the SAS Log
The SAS System 10:15 Friday, December 19, 2003 1
The CONTENTS Procedure
Data Set Name WORK.GRADES Observations 1
Member Type DATA Variables 4
Engine V9 Indexes 0
Created 11:03 Friday, December 19, 2003 Observation Length 32 Last Modified 11:03 Friday, December 19, 2003 Deleted Observations 0
Protection Compressed NO
Data Set Type Sorted NO
Label
Data Representation HP_UX_64, RS_6000_AIX_64, SOLARIS_64, HP_IA_64 u
Encoding latin1 Western (ISO)
Engine/Host Dependent Information
Data Set Page Size 4096 Number of Data Set Pages 1 First Data Page 1 Max Obs per Page 126 Obs in First Data Page 1 Number of Data Set Repairs 0
File Name C:\TEMP\SAS Temporary Files\_TD228\grades.sas7bdat Release Created 9.0000M0
Host Created WIN_NT v
Alphabetic List of Variables and Attributes
# Variable Type Len
4 final Num 8 1 student Char 8 2 test1 Num 8 3 test2 Num 8
uThe data set is represented in HP_UX_64 format, which is foreign to the native Windows environment.
vThe native format is WIN_NT.
Transferring a SAS File between Computers
You can use either of these methods to make a SAS file available for access at the target computer:
3 NFS (Network File Services) to mount the file on the network for operating environment access. See the documentation for NFS and for your operating environment.
3 FTP (File Transfer Protocol) services to copy a file in binary format to a specific target operating environment. For an FTP example, see “Example: Using FTP to Transfer Foreign Files and Transport Files” on page 42.
CAUTION:
16 Identifying the Format of a SAS File 4 Chapter 2
Identifying the Format of a SAS File
Example: Reporting That CEDA Is Being Used
In SAS 9 and later, SAS writes a message to the log when CEDA is used. Here is an example:
NOTE: Data file HEALTH.GRADES.DATA is in a format that is native to another host, or the file encoding does not match the session encoding. Cross Environment Data Access will be used, which might require
additional CPU resources and might reduce performance.
Note: Additional resources are consumed each time you read a foreign file. 4
Example: Identifying a File’s Format Using PROC CONTENTS
You can use the CONTENTS procedure (or the CONTENTS statement in PROC DATASETS) to find out the format of the specified SAS file.
Here is an example of the code:
proc contents data=grades; run;
An excerpt of the output follows:
Data Representation HP_UX_64, RS_6000_AIX_64, SOLARIS_64, HP_IA64
In the preceding example, the output shows that the file is represented in UNIX format.
If the target computer uses a format that is the same as the file format, then you can read, write, and update the file.
Note: No additional resources are consumed.4
If the target computer uses a format that is different from the file format (in this example, UNIX), you can read and write, but you cannot update the files.
Note: Additional resources are consumed each time you read a foreign file. 4
Restrictions on Accessing a Foreign File
You cannot update a foreign file. However, you can do the following: 3 read the file.
Note: Additional resources are consumed each time you read a foreign file. 4
CEDA 4 Reading and Writing a Foreign File 17
Note: After you change the file’s format, no additional resources are consumed when you access the file. 4
If you try to update a SAS file that has a format that is foreign to the accessing computer, an error message is displayed.
Note: The type of access that CEDA is permitted depends on the engine used and the type of file access requested (read, write, update). For more information about file access limitations, see the topic about CEDA inSAS Language Reference: Concepts.4 A typical error message follows:
ERROR: File TEST.CMVS cannot be updated because its
encoding does not match the session encoding or the file is in a format native to another host, such as SOLARIS, HP_UX, RS_6000_AIX, MIPS_ABI.
Reading and Writing a Foreign File
After a foreign file has been transferred across the network to the target computer, and if the target computer runs SAS 8 or later, the target computer can read and write the SAS file. A target computer can transparently access a foreign file for reading or writing, but not for updating the files.
You can read and write, but you cannot update the files.
19
C H A P T E R
3
PROC CPORT and PROC CIMPORT
Overview of Moving SAS Files Using PROC CPORT and PROC CIMPORT 19
Limitations of Moving SAS Files Using PROC CPORT and PROC CIMPORT 20
Disadvantages of Moving SAS Files Using PROC CPORT and PROC CIMPORT 20
Creating a Transport File at the Source Computer 20
Create a Transport File Using PROC CPORT 20
Example: Using PROC CPORT to Create a Transport File for Data Sets 20
Example: Using PROC CPORT to Create a Transport File for Multiple Catalogs 21
Example: Using PROC CPORT to Create a Transport File for an Entire Catalog 21
Example: Using PROC CPORT to Create a Transport File for a Specific Catalog Entry Type 21
Example: Using PROC CPORT to Create a Transport File for Catalog Entries 22
Transferring Transport Files to a Target Computer 22
Restoring Transport Files at the Target Computer 22
Verifying the Content of the Transport File 22
Restore the Transport File Using PROC CIMPORT 23
Example: Using PROC CIMPORT to Import Data Sets from a Transport File 23
Using Compatible Destination Member Types in PROC CPORT and PROC CIMPORT 24
Example: Using PROC CIMPORT to Import Multiple Catalogs from a Transport File 24
Example: Using PROC CIMPORT to Import a Single Catalog from a Transport File 25
Example: Using PROC CIMPORT to Import a Single Catalog Entry Type from a Transport File 25
Example: Using PROC CIMPORT to Import Selected Catalog Entries from a Transport File 25
Overview of Moving SAS Files Using PROC CPORT and PROC CIMPORT
PROC CPORT creates files intransport format, which uses an
environment-independent standard for character encoding and numeric representation. Transport files that are created by PROC CPORT can be transferred across operating environments and read using PROC CIMPORT.
Here is the process for creating a transport file at the source computer and reading it at a target computer:
1 A transport file is created at the source computer using PROC CPORT.
2 The file is transferred from the source computer to the target computer.
3 The transport file is read at the target computer using PROC CIMPORT.
20 Limitations of Moving SAS Files Using PROC CPORT and PROC CIMPORT 4 Chapter 3
Limitations of Moving SAS Files Using PROC CPORT and PROC CIMPORT
The CPORT and CIMPORT procedures are preferable for moving members of both DATA and CATALOG types. PROC COPY is used to move members of type DATA only.
Disadvantages of Moving SAS Files Using PROC CPORT and PROC
CIMPORT
These are the disadvantages of using PROC CPORT and PROC CIMPORT to move SAS files:
3 PROC CPORT and PROC CIMPORT do not support the transport of any type of view or MDDB.
3 PROC CPORT and PROC CIMPORT do not allow file transport from a later version to an earlier version, which is known asregressing(for example, from SAS 9 to SAS 6). PROC CPORT and PROC CIMPORT move files only from an earlier version to a later version (for example, from SAS 6 to SAS 9) or between the same versions (for example, from one SAS 9 operating environment to another SAS 9 operating environment).
However, you can move files between releases of SAS 6; for example, from SAS 6.12 to SAS 6.08. For details about the syntax for these procedures, see PROC CPORT and PROC CIMPORT in theBase SAS Procedures Guide.
Creating a Transport File at the Source Computer
Create a Transport File Using PROC CPORT
Create a transport file that contains one or more SAS data sets or one or more SAS catalogs by using PROC CPORT.
Example: Using PROC CPORT to Create a Transport File for Data Sets
This example uses the CPORT procedure to create a transport file for one data set.
libname source ’SAS-data-library’; filename cportout ’transport-file’;
proc cport data=source.grades file=cportout; run;
In the preceding example, the libref SOURCE points to the original location of the data set that is on the source computer. The fileref CPORTOUT points to a new location where the transport file will be created. The PROC CPORT statement copies, as its source, the file that is identified in the DATA= option to the new transport file that is identified in the FILE= option. The DATA= option specifies only one data set to be transported.
PROC CPORT and PROC CIMPORT 4 Create a Transport File Using PROC CPORT 21
Here is an example of PROC CPORT that specifies that all data sets in the library be transported:
proc cport library=source file=cportout memtype=data;
Example: Using PROC CPORT to Create a Transport File for Multiple
Catalogs
This example uses the CPORT procedure to create a transport file for multiple catalogs in a library.
libname source ’SAS-data-library’; filename cportout ’transport-file’;
proc cport library=source file=cportout memtype=catalog; run;
In the preceding example, the libref SOURCE points to the library that contains the catalogs that are on the source computer. The fileref CPORTOUT points to a new location where the transport file will be created. The PROC CPORT statement copies from the specified library all members of the types that are identified in the
MEMTYPE= option to the new transport file that is identified in the FILE= option. You can use the EXCLUDE statement in PROC CPORT to omit explicitly the catalog entries that you do not want, or use the SELECT statement in PROC CPORT to specify the catalog entries that you want.
Example: Using PROC CPORT to Create a Transport File for an Entire
Catalog
This example uses the CPORT procedure to create a transport file for an entire catalog.
libname source ’SAS-data-library’; filename cportout ’transport-file’;
proc cport catalog=source.testcat file=cportout; run;
In the preceding example, the libref SOURCE points to the original location of the catalog that is on the source computer. The fileref CPORTOUT points to a new location where the transport file will be created. The PROC CPORT statement copies, as its source, the file that is identified in the CATALOG= option to the new transport file that is identified in the FILE= option. SOURCE specifies the libref and TESTCAT specifies the catalog name. The omission of the SELECT or EXCLUDE statements in PROC CPORT indicates that the entire catalog should be copied.
Example: Using PROC CPORT to Create a Transport File for a Specific
Catalog Entry Type
This example uses the CPORT procedure to create a transport file for a specific catalog entry type:
libname source ’SAS-data-library’; filename cportout ’transport-file’;
proc cport catalog=source.testcat file=cportout et=list; run;
22 Transferring Transport Files to a Target Computer 4 Chapter 3
where the transport file will be created. The PROC CPORT statement copies, as its source, the file that is identified in the CATALOG= option to the new transport file that is identified in the FILE= option. The ET= option in PROC CPORT specifies that all catalog entries of type LIST be written to the new library. Alternatively, you can use the EET= option to exclude an entire entry type.
Example: Using PROC CPORT to Create a Transport File for Catalog Entries
This example uses the CPORT procedure to create a transport file for one or more catalog entries:
libname source ’SAS-data-library’; filename cportout ’transport-file’;
proc cport catalog=source.mycat file=cportout; select testnpgm.list;
run;
In the preceding example, the libref SOURCE points to the original location of the catalog that is on the source computer. The fileref CPORTOUT points to a new location where the transport file will be created. The PROC CPORT statement copies as its source the file that is identified in the CATALOG= option to the new transport file that is identified in the FILE= option.
In this example, SELECT TESTNPGM.LIST explicitly names a single catalog entry. However, you can specify one or more catalog entries by name.
You can use the EXCLUDE statement in PROC CPORT to omit explicitly the catalog entries that you do not want, or use the SELECT statement in PROC CPORT to specify catalog entries that you want.
Transferring Transport Files to a Target Computer
You can use either of these methods to make a transport file available for access: 3 NFS (Network File Services) to mount the file on the network for operating
environment access. See the documentation for NFS and for your operating environment.
3 FTP (File Transfer Protocol) services to copy a file in binary format to a specific target computer. For an FTP example, see “The FTP Utility” on page 41.
Restoring Transport Files at the Target Computer
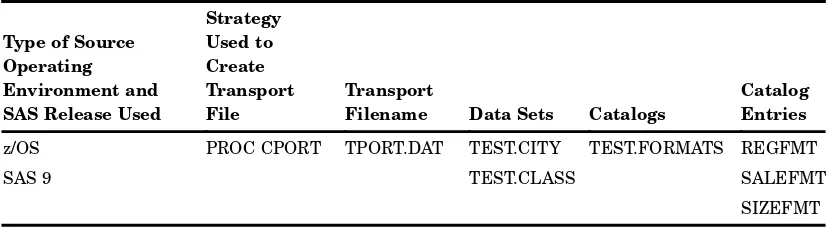
Verifying the Content of the Transport File
PROC CPORT and PROC CIMPORT 4 Restore the Transport File Using PROC CIMPORT 23
Table 3.1 Description of Transport File
Type of Source Operating Environment and SAS Release Used
Strategy Used to Create Transport File Transport
Filename Data Sets Catalogs
Catalog Entries
z/OS
SAS 9
PROC CPORT TPORT.DAT TEST.CITY
TEST.CLASS
TEST.FORMATS REGFMT
SALEFMT
SIZEFMT
You can find out the strategy that was used to create the transport file by using a text editor or by using an operating environment read or view command to read the transport file. The XPORT engine and PROC CPORT create transport files whose headers look different. For details, see “File Headers: Finding Out the Method Used to Create the Transport File” on page 64.
Also, you can use these SAS procedures to list the contents of the transport file: PROC CATALOG, PROC CONTENTS, and PROC DATASETS. For details about these procedures, see theBase SAS Procedures Guide.
Restore the Transport File Using PROC CIMPORT
Restore a transport file that contains one or more SAS data sets or one or more SAS catalogs by using PROC CIMPORT.
Example: Using PROC CIMPORT to Import Data Sets from a Transport File
This example uses the CIMPORT procedure to import multiple data sets from a transport file.
filename importin ’transport-file’; libname target ’SAS-data-library’;
proc cimport infile=importin library=target memtype=data; run;
In the preceding example, the fileref IMPORTIN points to the location where the transport file was transferred to the target computer. The libref TARGET points to a new location where the transport file will be copied. The PROC CIMPORT statement copies as its source the file that is identified in the INFILE= option to the location identified in the LIBRARY= option. The PROC CIMPORT statement implicitly translates the transport file into the target computer native format.
24 Restore the Transport File Using PROC CIMPORT 4 Chapter 3
In order to subset the destination member in PROC CIMPORT, use either the SELECT statement, the EXCLUDE statement, or the MEMTYPE= option. Here is an example of subsetting:
filename importin ’transport-file’; libname target ’SAS-data-library’;
proc cimport infile=importin library=target memtype=data; select grades;
run;
In the preceding example, the libref TARGET and the MEMTYPE= option point to the new location where the transport file will be copied. The fileref IMPORTIN points to the location where the transport file was transferred to the target computer. The PROC CIMPORT statement copies as its source the file that is identified in the INFILE= option to the location identified in the LIBRARY= option. The PROC CIMPORT statement implicitly translates the transport file into the target computer native format.
The SELECT statement selects only the data set GRADES for the library TARGET.
Using Compatible Destination Member Types in PROC CPORT and PROC
CIMPORT
To import catalogs from a transport file make sure that you use compatible destination member types in PROC CPORT and PROC CIMPORT.
Supported Statements at the Source Computer
Supported Statements at the Target Computer
CPORT LIBNAME= CIMPORT LIBNAME= or DATA=
CPORT DATA= CIMPORT LIBNAME= or DATA=
CPORT CATALOG= CIMPORT LIBNAME= or CATALOG=
If destination members are incompatible, you receive either an error or a warning message. See Chapter 12, “Preventing and Fixing Problems,” on page 69 for recovery actions that can be taken to fix common errors. For details about PROC CPORT and PROC CIMPORT syntax, see theBase SAS Procedures Guide.
Example: Using PROC CIMPORT to Import Multiple Catalogs from a
Transport File
This example uses the CIMPORT procedure to import multiple catalogs from a transport file. To import multiple catalogs, specify the LIBRARY= option and MEMTYPE=CATALOG in PROC CIMPORT.
filename importin ’transport-file’; libname target ’SAS-data-library’;
proc cimport infile=importin library=target memtype=catalog; run;
PROC CPORT and PROC CIMPORT 4 Restore the Transport File Using PROC CIMPORT 25
is specified. The MEMTYPE= option restricts the import to catalogs. PROC CIMPORT implicitly translates the transport file into the target computer native format.
Example: Using PROC CIMPORT to Import a Single Catalog from a Transport
File
This example uses the CIMPORT procedure to import a single catalog from a transport file. To import a single catalog, specify the CATALOG= option in PROC CIMPORT.
filename importin ’transport-file’; libname target ’SAS-data-library’;
proc cimport infile=importin catalog=target.testcat; run;
Example: Using PROC CIMPORT to Import a Single Catalog Entry Type from
a Transport File
This example uses the CIMPORT procedure to import a single catalog entry type from a transport file. To import a single catalog entry type, specify the ET= option and the CATALOG= option in PROC CIMPORT.
filename importin ’transport-file’; libname target ’SAS-data-library’;
proc cimport infile=importin catalog=target.testcat et=list; run;
Example: Using PROC CIMPORT to Import Selected Catalog Entries from a
Transport File
This example uses the CIMPORT procedure to import selected catalog entries from a transport file. Use a SELECT statement to specify the names of the catalog entries that you want. In this example, SELECT TESTNPGM.LIST ONE.SCL explicitly names the selected catalog entries. Also, the CATALOG= option in PROC CIMPORT must be specified.
filename importin ’transport-file’; libname target ’SAS-data-library’;
proc cimport infile=importin catalog=target.testcat; select testnpgm.list one.scl;
run;
27
C H A P T E R
4
XPORT Engine with DATA Step or
PROC COPY
Overview of the XPORT Engine 27
XPORT Engine Advantages 27
XPORT Engine Limitations 28
Regressing SAS Data Sets to SAS 6 Format 28
Creating a Transport File at the Source Computer 29
Example: Using the DATA Step to Create a Transport File for One Data Set 29
Example: Using PROC COPY to Create a Transport File for One or More Data Sets 30
Transferring Transport Files across a Network 31
Restoring Transport Files at the Target Computer 31
Identifying the Content of the Transport File 31
Example: Using a DATA Step to Restore a Single Data Set from a Transport File 31
Example: Using PROC COPY to Restore Data Sets from a Transport File 32
Overview of the XPORT Engine
The XPORT engine creates files intransport format, which uses an
environment-independent standard for character encoding and numeric representation. Transport files that are created by the XPORT engine can be transferred across
operating environments and read using the XPORT engine with the DATA step or PROC COPY.
Here is the process for creating a transport file at the source computer and reading it on a target computer:
1 A transport file is created at the source computer using the XPORT engine with the DATA step or PROC COPY.
2 The file is transferred from the source computer to the target computer.
3 The transport file is read at the target computer using the XPORT engine with the DATA step or PROC COPY.
Note: Transport files that are created using PROC CPORT are not interchangeable with transport files that are created using the XPORT engine. 4
XPORT Engine Advantages
Using the XPORT engine (with either the DATA step or the COPY procedure) provides these advantages:
28 XPORT Engine Limitations 4 Chapter 4
Note: Regressing a data set (moving from a later release to an earlier release) eliminates the features that are specific to the later release. For example, when moving from SAS 9 to SAS 6, the long variable names in SAS 9 are truncated to eight bytes. For details about file regression, see “Regressing SAS Data Sets to SAS 6 Format” on page 28. 4
3 You can use the XPORT engine when sending a transport file to a destination operating environment when the SAS release is unknown.
3 You can create the transport file one time and direct it to multiple target operating environments that run different SAS releases.
The primary reason for using the XPORT engine with the DATA step is to
dynamically create one or more data sets, to order them, and then to translate them to transport format. By contrast, PROC COPY allows you to translate multiple data sets that already exist in a library.
XPORT Engine Limitations
Using the XPORT engine has these limitations:
3 The XPORT engine supports only members of type DATA. It does not support members of type CATALOG or VIEW.
3 The XPORT engine supports a feature set that is compatible with SAS 6. The XPORT engine cannot support SAS 9 features, such as long variable names. Warning or error messages report limitations that are encountered during the transport operation. For details about typical error messages and recovery actions, see “Filelibrary.member.DATA has too long a member name for the XPORT engine” on page 75.
3 The XPORT engine with PROC COPY doesnotsupport the transport of any type of view or MDDB.
Regressing SAS Data Sets to SAS 6 Format
The UPLOAD and DOWNLOAD procedures in SAS/CONNECT and PROC COPY with the XPORT engine are the only strategies available for regressing a data set to SAS 6.
Note: SAS/CONNECT requires a separate license.4
The support of long variable names, long variable labels, and long data set labels in SAS 9 and SAS 8 can make SAS 9 and SAS 8 data sets incompatible with SAS 6 data sets. In order to revert back to SAS 6, these long names must be truncated to a length that is supported in SAS 6. Here are the truncation rules:
SAS 9 and SAS 8 Data Set Object Names to Regress
Number of Characters for SAS 6
Data set labels 40
Variable labels 40
XPORT Engine with DATA Step or PROC COPY 4 Example: Using the DATA Step to Create a Transport File for One Data Set 29
In order to transport SAS 9 and SAS 8 files back to SAS 6, set the portable
VALIDVARNAME system option to the value V6 in the SAS session in which you are transporting the file. Here are examples, which are specified in the form of a SAS system option and a macro variable:
options VALIDVARNAME=V6 %let VALIDVARNAME=V6;
For details about setting the VALIDVARNAME system option, seeSAS Language Reference: Dictionary.
The truncation algorithm that is used to produce the eight-character variable name also resolves conflicting names:
3 The first name that is greater than eight characters is truncated to eight characters. A truncation from PROPERTYTAXRATE to PROPERTY is the first truncation.
3 The next name that is greater than eight characters is truncated to eight
characters. If it conflicts with an existing variable name, it is truncated to seven characters, and a suffix of 2 is added. For example, PROPERTYTAXRATE is truncated to PROPERT2.
3 The suffix is increased by 1 for each truncated name that conflicts with an existing name. If the suffix reaches 9, the next conflicting variable name is truncated to 6 characters, and a suffix of 10 is appended. For example, PROPERTYTAXRATE is truncated to PROPER10.
The VALIDVARNAME option solves the long variable name truncation problem. However, there are no techniques for regressing these SAS 9 or SAS 8 features to SAS 6:
3 data set names that exceed eight characters 3 integrity constraints
3 data set generations 3 audit trail
The solution to regressing data sets that have these features is to re-create the data sets without the SAS 9 or SAS 8 features in a SAS 9 or SAS 8 session.
Note: SAS/CONNECT does support uploading or downloadingsomecatalog entries from SAS 9 or 8 to SAS 6. For details, see PROC UPLOAD and PROC DOWNLOAD in the SAS/CONNECT User’s Guide.4
Creating a Transport File at the Source Computer
Example: Using the DATA Step to Create a Transport File for One Data
Set
This example uses the DATA step to create a transport file for one data set.
libname source ’SAS-data-library’; libname xportout xport ’transport-file’; data xportout.grades;
30 Example: Using PROC COPY to Create a Transport File for One or More Data Sets 4 Chapter 4
In the preceding example, the libref SOURCE points to the original location of the data set that is on the source operating environment. The libref XPORTOUT points to a new location where the transport file will be created. The XPORT engine in this
LIBNAME statement specifies that the data set is to be created in transport format. The SET statement reads the data set GRADES and re-creates it in transport format at the location specified in the DATA statement.
Example: Using PROC COPY to Create a Transport File for One or
More Data Sets
This example uses the COPY procedure to create a transport file for multiple data sets.
libname source ’SAS-data-library’; libname xportout xport ’transport-file’; proc copy in=source out=xportout memtype=data; run;
In the preceding example, the libref SOURCE points to the original location of the library that is on the source operating environment. The libref XPORTOUT points to a new location to which the transport file will be copied. The XPORT engine in this LIBNAME statement specifies that the library is to be created in transport format. The PROC COPY statement copies all data sets in the library that are identified in the IN= option to the new library that is identified in the OUT= option. The MEMTYPE=DATA option limits the files that are copied to type DATA, which excludes catalogs and views.
CAUTION:
Do not omit the MEMTYPE=DATA option. Otherwise, SAS attempts to copy the entire contents of the library (including catalogs and views) to the transport file. The XPORT engine does not support the CATALOG or the VIEW member type. Error and warning messages are written to the SAS log.4
This example uses PROC COPY to create a transport file for one data set:
libname source ’SAS-data-library’; libname xportout xport ’transport-file’; proc copy in=source out=xportout memtype=data;
select grades; run;
In the preceding example, the libref SOURCE points to the original location of the data set that is on the source operating environment. The libref XPORTOUT points to a new location where the transport file will be copied. The XPORT engine in this
LIBNAME statement specifies that the data set is to be created in transport format. The PROC COPY statement copies all data sets that are identified in the IN= option to the new library that is identified in the OUT= option. The MEMTYPE=DATA option limits the files that are copied to type DATA, which excludes catalogs and views. The SELECT statement specifies that only the data set GRADES be copied to the new library. However, you could specify more than one data set here. If you omit the SELECT statement, all data sets will be copied to the transport file.
XPORT Engine with DATA Step or PROC COPY 4 Example: Using a DATA Step to Restore a Single Data Set 31
Transferring Transport Files across a Network
You can use either of these methods to make a transport file available for access: 3 NFS (Network File Services) to mount the file on the network for operating
environment access. See the documentation for NFS and for your operating environment.
3 FTP (File Transfer Protocol) services to copy a file in binary format to a specific target computer. For an FTP example, see Chapter 6, “Transferring Files,” on page 39.
Restoring Transport Files at the Target Computer
Identifying the Content of the Transport File
If the person who restores the transport file at the target operating environment is different from the person who creates the transport file at the source operating environment, make sure you obtain information about the transport file in advance of the file restore operation. Here is an example of the type of information that might be useful for restoring the transport file to native format at the target operating
environment:
Table 4.1 Description of Transport File
Type of Source Operating Environment and SAS Release Used
Strategy Used to Create Transport File
Transport
Filename Data Sets
z/OS
SAS 9
XPORT Engine TPORT.DAT TEST.CITY
TEST.CLASS
You can find out which strategy was used to create the transport file by examining the file header. The XPORT engine and PROC CPORT create transport files whose headers look different. For details, see “File Headers: Finding Out the Method Used to Create the Transport File” on page 64.
Also, you can use PROC CONTENTS and PROC DATASETS to list the contents of the transport file. For details about these procedures, seeBase SAS Procedures Guide.
Example: Using a DATA Step to Restore a Single Data Set from a
Transport File
This example uses the DATA step to restore a data set from a transport file.
libname xportin xport ’transport-file’; libname target ’SAS-data-library’; data target.grades;
set xportin.grades; run;
32 Example: Using PROC COPY to Restore Data Sets from a Transport File 4 Chapter 4
specifies that the data set is to be read in transport format. The libref TARGET points to a new location where the translated file will be copied. The SET statement reads the data set XPORTIN.GRADES in transport format and translates it and copies it to the location specified in the DATA statement. Because a DATA step with the XPORT engine was used at the source operating environment to create the transport file for a single data set, only a data set can be restored at the target operating environment.
Example: Using PROC COPY to Restore Data Sets from a Transport File
This example uses the COPY procedure to restore one or more data sets from a transport file.
libname xportin xport ’transport-file’; libname target ’SAS-data-library’; proc copy in=xportin out=target;
select grades; run;
In the preceding example, the libref XPORTIN points to the location where the transport file was transferred to the target operating environment. The XPORT engine in this LIBNAME statement specifies that the transport file at this location is to be read in transport format. The libref TARGET points to a new location where the transport file will be copied in native format. The PROC COPY statement copies the selected data set GRADES from the library that is identified in the IN= option to the new library that is identified in the OUT= option.
Using a SELECT statement, you specify one or more specific data sets to be copied to the new library. To specify that all data sets in the transport file be copied, omit the SELECT statement from PROC COPY.
33
C H A P T E R
5
XML Engine with DATA Step or
PROC COPY
Overview of the XML Engine 33
XML Engine Advantages 33
XML Engine Limitations 34
Creating an XML Document at the Source Computer 34
Example: Using the DATA Step to Create an XML Document from a Data Set 34
Example: Using PROC COPY to Create an XML Document from a Data Set 35
Transferring an XML Document across a Network 35
Restoring an XML Document as a Data Set at a Target Computer 36
Example: Using a DATA Step to Restore a Data Set from an XML Document 36
Example: Using PROC COPY to Restore a Data Set from an XML Document 36
Overview of the XML Engine
The XML engine enables you to export XML documents from SAS data sets and to restore XML documents as SAS data sets. XML documents can be transported across operating environments and read using the XML engine with the DATA step or PROC COPY.
Here is the process for creating an XML document at the source computer and reading it on a target computer:
1 An XML document is created at the source computer using the XML engine with the DATA step or PROC COPY.
2 The file is transferred from the source computer to the target computer.
3 The XML document is read at the target computer using the XML engine with the DATA step or PROC COPY.
For details about the XML engine, see theSAS XML LIBNAME Engine User’s Guide.
XML Engine Advantages
Using the XML engine with the DATA step or with PROC COPY provides these advantages:
3 XML data is stored as text. Unlike SAS files, XML documents can be read and updated by using a text editor.
34 XML Engine Limitations 4 Chapter 5
3 The XML engine supports SAS 8 and later features. Unlike the XPORT engine, the XML engine supports SAS 8 features such as long names.
XML Engine Limitations
The XML engine has these limitations:
3 The XML engine supports only data sets. Libraries, views, and other data types are not supported.
3 The XML engine is not supported in SAS 6 and earlier releases. If you are moving to or from SAS 6, you must use the XPORT engine.
3 The XML engine uses more processing time than the other strategies. If processing time is an issue, XML is not recommended.
3 XML documents can be large. If disk space or network bandwidth is an issue, XML is not recommended.
3 The XML engine is dependent on the transfer method for character translation. If you transfer an XML document as a binary file, it might not be readable at the target computer.
Creating an XML Document at the Source Computer
Example: Using the DATA Step to Create an XML Document from a
Data Set
This example uses the DATA step with the XML engine to create an XML document from a data set.
libname source ’SAS-data-library’; libname xmlout xml ’XML-document’; data xmlout.grades;
set source.grades; run;
XML Engine with DATA Step or PROC COPY 4 Transferring an XML Document across a Network 35
Here are the contents of the resulting XML document:
Output 5.1 XML Output Generated from Data Set GRADES
<?xml version="1.0" encoding="windows-1252" ?> <TABLE>
<GRADES>
<student> Fred </student> <test1> 66 </test1> <test2> 80 </test2> <final> 90 </final> </GRADES>
<GRADES>
<student> Wilma </student> <test1> 97 </test1> <test2> 91 </test2> <final> 98 </final> </GRADES>
</TABLE>
Example: Using PROC COPY to Create an XML Document from a Data
Set
This example uses the COPY procedure to create an XML document from a data set.
libname source ’SAS-data-library’; libname xmlout xml ’XML-document’; proc copy in=source out=xmlout;
select grades; run;
In the preceding example, the libref SOURCE points to the location of the library that is on the source computer. The libref XMLOUT points to the location at which the XML document will be created. The XML engine in this LIBNAME statement specifies that the file is to be created in XML markup. The PROC COPY statement copies data from the library that is identified in the IN= option to the library that is identified in the OUT= option. The SELECT statement specifies the data set that will be copied from the input library.
Note: If you do not specify a single data set in the SELECT statement, the XML engine will process all members of the input library. However, because an XML
document can contain only one data set, only the last data set that is processed remains in the resulting XML document. 4
Transferring an XML Document across a Network
You can use either of these methods to make an XML document available for access: 3 NFS (Network File Services) to mount the file on the network for operating
environment access. See the documentation for NFS and for your operating environment.
3 FTP (File Transfer Protocol) to copy a file to a specific target computer. For details about FTP, see Chapter 6, “Transferring Files,” on page 39.
36 Restoring an XML Document as a Data Set at a Target Computer 4 Chapter 5
Restoring an XML Document as a Data Set at a Target Computer
Example: Using a DATA Step to Restore a Data Set from an XML
Document
This example uses the DATA step to restore a data set from an XML document.
libname xmlin xml ’XML-document’; libname target ’SAS-data-library’; data target.grades;
set xmlin.grades; run;
In the preceding example, the libref XMLIN points to the location of an XML document. The XML engine specifies that a SAS data set is to be read. The libref TARGET points to the location to which the converted SAS data set will be copied. The SET statement reads the data set XMLIN.GRADES in XML format, translates it, and copies it to the location that is specified in the DATA statement.
Example: Using PROC COPY to Restore a Data Set from an XML
Document
This example uses the COPY procedure to restore a data set from an XML document.
libname xmlin xml ’XML-document’; libname target ’SAS-data-library’; proc copy in=xmlin out=target; run;
37
P A R T
3
Transferring Transport Files and Foreign
Files
39
C H A P T E R
6
Transferring Files
Overview of File Transfers 39
Attributes for Transport Files 40
Using the FILENAME Statement or FTP for Foreign Files and Transport Files 41
Example: Using the FILENAME Statement for a File Transfer 41
The FTP Utility 41
Example: Using FTP to Transfer Foreign Files and Transport Files 42
Example: Using a Magnetic Medium to Transfer Foreign Files and Transport Files 43
Overview of File Transfers
These types of files can be transferred: foreign file
A file whose format is foreign to the target computer. For example, a Windows file format is foreign to a UNIX operating environment.
transport file
A file whose format has been changed to transport format, which can be subsequently read and changed to the native format of the target computer. Transfer is the process of conveying a foreign file or a transport file between operating environments across a network. Various third-party products are available for performing this operation. This example uses FTP (File Transfer Protocol) to illustrate the transfer operation.
You perform a transfer operation by doing one of the following actions: pushing a file
From the source computer, use the FTPputcommand to copy a file from the source computer to the target computer.
pulling a file
From the target computer, use the FTP getcommand to copy a file from the source computer to the target computer.
40 Attributes for Transport Files 4 Chapter 6
Attributes for Transport Files
F